CI / CD Integration
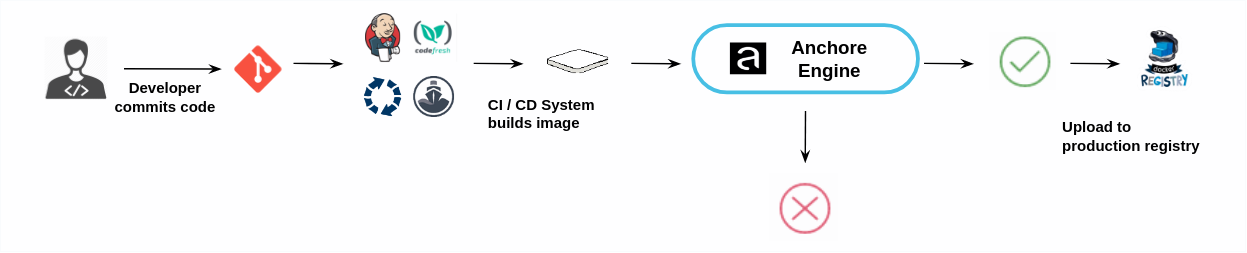
Anchore Enterprise can be integrated into CI/CD pipelines such as Jenkins to secure the CI/CD pipeline by adding image scanning including not just CVE based security scans but policy based scans that can include checks around security, compliance and operational best practices.
As part of the CI/CD workflow images are submitted to the Anchore Enterprise for analysis. If an image does not pass the policy checks then the build can be failed.
Images that pass the policy check can be promoted to the production registry.
Some users may implement a gating workflow where policy violations fail the build, other users may prefer to allow the build to proceed but provide a warning to the developer and operations team about the violations present in the image.
A plugin is available for Jenkins that supports Freestyle jobs and Pipeline jobs.
For other CI/CD systems Integration is as simple as making two API or CLI calls to the system
- Submit image for analysis
- Retrieve image policy status.
These calls can be made using the Anchore CLI or through the Anchore REST API.
1 - CircleCI
Integrating Anchore Enterprise into your CircleCI pipeline can be accomplished seamlessly using the official Anchore Orb.
Orb source code & usage examples can be found on our GitHub Repository.
To read more about CircleCI orbs, view the official documentation - CircleCi Orbs
2 - Jenkins
We keep the latest Anchore/Jenkins integration documentation hosted alongside the official Anchore Jenkins plugin module, here.
3 - GitHub
Image Scanning can be easily integrated into your GitHub Actions pipeline using the official Anchore Scan Action.
Documentation on how to use the action can be found in the official GitHub repository anchore scan-action
Check out our Anchore Scan Action webinar demo
4 - GitLab
Adding Anchore Scanning to GitLab
The Anchore Enterprise GitLab Scan integration enables vulnerability scanning via Anchore Enterprise in GitLab CI. This includes automatic conversion from the Anchore default vulnerability report format to GitLab’s container scanning format, for display in the GitLab Security & Compliance Vulnerability UI.
Requirements
- Anchore Enterprise is deployed in your environment, with the API accessible from your GitLab CI environment.
- Credentials for your GitLab Container Registry are added to Anchore Enterprise, under the Anchore account that you intend to use with GitLab CI. See Registries. For information on what registry/credentials must be added to allow Anchore Enterprise to access your GitLab Container Registry, see https://docs.gitlab.com/ee/user/packages/container_registry/.
Usage
- In your GitLab project repository, ensure that the following variables are set in Settings > CI/CD > Variables:
- ANCHORECTL_URL
- ANCHORECTL_USERNAME
- ANCHORECLT_PASSWORD
This allows the integration to access your Anchore Enterprise depoyment. The ANCHORECTL_PASSWORD variable should have protected and masked options set to prevent exposure of the variable in job logs.
- In your project’s .gitlab-ci.yml, include the following snippet anywhere in your CI flow after your target container image has been built and pushed to the GitLab Container Registry that you have made accessible from your Anchore Enterprise deployment.
containerscan:anchorescan:
  stage: test
  image: docker.io/anchore/enterprise-gitlab-scan:v3
  variables:
    ANCHORE_IMAGE: "${CI_REGISTRY_IMAGE}:${CI_COMMIT_SHA}"
  script:
    - anchore-gitlab-scan > gl-container-scanning-report.json
  artifacts:
    reports:
      container_scanning: gl-container-scanning-report.json
- After a successful scan, results will be available for review and management using GitLab’s native security features. Navigate to your project’s Security & Compliance > Vulnerability Report UI to review any discovered vulnerabilities in your container image.
Example
For this example, we’ll add two sections to the GitLab CI .gitlab-ci.yml file; the first runs Docker to build an image and push it to the GitLab Container Registry for the project. The second runs Anchore Enterprise vulnerability scanning on the image and converts the output to GitLab’s container scanning format.
Add Dockerfile and .gitlab-ci.yml To Your GitLab Project
Example Dockerfile:
FROM alpine:latest

CMD /bin/sh
Example .gitlab-ci.yml:
# Build our image and push it to our project's container repo
containerbuild:
  stage: build
  image: docker:19.03.12
  variables:
    DOCKER_TLS_CERTDIR: "/certs"
  services:
    - docker:19.03.12-dind
  # See note below on Access Tokens for authenticating to the GitLab Container Registry
  before_script:
    - docker login -u $CI_REGISTRY_USER -p $CI_REGISTRY_PASSWORD $CI_REGISTRY
  script:
    - docker pull $CI_REGISTRY_IMAGE:latest || true
    - docker build --cache-from $CI_REGISTRY_IMAGE:latest --tag $CI_REGISTRY_IMAGE:$CI_COMMIT_SHA --tag $CI_REGISTRY_IMAGE:latest .
    - docker push $CI_REGISTRY_IMAGE:$CI_COMMIT_SHA
    - docker push $CI_REGISTRY_IMAGE:latest

# Scan with Anchore Enterprise and convert the results for GitLab's native security display
containerscan:anchorescan:
  stage: test
  image: docker.io/anchore/enterprise-gitlab-scan:v3
  variables:
    ANCHORE_IMAGE: "${CI_REGISTRY_IMAGE}:${CI_COMMIT_SHA}"
  script:
    - anchore-gitlab-scan > gl-container-scanning-report.json
  artifacts:
    reports:
      container_scanning: gl-container-scanning-report.json
Navigate To Settings > CI/CD; Expand the Variables Section

Set Or Edit Anchore Variables

Trigger GitLab CI
Make a change in the repository that will trigger GitLab CI so that your pipeline runs.
Then, navigate to CI/CD > Pipelines, where you can see details of your pipelines:

Review Scan Report
Navigate to Security & Compliance > Vulnerability Report to view the scan results:

Access Tokens
Authentication with the GitLab Container Registry can use a personal access token or a deploy token. Please see GitLab’s documentation on authentication options.