Using the Anchore Enterprise
Introduction
Once deployed, Anchore Enterprise can be interacted with in a number of ways. Every function is available via API with all higher level clients using the same APIs.
- AnchoreCTL The command line client for Anchore Enterprise deployments.
- Anchore Enterprise UI sits on top of the APIs and simplifies interactions with functions such as policy editing, reporting, and content browsing.
- Anchore Enterprise API can be used directly for custom integrations or fully programmatic interactions.
1 - Using the AnchoreCTL
AnchoreCTL provides a command line interface on top of the REST API and is published as a golang executable. Using AnchoreCTL users can manage and inspect images, policies, subscriptions, and registries.
If you have not installed AnchoreCTL, please refer to the deployment guide.
To jump to a particular guide, select from the following below:
1.1 - Using the Analysis Archive
As mentioned in concepts, there are two locations for image analysis to be stored:
- The working set: the standard state after analysis completes. In this location, the image is fully loaded and available for policy evaluation, content, and vulnerability queries.
- The archive set: a location to keep image analysis data that cannot be used for policy evaluation or queries but can use cheaper storage and less db space and can be reloaded into the working set as needed.
Working with the Analysis Archive
List archived images:
anchorectl archive image list
 ✔ Fetched archive-images
┌─────────────────────────────────────────────────────────────────────────┬────────────────────────┬──────────┬──────────────┬──────────────────────┐
│ IMAGE DIGEST                                                            │ TAGS                   │ STATUS   │ ARCHIVE SIZE │ ANALYZED AT          │
├─────────────────────────────────────────────────────────────────────────┼────────────────────────┼──────────┼──────────────┼──────────────────────┤
│ sha256:89020cd33be2767f3f894484b8dd77bc2e5a1ccc864350b92c53262213257dfc │ docker.io/nginx:latest │ archived │ 1.4 MB       │ 2022-08-23T21:08:29Z │
└─────────────────────────────────────────────────────────────────────────┴────────────────────────┴──────────┴──────────────┴──────────────────────┘
To add an image to the archive, use the digest. All analysis, policy evaluations, and tags will be added to the archive.
NOTE: this does not remove it from the working set. To fully move it you must first archive and then delete image in the working set using AnchoreCTL or the API directly.
Archiving Images
Archiving an image analysis creates a snapshot of the image’s analysis data, policy evaluation history, and tags and stores in a different storage location and
different record location than working set images.
# anchorectl image list
 ✔ Fetched images
┌───────────────────────────────────────────────────────┬─────────────────────────────────────────────────────────────────────────┬──────────┬────────┐
│ TAG                                                   │ DIGEST                                                                  │ ANALYSIS │ STATUS │
├───────────────────────────────────────────────────────┼─────────────────────────────────────────────────────────────────────────┼──────────┼────────┤
│ docker.io/ubuntu:latest                               │ sha256:33bca6883412038cc4cbd3ca11406076cf809c1dd1462a144ed2e38a7e79378a │ analyzed │ active │
│ docker.io/ubuntu:latest                               │ sha256:42ba2dfce475de1113d55602d40af18415897167d47c2045ec7b6d9746ff148f │ analyzed │ active │
│ docker.io/localimage:latest                           │ sha256:74c6eb3bbeb683eec0b8859bd844620d0b429a58d700ea14122c1892ae1f2885 │ analyzed │ active │
│ docker.io/nginx:latest                                │ sha256:89020cd33be2767f3f894484b8dd77bc2e5a1ccc864350b92c53262213257dfc │ analyzed │ active │
└───────────────────────────────────────────────────────┴─────────────────────────────────────────────────────────────────────────┴──────────┴────────┘

# anchorectl archive image add sha256:89020cd33be2767f3f894484b8dd77bc2e5a1ccc864350b92c53262213257dfc
 ✔ Added image to archive
┌─────────────────────────────────────────────────────────────────────────┬──────────┬────────────────────────┐
│ DIGEST                                                                  │ STATUS   │ DETAIL                 │
├─────────────────────────────────────────────────────────────────────────┼──────────┼────────────────────────┤
│ sha256:89020cd33be2767f3f894484b8dd77bc2e5a1ccc864350b92c53262213257dfc │ archived │ Completed successfully │
└─────────────────────────────────────────────────────────────────────────┴──────────┴────────────────────────┘
Then to delete it in the working set (optionally):
NOTE: You may need to use –force if the image is the newest of its tags and has active subscriptions_
# anchorectl image delete sha256:89020cd33be2767f3f894484b8dd77bc2e5a1ccc864350b92c53262213257dfc  --force
┌─────────────────────────────────────────────────────────────────────────┬──────────┐
│ DIGEST                                                                  │ STATUS   │
├─────────────────────────────────────────────────────────────────────────┼──────────┤
│ sha256:89020cd33be2767f3f894484b8dd77bc2e5a1ccc864350b92c53262213257dfc │ deleting │
└─────────────────────────────────────────────────────────────────────────┴──────────┘
At this point the image in the archive only.
Restoring images from the archive into the working set
This will not delete the archive entry, only add it back to the working set. Restore and image to working set from archive:
# anchorectl archive image restore sha256:89020cd33be2767f3f894484b8dd77bc2e5a1ccc864350b92c53262213257dfc
 ✔ Restore image
┌────────────────────────┬─────────────────────────────────────────────────────────────────────────┬──────────┬────────┐
│ TAG                    │ DIGEST                                                                  │ ANALYSIS │ STATUS │
├────────────────────────┼─────────────────────────────────────────────────────────────────────────┼──────────┼────────┤
│ docker.io/nginx:latest │ sha256:89020cd33be2767f3f894484b8dd77bc2e5a1ccc864350b92c53262213257dfc │ analyzed │ active │
└────────────────────────┴─────────────────────────────────────────────────────────────────────────┴──────────┴────────┘
To view the restored image:
# anchorectl image get sha256:89020cd33be2767f3f894484b8dd77bc2e5a1ccc864350b92c53262213257dfc
Tag: docker.io/nginx:latest
Digest: sha256:89020cd33be2767f3f894484b8dd77bc2e5a1ccc864350b92c53262213257dfc
ID: 2b7d6430f78d432f89109b29d88d4c36c868cdbf15dc31d2132ceaa02b993763
Analysis: analyzed
Status: active
Working with Archive rules
As with all AnchoreCTL commands, the --help option will show the arguments, options and descriptions of valid values.
List existing rules:
# anchorectl archive rule list
 ✔ Fetched rules
┌──────────────────────────────────┬────────────┬──────────────┬────────────────────┬────────────┬─────────┬───────┬──────────────────┬──────────────┬─────────────┬──────────────────┬────────┬──────────────────────┐
│ ID                               │ TRANSITION │ ANALYSIS AGE │ TAG VERSIONS NEWER │ REGISTRY   │ REPO    │ TAG   │ REGISTRY EXCLUDE │ REPO EXCLUDE │ TAG EXCLUDE │ EXCLUDE EXP DAYS │ GLOBAL │ LAST UPDATED         │
├──────────────────────────────────┼────────────┼──────────────┼────────────────────┼────────────┼─────────┼───────┼──────────────────┼──────────────┼─────────────┼──────────────────┼────────┼──────────────────────┤
│ 2ca9284202814f6aa41916fd8d21ddf2 │ archive    │ 90d          │ 90                 │ *          │ *       │ *     │                  │              │             │ -1               │ false  │ 2022-08-19T17:58:38Z │
│ 6cb4011b102a4ba1a86a5f3695871004 │ archive    │ 90d          │ 90                 │ foobar.com │ myimage │ mytag │ barfoo.com       │ *            │ *           │ -1               │ false  │ 2022-08-22T18:47:32Z │
└──────────────────────────────────┴────────────┴──────────────┴────────────────────┴────────────┴─────────┴───────┴──────────────────┴──────────────┴─────────────┴──────────────────┴────────┴──────────────────────┘
Add a rule:
anchorectl archive rule add --transition archive --analysis-age-days 90 --tag-versions-newer 1 --selector-registry 'docker.io' --selector-repository 'library/*' --selector-tag 'latest'
 ✔ Added rule
ID: 0031546b9ce94cf0ae0e60c0f35b9ea3
Transition: archive
Analysis Age: 90d
Tag Versions Newer: 1
Selector:
  Registry: docker.io
  Repo: library/*
  Tag: latest
Exclude:
  Selector:
    Registry Exclude:
    Repo Exclude:
    Tag Exclude:
  Exclude Exp Days: -1
Global: false
Last Updated: 2022-08-24T22:57:51Z
The required parameters are: minimum age of analysis in days, number of tag versions newer, and the transition to use.
There is also an optional --system-global flag available for admin account users that makes the rule apply to all accounts
in the system.
As a non-admin user you can see global rules but you cannot update/delete them (will get a 404):
# ANCHORECTL_USERNAME=test1user ANCHORECTL_PASSWORD=password ANCHORECTL_ACCOUNT=test1acct anchorectl archive rule list
 ✔ Fetched rules
┌──────────────────────────────────┬────────────┬──────────────┬────────────────────┬───────────┬───────────┬────────┬──────────────────┬──────────────┬─────────────┬──────────────────┬────────┬──────────────────────┐
│ ID                               │ TRANSITION │ ANALYSIS AGE │ TAG VERSIONS NEWER │ REGISTRY  │ REPO      │ TAG    │ REGISTRY EXCLUDE │ REPO EXCLUDE │ TAG EXCLUDE │ EXCLUDE EXP DAYS │ GLOBAL │ LAST UPDATED         │
├──────────────────────────────────┼────────────┼──────────────┼────────────────────┼───────────┼───────────┼────────┼──────────────────┼──────────────┼─────────────┼──────────────────┼────────┼──────────────────────┤
│ 16dc38cef54e4ce5ac87d00e90b4a4f2 │ archive    │ 90d          │ 1                  │ docker.io │ library/* │ latest │                  │              │             │ -1               │ true   │ 2022-08-24T23:01:05Z │
└──────────────────────────────────┴────────────┴──────────────┴────────────────────┴───────────┴───────────┴────────┴──────────────────┴──────────────┴─────────────┴──────────────────┴────────┴──────────────────────┘

# ANCHORECTL_USERNAME=test1user ANCHORECTL_PASSWORD=password ANCHORECTL_ACCOUNT=test1acct anchorectl archive rule delete 16dc38cef54e4ce5ac87d00e90b4a4f2
 ⠙ Deleting rule
error: 1 error occurred:
	* unable to delete rule:
{
  "detail": {
    "error_codes": []
  },
  "httpcode": 404,
  "message": "Rule not found"
}

# ANCHORECTL_USERNAME=test1user ANCHORECTL_PASSWORD=password ANCHORECTL_ACCOUNT=test1acct anchorectl archive rule get 16dc38cef54e4ce5ac87d00e90b4a4f2
 ✔ Fetched rule
ID: 16dc38cef54e4ce5ac87d00e90b4a4f2
Transition: archive
Analysis Age: 90d
Tag Versions Newer: 1
Selector:
  Registry: docker.io
  Repo: library/*
  Tag: latest
Exclude:
  Selector:
    Registry Exclude:
    Repo Exclude:
    Tag Exclude:
  Exclude Exp Days: -1
Global: true
Last Updated: 2022-08-24T23:01:05Z
Delete a rule:
# anchorectl archive rule delete 16dc38cef54e4ce5ac87d00e90b4a4f2
 ✔ Deleted rule
No results
1.2 - Analyzing Images
Introduction
In this section you will learn how to analyze images with Anchore Enterprise using AnchoreCTL in two different ways:
- Distributed Analysis: Content analysis by AnchoreCTL where it is run and importing the analysis to your Anchore deployment
- Centralized Analysis: The Anchore deployment downloads and analyzes the image content directly
Using AnchoreCTL for Centralized Analysis
Overview
This method of image analysis uses the Enterprise deployment itself to download and analyze the image content. You’ll use AnchoreCTL to make API requests to Anchore to tell it which image to analyze but the Enterprise deployment does the work.
You can refer to the Image Analysis Process document in the concepts section to better understand how centralized analysis works in Anchore.
sequenceDiagram
participant A as AnchoreCTL
participant R as Registry
participant E as Anchore Deployment
A->>E: Request Image Analysis
E->>R: Get Image content
R-->>E: Image Content
E->>E: Analyze Image Content (Generate SBOM and secret scans etc) and store results
E->>E: Scan sbom for vulns and evaluate compliance
Usage
The anchorectl image add command instructs the Anchore Enterprise deployment to pull (download) and analyze an image from a registry. Anchore Enterprise will attempt to retrieve metadata about the image from the Docker registry and if successful will initiate a pull of the image and queue the image for analysis. The command will output details about the image including the image digest, image ID, and full name of the image.
# anchorectl image add docker.io/library/nginx:latest
anchorectl image add docker.io/library/nginx:latest
 ✔ Added Image
Image:
  status:           not-analyzed (active)
  tag:              docker.io/library/nginx:latest
  digest:           sha256:89020cd33be2767f3f894484b8dd77bc2e5a1ccc864350b92c53262213257dfc
  id:               2b7d6430f78d432f89109b29d88d4c36c868cdbf15dc31d2132ceaa02b993763
For an image that has not yet been analyzed, the status will appear as not_analyzed. Once the image has been downloaded it will be queued for analysis. When the analysis begins the status will be updated to analyzing, after which te status will update to analyzed.
Anchore Enterprise can be configured to have a size limit for images being added for analysis. Attempting to add an image that exceeds the configured size will fail, return a 400 API error, and log an error message in the catalog service detailing the failure. This feature is disabled by default so see documentation for additional details on the functionality of this feature and instructions on how to configure the limit.
Using AnchoreCTL for Distributed Analysis
Overview
This way of adding images uses anchorectl to performs analysis of an image outside the Enterprise deployment, so the Enterprise deployment never
downloads or touches the image content directly. The generation of the SBOM, secret searches, filesystem metadata, and content searches are all
performed by AnchoreCTL on the host where it is run (CI, laptop, runtime node, etc) and the results are imported to the Enterprise deployment where it can be scanned for vulnerabilities and evaluated against policy.
sequenceDiagram
participant A as AnchoreCTL
participant R as Registry/Docker Daemon
participant E as Anchore Deployment
A->>R: Get Image content
R-->>A: Image Content
A->>A: Analyze Image Content (Generate SBOM and secret scans etc)
A->>E: Import SBOM, secret search, fs metadata
E->>E: Scan sbom for vulns and evaluate compliance
Configuration
Enabling the full set of analyzers, “catalogers” in AnchoreCTL terms, requires updates to the config file used by AnchoreCTL. See Configuring AnchoreCTL for more information on the format and options.
Usage
Note
To locally analyze an image that has been pushed to a registry, it is strongly recommended to use the ‘–from registry’ rather than ‘–from docker’.
This removes the need to have docker installed and also results in a consistent image digest for later use. The registry option gives anchorectl access
to data that the docker source does not due to limitations with the Docker Daemon itself and how it handles manifests and image digests.
The anchorectl image add --from [registry|docker] command will run a local SBOM-generation and analysis (secret scans, filesystem metadata, and content searches) and upload the result to Anchore Enterprise without ever having that image touched or loaded by your Enterprise deployment.
# anchorectl image add docker.io/library/nginx:latest --from registry
anchorectl image add docker.io/library/nginx:latest --from registry -n
 ✔ Added Image
Image:
  status:           not-analyzed (active)
  tag:              docker.io/library/nginx:latest
  digest:           sha256:89020cd33be2767f3f894484b8dd77bc2e5a1ccc864350b92c53262213257dfc
  id:               2b7d6430f78d432f89109b29d88d4c36c868cdbf15dc31d2132ceaa02b993763
For an image that has not yet been analyzed, the status will appear as not_analyzed. Once the image has been downloaded it will be queued for analysis. When the analysis begins the status will be updated to analyzing, after which te status will update to analyzed.
The ‘–platform’ option in distributed analysis specifies a different platform than the local hosts’ to use when retrieving the image from the registry for analysis by AnchoreCTL.
# anchorectl image add alpine:latest --from registry --platform linux/arm64
Adding images that you own
For images that you are building yourself, the Dockerfile used to build the image should always be passed to Anchore Enterprise at the time of image addition. This is achieved by adding the image as above, but with the additional option to pass the Dockerfile contents to be stored with the system alongside the image analysis data.
This can be achieved in both analysis modes.
For centralized analysis:
# anchorectl image add myrepo.example.com:5000/app/webapp:latest --dockerfile /path/to/Dockerfile
For distributed analysis:
# anchorectl image add myrepo.example.com:5000/app/webapp:latest --from registry --dockerfile /path/to/Dockerfile
To update an image’s Dockerfile, simply run the same command again with the path to the updated Dockerfile along with ‘–force’ to re-analyze the image with the updated Dockerfile. Note that running add without --force (see below) will not re-add an image if it already exists.
Providing Dockerfile content is supported in both push and pull modes for adding images.
Additional Options
When adding an image, there are some additional (optional) parameters that can be used. We show some examples below and all apply to both distributed and centralize analysis workflows.
# anchorectl image add docker.io/library/alpine:latest --force
 ✔ Added Image                                                                                                                                                                                                                             docker.io/library/alpine:latest
Image:
  status:           not-analyzed (active)
  tags:             docker.io/alpine:3
                    docker.io/alpine:latest
                    docker.io/dnurmi/testrepo:test0
                    docker.io/library/alpine:latest
  digest:           sha256:1304f174557314a7ed9eddb4eab12fed12cb0cd9809e4c28f29af86979a3c870
  id:               9c6f0724472873bb50a2ae67a9e7adcb57673a183cea8b06eb778dca859181b5
  distro:           [email protected] (amd64)
  layers:           1
the --force option can be used to reset the image analysis status of any image to not_analyzed, which is the base analysis state for an image. This option shouldn’t be necessary to use in normal circumstances, but can be useful if image re-analysis is needed for any reason desired.
# anchorectl image add myrepo.example.com:5000/app/webapp:latest --dockerfile /path/to/dockerfile --annotation owner=someperson --annotation [email protected]
the --annotation parameter can be used to specify ‘key=value’ pairs to associate with the image at the time of image addition. These annotations will then be carried along with the tag, and will appear in image records when fetched, and in webhook notification payloads that contain image information when they are sent from the system. To change an annotation, simply run the add command again with the updated annotation and the old annotation will be overriden.
# anchorectl image add alpine:latest --no-auto-subscribe
the ‘–no-auto-subscribe’ flag can be used if you do not wish for the system to automatically subscribe the input tag to the ’tag_update’ subscription, which controls whether or not the system will automatically watch the added tag for image content updates and pull in the latest content for centralized analysis. See Subscriptions for more information about using subscriptions and notifications in Anchore.
These options are supported in both distributed and centralized analysis.
In this example, we’re adding docker.io/mysql:latest, if we attempt to add a tag that mapped to the same image, for example docker.io/mysql:8 Anchore Enterprise will detect the duplicate image identifiers and return a detail of all tags matching that image.
Image:
  status:           analyzed (active)
  tags:             docker.io/mysql:8
                    docker.io/mysql:latest
  digest:           sha256:8191525e9110aa32b436a1ec772b76b9934c1618330cdb566ca9c4b2f01b8e18
  id:               4390e645317399cc7bcb50a5deca932a77a509d1854ac194d80ed5182a6b5096
  distro:           [email protected] (amd64)
  layers:           11
Deleting An Image
The following command instructs Anchore Enterprise to delete the image analysis from the working set using a tag. The --force option must be used if there is only one digest associated with the provided tag, or any active subscriptions are enabled against the referenced tag.
# anchorectl image delete mysql:latest --force
┌─────────────────────────────────────────────────────────────────────────┬──────────┐
│ DIGEST                                                                  │ STATUS   │
├─────────────────────────────────────────────────────────────────────────┼──────────┤
│ sha256:8191525e9110aa32b436a1ec772b76b9934c1618330cdb566ca9c4b2f01b8e18 │ deleting │
└─────────────────────────────────────────────────────────────────────────┴──────────┘
To delete a specific image record, the digest can be supplied instead to ensure it is the exact image record you want:
# anchorectl image delete sha256:899a03e9816e5283edba63d71ea528cd83576b28a7586cf617ce78af5526f209
┌─────────────────────────────────────────────────────────────────────────┬──────────┐
│ DIGEST                                                                  │ STATUS   │
├─────────────────────────────────────────────────────────────────────────┼──────────┤
│ sha256:899a03e9816e5283edba63d71ea528cd83576b28a7586cf617ce78af5526f209 │ deleting │
└─────────────────────────────────────────────────────────────────────────┴──────────┘
Deactivate Tag Subscriptions
Check if the tag has any active subscriptions.
# anchorectl subscription list
anchorectl subscription list
 ✔ Fetched subscriptions
┌──────────────────────────────────────────────────────────────────────┬─────────────────┬────────┐
│ KEY                                                                  │ TYPE            │ ACTIVE │
├──────────────────────────────────────────────────────────────────────┼─────────────────┼────────┤
│ docker.io/alpine:latest                                              │ policy_eval     │ false  │
│ docker.io/alpine:3.12.4                                              │ policy_eval     │ false  │
│ docker.io/alpine:latest                                              │ vuln_update     │ false  │
│ docker.io/redis:latest                                               │ policy_eval     │ false  │
│ docker.io/centos:8                                                   │ policy_eval     │ false  │
...
...
If the tag has an active subscription(s), then can disabled (deactivated) in order to permit deletion:
# anchorectl subscription deactivate docker.io/alpine:3.12.6 tag_update
 ✔ Deactivate subscription
Key: docker.io/alpine:3.12.6
Type: tag_update
Id: a6c7559deb7d5e20621d4a36010c11b0
Active: false
Advanced
Anchore Enterprise also allows adding images directly by digest / tag / timestamp tuple, which can be useful to add images that are still available in a registry but not associated with a current tag any longer.
To add a specific image by digest with the tag it should be associated with:
anchorectl image add docker.io/nginx:stable@sha256:f586d972a825ad6777a26af5dd7fc4f753c9c9f4962599e6c65c1230a09513a8
Note: this will submit the specific image by digest with the associated tag, but Anchore will treat that digest as the most recent digest for the tag, so if the image registry actually has a different history (e.g. a newer image has been pushed to that tag), then the tag history in Anchore may not accurately reflect the history in the registry.
Next Steps
Next, let’s find out how to Inspect Image Content
1.2.1 - Inspecting Image Content
Introduction
During the analysis of container images, Anchore Enterprise performs deep inspection, collecting data on all artifacts in the image including files, operating system packages and software artifacts such as Ruby GEMs and Node.JS NPM modules.
Inspecting images
The image content command can be used to return detailed information about the content of the container image.
# anchorectl image content INPUT_IMAGE -t CONTENT_TYPE
The INPUT_IMAGE can be specified in one of the following formats:
- Image Digest
- Image ID
- registry/repo:tag
the CONTENT_TYPE can be one of the following types:
- os: Operating System Packages
- files: All files in the image
- go: GoLang modules
- npm: Node.JS NPM Modules
- gem: Ruby GEMs
- java: Java Archives
- python: Python Artifacts
- nuget: .NET NuGet Packages
- binary: Language runtime locations and version (e.g. openjdk, python, node)
- malware: ClamAV mailware scan results, if enabled
You can always get the latest available content types using the ‘-a’ flag:
# anchorectl image content library/nginx:latest -a
 ✔ Fetched content                           [fetching available types]                                                                                                                                    library/nginx:latest
binary
files
gem
go
java
malware
npm
nuget
os
python
For example:
# anchorectl image content library/nginx:latest -t files
 ✔ Fetched content                           [0 packages] [6099 files]                                                                                                                                                                                                                                                   library/nginx:latest
Files:
┌────────────────────────────────────────────────────────────────────────────────────────────────────┬────────────────────────────────────────────────────────────────────────────────────────────────────┬───────┬─────┬─────┬───────┬───────────────┬──────────────────────────────────────────────────────────────────┐
│ FILE                                                                                               │ LINK                                                                                               │ MODE  │ UID │ GID │ TYPE  │ SIZE          │ SHA256 DIGEST                                                    │
├────────────────────────────────────────────────────────────────────────────────────────────────────┼────────────────────────────────────────────────────────────────────────────────────────────────────┼───────┼─────┼─────┼───────┼───────────────┼──────────────────────────────────────────────────────────────────┤
│ /bin                                                                                               │                                                                                                    │ 00755 │ 0   │ 0   │ dir   │ 0             │                                                                  │
│ /bin/bash                                                                                          │                                                                                                    │ 00755 │ 0   │ 0   │ file  │ 1.234376e+06  │ d86b21405852d8642ca41afae9dcf0f532e2d67973b0648b0af7c26933f1becb │
│ /bin/cat                                                                                           │                                                                                                    │ 00755 │ 0   │ 0   │ file  │ 43936         │ e9165e34728e37ee65bf80a2f64cd922adeba2c9f5bef88132e1fc3fd891712b │
│ /bin/chgrp                                                                                         │                                                                                                    │ 00755 │ 0   │ 0   │ file  │ 72672         │ f47bc94792c95ce7a4d95dcb8d8111d74ad3c6fc95417fae605552e8cf38772c │
│ /bin/chmod                                                                                         │                                                                                                    │ 00755 │ 0   │ 0   │ file  │ 64448         │ b6365e442b815fc60e2bc63681121c45341a7ca0f540840193ddabaefef290df │
│ /bin/chown                                                                                         │                                                                                                    │ 00755 │ 0   │ 0   │ file  │ 72672         │ 4c1443e2a61a953804a462801021e8b8c6314138371963e2959209dda486c46e │
...
AnchoreCTL will output a subset of fields from the content view, for example for files on the file name and size are displayed. To retrieve the full output the --json parameter should be passed.
For example:
# anchorectl -o json image content library/nginx:latest -t files
 ✔ Fetched content                           [0 packages] [6099 files]                                                                                                                                     library/nginx:latest
{
  "files": [
    {
      "filename": "/bin",
      "gid": 0,
      "linkdest": null,
      "mode": "00755",
      "sha256": null,
      "size": 0,
      "type": "dir",
      "uid": 0
    },
...
Next Steps
1.2.2 - Viewing Security Vulnerabilities
Introduction
The image vulnerabilities command can be used to return a list of vulnerabilities found in the container image.
# anchorectl image vulnerabilities INPUT_IMAGE -t VULN_TYPE
The INPUT_IMAGE can be specified in one of the following formats:
- Image Digest
- Image ID
- registry/repo:tag
The VULN_TYPE currently supports:
- os: Vulnerabilities against operating system packages (RPM, DPKG, APK, etc.)
- non-os: Vulnerabilities against language packages (NPM, GEM, Java Archive (jar, war, ear), Python PIP, .NET NuGet, etc.)
- all: Combination report containing both ‘os’ and ’non-os’ vulnerability records.
The system has been designed to incorporate 3rd party feeds for other vulnerabilites.
Examples
To generate a report of OS package (RPM/DEB/APK) vulnerabilities found in the image including CVE identifier, Vulnerable Package, Severity Level, Vulnerability details and version of fixed package (if available).
# anchorectl image vulnerabilities debian:latest -t os
Currently the following the system draws vulnerability data specifically matched to the following OS distros:
- Alpine
- CentOS
- Debian
- Oracle Linux
- Red Hat Enterprise Linux
- Red Hat Universal Base Image (UBI)
- Ubuntu
- Suse Linux
- Amazon Linux 2
- Google Distroless
To generate a report of language package (NPM/GEM/Java/Python) vulnerabilities, the system draws vulnerability data from the NVD data feed, and vulnerability reports can be viewed using the ’non-os’ vulnerability type:
# anchorectl image vulnerabilities node:latest -t non-os
To generate a list of all vulnerabilities that can be found, regardless of whether they are against an OS or non-OS package type, the ‘all’ vulnerability type can be used:
# anchorectl image vulnerabilities node:latest -t all
Finally, for any of the above queries, these commands (and other anchorectl commands) can be passed the -o json flag to output the data in JSON format:
# anchorectl -o json image vulnerabilities node:latest -t all
Other options can be reviewed by issuing anchorectl image vulnerabilities --help at any time.
Next Steps
- Evaluate the image against policies you create.
- Subscribe to receive notifications when the image is updated, when the policy status changes or when new vulnerabilities are detected.
1.3 - Working with Policies
Introduction
Policies are central to the concept of Anchore Enterprise, this article provides information on how to create, delete, update, and describe policies using AnchoreCTL to interact with a running Anchore Enterprise deployment.
At a high-level Anchore Enterprise consumes policies store in a Policy that contain:
- Policies
- Allowlists
- Mappings
- Allowlisted Images
- Denylisted Images
Anchore Enterprise can store multiple policies for each account, but only one policy can be active at any point in time. All users within an account share the same set of policies. It is common to store historic policies to allow previous policies and evaluations to be inspected. The active policy is the one used for evaluation for notifications, incoming kubernetes webhooks (unless configured otherwise), and other automatic system functions, but a user may request evaluation of any policy stored in the system using its id.
For more information on the content and semantics of policies see: Policies and Evaluation
Creating Policies
Policies are just JSON documents. Anchore Enterprise includes a default policy configured at installation that performs basic CVE checks as well as some Dockerfile checks.
To create custom polices, you may:
- Edit JSON manually and upload a file
- Use the Anchore Enterprise UI to edit policies
Managing Policies
Policies can be managed directly using the REST API or the anchorectl policy command.
Adding Policies using AnchoreCTL
The anchorectl tool allows you to upload policies to Anchore Enterprise.
# anchorectl policy add --input /path/to/policy/policy.json
Note: Adding a policy will not automatically set the policy to be active, you will need to activate the policy using the activate command.
Listing Policies
Anchore Enterprise may store multiple policies however at a given time only one policy may be active. Policies can be listed using the policy list command.
# anchorectl policy list
 ✔ Fetched policies
┌────────────────┬──────────────────────────────────────┬────────┬──────────────────────┐
│ NAME           │ POLICY ID                            │ ACTIVE │ UPDATED              │
├────────────────┼──────────────────────────────────────┼────────┼──────────────────────┤
│ Default policy │ 2c53a13c-1765-11e8-82ef-23527761d060 │ true   │ 2023-10-25T20:39:28Z │
│ devteam1policy │ da8208a2-c8ae-4cf2-a25b-a52b0cdcd789 │ false  │ 2023-10-25T20:47:16Z │
└────────────────┴──────────────────────────────────────┴────────┴──────────────────────┘
Each policy has a unique ID that will be reference in policy evaluation reports.
Note: Times are reported in UTC.
Viewing Policies
Using the policy get command, summary or detailed information about a policy can be retrieved. The policy is referenced using its unique id.
# anchorectl policy get 2c53a13c-1765-11e8-82ef-23527761d060
 ✔ Fetched policy
Name: Default policy
ID: 2c53a13c-1765-11e8-82ef-23527761d060
Comment: Default policy
Policies:
  - artifactType: image
    comment: System default policy
    id: 48e6f7d6-1765-11e8-b5f9-8b6f228548b6
    name: DefaultPolicy
    rules:
      - action: STOP
        gate: dockerfile
        id: ce7b8000-829b-4c27-8122-69cd59018400
        params:
          - name: ports
            value: "22"
          - name: type
            value: denylist
        trigger: exposed_ports
...
...
The policy can be downloaded in JSON format by passing the --detail parameter.
# anchorectl policy get 2c53a13c-1765-11e8-82ef-23527761d060 --detail -o json-raw > policy.json
 ✔ Fetched policy
Activating Policies
The policy activate command can be used to activate a policy. The policy is referenced using its unique id which can be retrieved using the policy list command.
# anchorectl policy activate 2c53a13c-1765-11e8-82ef-23527761d061
 ✔ Activate policy
┌─────────────────┬──────────────────────────────────────┬────────┬──────────────────────┐
│ NAME            │ POLICY ID                            │ ACTIVE │ UPDATED              │
├─────────────────┼──────────────────────────────────────┼────────┼──────────────────────┤
│ Default policy  │ 2c53a13c-1765-11e8-82ef-23527761d061 │ true   │ 2023-10-25T20:50:17Z │
└─────────────────┴──────────────────────────────────────┴────────┴──────────────────────┘
Note: If Anchore Enterprise has been configured to automatically synchronize policies from the Anchore Cloud then the active policy may be overridden automatically during the next sync.
Deleting Policies
Policies can be deleted from Anchore Enterprise using the policy del command The policy is referenced using its unique id. A policy marked as active cannot be deleted, another policy has to be marked active before deleting the currently active policy.
# anchorectl policy delete 2c53a13c-1765-11e8-82ef-23527761d061
 ✔ Deleted policy
No results
See Anchore Policy Checks for information about available policy gates and triggers in Anchore Enterprise.
1.3.1 - Anchore Policy Checks
Introduction
For an list of all available gates/triggers, refer to Anchore Policy Checks
1.3.2 - Evaluating Images Against Policies
Introduction
The evaluate command can be used to evaluate a given image for policy compliance.
The image to be evaluated can be in the following format:
- Image Digest
- Image ID
- registry/repo:tag
Using the Evaluate command
# anchorectl image check docker.io/debian:latest
 ✔ Evaluated against policy                  [failed]                                                                                                                                                                                              docker.io/debian:latest
Tag: docker.io/debian:latest
Digest: sha256:0fcb5a38077422c4e70c5c43be21831193ff4559d143e27d8d5721e7a814bdcc
Policy ID: 2c53a13c-1765-11e8-82ef-23527761d060
Last Evaluation: 2023-10-25T20:34:43Z
Evaluation: fail
By default only the summary of the evaluation is shown. Passing the --detail parameter will show the policy checks that raised warnings or errors.
# anchorectl image check docker.io/debian:latest --detail
 ✔ Evaluated against policy                  [failed]                                                                                                                                                                                              docker.io/debian:latest
Tag: docker.io/debian:latest
Digest: sha256:0fcb5a38077422c4e70c5c43be21831193ff4559d143e27d8d5721e7a814bdcc
Policy ID: 2c53a13c-1765-11e8-82ef-23527761d060
Last Evaluation: 2023-10-25T20:35:05Z
Evaluation: fail
Final Action: stop
Reason: policy_evaluation

Policy Evaluation Details:
┌─────────────────┬─────────────┬────────────────────────────────────────────────────────────────────────────────────────────────────────────────────────────────────────────────┬────────┐
│ GATE            │ TRIGGER     │ DESCRIPTION                                                                                                                                    │ STATUS │
├─────────────────┼─────────────┼────────────────────────────────────────────────────────────────────────────────────────────────────────────────────────────────────────────────┼────────┤
│ dockerfile      │ instruction │ Dockerfile directive 'HEALTHCHECK' not found, matching condition 'not_exists' check                                                            │ warn   │
│ vulnerabilities │ package     │ MEDIUM Vulnerability found in os package type (dpkg) - libgnutls30 (CVE-2011-3389 - https://security-tracker.debian.org/tracker/CVE-2011-3389) │ warn   │
│ vulnerabilities │ package     │ CRITICAL Vulnerability found in os package type (dpkg) - zlib1g (CVE-2022-37434 - https://security-tracker.debian.org/tracker/CVE-2022-37434)  │ stop   │
└─────────────────┴─────────────┴────────────────────────────────────────────────────────────────────────────────────────────────────────────────────────────────────────────────┴────────┘
In this example we specified library/repo:tag which could be ambiguous. At the time of writing the image Digest for library/debian:latest was sha256:0fc..... however previously different images may have been tagged as library/debian:latest. The --history parameter can be passed to show historic evaluations based on previous images or previous policies.
Anchore supports allowlisting and denylisting images by their name, ID or digest. A denylist or allowlist takes precedence over any policy checks. For example if an image is explicitly listed as denylisted then even if all the individual policy checks pass the image will still fail evaluation.
# anchorectl image check docker.io/debian:latest --detail
 ✔ Evaluated against policy                  [failed]                                                                                                                                                                                              docker.io/debian:latest
Tag: docker.io/debian:latest
Digest: sha256:0fcb5a38077422c4e70c5c43be21831193ff4559d143e27d8d5721e7a814bdcc
Policy ID: 2c53a13c-1765-11e8-82ef-23527761d060
Last Evaluation: 2023-10-25T20:39:36Z
Evaluation: fail
Final Action: stop
Reason: denylisted

Policy Evaluation Details:
┌─────────────────┬─────────────┬────────────────────────────────────────────────────────────────────────────────────────────────────────────────────────────────────────────────┬────────┐
│ GATE            │ TRIGGER     │ DESCRIPTION                                                                                                                                    │ STATUS │
├─────────────────┼─────────────┼────────────────────────────────────────────────────────────────────────────────────────────────────────────────────────────────────────────────┼────────┤
│ dockerfile      │ instruction │ Dockerfile directive 'HEALTHCHECK' not found, matching condition 'not_exists' check                                                            │ warn   │
│ vulnerabilities │ package     │ MEDIUM Vulnerability found in os package type (dpkg) - libgnutls30 (CVE-2011-3389 - https://security-tracker.debian.org/tracker/CVE-2011-3389) │ warn   │
└─────────────────┴─────────────┴────────────────────────────────────────────────────────────────────────────────────────────────────────────────────────────────────────────────┴────────┘
In this example even though the image only had one policy check that raised a warning the image fails policy evaluation since it is present on a denylist.
Evaluating status based on Digest or ID
Performing an evaluation on an image specified by name is not recommended since an image name is ambiguous. For example the tag docker.io/library/centos:latest refers to whatever image has the tag library/centos:latest at the time of evaluation. At any point in time another image may be tagged as library/centos:latest.
It is recommended that images are referenced by their Digest. For example at the time of writing the digest of the ‘current’ library/centos:latest image is sha256:191c883e479a7da2362b2d54c0840b2e8981e5ab62e11ab925abf8808d3d5d44
If the image to be evaluated is specified by Image ID or Image Digest then the --tag parameter must be added. Policies are mapped to images based on registry/repo:tag so since an Image ID may may to multiple different names we must specify the name user in the evaluation.
For example - referencing by Image Digest:
# anchorectl image check docker.io/debian@sha256:0fcb5a38077422c4e70c5c43be21831193ff4559d143e27d8d5721e7a814bdcc --detail --tag docker.io/debian:latest
 ✔ Evaluated against policy                  [failed]                                                                                                                             docker.io/debian@sha256:0fcb5a38077422c4e70c5c43be21831193ff4559d143e27d8d5721e7a814bdcc
Tag: docker.io/debian:latest
Digest: sha256:0fcb5a38077422c4e70c5c43be21831193ff4559d143e27d8d5721e7a814bdcc
Policy ID: 2c53a13c-1765-11e8-82ef-23527761d060
Last Evaluation: 2023-10-25T20:44:24Z
Evaluation: fail
Final Action: stop
Reason: denylisted

Policy Evaluation Details:
┌─────────────────┬─────────────┬────────────────────────────────────────────────────────────────────────────────────────────────────────────────────────────────────────────────┬────────┐
│ GATE            │ TRIGGER     │ DESCRIPTION                                                                                                                                    │ STATUS │
├─────────────────┼─────────────┼────────────────────────────────────────────────────────────────────────────────────────────────────────────────────────────────────────────────┼────────┤
│ dockerfile      │ instruction │ Dockerfile directive 'HEALTHCHECK' not found, matching condition 'not_exists' check                                                            │ warn   │
│ vulnerabilities │ package     │ MEDIUM Vulnerability found in os package type (dpkg) - libgnutls30 (CVE-2011-3389 - https://security-tracker.debian.org/tracker/CVE-2011-3389) │ warn   │
│ vulnerabilities │ package     │ CRITICAL Vulnerability found in os package type (dpkg) - zlib1g (CVE-2022-37434 - https://security-tracker.debian.org/tracker/CVE-2022-37434)  │ stop   │
└─────────────────┴─────────────┴────────────────────────────────────────────────────────────────────────────────────────────────────────────────────────────────────────────────┴────────┘
For example - referencing by image ID:
# anchorectl image check dd8bae8d259fed93eb54b3bca0adeb647fc07f6ef16745c8ed4144ada4d51a95  --detail --tag docker.io/debian:latest
 ✔ Evaluated against policy                  [failed]                                                                                                                                                     dd8bae8d259fed93eb54b3bca0adeb647fc07f6ef16745c8ed4144ada4d51a95
Tag: docker.io/debian:latest
Digest: sha256:0fcb5a38077422c4e70c5c43be21831193ff4559d143e27d8d5721e7a814bdcc
Policy ID: 2c53a13c-1765-11e8-82ef-23527761d060
Last Evaluation: 2023-10-25T20:45:20Z
Evaluation: fail
Final Action: stop
Reason: denylisted

Policy Evaluation Details:
┌─────────────────┬─────────────┬────────────────────────────────────────────────────────────────────────────────────────────────────────────────────────────────────────────────┬────────┐
│ GATE            │ TRIGGER     │ DESCRIPTION                                                                                                                                    │ STATUS │
├─────────────────┼─────────────┼────────────────────────────────────────────────────────────────────────────────────────────────────────────────────────────────────────────────┼────────┤
│ dockerfile      │ instruction │ Dockerfile directive 'HEALTHCHECK' not found, matching condition 'not_exists' check                                                            │ warn   │
│ vulnerabilities │ package     │ MEDIUM Vulnerability found in os package type (dpkg) - libgnutls30 (CVE-2011-3389 - https://security-tracker.debian.org/tracker/CVE-2011-3389) │ warn   │
│ vulnerabilities │ package     │ CRITICAL Vulnerability found in os package type (dpkg) - zlib1g (CVE-2022-37434 - https://security-tracker.debian.org/tracker/CVE-2022-37434)  │ stop   │
└─────────────────┴─────────────┴────────────────────────────────────────────────────────────────────────────────────────────────────────────────────────────────────────────────┴────────┘
1.3.3 - Policy Gate: dockerfile
Introduction
This article reviews the “dockerfile” gate and its triggers. The dockerfile gate allows users to perform checks on the content of the dockerfile or docker history for an image and make policy actions based on the construction of an image, not just its content. This is particularly useful for enforcing best practices or metadata inclusion (e.g. labels) on images.
Anchore is either given a dockerfile or infers one from the docker image layer history. There are implications to what data is available and what it means depending on these differing sources, so first, we’ll cover the input data for the gate and how it impacts the triggers and parameters used.
The “dockerfile”
The data that this gate operates on can come from two different sources:
- The actual dockerfile used to build an image, as provided by the user at the time of running
anchorectl image add <img ref> --dockerfile <filename> or the corresponding API call to: POST /images?dockerfile= - The history from layers as encoded in the image itself (see
docker history <img> for this output)
All images have data from history available, but data from the actual dockerfile is only available when a user provides it. This also means that any images analyzed by the tag watcher functionality will not have an actual dockerfile.
The FROM line
In the actual dockerfile, the FROM instruction is preserved and available as used to build the image, however in the history data, the FROM line will always be the very first FROM instruction used to build the image and all of its dependent based image. Thus, for most images, the value in the history will be omitted and Anchore will automatically infer a FROM scratch line, which is logically inserted for this gate if the dockerfile/history does not contain an explicit FROM entry.
For example, using the docker.io/jenkins/jenkins image:
IMAGE CREATED CREATED BY SIZE COMMENT
sha256:3b9c9666a66e53473c05a3c69eb2cb888a8268f76935eecc7530653cddc28981 11 hours ago /bin/sh -c #(nop) COPY file:3a15c25533fd87983edc33758f62af7b543ccc3ce9dd570e473eb0702f5f298e in /usr/local/bin/install-plugins.sh 8.79kB
<missing> 11 hours ago /bin/sh -c #(nop) COPY file:f97999fac8a63cf8b635a54ea84a2bc95ae3da4d81ab55267c92b28b502d8812 in /usr/local/bin/plugins.sh 3.96kB
<missing> 11 hours ago /bin/sh -c #(nop) ENTRYPOINT ["/sbin/tini" "--" "/usr/local/bin/jenkins.sh"] 0B
<missing> 11 hours ago /bin/sh -c #(nop) COPY file:dc942ca949bb159f81bbc954773b3491e433d2d3e3ef90bac80ecf48a313c9c9 in /bin/tini 529B
<missing> 11 hours ago /bin/sh -c #(nop) COPY file:a8f986413b77bf4d88562b9d3a0dce98ab6e75403192aa4d4153fb41f450843d in /usr/local/bin/jenkins.sh 1.45kB
<missing> 11 hours ago /bin/sh -c #(nop) COPY file:55594d9d2aed007553a6743a43039b1a48b30527f8fb991ad93e1fd5b1298f60 in /usr/local/bin/jenkins-support 6.12kB
<missing> 11 hours ago /bin/sh -c #(nop) USER jenkins 0B
<missing> 11 hours ago /bin/sh -c #(nop) ENV COPY_REFERENCE_FILE_LOG=/var/jenkins_home/copy_reference_file.log 0B
<missing> 11 hours ago /bin/sh -c #(nop) EXPOSE 50000 0B
<missing> 11 hours ago /bin/sh -c #(nop) EXPOSE 8080 0B
<missing> 11 hours ago |9 JENKINS_SHA=e026221efcec9528498019b6c1581cca70fe9c3f6b10303777d85c6699bca0e4 JENKINS_URL=https://repo.jenkins-ci.org/public/org/jenkins-ci/main/jenkins-war/2.161/jenkins-war-2.161.war TINI_VERSION=v0.16.1 agent_port=50000 gid=1000 group=jenkins http_port=8080 uid=1000 user=jenkins /bin/sh -c chown -R ${user} "$JENKINS_HOME" /usr/share/jenkins/ref 328B
<missing> 11 hours ago /bin/sh -c #(nop) ENV JENKINS_INCREMENTALS_REPO_MIRROR=https://repo.jenkins-ci.org/incrementals 0B
<missing> 11 hours ago /bin/sh -c #(nop) ENV JENKINS_UC_EXPERIMENTAL=https://updates.jenkins.io/experimental 0B
<missing> 11 hours ago /bin/sh -c #(nop) ENV JENKINS_UC=https://updates.jenkins.io 0B
<missing> 11 hours ago |9 JENKINS_SHA=e026221efcec9528498019b6c1581cca70fe9c3f6b10303777d85c6699bca0e4 JENKINS_URL=https://repo.jenkins-ci.org/public/org/jenkins-ci/main/jenkins-war/2.161/jenkins-war-2.161.war TINI_VERSION=v0.16.1 agent_port=50000 gid=1000 group=jenkins http_port=8080 uid=1000 user=jenkins /bin/sh -c curl -fsSL ${JENKINS_URL} -o /usr/share/jenkins/jenkins.war && echo "${JENKINS_SHA} /usr/share/jenkins/jenkins.war" | sha256sum -c - 76MB
<missing> 11 hours ago /bin/sh -c #(nop) ARG JENKINS_URL=https://repo.jenkins-ci.org/public/org/jenkins-ci/main/jenkins-war/2.161/jenkins-war-2.161.war 0B
<missing> 11 hours ago /bin/sh -c #(nop) ARG JENKINS_SHA=5bb075b81a3929ceada4e960049e37df5f15a1e3cfc9dc24d749858e70b48919 0B
<missing> 11 hours ago /bin/sh -c #(nop) ENV JENKINS_VERSION=2.161 0B
<missing> 11 hours ago /bin/sh -c #(nop) ARG JENKINS_VERSION 0B
<missing> 11 hours ago /bin/sh -c #(nop) COPY file:c84b91c835048a52bb864c1f4662607c56befe3c4b1520b0ea94633103a4554f in /usr/share/jenkins/ref/init.groovy.d/tcp-slave-agent-port.groovy 328B
<missing> 11 hours ago |7 TINI_VERSION=v0.16.1 agent_port=50000 gid=1000 group=jenkins http_port=8080 uid=1000 user=jenkins /bin/sh -c curl -fsSL https://github.com/krallin/tini/releases/download/${TINI_VERSION}/tini-static-$(dpkg --print-architecture) -o /sbin/tini && curl -fsSL https://github.com/krallin/tini/releases/download/${TINI_VERSION}/tini-static-$(dpkg --print-architecture).asc -o /sbin/tini.asc && gpg --no-tty --import ${JENKINS_HOME}/tini_pub.gpg && gpg --verify /sbin/tini.asc && rm -rf /sbin/tini.asc /root/.gnupg && chmod +x /sbin/tini 866kB
<missing> 11 hours ago /bin/sh -c #(nop) COPY file:653491cb486e752a4c2b4b407a46ec75646a54eabb597634b25c7c2b82a31424 in /var/jenkins_home/tini_pub.gpg 7.15kB
<missing> 11 hours ago /bin/sh -c #(nop) ARG TINI_VERSION=v0.16.1 0B
<missing> 11 hours ago |6 agent_port=50000 gid=1000 group=jenkins http_port=8080 uid=1000 user=jenkins /bin/sh -c mkdir -p /usr/share/jenkins/ref/init.groovy.d 0B
<missing> 11 hours ago /bin/sh -c #(nop) VOLUME [/var/jenkins_home] 0B
<missing> 11 hours ago |6 agent_port=50000 gid=1000 group=jenkins http_port=8080 uid=1000 user=jenkins /bin/sh -c mkdir -p $JENKINS_HOME && chown ${uid}:${gid} $JENKINS_HOME && groupadd -g ${gid} ${group} && useradd -d "$JENKINS_HOME" -u ${uid} -g ${gid} -m -s /bin/bash ${user} 328kB
<missing> 11 hours ago /bin/sh -c #(nop) ENV JENKINS_SLAVE_AGENT_PORT=50000 0B
<missing> 11 hours ago /bin/sh -c #(nop) ENV JENKINS_HOME=/var/jenkins_home 0B
<missing> 11 hours ago /bin/sh -c #(nop) ARG JENKINS_HOME=/var/jenkins_home 0B
<missing> 11 hours ago /bin/sh -c #(nop) ARG agent_port=50000 0B
<missing> 11 hours ago /bin/sh -c #(nop) ARG http_port=8080 0B
<missing> 11 hours ago /bin/sh -c #(nop) ARG gid=1000 0B
<missing> 11 hours ago /bin/sh -c #(nop) ARG uid=1000 0B
<missing> 11 hours ago /bin/sh -c #(nop) ARG group=jenkins 0B
<missing> 11 hours ago /bin/sh -c #(nop) ARG user=jenkins 0B
<missing> 11 hours ago /bin/sh -c apt-get update && apt-get install -y git curl && rm -rf /var/lib/apt/lists/* 0B
<missing> 3 weeks ago /bin/sh -c set -ex; if [ ! -d /usr/share/man/man1 ]; then mkdir -p /usr/share/man/man1; fi; apt-get update; apt-get install -y --no-install-recommends openjdk-8-jdk="$JAVA_DEBIAN_VERSION" ; rm -rf /var/lib/apt/lists/*; [ "$(readlink -f "$JAVA_HOME")" = "$(docker-java-home)" ]; update-alternatives --get-selections | awk -v home="$(readlink -f "$JAVA_HOME")" 'index($3, home) == 1 { $2 = "manual"; print | "update-alternatives --set-selections" }'; update-alternatives --query java | grep -q 'Status: manual' 348MB
<missing> 3 weeks ago /bin/sh -c #(nop) ENV JAVA_DEBIAN_VERSION=8u181-b13-2~deb9u1 0B
<missing> 3 weeks ago /bin/sh -c #(nop) ENV JAVA_VERSION=8u181 0B
<missing> 3 weeks ago /bin/sh -c #(nop) ENV JAVA_HOME=/docker-java-home 0B
<missing> 3 weeks ago /bin/sh -c ln -svT "/usr/lib/jvm/java-8-openjdk-$(dpkg --print-architecture)" /docker-java-home 33B
<missing> 3 weeks ago /bin/sh -c { echo '#!/bin/sh'; echo 'set -e'; echo; echo 'dirname "$(dirname "$(readlink -f "$(which javac || which java)")")"'; } > /usr/local/bin/docker-java-home && chmod +x /usr/local/bin/docker-java-home 87B
<missing> 3 weeks ago /bin/sh -c #(nop) ENV LANG=C.UTF-8 0B
<missing> 3 weeks ago /bin/sh -c apt-get update && apt-get install -y --no-install-recommends bzip2 unzip xz-utils && rm -rf /var/lib/apt/lists/* 2.21MB
<missing> 3 weeks ago /bin/sh -c apt-get update && apt-get install -y --no-install-recommends bzr git mercurial openssh-client subversion procps && rm -rf /var/lib/apt/lists/* 142MB
<missing> 3 weeks ago /bin/sh -c set -ex; if ! command -v gpg > /dev/null; then apt-get update; apt-get install -y --no-install-recommends gnupg dirmngr ; rm -rf /var/lib/apt/lists/*; fi 7.81MB
<missing> 3 weeks ago /bin/sh -c apt-get update && apt-get install -y --no-install-recommends ca-certificates curl netbase wget && rm -rf /var/lib/apt/lists/* 23.2MB
<missing> 3 weeks ago /bin/sh -c #(nop) CMD ["bash"] 0B
<missing> 3 weeks ago /bin/sh -c #(nop) ADD file:da71baf0d22cb2ede91c5e3ff959607e47459a9d7bda220a62a3da362b0e59ea in / 101MB
Where the actual dockerfile for that image is:
FROM openjdk:8-jdk-stretch

RUN apt-get update && apt-get install -y git curl && rm -rf /var/lib/apt/lists/*

ARG user=jenkins
ARG group=jenkins
ARG uid=1000
ARG gid=1000
ARG http_port=8080
ARG agent_port=50000
ARG JENKINS_HOME=/var/jenkins_home

ENV JENKINS_HOME $JENKINS_HOME
ENV JENKINS_SLAVE_AGENT_PORT ${agent_port}

# Jenkins is run with user `jenkins`, uid = 1000
# If you bind mount a volume from the host or a data container,
# ensure you use the same uid
RUN mkdir -p $JENKINS_HOME \
  && chown ${uid}:${gid} $JENKINS_HOME \
  && groupadd -g ${gid} ${group} \
  && useradd -d "$JENKINS_HOME" -u ${uid} -g ${gid} -m -s /bin/bash ${user}

# Jenkins home directory is a volume, so configuration and build history
# can be persisted and survive image upgrades
VOLUME $JENKINS_HOME

# `/usr/share/jenkins/ref/` contains all reference configuration we want
# to set on a fresh new installation. Use it to bundle additional plugins
# or config file with your custom jenkins Docker image.
RUN mkdir -p /usr/share/jenkins/ref/init.groovy.d

# Use tini as subreaper in Docker container to adopt zombie processes
ARG TINI_VERSION=v0.16.1
COPY tini_pub.gpg ${JENKINS_HOME}/tini_pub.gpg
RUN curl -fsSL https://github.com/krallin/tini/releases/download/${TINI_VERSION}/tini-static-$(dpkg --print-architecture) -o /sbin/tini \
  && curl -fsSL https://github.com/krallin/tini/releases/download/${TINI_VERSION}/tini-static-$(dpkg --print-architecture).asc -o /sbin/tini.asc \
  && gpg --no-tty --import ${JENKINS_HOME}/tini_pub.gpg \
  && gpg --verify /sbin/tini.asc \
  && rm -rf /sbin/tini.asc /root/.gnupg \
  && chmod +x /sbin/tini

COPY init.groovy /usr/share/jenkins/ref/init.groovy.d/tcp-slave-agent-port.groovy

# jenkins version being bundled in this docker image
ARG JENKINS_VERSION
ENV JENKINS_VERSION ${JENKINS_VERSION:-2.121.1}

# jenkins.war checksum, download will be validated using it
ARG JENKINS_SHA=5bb075b81a3929ceada4e960049e37df5f15a1e3cfc9dc24d749858e70b48919

# Can be used to customize where jenkins.war get downloaded from
ARG JENKINS_URL=https://repo.jenkins-ci.org/public/org/jenkins-ci/main/jenkins-war/${JENKINS_VERSION}/jenkins-war-${JENKINS_VERSION}.war

# could use ADD but this one does not check Last-Modified header neither does it allow to control checksum
# see https://github.com/docker/docker/issues/8331
RUN curl -fsSL ${JENKINS_URL} -o /usr/share/jenkins/jenkins.war \
  && echo "${JENKINS_SHA}  /usr/share/jenkins/jenkins.war" | sha256sum -c -

ENV JENKINS_UC https://updates.jenkins.io
ENV JENKINS_UC_EXPERIMENTAL=https://updates.jenkins.io/experimental
ENV JENKINS_INCREMENTALS_REPO_MIRROR=https://repo.jenkins-ci.org/incrementals
RUN chown -R ${user} "$JENKINS_HOME" /usr/share/jenkins/ref

# for main web interface:
EXPOSE ${http_port}

# will be used by attached slave agents:
EXPOSE ${agent_port}

ENV COPY_REFERENCE_FILE_LOG $JENKINS_HOME/copy_reference_file.log

USER ${user}

COPY jenkins-support /usr/local/bin/jenkins-support
COPY jenkins.sh /usr/local/bin/jenkins.sh
COPY tini-shim.sh /bin/tini
ENTRYPOINT ["/sbin/tini", "--", "/usr/local/bin/jenkins.sh"]

# from a derived Dockerfile, can use `RUN plugins.sh active.txt` to setup /usr/share/jenkins/ref/plugins from a support bundle
COPY plugins.sh /usr/local/bin/plugins.sh
COPY install-plugins.sh /usr/local/bin/install-plugins.sh
Anchore will detect the history/dockerfile as this, if not explicitly provided (note order is reversed from docker history output, so it reads in same order as actual dockerfile):
[
   {
      "Size" : 45323792,
      "Tags" : [],
      "Comment" : "",
      "Id" : "sha256:cd8eada9c7bb496eb685fc6d2198c33db7cb05daf0fde42e4cf5bf0127cbdf38",
      "Created" : "2018-12-28T23:29:37.981962131Z",
      "CreatedBy" : "/bin/sh -c #(nop) ADD file:da71baf0d22cb2ede91c5e3ff959607e47459a9d7bda220a62a3da362b0e59ea in / "
   },
   {
      "Size" : 0,
      "Tags" : [],
      "Comment" : "",
      "Id" : "<missing>",
      "Created" : "2018-12-28T23:29:38.226681736Z",
      "CreatedBy" : "/bin/sh -c #(nop)  CMD [\"bash\"]"
   },
   {
      "Size" : 10780911,
      "Comment" : "",
      "Tags" : [],
      "CreatedBy" : "/bin/sh -c apt-get update && apt-get install -y --no-install-recommends \t\tca-certificates \t\tcurl \t\tnetbase \t\twget \t&& rm -rf /var/lib/apt/lists/*",
      "Created" : "2018-12-29T00:04:28.920875483Z",
      "Id" : "sha256:c2677faec825930a8844845f55454ee0495ceb5bea9fc904d5b3125de863dc1d"
   },
   {
      "Comment" : "",
      "Tags" : [],
      "Size" : 4340024,
      "CreatedBy" : "/bin/sh -c set -ex; \tif ! command -v gpg > /dev/null; then \t\tapt-get update; \t\tapt-get install -y --no-install-recommends \t\t\tgnupg \t\t\tdirmngr \t\t; \t\trm -rf /var/lib/apt/lists/*; \tfi",
      "Created" : "2018-12-29T00:04:34.642152001Z",
      "Id" : "sha256:fcce419a96b1219a265bf7a933d66b585a6f8d73448533f3833c73ad49fb5e88"
   },
   {
      "Size" : 50062697,
      "Tags" : [],
      "Comment" : "",
      "Id" : "sha256:045b51e26e750443c84216071a1367a7aae0b76245800629dc04934628b4b1ea",
      "CreatedBy" : "/bin/sh -c apt-get update && apt-get install -y --no-install-recommends \t\tbzr \t\tgit \t\tmercurial \t\topenssh-client \t\tsubversion \t\t\t\tprocps \t&& rm -rf /var/lib/apt/lists/*",
      "Created" : "2018-12-29T00:04:59.676112605Z"
   },
 ... <truncated for brevity> ...
   {
      "Tags" : [],
      "Comment" : "",
      "Size" : 0,
      "Id" : "<missing>",
      "CreatedBy" : "/bin/sh -c #(nop)  ENTRYPOINT [\"/sbin/tini\" \"--\" \"/usr/local/bin/jenkins.sh\"]",
      "Created" : "2019-01-21T08:56:30.737221895Z"
   },
   {
      "Size" : 1549,
      "Tags" : [],
      "Comment" : "",
      "Id" : "sha256:283cd3aba8691a3b9d22d923de66243b105758e74de7d9469fe55a6a58aeee30",
      "Created" : "2019-01-21T08:56:32.015667468Z",
      "CreatedBy" : "/bin/sh -c #(nop) COPY file:f97999fac8a63cf8b635a54ea84a2bc95ae3da4d81ab55267c92b28b502d8812 in /usr/local/bin/plugins.sh "
   },
   {
      "Comment" : "",
      "Tags" : [],
      "Size" : 3079,
      "Created" : "2019-01-21T08:56:33.158854485Z",
      "CreatedBy" : "/bin/sh -c #(nop) COPY file:3a15c25533fd87983edc33758f62af7b543ccc3ce9dd570e473eb0702f5f298e in /usr/local/bin/install-plugins.sh ",
      "Id" : "sha256:b0ce8ab5a5a7da5d762f25af970f4423b98437a8318cb9852c3f21354cbf914f"
   }
]
NOTE: Anchore processes the leading /bin/sh commands, so you do not have to include those in any trigger param config if using the docker history output.
The actual_dockerfile_only Parameter
The actual vs history impacts the semantics of the dockerfile gate’s triggers. To allow explicit control of the differences, most triggers in this gate includes a parameter: actual_dockerfile_only that if set to true or false will ensure the trigger check is only done on the source of data specified. If actual_dockerfile_only = true, then the trigger will evaluate only if an actual dockerfile is available for the image and will skip evaluation if not. If actual_dockerfile_only is false or omitted, then the trigger will run on the actual dockerfile if available, or the history data if the dockerfile was not provided.
Differences in data between Docker History and actual Dockerfile
With Actual Dockerfile:
- FROM line is preserved, so the parent tag of the image is easily available
- Instruction checks are all against instructions created during the build for that exact image, not any parent images
- When the actual_dockerfile_only parameter is set to true, all instructions from the parent image are ignored in policy processing. This may have some unexpected consequences depending on how your images are structured and layered (e.g. golden base images that establish common patterns of volumes, labels, healthchecks)
- COPY/ADD instructions will maintain the actual values used
- Multistage-builds in that specific dockerfile will be visible with multiple FROM lines in the output
With Docker History data, when no dockerfile is provided:
- FROM line is not accurate, and will nearly always default to ‘FROM scratch’
- Instructions are processed from all layers in the image
- COPY and ADD instructions are transformed into SHAs rather than the actual file path/name used at build-time
- Multi-stage builds are not tracked with multiple FROM lines, only the copy operations between the phases
Trigger: instruction
This trigger evaluates instructions found in the “dockerfile”
Supported Directives/Instructions:
Parameters
actual_dockerfile_only (optional): See above
instruction: The dockerfile instruction to check against. One of:
- ADD
- ARG
- COPY
- CMD
- ENTRYPOINT
- ENV
- EXPOSE
- FROM
- HEALTHCHECK
- LABEL
- MAINTAINER
- ONBUILD
- USER
- RUN
- SHELL
- STOPSIGNAL
- VOLUME
- WORKDIR
check: The comparison/evaluation to perform. One of: =, != , exists, not_exists, like, not_like, in, not_in.
value (optional): A string value to compare against, if applicable
Examples
- Ensure an image has a HEALTHCHECK defined in the image (warn if not found):
{
  "gate": "dockerfile",
  "trigger": "instruction",
  "action": "warn",
  "parameters": [
    {
      "name": "instruction",
      "value": "HEALTHCHECK"
    },
    {
      "name": "check",
      "value": "not_exists"
    }
  ]
}
- Check for AWS environment variables set:
{
  "gate": "dockerfile",
  "trigger": "instruction",
  "action": "stop",
  "parameters": [
    {
      "name": "instruction",
      "value": "ENV"
    },
    {
      "name": "check",
      "value": "like"
    },
    {
      "name": "value",
      "value": "AWS_.*KEY"
    }
  ]
}
Trigger: packages_added
This trigger warns if a package was added to the SBOM.
Parameters
Optional parameter: “package_type”
Example
Raise a warning if packages were added.
  {
   "action": "WARN",
   "gate": "tag_drift",
   "trigger": "packages_added",
   "params": [],
   "id": "1ba3461f-b9db-4a6c-ac88-329d38e08df5"
  }
Trigger: packages_removed
This trigger warns if a package was deleted from the SBOM.
Parameters
Optional parameter: “package_type”
Example
Raise a warning if packages were deleted.
  {
   "action": "WARN",
   "gate": "tag_drift",
   "trigger": "packages_removed",
   "params": [],
   "id": "de05d77b-1f93-4df4-a65d-57d9042b1f3a"
  }
Trigger: packages_modified
This trigger warns if a package was changed in the SBOM.
Parameters
Optional parameter: “package_type”
Example
Raise a warning if packages were changed.
  {
   "action": "WARN",
   "gate": "tag_drift",
   "trigger": "packages_modified",
   "params": [],
   "id": "1168b0ac-df6c-4715-8077-2cb3e016cf63"
  }
Trigger: effective_user
This trigger processes all USER directives in the dockerfile or history to determine which user will be used to run the container by default (assuming no user is set explicitly at runtime). The detected value is then subject to a allowlist or denylist filter depending on the configured parameters. Typically, this is used for denylisting the root user.
Parameters
actual_dockerfile_only (optional): See above
users: A string with a comma delimited list of username to check for
type: The type of check to perform. One of: ‘denylist’ or ‘allowlist’. This determines how the value of the ‘users’ parameter is interpreted.
Examples
- Denylist root user
{
  "gate": "dockerfile",
  "trigger": "effective_user",
  "action": "stop",
  "parameters": [
    {
      "name": "users",
      "value": "root"
    },
    {
      "name": "type",
      "value": "denylist"
    }
  ]
}
- Denylist root user but only if set in actual dockerfile, not inherited from parent image
{
  "gate": "dockerfile",
  "trigger": "effective_user",
  "action": "stop",
  "parameters": [
    {
      "name": "users",
      "value": "root"
    },
    {
      "name": "type",
      "value": "denylist"
    },
    {
      "name": "actual_dockerfile_only",
      "value": "true"
    }
  ]
}
- Warn if the user is not either “nginx” or “jenkins”
{
  "gate": "dockerfile",
  "trigger": "effective_user",
  "action": "warn",
  "parameters": [
    {
      "name": "users",
      "value": "nginx,jenkins"
    },
    {
      "name": "type",
      "value": "allowlist"
    }
  ]
}
Trigger: exposed_ports
This trigger processes the set of EXPOSE directives in the dockerfile/history to determine the set of ports that are defined to be exposed (since it can span multiple directives). It performs checks on that set to denylist/allowlist them based on parameter settings.
Parameters
actual_dockerfile_only (optional): See above
ports: String of comma delimited port numbers to be checked
type: The type of check to perform. One of: ‘denylist’ or ‘allowlist’. This determines how the value of the ‘users’ parameter is interpreted
Examples
- Allow only ports 80 and 443. Trigger will fire on any port defined to be exposed that is not 80 or 443
{
  "gate": "dockerfile",
  "trigger": "exposed_ports",
  "action": "warn",
  "parameters": [
    {
      "name": "ports",
      "value": "80,443"
    },
    {
      "name": "type",
      "value": "allowlist"
    }
  ]
}
- Denylist ports 21 (ftp), 22 (ssh), and 53 (dns) . Trigger will fire a match on ports 21, 22, 53 if found in EXPOSE directives
{
  "gate": "dockerfile",
  "trigger": "exposed_ports",
  "action": "warn",
  "parameters": [
    {
      "name": "ports",
      "value": "21,22,53"
    },
    {
      "name": "type",
      "value": "denylist"
    }
  ]
}
Trigger: no_dockerfile_provided
This trigger allows checks on the way the image was added, firing if the dockerfile was not explicitly provided at analysis time. This is useful in identifying and qualifying other trigger matches.
Parameters
None
Examples
- Raise a warning if no dockerfile was provided at analysis time
{
  "gate": "dockerfile",
  "trigger": "no_dockerfile_provided",
  "action": "warn",
  "parameters": []
}
1.4 - Working with Registries
Using the API or AnchoreCTL, Anchore Enterprise can be instructed to download an image from a public or private container registry.
Anchore Enterprise will attempt to download images from any registry without requiring further configuration. However if
your registry requires authentication then the registry and corresponding credentials will need to be defined.
Anchore Enterprise can analyze images from any Docker V2 compatible registry.

Jump to the registry configuring guide for your registry:
1.4.1 - Configuring Registries
Anchore Enterprise will attempt to download images from any registry without requiring further configuration.
However if your registry requires authentication then the registry and corresponding credentials will need to be defined.
Listing Registries
Running the following command lists the defined registries.
# anchorectl registry list
 ✔ Fetched registries
┌───────────────────┬───────────────┬───────────────┬─────────────────┬──────────────────────┬─────────────┬───────────────────┐
│ REGISTRY NAME     │ REGISTRY TYPE │ REGISTRY USER │ REGISTRY VERIFY │ CREATED AT           │ LAST UPATED │ REGISTRY          │
├───────────────────┼───────────────┼───────────────┼─────────────────┼──────────────────────┼─────────────┼───────────────────┤
│ docker.io         │ docker_v2     │ anchore       │ true            │ 2022-08-24T21:37:08Z │             │ docker.io         │
│ quay.io           │ docker_v2     │ anchore       │ true            │ 2022-08-25T20:55:33Z │             │ quay.io           │
│ 192.168.1.89:5000 │ docker_v2     │ johndoe       │ true            │ 2022-08-25T20:56:01Z │             │ 192.168.1.89:5000 │
└───────────────────┴───────────────┴───────────────┴─────────────────┴──────────────────────┴─────────────┴───────────────────┘
Here we can see that 3 registries have been defined. If no registry was defined Anchore Enterprise would attempt to
pull images without authentication but a registry is defined then all pulls for images from that registry will use the specified username and password.
Adding a Registry
Registries can be added using the following syntax.
# ANCHORECTL_REGISTRY_PASSWORD=<password> anchorectl registry add <registry> --username <username>
The REGISTRY parameter should include the fully qualified hostname and port number of the registry. For example: registry.anchore.com:5000
Anchore Enterprise will only pull images from a TLS/SSL enabled registry. If the registry is protected with a self signed certificate or a certificated
signed by an unknown certificate authority then the --secure-conection=<true|false> parameter can be passed which instructs Anchore Enterprise not to validate the certificate.
Most Docker V2 compatible registries require username and password for authentication. Amazon ECR, Google GCR and Microsoft Azure include support
for their own native credentialing. See Working with AWS ECR Registry Credentials,
Working with Google GCR Registry Credentials and
Working with Azure Registry Credentials for more details.
Getting Registry Details
The registry get command allows the user to retrieve details about a specific registry.
For example:
# anchorectl registry get registry.example.com
 ✔ Fetched registry
┌──────────────────────┬───────────────┬───────────────┬─────────────────┬──────────────────────┬─────────────┬──────────────────────┐
│ REGISTRY NAME        │ REGISTRY TYPE │ REGISTRY USER │ REGISTRY VERIFY │ CREATED AT           │ LAST UPATED │ REGISTRY             │
├──────────────────────┼───────────────┼───────────────┼─────────────────┼──────────────────────┼─────────────┼──────────────────────┤
│ registry.example.com │ docker_v2     │ johndoe       │ false           │ 2022-08-25T20:58:33Z │             │ registry.example.com │
└──────────────────────┴───────────────┴───────────────┴─────────────────┴──────────────────────┴─────────────┴──────────────────────┘
In this example we can see that the registry.example.com registry was added to Anchore Enterprise on the 25th August at 20:58 UTC.
The password for the registry cannot be retrieved through the API or AnchoreCTL.
Updating Registry Details
Once a registry had been defined the parameters can be updated using the update command. This allows a registry’s username, password and secure-connection (validate TLS) parameters to be updated using the same syntax as is used in the ‘add’ operation.
# ANCHORECTL_REGISTRY_PASSWORD=<newpassword> anchorectl registry update registry.example.com --username <newusername> --validate=<true|false> --secure-connection=<true|false>
Deleting Registries
A Registry can be deleted from Anchore’s configuration using the del command.
For example to delete the configuration for registry.example.com the following command should be issued:
# anchorectl registry delete registry.example.com
 ✔ Deleted registry
No results
Note: Deleting a registry record does not delete the records of images/tags associated with that registry.
Advanced
Anchore Enterprise attempts to perform a credential validation upon registry addition, but there are cases where a credential can be valid but the validation routine can fail (in particular, credential
validation methods are changing for public registries over time). If you are unable to add a registry but believe that the credential you are providing is valid, or you wish to add a
credential to anchore before it is in place in the registry, you can bypass the registry credential validation process using the --validate=false option to the registry add or registry update command.
1.4.2 - Working with Amazon ECR Registry Credentials
Amazon AWS typically uses keys instead of traditional usernames & passwords. These keys consist of an access key ID and a secret access key. While it is possible to use the aws ecr get-login command to create an access token, this will expire after 12 hours so it is not appropriate for use with Anchore Enterprise, otherwise a user would need to update their registry credentials regularly. So when adding an Amazon ECR registry to Anchore Enterprise you should pass the aws_access_key_id and aws_secret_access_key.
# ANCHORECTL_REGISTRY_PASSWORD=<MY_AWS_SECRET_ACCESS_KEY> anchorectl registry add 1234567890.dkr.ecr.us-east-1.amazonaws.com --username <MY_AWS_ACCESS_KEY_ID> --type awsecr
The registry-type parameter instructs Anchore Enterprise to handle these credentials as AWS credentials rather than traditional usernames and passwords. Currently Anchore Enterprise supports two types of registry authentication standard username and password for most Docker V2 registries and Amazon ECR. In this example we specified the registry type on the command line however if this parameter is omitted then AnchoreCTL will attempt to guess the registry type from the URL which uses a standard format.
Anchore Enterprise will use the AWS access key and secret access keys to generate authentication tokens to access the Amazon ECR registry, Anchore Enterprise will manage regeneration of these tokens which typically expire after 12 hours.
In addition to supporting AWS access key credentials Anchore also supports the use of IAM roles for authenticating with Amazon ECR if Anchore Enterprise is run on an EC2 instance.
In this case you can configure Anchore Enterprise to inherit the IAM role from the EC2 instance hosting the system.
When launching the EC2 instance that will run Anchore Enterprise you need to specify a role that includes the AmazonEC2ContainerRegistryReadOnly policy.
While this is best performed using a CloudFormation template, you can manually configure from the launch instance wizard.
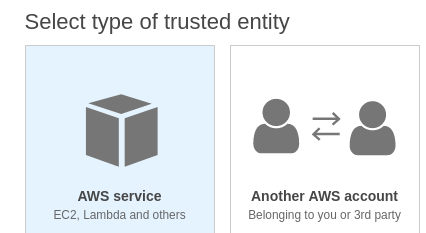
Step 1: Select Create new IAM role.
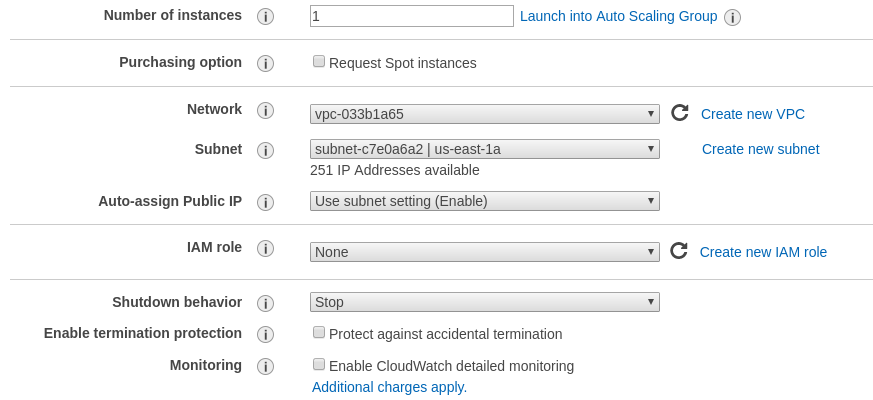
Step 2: Under type of trusted entity select EC2.
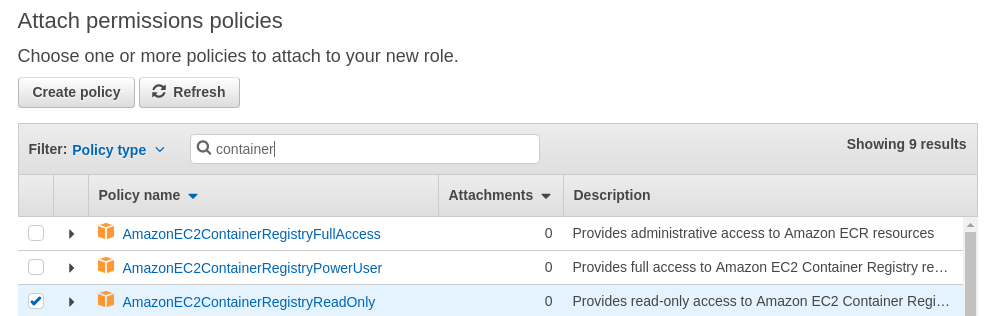
Ensure that the AmazonEC2ContainerRegistryReadOnly policy is selected.
Step 3: Attach Permissions to the Role.
Step 4: Name the role.
Give a name to the role and add this role to the Instance you are launching.
On the running EC2 instance you can manually verify that the instance has inherited the correct role by running the following command:
# curl http://169.254.169.254/latest/meta-data/iam/info
{
 "Code" : "Success",
 "LastUpdated" : "2018-01-1218:45:12Z",
 "InstanceProfileArn" : "arn:aws:iam::123456789012:instance-profile/ECR-ReadOnly",
 "InstanceProfileId" : "ABCDEFGHIJKLMNOP”
}
Step 5: Enable IAM Authentication in Anchore Enterprise.
By default the support for inheriting the IAM role is disabled.
To enable IAM based authentication add the following entry to the top of Anchore Enterprise config.yaml file:
allow_awsecr_iam_auto: True
Step 6: Add the Registry using the AWSAUTO user.
When IAM support is enabled instead of passing the access key and secret access key use “awsauto” for both username and password. This will instruct Anchore Enterprise to inherit the role from the underlying EC2 instance.
# ANCHORECTL_REGISTRY_PASSWORD=awsauto anchorectl registry add 1234567890.dkr.ecr.us-east-1.amazonaws.com --username awsauto --type awsecr
1.4.3 - Working with Azure Registry Credentials
To use an Azure Registry, you can configure Anchore to use either the admin credential(s) or a service principal. Refer to Azure documentation for differences and how to setup each. When you’ve chosen a credential type, use the following to determine which registry command options correspond to each value for your credential type
Admin Account
- Registry: The login server (Ex. myregistry1.azurecr.io)
- Username: The username in the ‘az acr credential show –name ’ output
- Password: The password or password2 value from the ‘az acr credential show’ command result
Service Principal
- Registry: The login server (Ex. myregistry1.azurecr.io)
- Username: The service principal app id
- Password: The service principal password
Note: You can follow Microsoft Documentation for creating a Service Principal.
To add an azure registry credential, invoke anchorectl as follows:
ANCHORECTL_REGISTRY_PASSWORD=<password> anchorectl registry add <registry> --username <username> <Password>
Once a registry has been added, any image that is added (e.g. anchorectl image add <Registry>/some/repo:sometag) will use the provided credential to download/inspect and analyze the image.
1.4.4 - Working with Google Container Registry (GCR) Credentials
When working with Google Container Registry it is recommended that you use JSON keys rather than the short lived access tokens.
JSON key files are long-lived and are tightly scoped to individual projects and resources. You can read more about JSON credentials in Google’s documentation at the following URL: Google Container Registry advanced authentication
Once a JSON key file has been created with permissions to read from the container registry then the registry should be added with the username _json_key and the password should be the contents of the key file.
In the following example a file named key.json in the current directory contains the JSON key with readonly access to the my-repo repository within the my-project Google Cloud project.
# ANCHORECTL_REGISTRY_PASSWORD="$(cat key.json)" anchorectl registry add us.gcr.io --username _json_key
1.5 - Working with Subscriptions
Introduction
Anchore Enterprise supports 7 types of subscriptions.
- Tag Update
- Policy Update
- Vulnerability Update
- Analysis Update
- Alerts
- Repository Update
- Runtime Inventory
For detail information about Subscriptions please see Subscriptions
Managing Subscriptions
Subscriptions can be managed using AnchoreCTL.
Listing Subscriptions
Running the subscription list command will output a table showing the type and status of each subscription.
# anchorectl subscription list | more
 ✔ Fetched subscriptions
┌──────────────────────────────────────────────────────────────────────┬─────────────────┬────────┐
│ KEY                                                                  │ TYPE            │ ACTIVE │
├──────────────────────────────────────────────────────────────────────┼─────────────────┼────────┤
│ docker.io/alpine:latest                                              │ policy_eval     │ false  │
│ docker.io/alpine:3.12.4                                              │ policy_eval     │ false  │
│ docker.io/alpine:latest                                              │ vuln_update     │ false  │
│ docker.io/redis:latest                                               │ policy_eval     │ false  │
│ docker.io/centos:8                                                   │ policy_eval     │ false  │
│ docker.io/alpine:3.8.4                                               │ policy_eval     │ false  │
│ docker.io/centos:8                                                   │ vuln_update     │ false  │
...
└──────────────────────────────────────────────────────────────────────┴─────────────────┴────────┘
Note: Tag Subscriptions are tied to registry/repo:tag and not to image IDs.
Activating Subscriptions
The subscription activate command is used to enable a subscription type for a given image. The command takes the following form:
anchorectl subscription activate SUBSCRIPTION_KEY SUBSCRIPTION_TYPE
SUBSCRIPTION_TYPE should be either:
- tag_update
- vuln_update
- policy_eval
- analysis_update
SUBSCRIPTION_KEY should be the name of the subscribed tag. eg. docker.io/ubuntu:latest
For example:
# anchorectl subscription activate docker.io/ubuntu:latest tag_update
 ✔ Activate subscription
Key: docker.io/ubuntu:latest
Type: tag_update
Id: 04f0e6d230d3e297acdc91ed9944278d
Active: true
and to de-activate:
# anchorectl subscription deactivate docker.io/ubuntu:latest tag_update
 ✔ Deactivate subscription
Key: docker.io/ubuntu:latest
Type: tag_update
Id: 04f0e6d230d3e297acdc91ed9944278d
Active: false
Tag Update Subscription
Any new tag added to Anchore Enterprise by AnchoreCTL will, by default, enable the Tag Update Subscription.
If you do to need this functionality, you can use the flag --no-auto-subscribe or set the environment variable ANCHORECTL_IMAGE_NO_AUTO_SUBSCRIBE when adding new tags.
# ./anchorectl image add docker.io/ubuntu:latest --no-auto-subscribe
Runtime Inventory Subscription
AnchoreCTL provides commands to help navigate the runtime_inventory Subscription. The subscription will monitor a specify runtime inventory context and add its images to the system for analysis.
Listing Inventory Watchers
# ./anchorectl inventory watch list
 ✔ Fetched watches
┌──────────────────────────┬───────────────────┬────────┐
│ KEY                      │ TYPE              │ ACTIVE │
├──────────────────────────┼───────────────────┼────────┤
│ cluster-one/my-namespace │ runtime_inventory │ false   │
└──────────────────────────┴───────────────────┴────────┘
Activating an Inventory Watcher
Note: This command will create the subscription is one does not already exist.
# ./anchorectl inventory watch activate cluster-one/my-namespace
 ✔ Activate watch
┌──────────────────────────┬───────────────────┬────────┐
│ KEY                      │ TYPE              │ ACTIVE │
├──────────────────────────┼───────────────────┼────────┤
│ cluster-one/my-namespace │ runtime_inventory │ true   │
└──────────────────────────┴───────────────────┴────────┘
Deactivating an Inventory Watcher
# ./anchorectl inventory watch deactivate cluster-one/my-namespace
 ✔ Deactivate watch
┌──────────────────────────┬───────────────────┬────────┐
│ KEY                      │ TYPE              │ ACTIVE │
├──────────────────────────┼───────────────────┼────────┤
│ cluster-one/my-namespace │ runtime_inventory │ false  │
└──────────────────────────┴───────────────────┴────────┘
Webhook Configuration
Webhooks are configured in the Anchore Enterprise configuration file config.yaml In the sample configuration file webhooks are disabled (commented) out.
webhooks:
  webhook_user: 'user'
  webhook_pass: 'pass'
  ssl_verify: False
The webhooks can, optionally, pass basic credentials to the webhook endpoint, if these are not required the the webhook_user and webhool_pass entries can be commented out. By default TLS/SSL connections will validate the certificate provided. This can be suppressed by uncommenting the ssl_verify option.
url: 'http://localhost:9090/general/<notification_type>/<userId>'
If configured, the general webook will receive all notifications (policy_eval, tag_update, vuln_update) for each user.In this case <notification_type> will be replaced by the appropriate type. will be replaced by the configured user which is, by default, admin. eg. http://localhost:9090/general/vuln_update/admin'
policy_eval:
    url: 'http://localhost:9090/somepath/<userId>'
    webhook_user: 'mehuser'
    webhook_pass: 'mehpass'
Specific endpoints for each event type can be configured, for example an endpoint for policy_eval notifications. In these cases the url, username, password and SSL/TLS verification can be specified.
error_event:
    url: 'http://localhost:9090/error_event/'
This webook, if configured, will send a webhook if any FATAL system events are logged.
1.6 - Scanning Repositories
Introduction
Individual images can be added to Anchore Enterprise using the image add command. This may be performed by a CI/CD plugin such as Jenkins or manually by a user with AnchoreCTL or API.
Anchore Enterprise can also be configured to scan repositories and automatically add any tags found in the repository. Once added, Anchore Enterprise will poll the registry to look for changes at a user configurable interval.
This interval is specified in the Anchore Enterprise configuration file: config.yaml within the services -> Catalog configuration stanza.
Example Configuration
cycle_timers:
      image_watcher: 3600
      repo_watcher: 60
In this example the repo is polled for updates every minute (60 seconds).
For more details on the Repository Subscription, please see Subscriptions
Adding Repositories
The repo add command instructs Anchore Enterprise to add the specified repository watch list.
# anchorectl repo add docker.io/alpine
 ✔ Added repo
┌──────────────────┬─────────────┬────────┐
│ KEY              │ TYPE        │ ACTIVE │
├──────────────────┼─────────────┼────────┤
│ docker.io/alpine │ repo_update │ true   │
└──────────────────┴─────────────┴────────┘
By default Anchore Enterprise will automatically add the discovered tags to the list of subscribed tags (see Working with Subscriptions this behavior can be overridden by passing the --auto-subscribe=<true|false> option.
Listing Repositories
The repo list command will show the repositories monitored by Anchore Enterprise.
# anchorectl repo list
 ✔ Fetched repos
┌─────────────────────────┬─────────────┬────────┐
│ KEY                     │ TYPE        │ ACTIVE │
├─────────────────────────┼─────────────┼────────┤
│ docker.io/alpine        │ repo_update │ true   │
│ docker.io/elasticsearch │ repo_update │ true   │
└─────────────────────────┴─────────────┴────────┘
Deleting Repositories
The del option can be used to instruct Anchore Enterprise to remove the repository from the watch list. Once the repository record has been deleted no further changes to the repository will be detected by Anchore Enterprise.
Note: No existing image data will be removed from Anchore Enterprise.
# anchorectl repo del docker.io/alpine
 ✔ Deleted repo
No results
Unwatching Repositories
When a repository is added, Anchore Enterprise will monitor the repository for new and updated tags. This behavior can be disabled preventing Anchore Enterprise from monitoring the repository for changes.
In this case the repo list command will show false in the Watched column for this registry.
# anchorectl repo unwatch docker.io/alpine
 ✔ Unwatch repo
┌──────────────────┬─────────────┬────────┐
│ KEY              │ TYPE        │ ACTIVE │
├──────────────────┼─────────────┼────────┤
│ docker.io/alpine │ repo_update │ false  │
└──────────────────┴─────────────┴────────┘
Watching Repositories
The repo watch command instructs Anchore Enterprise to monitor a repository for new and updated tags. By default repositories added to Anchore Enterprise are automatically watched. This option is only required if a repository has been manually unwatched.
# anchorectl repo watch docker.io/alpine
 ✔ Watch repo
┌──────────────────┬─────────────┬────────┐
│ KEY              │ TYPE        │ ACTIVE │
├──────────────────┼─────────────┼────────┤
│ docker.io/alpine │ repo_update │ true   │
└──────────────────┴─────────────┴────────┘
As of v3.0, Anchore Enterprise can be configured to have a size limit for images being added for analysis. This feature applies to the repo watcher. Images that exceed the max configured size in the repo being watched will not be added and a message will be logged in the catalog service. This feature is disabled by default so see documentation for additional details on the functionality of this feature and instructions on how to configure the limit
Removing a Repository and All Images
There may be a time when you wish to stop a repository analysis when the analysis is running (e.g., accidentally watching an image with a large number of tags). There are several steps in the process which are outlined below. We will use docker.io/library/alpine as an example.
Note: Be careful when deleting images. In this flow, Anchore deletes the image, not just the repository/tag combo. Because of this, deletes may impact more than the expected repository since an image may have tags in multiple repositories or even registries.
Check the State
Take a look at the repository list.
anchorectl repo list
 ✔ Fetched repos
┌──────────────────┬─────────────┬────────┐
│ KEY              │ TYPE        │ ACTIVE │
├──────────────────┼─────────────┼────────┤
│ docker.io/alpine │ repo_update │ true   │
└──────────────────┴─────────────┴────────┘
Also look at the image list.
anchorectl image list | grep docker.io/alpine
 ✔ Fetched images
│ docker.io/alpine:20220328                             │ sha256:c11c38f8002da63722adb5111241f5e3c2bfe4e54c0e8f0fb7b5be15c2ddca5f │ not_analyzed │ active │
│ docker.io/alpine:3.16.0                               │ sha256:4ff3ca91275773af45cb4b0834e12b7eb47d1c18f770a0b151381cd227f4c253 │ not_analyzed │ active │
│ docker.io/alpine:20220316                             │ sha256:57031e1a3b381fba5a09d5c338f7dbeeed2260ad5100c66b2192ab521ae27fc1 │ not_analyzed │ active │
│ docker.io/alpine:3.14.5                               │ sha256:aee6c86e12b609732a30526ddfa8194e4a54dc5514c463e4c2e41f5a89a0b67a │ not_analyzed │ active │
│ docker.io/alpine:3.15.5                               │ sha256:26284c09912acfc5497b462c5da8a2cd14e01b4f3ffa876596f5289dd8eab7f2 │ not_analyzed │ active │
...
...
Removing the Repository from the Watched List
Unwatch docker.io/library/alpine to prevent future automatic updates.
# anchorectl repo unwatch docker.io/alpine
 ✔ Unwatch repo
┌──────────────────┬─────────────┬────────┐
│ KEY              │ TYPE        │ ACTIVE │
├──────────────────┼─────────────┼────────┤
│ docker.io/alpine │ repo_update │ false  │
└──────────────────┴─────────────┴────────┘
Delete the Repository
Delete the repository. This may need to be done a couple times if the repository still shows in the repository list.
# anchorectl repo delete docker.io/alpine
 ✔ Deleted repo
No results
Forcefully Delete the Images
Delete the analysis/images. This may need to be done several times to remove all images depending on how many there are.
# for i in `anchorectl -q image list | grep docker.io/alpine | awk '{print $2}'`
> do
> anchorectl image delete ${i} --force
> done
┌─────────────────────────────────────────────────────────────────────────┬──────────┐
│ DIGEST                                                                  │ STATUS   │
├─────────────────────────────────────────────────────────────────────────┼──────────┤
│ sha256:c11c38f8002da63722adb5111241f5e3c2bfe4e54c0e8f0fb7b5be15c2ddca5f │ deleting │
└─────────────────────────────────────────────────────────────────────────┴──────────┘
┌─────────────────────────────────────────────────────────────────────────┬──────────┐
│ DIGEST                                                                  │ STATUS   │
├─────────────────────────────────────────────────────────────────────────┼──────────┤
│ sha256:4ff3ca91275773af45cb4b0834e12b7eb47d1c18f770a0b151381cd227f4c253 │ deleting │
└─────────────────────────────────────────────────────────────────────────┴──────────┘
...
...
...
Verify the Repository and All Images are Deleted
Check the repository list.
# anchorectl repo list
 ✔ Fetched repos
┌─────┬──────┬────────┐
│ KEY │ TYPE │ ACTIVE │
├─────┼──────┼────────┤
└─────┴──────┴────────┘
Check the image list.
# anchorectl image list | grep docker.io/alpine
 ✔ Fetched images
<no output>
Next Steps
1.7 - Feeds Overview
Anchore Enterprise uses security vulnerability and package data from a number of sources:
Feed vulnerabilities - security advisories from specific Linux Distribution vendors against Distribution specific packages.
- Alpine Linux
- CentOS
- Debian
- Oracle Linux
- Red Hat Enterprise Linux
- Red Hat Universal Base Image (UBI)
- Ubuntu
- Amazon Linux 2
- Google Distroless
Feed packages - Software Package Repositories
Feed nvd - NIST National Vulnerability Database (NVD)

The Anchore Feed Service collects vulnerability and package data from the upstream sources and normalizes this data to be published
as feeds that Anchore Enterprise can subscribe to.
Anchore Enterprise polls the feed service at a user defined interval, by default every six hours, and will download feed data
updated since the last sync.
Anchore hosts a public service on the Anchore Cloud which provides access, for free, to all public feeds.
An on-premises feed service is available for commercial customers allowing Anchore Enterprise to synchronize with a locally
deployed feed service, without any reliance on Anchore Cloud.
1.7.1 - Feed Configuration
Feed Synchronization Interval
The default configuration for Anchore Enterprise will download vulnerability data from Anchore’s feed service every 21,600 seconds (6hours).
For most users the only configuration option that is typically updated is the feed synchronization interval - the time interval (in seconds) at which the feed sync is run.
    .....

    cycle_timers:
      ...
      feed_sync: 14400
Feed Data Settings
Feed data configuration is set in the config.yaml file used by policy engine service. The services.policy_engine.vulnerabilities.sync.data section
of the configuration file controls the behavior of data to be synced. In addition, the data groups that can be synced depend on the services.policy_engine.vulnerabilities.provider,
and are explained in detail in the following sections.
Feed Groups
Anchore Enterprise is configured with grype as the services.policy_engine.vulnerabilities.provider and grypedb feed group enabled.
The grypedb feed group syncs a single Grype database to the policy engine.
A Grype database contains data that spans multiple groups. Due to this encapsulation, it is not possible to enable or disable individual feed groups.
Anchore Enterprise will default to downloading the feed group from a publicly accessible URL maintained by Grype https://toolbox-data.anchore.io/grype/databases/listing.json.
The Grype database available from this endpoint does not include third-party/proprietary groups such as MSRC.
To get those groups, set url (or override the environment variable ANCHORE_GRYPE_DB_URL) to your local feed service.
services:
  ...
  policy_engine:
    ...
    vulnerabilities:
      provider: grype
      ...
      sync:
        ...
        data:
          grypedb:
            enabled: true
            url: ${ANCHORE_GRYPE_DB_URL}
Read Timeout
Under rare circumstances you may see syncs failing with errors to fetch data due to timeouts. This is typically due to load on the feed service, network issues, or
some other temporary condition. However, if you want to increase the timeout to increase the likelihood of success, modify the read_timeout_seconds of the feeds configuration:
feeds:
  ...
  read_timeout_seconds: 180
Controlling Which Feeds and Groups are Synced
Note: The package and nvd data feeds are large, resulting in the initial sync taking some time to sync.
During initial feed sync, you can always query the progress and status of the feed sync using anchorectl.
# anchorectl feed list
 ✔ List feed
┌─────────────────┬────────────────────┬─────────┬──────────────────────┬──────────────┐
│ FEED            │ GROUP              │ ENABLED │ LAST SYNC            │ RECORD COUNT │
├─────────────────┼────────────────────┼─────────┼──────────────────────┼──────────────┤
│ vulnerabilities │ github:composer    │ true    │ 2023-08-21T16:41:04Z │ 2148         │
│ vulnerabilities │ github:gem         │ true    │ 2023-08-21T16:41:04Z │ 700          │
│ vulnerabilities │ github:go          │ true    │ 2023-08-21T16:41:04Z │ 1176         │
│ vulnerabilities │ github:java        │ true    │ 2023-08-21T16:41:04Z │ 3848         │
│ vulnerabilities │ github:npm         │ true    │ 2023-08-21T16:41:04Z │ 3450         │
│ vulnerabilities │ github:nuget       │ true    │ 2023-08-21T16:41:04Z │ 496          │
│ vulnerabilities │ github:python      │ true    │ 2023-08-21T16:41:04Z │ 1966         │
│ vulnerabilities │ github:rust        │ true    │ 2023-08-21T16:41:04Z │ 628          │
│ vulnerabilities │ nvd                │ true    │ 2023-08-21T16:41:04Z │ 223049       │
│ vulnerabilities │ alpine:3.10        │ true    │ 2023-08-21T16:41:04Z │ 2321         │
│ vulnerabilities │ alpine:3.11        │ true    │ 2023-08-21T16:41:04Z │ 2659         │
│ vulnerabilities │ alpine:3.12        │ true    │ 2023-08-21T16:41:04Z │ 3193         │
│ vulnerabilities │ alpine:3.13        │ true    │ 2023-08-21T16:41:04Z │ 3684         │
│ vulnerabilities │ alpine:3.14        │ true    │ 2023-08-21T16:41:04Z │ 4265         │
│ vulnerabilities │ alpine:3.15        │ true    │ 2023-08-21T16:41:04Z │ 4760         │
│ vulnerabilities │ alpine:3.16        │ true    │ 2023-08-21T16:41:04Z │ 5146         │
│ vulnerabilities │ alpine:3.17        │ true    │ 2023-08-21T16:41:04Z │ 5399         │
│ vulnerabilities │ alpine:3.18        │ true    │ 2023-08-21T16:41:04Z │ 5566         │
│ vulnerabilities │ alpine:3.2         │ true    │ 2023-08-21T16:41:04Z │ 305          │
│ vulnerabilities │ alpine:3.3         │ true    │ 2023-08-21T16:41:04Z │ 470          │
│ vulnerabilities │ alpine:3.4         │ true    │ 2023-08-21T16:41:04Z │ 679          │
│ vulnerabilities │ alpine:3.5         │ true    │ 2023-08-21T16:41:04Z │ 902          │
│ vulnerabilities │ alpine:3.6         │ true    │ 2023-08-21T16:41:04Z │ 1075         │
│ vulnerabilities │ alpine:3.7         │ true    │ 2023-08-21T16:41:04Z │ 1461         │
│ vulnerabilities │ alpine:3.8         │ true    │ 2023-08-21T16:41:04Z │ 1671         │
│ vulnerabilities │ alpine:3.9         │ true    │ 2023-08-21T16:41:04Z │ 1955         │
│ vulnerabilities │ alpine:edge        │ true    │ 2023-08-21T16:41:04Z │ 5571         │
│ vulnerabilities │ amzn:2             │ true    │ 2023-08-21T16:41:04Z │ 1381         │
│ vulnerabilities │ amzn:2022          │ true    │ 2023-08-21T16:41:04Z │ 276          │
│ vulnerabilities │ amzn:2023          │ true    │ 2023-08-21T16:41:04Z │ 300          │
│ vulnerabilities │ chainguard:rolling │ true    │ 2023-08-21T16:41:04Z │ 378          │
│ vulnerabilities │ debian:10          │ true    │ 2023-08-21T16:41:04Z │ 27731        │
│ vulnerabilities │ debian:11          │ true    │ 2023-08-21T16:41:04Z │ 27886        │
│ vulnerabilities │ debian:12          │ true    │ 2023-08-21T16:41:04Z │ 26675        │
│ vulnerabilities │ debian:13          │ true    │ 2023-08-21T16:41:04Z │ 26359        │
│ vulnerabilities │ debian:7           │ true    │ 2023-08-21T16:41:04Z │ 20455        │
│ vulnerabilities │ debian:8           │ true    │ 2023-08-21T16:41:04Z │ 24058        │
│ vulnerabilities │ debian:9           │ true    │ 2023-08-21T16:41:04Z │ 28240        │
│ vulnerabilities │ debian:unstable    │ true    │ 2023-08-21T16:41:04Z │ 30185        │
│ vulnerabilities │ mariner:1.0        │ true    │ 2023-08-21T16:41:04Z │ 2096         │
│ vulnerabilities │ mariner:2.0        │ true    │ 2023-08-21T16:41:04Z │ 1774         │
│ vulnerabilities │ ol:5               │ true    │ 2023-08-21T16:41:04Z │ 1255         │
│ vulnerabilities │ ol:6               │ true    │ 2023-08-21T16:41:04Z │ 1695         │
│ vulnerabilities │ ol:7               │ true    │ 2023-08-21T16:41:04Z │ 2005         │
│ vulnerabilities │ ol:8               │ true    │ 2023-08-21T16:41:04Z │ 1372         │
│ vulnerabilities │ ol:9               │ true    │ 2023-08-21T16:41:04Z │ 359          │
│ vulnerabilities │ rhel:5             │ true    │ 2023-08-21T16:41:04Z │ 6995         │
│ vulnerabilities │ rhel:6             │ true    │ 2023-08-21T16:41:04Z │ 8720         │
│ vulnerabilities │ rhel:7             │ true    │ 2023-08-21T16:41:04Z │ 8452         │
│ vulnerabilities │ rhel:8             │ true    │ 2023-08-21T16:41:04Z │ 4828         │
│ vulnerabilities │ rhel:9             │ true    │ 2023-08-21T16:41:04Z │ 1752         │
│ vulnerabilities │ sles:11            │ true    │ 2023-08-21T16:41:04Z │ 594          │
│ vulnerabilities │ sles:11.1          │ true    │ 2023-08-21T16:41:04Z │ 6125         │
│ vulnerabilities │ sles:11.2          │ true    │ 2023-08-21T16:41:04Z │ 3291         │
│ vulnerabilities │ sles:11.3          │ true    │ 2023-08-21T16:41:04Z │ 7081         │
│ vulnerabilities │ sles:11.4          │ true    │ 2023-08-21T16:41:04Z │ 6583         │
│ vulnerabilities │ sles:12            │ true    │ 2023-08-21T16:41:04Z │ 5948         │
│ vulnerabilities │ sles:12.1          │ true    │ 2023-08-21T16:41:04Z │ 6205         │
│ vulnerabilities │ sles:12.2          │ true    │ 2023-08-21T16:41:04Z │ 8306         │
│ vulnerabilities │ sles:12.3          │ true    │ 2023-08-21T16:41:04Z │ 10161        │
│ vulnerabilities │ sles:12.4          │ true    │ 2023-08-21T16:41:04Z │ 10121        │
│ vulnerabilities │ sles:12.5          │ true    │ 2023-08-21T16:41:04Z │ 10728        │
│ vulnerabilities │ sles:15            │ true    │ 2023-08-21T16:41:04Z │ 8738         │
│ vulnerabilities │ sles:15.1          │ true    │ 2023-08-21T16:41:04Z │ 8852         │
│ vulnerabilities │ sles:15.2          │ true    │ 2023-08-21T16:41:04Z │ 8455         │
│ vulnerabilities │ sles:15.3          │ true    │ 2023-08-21T16:41:04Z │ 8753         │
│ vulnerabilities │ sles:15.4          │ true    │ 2023-08-21T16:41:04Z │ 8678         │
│ vulnerabilities │ sles:15.5          │ true    │ 2023-08-21T16:41:04Z │ 7753         │
│ vulnerabilities │ ubuntu:12.04       │ true    │ 2023-08-21T16:41:04Z │ 14934        │
│ vulnerabilities │ ubuntu:12.10       │ true    │ 2023-08-21T16:41:04Z │ 5641         │
│ vulnerabilities │ ubuntu:13.04       │ true    │ 2023-08-21T16:41:04Z │ 4117         │
│ vulnerabilities │ ubuntu:14.04       │ true    │ 2023-08-21T16:41:04Z │ 32822        │
│ vulnerabilities │ ubuntu:14.10       │ true    │ 2023-08-21T16:41:04Z │ 4437         │
│ vulnerabilities │ ubuntu:15.04       │ true    │ 2023-08-21T16:41:04Z │ 6220         │
│ vulnerabilities │ ubuntu:15.10       │ true    │ 2023-08-21T16:41:04Z │ 6489         │
│ vulnerabilities │ ubuntu:16.04       │ true    │ 2023-08-21T16:41:04Z │ 29968        │
│ vulnerabilities │ ubuntu:16.10       │ true    │ 2023-08-21T16:41:04Z │ 8607         │
│ vulnerabilities │ ubuntu:17.04       │ true    │ 2023-08-21T16:41:04Z │ 9094         │
│ vulnerabilities │ ubuntu:17.10       │ true    │ 2023-08-21T16:41:04Z │ 7900         │
│ vulnerabilities │ ubuntu:18.04       │ true    │ 2023-08-21T16:41:04Z │ 24446        │
│ vulnerabilities │ ubuntu:18.10       │ true    │ 2023-08-21T16:41:04Z │ 8368         │
│ vulnerabilities │ ubuntu:19.04       │ true    │ 2023-08-21T16:41:04Z │ 8635         │
│ vulnerabilities │ ubuntu:19.10       │ true    │ 2023-08-21T16:41:04Z │ 8416         │
│ vulnerabilities │ ubuntu:20.04       │ true    │ 2023-08-21T16:41:04Z │ 18500        │
│ vulnerabilities │ ubuntu:20.10       │ true    │ 2023-08-21T16:41:04Z │ 9979         │
│ vulnerabilities │ ubuntu:21.04       │ true    │ 2023-08-21T16:41:04Z │ 11310        │
│ vulnerabilities │ ubuntu:21.10       │ true    │ 2023-08-21T16:41:04Z │ 12627        │
│ vulnerabilities │ ubuntu:22.04       │ true    │ 2023-08-21T16:41:04Z │ 16763        │
│ vulnerabilities │ ubuntu:22.10       │ true    │ 2023-08-21T16:41:04Z │ 14506        │
│ vulnerabilities │ ubuntu:23.04       │ true    │ 2023-08-21T16:41:04Z │ 14044        │
│ vulnerabilities │ wolfi:rolling      │ true    │ 2023-08-21T16:41:04Z │ 353          │
└─────────────────┴────────────────────┴─────────┴──────────────────────┴──────────────┘
Using the Config File to Include/Exclude Feeds at System Bootstrap
The most common way to set which feeds are synced is in the config.yaml for the policy engine. By default,
the vulnerabilities, nvdv2, and github feeds are synced to provide good vulnerability matching support for a variety of Linux distros
and application package types. Normally it will not be necessary to modify that set.
To disable a feed or enable a disabled feed, modify the config.yaml’s feeds section to:
feeds:
  selective_sync:
    enabled: true
    feeds:
      vulnerabilities: true
      nvdv2: true
      github: true
      packages: false
Those boolean values can be used to enable/disable the feeds. Note that changes will require a restart of the policy engine to take effect and settng
a feed to ‘false’ will not remove any data or show in the API or via AnchoreCTL, it will simply skip updates during sync operations.
1.7.2 - Feed Synchronization
When Anchore Enterprise runs it will begin to synchronize security feed data from the Anchore feed service.
CVE data for Linux distributions such as Alpine, CentOS, Debian, Oracle, Red Hat and Ubuntu will be downloaded. The initial sync may take anywhere from 10 to 60 minutes depending on the speed of your network connection.
Checking Feed Status
Feed information can be retrieved through the API and AnchoreCTL.
# anchorectl feed list
 ✔ List feed
┌─────────────────┬────────────────────┬─────────┬──────────────────────┬──────────────┐
│ FEED            │ GROUP              │ ENABLED │ LAST SYNC            │ RECORD COUNT │
├─────────────────┼────────────────────┼─────────┼──────────────────────┼──────────────┤
│ vulnerabilities │ github:composer    │ true    │ 2023-08-21T16:41:04Z │ 2148         │
│ vulnerabilities │ github:gem         │ true    │ 2023-08-21T16:41:04Z │ 700          │
│ vulnerabilities │ github:go          │ true    │ 2023-08-21T16:41:04Z │ 1176         │
│ vulnerabilities │ github:java        │ true    │ 2023-08-21T16:41:04Z │ 3848         │
│ vulnerabilities │ github:npm         │ true    │ 2023-08-21T16:41:04Z │ 3450         │
│ vulnerabilities │ github:nuget       │ true    │ 2023-08-21T16:41:04Z │ 496          │
│ vulnerabilities │ github:python      │ true    │ 2023-08-21T16:41:04Z │ 1966         │
│ vulnerabilities │ github:rust        │ true    │ 2023-08-21T16:41:04Z │ 628          │
│ vulnerabilities │ nvd                │ true    │ 2023-08-21T16:41:04Z │ 223049       │
│ vulnerabilities │ alpine:3.10        │ true    │ 2023-08-21T16:41:04Z │ 2321         │
│ vulnerabilities │ alpine:3.11        │ true    │ 2023-08-21T16:41:04Z │ 2659         │
│ vulnerabilities │ alpine:3.12        │ true    │ 2023-08-21T16:41:04Z │ 3193         │
│ vulnerabilities │ alpine:3.13        │ true    │ 2023-08-21T16:41:04Z │ 3684         │
│ vulnerabilities │ alpine:3.14        │ true    │ 2023-08-21T16:41:04Z │ 4265         │
│ vulnerabilities │ alpine:3.15        │ true    │ 2023-08-21T16:41:04Z │ 4760         │
│ vulnerabilities │ alpine:3.16        │ true    │ 2023-08-21T16:41:04Z │ 5146         │
│ vulnerabilities │ alpine:3.17        │ true    │ 2023-08-21T16:41:04Z │ 5399         │
│ vulnerabilities │ alpine:3.18        │ true    │ 2023-08-21T16:41:04Z │ 5566         │
│ vulnerabilities │ alpine:3.2         │ true    │ 2023-08-21T16:41:04Z │ 305          │
│ vulnerabilities │ alpine:3.3         │ true    │ 2023-08-21T16:41:04Z │ 470          │
│ vulnerabilities │ alpine:3.4         │ true    │ 2023-08-21T16:41:04Z │ 679          │
│ vulnerabilities │ alpine:3.5         │ true    │ 2023-08-21T16:41:04Z │ 902          │
│ vulnerabilities │ alpine:3.6         │ true    │ 2023-08-21T16:41:04Z │ 1075         │
│ vulnerabilities │ alpine:3.7         │ true    │ 2023-08-21T16:41:04Z │ 1461         │
│ vulnerabilities │ alpine:3.8         │ true    │ 2023-08-21T16:41:04Z │ 1671         │
│ vulnerabilities │ alpine:3.9         │ true    │ 2023-08-21T16:41:04Z │ 1955         │
│ vulnerabilities │ alpine:edge        │ true    │ 2023-08-21T16:41:04Z │ 5571         │
│ vulnerabilities │ amzn:2             │ true    │ 2023-08-21T16:41:04Z │ 1381         │
│ vulnerabilities │ amzn:2022          │ true    │ 2023-08-21T16:41:04Z │ 276          │
│ vulnerabilities │ amzn:2023          │ true    │ 2023-08-21T16:41:04Z │ 300          │
│ vulnerabilities │ chainguard:rolling │ true    │ 2023-08-21T16:41:04Z │ 378          │
│ vulnerabilities │ debian:10          │ true    │ 2023-08-21T16:41:04Z │ 27731        │
│ vulnerabilities │ debian:11          │ true    │ 2023-08-21T16:41:04Z │ 27886        │
│ vulnerabilities │ debian:12          │ true    │ 2023-08-21T16:41:04Z │ 26675        │
│ vulnerabilities │ debian:13          │ true    │ 2023-08-21T16:41:04Z │ 26359        │
│ vulnerabilities │ debian:7           │ true    │ 2023-08-21T16:41:04Z │ 20455        │
│ vulnerabilities │ debian:8           │ true    │ 2023-08-21T16:41:04Z │ 24058        │
│ vulnerabilities │ debian:9           │ true    │ 2023-08-21T16:41:04Z │ 28240        │
│ vulnerabilities │ debian:unstable    │ true    │ 2023-08-21T16:41:04Z │ 30185        │
│ vulnerabilities │ mariner:1.0        │ true    │ 2023-08-21T16:41:04Z │ 2096         │
│ vulnerabilities │ mariner:2.0        │ true    │ 2023-08-21T16:41:04Z │ 1774         │
│ vulnerabilities │ ol:5               │ true    │ 2023-08-21T16:41:04Z │ 1255         │
│ vulnerabilities │ ol:6               │ true    │ 2023-08-21T16:41:04Z │ 1695         │
│ vulnerabilities │ ol:7               │ true    │ 2023-08-21T16:41:04Z │ 2005         │
│ vulnerabilities │ ol:8               │ true    │ 2023-08-21T16:41:04Z │ 1372         │
│ vulnerabilities │ ol:9               │ true    │ 2023-08-21T16:41:04Z │ 359          │
│ vulnerabilities │ rhel:5             │ true    │ 2023-08-21T16:41:04Z │ 6995         │
│ vulnerabilities │ rhel:6             │ true    │ 2023-08-21T16:41:04Z │ 8720         │
│ vulnerabilities │ rhel:7             │ true    │ 2023-08-21T16:41:04Z │ 8452         │
│ vulnerabilities │ rhel:8             │ true    │ 2023-08-21T16:41:04Z │ 4828         │
│ vulnerabilities │ rhel:9             │ true    │ 2023-08-21T16:41:04Z │ 1752         │
│ vulnerabilities │ sles:11            │ true    │ 2023-08-21T16:41:04Z │ 594          │
│ vulnerabilities │ sles:11.1          │ true    │ 2023-08-21T16:41:04Z │ 6125         │
│ vulnerabilities │ sles:11.2          │ true    │ 2023-08-21T16:41:04Z │ 3291         │
│ vulnerabilities │ sles:11.3          │ true    │ 2023-08-21T16:41:04Z │ 7081         │
│ vulnerabilities │ sles:11.4          │ true    │ 2023-08-21T16:41:04Z │ 6583         │
│ vulnerabilities │ sles:12            │ true    │ 2023-08-21T16:41:04Z │ 5948         │
│ vulnerabilities │ sles:12.1          │ true    │ 2023-08-21T16:41:04Z │ 6205         │
│ vulnerabilities │ sles:12.2          │ true    │ 2023-08-21T16:41:04Z │ 8306         │
│ vulnerabilities │ sles:12.3          │ true    │ 2023-08-21T16:41:04Z │ 10161        │
│ vulnerabilities │ sles:12.4          │ true    │ 2023-08-21T16:41:04Z │ 10121        │
│ vulnerabilities │ sles:12.5          │ true    │ 2023-08-21T16:41:04Z │ 10728        │
│ vulnerabilities │ sles:15            │ true    │ 2023-08-21T16:41:04Z │ 8738         │
│ vulnerabilities │ sles:15.1          │ true    │ 2023-08-21T16:41:04Z │ 8852         │
│ vulnerabilities │ sles:15.2          │ true    │ 2023-08-21T16:41:04Z │ 8455         │
│ vulnerabilities │ sles:15.3          │ true    │ 2023-08-21T16:41:04Z │ 8753         │
│ vulnerabilities │ sles:15.4          │ true    │ 2023-08-21T16:41:04Z │ 8678         │
│ vulnerabilities │ sles:15.5          │ true    │ 2023-08-21T16:41:04Z │ 7753         │
│ vulnerabilities │ ubuntu:12.04       │ true    │ 2023-08-21T16:41:04Z │ 14934        │
│ vulnerabilities │ ubuntu:12.10       │ true    │ 2023-08-21T16:41:04Z │ 5641         │
│ vulnerabilities │ ubuntu:13.04       │ true    │ 2023-08-21T16:41:04Z │ 4117         │
│ vulnerabilities │ ubuntu:14.04       │ true    │ 2023-08-21T16:41:04Z │ 32822        │
│ vulnerabilities │ ubuntu:14.10       │ true    │ 2023-08-21T16:41:04Z │ 4437         │
│ vulnerabilities │ ubuntu:15.04       │ true    │ 2023-08-21T16:41:04Z │ 6220         │
│ vulnerabilities │ ubuntu:15.10       │ true    │ 2023-08-21T16:41:04Z │ 6489         │
│ vulnerabilities │ ubuntu:16.04       │ true    │ 2023-08-21T16:41:04Z │ 29968        │
│ vulnerabilities │ ubuntu:16.10       │ true    │ 2023-08-21T16:41:04Z │ 8607         │
│ vulnerabilities │ ubuntu:17.04       │ true    │ 2023-08-21T16:41:04Z │ 9094         │
│ vulnerabilities │ ubuntu:17.10       │ true    │ 2023-08-21T16:41:04Z │ 7900         │
│ vulnerabilities │ ubuntu:18.04       │ true    │ 2023-08-21T16:41:04Z │ 24446        │
│ vulnerabilities │ ubuntu:18.10       │ true    │ 2023-08-21T16:41:04Z │ 8368         │
│ vulnerabilities │ ubuntu:19.04       │ true    │ 2023-08-21T16:41:04Z │ 8635         │
│ vulnerabilities │ ubuntu:19.10       │ true    │ 2023-08-21T16:41:04Z │ 8416         │
│ vulnerabilities │ ubuntu:20.04       │ true    │ 2023-08-21T16:41:04Z │ 18500        │
│ vulnerabilities │ ubuntu:20.10       │ true    │ 2023-08-21T16:41:04Z │ 9979         │
│ vulnerabilities │ ubuntu:21.04       │ true    │ 2023-08-21T16:41:04Z │ 11310        │
│ vulnerabilities │ ubuntu:21.10       │ true    │ 2023-08-21T16:41:04Z │ 12627        │
│ vulnerabilities │ ubuntu:22.04       │ true    │ 2023-08-21T16:41:04Z │ 16763        │
│ vulnerabilities │ ubuntu:22.10       │ true    │ 2023-08-21T16:41:04Z │ 14506        │
│ vulnerabilities │ ubuntu:23.04       │ true    │ 2023-08-21T16:41:04Z │ 14044        │
│ vulnerabilities │ wolfi:rolling      │ true    │ 2023-08-21T16:41:04Z │ 353          │
└─────────────────┴────────────────────┴─────────┴──────────────────────┴──────────────┘
This command will report list the feeds synchronized by Anchore Enterprise, last sync time and current record count.
Note: Time is reported as UTC, not local time.
Manually initiating feed sync
After the initial sync has completed the system will run an incremental sync at a user defined period, by default every 4 hours. At any time a feed sync can be initiated through the API or AnchoreCTL.
A sync operation can be manually initiated by running the system feeds sync command however this should not be required under normal operation.
# anchorectl feed sync
 ✔ Sync feed
┌─────────────────┬─────────┬──────────────┐
│ FEED            │ STATUS  │ TIME TO SYNC │
├─────────────────┼─────────┼──────────────┤
│ vulnerabilities │ success │ 0            │
└─────────────────┴─────────┴──────────────┘
Anchore Enterprise can be instructed to flush the current feed data and perform a full synchronization.
NOTE: Under normal circumstances this operation should not be performed since Anchore Enterprise performs regular incremental sync.
NOTE: This process may take anywhere from 10 to 60 minutes depending on the speed of your network connection, and will cause interruptions in regular operations during sync. It is included for testing and troubleshooting scenarios only.
# anchorectl feed sync --flush
 ✔ Sync feed
┌─────────────────┬─────────┬──────────────┐
│ FEED            │ STATUS  │ TIME TO SYNC │
├─────────────────┼─────────┼──────────────┤
│ vulnerabilities │ success │ 0            │
└─────────────────┴─────────┴──────────────┘
1.8 - Accounts and Users
System Initialization
When the system first initializes it creates a system service account (invisible to users) and a administrator account (admin) with a single administrator user (admin). The password for this user is set at bootstrap using a default value or an override available in the config.yaml on the catalog service (which is what initializes the db). There are two top-level keys in the config.yaml that control this bootstrap:
default_admin_password - To set the initial password (can be updated by using the API once the system is bootstrapped). Defaults to foobar if omitted or unset.
default_admin_email - To set the initial admin account email on bootstrap. Defaults to admin@myanchore if unset
Managing Accounts Using AnchoreCTL
These operations must be executed by a user in the admin account. These examples are executed from within the enterprise-api container if using the quickstart guide:
First, exec into the enterprise-api container, if using the quickstart docker-compose. For other deployment types (eg. helm chart into kubernetes), execute these commands anywhere you have AnchoreCTL installed that can reach the external API endpoint for you deployment.
docker-compose exec enterprise-api /bin/bash
To list all the currently present accounts in the system, perform the following command:
# anchorectl account list
 ✔ Fetched accounts
┌──────────┬────────────────────┬──────────┐
│ NAME     │ EMAIL              │ STATE    │
├──────────┼────────────────────┼──────────┤
│ admin    │ admin@myanchore    │ enabled  │
│ devteam1 │ [email protected] │ enabled  │
│ devteam2 │ [email protected] │ enabled  │
└──────────┴────────────────────┴──────────┘
To review the list of users for a specific account, issue the following:
# anchorectl user list --account devteam1
 ✔ Fetched users
┌───────────────┬──────────────────────┬──────────────────────┬────────┬────────┐
│ USERNAME      │ CREATED AT           │ LAST UPDATED         │ SOURCE │ TYPE   │
├───────────────┼──────────────────────┼──────────────────────┼────────┼────────┤
│ devteam1admin │ 2022-08-25T17:43:43Z │ 2022-08-25T17:43:43Z │        │ native │
└───────────────┴──────────────────────┴──────────────────────┴────────┴────────┘
Adding a New Account
To add a new account which, by default, will have no active credentials, issue the following command:
# anchorectl account add devteam1 --email [email protected]
 ✔ Added account
Name: devteam1
Email: [email protected]
State: enabled#
Note that the email address is optional and can be omitted.
At this point the account exists but contains no users. To create a user with a password, see below in the Managing Users section.
Disabling Account
Disabling an account prevents any of that account’s users from being able to perform any actions in the system. It also disabled all asynchronous updates on resources in that account, effectively freezing the state of the account and all of its resources. Disabling an account is idempotent, if it is already disabled the operation has no effect. Accounts may be re-enabled after being disabled.
Note
# anchorectl account disable devteam1
 ✔ Disabled account
State: disabled
Enabling an Account
To restore a disabled account to allow user operations and resource updates, simply enable it. This is idempotent, enabling an already enabled account has no effect.
# anchorectl account enable devteam1
 ✔ Enabled account
State: enabled
Deleting an Account
Note: Deleting an account is irreversible and will delete all of its resources (images, policies, evaluations, etc).
Deleting an account will synchronously delete all users and credentials for the account and transition the account to the deleting state. At this point the system will begin reaping all resources for the account. Once that reaping process is complete, the account record itself is deleted. An account must be in a disabled state prior to deletion. Failure to be in this state results in an error:
# anchorectl account delete devteam1
error: 1 error occurred:
	* unable to delete account:
{
  "detail": {
    "error_codes": []
  },
  "httpcode": 400,
  "message": "Invalid account state change requested. Cannot go from state enabled to state deleting"
}
So, first you must disable the account, as shown above. Once disabled:
# anchorectl account disable devteam1
 ✔ Disabled account
State: disabled

# anchorectl account delete devteam1
 ✔ Deleted account
No results

# anchorectl account get devteam1
 ✔ Fetched account
Name: devteam1
Email: [email protected]
State: deleting
Managing Users Using AnchoreCTL
Users exist within accounts, but usernames themselves are globally unique since they are used for authenticating api requests. User management can be performed by any user in the admin account in the default Anchore Enterprise configuration using the native authorizer. For more information on configuring other authorization plugins see: Authorization Plugins and Configuration.
Create User in a User-Type Account
To create a new user credential within a specified account, you can issue the following command. Note that the ‘role’ assigned will dictate the API/operation level permissions granted to this new user. See help output for a list of available roles, or for more information you can review roles and associated permissions via the Anchore Enterprise UI. In the following example, we’re granting the new user the ‘full-control’ role, which gives the credential full access to operations within the ‘devteam1’ account namespace.
# ANCHORECTL_USER_PASSWORD=devteam1adminp4ssw0rd anchorectl user add --account devteam1 devteam1admin --role full-control
 ✔ Added user                                                                                                                                                                                                                                                devteam1admin
Username: devteam1admin
Created At: 2022-08-25T17:50:18Z
Last Updated: 2022-08-25T17:50:18Z
Source:
Type: native

# anchorectl user list --account devteam1
 ✔ Fetched users
┌───────────────┬──────────────────────┬──────────────────────┬────────┬────────┐
│ USERNAME      │ CREATED AT           │ LAST UPDATED         │ SOURCE │ TYPE   │
├───────────────┼──────────────────────┼──────────────────────┼────────┼────────┤
│ devteam1admin │ 2022-08-25T17:50:18Z │ 2022-08-25T17:50:18Z │        │ native │
└───────────────┴──────────────────────┴──────────────────────┴────────┴────────┘
That user may now use the API:
# ANCHORECTL_USERNAME=devteam1admin ANCHORECTL_PASSWORD=devteam1adminp4ssw0rd ANCHORECTL_ACCOUNT=devteam1 anchorectl user list
 ✔ Fetched users
┌───────────────┬──────────────────────┬──────────────────────┬────────┬────────┐
│ USERNAME      │ CREATED AT           │ LAST UPDATED         │ SOURCE │ TYPE   │
├───────────────┼──────────────────────┼──────────────────────┼────────┼────────┤
│ devteam1admin │ 2022-08-25T17:50:18Z │ 2022-08-25T17:50:18Z │        │ native │
└───────────────┴──────────────────────┴──────────────────────┴────────┴────────┘
Deleting a User
Using the admin credential, or a credential that has a user management role assigned for an account, you can delete a user with the following command. In this example, we’re using the admin credential to delete a user in the ‘devteam1’ account:
ANCHORECTL_USERNAME=admin ANCHORECTL_ACCOUNT=admin ANCHORECTL_PASSWORD=foobar anchorectl user delete devteam1admin --account devteam1
 ✔ Deleted user
No results
Updating a User Password
Note that only system admins can execute this for a different user/account.
As an admin, to reset another users credentials:
# ANCHORECTL_USER_PASSWORD=n3wp4ssw0rd anchorectl user set-password devteam1admin --account devteam1
 ✔ User password set
Type: password
Value: ***********
Created At: 2022-08-25T17:58:32Z
To update your own password:
# ANCHORECTL_USERNAME=devteam1admin ANCHORECTL_PASSWORD=existingp4ssw0rd ANCHORECTL_ACCOUNT=devteam1 anchorectl user set-password devteam1admin
 ❖ Enter new user password  : ●●●●●●●●●●●
 ❖ Retype new user password : ●●●●●●●●●●●
 ✔ User password set
Type: password
Value: ***********
Created At: 2022-08-25T18:00:35Z
Or, to perform the operation fully-scripted, you can set the new password as an environment variable:
ANCHORECTL_USERNAME=devteam1admin ANCHORECTL_PASSWORD=existingp4ssw0rd ANCHORECTL_ACCOUNT=devteam1 ANCHORECTL_USER_PASSWORD=n3wp4ssw0rd anchorectl user set-password devteam1admin
 ✔ User password set
Type: password
Value: ***********
Created At: 2022-08-25T18:01:19Z
1.9 - Event Log
Introduction
The event log subsystem provides the users with a mechanism to inspect asynchronous events occurring across various Anchore Enterprise services. Anchore events include periodically triggered activities such as vulnerability data feed syncs in the policy-engine service, image analysis failures originating from the analyzer service, and other informational or system fault events. The catalog service may also generate events for any repositories or image tags that are being watched, when the engine encounters connectivity, authentication, authorization or other errors in the process of checking for updates. The event log is aimed at troubleshooting most common failure scenarios (especially those that happen during asynchronous engine operations) and to pinpoint the reasons for failures, that can be used subsequently to help with corrective actions. Events can be cleared from anchore-engine in bulk or individually.
The Anchore events (drawn from the event log) can be accessed through the Anchore Enterprise API and AnchoreCTL, or can be emitted as webhooks if your Anchore Enterprise is configured to send webhook notifications. For API usage refer to the document on using the Anchore Enterprise API.
Accessing Events
The anchorectl command can be used to list events and filter through the results, get the details for a specific event and delete events matching certain criteria.
# anchorectl event --help
Event related operations

Usage:
   event [command]

Available Commands:
  delete      Delete an event by its ID or set of filters
  get         Lookup an event by its event ID
  list        Returns a paginated list of events in the descending order of their occurrence

Flags:
  -h, --help   help for event

Use " event [command] --help" for more information about a command.

For help regarding global flags, run --help on the root command
For a list of the most recent events:
anchorectl event list
 ✔ List events
┌──────────────────────────────────┬──────────────────────────────────────────────┬───────┬─────────────────────────────────────────────────────────────────────────┬─────────────────┬────────────────┬────────────────────┬─────────────────────────────┐
│ UUID                             │ EVENT TYPE                                   │ LEVEL │ RESOURCE ID                                                             │ RESOURCE TYPE   │ SOURCE SERVICE │ SOURCE HOST        │ TIMESTAMP                   │
├──────────────────────────────────┼──────────────────────────────────────────────┼───────┼─────────────────────────────────────────────────────────────────────────┼─────────────────┼────────────────┼────────────────────┼─────────────────────────────┤
│ 8c179a3b27a543fe9285cf4feb65561d │ system.image_analysis.registry_lookup_failed │ error │ docker.io/alpine:3.4                                                    │ image_reference │ catalog        │ anchore-quickstart │ 2022-08-24T23:08:30.54001Z  │
│ 48c18a84575d45efbf5b41e0f3a87177 │ system.image_analysis.registry_lookup_failed │ error │ docker.io/alpine:latest                                                 │ image_reference │ catalog        │ anchore-quickstart │ 2022-08-24T23:08:30.510193Z │
│ f6084efd159c43a1a0518b6df5e58505 │ system.image_analysis.registry_lookup_failed │ error │ docker.io/alpine:3.12                                                   │ image_reference │ catalog        │ anchore-quickstart │ 2022-08-24T23:08:30.480625Z │
│ 4464b8f83df046388152067122c03610 │ system.image_analysis.registry_lookup_failed │ error │ docker.io/alpine:3.8                                                    │ image_reference │ catalog        │ anchore-quickstart │ 2022-08-24T23:08:30.450983Z │
...
│ 60f14821ff1d407199bc0bde62f537df │ system.image_analysis.restored_from_archive  │ info  │ sha256:89020cd33be2767f3f894484b8dd77bc2e5a1ccc864350b92c53262213257dfc │ image_digest    │ catalog        │ anchore-quickstart │ 2022-08-24T22:53:12.662535Z │
│ cd749a99dca8493889391ae549d1bbc7 │ system.analysis_archive.image_archived       │ info  │ sha256:89020cd33be2767f3f894484b8dd77bc2e5a1ccc864350b92c53262213257dfc │ image_digest    │ catalog        │ anchore-quickstart │ 2022-08-24T22:48:45.719941Z │
...
└──────────────────────────────────┴──────────────────────────────────────────────┴───────┴─────────────────────────────────────────────────────────────────────────┴─────────────────┴────────────────┴────────────────────┴─────────────────────────────┘
Note: Events are ordered by the timestamp of their occurrence, the most recent events are at the top of the list and the least recent events at the bottom.
There are a number of ways to filter the event list output (see anchorectl event list --help for filter options):
For troubleshooting events related to a specific event type:
# anchorectl event list --event-type system.analysis_archive.image_archive_failed
 ✔ List events
┌──────────────────────────────────┬──────────────────────────────────────────────┬───────┬──────────────┬───────────────┬────────────────┬────────────────────┬────────────────────────────┐
│ UUID                             │ EVENT TYPE                                   │ LEVEL │ RESOURCE ID  │ RESOURCE TYPE │ SOURCE SERVICE │ SOURCE HOST        │ TIMESTAMP                  │
├──────────────────────────────────┼──────────────────────────────────────────────┼───────┼──────────────┼───────────────┼────────────────┼────────────────────┼────────────────────────────┤
│ 35114639be6c43a6b79d1e0fef71338a │ system.analysis_archive.image_archive_failed │ error │ nginx:latest │ image_digest  │ catalog        │ anchore-quickstart │ 2022-08-24T22:48:23.18113Z │
└──────────────────────────────────┴──────────────────────────────────────────────┴───────┴──────────────┴───────────────┴────────────────┴────────────────────┴────────────────────────────┘
To filter events by level such as ERROR or INFO:
anchorectl event list --level info
 ✔ List events
┌──────────────────────────────────┬─────────────────────────────────────────────┬───────┬─────────────────────────────────────────────────────────────────────────┬───────────────┬────────────────┬────────────────────┬─────────────────────────────┐
│ UUID                             │ EVENT TYPE                                  │ LEVEL │ RESOURCE ID                                                             │ RESOURCE TYPE │ SOURCE SERVICE │ SOURCE HOST        │ TIMESTAMP                   │
├──────────────────────────────────┼─────────────────────────────────────────────┼───────┼─────────────────────────────────────────────────────────────────────────┼───────────────┼────────────────┼────────────────────┼─────────────────────────────┤
│ 60f14821ff1d407199bc0bde62f537df │ system.image_analysis.restored_from_archive │ info  │ sha256:89020cd33be2767f3f894484b8dd77bc2e5a1ccc864350b92c53262213257dfc │ image_digest  │ catalog        │ anchore-quickstart │ 2022-08-24T22:53:12.662535Z │
│ cd749a99dca8493889391ae549d1bbc7 │ system.analysis_archive.image_archived      │ info  │ sha256:89020cd33be2767f3f894484b8dd77bc2e5a1ccc864350b92c53262213257dfc │ image_digest  │ catalog        │ anchore-quickstart │ 2022-08-24T22:48:45.719941Z │
...
Note: Event listing response is paginated, anchorectl displays the first 100 events matching the filters. For all the results use the –all flag.
All available options for listing events:
# anchorectl event list --help
Returns a paginated list of events in the descending order of their occurrence. Optional query parameters may be used for filtering results

Usage:
   event list [flags]

Flags:
      --all                    return all events (env: ANCHORECTL_EVENT_ALL)
      --before string          return events that occurred before the ISO8601 formatted UTC timestamp
                               (env: ANCHORECTL_EVENT_BEFORE)
      --event-type string      filter events by a prefix match on the event type (e.g. "user.image.")
                               (env: ANCHORECTL_EVENT_TYPE)
  -h, --help                   help for list
      --host string            filter events by the originating host ID (env: ANCHORECTL_EVENT_SOURCE_HOST_ID)
      --level string           filter events by the level - INFO or ERROR (env: ANCHORECTL_EVENT_LEVEL)
  -o, --output string          the format to show the results (allowable: [text json json-raw id]; env: ANCHORECTL_FORMAT) (default "text")
      --page int32             return the nth page of results starting from 1. Defaults to first page if left empty
                               (env: ANCHORECTL_PAGE)
      --resource-type string   filter events by the type of resource - tag, imageDigest, repository etc
                               (env: ANCHORECTL_EVENT_RESOURCE_TYPE)
      --service string         filter events by the originating service (env: ANCHORECTL_EVENT_SOURCE_SERVICE_NAME)
      --since string           return events that occurred after the ISO8601 formatted UTC timestamp
                               (env: ANCHORECTL_EVENT_SINCE)

For help regarding global flags, run --help on the root command
Event listing displays a brief summary of the event, to get more detailed information about the event such as the host where the event has occurred or the underlying the error:
# anchorectl event get c31eb023c67a4c9e95278473a026970c
 ✔ Fetched event
UUID: c31eb023c67a4c9e95278473a026970c
Event:
  Event Type: system.image_analysis.registry_lookup_failed
  Level: error
  Message: Referenced image not found in registry
  Resource:
    Resource ID: docker.io/aerospike:latest
    Resource Type: image_reference
    User Id: admin
  Source:
    Source Service: catalog
    Base Url: http://catalog:8228
    Source Host: anchore-quickstart
    Request Id:
  Timestamp: 2022-08-24T22:08:28.811441Z
  Category:
  Details: cannot fetch image digest/manifest from registry
Created At: 2022-08-24T22:08:28.812749Z
Clearing Events
Events can be cleared/deleted from the system in bulk or individually. Bulk deletion allows for specifying filters to clear the events within a certain time window. To delete all events from the system:
# anchorectl event delete --all
Use the arrow keys to navigate: ↓ ↑ → ←
? Are you sure you want to delete all events:
  ▸ Yes
    No
 ⠙ Deleting event
c31eb023c67a4c9e95278473a026970c
329ff24aa77549458e2656f1a6f4c98f
649ba60033284b87b6e3e7ab8de51e48
4010f105cf264be6839c7e8ca1a0c46e
...
Delete events before a specified timestamp (can also use --since instead of --before to delete events that were generated after a specified timestamp):
# anchorectl event delete --before 2022-08-24T22:08:28.629543Z
 ✔ Deleted event
ce26f1fa1baf4adf803d35c86d7040b7
081394b6e62f4708a10e521a960c54d7
d21b587dea5844cc9c330ba2b3d02d2e
7784457e6bf84427a175658f134f3d6a
...
Delete a specific event:
# anchorectl event delete fa110d517d2e43faa8d8e2dfbb0596af
 ✔ Deleted event
fa110d517d2e43faa8d8e2dfbb0596af
Sending Events as Webhook Notifications
In addition to access via API and AnchoreCTL, the Anchore Enterprise may be configured to send notifications for events as they are generated in the system via its webhook subsystem. Webhook notifications for event log records is turned off by default. To turn enable the ’event_update’ webhook, uncomment the ’event_log’ section under ‘services->catalog’ in config.yaml, as in the following example:
services:
  ...
  catalog:
    ...
    event_log:
      notification:
        enabled: True
        # (optional) notify events that match these levels. If this section is commented, notifications for all events are sent
        level:
        - error
Note: In order for events to be sent via webhook notifications, you’ll need to ensure that the webhook subsystem is configured in config.yaml (if it isn’t already) - refer to the document on subscriptions and notifications for information on how to enable webhooks in Anchore Enterprise. Event notifications will be sent to ’event_update’ webhook endpoint if it is defined, and the ‘general’ webhook endpoint otherwise.
2 - Using the Anchore Enterprise UI
The Anchore Enterprise UI client can be used to scan repositories and images, edit policies, manage users accounts and roles via RBAC, and view and generate security vulnerability and policy evaluation reports.
If you have not installed the Anchore Enterprise UI, please refer to the installation guide.
To jump to a particular guide, select from the following below:
2.1 - Usine Dashboard
Overview
The Dashboard is your configurable landing page where insights into the collective status of your container image environment can be displayed through various widgets. Utilizing the Enterprise Reporting Service, the widgets are hydrated with metrics which are generated and updated on a cycle, the duration of which is determined by application configuration.
Note: Because the reporting data cycle is configurable, the results shown in this view may not precisely reflect actual analysis output at any given time.
For more information on how to modify this cycle or the Reporting Service in general, please refer to the Reporting Service.
The following sections in this document describe how to add widgets to the dashboard and how to customize the dashboard layout to your preference.
To add a new widget, click the Add New Widget button present in the Dashboard view. Or, if no widgets are defined, click the Let’s add one! button shown.
Upon doing so, a modal will appear with several properties described below:
| Property | Description |
|---|
| Name | The name shown within the Widget’s header. |
| Mode | ‘Compact’ a widget to keep data easily digestable at a glance. ‘Expand’ to view how your data has evolved over a configurable time period. |
| Collection | The collection of tags you’re interested in. Toggle to view metrics for all tags - including historical ones. |
| Time Series Settings | The time period you wish to view metrics for within the expanded mode. |
| Type | The category of information such as ‘Vulnerabilities’ or ‘Policy Evaluations’ which denotes what metrics are capable of being shown. |
| Metrics | The list of metrics available based on Type. |
Once you enter the required properties and click OK, the widget will be created and any metrics needed to hydrate your Dashboard will be fetched and updated.
Note: All fields except Type are editable by clicking the button shown on the top right of the header when hovering over a widget.
Viewing Results
The Reporting Service at its core aggregates data on resources across accounts and generates metrics. These metrics, in turn, fuel the Dashboard’s mission to provide actionable items straight to the user - that’s you!
Leverage these results to dive into the exact reason for a failed policy evaluation or the cause and fix of a critical vulnerability.
Vulnerabilities
Vulnerabilities are grouped and colored by severity. Critical, High, and Medium vulnerabilities are included by default but you can toggle which ones are relevant to your interests by clicking the button.
Clicking one of these metrics navigates you to a view (shown below) where you can browse the filtered set of vulnerabilities matching that severity.
For more info on a particular vulnerability, click on its corresponding button visible in the Links column. To view the exact tags affected, drill down to a specific repository by expanding the arrows ().
View that tag’s in-depth analysis by clicking on the value within its Image Digest column.
Policy Evaluations
Policy Evaluations are grouped by their evaluation outcome such as Pass or Fail and can be further filtered by the reason for that result. All reasons are included by default but as with other widget properties, they can be edited by clicking the button.
Clicking one of these results navigates you to a view (shown below) where you can browse the affected and filtered set of tags.
Dig down to a specific tag by expanding the arrow () shown on the left side of the row.
Navigate using the Image Digest value to view even more info such as the specific policy being triggered and what exactly is triggering it. If you’re interested in viewing the contents of your policy, click on the Policy ID value.
Dashboard Configuration
After populating your Dashboard with various widgets, you can easily modify the layout by using some methods explained below:
Click this icon shown in the top right or the header of a widget to Drag and Drop it into a new location.
Click this icon shown in the top right of a widget to Expand it and include a graphical representation of how your data has evolved over a time period of your choice.
Click this icon shown in the top right of a widget to Compact it into an easily digestable view of the metrics you’re interested in.
Click this icon shown in the top right of a widget to Delete it from the dashboard.
2.2 - Data Context Switching
Overview
Administrators and specially-entitled standard users are offered the ability to context switch between the image analysis data contexts of different accounts. This capability allows you to view the analysis data held inside a different account while still retaining your own user profile configuration.
When you switch data context, the data-oriented aspects of the application will change but the qualities specific to your original account—herein referred to as your actual account—remain the same. Administrators keep their original permission set and have full control within the switched account. The account availability and associated permission set for standard users is decided by the role configuration of their switching entitlement, and these roles can be additionally set to differ per account.
This feature allows users to gain insights into multiple datasets, can be used by administrators for troubleshooting purposes or to make ad-hoc modifications to the data-oriented aspects of any account, and provides standard users with an additional level and vector of access control.
This following sections in this document describes how to switch and reset data contexts—both as an administrator and as a standard user—and how administrators can assign this capability to standard users.
Administrative Users
Context switching as as an administrator is available without prior configuration, and only requires that an account other than your own be available. When you click the account button in the top-right of the screen you are presented with a menu that contains an entry called Switch Account Data Context, which will be enabled when one or more accounts other than your own are present.
Clicking this item displays a submenu that describes all currently available accounts—both active and disabled—into which you can switch context:
Your home account is represented by the label Actual. If an account is disabled, this is indicated by the label Disabled (note that only administrators can context switch into disabled accounts). The account category—administrator or standard user—is indicated by the user-type icon.
Your current data context is represented by an entry with an emphasized title and checkmark prefix. When you click an entry for a different account, the application view will switch to use the data provided by this new context. The account button and dropdown items are similarly updated to reflect this change:
You will also notice a change to the background color of the main view, which serves as a reminder that your current data context is now different than the one provided by your actual account. In addition, a button is now present on the navigation bar that allows you to immediately revert to your actual data context when clicked (you can of course also use the menu to do this):
In the above example, the analysis information now presented is exactly what a user of the standard account would see in their actual account. As an administrator, you are now free to browse and interact with this data, add tags or repositories for analysis, create policies etc., and there are no permission restrictions on any of these operations.
Note: only the analysis data context has switched, and this new state does not extend to application data items such a private registry configurations.
Standard Users
Non-administrative users can also switch context if this capability has been conferred upon them by an administrator within an RBAC-enabled environment.
When you add a new standard user (or modify an existing one) you can optionally associate them with one or more additional accounts, providing those accounts are not currently disabled. The Add a New User dialog, which is accessed from within the account editor in the Configuration > Accounts view, is shown below:
Note: If an account is currently active and available for addition, but is subsequently disabled, the standard user will not be able to switch into that account.
For each associated account you must also provide one or more RBAC roles that determine how the standard user can interact with that account after they have switched context:
For example, a user may have full-control within their actual account, but could be restricted to read-only operations after switching context. You can provide multiple different roles for different accounts, but you must provide at least one role per account association:
Account associations can also be removed by clicking the X adjacent to each role list, or by removing the labels directly from the Associate Account(s) dropdown control.
Once you are satisfied with the user configuration, click OK to create (or update) these associations. The standard user will now be able to switch account data context using the same procedure as the one described for administrators, presented earlier in this document.
2.3 - Events
Overview
The Events tab is your gateway to current and historical activity happening in your system. View various events such as policy evaluation and vulnerability updates, system errors, feed syncs, and more.
The following sections in this document describe how to view event details, how to filter for specific events you’re interested in, and how to manage events with bulk deletion.

Viewing Events
In order to view events, navigate to the Events & Notifications > View Events tab. By default, the most recent activity (up to 1000 events) is shown and is automatically updated for you every 5 minutes. Note that if you have applied any filters through the search bar, your results will need to be refreshed manually.
Top-level details such as the event’s level (whether it’s an INFO or ERROR event), type, message, and affected resource is shown. Dig in to a specific event by clicking View Details under its Actions column to expand the row.

Additional information such as the origininating service and host ID are available in the expanded row. Any details given by the service are also provided in JSON format to view or copy to clipboard.
Filtering Events

Often, you might want to search for a specific event type or events that happened after a certain time. In this case, use the Search Events bar near the top of the page to select a filter to search on. These include:
- Level
- Filter events by level - INFO or ERROR
- Event Type
- Filter events by a match on the event type (e.g. “user.image.*”)
- Since
- Return events that occurred after the timestamp
- Before
- Return events that occurred before the timestamp
- Source Servicename
- Filter events by the originating service
- Source Host ID
- Filter events by the originating host ID
- Resource Type
- Filter events by the type of resource - tag, imageDigest, repository, etc.
- Resource ID
- Filter events by the id of the resource
Once you have selected and populated the filter fields you’re interested in, click Apply Filters to search and show those filtered results.
An alternative way to filter your results is through the in-table filter input. Note that this only applies against any data already fetched. To increase what you’re filtering on, click Fetch More near the top-right of the table for up to an additional 1000 items.
To remove any filters and reset to the default view, click Clear Filters.
Deleting Events
To assist with event management, event deletion has been added in the Enterprise 2.3 release.
Deleting individual events can be done simply through clicking Delete under the Actions column and selecting Yes to confirm. Note that after deletion, events are not recoverable.
Multi-select is available for deleting multiple events at a time. Upon selecting an event using the checkbox in the far-left column, a toolbar-like component will slide in at the bottom of the table. The number of events selected is shown along with the selection type, Clear Selection, and Delete Events options.
Checking the box in the header will select all events within that page.

By default, it is viewed as a Custom selection. Choosing to select All Retrieved events auto-selects everything already fetched and present in the table (i.e. if a filter is applied, events not matching the filter are not selected but will be upon removal of the filter). In this state, deselecting an item will trigger a custom selection again.
Selecting All events will again auto-select all events already fetched and present in the table but while applying a filter may modify what’s viewable, this option is solely for clearing the entire backlog of events - including those not shown. In this state, deselecting an item will also trigger a custom selection.
Once you have selected the events you wish to remove, click Delete Events to open a modal and review up to 50 items. Any events you don’t wish to delete anymore can be deselected as well. To continue with removal, click Yes to confirm and start the process.
Note that events are account-wide and that any events removed will be mirrored across all users in the account.
2.4 - Image Analysis
Overview
In this section you will learn how to submit images for analysis using the user
interface, and how to execute a bulk removal of pending items or
previously-analyzed items from within a repository group.
Note: Only administrators and standard users with the requisite role-based
access control permissions are allowed to submit items for analysis, or remove
previously analyzed assets.
Getting Started
From within an authenticated session, click the Image Analysis button on the
navigation bar:

You will be presented with the Image Analysis view. On the right-hand side
of this view you will see the Analyze Repository and Analyze Tag buttons:

These controls allow you to add entire repositories or individual items to
the Anchore analysis queue, and to also provide details about how you would like
the analysis of these submissions to be handled on an ongoing basis. Both
options are described below in the following sections.
Analyze a Repository
After clicking the Analyze Repository button, you are presented with the
following dialog:

The following fields are required:
- Registry—for example:
docker.io - Repository—for example:
library/centos
Provided below these fields is the Watch Tags in Repository configuration
toggle. By default, when One-Time Tag Analysis is selected all tags
currently present in the repository will be analyzed; once initial analysis is
complete the repository will not be watched for future additions.
Setting the toggle to Automatically Check for Updates to Tags specifies that
the repository will be monitored for any new tag additions that take place
after the initial analysis is complete. Note that you are also able to set
this option for any submitted repository from within the Image Analysis
view.
Once you have populated the required fields and click OK, you will be
notified of the overhead of submitting this repository by way of a count that
shows the maximum number of tags detected within that repository that will be
analyzed:

You can either click Cancel to abandon the repository analysis request at
this point, or click OK to proceed, whereupon the specified repository will
be flagged for analysis.
Max image size configuration applies to repositories added via UI. See max image size
Analyze a Tag
After clicking the Analyze Tag button, you are presented with the
following dialog:

The following fields are required:
- Registry—for example,
docker.io - Repository—for example,
library/centos - Tag—for example,
latest
Note: Depending upon where the dialog was invoked, the above fields may be
pre-populated. For example, if you clicked the Analyze Tag button while
looking at a view under Image Analysis that describes a previously-analyzed
repository, the name of that repository and its associated registry will be
displayed in those fields.
Some additional options are provided on the right-hand side of the dialog:
Watch Tag—enabling this toggle specifies that the tag should be
monitored for image updates on an ongoing basis after the initial analysis
Force Reanalysis—if the specified tag has already been analyzed, you can
force re-analysis by enabling this option. You may want to force re-analysis if
you decide to add annotations (see below) after the initial analysis. This
option is ignored if the tag has not yet been analyzed.
Add Annotation—annotations are optional key-pair values that can be
added to the image metadata. They are visible within the Overview tab of
the Image Analysis view once the image has been analyzed, as well as from
within the payload of any webhook notification from Anchore that contains image
information.
Once you have populated the required fields and click OK, the specified tag
will be scheduled for analysis.
Max image size configuration applies to images added via UI. See max image size
Note: Anchore will attempt to download images from any registry without
requiring further configuration. However, if your registry needs authentication
then the corresponding credentials will need to be defined. See Configuring
Registries for more information.
Repository Deletion
Shown below is an example of a repository view under Image Analysis:

From a repository view you can carry out actions relating to the bulk removal of
items in that repository. The Analysis Cancellation / Repository Removal
control is provided in this view, adjacent to the analysis controls:

After clicking this button you are presented with the following options:
Cancel Images Currently Pending Analysis—this option is only enabled if
you have one or more tags in the repository view that are currently scheduled
for analysis. When invoked, all pending items will be removed from the queue.
This option is particularly useful if you have selected a repository for
analysis that contains many tags, and the overall analysis operation is
taking longer than initially expected.
Note: If there is at least one item present in the repository that is
not pending analysis, you will be offered the opportunity to decide if you
want the repository to be watched after this operation is complete.
Remove Repository and Analyzed Items—In order to remove a repository from
the repository view in its entirety, all items currently present within the
repository must first be removed from Anchore. When invoked, all items (in any
state of analysis) will be removed. If the repository is being watched, this
subscription is also removed.
2.5 - Kubernetes Inventory
Anchore Enterprise allows you to navigate through your Kubernetes clusters to quickly and easy asses your vulnerabilities, apply policies, and take action on them. You’ll need to configure your clusters for collection before being able to take advantage of these features. See our installation instructions to get setup.
Watching Clusters and Namespaces
Users can opt to automatically scan all the images that are deployed to a specific cluster or namespace. This is helpful to monitor
your overall security posture in your runtime and enforce policies. Before opting to subscribe to a new cluster, it’s important to ensure you have proper credentials saved in Anchore to pull the images from the registry. Also watching a new cluster can create a considerable queue of images to work through and impact other users of your Anchore Enterprise deployment.
Using Charts Filters
The charts at the top of the UI provide key contextual information about your runtime. Upon landing on the page you’ll see a summary of your policy evaluations and vulnerabilities for all your clusters. Drilling down into a cluster or namespace will update these charts to represent the data for the selected cluster and/or namespace. Additionally, users can select to only view clusters or namespaces with the selected filters. For example selecting only high and critical vulnerabilities will only show the clusters and/or namespaces that have those vulnerabilities.
Using Views
In addition to navigating your runtime inventory by clusters and namespaces, users can opt to view the images or vulnerabilities across. This is a great way to identify vulnerabilities across your runtime and asses their impact.
Assessing impact
Another important aspect of the Kubernetes Inventory UI is the ability to assess how a vulnerability in a container images impacts your environment. For every container when you see a note about it usage being seen in particular cluster and X more… you will be able to mouse over the link for a detailed list of where else that container image is being used. This is fast way to determine the “blast-radius” of a vulnerability.
Data Delays
Due to the processing required to generate the data used by the Kubernetes Inventory UI, the results displayed may not be fully up to date. The overall delay depends on the configuration of how often inventory data is collected, and how frequently your reporting data is refreshed. This is similar to delays present on the dashboard.
Policy and Account Considerations
The Kubernetes Inventory is only available for an account’s default policy. You may want to consider setting up an account specifically for tracking your Kubernetes Inventory and enforcing a policy.
2.6 - LDAP
Overview
The Lightweight Directory Access Protocol (LDAP) is a standardized and widely-used client-server protocol for accessing directory information, and can be enabled in Anchore Enterprise Client to authenticate users against an existing directory server.
In order to configure Anchore Enterprise Client for use with LDAP, the requisite information for connecting and authenticating with an LDAP directory server must first be provided by an administrator. For the purposes of determining what users can see and do once they are logged in, the administrator must also create one or more account association entries, called user mappings.
When an LDAP user authenticates, the Anchore Enterprise account associated with their session is determined by the first user mapping containing a search filter that matches the information in their LDAP record. LDAP authentication will fail if no matches are found, if the associated account is disabled, or if the user’s login credentials are incorrect.
The following sections in this document describe how to configure the Anchore Enterprise Client for use with an LDAP directory server, how to add user mappings, and how to log in to the application as an LDAP user.
Server Connection Properties
Administrators can provide the information used to connect Anchore Enterprise Client to an LDAP server from the LDAP sidetab in the Configuration view. Please note that this sidetab is not visible to non-administrative users.
The connection property fields shown in this view are described below:
| Property | Description |
|---|
| Server URI | The ldap:// or ldaps:// URI of the LDAP directory server to query. |
| Manager DN | The distinguished name (DN) of an LDAP directory manager that the Anchore Enterprise Client can use to perform further queries about LDAP users during login. The directory manager is typically a privileged server administrator who, once authenticated, can access the LDAP record of any user intended to access the application. |
| Manager Password | The password associated with the Manager DN. |
| Base DN | The relative distinguished name in the LDAP directory tree hierarchy under which queries about users should be performed. |
After you have entered the required connection properties, click the Save button to store them. Once stored, you can click the Test button to verify that the application can authenticate with the LDAP server using the details you’ve provided.
Note: Clicking Save when no values are provided in any of the fields will disable LDAP in the application and prevent LDAP from being displayed as an authentication option on the login screen.
User Mappings
LDAP user mappings contain search filters that unite the results of searches made against the data attributes of LDAP records with account information stored in Anchore Enterprise.
When an LDAP user submits their credentials on the login page, the first match encountered will provide Anchore Enterprise Client with an associated Anchore Enterprise account that is used to define the scope of what the user can see and do once they are fully authenticated.
If a match is detected, the submitted password is then validated against the one stored inside the matched LDAP record. If the password is correct and the associated Anchore Enterprise account is not suspended, the user will be successfully logged in. If no match is found or the password is incorrect, authentication will fail.
Adding a User Mapping
User mappings can be created by administrators from inside an account within the Accounts sidetab in the Configuration view, or from the LDAP sidetab in the area below the server connection properties form.
To add a new user mapping containing an LDAP search filter, click the Add New LDAP User Mapping button—or if no user mappings are currently defined, click the Let’s add one! button in the empty table.
You will be presented a dialog, similar to the one shown below, where you can provide an LDAP search filter:
LDAP Search Filters
The LDAP search filter in each mapping provides the criteria for associating that mapping with an Anchore Enterprise account. For example:
uid=$USERNAME
In the above example, the user mapping requires that the uid (user ID) attribute in an LDAP record matches the data represented by the $USERNAME token.
The =$USERNAME string is a required entry, and the actual value of the token resolves to whatever value the user enters in the Username field when they log in to Anchore Enterprise Client.
In Microsoft® Active Directory® (AD) implementations that support the LDAP protocol, the sAMAccountName attribute is the broad equivalent of uid:
sAMAccountName=$USERNAME
Note: The submitted value of $USERNAME should always correspond to an attribute with a unique value within the LDAP user record, or one that is unique in combination with other criteria. In Active Directory, the uniqueness of sAMAccountName is enforced, whereas this may not be true for uid (which is an optional attribute in AD).
Additional filter criteria beyond the user identity can be provided to assert granular control over user access. The following examples describe filters with narrower scope:
(&(cn=$USERNAME)(|(ou:dn:=Administrative)(ou:dn:=Management)))
(&(ou=devops)(uniqueMember=uid=$USERNAME,dc=example,dc=org))
A detailed summary of the syntax and formula of LDAP search filters is beyond the scope of this document, however RFC 1558 provides a comprehensive description of how these entries are structured.
Mapping Order
By default, mappings are evaluated in priority order, with new entries being stored at the lowest priority. It can be challenging to infer the exact order of all mappings when they are spread across multiple accounts, so the table listing all current mappings the LDAP sidetab shows the priority of every item and includes the account with which they are associated. Example:

From here you can move row entries to a higher or lower order of precedence by clicking down on a hotspot () and then dragging the row up or down the list.
The priority order of user mappings determines the order in which search filters are evaluated when a user logs in. The first mapping to successfully locate an LDAP user record that matches the $USERNAME and any other criteria in its search filter will be used to determine the Anchore Enterprise account association for that user.
Once a user is located, subsequent mapping entries will be ignored, regardless of (possibly narrower) specificity, as only priority order matters here.
Test Mapping Behavior
You can evaluate the behavior of your user mappings by entering $USERNAME data (for example, the uid of a user) in the Check $USERNAME Against LDAP Mappings search field.
If an LDAP record is located that matches the search filter criteria of a mapping, you’ll be informed of which mapping provided the match, the associated Anchore Enterprise user, and the distinguished name of the user whose LDAP record was returned.
Login With LDAP Credentials
If a set of valid LDAP server connection properties have been stored by an administrator, the LDAP authentication option is activated in the application login view, in addition to the Default option of authenticating against the user records stored in Anchore Enterprise:
The value entered in the Username field will be used by the application to populate the $USERNAME token when evaluating each user mapping. The value entered in the Password field will be used to authenticate the matched user with the LDAP directory server.
Once these operations have completed, and providing the account associated with the mapping is not disabled, the user will be logged in.
2.7 - Policies
What is a policy?
A policy is composed of a set of rules that are used to perform an evaluation
on a source repository or container image. These rules include—but are not
limited to—checks on security, known vulnerabilities, configuration file
contents, the presence of credentials, manifest changes, exposed ports, or any
user defined checks.
Policies can be deployed site wide, or customized to run against specific
sources, container images, or categories of application. For additional
information, refer to the Policy
concepts section.
Once a policy has been applied to a source repository or image container, it can
return one of two results:
Rules
Each rule contained within a policy is configured with a check to perform. For
example, check if deny-listed package openssh-server present. The policy
additionally specifies the action to take place, based on the result of the
evaluation.
- STOP: Critical error that should stop the deployment by failing the policy
evaluation.
- WARN: Issue a warning.
- GO: Okay to proceed.
Policy rule checks are made up of gates and triggers. A gate is a set of
policy checks against broad categories like vulnerabilities, secret scans,
licenses, and so forth. It will include one or more triggers, which are checks
specific to the gate category.
Listing Policies
The area under the Policies sub-tab in the policy editor contains a table
that lists the policies defined within a selected policy. The numeric
indicator represents the overall number of polices currently defined in the
policy.

Adjacent to each name in the policy list is a counter that indicates the number
of rules within that policy.
Note: A lock icon next to the rule counter indicates that the policy cannot
be deleted. Policy rules that are used by policy mappings in the policy (which
will be listed under the Used By Mapping(s) column entry) cannot be deleted
until they are removed from every associated mapping.
The Tools dropdown menu in the Actions column provides options to:
Adding a New Policy
You can add new rule sets to a policy.
Click Add New Rule Set.
Select Source Repository if you want the new policy to apply to a source,
or select Container Image to have the policy apply to an image.
Type a uniqe name for the new policy (you can also add an optional
description)
and click OK.
From the Edit Source Repository Policy Rules modal, set up the policy
rules for the new policy. Start by selecting an item from the Gate
dropdown list, where each item represents a category of policy checks.
Note: If you are creating a policy rule for a source repository, only
vulnerabilities are available.

After selecting a gate item, hover over the (i) indicator next to
Gate to see additional descriptive details about the gate you have
selected.
Click the Triggers drop down and select a specific check that you want
associated with this item, such as package, vulnerability data unavailable,
and so on. Triggers may have parameters, some of which may be optional.
If any optional parameters are associated with the trigger you select, these
will also be displayed in an additional field where they can be added or
removed. Optional parameters are described in more detail in the next
section.

Select an action to apply to the policy rule. Choose STOP, WARN, or
GO. The action options are only displayed once all required parameters
have been provided, or if no mandatory parameters are required. Once an
action has been selected, the rule is added to the main list of rules
contained in the policy.
Click Save and Close.
Editing Rule Sets
Existing rule sets from a source repository or container image may be modified.
From Actions, either select Edit, or Tools > Edit Policy Rules.
You can also copy a policy, download the policy to JSON, or delete the
policy.

From the Edit Source Repository Policy Rules or Edit Container Image
Policy Rules modal (depending on whether you choose to edit a policy for a
source repository or container image), you can change the policy name and
description.
You can also change any documentation associated with individual policy rules
by editing the descriptions presented within each row of the table.

Note: If you are editing a policy rule for a source repository, only
vulnerabilities are available under Gate.
The following example shows a sophisticated policy check. The metadata gate has
a single trigger that allows checks to be performed against various attributes
of an image, including image size, architecture, and operating system
distribution:

The Attribute parameter drop-down includes a number of attributes taken from
image metadata, including the operating system distribution, number of layers,
and architecture of the image (AMD64, ARM, and so forth).
Once an attribute has been selected, the Check dropdown is used to create a
comparison expression.
The type of comparison varies based on the attribute. For example the numeric
comparison operators such as >, <, >= would be relevant for numeric field
such as size, while other operators such as not in may be useful for querying
data field such as distro.
In this example, by entering rhel centos oracle in the Value field, our
rule will check that the distro (that is, the operating system) under analysis
is not RHEL, Centos, or Oracle.

Optional Parameters
If a trigger has optional parameters, they will be automatically displayed in
the policy editor, and an editable field next to the Triggers drop-down will
show all the current selections.
You can remove unneeded optional parameters by clicking the X button
associated with each entry in the Optional Parameters list, or by clicking
the X button within each associated parameter block.
If an optional parameter is removed, it can be reapplied to the rule by clicking
the Optional Parameters field and selecting it from the resulting dropdown
list.
Editing Rules
After a rule has been added to the policy, you will see it in the the edit
policy list page as a new entry.
The final action of each rule can be modified by clicking the STOP,
WARN, or GO buttons.

Click Remove to get rid of any unwanted rules.
Click Edit to edit the policy rule again.

After modifying the existing rule, click Apply and the rule will be
updated.
When you are satisfied that all your new (or updated) rules are correct, you
can click Save new rule, and Close to update and store your policy.
2.7.1 - Policy
Introduction
The Policy Manager page shows a list of your policies. You can see the
policy names, IDs, descriptions, when they were last updated, and which policies
are active. From this view you can also create or add policies, as well as edit,
copy, delete, or download policies.

Create a New Bundle.
Create a new policy and add it to the list of policies.
To add a new policy , click Create New Bundle.

Enter a unique name, along with an optional (but recommended) description
for your new policy.

Click OK. Notice that when you create a new policy, it is
populated with two policies. DefaultPolicy is for a container image, and
DefaultSourcePolicy is for a source repository.

Start adding rules to your new policy. You can edit existing
policies, add additional policies, add new mappings or edit existing mapping
rules from either source repositories or container images, set up allow
lists, or allowed/denied images for your policy.
Refresh a Policy
Click Refresh the Bundle Data if multiple users are accessing the Policy
Manager, or if policy items are being added or removed through the API or AnchoreCTL
then you may update the list of policies.

Rename a Policy
Click Edit Name to rename the policy.

Enter the new name.
Click the green check to rename the policy.

Policy Status
As described in the
Managing Policies page, only one
policy may be set as active (default). The management view for each
policy includes a status indicator to represent the current status.
 This label shows that the policy is active
and that changes will have an immediate effect on your policy evaluation.
This label shows that the policy is active
and that changes will have an immediate effect on your policy evaluation.
 This label shows that the policy is not
currently active and that changes can be made without altering the policy
evaluation output.
This label shows that the policy is not
currently active and that changes can be made without altering the policy
evaluation output.
Navigate Back to the Bundle List
Click Policies, or use the browsers navigation buttons to navigate
back to the list of Policies.

Edit Bundle Content
You can edit the components of the policy at any time, including the
policies, allowlists, mappings, and allowed or denied images.

Policies tab:
Edit or add policies and policy rules. See the
Policies section for more
information.

Allowlists tab:
Edit or add allowlists associated with the policy. See the
Allowlists section for
more information.

Mappings tab:
Edit or add mappings and mapping rules. See the
Policy Mappings section for more
information.

Allowed / Denied Images tab:
Edit or add images that you want allowed or denied in a policy. Each of
the policy elements can be edited by selecting the appropriate tab in the
navigation bar. See the Allowed / Denied Images section for more information.

2.7.2 - Policy Mappings
Introduction
The Mapping feature of the Policy Editor creates rules that define which
policies and allowlists should be used to perform the policy evaluation of a
source repository or container image based on the registry, repository name,
and tag of the image.
The policy editor lets you set up different policies that will be used on
different images based on the use case. For example the policy applied to a
web-facing service may have different security and operational best
practices rules than a database backend service.
Mappings are set up based on the registry, repository, and tag of an image. Each
field supports wildcards. For example:
| Field | Example | Description |
|---|
| Registry | registry.example.com | Apply mapping to the registry.example.com |
| Repository | anchore/web\* | Map any repository starting with web in the anchore namespace |
| Tag | * | Map any tag |
In this example,an image named registry.example.com/anchore/webapi:latest
would match this mapping, and so the policy and allowlist configured for this
mapping would be applied.
The mappings are applied in order, from top to bottom and the system will stop
at the first match.
Note: The trusted images and denylisted images lists take precedence over
the mapping. See Allowed / Denied Images for
details.
If the policy includes no mappings, click the
 to add your first mapping.

The Add a New Mapping dialog will be displayed and includes mandatory fields
for Name, Policy, Registry, Repository and Tag. The
Allowlist(s) field is optional.

| Field | Description |
|---|
| Name | A unique name to describe the mapping. For example: Mapping for webapps. |
| Policies | Name of policy to use for evaluation. A drop down will be displayed allowing selection of a single policy. |
| Allowlist(s) | Optional: The allowlist(s) to be applied to the source repository or container image evaluation. Multiple allowlists may be applied to the same source repository or container image. |
| Registry | The name of the registry to match. Note the name should exactly match the name used to submit the source repository or container image for analysis. For example: foo.example.com:5000 is different to foo.example.com. Wildcards are supported. A single * would specify any registry. |
| Repository | The name of the repository, optionally including namespace. For example: webapp/foo. Wildcards are supported. A single _ would specify any repository. Partial names with wildcards are supported. For example: web_/\*. |
| Tag | Tags mapped by this rule. For example: latest. Wildcard are supported. A single _ would match any tag. Partial names with wildcards are supported. For example: 2018_. |
Each entry field includes an indicator showing if the current entry is valid
 or has errors
  .
.
In the following screenshot you can see multiple policy mappings have been defined
some of which include one or more allowlists.

Image evaluation is performed sequentially from top to bottom. The system will
stop at the first match so particular care should be paid to the ordering.
Mappings can be reordered using the  buttons which
will move a mapping up or down the list. Mappings may be deleted using the
buttons which
will move a mapping up or down the list. Mappings may be deleted using the
 button.
It is recommended that a final catch all mapping is applied to ensure that all
images are mapped to a policy. This catch-all mapping should specify wildcards
in the registry, repository, and tag fields.
2.7.2.1 - Container Image Mapping
Introduction
The container image policy mapping editor creates rules that define which
policies and allowlists should be used to perform the policy evaluation of an
image based on the registry, repository name, and tag of the image.
Create a new Image Container Mapping
From the Policies screen, click Mappings.
Click Add New Mapping, then select Container Images to create the mapping from a container image.

From the Add New Container Image Mapping dialog, add a name for the mapping, the policy for which the mapping will apply (added automatically), a registry, a repository, and a tag. You can optionally add an allowlist and set the position for the mapping.
Using the policy editor, you can set up different policies that will be used on different images based on use case. For example the policy applied to a web facing service may have different security and operational best practices rules than a database backend service.
Mappings are set up based on the registry, repository, and tag of an image. Each field supports wildcards. For example:
| Field | Example | Description |
|---|
| Registry | registry.example.com | Apply mapping to the registry.example.com |
| Repository | anchore/web\* | Map any repository starting with web in the anchore namespace |
| Tag | * | Map any tag |
In this example, an imaged named registry.example.com/anchore/webapi:latest would match this mapping, so the policy and allowlist configured for this mapping would be applied.
The mappings are applied in order, from top to bottom and the system will stop at the first match.
Note: The allowed images and denied images lists take precedence over the mapping. See Allowed / Denied Images for details.
The empty policy includes no mappings. Click Let’s add one! to add your first mapping.
From Add a New Container Image Mapping, fill in the mandatory fields for Name, Policy, Registry, Repository and Tag. The Allowlists and Position fields are optional. See the following table for more information about these fields.

| Field | Description |
|---|
| Name | A unique name to describe the mapping. For example: “Mapping for webapps”. |
| Position | Set the order for the new mapping. |
| Policies | Name of policy to use for evaluation. A drop down will be displayed allowing selection of a single policy. |
| Allowlist(s) | Optional: The allowlist(s) to be applied to the image evaluation. Multiple allowlists may be applied to the same image. |
| Registry | The name of the registry to match. Note the name should exactly match the name used to submit the image or repo for analysis. For example: foo.example.com:5000 is different to foo.example.com. Wildcards are supported. A single * would specify any registry. |
| Repository | The name of the repository, optionally including namespace. For example: webapp/foo. Wildcards are supported. A single * would specify any repository. Partial names with wildcards are supported. For example: web*/*. |
| Tag | Tags mapped by this rule. For example: latest. Wildcard are supported. A single * would match any tag. Partial names with wildcards are supported. For example: 2018*. |
Each entry field includes an indicator showing if the current entry is valid or has errors  .
.
Image evaluation is performed sequentially from top to bottom. The system will stop at the first match, so particular care should be paid to the ordering.
Mappings can be reordered using the buttons which will move a mapping up or down the list. Mappings may be deleted using the  button.
It is recommended that a final catch-all mapping is applied to ensure that all container images are mapped to a policy. This catch-all mapping should specify wildcards in the registry, repository, and tag fields.
2.7.2.2 - Source Repository Mapping
The source repository policy mapping editor creates rules that define which policies and allowlists should be used to perform the policy evaluation of a source repository based on the host, and repository name.

Using the policy editor organizations can set up multiple policies that will be used on different source repositories based on use case. For example the policy applied to a web facing service may have different security and operational best practices rules than a database backend service.
Mappings are set up based on the Host and Repository of a source repository. Each field supports wildcards.
Create a Source Repository Mapping
From the Policies screen, click Mappings.

Click Add New Mapping, then select Source Repositories. By selecting source repositories, you are saying you want the new policy rule to apply to a source repository.

From the Add New Source Repository Mapping dialog, add a name for the
mapping, choose the policy for which the mapping will apply, the position (optional) for the new mapping, a host (such as github.com), and a repository. You can optionally add an allowlist and set the position for the mapping.

| Field | Description |
|---|
| Name | A unique name to describe the mapping. |
| Position | Optional: Set the order for the new mapping. |
| Policies | Name of policy to use for evaluation. A drop down will be displayed allowing selection of a single policy. |
| Allowlist(s) | Optional: The allowlist(s) to be applied to the source repository evaluation. Multiple allowlists may be applied to the same source |
| Host | The name of the source host to match. For example: github.com. |
| Repository | The name of the source repository, optionally including namespace. For example: webapp/foo. Wildcards are supported. A single * would specify any repository. Partial names with wildcards are supported. For example: web*/*. |
- Click OK to create the new mapping.
2.7.3 - Managing Policies
What is a Policy
A policy container includes the following elements:
Rule Sets
A policy is made up from a set of rules that are used to perform an evaluation
on a source repository or container image. These rules can include checks on
security vulnerabilities, package allowlists, denylists, configuration file
contents, presence of credentials, manifest changes, exposed ports, or any
user defined checks. These policies can be deployed site wide or customized
for specific source repositories, container images, or categories of
applications. A policy may contain one or more named rule sets.
Allowlists
An allowlist contains one or more exceptions that can be used during policy
evaluation. For example allowing a CVE to be excluded from policy evaluation.
A policy may contain multiple allowlists.
Mappings
A policy mapping defines which policies and allowlists should be used to
perform the policy evaluation of a given source repository or container image.
A policy may contain multiple mappings including wildcard mappings that
apply to multiple elements.
Allowed Image
An allowed image defines one or more images that will always pass policy
evaluation regardless of any policy violations. Allowed images can be
specified by name, image ID, or image digest. A policy contains a
single list of allowed images.
Denied Images
A denied Images list defines one or more images that will always fail policy
evaluation. Denied images can be specified by name, image ID, or image digest.
A policy contains a single list of denied images.
Policies
The Policy Manager displays a list of policies that are loaded in the
system. Each policy has a unique name, unique ID (UUID), and an optional
description.

Anchore Enterprise supports multiple policies. The Anchore API, CLI, and CI/CD
plugins support specifying a policy when requesting an source repository or
container image evaluation. For example, the development team may use a
different set of policy checks than the operations team. In this case, the
development team would specify their policy ID as part of their policy
evaluation request.
If no policy ID is specified, then Anchore Enterprise will use the active policy
which can be considered as the default policy. Only one policy can be set as
default/active at any time. This policy will be highlighted with a green ribbon.
Note: policiess which are not marked as Active can still be explicitly
requested as part of a policy evaluation.
If multiple users are accessing the Policy Manager, or if policy are
being added or removed through the API or AnchoreCTL, then you may update the list of
policies using the clicking Refresh the Bundle Data.

The following command can be run to list policies using AnchoreCTL:
# anchorectl policy list
Create a New Policy
- To create a new, empty policy, click Create New Policy.

Add a name for the policy. This name should be unique.
Optional: You can add a description.
The following example shows a policy called test. Notice the unique Bundle
ID (UUID) that was automatically created by Anchore Enterprise.

Upload a Policy Bundle
If you have a JSON document containing an existing policy, then you can
upload it into Anchore Enterprise.
- Click Add a Local File to upload or paste a valid policy JSON.

You can drag Policy Bundle files into the dropzone. Or, you can click
the “Add a Local File” button to add from the local file system.
Click OK to perform a validation on a policy. Only validated policies may
be stored by Anchore Enterprise.
Note: The following command can be run to add policies using AnchoreCTL
# anchorectl policy add --input /path/to/my/policy/bundle.json
Edit a Policy Bundle
You can edit existing policies at any time, including the policies,
allowlists, mappings, and allowed or denied images.
- Click Edit Policy to open the policy viewer which has the
following options.
- Policies tab: Edit or add policies and policy rules. See the policies section
for more information.
- Allowlists tab: Edit or add allowlists associated with the policy.
- Mappings tab: Edit or add mappings and mapping rules. See the Policy Mappings
section for more information.
- Allowed / Denied Images tab: Edit or add images that you want allowed or
denied in a policy. Each of the policy elements can be edited by
selecting the appropriate tab in the navigation bar.
Copy an Existing Policy Bundle
If you already have a policy that you would like to use as a base for
another policy, you can make a copy of it, give it a new name, and then work
with the policies, mappings, allowlists, and allowed or denied images.
- From the Tools list, select Copy Bundle.

- Enter a unique name for the copy of the policy.

Optional: You can add a description to explain the new policy. This is
recommended.
Click OK to copy the policy.
Delete a Policy Bundle
If you no longer use a policy, you can delete it. An active (default)
policy cannot be deleted. To delete the active policy first you must mark
another policy as active.
- From the Tools menu, select Delete Bundle.

- Click Yes to confirm that you want to delete the policy.
*Warning: Once the policy is deleted, you cannot recover it.

Note: Use the following command to delete a policy using AnchoreCTL.
The policy must be referenced by its UUID. For example:
# anchorectl policy delete 4c1627b0-3cd7-4d0f-97da-00be5aa835f4
Download a Policy Bundle
- From the Tools menu, select Download to JSON.

- The JSON file is downloaded just like any other downloaded file to your
computer. Save the downloaded JSON file to your location of choice.
Note: Use the following command to download a policy using AnchoreCTL.
The policy must be referenced by its UUID. For example:
# anchorectl policy get 4c1627b0-3cd7-4d0f-97da-00be5aa835f4 --detail > policy.json
2.7.4 - Alowed / Denied Images
Introduction
You can add or edit allowed or denied images for your policy rules.
The Allowed / Denied Images tab is split into the following two sub tabs:
Allowed Images: A list of images which will always pass policy evaluation irrespective of any policies that are mapped to them.
Denied Images: A list if images which will always fail policy evaluation irrespective of any policies that are mapped to them.
Add an Allowed or Denied Image to Bundle
- If you do not have any allowed or denied images in your policy, click Let’s add one! to add them.


The workflow for adding Allowed or Denied images is identical.
- Images can be referenced in one of the following ways:
By Name: including the registry, repository and tag. For example: docker.io/library/centos:latest
The name does not have to be unique but it is recommended that the identifier is descriptive.

By Image ID: including the full image ID. For example: e934aafc22064b7322c0250f1e32e5ce93b2d19b356f4537f5864bd102e8531f

The full Image ID should be entered. This will be a 64 hex characters. There are a variety of ways to retrieve the ID of an image including using the anchorectl, Anchore UI, and Docker command.
By Image Digest: including the registry, repository and image digest of the image. For example: docker.io/library/centos@sha256:989b936d56b1ace20ddf855a301741e52abca38286382cba7f44443210e96d16

- Click OK to add the Allowed or Denied Image item to your policy.
See the following sections for more details about the Name, Image ID, and Image Digest.
For most use cases, it is recommended that the image digest is used to reference the image since an image name is ambiguous. Over time different images may be tagged with the same name.
If an image appears on both the Allowed Images and Denied Images lists, then the Denied Image takes precedence and the image will be failed.
Note: See Evaluating Images against Policies for details on image policy evaluation.
The Allowed Images list will show a list of any allowed images defined by the system includes the following fields:
Allowlist Name
A user friendly name to identify the image(s).
Type
Describes how the image has been specified. By Name, ID, or Digest.
Image
The specification used to define the image.
Actions
The actions you can set for the allowed image.
The  button can be used to copy the image specification into the clipboard.
An existing image may be deleted using the or edited by pressed the  button.
Adding an Image by Image ID
The full Image ID should be entered. This will be a 64 hex characters. There are a variety of ways to retrieve the ID of an image including using the anchorectl, Anchore UI and Docker command.
Using AnchoreCTL
$ anchorectl image get library/debian:latest | grep ID
ID: 8626492fecd368469e92258dfcafe055f636cb9cbc321a5865a98a0a6c99b8dd
Using Docker CLI
$ docker images --no-trunc debian:latest

REPOSITORY          TAG                 IMAGE ID                                                                  CREATED             SIZE
docker.io/debian    latest              sha256:8626492fecd368469e92258dfcafe055f636cb9cbc321a5865a98a0a6c99b8dd   3 days ago          101 MB
By default the docker CLI displays a short ID, the long ID is required and it can be displayed by using the –no-trunc parameter.
Note: The algorithm (sha256:) should not be entered into the Image ID field.
Adding an Image by Digest
When adding an image by Digest the following fields are required:
Registry. For example: docker.io
Repository. For example: library/debian
Digest. For example: sha256:de3eac83cd481c04c5d6c7344cd7327625a1d8b2540e82a8231b5675cef0ae5f
The full identifier for this image is: docker.io/library/debian@sha256:de3eac83cd481c04c5d6c7344cd7327625a1d8b2540e82a8231b5675cef0ae5f
Note: The tag is not used when referencing an image by digest.
There are a variety of ways to retrieve the digest of an image including using the anchorectl, Anchore UI, and Docker command.
Using AnchoreCTL
$ anchorectl image get library/debian:latest | grep Digest
Digest: sha256:7df746b3af67bbe182a8082a230dbe1483ea1e005c24c19471a6c42a4af6fa82
Using Docker CLI
$ docker images --digests debian
REPOSITORY          TAG                 DIGEST                                                                    IMAGE ID            CREATED             SIZE
docker.io/debian    latest              sha256:de3eac83cd481c04c5d6c7344cd7327625a1d8b2540e82a8231b5675cef0ae5f   8626492fecd3        1 days ago          101 MB
Note: Unlike the Image ID entry, the algorithm (sha256:) is required.
Adding an Image by Name
When adding an image by Name, the following fields are required:
Note: Wild cards are supported, so to trust all images from docker.io you would enter docker.io in the Registry field, and add a * in the Repository and Tag fields.
2.7.5 - Allowlists
Introduction
An allowlist contains one or more exceptions that can be used during policy
evaluation. For example allowing a CVE to be excluded from policy evaluation.
The Allowlist tab shows a list of allowlists present in the policy.
Allowlists are an optional element of the policy, and a policy may
contain multiple instances.
Add a New Allowlist
Click Add New Allowlist to create a new, empty allowlist.
Add a name for the allowlist. A name is required and should be unique.
Optional: Add a description. A description is recommended. Often the
description is updated as new entries are added to the allowlist to explain
any background. For example “Updated to account for false positive in glibc
library”.

Upload or Paste an Allowlist
If you have a JSON document containing an existing allowlist, then you can
upload it into Anchore Enterprise.
Click Upload / Paste Allowlist to upload an allowlist. You can also
manually edit the allowlist in the native JSON format.

Drag an allowlist file into the dropzone. Or, you can click the “Add a
Local File” button and load it from a local filesystem.
Click OK to upload the allowlist. The system will perform a validation
for the allowlist. Only validated allowlists may be stored by Anchore
Enterprise.
Copying a Allowlists
You can copy an existing allowlist, give it a new name, and use it for a policy
evaluation.
From the Tools drop down, select Copy Allowlist.

Enter a unique name for the allowlist.
Optional: Add a description. This is recommended. Often the description is
updated as new entries are added to the allowlist to explain any background.

Downloading Allowlists
You can download an existing allowlists as a JSON file. From the Tools drop
down, click Download to JSON.

Editing Allowlists
The Allowlists editor allows new allowlist entries to be created, and existing
entries to be edited or removed.

Choose an allowlist to edit, then click Edit.

Anchore Enterprise supports allowlisting any policy trigger, however the
Allowlists editor currently supports only adding Anchore Security checks,
allowing vulnerabilities to be allowlisted.
Choose a gate for the allowlist, for example, vulnerabilities.

A vulnerabilities allowlists entry includes two elements: A CVE / Vulnerability Identifier and a Package.
Enter a CVE / Vulnerability Identifier. The CVE/Vulnerability Identifier
field contains the vulnerability that should be matched by the allowlists.
This can include wildcards.

For example: CVE-2017-7246. This format should match the format of the CVEs
shown in the image vulnerabilities report. Wildcards are supported, however,
care should be taken with using wildcards to prevent allowlisting too many
vulnerabilities.
Enter a package. The package name field contains the package that should be
matched with a vulnerability. For example libc-bin.

Wildcards are also supported within the Package name field.
An allowlists entry may include entries for both the CVE and Package field
to specify an exact match, for example: Vulnerability: CVE-2005-2541
Package: tar.
In other cases, wildcards may be used where a multiple packages may match a
vulnerability. For example, where multiple packages are built from the same
source. Vulnerability: CVE-2017-9000 Package: bind-*
In this example the packages bind-utils, bind-libs and bind-license will all
be allowlisted for CVE-2017-9000.
Special care should be taken with wildcards in the CVE / Vulnerability
Identifier field. In most cases a specific vulnerability identifier will be
entered. In some exceptional cases a wild card in this field may be
appropriate.
A good example of a valid use case for a wildcard in the CVE / Vulnerability
Identifier field is the bind-license package. This package include a single
copyright text file and is included by default in all CentOS:7 images.
CVEs that are reported against the Bind project are typically applied to all
packages built from the Bind source package. So when a CVE is found in Bind
it is common to see a CVE reported against the bind-license package. To
address this use case it is useful to add an allowlists entry for any
vulnerability (*) to the bind-license package.

Optional: Click  to edit an allowlist.
Optional: Click Remove to delete an allowlist.
Ensure that all changes are saved before exiting out of the Edit Allowlists
Items Page. At that point the edits will be sent to Anchore Enterprise.
2.7.6 - Testing Policies
Introduction
The Evaluation Preview feature allows you to perform a test evaluation on an image to verify the mapping, policies and allowlists used to evaluate an image.

To test an image you should enter the name of the image, optionally including the registry if the image is not stored on docker.io In the example below an evaluate was requested for library/debian:latest because no registry was specified the default, docker.io registry was used.

Here we can see that the image was evaluated against the policy named “anchore_security_only” and the evaluate failed, the final action was Stop.
Clicking the “View Policy Test Details” will show a more detailed report.

The image was evaluating using the mapping named  and the evaluation failed as the image was found in a denylist.
The next line explains that the image had been denylisted by the No centos denylist rule, however if the image was not denylisted it would only have produced a warning instead of a failure.

The subsequent table lists the policy checks that resulted in any Warning or Stop (failure) checks.
The policy checks are performed on images already analyzed and recorded in Anchore Enterprise. If an image has been added to the system but has not yet completed analysis then the system will display the following error:

If the evaluation test is re-run after a few minutes the image will likely have completed analysis and a policy evaluation result will be returned.
If the image specified has not been analyzed by the system and has not been submitted for analysis then the following error message will be displayed.

2.8 - Configuring Registries
Introduction
In this section you will learn how to configure access to registies within the Anchore Enterprise UI.
Assumptions
- You have a running instance of Anchore Enterprise and access to the UI.
- You have the appropriate permissions to list and create registries. This means you are either a user in the admin account, or a user that is already a member of the read-write role for your account.
The UI will attempt to download images from any registry without requiring further configuration. However, if your registry requires authentication then the registry and corresponding credentials will need to be defined.
First off, after a successful login, navigate to the Configuration tab in the main menu.

Add a New Registry
In order to define a registry and its credentials, navigate to the Registries tab within Configuration. If you have not yet defined any registries, select the Let’s add one! button. Otherwise, select the Add New Registry button on the right-hand side.
Upon selection, a modal will appear:

A few items will be required:
- Registry
- Type (e.g. docker_v2 or awsecr)
- Username
- Password
As the required field values may vary depending on the type of registry and credential options, they will be covered in more depth below. A couple additional options are also provided:
Allow Self Signed
By default, the UI will only pull images from a TLS/SSL enabled registry. If the registry is protected with a self signed certificate or a certificate signed by an unknown certificate authority, you can enable this option by sliding the toggle to the right to instruct the UI not to validate the certificate.
Validate on Add
Credential validation is attempted by default upon registry addition although there may be cases where a credential can be valid but the validation routine can fail (in particular, credential validation methods are changing for public registries over time). Disabling this option by sliding the toggle to the left will instruct the UI to bypass the validation process.
Once a registry has been successfully configured, its credentials as well as the options mentioned above can be updated by clicking Edit under the Actions column. For more information on analyzing images with your newly defined registry, refer to: UI - Analyzing Images.

The instructions provided below for setting up the various registry types can also be seen inline by clicking ‘Need some help setting up your registry?’ near the bottom of the modal.
Docker V2 Regsitry
Regular docker v2 registries include dockerhub, quay.io, artifactory, docker registry v2 container, redhat public container registry, and many others. Generally, if you can execute a ‘docker login’ with a pair of credentials, Anchore can use those.
Registry
Hostname or IP of your registry endpoint, with an optional port
Ex: docker.io, mydocker.com:5000, 192.168.1.20:5000
Type
Set this to docker_v2
Username
Username that has access to the registry
Password
Password for the specified user
Amazon Web Services Registry (AWS ECR)
For Username and Password, there are three different modes that require different settings when adding an ECR registry, depending on where your Anchore Enterprise is running and how your AWS IAM settings are configured to allow access to a given ECR registry.
API Keys
Provide access/secret keys from an account or IAM user. We highly recommend using a dedicated IAM user with specific access restrictions for this mode.
Username
AWS access key
Password
AWS secret key
Local Credentials
Uses the AWS credentials found in the local execution environment for Anchore Enterprise (Ex. env vars, ~/.aws/credentials, or instance profile).
ECR Assume Role
To have Anchore Enterprise assume a specific role different from the role it currently runs within, specify a different role ARN. Anchore Enterprise will use the execution role (as in iamauto mode from the instance/task profile) to assume a different role. The execution role must have permissions to assume the role requested.
For more information, see: Working with Amazon ECR Registry Credentials
Google Container Registry (GCR)
When working with Google Container Registry, it is recommended that you use service account JSON keys rather than the short lived access tokens. Learn more about how to generate a JSON key here.
Registry
GCR registry hostname endpoint
Ex: gcr.io, us.gcr.io, eu.gcr.io, asia.gcr.io
Type
Set this to docker_v2
Username
Set this to _json_key
Password
Full JSON string of your JSOn key (the content of the key.json file you got from GCR)
For more information, see: Working with Google Container Registry (GCR) Credentials
Microsoft Azure Registry
To use an Azure Registry, you can configure Anchore to use either the admin credential(s) or a service principal. Refer to Azure documentation for differences and how to setup each.
Admin Account
Username
The username in the ‘az acr credentials show –name ’ output
Password
The password or password2 value from the ‘az acr credentials show’ command result
Service Principal
Username
The service principal app id
Password
The service principal password
For more information, see: Working with Azure Registry Credentials
2.9 - Reports
Overview
The Reports tab is your gateway to producing insights into the collective status of your container image environment based on the back-end Enterprise Reporting Service.
Note: Because the reporting data cycle is configurable, the results shown in this view may not precisely reflect actual analysis output at any given time.
For more information on how to modify this cycle or the Reporting Service in general, please refer to the Reporting Service documentation.
Report View
The Report feature provides the tools to create custom reports, set a report to run on a schedule (or store the report for future use), and get notified when they’re executed in order to receive the insights you’re interested in for account-wide artifacts.
In addition, you can create user templates (also known as custom templates) that use any of the preconfigured system templates offered with the application as their basis, or create your own templates from scratch. Templates provide the structure and filter definitions the application uses in order to generate reports.
To jump to a particular guide, select from the following below:
2.9.1 - New Reports
Overview
The New Reports tab in the Reports view is where you can create a new report, either on
an ad-hoc basis for immediate download, or for it to be saved for future use. Saved
reports can be executed immediately, scheduled, or both.
Note: The New Reports tab will be the default tab selected in the Reports view when you don’t yet have any saved reports.
Reports created in this view are based on templates. Templates provide the output structure and filter definitions the user can configure in order for the application to generate the shape of the report. Anchore Enterprise client provides immediate access to a number of preconfigured system templates that can be used as the basis for user templates. For more information on how to create and manage templates, please refer to the Templates documentation.
Creating a Report
The initial view of the New Reports tab is shown below:

In the above view you can see that the application is inviting you to select a template
from the dropdown menu. You can either select an item from this dropdown or click in the field itself and enter text in order to filter the list.
Once a template is selected, the view will change to show the available filters for the selected template. The following screenshot shows the view after selecting the Artifacts by Vulnerability template:

At this point you can click Preview Report to see the summary output and download the information, or you can refine the report by adding filters from the associated dropdown. As with the template selection, you can either select an item from the dropdown or click in the field itself and enter text in order to filter the list.

After you click the Preview Report button, you are presented with the summary output and the ability to download the report in a variety of formats:

At this point you can click any of the filters you applied in order to adjust them (or remove them entirely). The results will update automatically. If you want to add more filters you can click the [ Edit ] button and select more items from the available options and then click Preview Report again to see the updated results.
You can now optionally configure the output information by clicking the [ Configure Columns ] button. The resulting popup allows you to reorder and rename the columns, as well as remove columns you don’t want to see in the output or add columns that are not present by default:

Once you’re satisfied with the output, click Download Full Report to download the report in the selected format. The formats provided are:
- CSV - comma-separated values, with all nested objects flattened into a linear list of items
- Flat JSON - JavaScript object notation, with all nested objects flattened into a linear list of items
- Raw JSON - JavaScript object notation, with all nested objects preserved
Saving a Report
The above describes the generation of an ad-hoc report for download, which may
be all you need. However, you can also save the report for future use. To do so, click the Save Report button. The following popup will appear:

Provide a name and optional description for the report, and then select
whether you want to save the report and store results immediately, set it to run on a schedule, or both. If you select the Generate Report option, you can then select the frequency of the report generation. Once you’re satisfied with the configuration, click Save.
The saved report will be stored under Saved Reports and you will immediately be transitioned to this view on success. The features within this
view are described in the Saved Reports section.
2.9.2 - Quick Report
Overview
Generate a report utilizing the back-end Enterprise Reporting Service through a variety of formats - table, JSON, and CSV. If you’re interested in refining your results, we recommend using the plethora of optional filters provided.
Note: Because the reporting data cycle is configurable, the results shown in this view may not precisely reflect actual analysis output at any given time.
For more information on how to modify this cycle or the Reporting Service in general, please refer to the Reporting Service documentation.
The following sections in this document describe how to select a query, add optional filters, and generate a report.
Reports
Selecting a Query
To select a query, click the available dropdown present in the view and select the type of report you’re interested in generating.
Images Affected by Vulnerability
View a list of images and their various artifacts that are affected by a vulnerability. By default, a couple optional filters are provided:
| Filter | Description |
|---|
| Vulnerability Id | Vulnerability ID |
| Tag Current Only | If set to true, current tag mappings are evaluated. Otherwise, all historic tag mappings are evaluated |
Policy Compliance History by Tag
Query your policy evaluation data using this report type. By default, this report was crafted with compliance history in mind. Quite a few optional filters are provided to include historic tag mappings and historic policy evaluations from any policy that is or was set to active. More info below:
| Filter | Description |
|---|
| Registry Name | Name of the registry |
| Repository Name | Name of the repository |
| Tag Name | Name of the tag |
| Tag Current Only | If set to true, current tag mappings are evaluated. Otherwise, all historic tag mappings are evaluated |
| Policy Evaluation Latest Only | If set to true, only the most recent policy evaluation is processed. Otherwise, all historic policy evaluations are evaluated |
| Policy Active | If set to true, only the active policy at the time of this query is used. Otherwise, all historically active policies are also included. This attribute is ignored if a policy ID or digest is specified in the filter |
Note that the default filters provided are optional.
Adding Optional Filters
Once a report type has been selected, an Optional Filters dropdown becomes available with items specific to that Query. Such as those listed above, any filters considered default to that report type are also shown.
You can remove any filters you don’t need by pressing the in their top right corner but as long as they’re empty/unset, they will be ignored at the time of report generation.
Generating a Report
After a report type has been selected, you immediately can Generate Report by clicking the button shown in the bottom left of the view.
By default, the Table format is selected but you can click the dropdown and modify the format for your report by selecting either JSON or CSV.
Table
A fast and easy way to browse your data, the table report retrieves paginated results and provides optional sorting by clicking on any column header. Each column is also resizable for your convenience. You can choose to fetch more or fetch all items although please note that depending on the size of your data, fetching all items may take a while.
Download Options
Download your report in JSON or CSV format. Various metadata such as the report type, any filters used when querying, and the timestamp of the report are included with your results. Please note that depending on the size of your data, the download may take a while.
2.9.3 - Report Manager
Overview
Use the Report Manager view to create custom queries, set a report to run on a schedule (or store the configuration for future use), and get notified when they’re executed in order to receive the insights you’re interested in for account-wide artifacts. The results are provided through a variety of formats - tabular, JSON, or CSV - and rely on data retrieved from the back-end Enterprise Reporting Service.
Note: Because the reporting data cycle is configurable, the results shown in this view may not precisely reflect actual analysis output at any given time.
For more information on how to modify this cycle or the Reporting Service in general, please refer to the Reporting Service documentation.
The following sections in this document describe templates, queries, scheduling reports, and viewing your results.
Report Manager

Templates
Templates define the filters and table field columns used by queries to generate report output. The templates provided by the sytem or stored by other users in your account can be used directly to create a new query or as the basis for crafting new templates.
System Templates
By default, the UI provides a set of system templates:
- Images Failing Policy Evaluation
- This template contains a customized set of filters and fields, and is based on “Policy Compliance History by Tag”.
- Images With Critical Vulnerabilities
- This template contains a customized set of filters and fields, and is based on “Images Affected by Vulnerability”.
- Artifacts by Vulnerability
- This templates contains all filters and fields by default.
- Tags by Vulnerability
- This templates contains all filters and fields by default.
- Images Affected by Vulnerability
- This templates contains all filters and fields by default.
- Policy Compliance History by Tag
- This templates contains all filters and fields by default.
- Vulnerabilities by Kubernetes Namespace
- This templates contains all filters and fields by default.
- Vulnerabilities by Kubernetes Container
- This templates contains all filters and fields by default.
- Vulnerabilities by ECS Container
- This templates contains all filters and fields by default.
Creating a Template
In order to define a template’s list of fields and filters, navigate to the Create a New Template section of the page, select a base configuration provided by the various System Templates listed above, and click Next to open a modal.

Provide a name for your new template, add an optional description, and modify any fields or filters to your liking.
The fields you choose control what data is shown in your results and are displayed from left to right within a report table. To optionally refine the result set returned, you can add or remove filter options, set a default value for each entry and specify if the filter is optional or required.
Note that templates must contain at least one field and one filter.
Once the template is configured to your satisfaction, click OK to save it as a Stored Template. Your new template is now available to hydrate a query or as a basis for future templates.
Editing a Template
To view or edit a template that has been stored previously, click its name under Stored Report Items on the right of the page. As with the creation of a template, the list of fields and filters can be customized to your preference.
When you’re done, click OK to save any new changes or Cancel to discard them.
Deleting a Template
To delete a template that you have configured previously, click the red “x” to the left of its name under Stored Report Items and click Yes to remove it. Note that once the template has been removed, you won’t be able to recover it.
Queries
Queries are based on a template’s configuration and can then be submitted to the back-end Enterprise Reporting Service on a reoccurring schedule to generate reports. These results can then be previewed in tabular form and downloaded in JSON or CSV format.
Creating a Query
To create a query, navigate to the Create a New Query section of the page, select a template configuration, and click Next to open a modal.

After you provide a unique name for the query and an optional description, click OK to save your new query. You will be automatically navigated to view it.
Editing a Query
To view or edit a query, click its name under Stored Report Items on the right of the page to be navigated to the Query View.

Within this view, you can edit its name and description, set a schedule to act as the base configuration for Scheduled Items, and view the various filters set by the template this query was based on.
To save any changes to the query, click Save Query or Save Query and Schedule Report.
Setting a Schedule
In order to set or modify a query’s schedule, click Add/Change Schedule to open a modal.

Reports can be generated daily, weekly, or monthly at a time of your choosing. This can be set according to your timezone or UTC. By default, the schedule is set for weekly on Mondays at 12PM your time.
When scheduling reports to be generated monthly, note that multiple days of the month can be selected and that certain days (the 31st, for example) may not trigger every month.
In the top-right corner of the modal, you can toggle the enabled state of the schedule which determines whether reports will be executed continuously on the timed interval you saved. Note that pressing OK modifies the schedule but does not save it to the query. Please click the Save Query or Save Query and Schedule Report to do so.
Deleting a Query
To delete a query, click the red “x” to the left of its name under Stored Report Items and click Yes to remove it. Note that every scheduled report associated with that query will also be removed and not be recoverable.
Scheduled Reports
Adding a Scheduled Item
Once you’ve crafted a query based on a system or custom template, supplied any filters to refine the results, and previewed the report generated to ensure it is to your satisfaction, you can add it to be scheduled by clicking Save Query and Schedule Report.
Any schedules created from this view will be listed at the bottom.
Editing a Scheduled Item
To edit a scheduled item, click on Tools within that entry’s Actions column and select Edit Scheduled Item to open a modal.
Here, you can modify the name, description, and schedule for that item. Click Yes to save any new changes or Cancel to discard them.
Deleting a Scheduled Item
To delete a scheduled item, click on Tools within that entry’s Actions column and select Delete Scheduled Item. Note that every report generated from that schedule will also be removed upon clicking Yes and will not be recoverable.
Viewing Results
Click View under a scheduled item’s Actions column to expand the row and view its list of associated reports sorted by most recent. Click View or Tools > View Results to navigate to that report’s results.

If you configured notifications to be sent when a report has been executed, you can navigate to the report’s results by clicking the link provided in its notification.
Downloading results
A preview of up to 1000 result items are shown in tabular form which provides optional sorting by clicking on any column header. If a report contains more than 1000 results, please download the data to view the full report. To do so, click Download to JSON or Download to CSV based on your preferred format.
Various metadata such as the report type, any filters used when querying, and the timestamp of the report are included with your results. Please note that depending on the size of your data, the download may take a while.
To be notified whenever a report has been generated, navigate to Events & Notifications > Manage Notifications. Once any previous notification configurations have loaded, add a new one from your preferred endpoint (Email, Slack, etc), and select the predefined event selector option for Scheduled Reports.

This includes the availability of a new result or any report execution failures.
Once you receive a notification, click on the link provided to automatically navigate to the UI to view the results for that report.
2.9.4 - Saved Reports
Overview
The Saved Reports tab in the Reports view is where you can view,
configure, download, or delete reports that have been saved for future use. Each report
entry may contain zero or more results, depending on whether the report has
been run or not.
Note: The Saved Reports tab will be the default tab selected in the
Reports view when you have one or more saved reports.
Viewing a Report
An example of the Saved Reports tab is shown below:
Clicking anywhere within the row other than on an active report title or on the
Actions button will expand it, displaying the executions for that report if
any are available. Clicking an active report title will take you to a view
displaying the latest execution for that report. An inactive report title
indicates that no results are yet available.
If a report has been scheduled but has no executions, the expanded row will look
like the following example:

Reports with one or more executions will look like the following example:

In the above example you can see a list of previously executed reports. Their
completion status is indicated by the green check mark. Reports that are still
in progress are indicated by a spinning icon. Reports that are queued for
execution are indicated by an hourglass icon. The reports shown here are all
complete, so they can be downloaded by clicking the Download Full Report button.
Incomplete, queued, or failed reports cannot be downloaded.
The initial view shows up to four reports, with any older items being viewable
by clicking the View More button. The View More button will disappear
when there are no more reports to show. In addition:
Clicking the Refresh List button will refresh the list of reports, including any executions that may have completed since the last time the list was refreshed. Clicking the Generate Now button will generate a new execution of the report.
Individual report items can be deleted by clicking the Delete button. If the
topmost report item is deleted, the link in the table row will correspond to the
next report item in the list (if any are available).
Note: Deleting all the execution entries for a report will not delete the
report itself. The report will still be available for future executions.
Each report row has a Tools control that allows you to perform the following
actions:
- Configure: Opens the report configuration popup, allowing you to change
the report name, description, and schedule
- Generate Now: Generates a new execution of the report
- Save as Template: Saves the report as a user template, allowing you to use
it as the basis for future reports
- Delete: Removes the report and any associated executions. If all reports
are deleted, the page will transition to the New Reports tab and the Saved
Reports tab will be disabled.
2.9.5 - Templates
Overview
The Templates tab in the Reports view is where you can view and manage
report templates. Templates provide the basis for creating the reports executed
by the system and specify which filters are applied to the retrieved dataset and
how the returned data is shaped.
A number of system templates are provided with the application and all of these
and can be used as-is, or as a starting point for creating your own user templates.
Viewing Templates
An example of the System Templates view in the Templates tab is shown
below:

In this view you can see all the system templates provided by default, and their
associated descriptions. System templates cannot be deleted, but can be copied
and modified to create your own user templates.
An alternate way of creating a new user template is by clicking the Create New
Template button. You will be presented with a dialog that allows you to
select an existing system template as your starting point, or base your
composition on any of the custom templates created by you or other users:

Selecting a template from the provided dropdown will open the Create a New
Template dialog:

Within this dialog you can provide a unique name and optional description for
the new template. In addition, you can modify the filters available when composing
reports based on this template, and the columns that will be displayed in the
resulting report:
Filters: You can add or remove filters, set
default values, and specify if the filter is optional or required. Filters are
displayed from left to right when composing a report—you can change the display
order by clicking on a row hotspot and dragging the row item up or down
the list.
Columns: You can add or remove columns, change their display
order, or provide custom column names to be used when the data is presented in
the tabular form offered by comma-separated variable (CSV) file downloads.
Columns are displayed from left to right within a report table—you can change
the display order by clicking on a row hotspot and dragging the row item up or
down the list. Note that templates must contain at least one column.
Once you have configured the filters and columns, you can specify if the report
will be scoped to return results against the analysis data in either the current selected
account or from all accounts, and click OK. The new template will be added
to the list of available user templates.
Custom Templates
The custom templates view shows all user-defined templates present in
the current selected account. An example of the Custom Templates view is shown below:
Unlike system templates, custom templates can be edited or deleted in addition
to being copied. Clicking the Tools button for a custom template will
display the following options:

Note that any changes you make to templates in this view, or any new entries you
create, will be available to all users in the current selected account.
2.10 - User Management
Introduction
In this section you will learn how to create accounts, users, and role assignment with the Anchore Enterprise UI.
Assumptions
- You have a running instance of Anchore Enterprise and access to the UI.
- You have the appropriate permissions to create accounts, users, and roles. This means you are either a user in the admin account, or a user that already is a member of the account-users-admin role for your account.
For more information on accounts, users, roles, and permissions see: Role Based Access Control
Navigation
- After a successful login, navigate to the configuration tab on the main menu.
Creating Accounts
In order to create accounts, navigate to the accounts tab from inside the configuration view and select “Create New Account”.
Upon selection, a popup window will display asking for two items:
- Account Name (required)
- Email
In the following example I’ve created a ‘security’ account:

Now that a group has been created, I can begin to add users to it.
Viewing Role Permissions
To view the permissions associated with a specific role using the UI, select an account, and navigate to the roles tab:

To view the members in the account assigned to a specific role, select the ‘View’ button on the right-hand side.
Creating Users and assigning Roles
Upon immediate creation of an account, there will, by default be zero users. To add users, select the edit button corresponding the account you would like to add users to. This will bring you to the account page, where you can add your first user by selecting the “Let’s add one!” button.
Upon selection, a popup window will display asking for three items:
- Username (required)
- Password (required)
- Assign Role(s)
- Note that you can assign more than one role to a user. For a normal user with full access to add, update, and evaluate images, we recommend assigning the read-write role. The other roles are for specific use-cases such as CI/CD automation, and read-only access for reporting. See: Role Based Access Control from more details on the roles and their capabilities.
In this case I’ve assigned three roles to the user:

Once ‘OK’ is selected, the user will be created and you will be able to edit or remove the user as needed.
Deleting and Disabling Accounts
In order to delete an account, disable the account by sliding the button under the ‘Active’ column for the corresponding account, then select the ‘Remove’ button on the right-hand side.
A few notes to keep in mind when deleting accounts:
- The ‘admin’ account is locked and cannot be deleted.
- Once deletion is in progress, all resources (users, images, automated tasks, etc) will start a garbage collection process and won’t be viewable. Although it will still be present in the list to prevent admins from adding an account with the same name.
- Once deleted, an account and their associated resources can’t be recovered.
A couple notes on disabling accounts:
- Disabling accounts is a way for administrators to freeze an account while still keeping any associated analysis info intact.
- Any automated tasks associated with the disabled account will be frozen.
Switching Account Data Context
System administrator users are able to view another account’s data context using the dropdown located at the top-right:

2.11 - Notifications
Overview
Added in Anchore Enterprise v2.2
Alert external endpoints (Email, GitHub, Slack, and more) about Anchore events such as policy evaluation results, vulnerability updates, and system errors with our new Notifications service. Configure notification endpoints and manage which specific events you need through Anchore Enterprise UI.
For more information on the Notifications Service in general, its concepts, and details on its configuration, please refer to the Notifications Service.
The following sections in this document describe the current endpoints available for configuration, the options provided for selecting events, the various actions you can do with a configuration (add, edit, test, and remove), and how to disable an endpoint as an admin.
Notifications
Supported Endpoints
- Email
- Send notifications to a specific SMTP mail service.
- GitHub
- Version control for software development using Git.
- JIRA
- Issue tracking and agile product management software by Atlassian.
- Slack
- Team collaboration software tools and online services by Slack Technologies.
- Teams
- Team collaboration software tools and online services by Microsoft.
- Webhook
- Send notifications to a specific API endpoint.
Event Selector Options
When adding or editing a configuration, selecting which events to be notified on can be as easy as choosing one of the above three options: All Notification Events, Policy & Vulnerability Events, or Error Events.
Advanced users can select Add Custom Selector for more granularity:
In the example shown, we configure to be notified on all system info events affecting any resource associated with the user’s account. For an in-depth explanation on the provided properties and their possible values, view our Selector documentation.
Adding a Configuration
If you haven’t already defined a configuration for an endpoint, simply click Let’s Add One! as shown above. Once you have, add additional configurations with Add New Configuration as shown below.
Upon doing so, a modal will appear with various properties shown on the left side. Note that based on the type of endpoint, these properties may differ.
To view the various requirements, check the documentation for Email, GitHub, JIRA, Slack, and Teams.
For more information on adding a custom selector, please view our Selector documentation.
Prior to saving your new configuration, feel free to test with the Test Configuration button. Then save with OK.
Note: If OK is not enabled, be sure all required fields have been filled out.
Editing a Configuration
The process to edit a configuration entry is started by clicking Edit which is found within the Actions column as shown above.
The various fields available for editing are the same shown when adding the configuration. For additional info on a specific field, hover over the provided question icon circled with an orange ring next to the field name.
At any time, you can select Cancel to disregard any changes you’ve made.
For testing any new changes prior to saving them, click Test Configuration.
To save your changes, click OK. If OK is not enabled, be sure all required fields have been filled out.
Testing a Configuration
When viewing your configurations, testing is easy - just look under the Actions column and click Test for that entry.
Otherwise, when adding or editing a configuration, search for the test button pictured above. It can be found near the bottom of the modal, next to the Cancel and OK buttons.
Removing a Configuration
To remove a specific notification configuration, simply click on the Remove button (as shown above) within the Actions column for that entry.
Select Yes to proceed with the deletion process or No to cancel. Please note that once you agree to remove the configuration, you won’t be able to recover it.
Admin-specific Actions
Disabling Endpoints
As an admin, navigate to System > Notifications and click on the toggle visible in the lower-right corner of the specific endpoint you’re aiming to disable.
By default, all endpoints (such as Email, Slack, and Webhook) are enabled out of the box. Disabling a specific endpoint requires admin privileges as it ensures all notifications are stopped from going out to any configuration for that endpoint system-wide.
Note that users are still able to add, edit, test, and remove notification configuration items, but no event messages will be sent for that endpoint until it is re-enabled.
2.12 - System Health
Overview
Added in Anchore Enterprise 2.2, the Health section within the System tab is an administrator’s new display for investigating the operational status of their system’s various services and feeds. Leverage this view to understand when your system is ready or if it requires intervention.
The following sections in this document describe how to determine system readiness, the state of your services, and the progression of your feed sync.
For more information on the overall architecture of a full Anchore Enterprise deployment, please refer to the Architecture documentation. Or refer to the Feeds Overview if you’re interested in the feeds-side of things.
System Readiness
Ready
(Tentatively) Ready
Not Ready
The indicator for system readiness can be seen from any screen by viewing the System tab header:
The system readiness status relies on the service and feed data which are routinely updated every 5 minutes. Using the example indicator provided above, once all the feed groups are successfully synced, the status icon will turn green.
For up-to-date information outside of the normal update cycle, navigate to the Health section within the System tab and click on Refresh Service Health, Refresh Feed Data, or manually refresh the page.
Services
As shown above and as of 2.2, there are five services required by the system to function (API, Catalog, Policy Engine, SimpleQueue, and Analyzer).
For every service, the Base URL, Host ID, and Version is displayed. As long as one instance of each service is up and available, the main system is regarded as ready. In the example image provided above, we see that we have multiple instances of the Policy Engine and Analyzer services.
For the full, filterable list of instances for that service, click on the numbers provided. In the case of the Policy Engine, that would be the 1/2 Available.
Note that orphaned services are filtered out by default in this view (with a toggle to include it again) but will still impact the availability count on the main page.
In the case of service errors, they are logged within the Events & Notifications tab so we recommend following up there for more information or browse our Troubleshooting documentation for remediation guidance.
Feeds Sync
Listed in this section are the various feed groups your system relies on for vulnerability and package data. This data comes from a variety of upstream sources which is vital for policy engine operations such as evaluating policies or listing vulnerabilities.
As shown, you can keep track of your sync progression using the Last Sync column. To manually update the feed data displayed outside of its normal 5-minute cycle, click the Refresh Feed Data button or refresh the page.
If you’d rather have them grouped by feed rather than listed out individually, you can toggle the layout from list to cards using the buttons in the top-right corner above the table:
Similar to the service cards, if you decide to have them grouped as we show below using the layout buttons, you can click on the number of groups synced to view the full, filterable list within.
When viewing a list of feed groups - whether through the default list or through a specific feed card - you can filter for a specific value using the input provided or click on the button attached to filter by category. In this case, groups can be filtered by whether they are synced or unsynced.
In the case of feed sync errors, they are logged within the Events & Notifications tab so we recommend following up there for more information or browse our Troubleshooting documentation for remediation guidance.
Or if you’re interested in an overview of the various drivers Enterprise Feeds uses, check out our Feeds Overview.
3 - Using the Anchore Enterprise API
Anchore Enterprise is an API-first system. All functions available in the UI and AnchoreCTL are constructed from the same
APIs directly available to users. The complete API is a combination of OpenAPI-specified REST-like APIs and a reporting-specific
GraphQL API.
For a more detailed information regarding access and authentication, see V2 API
Access to the API Specification itself is available in the following ways:
- Documentation API Browser
- Enterprise API
- Enterprise UI
3.1 - Anchore V2 API
V2 API Overview
Anchore Enterprise is an API-first system. All functions available in the UI and AnchoreCTL are constructed from the same
APIs directly available to users. THe APIs are a combination of a OpenAPI-specified REST-like API and a reporting-specific GraphQL API.
The REST API is the primary API for interacting with Anchore and has the most functionality. The GraphQL API is for querying
aggregated information within an account and does not provide the same functionality as the REST API.
The API specifications for this release of Anchore Enterprise are available here in the documentation. The specifications
are also available directly from your Enterprise deployment at GET /v2/openapi.json
REST API Version 2
The Anchore V2 API is now available with the Enterprise v4.9.0 release. V2 will be the only supported API beginning
in the future Enterprise v5.0.0 release.
GraphQL API
The GraphQL API is intended for reporting functions and aggregating data from all resources in an Anchore account. The data
that the GraphQL API operates on is updated differently than the data in the REST API and thus may have an update lag between
when changes are visible via the REST API and when that data flows into functionality covered by the GraphQL API.
Authentication
Any API exposed on a network should be protected at the channels level using TLS. Regardless of the authentication scheme,
transport security ensure resistance to replay attacks and other forms of request and credential abuse and should always be used.
See Configuring TLS for setting up TLS in Anchore service directly, or use TLS
termination via load balancers or service meshes such as Istio and LinkerD. The
right choice for your deployment will depend on your specific environment and requirements.
The API supports two authentication methods:
- HTTP Basic
- Use HTTP ‘Authorization’ header:
Authorization: Basic <base64_encode(<username> + ':' + <password>)>- curl example:
curl -u <username>:<password> http://localhost:8228/v2/images
- OAuth2 Bearer Tokens
- SAML Bearer Flow
- PasswordGrant flow
Authorization
Anchore implements authorization with Role-Based Access Control (RBAC)
Enterprise Service V2 API Specifications
Browse Online
The V2 API is available to browse hosted in this site: V2 API browser
Downloadable YAML Documents
Anchore API Swagger Specification YAML
Feed Service API Swagger Specfication YAML
Retrieving the Swagger JSON from your Anchore Deployment Directly
The APIs provide their own specifications available from the deployment itself using: GET /v2/openapi.json.
This provides a useful mechanism for integrations and other automation tasks to retrieve the specification for the correct
Anchore version since it is provided by the deployment itself.
3.1.1 - Anchore API V2 Reference
Reference for the Anchore API V2
3.1.2 - Anchore Enterprise Reports API Access
Anchore Enterprise Reports provides a GraphQL API for direct interaction with the service.
GraphQL is a query language for APIs and a runtime for fulfilling those queries.
The main Anchore REST API includes operations for retrieving scheduled report results as static sets to make retrieval
of saved results simpler. It is available here.
Get started
There are different ways of interacting with the Anchore Enterprise Reports GraphQL API. The following sections highlight
two different options for exploring the Anchore Enterprise Reports GraphQL schema with a few examples.
THe endpoint you use for interacting with the GraphQL API is the same host and port as the main V2 API. The path is:
/v2/reports/.
Interactive GUI
One of the ways of exploring and testing a GraphQL schema is by using GraphiQL.
Anchore Enterprise Reports Service has GraphiQL built-in to the service and enabled by default.
To access it in a running Anchore Enterprise deployment, open one of the following urls in a browser:
- http://<main_api_servername:port>/v2/reports/graphql
- http://<main_api_servername:port>/v2/reports/global/graphql (Administrator Access Only)
You will be prompted to enter your Anchore Enterprise credentials.
Click the Docs tab to view the self-describing schema

In addition to being able to see the API docs, GraphiQL is handy for exploring and constructing queries supported by
the backing API. Here is an example of a query for available metrics in the system. Happy querying!

Command line using curl
You can also use curl to send HTTP requests to Anchore Enterprise Reports API. To view the schema
$ curl -u <username:password> -X POST "http://<servername:port>/v2/reports/graphql?query=%7B__schema%7BqueryType%7Bname%20description%20fields%7Bname%20description%20args%7Bname%20description%20type%7Bname%20kind%7D%7D%7D%7D%7D%7D%0A"
Depending on the size of data set (i.e. number of tags, images etc in the system) results of a query could be very
large. Reports service implements pagination for all queries to better handle the volume of the results and respond to
the clients within a reasonable amount of time.
Structure of the query contains a metadata object called pageInfo. It is optional, recommended to add to all
queries:
{
  imagesByVulnerability {
    pageInfo {
      nextToken
      count
    }
    results {
      ...
    }
  }
}
The response may return an opaque token or a null value for nextToken:
{
  "data": {
    "imagesByVulnerability": {
      "pageInfo": {
        "nextToken": "Q1ZFLTIwMTYtMTAyNjY=",
        "count": 1000
      },
      "results": [
        ...
      ]
    }
  }
}
A non-null nextToken indicates that results are paginated. To get the next page of results, fire the same query along
with the nextToken from the last response as a query parameter:
{
  imagesByVulnerability(nextToken: "Q1ZFLTIwMTYtMTAyNjY=") {
    pageInfo {
      nextToken
      count
    }
    results {
      ...
    }
  }
}
Some useful queries
Vulnerability centric queries
List vulnerabilities of a specific severity. And include all the images, currently or historically mapped to a tag,
affected by each vulnerability
Use the query’s filter argument for specifying the conditionality. Reports service defaults to the “current”
image-tag mapping for computing results. To compute results across all image-tag mappings - current and historic,
set the tag filter’s currentOnly attribute to false. Query for vulnerabilities of Critical severity:
{ imagesByVulnerability(filter: {vulnerability: {severity: Critical}, tag: {currentOnly: false}}) { pageInfo { nextToken } results { vulnerabilityId links imagesCount images { digest } } } }
To get more details such as tag mappings for the image, add the relevant attributes from the schema to the body of the query.
List vulnerabilities detected in the last x hours. And include all the images, currently or historically mapped to a tag, affected by each vulnerability
Use vulnerability filter’s after and before attributes for specifying a time window using UTC timestamps. Query for vulnerabilities detected after/since August 1st 2019:
{
  imagesByVulnerability(filter: {vulnerability: {after: "2019-08-01T00:00:00"}, tag: {currentOnly: false}}) {
    pageInfo {
      nextToken
    }
    results {
      vulnerabilityId
      images {
        digest
      }
    }
  }
}
Given a vulnerability ID, list all the artifacts affected by that vulnerability. And include all the images, currently or historically mapped to a tag, containing the said artifact
Use vulnerability filter’s id attribute for specifying a vulnerability identifier. Query for vulnerability ID CVE-2019-15213:
{
  artifactsByVulnerability(filter: {vulnerability: {id: "CVE-2019-15213"}, tag: {currentOnly: false}}) {
    pageInfo {
      nextToken
    }
    results {
      vulnerabilityId
      links
      artifactsCount
      artifacts {
        artifactName
        artifactVersion
        artifactType
        severity
        images {
          digest
        }
      }
    }
  }
}
Policy evaluation centric queries
Given a repository, get the policy evaluation results for all the tags currently mapped to an image using the active policy
Use registry and repository filters for narrowing the results down. Query for docker.io registry and library/node repository:
{
  policyEvaluationsByTag(filter: {registry: {name: "docker.io"}, repository: {name: "library/node"}}) {
    pageInfo {
      nextToken
    }
    results {
      repositories {
        tagsCount
        tags {
          tagName
          imageDigest
          evaluations {
            result
            reason
          }
        }
      }
    }
  }
}
Given a tag, get the policy evaluation history. Include policy evaluations encompassing updates to the tag and the active policy
Reports service defaults to the “current” state for computing results. To compute results across historic state, a few filter knobs have to be turned
tag -> currentOnly set to false instructs the service to include all, current and historic, image tag mappingspolicyEvaluation -> latestOnly set to false instructs the service to include all, current and historic, policy evaluationspolicyBundle -> active set to false instructs service to include all, current and historic, active policies
{
  policyEvaluationsByTag(filter: {registry: {name: "docker.io"}, repository: {name: "library/node"}, tag: {name: "latest", currentOnly: false}, policyEvaluation: {latestOnly: false}, policyBundle: {active: false}}) {
    pageInfo {
      nextToken
    }
    results {
      repositories {
        tags {
          imageDigest
          detectedAt
          current
          evaluations {
            result
            reason
            lastEvaluatedAt
            policyBundle {
              bundleId
              bundleDigest
            }
            latest
          }
        }
      }
    }
  }
}
Metric centric queries
List all the available metrics
{
  metrics {
    pageInfo {
      nextToken
    }
    results {
      id
      name
      description
      metricType
    }
  }
}
Given a metric ID, list values for that metric within a period of time. Useful for plotting changes over a timescale
Query for vulnerabilities.tags.all.critical metric between 1st August and 1st September 2019:
{
  metricData(filter: {metricId: "vulnerabilities.tags.all.critical", start: "2019-08-01T00:00:00", end: "2019-09-01T00:00:00"}) {
    pageInfo {
      nextToken
    }
    results {
      collectedAt
      value
    }
  }
}
3.1.3 - Migrating from API V1 to V2
Overview
The changes from V1 to V2, while breaking, primarily resolve inconsistencies and confusion in the V1 API rather than
establishing any new API patterns or interaction styles. Clients using the V1 API should be able to migrate to V2 without
changing their workflows at all.
API Consolidation
Endpoint Consolidation
In the V2 API, all REST-like APIs are available from the main API service in the deployment. This means simpler integrations,
ingress setups, and client configurations. Specifically, the RBAC Manager API, Notifications API, and Reports API are now served
through the same endpoint. Those services will become internal-only services for processing requests in the 5.0 release.
A single swagger/openapi specification now covers all Anchore APIs except the GraphQL API.
Enterprise & Non-Enterprise Route Consolidation
There are no longer any enterprise prefixed routes, and all routes that had a version with and without the enterprise
prefix are now consolidated with no prefix but implement the full enterprise functionality.
Authentication
There are no changes to authentication mechanisms.
HTTP Basic and Oauth2 Tokens using JWT continue to be the authentication mechanisms for
using the API. See Authentication
Authorization
There are no changes to the RBAC authorization scheme, actions, and management workflows.
All roles, accounts, and role memberships directly transfer to V2, subject to some
field and URL path element renaming for consistency as indicated in the table below.
All the RBAC-related APIs are now served from the main API endpoint per the consolidation section above. There is no
longer a need to expose a public port from the RBAC manager service.
Specification
The V2 API is specified using OpenAPI v2/Swagger v2. We anticipate a future migration to specifying the API using
OpenAPI v3 to support more modern client generation tooling. However, in the 4.9 release of the V2 API the specification
continues to be in Swagger V2.
Required Version in Path
In the V1 API, Anchore services would automatically re-write a version-less request path to use a “v1” prefix. This behavior will
no longer be present in the V2 API and in the 5.0 release all clients must specify the requested API version in the path explicitly.
For example, in V1:
GET /images –> routed internally to –> GET /v1/images
In V2:
GET /images –> HTTP 404. Must use GET /v2/images explicitly.
This is being strictly enforced to allow better future migration between APIs and consistent request handling for clients as
the APIs evolve.
Field Renames and Consolidations Overview
This covers the most impactful and significant updates, but is not exhaustive.
Account Name
The “userId” field was a legacy element of a very old version of Anchore. It is now removed and replaced with account_name
in the operations where the return is in fact the account name rather than the ID of the specific user. Since resources
in Anchore are owned by accounts, which may contain multiple users, this is the correct and clear field.
Example: userId ==> account_name
Snake Casing
There is no longer a mix between Camel Casing and Snake Casing for fields in the API. All fields are snake-case for consistency.
Example: imageDigest is now image_digest
Arrays Removed Where Not Appropriate
All APIs that returned an array where the actual response was always a single element have been re-typed to return objects.
Example:
POST /v2/images, returns a single object instead of an array.
APIs that may return large arrays have been wrapped in an object and the array set to the “items” property of the object.
This change will allow better non-breaking evolution of the API in the future.
Detailed Changes from V1 to V2
API Comparison
 indicating that source or image complies
with your policy.
indicating that source or image complies
with your policy. indicating that the source or image is non-compliant with your policy.