Exceptions suppress or override policy findings without modifying the underlying rule sets. Anchore Enterprise provides two distinct mechanisms — pick the one that matches the scope of the override you want.
When to Use Which
The two mechanisms differ in what they target and when they are evaluated.
Whole images, identified by name, image ID, or digest
Image only — image mappings
Before any mapping or rule logic runs
Unconditionally trusting a base image, blocking an image known to be unfit for production
Both mechanisms record their action in the evaluation output, so a finding that was allowlisted or an image that was denied is still visible in the audit trail — the override is transparent, not silent.
How Exceptions Fit Into a Policy
Both allowlists and the allowed and denied image lists are stored inside the policy bundle, alongside rule sets and mappings. See Anatomy of a Policy Bundle for where each lives in the JSON structure.
Allowlists are referenced by mappings — when a mapping rule matches an artifact, it identifies which rule sets evaluate the artifact and which allowlists are applied to the resulting findings. The allowed and denied image lists are global to the bundle and are checked before any mapping is resolved.
The evaluation pipeline walks through the full order — including where each exception mechanism takes effect.
1 - Allowlists
Allowlists suppress specific policy findings without modifying the underlying rules — useful for accepted risks or known false positives. Each allowlist is stored inside the policy bundle alongside its rule sets and mappings, and is applied to findings during the evaluation pipeline. For how allowlists relate to the other exception mechanism, see Manage Exceptions.
Allowlists apply to both image-scoped and app-version-scoped policy evaluation — they target individual findings and are referenced by both image and SBOM mappings.
An allowlist contains one or more entries, each matching a specific gate/trigger result — for example, excluding a particular CVE from policy evaluation. Allowlists are optional, and a policy may contain multiple of them. An allowlist takes effect only when a matched mapping rule references it; when an allowlist entry matches a policy trigger output, that output’s action is set to go and the evaluation result records the matching allowlist and item IDs.
Manage Allowlists in the Anchore Enterprise GUI
The Allowlist tab shows the allowlists present in a policy.
Add a New Allowlist
Click Add New Allowlist to create a new, empty allowlist.
Enter a name. A name is required and should be unique.
Optionally add a description. A description is recommended — it is often updated as entries are added, to explain the background (for example, “Updated to account for a false positive in the glibc library”).
Import or Paste an Allowlist
If you have a JSON document containing an existing allowlist, you can upload it into Anchore Enterprise. You can also edit the allowlist directly in its native JSON format — see Manage Allowlists with AnchoreCTL for the structure.
Click Import Allowlist.
Drag an allowlist file into the dropzone, or click Add a Local File to load it from your filesystem.
Click OK to upload. Anchore Enterprise validates the allowlist; only validated allowlists are stored.
Copy an Allowlist
You can copy an existing allowlist, give it a new name, and reuse it for policy evaluation.
From the Tools drop-down, select Copy Allowlist.
Enter a unique name.
Optionally add a description.
Download an Allowlist
To download an existing allowlist as a JSON file, open the Tools drop-down and click Download to JSON.
Edit Allowlist Entries
The Allowlists editor lets you create, edit, and remove allowlist entries.
Each entry has these components:
Gate — the gate the entry matches, so trigger IDs are not matched in the wrong context.
Trigger ID — the specific trigger result to match. The format is gate/trigger-specific; for the vulnerabilities gate it is the CVE trigger ID. Wildcards are supported for partial matches.
id — an identifier for the entry, unique within the allowlist.
Expires On(optional) — an RFC 3339 date-time after which the entry no longer applies. An expired entry that matches is not allowlisted.
From the Select a Gate dropdown you can choose any active gate (deprecated gates appear in a separate group). The fields shown depend on the gate: the vulnerabilities gate takes a CVE / vulnerability identifier and a package, while any other gates differ. The steps below use the vulnerabilities gate as the example.
Choose an allowlist and click Edit.
Choose a gate — for example, vulnerabilities. A vulnerabilities entry has two elements: a CVE / vulnerability identifier and a package.
Enter a CVE / Vulnerability Identifier — the vulnerability to match (for example, CVE-2017-7246), in the same format shown in the image vulnerabilities report. Wildcards are supported, but use them carefully to avoid allowlisting too many vulnerabilities.
Enter a Package — the package to match with the vulnerability (for example, libc-bin). Wildcards are supported.
An entry can specify both a CVE and a package for an exact match (for example, CVE-2005-2541 + tar), or use a wildcard package where multiple packages are built from the same source (for example, CVE-2017-9000 + bind-* allowlists bind-utils, bind-libs, and bind-license). Take special care with wildcards in the CVE field — a wildcard there allowlists any vulnerability for the package, which is appropriate only in specific cases (for example, the bind-license package, a single copyright file included in all CentOS:7 images, which commonly accrues Bind CVEs that do not actually apply to it).
Save all changes before leaving the editor — at that point the edits are sent to Anchore Enterprise.
Manage Allowlists with AnchoreCTL
There is no dedicated AnchoreCTL command for allowlists — they are part of the policy bundle. To manage them from the CLI, edit the allowlists array in the bundle JSON and apply the bundle with anchorectl policy add or anchorectl policy update.
Each allowlist in the allowlists array is a JSON object:
{
  "id": "allowlist1",
  "name": "My First Allowlist",
  "comment": "An allowlist for my first try",
  "version": "2",
  "items": [
    {
      "gate": "vulnerabilities",
      "trigger_id": "CVE-2018-0737+*",
      "id": "rule1",
      "expires_on": "2026-12-30T12:00:00Z"
    }
  ]
}
id, name — identifier and label for the allowlist; comment is an optional description.
items — the allowlist entries. Each has a gate, a trigger_id (gate/trigger-specific; wildcards supported), an id unique within the allowlist, and an optional expires_on (RFC 3339). An entry whose expires_on has passed is not applied.
An allowlist takes effect only when a matched mapping rule references it. When an entry matches a trigger output, that output’s action is set to go and the result records the matching allowlist and item IDs.
Manage Allowlists with the API
Allowlists are submitted as part of the policy bundle, not through a dedicated endpoint. Include the allowlists array (shape above) in the bundle when you create or update a policy:
Method
Path
Purpose
POST
/policies
Create a policy whose bundle includes allowlists
PUT
/policies/{policy_id}
Update an existing policy’s bundle, including its allowlists
The full request and response schemas are in the API browser; search for the Policies tag.
2 - Allowed and Denied Images
The allowed and denied image lists are system-wide overrides that pass or fail images unconditionally, before any policy mapping logic runs. Both lists are stored inside the policy bundle and are checked at the very first step of the evaluation pipeline. For how these lists relate to the other exception mechanism, see Manage Exceptions.
Allowed and denied image lists apply to image policy evaluation only — they match whole images by identity and have no effect on SBOM (app-version) assets.
An image can be referenced in one of three ways:
Name — registry, repository, and tag. For example: docker.io/library/centos:latest. Wildcards (*) are supported. Names are not unique — over time different images may carry the same tag — so a descriptive identifier is recommended.
Image ID — the full 64-character hex image ID. For example: e934aafc22064b7322c0250f1e32e5ce93b2d19b356f4537f5864bd102e8531f. The algorithm prefix (sha256:) is not included.
Image Digest — registry, repository, and digest, including the algorithm prefix. For example: docker.io/library/centos@sha256:989b936d56b1ace20ddf855a301741e52abca38286382cba7f44443210e96d16. The tag is not used when referencing by digest.
For most use cases, reference the image by digest — an image name is ambiguous, since different images may be tagged with the same name over time.
If an image appears on both the allowed and denied lists, the denied entry takes precedence and the image is failed.
Manage Allowed and Denied Images in the Anchore Enterprise GUI
In a policy, open the Allowed / Denied Images tab. It is split into two sub-tabs:
Allowed Images — images that always pass policy evaluation, regardless of the policies mapped to them.
Denied Images — images that always fail policy evaluation, regardless of the policies mapped to them.
Add an Allowed or Denied Image
If the list is empty, click Let’s add one! to begin. The workflow is identical for allowed and denied images.
Choose how to reference the image — by Name, Image ID, or Image Digest (see the reference forms above) — and enter the required fields.
Click OK to add the entry to the policy.
The list view shows each entry with these fields:
Allowlist Name — a user-friendly label for the image(s).
Type — how the image is specified: Name, ID, or Digest.
Image — the specification used to define the image.
Actions — copy the image specification to the clipboard, edit the entry, or delete it.
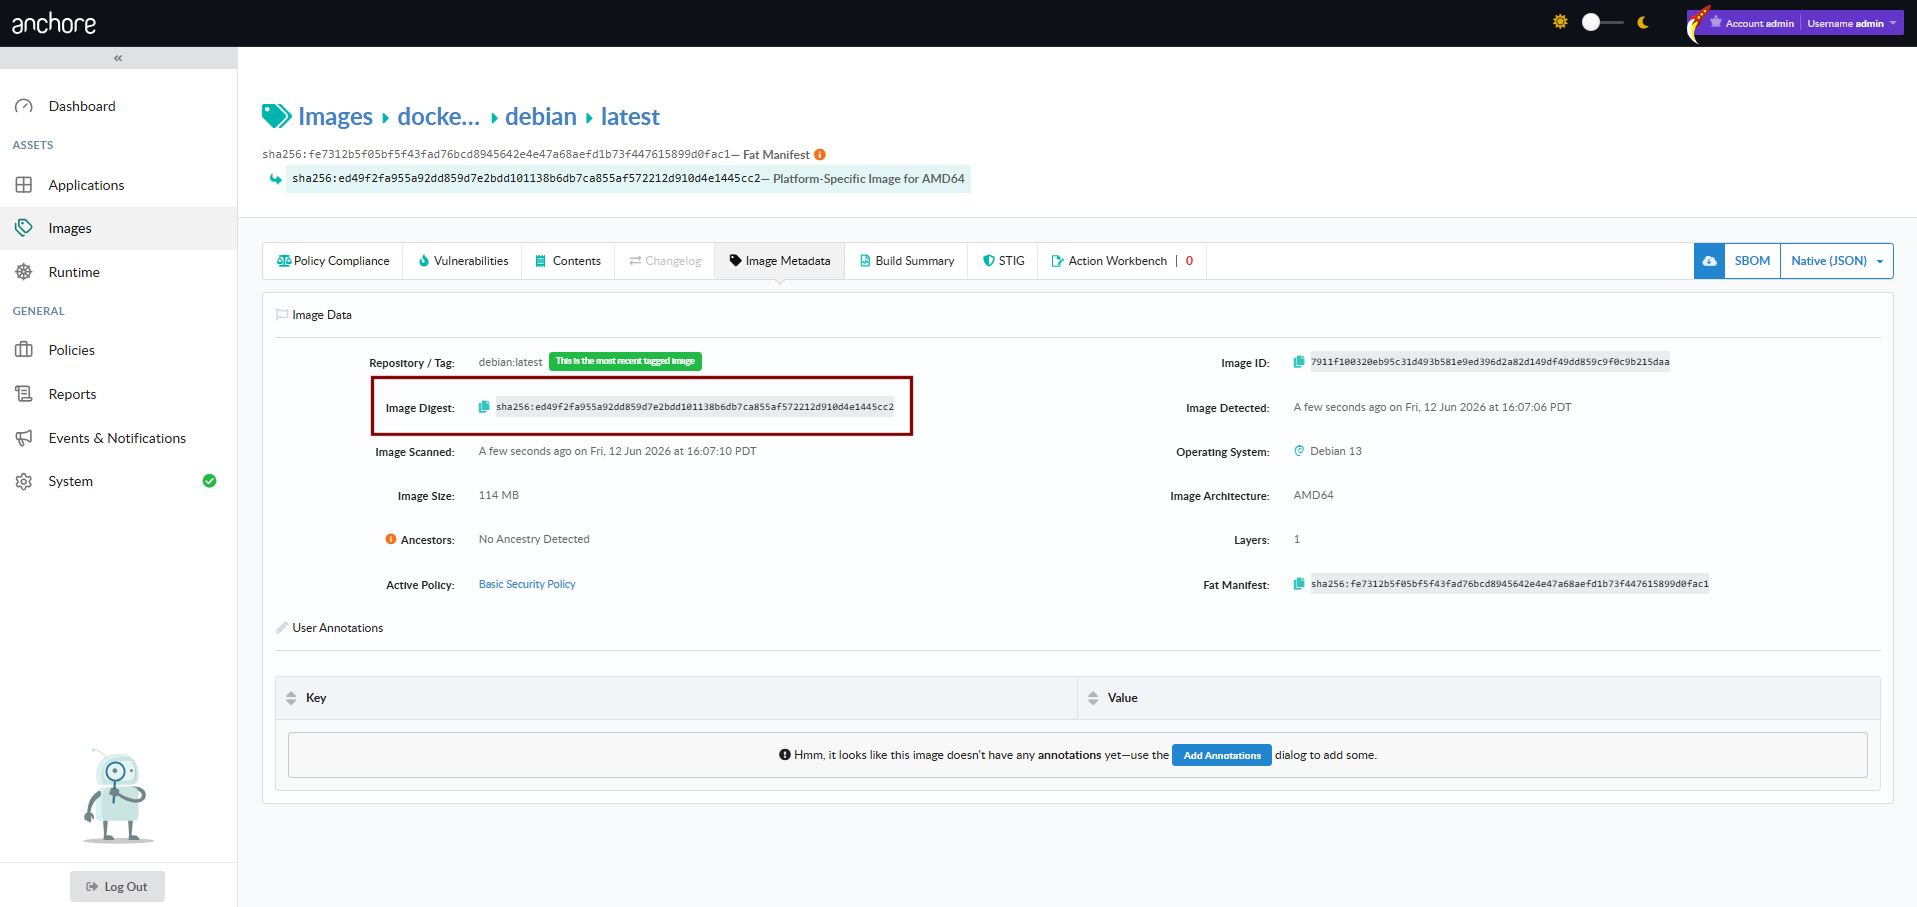
Find an Image’s ID or Digest
In the Anchore Enterprise GUI, an image’s ID and digest are shown on its detail page in the Images view — open the image and copy the value directly.
You can also retrieve the value with AnchoreCTL.
Image ID with AnchoreCTL:
anchorectl image get library/debian:latest | grep ID
ID: 8626492fecd368469e92258dfcafe055f636cb9cbc321a5865a98a0a6c99b8dd
Image digest with AnchoreCTL:
anchorectl image get library/debian:latest | grep Digest
Digest: sha256:7df746b3af67bbe182a8082a230dbe1483ea1e005c24c19471a6c42a4af6fa82
Manage Allowed and Denied Images with AnchoreCTL
There is no dedicated AnchoreCTL command for allowed and denied images — they are part of the policy bundle. To manage them from the CLI, edit the allowlisted_images and denylisted_images arrays in the bundle JSON (shape below) and apply the bundle with anchorectl policy add or anchorectl policy update.
Within the bundle, each entry in the allowlisted_images or denylisted_images array is a JSON object of the following shape:
registry, repository — the image source to match; wildcards (*) are supported.
image — the reference to match. type is one of tag, digest, or id, and value is the matching string. Wildcards are supported in value.
Allowlist entries (allowlisted_images) always produce a pass for matching images; denylist entries (denylisted_images) always produce a fail. When an image matches both, the denylist wins.
Manage Allowed and Denied Images with the API
The allowed and denied lists are submitted as part of the policy bundle, not through a dedicated endpoint. Include the allowlisted_images and denylisted_images arrays (shapes above) in the bundle when you create or update a policy:
Method
Path
Purpose
POST
/policies
Create a policy whose bundle includes the allowed/denied lists
PUT
/policies/{policy_id}
Update an existing policy’s bundle, including its allowed/denied lists
The full request and response schemas are in the API browser; search for the Policies tag.