This section provides information on how to deploy Anchore Enterprise onto Amazon EKS. Here is the recommended architecture on AWS EKS:
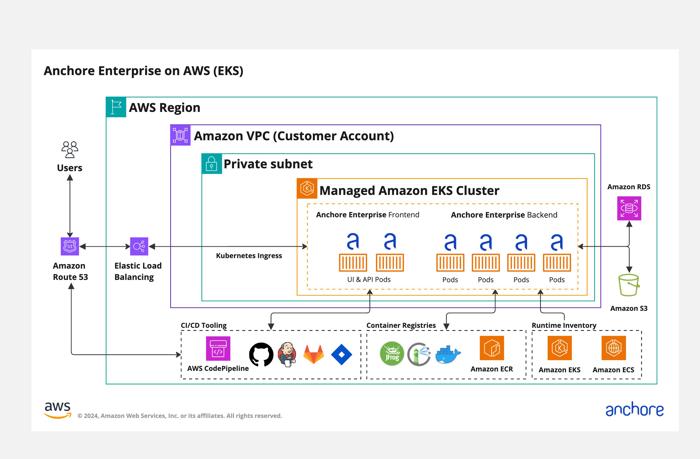
AWS EKS deployment architecture.
Prerequisites
You’ll need a running Amazon EKS cluster with worker nodes. See EKS Documentation for more information on this setup.
Once you have an EKS cluster up and running with worker nodes launched, you can verify it using the following command:
$ kubectl get nodes
NAME                             STATUS   ROLES    AGE   VERSION
ip-192-168-2-164.ec2.internal    Ready    <none>   10m   v1.30.3-eks-a737599
ip-192-168-35-43.ec2.internal    Ready    <none>   10m   v1.30.3-eks-a737599
ip-192-168-55-228.ec2.internal   Ready    <none>   10m   v1.30.3-eks-a737599
To deploy the Anchore Enterprise services, you’ll then need the Helm client installed on your local host. Anchore maintains a Helm chart to simplify the software deployment process.
To make the necessary configurations to the Helm chart, create a custom anchore_values.yaml file and reference it during deployment. There are many options for configuration with Anchore Enterprise. The following is intended to cover the recommended changes for successfully deploying Anchore Enterprise on Amazon EKS.
Configuration
The following configurations should be used when deploying on EKS.
Amazon RDS for PostgreSQL
Anchore Enterprise 6.x requires an external PostgreSQL 17 database with the pg_cron extension; the chart no longer ships a bundled PostgreSQL. On AWS, Anchore strongly recommends Amazon RDS for PostgreSQL as a managed, isolated database service, so the database can scale independently of your cluster workloads. It is suggested to allow the storage to automatically increase as needed.
For details on configuring an external database in the chart, see the chart External Database documentation and the Provision the Database section of the main Helm deployment guide.
pg_cron extension enabled and configured as described below.Enable pg_cron
Anchore Enterprise 6.x requires the pg_cron extension. On Amazon RDS, enable it as follows:
In the DB parameter group attached to your instance, add
pg_cronto theshared_preload_librariesparameter.Set the
cron.database_nameparameter to your Anchore database name (for example,anchore).Reboot the instance so the static parameters take effect.
Connect to the Anchore database and create the extension, then grant the Anchore user access to the
cronschema:CREATE EXTENSION IF NOT EXISTS pg_cron; GRANT USAGE ON SCHEMA cron TO <ANCHORE_DB_USER>;
pg_cron needs by default. Confirm your instance class provides sufficient max_worker_processes for your workload. See the AWS guide on scheduling maintenance with pg_cron.S3 Object Storage
Anchore Enterprise can use S3 as its external object store, offloading large objects — SBOM documents, analysis archives, and other analysis data — out of the database. This reduces database size and total cost of ownership. See the Amazon S3 object store configuration for details. Consider using the iamauto: True option to use IAM roles for access to S3.
PVCs
Anchore Enterprise by default uses ephemeral storage for pods, but we recommend configuring Analyzer scratch space, at a minimum. See Scratch Space configuration for further details.
Anchore generally recommends providing EBS-backed storage for analyzer scratch of the gp3 type. Note that you will need to follow the AWS guide on storing K8s volumes with Amazon EBS. Once the CSI driver is configured for your cluster, configure your Helm chart with values similar to this:
analyzer:
  scratchVolume:
    details:
      ephemeral:
        volumeClaimTemplate:
          metadata: {}
          spec:
            accessModes:
            - ReadWriteOnce
            resources:
              requests:
                # must be 3xANCHORE_MAX_COMPRESSED_IMAGE_SIZE_MB + analyzer_cache_size
                # Setting this to 100G would mean the largest image you can scan is 30G (not counting analysis cache if you choose to configure that)
                storage: 100Gi
            # this would refer to whatever your storage class was named
            storageClassName: "gp3"
Ingress
Anchore recommends using the AWS Load Balancer Controller or EKS Auto Mode for ingress.
We also suggest using a vanity domain (anchore.mydomain.com in the example below) over TLS with Route 53 and ACM; however, this goes beyond the scope of this document.
enable_ssl and enable_proxy to True in the Enterprise UI configuration. Without these settings, the UI may not correctly detect the HTTPS connection, which could result in unexpected behavior with session cookies and authentication. For more details, see Enterprise UI Configuration.Here is a sample manifest for use with the AWS LBC or EKS Auto Mode ALB ingress:
ingress:
  enabled: true
  apiPaths:
    - /v2/
    - /version/
  uiPath: /
  ingressClassName: alb
  annotations:
    # See https://github.com/kubernetes-sigs/aws-load-balancer-controller/blob/main/docs/guide/ingress/annotations.md for further customization of annotations
    alb.ingress.kubernetes.io/scheme: internet-facing
  # If you do not plan to bring your own hostname (i.e. use the AWS supplied CNAME for the load balancer) then you can leave apiHosts & uiHosts as empty lists:
  #apiHosts: []
  #uiHosts: []
  # If you plan to bring your own hostname then you'll likely want to populate them as follows:
  apiHosts:
    - anchore.mydomain.com
  uiHosts:
    - anchore.mydomain.com
You must also configure/change the following from ClusterIP to NodePort:
Anchore Enterprise API Service
# Pod configuration for the Anchore Enterprise API service.
api:
  # kubernetes service configuration for anchore external API
  service:
    type: NodePort
    port: 8228
    annotations: {}
Anchore Enterprise UI Service
ui:
  # kubernetes service configuration for anchore UI
  service:
    type: NodePort
    port: 80
    annotations: {}
    sessionAffinity: ClientIP
Amazon ALB Parameters
Users of ALB may want to align the timeout between gunicorn and ALB. The AWS ALB connection idle timeout defaults to 60 seconds. The Anchore Enterprise Helm chart has a timeout setting that defaults to 5 seconds, which should be aligned with the ALB timeout setting. Sporadic HTTP 502 errors may be emitted by the ALB if the timeouts are not in alignment. See this reference.
timeout_keep_alive from 5 to 65 to align with the ALB’s default timeout of 60.anchoreConfig:
server:
timeout_keep_alive: 65
Install Anchore Enterprise
Deploy Anchore Enterprise by following the instructions in the main Helm deployment guide, using the RDS database and anchore_values.yaml customizations described above.
Verify Ingress
Run the following command for details on the deployed ingress resource using the ELB:
$ kubectl describe ingress
Name:             anchore-enterprise
Namespace:        default
Address:          xxxxxxx-default-anchoreen-xxxx-xxxxxxxxx.us-east-1.elb.amazonaws.com
Default backend:  default-http-backend:80 (<none>)
Rules:
  Host  Path  Backends
  ----  ----  --------
  *
        /v2/*   anchore-enterprise-api:8228 (192.168.42.122:8228)
        /*      anchore-enterprise-ui:80 (192.168.14.212:3000)
Annotations:
  alb.ingress.kubernetes.io/scheme:  internet-facing
  kubernetes.io/ingress.class:       alb
Events:
  Type    Reason  Age   From                    Message
  ----    ------  ----  ----                    -------
  Normal  CREATE  14m   alb-ingress-controller  LoadBalancer 904f0f3b-default-anchoreen-d4c9 created, ARN: arn:aws:elasticloadbalancing:us-east-1:077257324153:loadbalancer/app/904f0f3b-default-anchoreen-d4c9/4b0e9de48f13daac
  Normal  CREATE  14m   alb-ingress-controller  rule 1 created with conditions [{    Field: "path-pattern",    Values: ["/v2/*"]  }]
  Normal  CREATE  14m   alb-ingress-controller  rule 2 created with conditions [{    Field: "path-pattern",    Values: ["/*"]  }]
The output above shows that an ELB has been created. Next, try navigating to the specified URL in a browser:
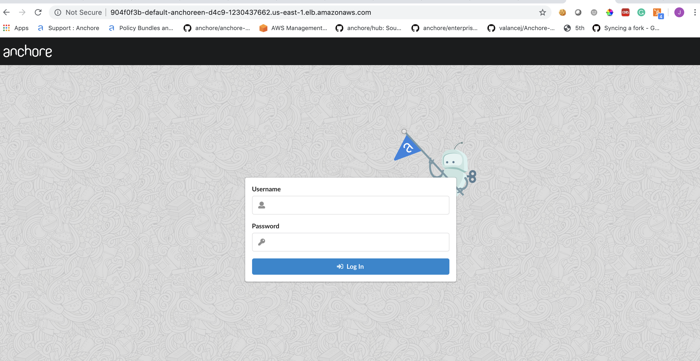
Anchore Enterprise login page.
Verify Anchore Enterprise Service Status
Check the status of the system with AnchoreCTL to verify all of the Anchore Enterprise services are up:
ANCHORECTL_URL=http://xxxxxx-default-anchoreen-xxxx-xxxxxxxxxx.us-east-1.elb.amazonaws.com ANCHORECTL_USERNAME=admin ANCHORECTL_PASSWORD=<ADMIN_PASSWORD> anchorectl system status