This document walks through the deployment of Anchore Enterprise on an OpenShift 4.x cluster and exposes it on the public internet.
Prerequisites
- A running OpenShift 4.x cluster. Read more about the installation requirements in the OpenShift Container Platform documentation.
- Helm client and server installed and configured with your cluster.
- AnchoreCTL installed on your local host.
- An external PostgreSQL 17 database with the
pg_cronextension. See Provision the Database below.
Anchore Enterprise Helm Chart
Anchore maintains a Helm chart to simplify the software deployment process. An Anchore Enterprise installation of the chart includes the following:
- Anchore Enterprise software
- Redis (7 or higher)
pg_cron extension. See Provision the Database below.To make the necessary configurations to the Helm chart, create a custom anchore_values.yaml file and reference it during deployment. There are many options for configuration with Anchore Enterprise; this document is intended to cover the minimum required changes to successfully deploy Anchore Enterprise on OpenShift.
Provision the Database
Anchore Enterprise 6.x requires a PostgreSQL 17 database with the pg_cron extension. On OpenShift, provision this with either:
- A cloud-provider managed database (for example, Amazon RDS if running OpenShift on AWS). See the Enable pg_cron steps in the EKS guide.
- An in-cluster PostgreSQL operator such as CloudNativePG (CNPG), using a PostgreSQL 17 image that includes
pg_cron. See Run PostgreSQL In-Cluster with CloudNativePG in the main Helm deployment guide. - Any other PostgreSQL 17+ instance you manage yourself, provided it has the
pg_cronextension enabled.
pg_cron extension is not included in the default PostgreSQL container images. When running PostgreSQL in-cluster, you must build and host a PostgreSQL 17 image that includes it.OpenShift Configurations
Create a New Project
Create a new project called anchore-enterprise:
oc new-project anchore-enterprise
Create Secrets
Two secrets are required for an Anchore Enterprise deployment.
Create a secret for the license file:
oc create secret generic anchore-enterprise-license --from-file=license.yaml=license.yaml
Create a secret for pulling the images:
oc create secret docker-registry anchore-enterprise-pullcreds --docker-server=docker.io --docker-username=<username> --docker-password=<password> --docker-email=<email>
Verify these secrets are in the correct namespace (anchore-enterprise):
oc describe secret <secret-name>
Link ImagePullSecret
Link the above Docker registry secret to the default service account:
oc secrets link default anchore-enterprise-pullcreds --for=pull --namespace=anchore-enterprise
Verify this by running the following:
oc describe sa
oc adm policy add-scc-to-user anyuid -z default.Anchore Enterprise Configurations
Create a custom anchore_values.yaml file for your Anchore Enterprise deployment. Configure the connection to your external PostgreSQL 17 database, and relax the security contexts as needed for OpenShift:
# NOTE: This is not a production-ready values file for an OpenShift deployment.

securityContext:
  fsGroup: null
  runAsGroup: null
  runAsUser: null

# Connection details for your external PostgreSQL 17 (with pg_cron) database
postgresql:
  externalEndpoint: <DB_HOSTNAME>
  auth:
    username: <DB_USERNAME>
    password: <DB_PASSWORD>
    database: <DB_NAME>
  port: 5432

ui-redis:
  master:
    podSecurityContext:
      enabled: false
    containerSecurityContext:
      enabled: false
Install Software
Run the following commands to install the software:
helm repo add anchore https://charts.anchore.io
helm install anchore -f anchore_values.yaml anchore/enterprise
It will take the system several minutes to bootstrap. You can check the status of the pods by running oc get pods:
$ oc get pods
NAME                                                READY   STATUS    RESTARTS   AGE
anchore-enterprise-analyzer-7f9c7c65c8-tp8cs        1/1     Running   0          13m
anchore-enterprise-api-754cdb48bc-x8kxt             1/1     Running   0          13m
anchore-enterprise-catalog-64d4b9bb8-x8vmb          1/1     Running   0          13m
anchore-enterprise-componentcatalog-568b59b87c-zbb8f 1/1    Running   0          13m
anchore-enterprise-datasyncer-585997576d-2fgkg      1/1     Running   0          13m
anchore-enterprise-notifications-65bd45459f-q28h2   1/1     Running   0          13m
anchore-enterprise-policy-657fdfd7f6-gzkmh          1/1     Running   0          13m
anchore-enterprise-reports-596cb47894-q8g49         1/1     Running   0          13m
anchore-enterprise-reportsworker-6fb4f55455-f2ts2   1/1     Running   0          13m
anchore-enterprise-simplequeue-98b95f985-5xqcv      1/1     Running   0          13m
anchore-enterprise-ui-6794bbd47-vxljt               1/1     Running   0          13m
anchore-ui-redis-master-0                           1/1     Running   0          13m
PostgreSQL is not listed because it runs externally.
Create Route Objects
Create two route objects in the OpenShift console to expose the UI and API services on the public internet:
enable_ssl and enable_proxy to True in the Enterprise UI configuration. Without these settings, the UI may not correctly detect the HTTPS connection, which could result in unexpected behavior with session cookies and authentication. For more details, see Enterprise UI Configuration.API Route
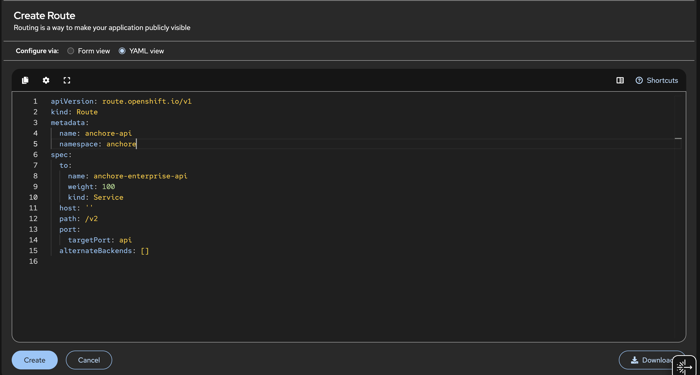
Route configuration for the API service.
UI Route
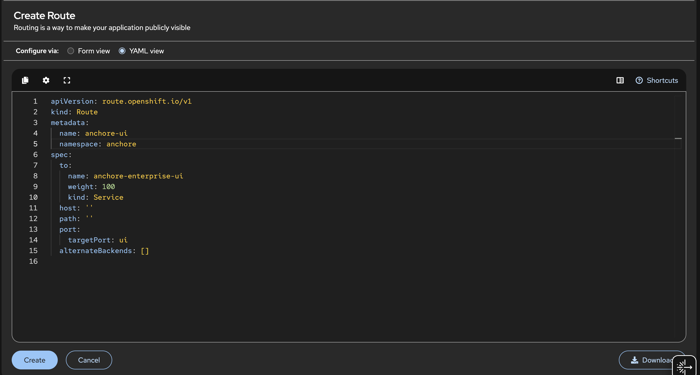
Route configuration for the UI service.
Routes
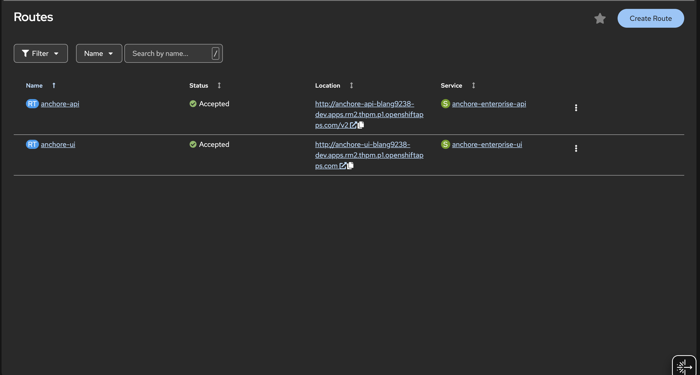
Configured routes for the deployment.
Verify by navigating to the anchore-enterprise-ui route hostname. You should see the Anchore Enterprise login page.
Anchore Enterprise System
First, retrieve the admin password. This is stored as a secret during the helm install process:
oc get secret anchore-enterprise-env -o jsonpath='{.data.ANCHORE_ADMIN_PASSWORD}' -n anchore-enterprise | base64 -d
You can customize your Helm anchore_values.yaml file to use an existing/custom secret rather than have Helm generate one for you with a generated password.
Verify the API route hostname with AnchoreCTL:
ANCHORECTL_URL=http://<anchore-api-anchore.apps.rm2.thpm.p1.openshiftapps.com> \
  ANCHORECTL_USERNAME=admin \
  ANCHORECTL_PASSWORD=<ADMIN_PASSWORD> \
  anchorectl system status
Anchore Enterprise Vulnerability Data
Anchore Enterprise has a datasyncer service that pulls the vulnerability and other data sources, such as the ClamAV malware database, into your Anchore Enterprise deployment. You can check on the status of these feeds using AnchoreCTL:
ANCHORECTL_URL=http://<anchore-ui-anchore.apps.rm2.thpm.p1.openshiftapps.com> \
  ANCHORECTL_USERNAME=admin \
  ANCHORECTL_PASSWORD=<ADMIN_PASSWORD> \
  anchorectl feed list