Anchore Enterprise can analyze images from any Docker V2 compatible registry. A registry in Anchore Enterprise is a stored credential configuration: it tells the deployment how to authenticate to a registry host, and on its own it does not pull or analyze any images. (Repositories are the unit of analysis; see Watch a Repository.)
Anchore Enterprise attempts to download images from any registry without further configuration. You only need to define a registry when it requires authentication: once a registry and its credentials are defined, every pull for an image from that registry uses them.
A few options and behaviors apply to every registry, regardless of how you add it:
TLS certificate verification is on by default. Anchore Enterprise verifies the registry’s TLS certificate. You can turn verification off for a registry that presents a self-signed certificate or one signed by an unknown CA.
Credential validation is on by default. Anchore Enterprise validates the credential when a registry is added. Because validation methods for public registries change over time, you can skip the check, which is useful when a valid credential fails validation or when adding a credential before it is active at the registry.
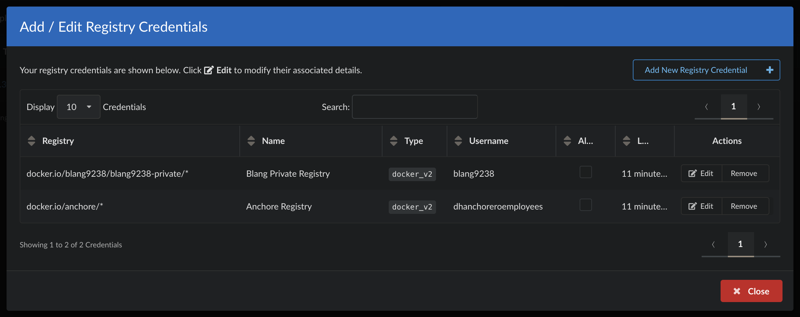
Multiple credentials per host. You can store different credentials for different repositories on the same host (for example, two private repositories on docker.io) by qualifying each entry with a repository path.
Passwords are write-only. A registry’s password cannot be retrieved through the GUI, AnchoreCTL, or the API.
Most Docker V2 registries authenticate with a username and password. Amazon ECR, Google GCR, and Microsoft Azure also support their own native credentialing; see the registry-specific configuration below.
Manage Registries in the Anchore Enterprise GUI
Registry management lives under System → Configuration → Registries. Listing and creating registries requires a user in the admin account or a member of the read-write role for the account.
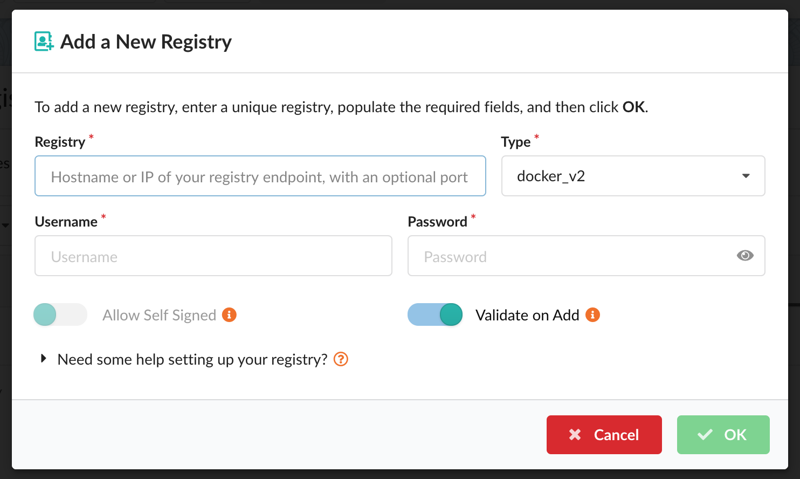
To add a registry, open the Registries tab and select Let’s add one! (or Add New Registry if registries already exist). In the modal, provide the Registry (hostname with optional port), the Type (for example docker_v2 or awsecr), and the Username and Password. Two toggles set the behavior described above: Allow Self Signed turns off TLS certificate verification, and Validate on Add skips credential validation.
After a registry is added, edit its credentials and options from the Actions column. The setup help for each registry type is also available inline via “Need some help setting up your registry?” near the bottom of the modal.
To store different credentials for repositories on the same host, add each entry with a repository path (for example, docker.io/anchore/*).
Manage Registries with AnchoreCTL
List the defined registries:
anchorectl registry list
Add a registry. The registry argument is the fully qualified hostname and optional port (for example registry.example.com:5000):
Both registry add and registry update accept --secure-connection=<true|false> (TLS certificate verification) and --validate=<true|false> (credential validation at add time); each defaults to true.
Get the details of a specific registry (the password is never returned):
anchorectl registry get <registry>
Update a registry’s username, password, or connection options:
Delete a registry. Deleting a registry record does not delete the image or tag records associated with it:
anchorectl registry delete <registry>
Manage Registries with the API
Registry configuration is managed through the Registries endpoints:
Method
Endpoint
Description
GET
/registries
List configured registries (list_registries)
POST
/registries
Add a registry (create_registry)
GET
/registries/{registry}
Get a registry configuration (get_registry)
PUT
/registries/{registry}
Update a registry (update_registry)
DELETE
/registries/{registry}
Delete a registry (delete_registry)
The full request and response schemas are in the API browser; search for the Registries tag.
Registry-Specific Configuration
The credential fields are the same whether you add a registry through the GUI, AnchoreCTL, or the API. For registries with native credentialing, see the registry-specific guides:
Amazon AWS typically uses keys instead of traditional usernames & passwords. These keys consist of an access key ID and a secret access key. While it is possible to use the aws ecr get-login command to create an access token, this will expire after 12 hours so it is not appropriate for use with Anchore Enterprise, otherwise a user would need to update their registry credentials regularly. So when adding an Amazon ECR registry to Anchore Enterprise you should pass the aws_access_key_id and aws_secret_access_key.
The registry-type parameter instructs Anchore Enterprise to handle these credentials as AWS credentials rather than traditional usernames and passwords. Currently Anchore Enterprise supports two types of registry authentication standard username and password for most Docker V2 registries and Amazon ECR. In this example we specified the registry type on the command line however if this parameter is omitted then AnchoreCTL will attempt to guess the registry type from the URL which uses a standard format.
Anchore Enterprise will use the AWS access key and secret access keys to generate authentication tokens to access the Amazon ECR registry, Anchore Enterprise will manage regeneration of these tokens which typically expire after 12 hours.
In addition to supporting AWS access key credentials Anchore also supports the use of IAM roles for authenticating with Amazon ECR if Anchore Enterprise is run on an EC2 instance.
In this case you can configure Anchore Enterprise to inherit the IAM role from the EC2 instance hosting the system.
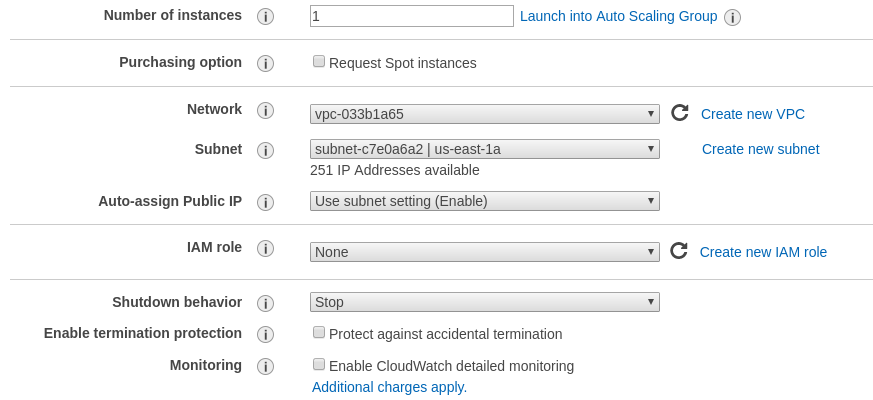
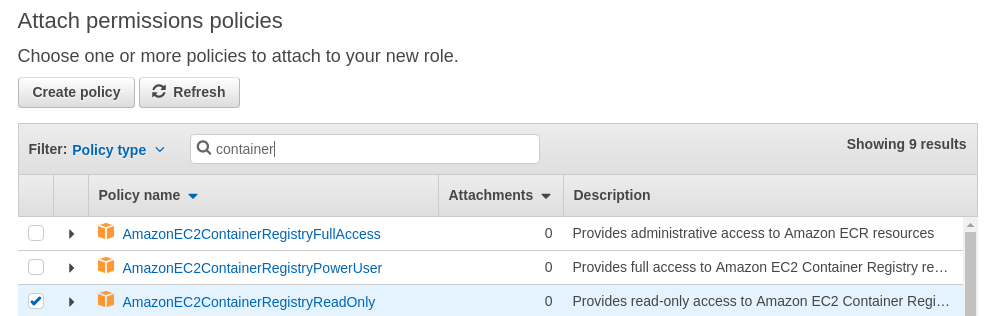
When launching the EC2 instance that will run Anchore Enterprise you need to specify a role that includes the AmazonEC2ContainerRegistryReadOnly policy.
While this is best performed using a CloudFormation template, you can manually configure from the launch instance wizard.
Step 1: Select Create new IAM role.
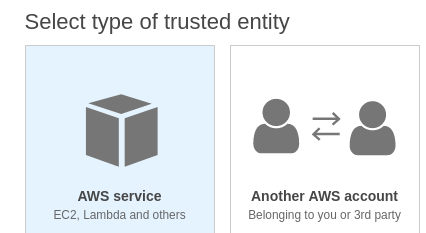
Step 2: Under type of trusted entity select EC2.
Ensure that the AmazonEC2ContainerRegistryReadOnly policy is selected.
Step 3: Attach Permissions to the Role.
Step 4: Name the role.
Give a name to the role and add this role to the Instance you are launching.
On the running EC2 instance you can manually verify that the instance has inherited the correct role by running the following command:
Step 5: Enable IAM Authentication in Anchore Enterprise.
By default the support for inheriting the IAM role is disabled.
To enable IAM based authentication add the following entry to the top of Anchore Enterprise config.yaml file:
allow_awsecr_iam_auto: True
Step 6: Add the Registry using the AWSAUTO user.
When IAM support is enabled instead of passing the access key and secret access key use “awsauto” for both username and password. This will instruct Anchore Enterprise to inherit the role from the underlying EC2 instance.
To use an Azure Registry, you can configure Anchore Enterprise to use either the admin credential(s) or a service principal. Refer to Azure documentation for differences and how to setup each. When you’ve chosen a credential type, use the following to determine which registry command options correspond to each value for your credential type
Admin Account
Registry: The login server (Ex. myregistry1.azurecr.io)
Username: The username in the ‘az acr credential show –name ’ output
Password: The password or password2 value from the ‘az acr credential show’ command result
Service Principal
Registry: The login server (Ex. myregistry1.azurecr.io)
Username: The service principal app id
Password: The service principal password Note: You can follow Microsoft Documentation for creating a Service Principal.
To add an azure registry credential, invoke anchorectl as follows:
Once a registry has been added, any image that is added (e.g. anchorectl image add <Registry>/some/repo:sometag) will use the provided credential to download/inspect and analyze the image.
3 - Google Container Registry
When working with Google Container Registry it is recommended that you use JSON keys rather than the short lived access tokens.
JSON key files are long-lived and are tightly scoped to individual projects and resources. You can read more about JSON credentials in Google’s documentation at the following URL: Google Container Registry advanced authentication
Once a JSON key file has been created with permissions to read from the container registry then the registry should be added with the username _json_key and the password should be the contents of the key file.
In the following example a file named key.json in the current directory contains the JSON key with readonly access to the my-repo repository within the my-project Google Cloud project.
Harbor is an open-source, cloud-native container registry. Anchore Enterprise integrates with Harbor in two ways: as a registry it pulls images from for analysis, and as a scanner that Harbor delegates its vulnerability scans to.
Use Harbor as a Registry
To let Anchore Enterprise pull and analyze images from Harbor, add it as a Docker V2 registry with your Harbor credentials:
Harbor URL — the base URL of your Harbor registry.
Harbor username — a Harbor account with access to the repositories you want analyzed (for example, the admin account).
Once the registry is added, any image you add (for example, anchorectl image add core.harbor.domain/some/repo:sometag) uses the stored credential to download, inspect, and analyze the image. See Container Registries for the full registry-management surface across the GUI, AnchoreCTL, and the API.
Harbor Scanner Adapter
For a deeper integration, the Harbor Scanner Adapter for Anchore lets Harbor issue scans to Anchore Enterprise directly. The adapter is a bridge between the two systems: Harbor schedules scans — on push, on a recurring schedule, or on demand — and the adapter forwards them to your Anchore Enterprise deployment, with results surfaced in both Harbor and the Anchore Enterprise GUI.
Using Harbor with Anchore — push images, run and schedule scans, gate on results, use Harbor as a proxy cache, and troubleshoot.
4.1 - Harbor Scanner Adapter Setup
Integrating Harbor
The Harbor Scanner Adapter for Anchore can be used to integrate Harbor with Anchore Enterprise. This scanner provides a gateway for Harbor to communicate with your Anchore Enterprise deployment thereby making it possible for jobs to be scheduled for scans through Harbor.
The adapter’s configuration can be customized using environment variables defined in the harbor-adapter-anchore.yaml.
You can edit this file to adjust the environment variables as needed to fit your deployment. You must configure how the adapter connects to Anchore Enterprise. The following variables are compulsory to be configured:
Note: It is highly recommended that you create a new account in the Anchore Enterprise deployment and a new user with credentials dedicated to the Harbor adapter. When using Enterprise 5+, you can also utilize api keys. Learn how to generate them here
For full Harbor Adapter configuration options, see here
Once you have edited the value file, use the updated file to deploy the Harbor Scanner Adapter by executing:
kubectl apply -f harbor-adapter-anchore.yaml
Once the adapter has been configured as shown above, you will need to add Anchore as the default scanner in Harbor.
Adding Anchore as default scanner
Setting Anchore as the default scanner in Harbor ensures that all image scans, unless specified otherwise, are automatically sent to your Anchore Enterprise deployment for scanning. Follow the steps below to add Anchore as a scanner and set it as the default:
In the Harbor UI login as an admin and navigate to Administration->Interrogation Services->Scanners and click “+ New Scanner”. In older versions of Harbor, this can be found under Configuration->Scanners.
In ‘Endpoint’, use the adapter hostname/url. The default is the following:
http://harbor-scanner-anchore:8080
Leave the authorization field empty, as no API key was set in the adapter deployment environment for this example.
Please untick use internal registry address. Anchore Enterprise could have issues accessing the Harbor registry otherwise
Click “Test Connection” to verify the connection. Then, click “Add” to add the scanner.
Now to ensure all projects in Harbor makes use of the newly configured Anchore scanner, you must make the Anchore scanner your default Scanner. In the Harbor UI, navigate to the project->scanner and click “Select Scanner” click on the radio button next to the selected Anchore Scanner to make it the default scanner.
Configuring Timeouts
Since Harbor and Anchore Enterprise are separate systems, an API call is needed for communication between them. As a result, configuring timeouts may be necessary depending on factors such as your network, the proximity of the two systems, and overall latency.
The ANCHORE_CLIENT_TIMEOUT_SECONDS setting determines the timeout duration (in seconds) for API calls from the Harbor Adapter to the Anchore Enterprise service. By default, it is set to 60 seconds. If the API call to Anchore exceeds this time, the scan may fail or be delayed. A shorter timeout can result in more frequent timeouts during scans, especially if the system is under heavy load or if Anchore’s response time is slower than expected.
The proximity of Anchore Enterprise to the registry also plays a crucial role in scan performance. If Anchore Enterprise is geographically distant or on a separate network from the registry, network latency could increase, leading to slower scan times or potential timeouts. Keeping Anchore Enterprise close to the registry in terms of network topology can reduce latency, improving scan efficiency and reducing the likelihood of timeouts.
To increase the ANCHORE_CLIENT_TIMEOUT_SECONDS, set the environment variable in your harbor-adapter-anchore.yaml file and reapply it.
You can now see the pushed image in the Harbor UI by Navigating to the project under the project menu
Initiate a Vulnerability Scan
To scan your image for vulnerabilities select the image from the repository list. Click SCAN VULNERABILITY under the Actions menu:
During integration you will have configured Anchore Enterprise as your default scanner. This means vulnerability scan requests will be sent to your Anchore Enterprise deployment. Once the scan is complete, the results will appear in both Harbor and the Anchore Enterprise GUI. You can view details about the vulnerabilities, including severity and remediation options.
Scheduling a Vulnerability Scan
Harbor allows you to schedule automated vulnerability scans on your container images. These scans can be performed using the configured scanner (Anchore Enterprise) and will help identify vulnerabilities within the images.
Navigate to Interrogation Services. Under the Vulnerability tab you will see options on scheduling scans (Hourly, daily, weekly or custom). You can also initiate scan of all your images immediately by clicking the SCAN NOW button.
Information regarding scan in progress will be provided on this page.
It is important to note that weekly scans can take time, especially if you have many images. Anchore Enterprise will fetch the latest vulnerability results only if it hasn’t scanned the image before since it caches images it has previously seen. This helps to reduce the overall time required for weekly scans. Additionally, number of analyzers, network latency and timeouts can impact the time taken for a weekly scan to complete.
Enable Image Scanning on Push
By enabling the Scan on Push option under the project’s configuration, Harbor will automatically scan any new images pushed to the project, helping you identify and manage potential security risks efficiently. To enable this. Navigate to the desired project -> configuration and look for the option vulnerability scanning as shown in the picture
Prevent vulnerable images from running
To prevent vulnerable images from being pulled and run, you can set up a policy which uses the last known vulnerability results.
Please note: Anchore Enterprise is still able to pull images to conduct scans.
To do this, navigate to the desired Project -> Configuration and enable the Vulnerability Scanning option
Locate the Deployment Security option, enable it, and choose the severity level to enforce.
Adding Proxy Registries
Harbor has the ability to act as a proxy registry linking to preconfigured upstream registries like DockerHub. This allows users to pull images from Harbor directly which in turn using pre configured credentials pulls and caches the images from an upstream source.
Use Case:
A common use case is that customers want to restrict registry access in a production and/or secure environment to only their Harbor registry and as such Anchore’s own Enterprise images are published and accessible via DockerHub and Iron Bank which might not be accessible. To resolve this, you can setup a proxy cache registry in Harbor and then pull the image from your Harbor deployment.
Don’t forget you can also configure your Anchore Enterprise values.yaml file so that your deployment will pull the images from your private Harbor registry
Finally, an added benefit is that you have a local copy of the Anchore Enterprise Images rather than relying on a public services such as DockerHub or Iron Bank.
Debugging scan issues
When image scanning fails in Harbor using Anchore, it’s important to review logs from three key components: Harbor, the Anchore Adapter, and Anchore Enterprise. Collecting these logs and generating a support bundle can help diagnose the issue. You can then share this information with the Anchore Customer Success team for further assistance.