Anchore Enterprise plays a crucial part in meeting Federal Authorization to Operate (ATO) requirements and Risk Management Framework (RMF). From implementation, assessment, to monitoring, Anchore Enterprise bakes in security compliance, vulnerability & malware scanning by constantly checking registries and running images to protect and enhance security posture. As industry continues to migrate to containerization and microservices, Anchore Enterprise supports multiple regulatory requirements using software bill of materials (SBOM) and policy as code to meet the demands through automated policy enforcement and continuous monitoring. SBOMs are vital to comply with Executive Order (EO) 14028 and understanding software inventory (NIST 800-53, 800-171, 800-218, and 800-190). As software delivery changes so should the ATO process by using code to ensure secure, quality, and reproducible results. Anchore Enterprise allows organizations to shift left, start secure, bake in compliance, and standardize security across the container, filesystem, virtual machine (VM) and source code landscape.
Security Controls
The security controls are described below with hyperlinks to the applicable documentation.
SBOM is essentially the ingredient list for a software product allowing the consumer to understand and manage the associated risks. Not only do our scans produces SBOMs but they can be imported as well. SBOMs are used to maintain compliance with CM-8 Information System Component Inventory.
Generating a vulnerability report of both container images, virtual machine files, and source code that map to CVEs (Common Vulnerabilities & Exposures), KEV (Known Exploited Vulnerabilities) and EPSS (Exploit Prediction Scoring System) data. The reports reflect all applicable CVEs, if there are known exploits and the probability of a CVE being exploited.
Use DISA STIGs for container images to establish and document configuration settings for images. Container images can be scanned against DISA STIGS in heimdall json format which can be easily converted using MITRE SAF™ into XCCDF and CKL files to import within STIG Viewer.
Use CI/CD pipelines to not only automate deployment but to ensure your security posture requirements are met each time, every time. Gates can be configured to only allow certain packages installed or be denied if there is a known exploit in a vulnerability.
Always know what images are running in your kubernetes clusters and ensure they meet organizational requirements for vulnerability and policy compliance.
This guide provides examples of how to setup a policy gate to enforce development teams to comply with organizational Plan of Actions & Milestones (POA&M).
The POA&M Challenge
POA&Ms can easily become an administrative nightmare to track, maintain and update. With Anchore Enterprise, POA&Ms can now be done via code configuring CI/CD policy gates that enforce compliance.
POA&M Solution
Generate an enforceable POA&M using policy as code
The example is shown using a policy from scratch but these direction could be used to add to an existing policy.
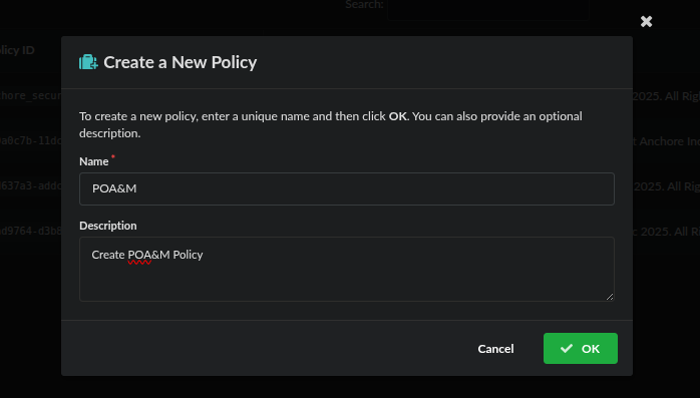
Create a new policy
Name and describe your policy, then click save
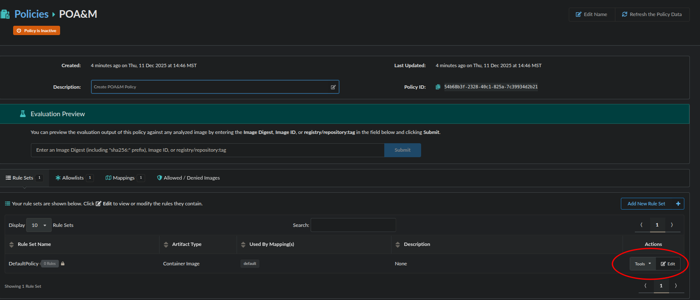
Now we will edit the default rule, by clicking edit:
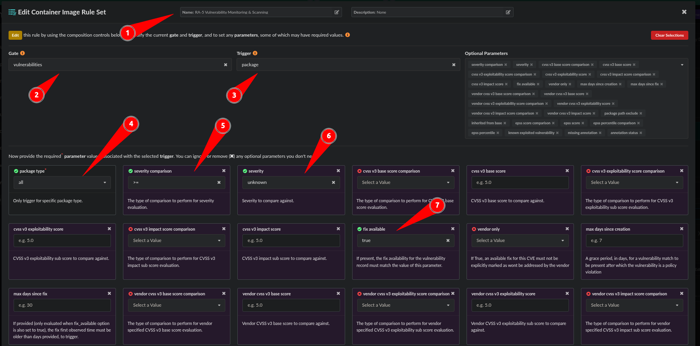
From here we will configure a rule:
Name the rule: RA-5 Vulnerability Monitoring & Scanning
Gate: Vulnerabilities
Trigger: Package
package type: all
severity comparison: >=
severity: unknown
fix available: true
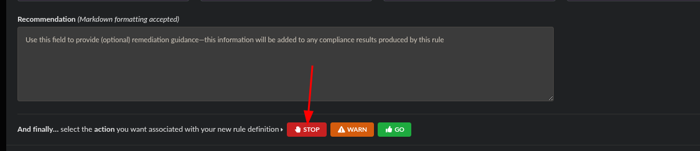
Scroll down to the bottom and click the action of STOP and click Save and Close.
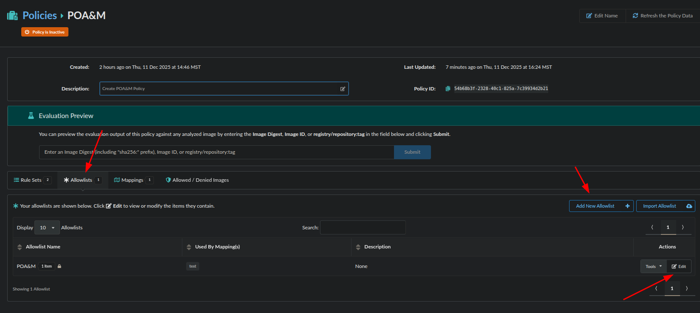
Next, we will make an Allowlists for the item we want to POA&M by editing a default Allowlist or adding a New Allowlist:
Now we will edit the Allowlist:
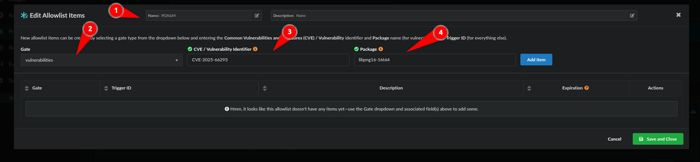
Name the Allowlist: POA&M
Gate: Vulnerabilities
CVE/Vulnerability Identifier: CVE-2025-66293
Package: libpng16-16t64
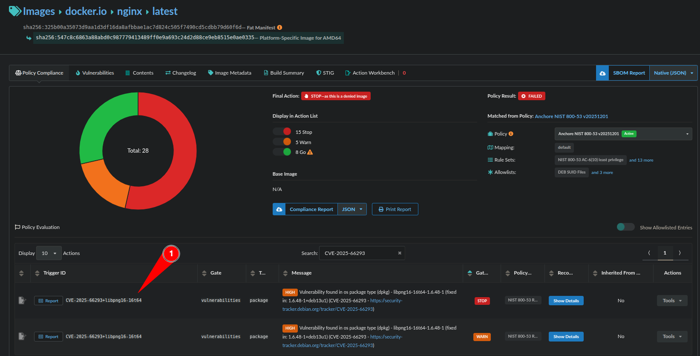
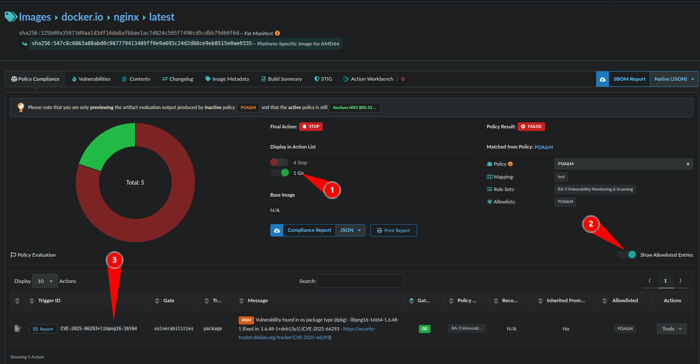
Note: Another way to get the CVE and Package information is to obtain the Trigger ID on the Policy Compliance Tab which is CVE ID+package as seen in image below:
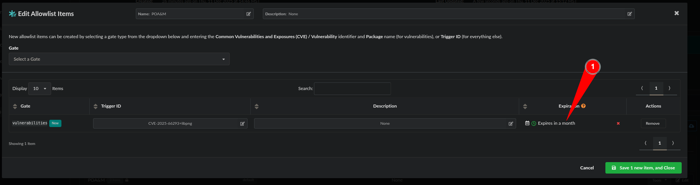
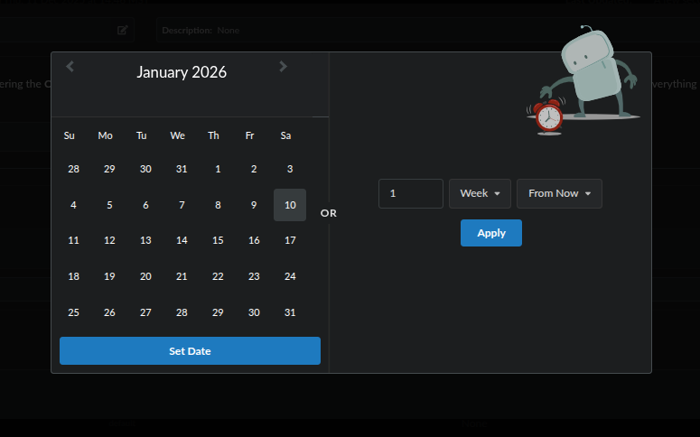
We have a rule and an Allowlist but we want to make this a POA&M item that expires so lets make an expiration by clicking on the calendar:
A calendar will pop-up and you can select a date or or a time frame of days, weeks or months:
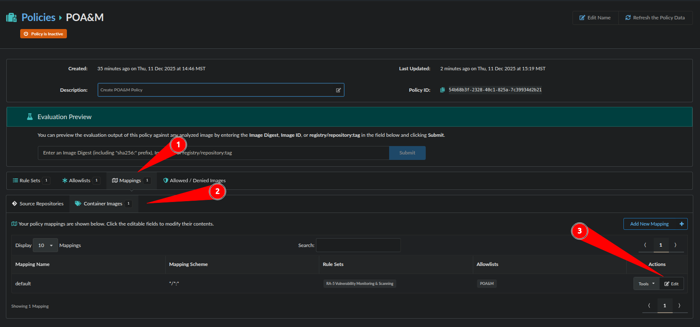
Next we will make a mapping to limit where this specific POA&M or Allowlist is applied by clicking Mappings, Container Images and Edit:
Next we will associate a Registry, Repository and Tag with the POA&M Allowlist we just made.
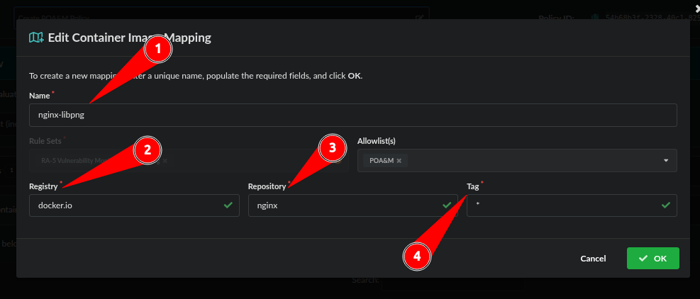
Name the Mapping: nginx-libpng
Registry: nginx-libpng
Repository: nginx
Tag: *
Note: Wildcards “*” can be used for Registry, Repository, and Tag
Our POA&M via an Allowlist with an expiration has been created. Let’s validate:
Toggle on Go
Show Allowlisted Entries
The TriggerID matches what was put in the Allowlist
You have now created a POA&M enforced by code
2 - STIG
Use Anchore Enterprise to STIG a container image
This guide provides examples of how to scan a container with DISA STIGs and import the data into Heimdall for a visualization or STIGViewer to create a checklist to provide as an ATO artifact.
This guide requires the dependencies located here to be installed along with the dependency below.
Once these dependencies are installed, the STIG profiles are written as indicated in the here link and a STIG evaluation has been completed, you are ready to begin.
We will assume that the output of the scan is located in our working directory for the examples below and the STIG --stig-output-dir was saved as results.json like the example below:
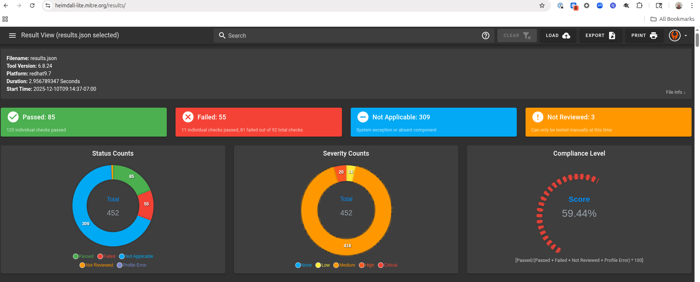
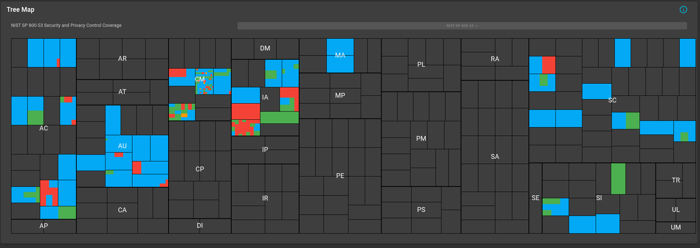
The native format for STIG output in Anchore Enterprise is OASIS Heimdall Data Format (OHDF) and can be easily uploaded to heimdall-lite.mitre.org
From here, you can upload the results.json file and obtain charts and a map of the NIST 800-53 controls like the images below:
You can easily filter what passed, failed, not reviewed and not applicable. The data can be exported as a DISA Checklist or as XCCDF Results as indicated in the picture below:
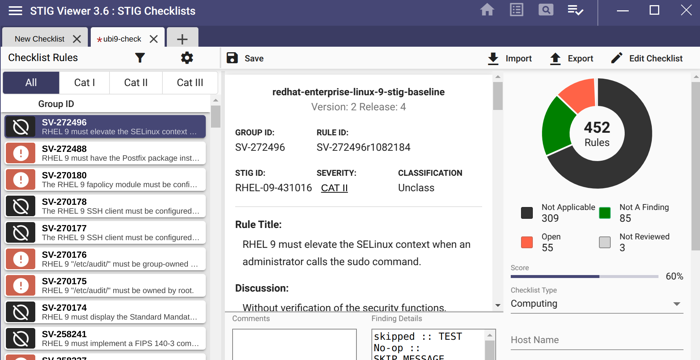
The data can be imported back into STIGViewer to audit a checklist as indicated in Step 4 under Working with STIGViewer
Working with STIGViewer
With safcli installed run the following command to convert the results.json to XCCDF:
saf convert hdf2xccdf -i results.json -o xccdf-results.xml
Now we want to convert the same results.json to a ckl file:
saf convert hdf2ckl -i results.json -o ubi9-check.ckl
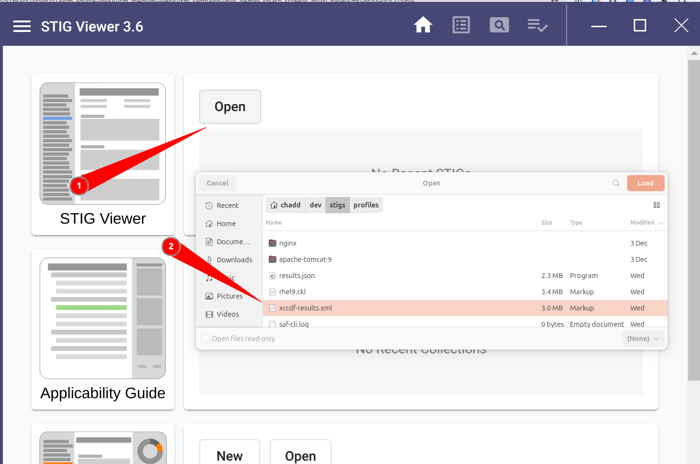
Let’s open STIGViewer and import the results-xccdf.xml file we created in step 1.
Now we can click the Home Icon and load our checklist:
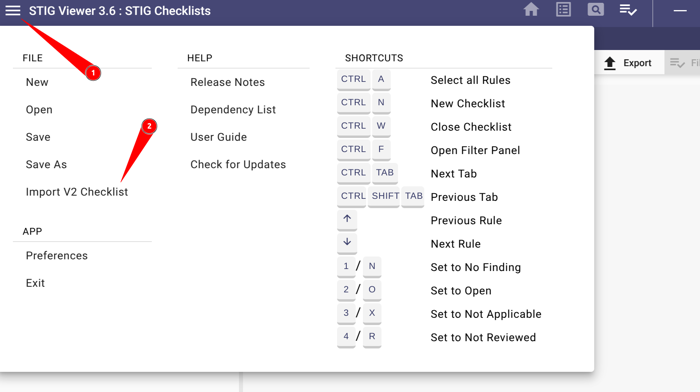
Click the hamburger menu
Click Import V2 Checklist and upload ubi9-check.ckl
The container STIG checklist can now be saved once the findings as either Open, Not a Finding, Not Applicable and submitted with the applicable Body of Evidence (BOE) documentation.
You have now STIG’d a container image and created a checklist