This page outlines the workflow for identifying and remediating security vulnerabilities using a number of different Anchore Enterprise platform features which combined provide a layered approach for augmenting your organization’s security posture.
Analyze and View Security Vulnerabilities on an Asset
In order to remediate a given vulnerability, we must first identify whether one exists in the underlying asset through analysis.
The asset in this case could represent a container image which can be analyzed either through the UI or anchorectl — both of which are described in detail below. Once analysis is complete, we can then view any identified vulnerabilities to start the process of remediation.
Through the UI
Through anchorectl
Flag Vulnerabilities for Remediation Using VEX Annotations
Anchore Enterprise leverages use of VEX (Vulnerability Exploitability eXchange) annotations that allows your organization to add context to identified vulnerabilities which helps prioritize remediation efforts by assessing real-world risk.
- Click the Images menu item.
- Select an image which has been analyzed with identified vulnerabilities.
- Click the Vulnerabilities tab.
- Under Annotation Status (VEX) select your intended status for the target vulnerabilities (i.e., Not Affected, Affected, Fixed, or Under Investigation).
- Click the caption box directly to the right to add annotation details in the Vulnerability Exploit Statement. Annotation details would include information such as how an identified vulnerability would be remediated (via an Action Statement).
For example, if you wanted to add an annotation for all CRITICAL vulnerabilities which meets the below criteria:
- Package Name:
java/jdk - Version:
1.8.0_452-b09 - Annotation Status:
Affected
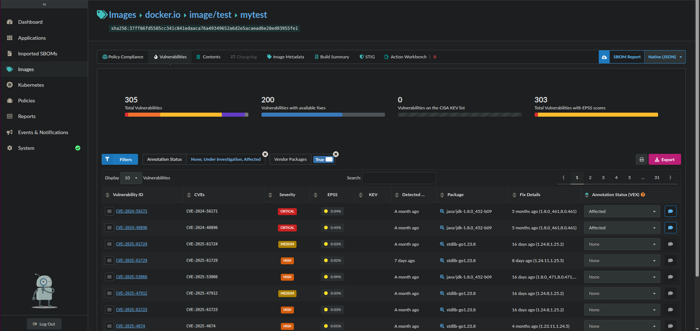
Critical vulnerabilities with Affected annotation
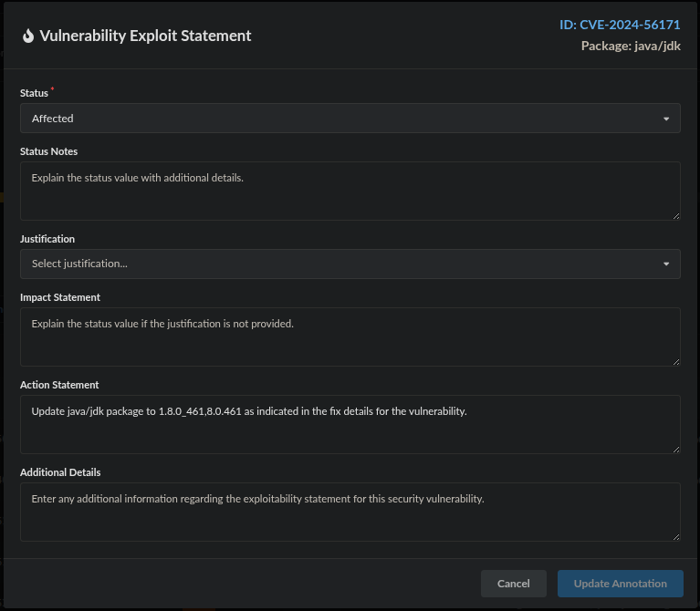
Annotation details with Action Statement
These vulnerabilities have now been annotated accordingly per their level of severity and can be prioritized for remediation per the Action Statement.
/images/{image_digest}/vuln-annotations and /images/{image_digest}/vuln-annotations/{vuln_annotation_uuid} in: API ReferenceCreate a Report on Images With Annotated Vulnerabilities
Anchore Enterprise features a robust reporting service that allows your organization to create, manage, and save reports using pre-defined or custom templates for key stakeholder awareness and remediation.
Click the Reports menu item.
Choose a New Report of Images Affected by Vulnerability.
Choose the Vulnerability Severities and Vulnerability Annotation Status filters and select the appropriate filter patterns.
For example, if you wanted to create a report with annotated vulnerabilities which meets the below criteria:
- Vulnerability Severities:
Critical - Vulnerability Annotation Status:
affected
Once you’ve set the desired filter patterns, you can then click on Preview Results which will return a listing of all images with Critical vulnerabilities that have been annotated as affected.
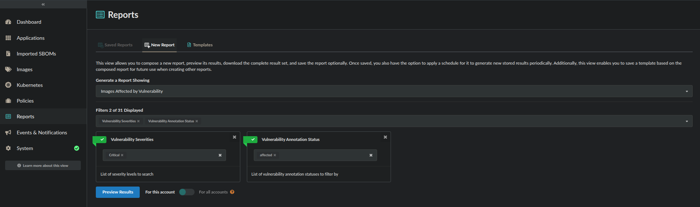
Images report on Critical and affected annotated vulnerabilities
The Account Scope is a default filter/option which controls whether the report should return global results encompassing all accounts, or if the results should be limited to only the local account. If you’re running the report as the admin user or as a user within the admin account, you’ll have the option to select either Local or Global as an Account Scope selection.
Once you’ve validated the Preview Results, you can either click on Download Full Report which will allow you to download the report in CSV (default) or JSON format or you can opt to click on Save Report.
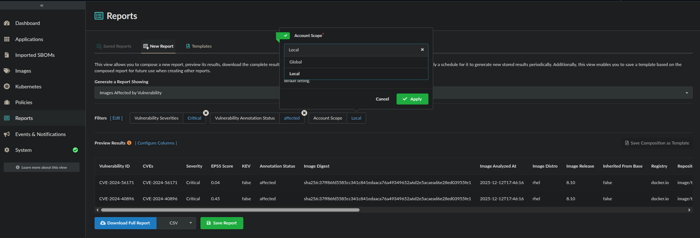
Preview Results
If saving the report, you should specify a report Name and optional Description. Additionally, you should also set the frequency (i.e., Daily, Weekly, or Monthly), day of the week, and time that report generation should occur. You also have the option to toggle Generate immediately on save which will generate a report for immediate download upon clicking the Save button.
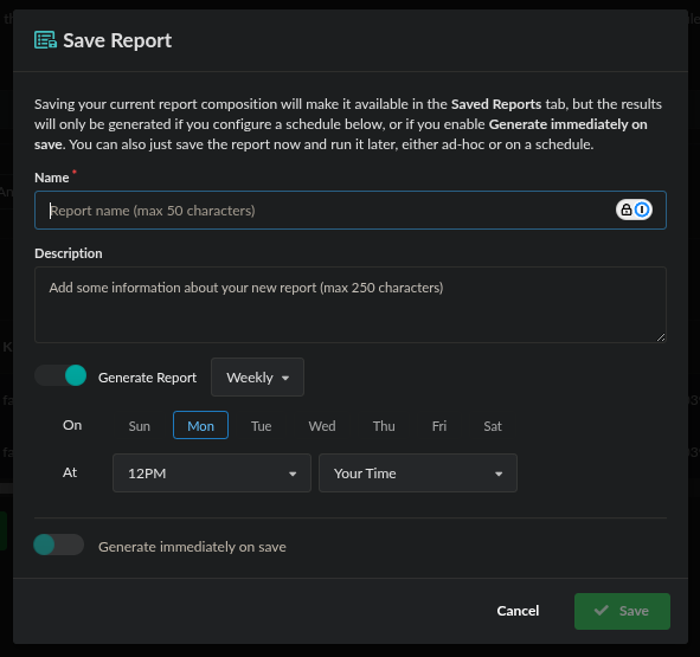
Save Report dialog
If you toggled Generate immediately on save, the saved report will be available for download in CSV (default) or JSON format and can be accessed by clicking on the Saved Reports tab.
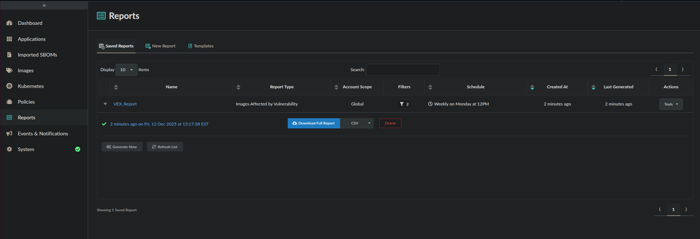
Saved Reports view
anchorectl can also be utilized to generate a list of images with annotated vulnerabilities that require remediation, providing you have the image identifier from anchorectl image list, it allows you to filter affected images by both Vulnerability Severity and Vulnerability Annotation Status (limited to Vulnerability Annotation Status only).
Syntax:
anchorectl image vulnerabilities <image ID, digest, or name:tag> --annotations <not affected, affected, fixed, under investigation>
With example, for all vulnerabilities annotated as Affected:
anchorectl image vulnerabilities docker.io/image/test:mytest --annotations affected
 ✔ Fetched vulnerabilities                   [2 vulnerabilities]                                                                                         docker.io/image/test:mytest
┌────────────────┬──────────┬──────────┬───────────────┬───────────────────┬──────────────┬────────┼────────────┬───────┬────────────────┬─────────────────────────────────────────────────┬───────────────────┐
│ ID             │ SEVERITY │ NAME     │ VERSION       │ FIX               │ WILL NOT FIX │ TYPE   │ FEED GROUP │ KEV   │ CVES           │ URL                                             │ ANNOTATION STATUS │
├────────────────┼──────────┼──────────┼───────────────┼───────────────────┼──────────────┼────────┼────────────┼───────┼────────────────┼─────────────────────────────────────────────────┼───────────────────┤
│ CVE-2024-56171 │ Critical │ java/jdk │ 1.8.0_452-b09 │ 1.8.0_461,8.0.461 │ false        │ binary │ nvd        │ false │ CVE-2024-56171 │ [https://nvd.nist.gov/vuln/detail/CVE-2024-56171](https://nvd.nist.gov/vuln/detail/CVE-2024-56171) │ affected          │
│ CVE-2024-40896 │ Critical │ java/jdk │ 1.8.0_452-b09 │ 1.8.0_461,8.0.461 │ false        │ binary │ nvd        │ false │ CVE-2024-40896 │ [https://nvd.nist.gov/vuln/detail/CVE-2024-40896](https://nvd.nist.gov/vuln/detail/CVE-2024-40896) │ affected          │
└────────────────┴──────────┴──────────┴───────────────┴───────────────────┴──────────────┴────────┼────────────┴───────┴────────────────┴─────────────────────────────────────────────────┴───────────────────┘
Note: The -o, --output <string> flag can also be supplied to output the results in any one of the below allowed formats. The default is text.
Allowed Formats: text, json, json-raw, csv, cyclonedx-json, or cyclonedx-xml
anchorectl image vulnerabilities docker.io/image/test:mytest --annotations affected -o csv
Export and Download a VEX Document
Anchore Enterprise can be used to generate a VEX (Vulnerability Exploitability eXchange) document for review with key stakeholders for security state awareness.
Click the Images menu item.
Select an image which has been analyzed where annotations have previously been added.
Click the Export button above the Annotation Status (VEX) column.
Exporting VEX annotations
From the Export dialog box, select the VEX radio button and desired export format (i.e. CycloneDX JSON, CycloneDX XML, or OpenVEX) from the drop-down box.
Click the Download button to download the VEX document.
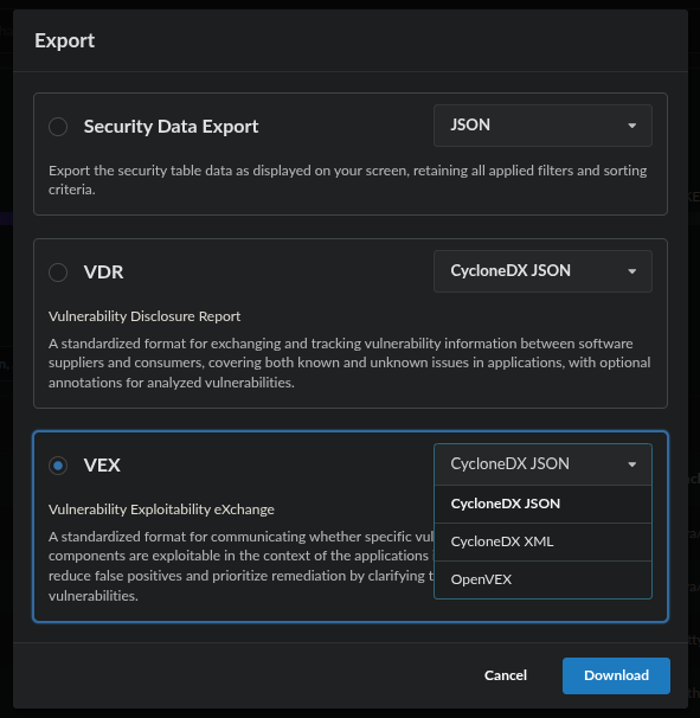
Export dialog showing VEX options
/images/{image_digest}/vex/openvex, /images/{image_digest}/vex/cyclonedx-xml, and /images/{image_digest}/vex/cyclonedx-json in: API ReferenceTrack Changes to Vulnerabilities
Anchore Enterprise features the ability to send notifications if the vulnerabilities within an image change.
For instance, changes made by the upstream providers of vulnerability data may cause CVEs to be added, removed, or modified. From a vulnerability management standpoint, it’s important to track such changes as a CVE severity level could be upgraded prompting the need to add a VEX annotation for vulnerability remediation.
Tracking changes to vulnerabilities is a core function of the Vulnerability Update subscription as described below.
Vulnerability Update Subscription
anchorectl is the primary mechanism for activating/deactivating the subscription (deactivated by default).
Once the subscription is activated, notifications can then be configured to notify upon changes or updates to vulnerabilities.
Use Policies for Vulnerability Management
Anchore Enterprise features a sophisticated policy engine that allows your organization to perform evaluations against source repositories or container images using a set of rules.
Click the Policies menu item.
Click on Create New Policy or click on Edit to modify the existing Active policy.
Click on Add New Rule Set and select either Source Repositories or Container Images from the drop-down box.
Provide a Name and Description for the ruleset and proceed to select and configure the ruleset Gate and Trigger.
Select an action (i.e., STOP, WARN, or GO) which should be associated with the ruleset.
For example, if you wanted to create a ruleset associated with the existing Anchore Enterprise - Secure policy to detect all CRITICAL vulnerabilities:
- Ruleset Type:
Container Images - Gate:
vulnerabilities - Trigger:
package
Parameters:
- package type (Required):
all - severity:
critical - severity comparison:
= - annotation status:
affected
Action (on policy evaluation): STOP
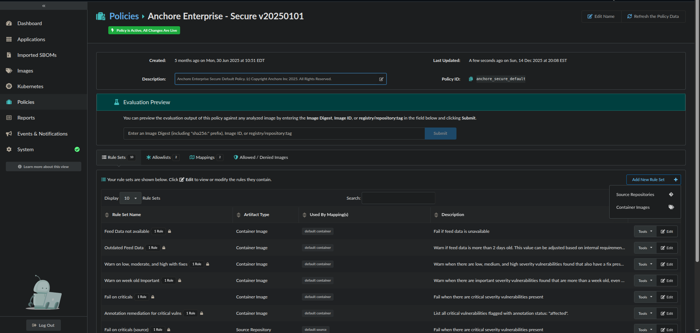
Add New Rule Set interface

Rule Set parameters and action configuration
Click on the Mappings tab followed by the Container Images tab.
Click on Edit for the default container Mapping Name.
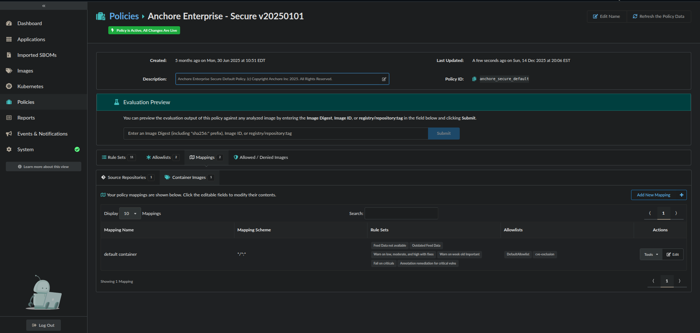
Policy Mappings view
- From the Edit Container Image Mapping dialog box, add the newly created ruleset to the Rule Sets list by selecting it from the drop-down menu. Once added, click OK.
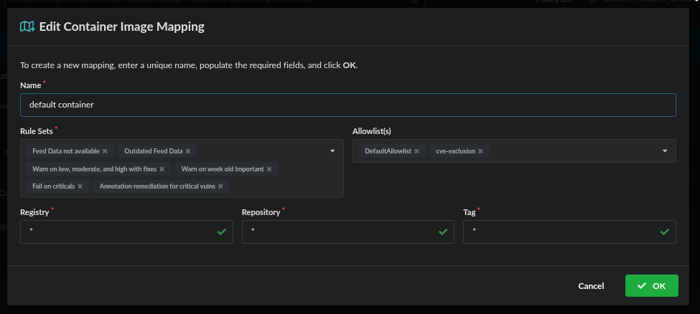
Container Image Mapping dialog
Click the Images menu item and select an image which has been analyzed where annotations have previously been added.
Click the Policy Compliance tab. Check to make sure the correct policy and newly added ruleset are listed next to Policy and under Rule Sets.
Type in the name of the newly added ruleset in the Search box to filter on just the vulnerabilities that match the ruleset.
Under the Gate Action column, verify the configured ruleset action is reflected.
13.Under the Policy Rule column, verify the name of the ruleset is reflected.
- Verify that the Policy Result in the upper right-hand side reflects the evaluation (i.e., PASSED or FAILED).

Policy Compliance evaluation results