Organizing Software into Apps, Versions and Assets
An app is the top-level building block in Anchore Enterprise’s SBOM management model. It represents a piece of software you ship or host, and it groups the versions of that software together so you can track security health across the full release lifecycle.
Each app contains one or more app versions, and each version contains one or more assets — the concrete container images, filesystems, and externally supplied SBOMs that make up that release. See How It Works for the full mental model.
Watch: a walkthrough of Applications, versions, and assets.
When to Model an App
Create an app for each project or product whose security health you want to track over time. Common patterns are:
One app per service in a microservices architecture
One app per shippable artifact in a monorepo
One app per major product line, with versions tracking individual releases
One app per development repo, with versions tracking nightly or milestone builds
Anatomy of an App
An app carries a small, fixed set of fields:
Field
Required
Purpose
name
Yes
Human-readable identifier, unique within an account
description
No
Free-form summary of the app
contact
Yes
Owning person or team — name is required, email and phone are optional
policy_id
No
Default policy applied to every version unless overridden — set to null to use the account default
version_count
Read-only
Number of versions currently attached
system_metadata
Read-only
UUID and created_at / updated_at timestamps
For the full create and update payload reference, worked examples, and a side-by-side of the AnchoreCTL and API workflows, see Creating and Managing Apps.
Apps are managed through the Anchore Enterprise GUI, AnchoreCTL, or the Anchore API. The three surfaces share the same data model — see Anatomy of an App for the field reference.
The lifecycle is straightforward: create an app, list and inspect the apps in your account, update the version status as apps are released or releases reach end of life (EOL), and update an app’s metadata as ownership or policy assignment changes.
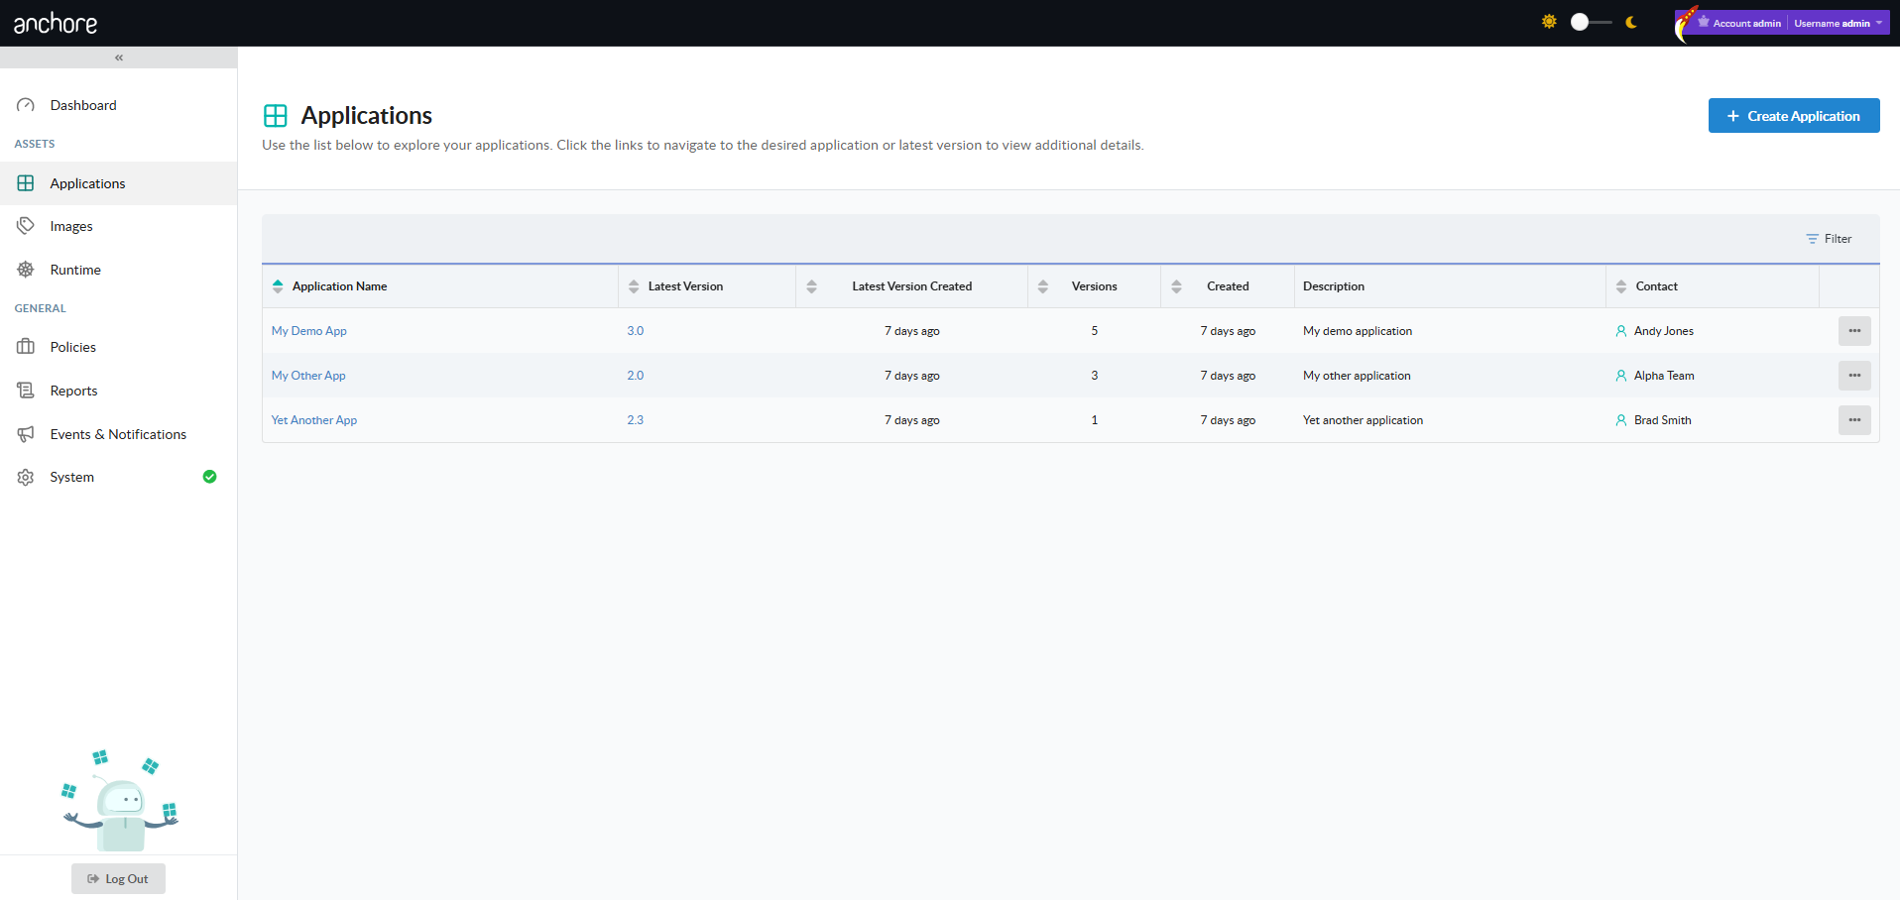
Manage Apps in the Anchore Enterprise GUI
The Apps view is the home for app management in the UI. From there you can browse every app in your current account, drill into a specific app to see its versions, and trigger the create / edit / delete flows from a single screen.
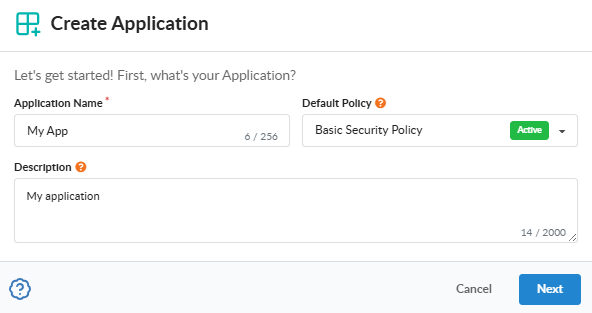
Create an App in the GUI
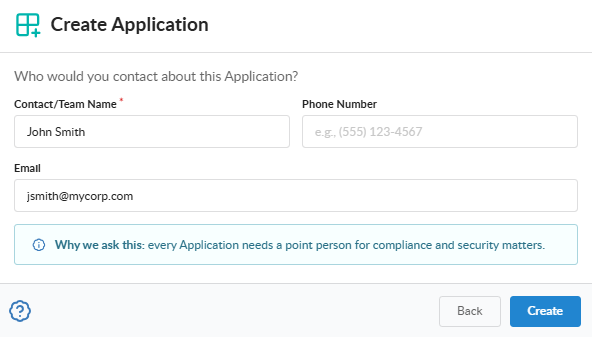
Click Create App in the Apps view to open the creation modal. Provide a name, an optional description, a contact (name required, email and phone optional), and an optional policy assignment.
If you leave the policy assignment blank, the app inherits the account’s default policy.
Edit an App in the GUI
From the Apps view or from an app’s detail page, open the Edit action to update the app’s name, description, contact, or policy assignment. The same field rules apply as on create.
Delete an App in the GUI
Open the Delete action from the Apps view or detail page. If the app still has versions attached, the GUI prompts you to confirm a forced delete that cascades to every version and asset under the app.
Deleting an app with force removes every version of the app and every asset attached to those versions. This operation is irreversible.
Manage Apps with AnchoreCTL
AnchoreCTL exposes the full CRUD surface for apps under anchorectl app. Every command accepts either an app name or its UUID, and the output format is controlled with -o text|json|json-raw|id.
Create an App
Create a new app with the add subcommand. The app name is the positional argument, and the contact name is the only required flag:
Optional flags include --contact-email, --contact-phone, --description, and --policy-id.
List Apps
List every app in the current account with no arguments:
anchorectl app list
To narrow the result to a single app by exact name, add --name:
anchorectl app list --name my-service
Get an App
Retrieve a single app’s record by either its name or UUID:
anchorectl app get my-service
Use -o json for the structured record, which includes system_metadata and the resolved policy_id.
Update an App
Update one or more fields on an existing app. Only the flags you provide are sent — omitted flags leave the corresponding fields unchanged:
anchorectl app update my-service \
--description "Customer-facing API service (regulated)"\
--policy-id strict-policy
To clear the policy assignment and fall back to the account default, pass an empty string: --policy-id "".
Delete an App
Delete an app by name or UUID. The default behavior refuses to delete an app that still has versions attached:
anchorectl app delete my-service
To cascade the delete through every version and every asset under the app, add --force:
anchorectl app delete my-service --force
Manage Apps with the API
App management is exposed under the /apps collection — create, list, get, update, and delete operations are all available, with cascading delete via ?force=true. The full endpoint inventory, request and response schemas, and error codes are in the API browser; search for the Apps tag.
A few conventions worth knowing as you call these endpoints:
List endpoints return paginated responses — see Pagination.
Cross-account requests are scoped via the x-anchore-account header or, from AnchoreCTL, the ANCHORECTL_ACCOUNT environment variable. See Account Scoping for the full mechanism.
DELETE /apps/{app_id}?force=true is destructive and irreversible — it removes every version of the app and every asset attached to those versions.
2 - Creating and Managing App Versions
An app version is a point-in-time release of an app — the unit that aggregates packages, vulnerabilities, and policy results across the assets that make up a release. Versions are managed through the Anchore Enterprise GUI, AnchoreCTL, or the Anchore API.
In addition to a name and description, an app version carries two fields that model the release lifecycle:
status — one of in_progress, released, or eol. New versions default to in_progress. Move a version to released when it ships, and to eol once support ends.
release_date — the date the version was released or hosted. Free-form for in_progress versions; typically set when the status moves to released.
Manage App Versions in the Anchore Enterprise GUI
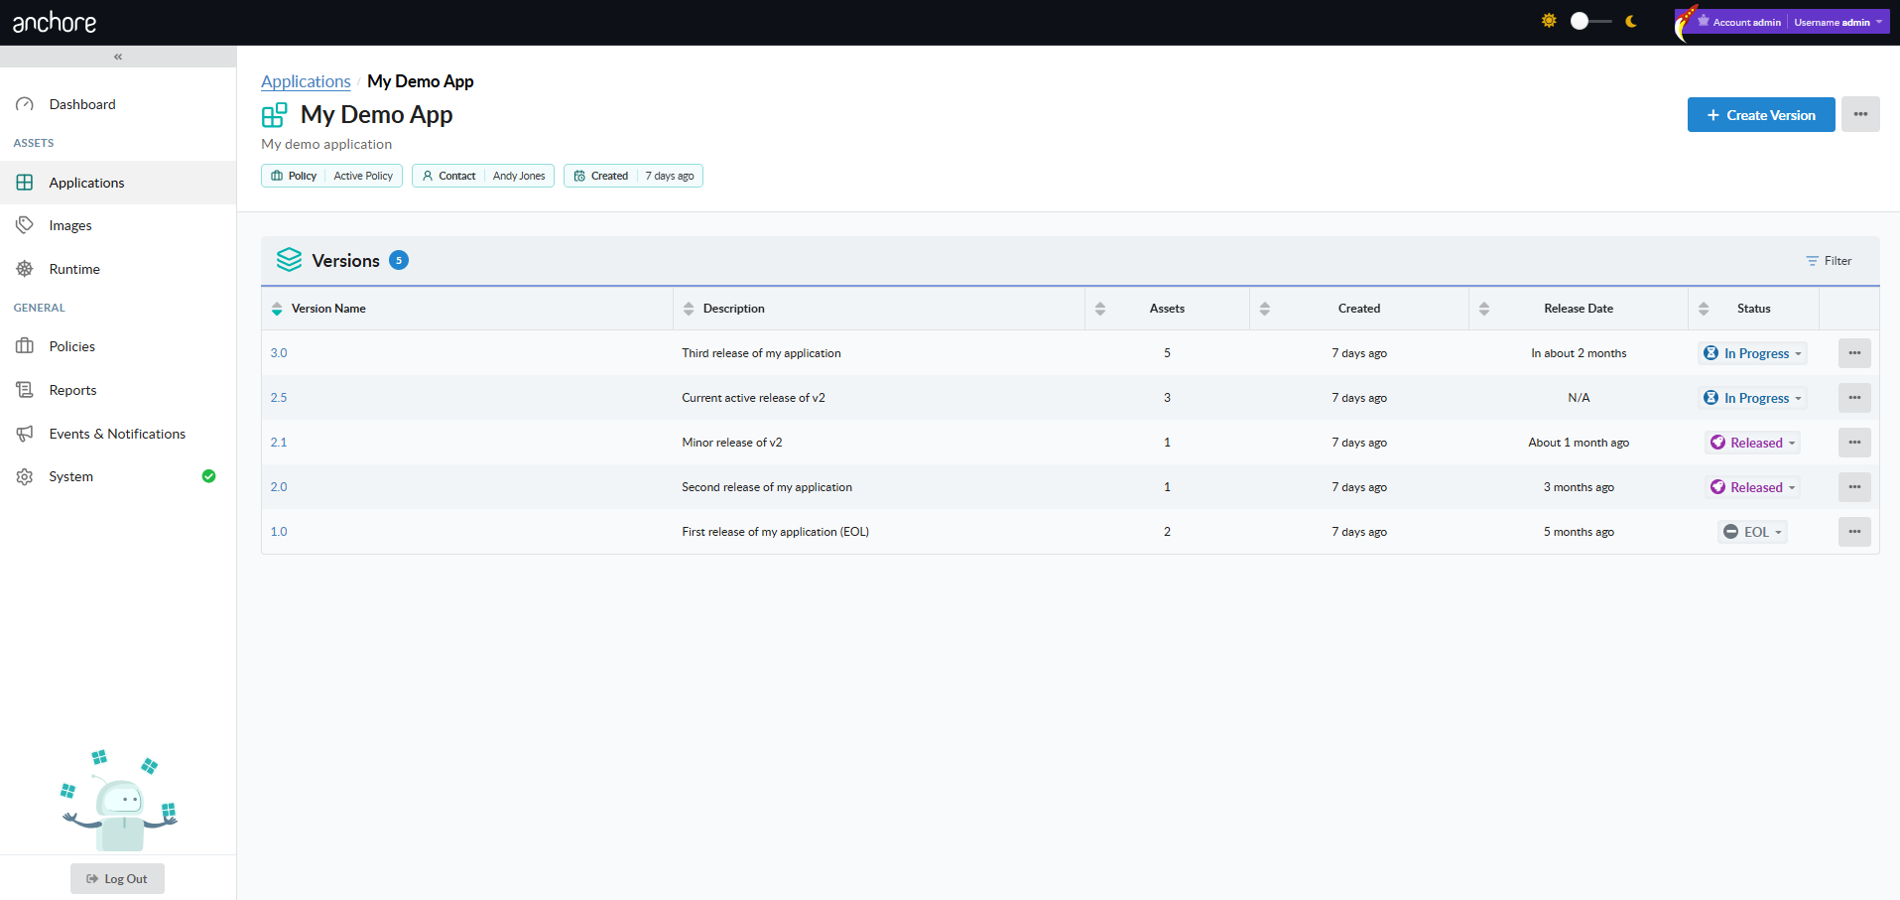
Versions are listed on an app’s detail page in the Apps view. From there you can create a new version, open an existing version’s detail page, or edit and delete versions.
Create a Version in the GUI
From the app detail page, click Create Version to open the creation modal. Provide a name, an optional description, an optional status, an optional previous version to chain from, and an optional release date.
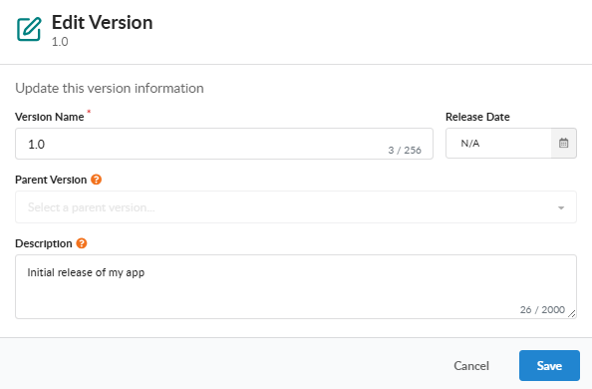
Edit a Version in the GUI
From the app detail page or the version’s own detail page, open the Edit action to update any field.
Delete a Version in the GUI
Open the Delete action from the version row or detail page. If the version still has assets attached, the GUI prompts you to confirm a forced delete that cascades to every asset.
Deleting a version with force removes every asset attached to that version. This operation is irreversible.
Version Detail Page
Open a version from the app detail page to land on its detail view. This is the centerpiece of SBOM management in the GUI — it aggregates every asset attached to the version and presents a tabbed view of the version’s overall compliance issues, packages, and vulnerabilities.
The header carries the version’s name, status, release date, and primary actions — Add Asset, Download Unified Documents, and an additional actions menu. The body is organised into tabs that presents the same underlying data through different perspectives. Each tab shows a data grid with a unique listing of relevant data. Above the grid are filters which can be used to reduce the data rows based on your desired criteria. Filters can be stacked to create multiple expressions. Next to the Filters is an Export button to download the unfiltered grid data into a data file. Each export creates an asynchronous job, and the resulting generated data file can be downloaded via the Recent Activity panel in the Summary tab.
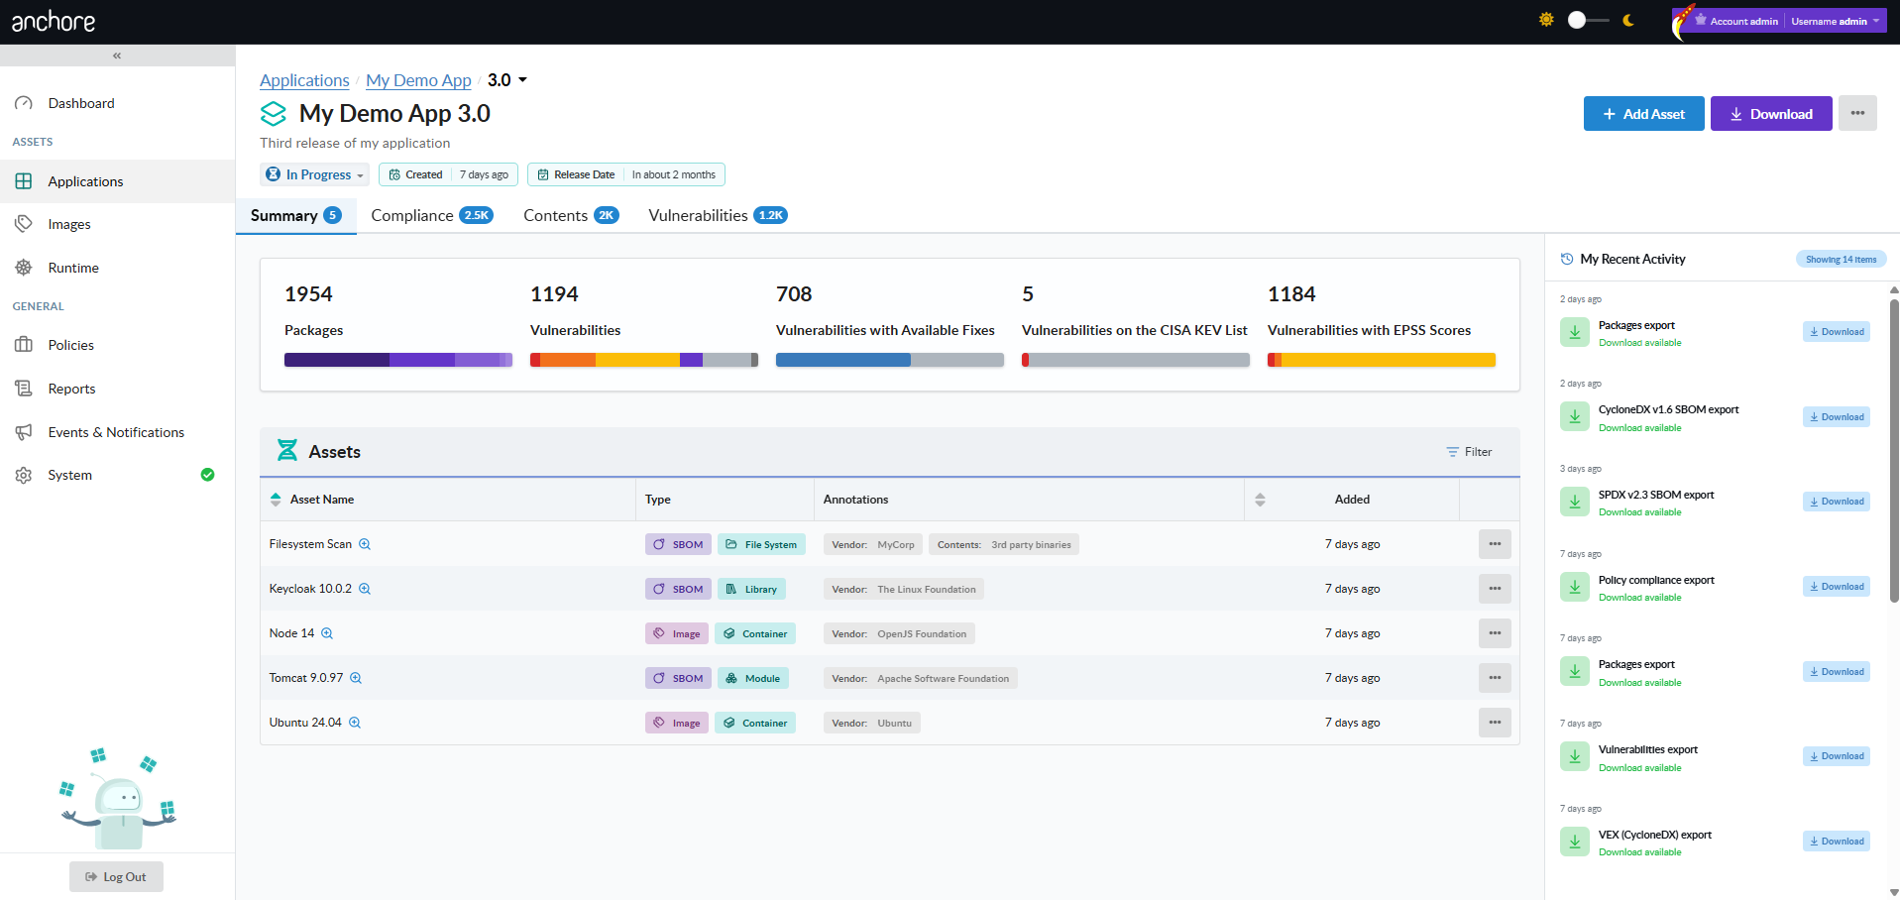
Summary Tab
The summary tab gives an at-a-glance view of the version’s compositions and compliance state: list of assets with their metadata, total packages with a breakdown by ecosystem, vulnerability counts with several breakdowns, and a recent activity panel on the right side which shows application version jobs and downloads. It is the ideal landing page for an executive or release-manager glance at the version.
Recent Activity Panel
Every asset-add, export, and policy-evaluation operation runs as an asynchronous job. The version detail page surfaces these through a Recent Activity panel that polls live for status updates and shows each in-flight, completed, or failed job.
Click a row to open the job detail popup, which shows the job type, status, headline message, and — for failed jobs — the error code and reason captured during validation. The same job records are available through anchorectl app job list / get and through the API at /apps/{app_id}/jobs. For the validation error codes you may see on failed SBOM uploads, see Content Validation.
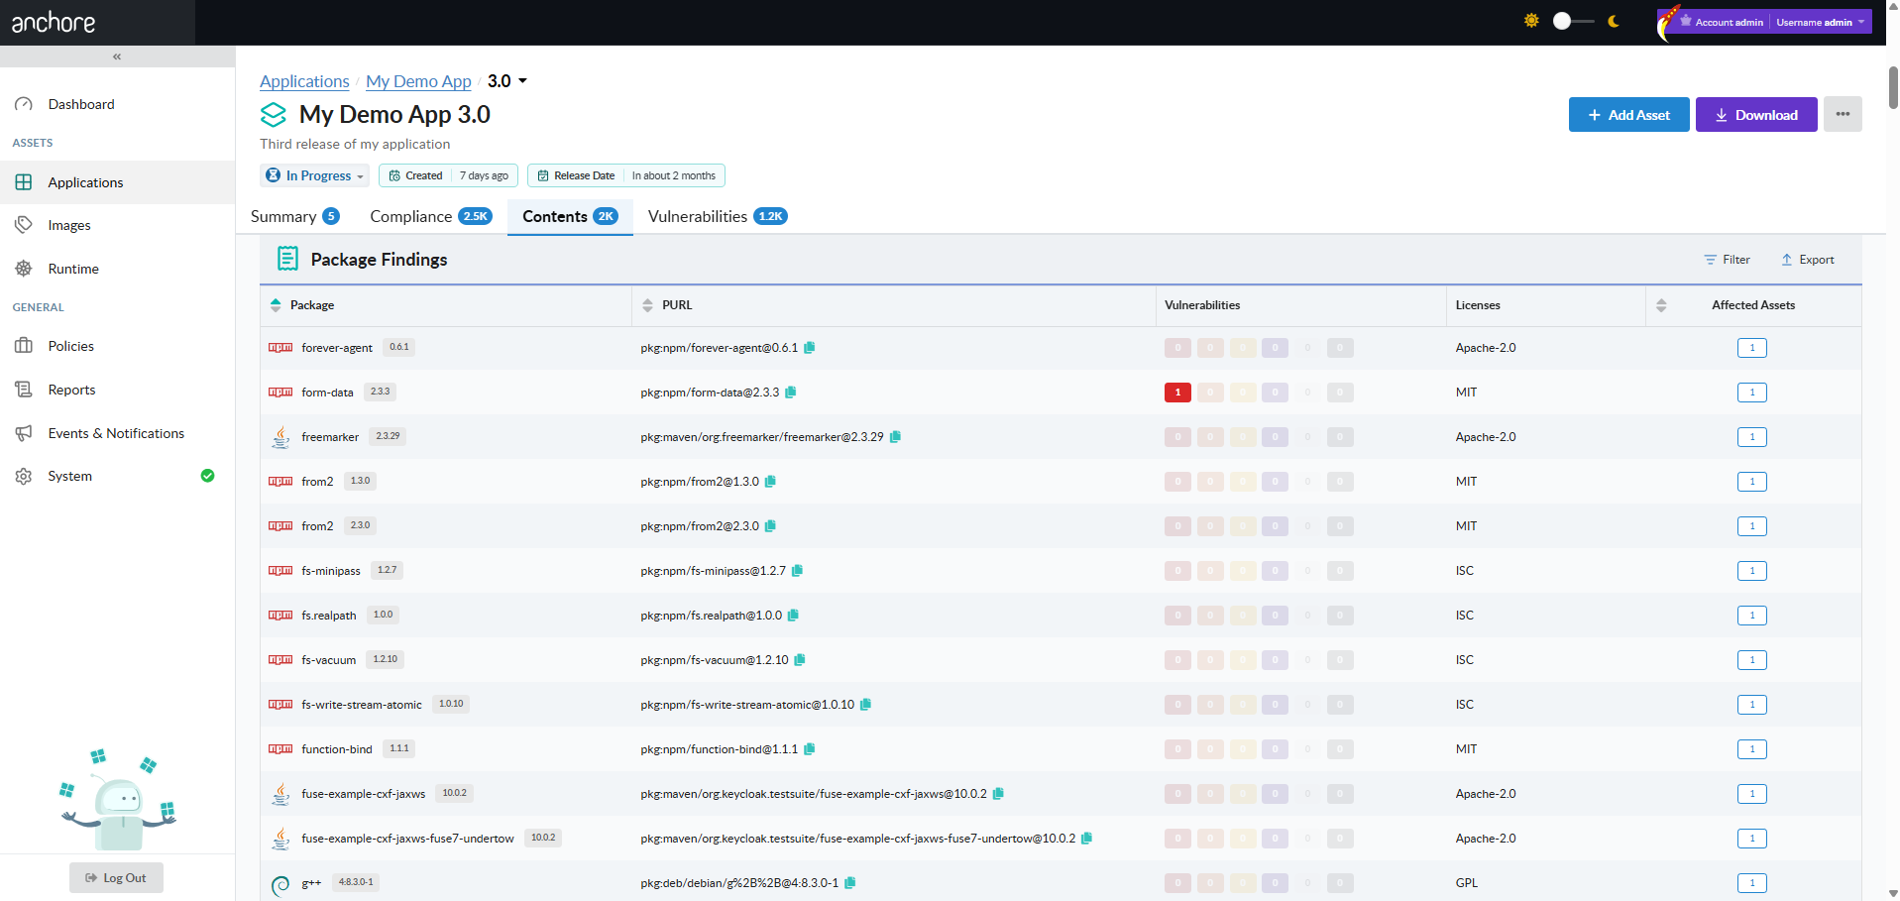
Contents Tab
The contents tab lists every unique package found across every asset in the version. Each row presents the package ecosystem, name and version, PURL, a vulnerability summary by severity and count, a list of licenses, and an affected asset count. From a package you can view which assets contain it. This is the GUI equivalent of the assets-by-package API endpoint described in Viewing an App Version’s SBOM.
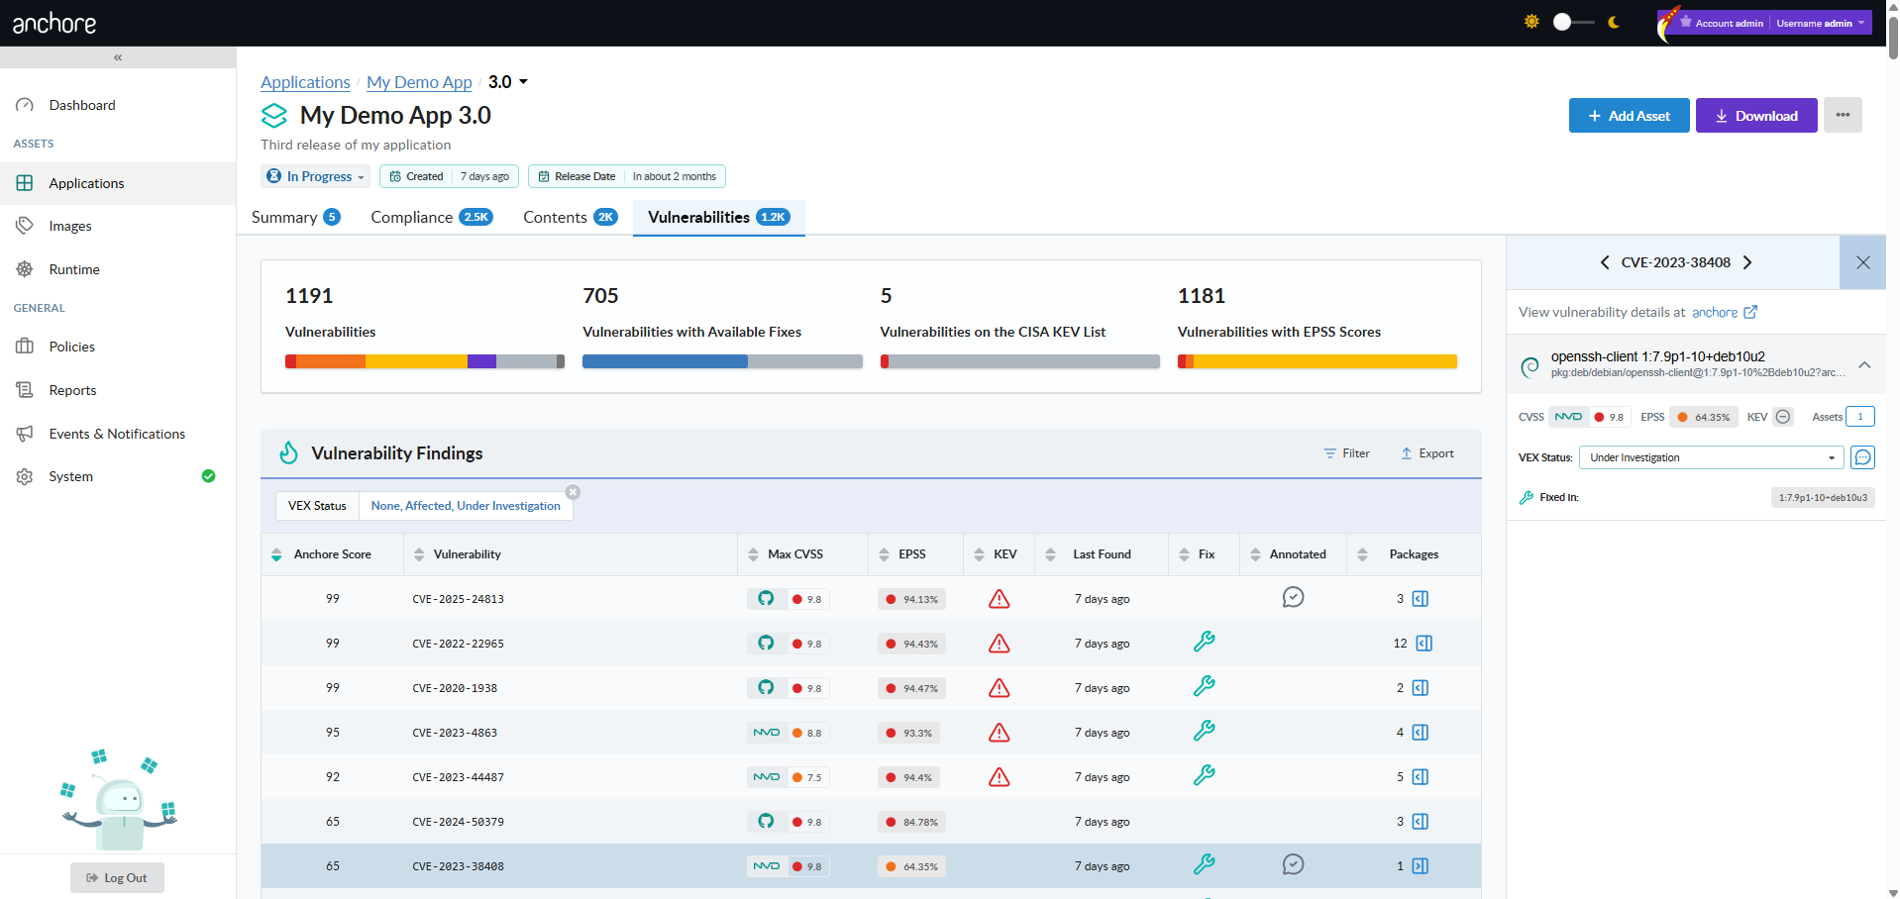
Vulnerabilities Tab
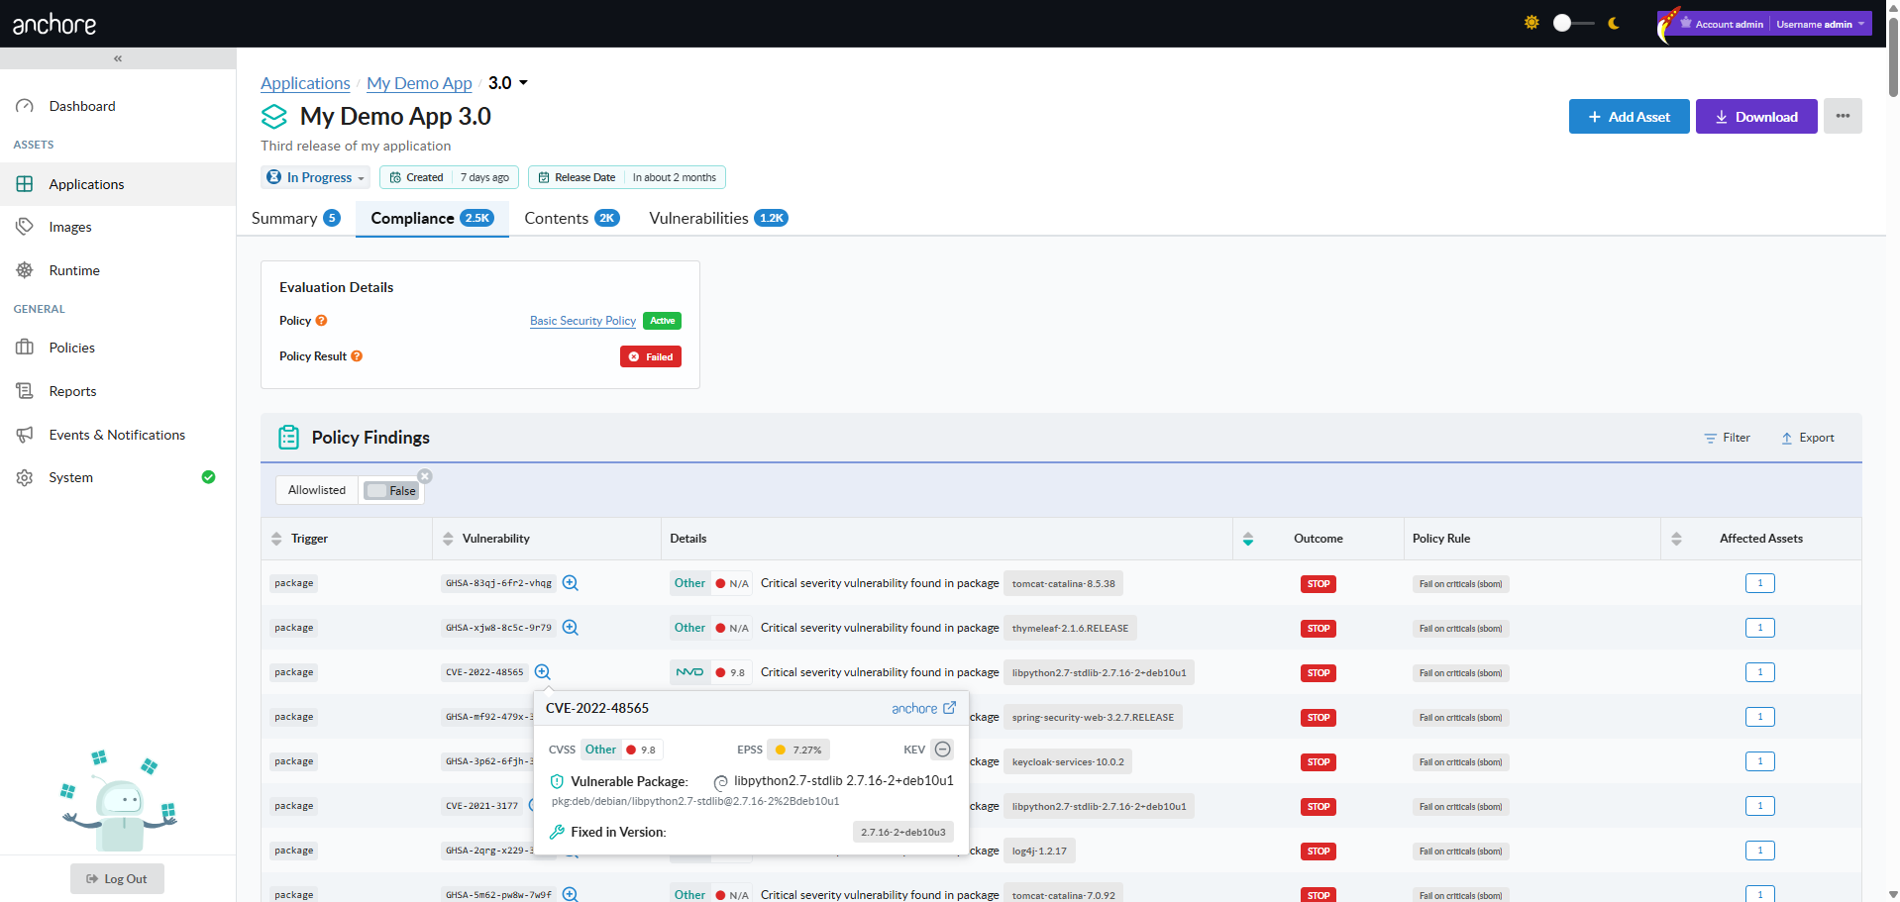
The vulnerabilities tab lists every unique vulnerability surfaced across the version’s assets. Each row presents a unique vulnerability record consisting of the computed Anchore Score (a composite risk index consisting of the CVSS score and severity, the EPSS, and the CISA KEV status, used to prioritize remediation work), vulnerability ID, maximum CVSS severity and score (from a given security repository), the EPSS data, the CISA KEV status, the last time the vulnerability was reported, whether any of the associated packages have fixes available, and whether any of the associated packages have VEX annotations applied to them. Selecting a vulnerability opens a panel that shows which packages are affected and in which assets the impacted package lives. The packages panel can also be used to apply a VEX annotation to provide the security assessment for a given vulnerability-package combination for the current application version.
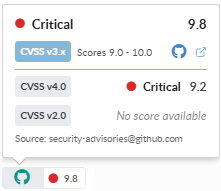
Clicking on any of the Vulnerability widgets will show the vulnerability repository from which the data is being provided, along with CVSS v2.0, v3.1, and v4.0 scores. There is also a link to the
Anchore Vulnerability Database website where you can conduct additional research about any vulnerabilities of interest looking across data aggregated across several providers.
Compliance Tab
The compliance tab shows the result of the most recent policy evaluation for the version. Findings are grouped by gate and trigger, and a STOP / WARN / GO badge on each finding mirrors what AnchoreCTL would surface from anchorectl app version policy findings list.
Manage App Versions with AnchoreCTL
App versions live under anchorectl app version. Every command requires the parent app via the --app flag and accepts either an app or version name, or its UUID.
Create a Version
Create a new version of an existing app. The version name is the positional argument, and the parent app is identified with --app:
Optional flags include --description, --status, and --release-date. New versions default to in_progress status.
List Versions for an App
List every version of an app, with the app name or UUID as the positional argument:
anchorectl app version list my-service
To narrow the result to a single version by exact name, add --name:
anchorectl app version list my-service --name 1.4.0
Get a Version
Retrieve a single version’s record. The version argument accepts either its name or UUID:
anchorectl app version get 1.4.0 --app my-service
Use -o json for the structured record, which includes system_metadata.
Update a Version
Update one or more fields on an existing version. Only the flags you provide are sent — omitted flags leave the corresponding fields unchanged. This is also how you transition the version’s status through its lifecycle:
anchorectl app version update 1.4.0 \
  --app my-service \
  --status released \
  --release-date 2026-05-15
Delete a Version
Delete a version by name or UUID. The default behavior refuses to delete a version that still has assets attached:
anchorectl app version delete 1.4.0 --app my-service
To cascade the delete through every asset under the version, add --force:
anchorectl app version delete 1.4.0 --app my-service --force
Manage App Versions with the API
App version management is exposed under /apps/{app_id}/versions — create, list, get, update, and delete operations are all available, with cascading delete via ?force=true. The full endpoint inventory, request and response schemas, and error codes are in the API browser; search for the App Versions tag.
A few conventions worth knowing as you call these endpoints:
Pagination on list endpoints is cursor-based — see How It Works.
Status transitions are sent through the same PATCH endpoint as the name and description fields.
The release_date field is an RFC 3339 date-time. AnchoreCTL accepts the shorter YYYY-MM-DD form and converts it.
DELETE /apps/{app_id}/versions/{version_id}?force=true is destructive and irreversible — it removes every asset attached to the version.
3 - Managing Assets in an App Version
An asset is an application codebase element that was analyzed and whose SBOM lives inside an app version. It can be an externally supplied SBOM document, a container image, or an analyzed filesystem — all three sit side by side under the same version. The version aggregates packages, vulnerabilities, and policy results across every asset it contains.
Each asset carries a small set of fields:
Field
Required
Purpose
name
Yes
Human-readable identifier, unique within the parent app version
type
Yes
One of the values in the AssetType enum (e.g. container, filesystem, library)
annotations
No
Free-form key=value pairs for build metadata, ownership, environment tags, and so on
system_metadata
Read-only
UUID and created_at / updated_at timestamps
The SBOM content for an asset is fetched separately from the asset record itself.
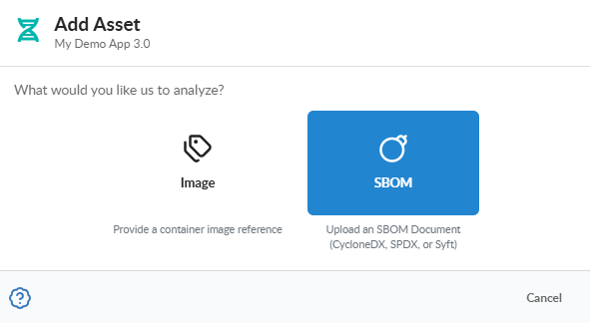
Add an Asset
Assets are added asynchronously through a job. AnchoreCTL exposes four asset-add commands that map to four job types in the API; the choice depends on what you’re attaching:
SBOM — upload an existing CycloneDX, SPDX, or Syft-native SBOM produced outside Anchore Enterprise. See Managing SBOM Assets.
Filesystem — analyze a directory tree locally (i.e., source repo, build artifact dir, or a mounted VM) and upload the resulting SBOM. See Managing Filesystem Assets.
For the job lifecycle — pending → processing → complete / failed / cancelled — and the full distinction between centralized and distributed image analysis, see How It Works.
Manage Assets in the Anchore Enterprise GUI
A version’s detail page lists every asset attached to that version, with each asset’s type, status, and a quick path to its SBOM, packages, and vulnerabilities.
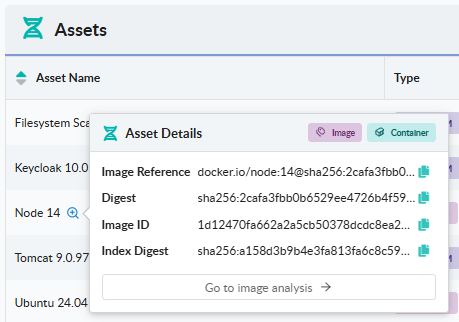
Asset Detail Popup
Selecting an asset on the version’s assets list opens a drill-in popup that shows the asset’s metadata. If the asset is an Image, click Go to image analysis to open the advanced images GUI. There you can review additional image details, assess advanced policies like FedRAMP or NIST 800-53, and view STIG results.
Edit an Asset in the GUI
Open an asset’s row action menu to edit its attributes — for example, choose Edit Annotations to manage the key=value annotations on the asset. Annotations are merged with what’s already there; clear a single key by setting its value to empty.
Delete an Asset in the GUI
From the version detail page, open the Delete action on the asset row. Deleting an asset removes it and its SBOM from the version; it does not affect any other asset or version.
Manage Assets with AnchoreCTL
Asset CRUD lives under anchorectl app version asset. Every command requires the parent app and version via --app and --version.
List Assets in a Version
List every asset attached to a specific version. The version name or UUID is the positional argument, and the parent app is identified with --app:
anchorectl app version asset list 1.4.0 --app my-service
To narrow the result to a single asset by exact name, add --name:
anchorectl app version asset list 1.4.0 --app my-service --name api-image
Get an Asset
Retrieve a single asset’s record. The asset argument accepts either its name or UUID:
anchorectl app version asset get api-image --app my-service --version 1.4.0
Use -o json for the structured record, which includes system_metadata and the asset’s annotations.
Get the SBOM for an Asset
The asset’s stored SBOM is fetched through a separate subcommand. Use --file to write the SBOM to disk, or omit it to write to stdout:
anchorectl app version asset sbom get api-image \
  --app my-service \
  --version 1.4.0 \
  --file api-image.sbom.json
Edit an Asset
Edit an asset’s attributes — annotations, name, or type — with the update subcommand:
--annotations accepts a comma-separated list of key=value pairs. The list is merged with existing annotations; remove a single key by setting its value to empty (key=). Rename the asset with --name, or correct its type with --type.
Delete an Asset
Delete an asset by name or UUID. The version it belongs to is identified with --version, and its parent app with --app:
Deletion is unconditional — there is no --force flag because nothing depends on an asset’s existence other than the version it belongs to.
Manage Assets with the API
Asset management is exposed under /apps/{app_id}/versions/{version_id}/assets — list and get on the collection, get / update / delete on individual assets, and a separate sub-resource for the asset’s SBOM content at /apps/{app_id}/versions/{version_id}/assets/{asset_id}/sbom. Asset creation is performed through the App Jobs endpoints — one job type per add path. The full endpoint inventory, request and response schemas, and error codes are in the API browser; search for the App Version Assets and App Jobs tags.
A few conventions worth knowing as you call these endpoints:
The list endpoint returns paginated responses — see Pagination — and accepts ?name=<exact-name> and ?type=<AssetType> filters.
Cross-account requests are scoped via the x-anchore-account header or ANCHORECTL_ACCOUNT environment variable. See Account Scoping for the full mechanism.
The query endpoints under the same version path — packages and assets-by-package — answer cross-asset questions about a release. They are covered in Viewing an App Version’s SBOM; the vulnerability-side queries (vulnerabilities, packages-by-vulnerability) are covered in Scan an App Version.
3.1 - Managing SBOM Assets
An SBOM asset is created by uploading an SBOM that was produced outside Anchore Enterprise — by a vendor, a different SCA tool, or a custom build pipeline — and attaching it to an app version. Use this path when you already have an SBOM in hand and want to bring it into Anchore Enterprise’s vulnerability and policy analysis without re-scanning the underlying artifact.
The same upload path also serves as the GUI equivalent for filesystem-derived SBOMs — generate the SBOM with a tool of your choice, then upload it here.
Supported Formats
The supported SBOM formats are:
Format
JSON versions
XML versions
Tag-Value versions
CycloneDX
1.2 – 1.6
1.0 – 1.6
—
SPDX 2.x
2.2 – 2.3
—
2.1 – 2.3
SPDX 3.0
3.0
—
—
Syft
native
—
—
SPDX 3.0 documents can be uploaded and downloaded today, but content and vulnerability analysis against them are not yet functional.
Content Validation
Anchore Enterprise runs every uploaded SBOM through a multi-stage validation pipeline before extracting its packages into the app version’s catalog. The pipeline runs as the first step of the upload job; if any stage fails, the job moves to failed with the specific error captured on the job record.
The stages are:
Format detection — the document is classified as CycloneDX, SPDX (2.x or 3.0), or Syft based on identifying markers in the document head. Documents that match none of the supported formats are rejected before any parser runs.
Structural parsing — the format-specific parser deserialises the document. Anchore Enterprise uses the cyclonedx-python-lib library for CycloneDX, spdx-tools for SPDX, and a native parser for Syft. Invalid JSON, malformed XML, missing required fields, or wrong root elements are rejected at this stage.
Version support — for CycloneDX uploads, the declared specVersion must fall within the supported range listed above. Documents declaring an unsupported version are rejected even if they otherwise parse cleanly.
Content ingestion — only after the previous stages pass does Anchore Enterprise extract packages and dependencies from the document and insert them into the app version.
When the job fails, the error record carries one of the following codes alongside a human-readable reason:
Code
Meaning
AS510
Generic SBOM parse failure (no format-specific code applies)
AS511
SPDX parse failure
AS512
CycloneDX JSON parse failure
AS513
CycloneDX specVersion outside the supported range
AS514
CycloneDX XML is malformed
AS515
Document does not match any recognised SBOM format
AS516
Syft document failed structural parsing
You can inspect the failure detail for a job through any of the three surfaces. From the GUI, open the Recent Activity panel on the version detail page and click the failed job to see the error code and reason. From the API, GET /apps/{app_id}/jobs/{job_id} returns the same record. From AnchoreCTL, retrieve the job by its ID:
anchorectl app job get <job-id> --app my-service
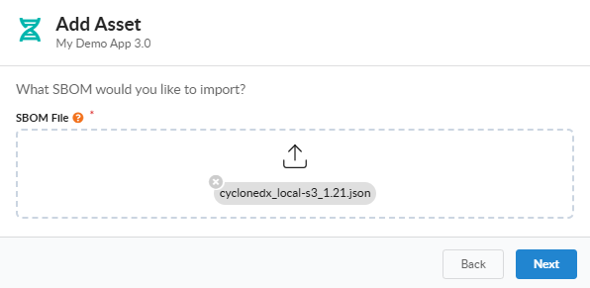
Upload an SBOM Asset in the Anchore Enterprise GUI
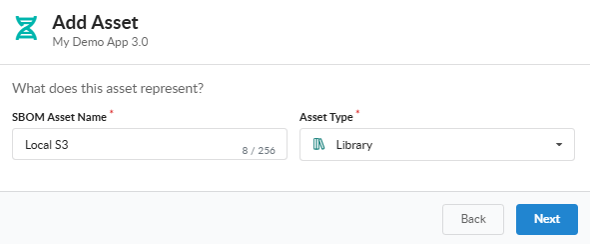
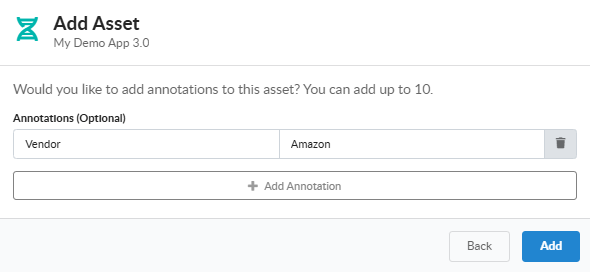
From an app version’s detail page, open the Add Asset action and choose SBOM. The GUI walks through a short three-step wizard: pick the SBOM file from disk, supply the asset’s name and type, and optionally add annotations. The asset’s type tells Anchore Enterprise what the SBOM describes — a container, a filesystem, a library, an application, and so on — and is selected from the same AssetType enum used everywhere else.
Select the SBOM option:
Select the desired SBOM document:
Enter the SBOM Asset Name:
Optionally, enter up to 10 SBOM asset annotations:
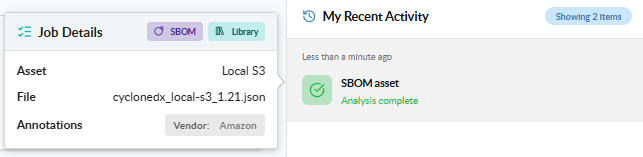
You can view the recently added assets in the My Recent Activity panel on the App Version Summary tab:
Upload an SBOM Asset with AnchoreCTL
Use app version asset add sbom to upload a CycloneDX, SPDX, or Syft-native document to an app version. The SBOM file path is the positional argument; the parent app, parent version, and asset name are required:
Unlike the container-image and filesystem add commands, add sbom cannot infer the asset’s type from the input — the SBOM document describes its components, but Anchore Enterprise does not assume what the whole asset represents. The flag defaults to unknown. Set it explicitly to one of the AssetType values so downstream queries and filters work as expected:
By default the command submits the job and returns immediately. To block until the job reaches a terminal state — useful in CI pipelines where you want validation to gate later steps — add --wait:
POST /apps/{app_id}/jobs/add-sbom-asset — multipart form-data carrying the asset name, the parent version ID, the SBOM document, an asset_type value, and optional annotations.
The full request and response schemas are in the API browser; search for the App Jobs tag. The same endpoint is used by AnchoreCTL’s filesystem and distributed container-image flows after local SBOM generation, so a direct API caller can replicate any of those flows by generating an SBOM client-side and submitting it here with the appropriate asset_type.
A few conventions worth knowing as you call this endpoint:
Schema validation runs before the job leaves pending; a malformed document moves the job to failed with the validation error in the job record.
Job state transitions and polling are documented in How It Works.
Cross-account requests are scoped via the x-anchore-account header or, from AnchoreCTL, the ANCHORECTL_ACCOUNT environment variable. See Account Scoping for the full mechanism.
SBOMs produced by AnchoreCTL’s distributed container-image or filesystem analysis are uploaded automatically by those commands. Use this page when you have an SBOM produced outside of AnchoreCTL — by a vendor, by Syft directly, by another SCA tool, or by a custom pipeline.
3.2 - Managing Container Image Assets
A container image asset is created by analyzing an OCI or Docker image and attaching the resulting SBOM to an app version. Anchore Enterprise supports two analysis paths — pick the one that matches where the image bytes can be read from.
This page covers attaching a container image to an app version. The standalone advanced image analysis workflow — scanning an image without binding it to an app — is also fully supported in v6 through the Images view in the Anchore Enterprise GUI and the anchorectl image add command. See Image Analysis for that path. Use this page when you want a container image to participate in app-version aggregation, pivot queries, and exports.
Distributed vs Centralized Analysis
Path
Who pulls the image
Who generates the SBOM
When to use
Distributed
AnchoreCTL, on the host where you run the command
AnchoreCTL, locally; only the SBOM is uploaded
Offloading SBOM-generation load from the central deployment, air-gapped or sensitive-image pipelines, registries Anchore Enterprise cannot reach
Centralized
Anchore Enterprise, from the registry
Anchore Enterprise, server-side
Registries Anchore Enterprise can reach, when you want consistent server-side analysis without local resource use
For the underlying lifecycle these two paths share, see How It Works.
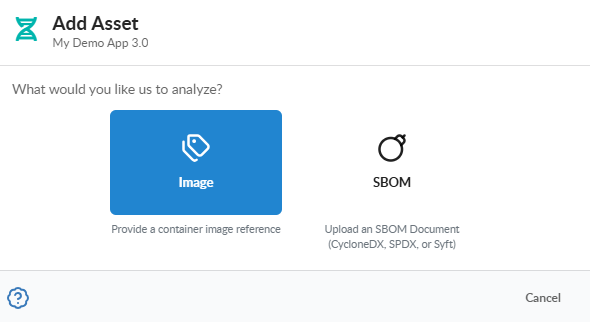
Add a Container Image Asset in the Anchore Enterprise GUI
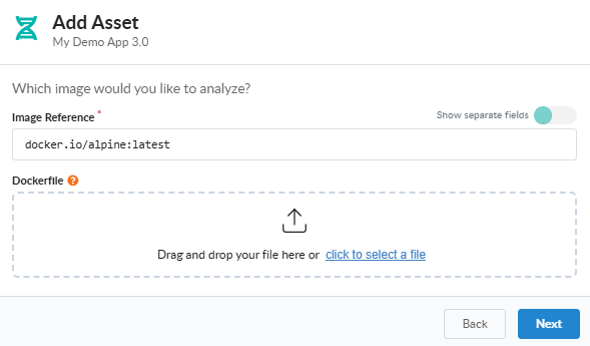
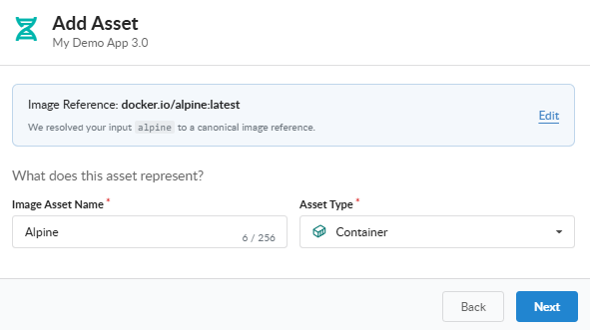
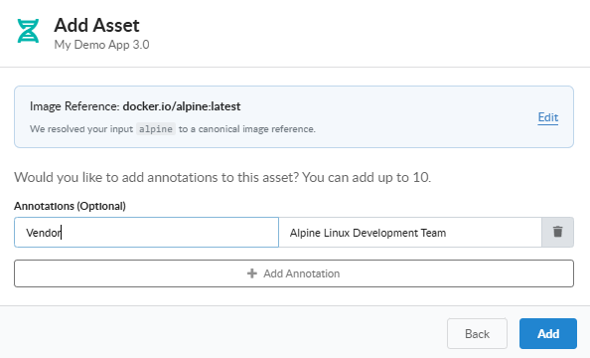
From an app version’s detail page, open the Add Asset action and choose Container Image. Provide the image reference, an asset name, and (optionally) a Dockerfile to attach and annotations. The GUI submits the analysis job and shows its progress on the version’s recent activity panel.
Select the Image option:
Enter the Image Reference and optional Dockerfile:
Enter the Image Asset Name:
Optionally, enter up to 10 image asset annotations:
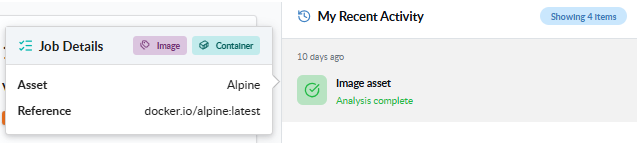
You can view the recently added assets in the My Recent Activity panel on the App Version Summary tab:
Add a Container Image Asset with AnchoreCTL
AnchoreCTL exposes the two analysis paths as separate subcommands. Both require the parent app, the parent version, and a name for the new asset.
Distributed Analysis
Use app version asset add container-image to have AnchoreCTL analyze the image locally and upload the SBOM. The default source is a registry pull:
Switch the source with --from. The supported values are:
Source
--from value
Notes
Registry (default)
omit, or registry
AnchoreCTL pulls the image from the registry
Local Docker daemon
docker
Reads an image already loaded into Docker
Local Podman daemon
podman
Reads an image already loaded into Podman
OCI/Docker archive
docker-archive:/path/to.tar
Loads the image from a local tar file
To analyze an image already loaded into your local Docker daemon — for example a freshly built image that hasn’t been pushed yet — point AnchoreCTL at the docker source:
The image reference must be resolvable from Anchore Enterprise — including registry credentials configured in your account. The centralized command does not accept --from or --platform, since Anchore Enterprise selects how to fetch the image.
Shared Flags
Both subcommands accept the same supporting flags:
--annotations "key=value,key=value" — attach build metadata at create time (see Managing Assets in an App Version for the merge and clear semantics)
--dockerfile /path/to/Dockerfile — attach the Dockerfile so policy checks can evaluate Dockerfile triggers
--wait — block until the job reaches a terminal state instead of returning immediately
--type — override the asset type (defaults to container); see the AssetType enum
These flags stack with both the distributed and centralized invocations. A complete CI/CD-friendly invocation that attaches a Dockerfile, captures build metadata, and blocks until the job completes:
Distributed and centralized analysis are two distinct job types in the API:
POST /apps/{app_id}/jobs/add-container-image-asset — used by the centralized path; Anchore Enterprise pulls and analyzes the image server-side.
POST /apps/{app_id}/jobs/add-imported-image-asset — used by the distributed path; AnchoreCTL analyzes the image locally and uploads the resulting SBOM together with the image manifest, image config, and any optional analysis artifacts (secret searches, content searches, file contents) as a multipart payload.
For both, the full multipart request schema and response schemas are in the API browser; search for the App Jobs tag.
A few conventions worth knowing as you call these endpoints:
Job state transitions and the --wait semantics are documented in How It Works.
The job response carries a job_id; poll GET /apps/{app_id}/jobs/{job_id} to track status.
Cross-account requests are scoped via the x-anchore-account header or, from AnchoreCTL, the ANCHORECTL_ACCOUNT environment variable. See Account Scoping for the full mechanism.
Server-side analysis depends on Anchore Enterprise being able to reach your registry and authenticate. Configure registry credentials in your account before submitting centralized jobs against private registries.
3.3 - Managing Filesystem Assets
A filesystem asset is created by analyzing a local directory tree and attaching the resulting SBOM to an app version. Use this path when the software you want to track is a build output, an unpacked archive, a virtual machine root, or any directory of files that does not live inside a container image.
Filesystem analysis happens on the host where you run AnchoreCTL: AnchoreCTL generates the SBOM locally and uploads the resulting document to Anchore Enterprise. To attach a filesystem-derived SBOM through the Anchore Enterprise GUI, generate the SBOM first and upload it via Managing SBOM Assets with the asset type set to filesystem.
Filesystem Assets in the Anchore Enterprise GUI
The GUI surfaces a filesystem asset once an app version asset add filesystem job completes — it appears in the version’s asset list alongside any other assets, with its type displayed as filesystem. For an ad-hoc upload of a pre-generated filesystem SBOM, use the GUI’s Add Asset → SBOM action with the asset type set to filesystem.
Add a Filesystem Asset with AnchoreCTL
Use app version asset add filesystem to analyze a directory and upload the resulting SBOM. AnchoreCTL runs Syft locally to generate the SBOM, then submits it to Anchore Enterprise as a job.
The directory path is the positional argument. The parent app, version, and asset name are required:
The asset type defaults to filesystem, so you typically do not need to set --type explicitly.
Set SBOM Document Author and Supplier
The generated SBOM document carries an author and a supplier field that downstream consumers (and SBOM quality checks) use to identify provenance. Both default to unknown. Set them with --author and --supplier:
--author follows the common Name <email> form. Both fields are free-text; pick values that match what your organization publishes for software provenance.
Annotate the Asset
Attach build metadata at create time with --annotations. The full merge and clear semantics are documented under Managing Assets in an App Version:
By default the command submits the job and returns immediately, leaving you to track progress through the asset list or job endpoint. To block until the job reaches a terminal state — useful in CI pipelines where you want the job’s outcome to gate later steps — add --wait:
Filesystem analysis happens on the AnchoreCTL host; only the resulting SBOM is sent to Anchore Enterprise. Under the hood, AnchoreCTL uploads the SBOM through the same job type used for any externally produced SBOM:
POST /apps/{app_id}/jobs/add-sbom-asset — the multipart request carries the asset name, the parent version ID, the SBOM payload, and an asset_type of filesystem.
The full request and response schemas are in the API browser; search for the App Jobs tag. If you are integrating directly with the API rather than using AnchoreCTL, you are responsible for running an SBOM generator (Syft or equivalent) against the filesystem and submitting the resulting document.
A few conventions worth knowing as you call this endpoint:
Job state transitions are documented in How It Works.
The job response carries a job_id; poll GET /apps/{app_id}/jobs/{job_id} to track status.
Cross-account requests are scoped via the x-anchore-account header or, from AnchoreCTL, the ANCHORECTL_ACCOUNT environment variable. See Account Scoping for the full mechanism.