Anchore Enterprise supports two kinds of upgrade, and the right procedure depends on the version you are running today. Upgrades between releases within the same major version are routine and are normally handled by your deployment tooling. Moving between major versions, such as from v5.x to v6.x, is a migration that involves breaking changes, database changes, and planned downtime.
Find Your Current Version
Run the anchorectl system status command and review the CODE VERSION column, which displays the running version of each service. You can also log in to the Anchore Enterprise GUI and find the version details in the top bar.
Choose Your Upgrade Path
Already on v6.x? Feature and patch upgrades within v6.x, for example v6.1 to v6.2 or v6.1.0 to v6.1.1, follow the standard procedures in Routine Upgrades (v6.x).
On v5.x or earlier? Moving to v6.x crosses a major version boundary and includes an automatic data migration. Plan a maintenance window and follow the v5.x → v6.x Migration Guide. For all major-version migrations, including v4.x → v5.x, see Major Upgrades (v5.x → v6.x).
1 - Routine Upgrades (v6.x)
This section covers routine upgrades between releases within the same major version of Anchore Enterprise, for example from v6.1 to v6.2, or from v6.1.0 to v6.1.1. These upgrades are normally handled seamlessly by the Helm chart, an upsert of your Docker Compose configuration, or the Cloud Image Manager.
If you are running Anchore Enterprise v5.x or earlier, the procedures in this section do not apply. Crossing a major version boundary is a migration; see Major Upgrades (v5.x → v6.x).
Prepare for the Upgrade
Prior to upgrading Anchore Enterprise, it is highly recommended to first review the Anchore Enterprise Release Notes for the target version, with particular attention on the Requirements and Recommended Component Versions sections.
The Requirements section shares important notices and/or DB schema changes and any possible suggested downtime needed for schema and/or data changes.
The Recommended Component Versions section details the supported versions of integration tooling like AnchoreCTL. This might require further upgrades of other software components across your environment to maintain compatibility with the core Anchore Enterprise service.
When you are ready to perform an upgrade, we recommend, as a best practice, that you first backup/snapshot your database. When backing up, you must first stop your Anchore Enterprise services/deployment so that all services have completed their writes. We also highly recommend you test upgrades in a QA/Test environment first.
There is no automatic downgrade capability. The only way to downgrade after an upgrade, whether it succeeds or fails, is to restore your database contents to a state from a prior version of Anchore Enterprise, then explicitly run the compatible version of Anchore Enterprise against the corresponding database version.
Upgrade a Docker Compose deployment of Anchore Enterprise to a newer release within the same major version.
This procedure upgrades a Docker Compose deployment of Anchore Enterprise to a newer release within the same major version. Before you begin, review Prepare for the Upgrade.
This procedure applies to upgrades within v6.x only. It reuses your existing volumes and configuration, which is not valid when migrating from v5.x. For that, follow the v5.x → v6.x Migration Guide.
Upgrading a host with no outbound internet access? See Air-Gapped Upgrade before you begin. You’ll need to mirror the new image tags to your registry (or move them as a tarball) before restarting the stack below.
Upgrade Procedure
Step 1: Review the Release Notes
View the Anchore Enterprise Release Notes for the target version. The release notes call out breaking changes, new or changed configuration, and any version-specific upgrade instructions you need to plan for before starting.
Download the compose file that ships with the target release and check it against your current file to see if there any changes that may affect your deployment, such as new services, environment variables, or volume definitions:
The name field in the compose file you download differs from the one in your existing file, because it tracks the release. If your deployment started on a v6.0.x quickstart, the volume name differs too — quickstart volumes were versioned per release up to v6.0.x and have been stable since v6.1.0. Do not copy either value across. Keep the values already in your docker-compose.yaml so your deployment keeps reading the volume it has been writing to.
Fold any relevant changes into your docker-compose.yaml. If the diff shows nothing beyond version bumps, confirm every service is still present in your file and update the image tags in place. All services using the enterprise image move to the new release tag, while the ui service uses the separately versioned enterprise-ui image:
Watch the output of the previous to confirm all the services start. Once they have all started, you can use the below command to list the running services and confirm that they are all healthy.
docker ps
Step 8: Verify the New Version Is Running
Once the containers are up, verify the new version is running:
anchorectl system status
1.1.1 - Upgrade Air-Gapped using Docker Compose
A routine v6.x upgrade in an air-gapped Docker Compose deployment just needs the new image tags mirrored to your registry (or moved as a tarball) before you restart the stack. Unlike the major-version migration, there’s no new compose file, no new Dockerfile.anchore-db, and no rebuild required — you’re bumping versions on a running deployment, not standing up a new one. Your docker-compose.yaml stays as-is, provided you don’t touch the project name or database volume name.
Throughout this guide, the low side is the internet-facing system and the high side is the air-gapped system.
Prepare the Images (low side)
Review the Release Notes for the target version to confirm which image tags actually changed. enterprise/enterprise-ui always move together; redis (and, less often, the PostgreSQL/pg_cron combination baked into anchore:db) can change independently, so don’t assume they’re unchanged from your last upgrade — diff the new reference docker-compose.yaml and Dockerfile.anchore-db against what you last mirrored if you’re unsure.
This is uncommon for a routine upgrade — most releases don’t touch the database image at all. If it didn’t change, skip this step; there’s nothing new to move for anchore-db.
Move the Images to the High Side
Choose one of the following, matching the equivalent step in the Air-Gapped Docker Compose deployment guide, for only the images that actually changed in step 2 (and step 3, if it applied):
Private container registry (recommended) — re-tag, then push directly, or save/transfer/load/push, exactly as described in Option 1.
Local image tarball — for hosts with no registry available, as described in Option 2.
Update Your Compose File
If this deployment was already deployed air-gapped, your docker-compose.yaml already points every image: line at your private registry or local image names — you only need to bump the tag on the lines that changed. The enterprise image is referenced by many services (api, catalog, component-catalog, queue, policy-engine, analyzer, reports, reports_worker, notifications, data-syncer, db-preflight), so update every occurrence:
api:image:<registry>/anchore/enterprise:v6.2.1
Leave everything else in the file untouched — in particular, do not touch name: at the top of the file or the database volume name. Changing either causes Compose to stand up a new, empty deployment instead of upgrading this one.
Upgrade a Helm deployment of Anchore Enterprise to a newer release within the same major version.
This procedure upgrades a Helm deployment of Anchore Enterprise to a newer release within the same major version. Before you begin, review Prepare for the Upgrade.
This procedure applies to upgrades within v6.x only. If you are migrating from v5.x, follow the v5.x → v6.x Migration Guide.
If you use your own secret (useExistingSecrets: true), add ANCHORE_AUTH_SECRET to your Anchore Enterprise secret before upgrading to v6.1 or later. If you do not, some services will not start after the upgrade.
If you use the chart’s default secret (useExistingSecrets: false), you do not need to do anything. The chart creates this value automatically.
Database column encryption is optional and off by default, so it is not a prerequisite for this upgrade. To enable it, supply a key — either anchoreConfig.database.encryption.currentKey in your values file, or ANCHORE_DB_ENCRYPTION_KEY_CURRENT in your own secret if you use useExistingSecrets: true. You can do this during this upgrade or at any later point. See Encrypting Database Secrets at Rest.
Upgrading a cluster with no outbound internet access? See Air-Gapped Upgrade before you begin — you’ll need to mirror the new chart version and any updated images, including kubectlImage, before running helm upgrade below.
A Helm pre-upgrade hook initiates a Kubernetes job that scales down all active Anchore Enterprise pods and handles the Anchore Enterprise database upgrade.
The Helm upgrade is marked as successful only upon the job’s completion. This process causes the Helm client to pause until the job finishes and new Anchore Enterprise pods are initiated. To monitor the upgrade, you can follow the logs of the upgrade jobs:
kubectl get jobs -n ${NAMESPACE}kubectl logs -f job/<JOB_NAME> -n ${NAMESPACE}
These jobs are automatically removed after a subsequent successful Helm upgrade.
Helm waits for the upgrade job to complete, with a default timeout of 5 minutes. On a very large deployment, or when a release includes database schema changes or similar data migrations, the upgrade job can run for much longer than that; if the timeout is reached, Helm marks the release as failed even though the job may still be working. For such upgrades, consider passing a longer --timeout to the helm upgrade command (for example --timeout 3600s for a one-hour window), sized to your deployment.
An alternative post-upgrade hook is available to perform Anchore Enterprise upgrades without forcing all pods to terminate prior to running the upgrade. To enable the post-upgrade hook, set upgradeJob.usePostUpgradeHook=true in your values file.
Once upgraded, you can review the new state of your Anchore Enterprise install to verify the new version is running using the regular system status command.
anchorectl system status
1.2.1 - Upgrade Air-Gapped using Helm
A routine v6.x upgrade in an air-gapped cluster needs the new chart version and any updated images mirrored to your registry before you run helm upgrade. This mirrors the same low-side/high-side process as Air-Gapped Helm deployment, but there’s less to move — you’re bumping versions on a running deployment, not standing up a new cluster.
Throughout this guide, the low side is the internet-facing system and the high side is the air-gapped cluster.
Check what images that chart version actually references — redis and kubectlImage can change between chart releases independent of the Anchore Enterprise application version, so don’t assume they’re unchanged from your last upgrade:
helm show values anchore/enterprise --version ${CHART_VERSION} | grep -E "^image:|repository:|tag:"
The v6.2.1 / v6.2.0 shortcodes always resolve to the version this documentation site currently covers. If you are upgrading to a different release, substitute that release’s actual tag instead.
Unlike a fresh install, kubectlImage is always required for an upgrade, minor or major — the pre-upgrade hook (or the post-upgrade hook, if upgradeJob.usePostUpgradeHook: true) uses it to scale Anchore Enterprise pods during the upgrade.
Private container registry (recommended) — re-tag, then save/transfer/load, then push from the high side, exactly as described in Option 1, but for the images pulled above.
Local import onto cluster nodes — for small clusters with no registry available, as described in Option 2.
Also transfer enterprise-${CHART_VERSION}.tgz to the high side along with the images.
Update Your Values File
If this cluster was deployed air-gapped, your existing anchore_values.yaml already points image, ui.image, and ui-redis.image at your private registry — you only need to bump the tags to the new version:
If kubectlImage isn’t already set — for example, if this cluster’s values file hasn’t changed since a fresh install, which never uses it — add it now. See Deploy on the High Side on the deployment air-gapped page for the full registry-override block if you need the other image fields too.
Run the Upgrade from the Local Chart
Substitute the local chart archive — or your internal registry reference — for anchore/enterprise:
Continue with the rest of Upgrade on Kubernetes using Helm — monitoring the upgrade job logs and verifying with anchorectl system status — exactly as written.
1.3 - Upgrade the Cloud Image
Occasionally, Anchore will release updates to the Anchore Enterprise Cloud Image (AECI) and the subsequent version of Anchore Enterprise shipped with it. Upgrades are managed through the Cloud Image Manager, which will provide you with the upgrades that are available and allow you to determine when you want to upgrade.
If an upgrade is available, the Cloud Image Manager will walk you through the upgrade process. The upgrade involves a period of downtime and reboots, and the Cloud Image Manager tells you what to expect before proceeding. This will allow you to plan for the upgrade when it is convenient for you.
This procedure applies to upgrades within v6.x only. If you are migrating from v5.x, follow the v5.x → v6.x Migration Guide.
Prepare for the Upgrade
AECI runs the Anchore Enterprise GUI, API, and database together on a single virtual machine instance. That unified topology shapes how you prepare: the services share one failure domain, so an upgrade briefly affects all of them at once, and a snapshot of the instance’s volumes captures the whole system (application, configuration, and data) as one consistent restore point.
Before you begin:
Review the release notes. Read the Anchore Enterprise Release Notes for the target version, with particular attention on the Requirements and Recommended Component Versions sections.
Schedule a maintenance window and notify users. The GUI and API will be unavailable while services restart; a typical installation should expect approximately 20 minutes of downtime.
Quiesce the system. Stop submitting new image scans and SBOM imports, and let in-flight analysis complete. Upgrading a quiet system keeps the database consistent and avoids cutting jobs off mid-run. To guarantee nothing new arrives during the window, consider temporarily blocking inbound traffic to the API and GUI in the instance’s network ingress rules (on platforms such as AWS, its security group) by removing the HTTPS (TCP 443) rule or restricting it to administrator addresses. Leave SSH (TCP 22) open, as it carries your Cloud Image Manager session, and restore the rule once you have verified the upgrade.
Confirm the system is healthy. Use the Cloud Image Manager System Status screen to check that all services are running, and note the currently deployed versions so you know your starting point if you need to roll back. Do not upgrade a degraded deployment; resolve service issues first.
Check disk space. The upgrade downloads new container images and may migrate data, so confirm there is free space on both the root and data volumes. If space is tight, expand the disks first; see Expand Disks.
Snapshot your volumes. It is best practice to stop an instance before snapshotting its root volume (on platforms such as AWS, this is the documented recommendation). Once the system is quiesced, stop the instance, create snapshots of both the root and data volumes using your platform’s snapshot mechanism, and start the instance again before beginning the upgrade. Snapshotting while stopped guarantees the whole system, application, configuration, and data, is captured in a consistent state; the snapshots are your recovery point if the upgrade needs to be rolled back. Note that stopping and starting extends the maintenance window, and the instance’s public IP address may change unless you have assigned a static address (such as an Elastic IP on AWS). See Backups for broader backup and restore guidance.
Change one thing at a time. Do not combine the upgrade with other changes to the instance, such as resizing it or expanding disks, in the same window. If those are needed, complete and verify them before you upgrade.
Upgrade using the Cloud Image Manager
Step 1: Connect to the Cloud Image Manager
Connect over SSH using your key pair and the instance address:
Review the System Status screen to confirm all services are healthy, and note the currently deployed versions.
Step 3: Open the Upgrade Screen
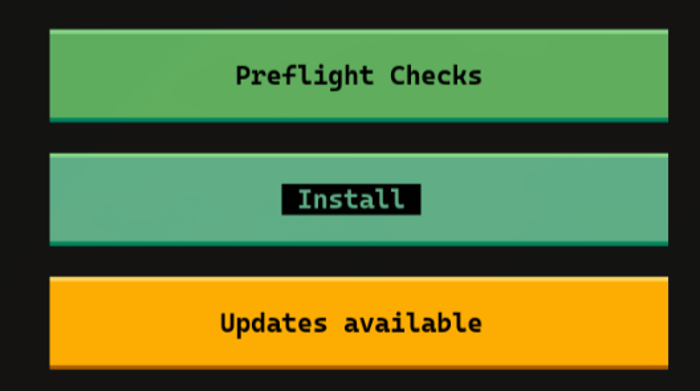
If upgrades are available for your deployment, the Updates available button in the Cloud Image Manager is highlighted yellow. Select it to open the upgrade screen.
The Updates available button is highlighted yellow when an upgrade is ready.
Step 4: Run the Upgrade
Before continuing, ensure you have followed the preparation steps, including taking snapshots or backups of your volumes.
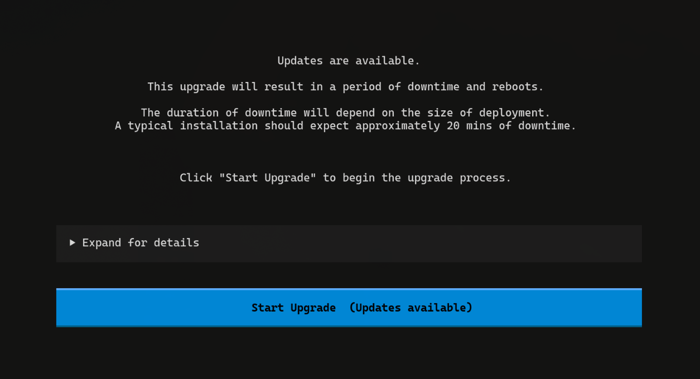
The upgrade screen summarizes what to expect: the upgrade results in a period of downtime and reboots, with a typical installation expecting approximately 20 minutes of downtime. The Cloud Image Manager will prompt you to ensure you have taken your snapshots; it does not create them for you, so confirm the snapshots from your preparation are complete before you continue.
Select Start Upgrade and let the Cloud Image Manager run the upgrade to completion. Keep your SSH session open and do not interrupt the process while the upgrade is in progress.
During the upgrade, your system may need to be restarted; if this occurs, log back into the Cloud Image Manager to continue the upgrade process.
Select Start Upgrade to begin. The screen notes the expected downtime for the upgrade.
Step 5: Verify the Result
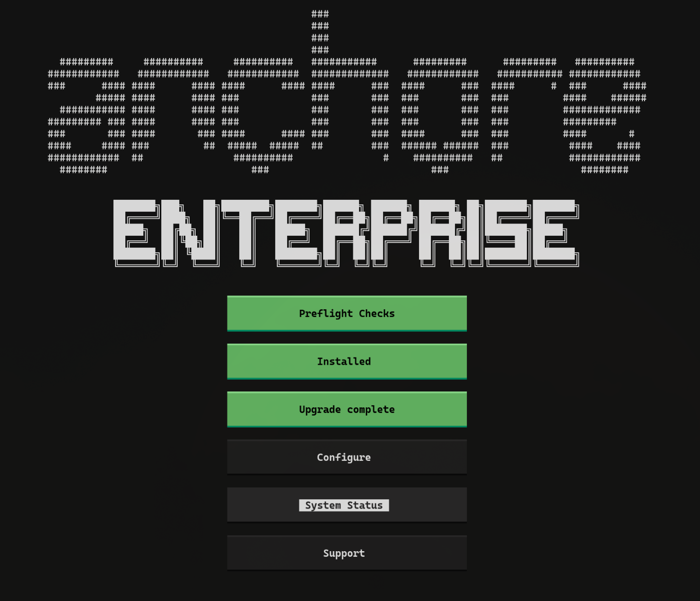
When the upgrade finishes, the Cloud Image Manager shows Upgrade complete. Validate the system status in the Cloud Image Manager by opening the System Status screen and confirming that all services are running and the new versions are deployed.
The Cloud Image Manager shows Upgrade complete when the upgrade has finished.
Consider running a smoke test before handing the system back, for example logging in to the Anchore Enterprise GUI and scanning a known image. Then conduct any tasks needed to make the system available to users again, such as restoring the network ingress rules you changed during preparation and resuming paused CI/CD pipelines and integrations.
Roll Back if Needed
If the upgrade fails or the system does not come back healthy, the volume snapshots from your preparation are your recovery point into a new instance of the appliance. Contact Anchore Customer Success via support.anchore.com for assistance with restoring or troubleshooting.
2 - Major Upgrades (v5.x → v6.x)
Crossing a major version boundary of Anchore Enterprise is a migration rather than a routine upgrade. Major releases include breaking changes and data migrations, and moving between them requires planning, a maintenance window, and mechanism-specific steps that differ from the routine upgrade procedures.
There is no direct migration path from v4.x to v6.x. If you are running v4.x, complete the v4.x → v5.x migration first, then follow the v5.x → v6.x Migration Guide.
Anchore Enterprise v4.x has already reached end of life (EOL) and no longer receives updates or support.
Follow the migration guide for the boundary you are crossing:
v5.x → v6.x Migration Guide — migrate a running Anchore Enterprise v5.x deployment to v6.x. Requires Anchore Enterprise v6.1.0 or later as the target version.
v4.x → v5.x Migration Guide (EOL) — migrate an Anchore Enterprise v4.x deployment to v5.x. Anchore Enterprise v5.x is scheduled to reach end of life (EOL) in early 2027, so plan to continue to v6.x after completing this migration.
2.1 - v5.x → v6.x Migration Guide
This guide will help you understand, plan, and execute the migration of your Anchore Enterprise deployment from v5.x to v6.1.0 or later. The migration brings your database to PostgreSQL 17 (typically by dumping and restoring it into a new v6.1 deployment), and on first boot, Anchore Enterprise upgrades the database schema and migrates your v5.x SBOM data into the App / App Version / Asset data model automatically.
Migration from v5.x requires a target of Anchore Enterprise v6.1.0 or later.
What Happens During the Migration
The first time v6.1 boots against your restored v5.x data, two things run automatically, and one v5.x feature does not migrate and needs your attention:
Schema upgrade — the standard Anchore Enterprise database upgrade chain brings the schema to the v6.1 level.
Legacy Imported SBOM migration — v5.x Imported SBOMs and SBOM Groups are migrated into the App / App Version / Asset / Artifact model:
Each v5.x SBOM Group becomes one App with a single version, with one Asset per SBOM in the group.
Each ungrouped v5.x SBOM becomes one App, App Version, and Asset.
Only the first 10 annotations per SBOM are carried over; any beyond that are dropped. If annotations matter to you, export them before migrating.
Identical SBOM content uploaded into multiple accounts becomes multiple Assets sharing a single Artifact, deduplicated on content hash.
The Legacy Imported SBOM migration runs in the background after the schema upgrade completes. Your deployment is up and fully usable while it runs, though migrated SBOMs may not all appear as Apps, App Versions, and Assets until it finishes. Avoid interrupting services while the migration is in progress. Progress is recorded in the database, and each migration runbook includes steps to monitor and verify it.
Legacy Application Groups and source SBOMs are not migrated — there is no automatic migration for these. The data is retained in the database, but the Anchore Enterprise GUI no longer provides access to it; it remains reachable through the deprecated AnchoreCTL commands or the API directly. If your v5.x deployment uses Application Groups or source SBOMs, reach out to Anchore Customer Success via support.anchore.com for guidance on a plan to move this data to the App / App Version / Asset model before you migrate.
New Database Requirements in v6.x
Anchore Enterprise v6.x requires PostgreSQL 17 or greater with the pg_cron extension; these are new requirements in the v6.x line (see Requirements).
The v6.x Helm chart (the enterprise chart, v4.1+ to migrate) no longer deploys a database for you; you must provide a PostgreSQL database.
We recommend a managed database service (such as Amazon RDS, Google Cloud SQL, or Azure Database for PostgreSQL) where available, or the CloudNativePG (CNPG) operator for running PostgreSQL in-cluster on Kubernetes. The runbooks listed in Run the Migration cover both moving your data into a new PostgreSQL 17 database and upgrading an existing external database in place.
Plan the Migration
Before you begin, make sure you have:
A valid license entitlement.
A review of the Anchore Enterprise Release Notes behind you, with particular attention on the Requirements and Recommended Component Versions sections. Read the v6.0.0 release notes as well, not only the notes for your target version: v6.0.0 carried most of the v6 deprecations and removals, and migrating from v5.x means crossing all of them.
A database backup taken before you start. Together with your untouched v5.x data it is your rollback path.
Enough disk space for the database dump if you are moving your data with a dump and restore (roughly the size of your v5.x database; the compressed custom format is smaller).
A decision on at-rest encryption of sensitive database columns, such as stored registry credentials. It is off by default and can be enabled during the migration or at any time later; see Encrypting Database Secrets at Rest.
A maintenance window. The v5.x deployment must be stopped for the dump, and the Legacy Imported SBOM migration runs on first boot of v6.1. As a reference point, roughly 35,000 SBOM records completed in about 2 hours on modest hardware. Scale expectations to your data.
Do not reuse the Helm values file from your v5.x deployment. Configuration keys and environment variable defaults were removed in v6.x, and a stale configuration causes services to fail at boot. Start from the configuration template for your deployment mechanism as shipped with Anchore Enterprise v6.1.0 or later (Helm chart v4.1+), and re-apply your customizations. Do not start from a v6.0.x template — v6.0.x is not a supported migration target.
AnchoreCTL should be version-aligned with your Anchore Enterprise deployment, so a migrated deployment needs AnchoreCTL v6.1.0 or later. Remember to upgrade AnchoreCTL everywhere it is deployed, such as CI/CD pipelines and developer workstations.
Run the Migration
Follow the runbook for your deployment mechanism; each includes its own verification steps:
Migrate a v5.x Docker Compose deployment to v6.1 or later by standing up a new deployment from the v6.x reference compose file and moving your data into it.
This runbook migrates a running Anchore Enterprise v5.x Docker Compose deployment to v6.1 or later. It assumes the commands are run on the host where the deployment lives. Before you begin, read the migration overview to understand what the migration does and what you need in place.
Rather than editing your existing v5.x docker-compose.yaml file in place, this guide has you start from a clean copy of the v6.x reference compose file and move your data into it.
The migration has two parts:
Migrate the underlying database from PostgreSQL 13 to PostgreSQL 17, exporting your v5.x data and restoring it into the new database.
Replace the v5.x application stack with a new deployment built from the v6.x reference compose file, running the v6.x images on the new migrated database.
Starting from the v6.x template takes care of both at once: the template already runs PostgreSQL 17, and once your data is restored into it, Anchore Enterprise upgrades its own database schema automatically on first boot.
Migrating a host with no outbound internet access? See Air-Gapped Migration before you begin. You’ll need to mirror the v6.x compose file, database Dockerfile, and application images to the high side before Step 4 below.
Prerequisites
Upgrades are only supported from v5.x to v6.1 or later. A v5.x deployment cannot upgrade directly to v6.0.
Before you begin, make sure you have:
Confirm the deployment is currently running a supported Anchore Enterprise v5.x release. Check the Recommended Component Versions table in the Release Notes for the version you’re moving from.
Docker and Docker Compose installed and up to date.
A valid license.yaml.
Ensure sufficient disk space exists for database backups, temporary migration files, and the additional PostgreSQL volume: a full second copy of your database’s data directory, plus the export file, at minimum.
A maintenance window — you will need to stop the deployment and writes to the database before the final export in Step 8 so no data is missed.
Test this procedure in a staging or QA environment before running it against production. The steps below include a downtime window while the database is exported and restored.
Downtime Expectations
This migration requires application downtime during the database export and restore. Downtime duration depends on database size, disk performance, and system resources.
Migration Procedure
Step 1: Stop All Services
docker compose down --remove-orphans
This begins the downtime window.
Step 2: Back Up Your Existing Configuration
Before making any changes, back up the existing docker-compose.yaml and, optionally, the Docker volumes. Store the backup somewhere safe so it is not accidentally reused or deleted.
cp docker-compose.yaml docker-compose-v5.yaml.bak
Step 3: Set Up a New Deployment Directory
Create a separate directory for the v6.x deployment. Do not reuse your v5.x deployment directory. This method keeps the two deployments, and their compose projects, independent until you’re ready to retire v5.x.
mkdir anchore-enterprise-v6 && cd anchore-enterprise-v6
Step 4: Download the v6.x Deployment Files
Your new v6.x directory needs the v6.x docker-compose.yaml file, your license file copied over from the old v5.x directory, and the Dockerfile we provide for building the new PostgreSQL 17 database:
As you bring values over from your old v5.x compose file (like the license above), work from the new v6.x file rather than editing your old one: the v6.x compose file adds two new services (component-catalog and db-preflight) along with several new required settings, which you will configure in the next step.
The Dockerfile needs to be named Dockerfile.anchore-db as it is targeted by name directly from the docker-compose file on build. If you name it anything else, the build will not pick it up.
Step 5: Configure Secrets
Follow Step 4: Configure Secrets in the standard deployment guide to set POSTGRES_PASSWORD, ANCHORE_ADMIN_PASSWORD, ANCHORE_AUTH_SECRET, and ANCHORE_DB_PASSWORD. These are fresh secrets for the new deployment; they do not need to match the values your v5.x deployment used.
You do not need to reconcile the database password with your v5.x deployment after restoring your data. pg_dumpall carries PostgreSQL role passwords over in a format PostgreSQL 17 rejects, but the export/restore in this guide uses pg_dump against a single database (not roles), so the fresh POSTGRES_PASSWORD you set here is never touched by the restore.
At-rest encryption of sensitive database columns (ANCHORE_DB_ENCRYPTION_KEY_CURRENT) is optional and off by default. Leave it commented out and the service starts normally, with those columns stored as plaintext exactly as in v5.x. See Encrypting Database Secrets at Rest if you want to enable it now or later.
Step 6: Start Only the New Database
docker compose up -d anchore-db
Wait for it to report healthy before continuing:
docker compose ps anchore-db
Step 7: Restart the v5.x Database
Step 1 stopped every v5.x service, including anchore-db, but the export in the next step needs it running. From your v5.x deployment directory, restart just the database:
cd /path/to/v5-directory
docker compose up -d anchore-db
The downtime window from Step 1 stays intact: the application services remain stopped, so nothing writes to the database, and anchore-db does not publish a host port, so it cannot conflict with the new v6.x database started in Step 6.
Step 8: Export the v5.x Database
From your v5.x deployment directory, export the database straight into the new v6.x deployment directory. You can decide where to archive the dump file once the migration is complete:
As mentioned in the Prerequisites, you need enough free disk space to store the dump file at least twice. Once the migration has been verified as successful, you can archive the dump file wherever you wish.
Step 9: Restore the Data into the New Database
From your new v6.x deployment directory, run the following to restore the export taken from the old database into the new one:
--clean --if-exists lets you re-run this command safely if you need to redo the restore: it drops matching objects before recreating them instead of erroring on a non-empty database.
Step 10: Start the Full v6.x Deployment
Again, from inside the new v6.x deployment directory, run the following to bring up the full v6.x deployment:
docker compose up -d
Anchore Enterprise performs its own database schema migration in-process on first boot, upgrading your restored v5.x data to the v6.x schema automatically; no separate migration command is needed.
Step 11: Stop the v5.x Database
Step 7 restarted the v5.x anchore-db service, but now that the data has been imported into the new v6 database we can stop the v5 database from continuing to run from your old v5.x deployment directory:
cd /path/to/v5-directory
docker compose down anchore-db
anchorectl image vulnerabilities <existing-tag> and anchorectl image check <existing-tag>
Retire the Old v5.x Deployment (Optional)
Once the upgrade is validated and you are confident you will not need to roll back, you can take the final (and completely optional) step of removing the old v5.x database volume. Our recommendation is to retain the database dump file, the original compose file, and the volume until the upgraded deployment has been fully validated in production.
docker volume rm <your-old-db-volume-name>
Make sure you are using the correct volume name in the command: the old v5 volume name, not the new v6 volume name. Using the wrong name may permanently delete all of your data.
Do not remove the v5.x deployment’s volumes until you have confirmed the migration succeeded and your existing data is intact. The old volume and the original v5 docker-compose.yaml file are your only rollback path.
2.1.1.1 - Migrate Air-Gapped using Docker Compose
If the deployment host has no outbound internet access, complete this guide before Step 4: Download the v6.x Deployment Files in the main migration runbook. It mirrors the low-side/high-side process in Air-Gapped Docker Compose deployment: the v6.x reference compose file, database Dockerfile, and application images all need to reach the high side before you can start the new deployment, in addition to the database dump you already have to move as part of the migration itself.
Throughout this guide, the low side is the internet-facing system and the high side is the air-gapped system.
Prepare the Files and Images (low side)
Download the v6.x compose file and database Dockerfile:
Private container registry (recommended) — re-tag, then push directly, or save/transfer/load/push, exactly as described in Option 1, for all four images pulled/built above.
Local image tarball — for hosts with no registry available, as described in Option 2.
Also transfer docker-compose.yaml, Dockerfile.anchore-db, and your license.yaml to the high side along with the images. You’ll need docker-compose.yaml in Step 4 of the main runbook; the Dockerfile is kept for reference even though anchore:db is already built.
Point Your Compose File at the Registry (or Local Images)
Update the image: lines in your new docker-compose.yaml exactly as described in Deploy on the High Side on the deployment air-gapped page. Point every service referencing docker.io/anchore/enterprise and docker.io/anchore/enterprise-ui at your registry tag or locally loaded image name, replace anchore-db’s build: section with a direct image: <registry>/anchore:db (or image: anchore:db for a local tarball) reference, and update the redis image line the same way.
Run the Migration from the Local Files
Continue with the main migration runbook starting at Step 4, substituting the compose file you just edited for the one Step 4 would otherwise download, and skipping the curl commands there; you already have both files from the low side.
Every other step needs no changes for an air-gapped host:
Because the deployment cannot reach the Anchore Data Service, complete Air-Gapped Feed Configuration on the new v6.x deployment (disable the Data Syncer’s automatic feed sync and import feed bundles manually with AnchoreCTL), or the migrated deployment will have no vulnerability data.
2.1.2 - Migrate on Kubernetes using Helm
Migrate a running Anchore Enterprise v5.x Helm deployment to v6.1 or later, including the move to PostgreSQL 17.
This runbook migrates a running Anchore Enterprise v5.x Helm deployment to v6.1 or later. Before you begin, read the migration overview to understand what the migration does and what you need in place.
The v6.x Helm chart (the enterprise chart v4.1+ to migrate) requires a customer-provided PostgreSQL 17 database with the pg_cron extension. Unlike the v5.x chart, it does not deploy a PostgreSQL instance for you. How much work the migration involves depends on where your v5.x database runs today:
If your v5.x deployment already uses an external PostgreSQL database, you upgrade that database to PostgreSQL 17, enable pg_cron, update your values file, and run helm upgrade. No data is moved. Follow Path A.
If your v5.x deployment uses the chart’s bundled (Bitnami) PostgreSQL, that subchart is removed in v6.x. You must migrate your data into a new PostgreSQL 17 database before installing v6.1. Follow Path B.
Upgrades are only supported from v5.x to v6.1 or later. A v5.x deployment cannot upgrade directly to v6.0. Use enterprise chart v4.1+, which ships Anchore Enterprise v6.1.0.
The v6.1 database schema migration is one-way. Once v6.1 runs against your database, the schema is no longer compatible with v5.x. A database backup taken immediately before the upgrade is your only rollback path. See Roll Back.
Prerequisites
Complete these steps regardless of which path you follow.
A running v5.x Helm deployment (v5.0.0 or later) with admin access to its PostgreSQL database.
A provisioned or upgradeable PostgreSQL 17 database with the pg_cron extension, cron.use_background_workers enabled, and USAGE on the cron schema granted to the Anchore user. See Requirements.
A CNCF-certified Kubernetes version within the chart’s supported kubeVersion range (1.23–1.36 at the time of writing), Helm v3.8+, and kubectl configured for the target cluster.
A valid v6.x license. Optionally a database encryption key: at-rest column encryption is off by default and can be enabled now or later, so it is not a prerequisite for migrating. See the migration overview.
A v6.1 values file built from the enterprise chart v4.1+. Do not reuse your v5-era values file unchanged — several keys were removed, renamed, or relocated in v6.x. See Values File Changes.
Several steps in this runbook are long-running and hold your terminal — the database dump/restore or import, and the helm upgrade that runs the schema migration can each take from many minutes to hours on large datasets. Run them from a stable host (for example a bastion or jumpbox) inside a persistent session such as screen, tmux, or nohup/at, so a dropped SSH connection or closed laptop does not interrupt the operation.
Set some environment variables used throughout this runbook:
Confirm the license and pull-credential secrets already exist in your namespace (they carry over from v5.x):
kubectl get secret anchore-enterprise-license -n ${NAMESPACE}kubectl get secret anchore-enterprise-pullcreds -n ${NAMESPACE}
Back Up the Database
This step is critical. Because the schema migration is one-way, this backup is your only way back to v5.x.
# Dump from the v5.x database in custom format (adjust host/user/db as needed).# For the chart's bundled PostgreSQL, exec into the postgres pod:kubectl exec -it ${RELEASE}-postgresql-0 -n ${NAMESPACE} -- \
pg_dump -U anchore -d anchore -Fc -f /tmp/anchore_backup.dump
# Copy the dump off the pod to durable storagekubectl cp ${NAMESPACE}/${RELEASE}-postgresql-0:/tmp/anchore_backup.dump ./anchore_backup.dump
Verify the backup is usable, then store it somewhere durable (not on ephemeral pod storage):
ls -lh anchore_backup.dump
pg_restore --list anchore_backup.dump | head -20
Use pg_dump -Fc, never pg_dumpall. On some platforms (for example, OpenShift) a pod’s ephemeral storage is capped; if your database is larger than that cap, run pg_dump directly against the database from a machine with enough disk instead of writing into the pod. Always check the dump size looks reasonable.
For a large database, a logical pg_dump is often impractical — it needs roughly as much free disk as the database size and can take hours. A volume snapshot of the database’s PersistentVolume (for example, an EBS or CSI VolumeSnapshot) is usually a faster, lower-overhead backup. This is especially true when your object store uses the database driver, since the stored objects live in the database and dominate its size.
Path A: Upgrade with an Existing External PostgreSQL
Use this path if your v5.x deployment already connects to an external PostgreSQL database (RDS, Cloud SQL, CNPG, or self-managed). This is the simplest path — your data stays where it is.
Step 1: Upgrade PostgreSQL to 17 and Enable pg_cron
If your database is not already on PostgreSQL 17+, upgrade it first. Take a snapshot before upgrading.
CloudNativePG: Update spec.imageName to a PostgreSQL 17 image that includes pg_cron; the operator performs a rolling restart.
Self-managed: Upgrade using your normal process.
Then enable pg_cron using your platform’s method (see the provider-specific steps in the EKS, GKE, and AKS guides). In every case, finish by creating the extension and granting the Anchore user access to the cron schema:
Apply the changes in Values File Changes to your existing values file. At minimum, remove postgresql.chartEnabled and any other removed keys, and relocate any settings you previously passed via extraEnv.
The chart runs its database upgrade job (upgradeJob, executed as a pre-upgrade hook) automatically during helm upgrade. It verifies database connectivity, scales down the running v5.x pods, runs the database schema migration, and then starts all services on the v6.1 image. Do not interrupt this process. The Legacy Imported SBOM migration then runs in the background on first boot.
upgradeJob.enabled must be true (the default). It is what performs the v6.1 database schema migration. With it disabled, helm upgrade only updates the deployment specs and images — the schema is never migrated — and the services fail to start against a mismatched schema. If the upgrade job fails, check its pod logs and delete the failed job before retrying; see Services Fail to Start After an Upgrade.
helm upgrade waits on its hooks and defaults to a 5-minute timeout. The v5.x → v6.1 schema upgrade can take longer than that on larger datasets, causing Helm to report a failure while the upgrade job is still running. Extend the timeout to comfortably exceed your expected migration time, for example helm upgrade ... --timeout 30m. This applies to the helm upgrade commands throughout this runbook.
Use this path if your v5.x deployment uses the chart’s bundled Bitnami PostgreSQL (postgresql.chartEnabled: true). That subchart is removed in v6.x, and it runs PostgreSQL 13 by default (or another pre-17 version if you overrode the image tag) — so you must move your data to a new PostgreSQL 17 database before installing v6.1.
If your object store uses the database driver (the default), the stored objects live in the database and can dominate its size — tens or hundreds of GB. Moving that much data with pg_dump/pg_restore or a CNPG import can take several hours. If you plan to move to an external object store (for example, S3) anyway, doing so before the migration — with the object store (OSAA) migration — shrinks the database dramatically and shortens the migration window. See External Object Store and Migrating the Object Store.
Step 1: Scale Down Anchore Enterprise
Stop all Anchore Enterprise services so no writes occur during the migration. Leave the bundled PostgreSQL pod running.
for deploy in $(kubectl get deploy -n ${NAMESPACE} -l app.kubernetes.io/name=${RELEASE}-enterprise -o name); do kubectl scale ${deploy} -n ${NAMESPACE} --replicas=0done# Verify all Anchore Enterprise pods are gone (the PostgreSQL pod should still be running)kubectl get pods -n ${NAMESPACE}
Step 2: Provision the PostgreSQL 17 Database
Stand up a new PostgreSQL 17 database with pg_cron enabled, using the same database name as your v5.x database (for example, anchore), and grant the Anchore user USAGE on the cron schema. Use a managed service (see the EKS / GKE / AKS guides) or an in-cluster operator (see Run PostgreSQL In-Cluster with CloudNativePG).
Step 3: Move Your Data
Choose one migration method.
Method A: pg_dump / pg_restore (Any Target)
This works for any PostgreSQL 17 target. Dump from the bundled PostgreSQL pod (you may already have this from Back Up the Database):
If your target is CloudNativePG, CNPG can import directly from the running bundled PostgreSQL using its bootstrap.initdb.import feature, so you do not run pg_dump/pg_restore by hand. Follow the CNPG operator and custom-image setup in the main deployment guide, then create a Cluster with an import bootstrap that points its externalClusters source at the ${RELEASE}-postgresql service. The bundled PostgreSQL pod must stay running during the import.
After the import completes, two follow-up tasks are required before the database is usable:
Create the pg_cron extension. A CNPG import bootstrap does not run the cluster’s postInitApplicationSQL, so the pg_cron extension is not created automatically, even though shared_preload_libraries includes pg_cron. Anchore Enterprise v6.x will not start without it. Create it on the imported database manually:
kubectl exec -it anchore-pg-1 -n ${NAMESPACE} -- \
  psql -U postgres -d anchore -c \
  "CREATE EXTENSION IF NOT EXISTS pg_cron; GRANT USAGE ON SCHEMA cron TO anchore;"
Reset the Anchore role’s password. PostgreSQL 13 may store password hashes in the older md5 format, which PostgreSQL 17 does not accept, leaving every service failing to authenticate. Reset the password on the new database so it is rewritten using scram-sha-256:
kubectl exec -it <new-pg-pod> -n ${NAMESPACE} -- \
  psql -U postgres -d anchore -c \
  "SET password_encryption = 'scram-sha-256'; ALTER ROLE anchore WITH PASSWORD '<PASSWORD>';"
Step 4: Update Your Values File
Create your v6.1 values file pointing at the new database, applying the changes in Values File Changes. A minimal example:
licenseSecretName:anchore-enterprise-licenseimagePullSecretName:anchore-enterprise-pullcredspostgresql:externalEndpoint:<NEW_DB_HOST> # e.g. anchore-pg-rw.anchore.svc for CNPGauth:username:anchorepassword:<PASSWORD>database:anchoreport:5432
Step 5: Install v6.x
Choose one of two approaches based on your risk tolerance.
Approach 1 — helm upgrade in place (recommended). Keeps the same release name, service names, and any existing ingress/DNS configuration. Because the v5.x release is already scaled down and the data has moved, upgrade the existing release directly:
Approach 2 — install as a new release (side-by-side). Keeps the scaled-down v5.x release as a safety net until you are confident. Install with a new release name:
A new release name changes every Kubernetes resource name (services, deployments) to the new prefix. After you verify v6.1 and uninstall the old release, you must update anything that referenced the old service names: ingress rules, DNS/load-balancer targets, CI/CD anchorectl or API URLs, and monitoring scrape targets.
Several chart values were removed, renamed, or relocated in v6.x. Review your existing values file against the tables below before running helm upgrade. The chart validates these on install/upgrade and fails fast with a descriptive error if a removed or relocated key is present, so it is safe to iterate.
Removed and Restructured Keys
v5.x value
Status in v6.x
Action
postgresql.chartEnabled
Removed
Delete it. The bundled PostgreSQL subchart no longer exists.
postgresql.primary.*
Removed
Delete it. Use postgresql.port instead of postgresql.primary.service.ports.postgresql.
postgresql.image.*
Removed
Delete it.
startMigrationPod
Removed
Delete it.
migrationPodImage
Removed
Delete it.
migrationAnchoreEngineSecretName
Removed
Delete it.
anchoreConfig.webhooks
Removed
Delete it.
anchoreConfig.internalServicesSSL.*
Restructured
Replace with anchoreConfig.internal_ssl_verify plus per-service external_tls fields.
anchoreConfig.<service>.external.enabled
Restructured
Replace with anchoreConfig.<service>.external_hostname, external_port, and external_tls.
Rename to anchoreConfig.analyzer.configFile.file_contents.
Object store swift driver
Removed
Only db and s3 are supported. Migrate from Swift to S3 before upgrading.
Settings Moved Out of extraEnv
In v6.x, a number of settings that were commonly passed as environment variables via extraEnv must be set in their dedicated anchoreConfig value instead. The chart rejects these environment variables and will not install or upgrade until they are moved.
After the upgrade, watch the pods come up and confirm system status:
kubectl get pods -n ${NAMESPACE} -w
# Port-forward the API and check status (use the new release name for Path B, Approach 2)kubectl port-forward svc/${RELEASE}-enterprise-api 8228:8228 -n ${NAMESPACE}anchorectl system status
anchorectl system feeds list
Confirm that all services report up, that your existing images, policies, and scan results are present, that feed syncs are running, and that the UI is reachable.
The Legacy Imported SBOM migration runs in the background on first boot; your deployment is fully usable while it runs, though migrated SBOMs may not all appear as Apps, App Versions, and Assets until it finishes. Report its progress with anchore-enterprise-manager, which reads the database directly and so must be run from inside a running Anchore Enterprise pod:
The database environment variables are already present in every Anchore Enterprise pod, so the connection string above needs no editing. It is quoted for the pod’s shell to expand, not yours.
If your database requires SSL, add --db-use-ssl and an ?sslmode=<mode> suffix to the connection string, matching what the chart’s own upgrade job passes for your anchoreConfig.database.sslMode.
{
"message": "Legacy SBOM Migration is in progress. SBOM mappings migrated so far: 604, SBOM mappings remaining: 549, SBOM mappings failed to migrate: 0",
"migrated": 604,
"remaining": 549,
"state": "in_progress",
"total": 1153,
"failed": 0}
state reports one of:
state
Meaning
not_triggered
No Legacy Imported SBOM migration ran. Expected when the v5.x deployment had no imported SBOMs.
in_progress
Still working. remaining counts the SBOM mappings left to process.
complete
Every SBOM mapping migrated, with no failures.
complete_with_failures
Finished, but failed mappings did not migrate.
The counts are SBOM mappings — one per SBOM per SBOM Group it belongs to, plus one per empty SBOM Group — not SBOM documents, so the total will exceed your imported SBOM count when SBOMs belong to more than one group. Drop --json to print the message line on its own.
If the migration ends as complete_with_failures, contact Anchore Customer Success via support.anchore.com before retiring your v5.x backup.
Roll Back
Rollback restores the pre-upgrade state from your backup, because the schema migration cannot be reversed.
Uninstall or scale down the v6.1 release.
Restore the database backup taken in Back Up the Database into a v5.x-compatible PostgreSQL instance.
Restart or reinstall the v5.x release pointing at the restored database.
Verify all services come back up with your pre-upgrade data intact.
Any work done in v6.1 after cutover is lost on rollback, so keep the v6.1 trial period write-light until you commit to it.
Troubleshooting
Symptom
Likely cause
Pre-upgrade hook fails with a DB connection error
PostgreSQL is unreachable or credentials changed. Check the hook job logs with kubectl get jobs -n ${NAMESPACE} and kubectl logs.
Helm upgrade fails citing postgresql.chartEnabled
The removed key is still in your values file. Delete it.
The extension is not enabled on the target database. Enable it and run CREATE EXTENSION pg_cron;.
pg_restore errors: role "anchore" does not exist
Create the Anchore user on the target first.
FATAL: password authentication failed after migrating off PG13
Reset the role password so it is rewritten as scram-sha-256 (see the password-reset task in Method B).
Services are up but data appears missing
You are pointed at the wrong database. Confirm the endpoint and check \dt in psql.
pg_dump is very slow on a large database
Add -j <N> to pg_dump/pg_restore for parallelism, and run during off-hours.
2.1.2.1 - Migrate Air-Gapped using Helm
If the cluster has no outbound internet access, complete this guide before Back Up the Database in the main migration runbook. It mirrors the low-side/high-side process in Air-Gapped Helm deployment, with one difference: this time kubectlImage must be mirrored too, because the pre-upgrade hook’s migration job actually runs it to scale down the v5.x pods — a fresh install never touches that image.
Throughout this guide, the low side is the internet-facing system and the high side is the air-gapped cluster.
Prepare the Chart and Images (low side)
Add the chart repository and find the current chart version — use enterprise chart v4.1+, which ships Anchore Enterprise v6.1.0 or later:
Unlike a fresh install, mirroring bitnamilegacy/kubectl:1.30 (the chart’s kubectlImage) is required here — the osaaMigrationJob and upgradeJob hooks use it to scale down the v5.x deployments before the schema migration runs.
Private container registry (recommended) — re-tag, then push directly, or save/transfer/load/push, exactly as described in Option 1, but for all four images pulled above.
Local import onto cluster nodes — for small clusters with no registry available, as described in Option 2.
Create (or update) the image pull secret to point at your private registry instead of Docker Hub, as described under Deploy on the High Side on the deployment air-gapped page.
Run the Migration from the Local Chart
Whichever path you follow in the migration runbook, complete Back Up the Database first. It needs no changes for an air-gapped cluster — pg_dump/pg_restore run directly against your database and require no internet access. Since you are already staging the chart and images for transfer, store the backup in that same durable storage.
Then substitute the local chart archive — or your internal registry reference — for anchore/enterprise in every helm upgrade/helm install command below.
Path A: Upgrade with an Existing External PostgreSQL
Method A: pg_dump/pg_restore needs no changes — it’s a direct database-to-database copy and does not touch the Anchore chart or images.
Method B: CloudNativePG Bootstrap Import additionally requires the CNPG operator chart, the CNPG operator image, and your custom pg_cron-enabled PostgreSQL image on the high side — none of which are part of the Anchore chart. Mirror all three exactly as described in step 4 of the deployment air-gapped guide (chart repo add/pull, operator image pull, custom image build), and include them in the same tarball you save and transfer in Move the Chart and Images to the High Side above. If you already mirrored these for a prior air-gapped deployment using the same registry, no extra mirroring is needed here.
Also save a cnpg-cluster.yaml on the low side now, same as step 4e in that guide, but using Method B’s bootstrap-import configuration (the bootstrap.initdb.import block pointing externalClusters at ${RELEASE}-postgresql) instead of a plain new cluster — leave imageName as a placeholder until the high side.
On the high side, install the operator from the local chart and point its image at your registry exactly as described in Install CloudNativePG and Provision the Database on the deployment air-gapped page. Then fill in imageName in your transferred cnpg-cluster.yaml and apply it — keeping the bundled v5.x PostgreSQL pod running during the import, per the warning in Method B.
At Step 5: Install v6.x, substitute the local chart archive (or internal registry reference) in whichever approach you choose:
# Approach 1 — helm upgrade in placehelm upgrade ${RELEASE} -n ${NAMESPACE} ./enterprise-${CHART_VERSION}.tgz -f anchore-values.yaml --timeout 30m
# Approach 2 — install as a new releasehelm install anchore-v6 -n ${NAMESPACE} ./enterprise-${CHART_VERSION}.tgz -f anchore-values.yaml --timeout 30m
or, from an internal OCI registry, replace ./enterprise-${CHART_VERSION}.tgz with oci://<registry>/charts/enterprise --version ${CHART_VERSION} in either command.
2.1.3 - Migrate the Cloud Image
This page covers migrating an Anchore Enterprise Cloud Image (AECI) deployment from v5.x to v6.x.
An Anchore Enterprise v6.x Cloud Image will be available soon, along with guidance for migrating existing Cloud Image deployments to it. Contact Anchore Customer Success if you need help planning a migration.
2.2 - v4.x → v5.x Migration Guide (EOL)
Anchore Enterprise v5.x is scheduled to reach end of life (EOL) in early 2027. Migrating to v5.x is a stepping stone, not a destination: after completing this migration, continue to v6.x by following the v5.x → v6.x Migration Guide.
This guide will help you understand, plan, and execute the migration of your Anchore Enterprise deployment from
Enterprise v4.x --> Enterprise v5.x
You cannot upgrade directly from 4.9.x to the latest release. You must first migrate to 5.9.0 through v2.10.0 of the Helm chart before proceeding to a later release
The Enterprise v5.x Major Release involved several breaking changes. The migration to a v5.x release can be more complex than the regular Anchore Enterprise feature release upgrade.
There are four significant component changes required to migrate to Enterprise v5.x that each have their own migration paths. This document will help you migrate all components in a safe and downtime-minimizing way.
The components are:
Anchore Enterprise: provides a new V2 API.
v5.x only supports the new V2 API
v4.9.x supports both V1 and V2 APIs
PostgreSQL Database: required version 13+ for Enterprise v5.x
Enterprise Helm Chart:
v5.x can be deployed only with the new enterprise Helm chart.
The older anchore-engine chart will be at end-of-life with the 4.x series.
Integrations & Clients: all Anchore-provided integrations have new released versions that are compatible with v5.x and support the new V2 API.
This guide will walk you through the process to go from this starting state.
The upgrade to v4.9.x is very strongly recommended for all deployments as a key part of the migration process to v5.x. If you use ANY integrations or API calls you should use v4.9.x and its dual-API support as the version of Anchore Enterprise to run while you migrate all your integrations to use the V2 API.
Plan Your Migration
Timing: Each phase has different duration expectations, and below we’ll review the expectations and process for each phase of the migration. You should expect and plan for downtime for each phase except the client API migrations, which are done while the system is running.
The migration may be a multi-day process since it involves things like client migrations that may take days or weeks depending on your org and how many other systems are integrated with your Anchore Enterprise deployment.
Combining Phases: Phases can be combined if you wish to use a smaller number of larger maintenance windows. Since
combining phases increases the complexity of each phase and associated risk of misconfigurations or errors, the combination should be carefully considered for your specific needs and risk tolerance.
Migration Path 1: Chart-Managed Database
If you have PostgreSQL deployed in Kubernetes using the Anchore-Engine Helm Chart, then this is the migration path for you.
graph
    subgraph Start
    %% Start at v4.8.x or earlier, using postgres 9.6 and the anchore-engine helm chart
        anchore4("Enterprise <= v4.8.x")
        pg9[("PostgreSQL 9.6")]
        engineChart["anchore-engine chart"]
        anchorectl("anchorectl v1.7.x") --V1 api calls--> anchore4
        anchore4 --uses--> pg9
        engineChart --deploys--> anchore4
    end

    subgraph step1[Latest Enterprise v4.9.x]
        %% Upgrade to v4.9.x for V2 API
        anchore49_1("Enterprise v4.9.x")
        pg9_2[("PostgreSQL 9.6")]
        engineChart1["anchore-engine chart"]
        anchore49_1 --uses--> pg9_2
        anchorectl3("anchorectl v1.8.x") --V1 api calls--> anchore49_1
        engineChart1 --deploys--> anchore49_1
    end

    subgraph step2[Chart and DB Migrated]
    %% Migrate to new Chart & DB Migration to PG13, no Anchore Enterprise version change
        anchore49("Enterprise = v4.9.x")
        pg13[("PostgreSQL 13+")]
        pg96[("PostgreSQL 9.6")]
        engineChart2["anchore-engine chart"]
        enterpriseChart["enterprise chart"]
        engineChart2 --uses--> pg96
        pg96 --migrates to--> pg13
        anchore49 --uses--> pg13
        anchorectl2("anchorectl v1.8.x") --V1 api calls--> anchore49
        enterpriseChart --deploys--> anchore49
    end

    subgraph step3[Integrations Migrated]
    %% Upgrade integrations/AnchoreCTL
        anchoreInter3("Enterprise v4.9.x")
        engineChart3["anchore-engine chart"]
        enterpriseChart2["enterprise chart"]
        pg13_4[("PostgreSQL 13+")]
        pg96_2[("PostgreSQL 9.6")]
        engineChart3 --> pg96_2
        anchoreInter3 --> pg13_4
        anchorectl5("anchorectl v4.9.x") --V2 api calls--> anchoreInter3
        enterpriseChart2 --deploys--> anchoreInter3
    end

    subgraph finish["Enterprise v5.x"]
    %% Upgrade to v5.x
        anchore5("Enterprise v5.x")
        enterpriseChart3["enterprise chart"]
        pg13_5[("PostgreSQL 13+")]
        anchore5 --> pg13_5
        anchorectl6("anchorectl v5.x") --V2 api calls--> anchore5
        enterpriseChart3 --deploys--> anchore5
    end

    Start --Upgrade Anchore Enterprise to latest v4.9.x release--> step1;
    step1 --Migrate to Enterprise Chart and PG13+ DB--> step2;
    step2 --Migrate integrations & anchorectl to use V2 API--> step3;
    step3 --Upgrade Anchore Enterprise to v5.x & delete 4.0.x deployment--> finish;
Step 1: Upgrade Anchore Enterprise to latest v4.9.x Release
Downtime: Required
Upgrade your Anchore Enterprise deployment to v4.9.x. This is an important step for several reasons:
It is supported by both the legacy anchore-engine helm chart and the new enterprise helm chart
It supports PostgreSQL 9.6+ and newer (13+), so it provides a stable base to execute the other upgrade steps
It supports both the V1 and V2 APIs, so you can have a stable Anchore Enterprise version for updating all your integrations
Upgrade mechanism: normal Anchore Enterprise upgrade process
Step 2: Migrate to Enterprise Chart, 4.9.x and PostgreSQL 13
This does not bring you to the latest version of Anchore Enterprise. Moving to the Enterprise chart readies you for the 4.9.x to 5.x upgrade in step 4.
Step 3: Migrate all integrations and clients to V2 API compatible versions
Downtime: None for Anchore Enterprise itself, but individual integrations may vary
Once your deployment is running v4.9.x you have a stable platform to migrate integrations and clients to using the V2 API of Enterprise. You should perform the upgrades/migrations for the new V2 API in this phase. This phase may last for a while and does not end until all your API calls are using the V2 endpoint instead of V1.
Integration
Recommended V2 API Compatible Version
AnchoreCTL
v4.9.0
anchore-k8s-inventory
v1.1.1
anchore-ecs-inventory
v1.2.0
Kubernetes Admission Controller
v0.5.0
Jenkins Plugin
v1.1.0
Harbor Scanner Adapter
v1.2.0
enterprise-gitlab-scan
v4.0.0
Upgrading AnchoreCTL Usage in CI
The installation script provided via Deploying AnchoreCTL will only automatically deploy new releases that are V1 API compatible, so you need to update use of that script to include specific versions.
For example, use:
curl -sSfL https://anchorectl-releases.anchore.io/anchorectl/install.sh | sh -s -- -b <DESTINATION_DIR> v4.9.0
Confirming V1 API is no longer in use
To verify that all clients have been updated, you can review the logs from the API containers in your v4.9.x deployment. We recommend that you monitor for multiple days to verify there are no periodic processes that still use the old endpoint.
Step 4: Upgrade from Enterprise 4.9.x to 5.9 using 2.10.0 of the chart
If you deploy PostgreSQL using any mechanism other than the Anchore-provided chart (e.g. AWS RDS, your own DB chart,
Google CloudSQL, etc.), then this is the migration plan for you.
graph
    subgraph Start[Enterprise v4.x]
        anchoreStart("Enterprise <= v4.8.X")
        pg9[("PostgreSQL 9.6")]
        engineChart["anchore-engine chart"]
        anchorectl("anchorectl v1.7.x") --V1 api calls--> anchoreStart
        anchoreStart --uses--> pg9
        engineChart --deploys--> anchoreStart
    end

    subgraph step1[Latest Enterprise v4.9.x]
        %% Upgrade to v4.9.x for V2
        anchoreInter1("Enterprise v4.9.x")
        pg9_2[("PostgreSQL 9.6")]
        engineChart2["anchore-engine chart"]
        anchoreInter1 --uses--> pg9_2
        anchorectl3("anchorectl v1.8.x") --V1 api calls--> anchoreInter1
        engineChart2 --deploys--> anchoreInter1
    end

    subgraph step2[Enterprise Helm Chart]
        %% Use new chart
        anchoreInter2("Enterprise v4.9.x")
        enterpriseChart["enterprise chart"]
        pg9_3[("PostgreSQL 9.6")]
        anchoreInter2 --> pg9_3
        anchorectl4("anchorectl v1.8.x") --V1 api calls--> anchoreInter2
        enterpriseChart --deploys--> anchoreInter2
    end

    subgraph step3[PostgreSQL 13+]
    %% Migrate to PG13+ , no Anchore Enterprise version change
        anchoreInter3("Enterprise = v4.9.x")
        pg13[("PostgreSQL 13+")]
        enterpriseChart2["enterprise chart"]
        anchoreInter3 --uses--> pg13
        anchorectl2("anchorectl v1.8.x") --V1 api calls--> anchoreInter3
        enterpriseChart2 --deploys--> anchoreInter3
    end

    subgraph step4[Integrations using V2 API]
    %% Upgrade integrations/AnchoreCTL
        anchoreInter4("Enterprise v4.9.x")
        enterpriseChart3["enterprise chart"]
        pg13_4[("PostgreSQL 13+")]
        anchoreInter4 --> pg13_4
        anchorectl5("anchorectl v4.9.x") --V2 api calls--> anchoreInter4
        enterpriseChart3 --deploys--> anchoreInter4
    end

    subgraph finish[Enterprise v5.x]
    %% Upgrade to v5.x
        anchore5("Enterprise v5.x")
        enterpriseChart4["enterprise chart"]
        pg13_5[("PostgreSQL 13+")]
        anchore5 --> pg13_5
        anchorectl6("anchorectl v5.x") --V2 api calls--> anchore5
        enterpriseChart4 --deploys--> anchore5
    end

    Start --Upgrade to latest v4.9.x Enterprise--> step1;
    step1 --Migrate to Enterprise Helm Chart--> step2;
    step2 --Upgrade External DB to PostgreSQL 13+--> step3;
    step3 --Migrate Integrations and AnchoreCTL to use V2 API--> step4;
    step4 --Upgrade Anchore Enterprise to v5.x --> finish;
Step 1: Upgrade to latest Anchore Enterprise v4.9.x
Downtime: Required
Upgrade your Anchore Enterprise deployment to v4.9.x. This is an important step for several reasons:
It is supported by both the legacy anchore-engine helm chart and the new enterprise helm chart
It supports PostgreSQL 9.6+ and newer (13+), so it provides a stable base to execute the other upgrade steps
It supports both the V1 and V2 APIs, so you can have a stable Anchore Enterprise version for updating all your integrations
Step 2: Upgrade PostgreSQL from 9.6.x to 13+
If Anchore Enterprise is deployed on FIPS Enabled Hosts and Amazon RDS (including GovCloud) is hosting the Anchore database, you will be required to have PostgreSQL version 16 or higher. This is due to RHEL 9 enforcing the FIPS-140-3 requirements. Amazon RDS is only supporting EMS or TLS 1.3 with the use of PostgreSQL 16 or greater.
Downtime: Required
Enterprise v5.x requires PostgreSQL 13 or later to run. The DB upgrade process will be specific to your deployment mechanisms and way of running Postgres. Depending on what version of PostgreSQL you are running when you start, there may be multiple DB upgrade operations necessary in PostgreSQL to get to 13+.
However, this upgrade can be done with any Anchore Enterprise version. All 4.x versions of Anchore Enterprise already support PostgreSQL 13+, so the DB upgrade can be executed outside any changes to the Anchore Enterprise deployment itself.
If you are using AWS RDS or another cloud platform for hosting your PostgreSQL database, please refer to their upgrade
documentation for the best practices to upgrade your instance(s) to version 13 or higher.
Step 3: Migrate to Enterprise Helm Chart
This does not bring you to the latest version of Anchore Enterprise. Moving to the Enterprise chart readies you for the 4.9.x to 5.x upgrade in step 4.
Step 4: Upgrade all your integrations/clients to use the V2 API
Downtime: None for Anchore Enterprise itself, but individual integrations may vary
Once your deployment is running v4.9.x you have a stable platform to migrate integrations and clients to using the V2 API of Enterprise. You should perform the upgrades/migrations for the new V2 API in this phase. This phase may last for a while and does not end until all your API calls are using the V2 endpoint instead of V1.
Integration
Recommended V2 API Compatible Version
AnchoreCTL
v4.9.0
anchore-k8s-inventory
v1.1.1
anchore-ecs-inventory
v1.2.0
Kubernetes Admission Controller
v0.5.0
Jenkins Plugin
v1.1.0
Harbor Scanner Adapter
v1.2.0
enterprise-gitlab-scan
v4.0.0
Upgrading AnchoreCTL Usage in CI
The installation script provided via Deploying AnchoreCTL will only automatically deploy new releases that are V1 API compatible, so you need to update use of that script to include specific versions.
For example, use:
curl -sSfL https://anchorectl-releases.anchore.io/anchorectl/install.sh | sh -s -- -b <DESTINATION_DIR> v4.9.0
Confirming V1 API is no longer in use
To verify that all clients have been updated, you can review the logs from the API containers in your v4.9.x deployment. We recommend that you monitor for multiple days to verify there are no periodic processes that still use the old endpoint.
Step 5: Upgrade from Enterprise 4.9.x to 5.9 using 2.10.0 of the chart