This section covers routine upgrades between releases within the same major version of Anchore Enterprise, for example from v6.1 to v6.2, or from v6.1.0 to v6.1.1. These upgrades are normally handled seamlessly by the Helm chart, an upsert of your Docker Compose configuration, or the Cloud Image Manager.
If you are running Anchore Enterprise v5.x or earlier, the procedures in this section do not apply. Crossing a major version boundary is a migration; see Major Upgrades (v5.x → v6.x).
Prepare for the Upgrade
Prior to upgrading Anchore Enterprise, it is highly recommended to first review the Anchore Enterprise Release Notes for the target version, with particular attention on the Requirements and Recommended Component Versions sections.
The Requirements section shares important notices and/or DB schema changes and any possible suggested downtime needed for schema and/or data changes.
The Recommended Component Versions section details the supported versions of integration tooling like AnchoreCTL. This might require further upgrades of other software components across your environment to maintain compatibility with the core Anchore Enterprise service.
When you are ready to perform an upgrade, we recommend, as a best practice, that you first backup/snapshot your database. When backing up, you must first stop your Anchore Enterprise services/deployment so that all services have completed their writes. We also highly recommend you test upgrades in a QA/Test environment first.
There is no automatic downgrade capability. The only way to downgrade after an upgrade, whether it succeeds or fails, is to restore your database contents to a state from a prior version of Anchore Enterprise, then explicitly run the compatible version of Anchore Enterprise against the corresponding database version.
Upgrade a Docker Compose deployment of Anchore Enterprise to a newer release within the same major version.
This procedure upgrades a Docker Compose deployment of Anchore Enterprise to a newer release within the same major version. Before you begin, review Prepare for the Upgrade.
This procedure applies to upgrades within v6.x only. It reuses your existing volumes and configuration, which is not valid when migrating from v5.x. For that, follow the v5.x → v6.x Migration Guide.
Upgrading a host with no outbound internet access? See Air-Gapped Upgrade before you begin. You’ll need to mirror the new image tags to your registry (or move them as a tarball) before restarting the stack below.
Upgrade Procedure
Step 1: Review the Release Notes
View the Anchore Enterprise Release Notes for the target version. The release notes call out breaking changes, new or changed configuration, and any version-specific upgrade instructions you need to plan for before starting.
Download the compose file that ships with the target release and check it against your current file to see if there any changes that may affect your deployment, such as new services, environment variables, or volume definitions:
The name field in the compose file you download differs from the one in your existing file, because it tracks the release. If your deployment started on a v6.0.x quickstart, the volume name differs too — quickstart volumes were versioned per release up to v6.0.x and have been stable since v6.1.0. Do not copy either value across. Keep the values already in your docker-compose.yaml so your deployment keeps reading the volume it has been writing to.
Fold any relevant changes into your docker-compose.yaml. If the diff shows nothing beyond version bumps, confirm every service is still present in your file and update the image tags in place. All services using the enterprise image move to the new release tag, while the ui service uses the separately versioned enterprise-ui image:
Watch the output of the previous to confirm all the services start. Once they have all started, you can use the below command to list the running services and confirm that they are all healthy.
docker ps
Step 8: Verify the New Version Is Running
Once the containers are up, verify the new version is running:
anchorectl system status
1.1 - Upgrade Air-Gapped using Docker Compose
A routine v6.x upgrade in an air-gapped Docker Compose deployment just needs the new image tags mirrored to your registry (or moved as a tarball) before you restart the stack. Unlike the major-version migration, there’s no new compose file, no new Dockerfile.anchore-db, and no rebuild required — you’re bumping versions on a running deployment, not standing up a new one. Your docker-compose.yaml stays as-is, provided you don’t touch the project name or database volume name.
Throughout this guide, the low side is the internet-facing system and the high side is the air-gapped system.
Prepare the Images (low side)
Review the Release Notes for the target version to confirm which image tags actually changed. enterprise/enterprise-ui always move together; redis (and, less often, the PostgreSQL/pg_cron combination baked into anchore:db) can change independently, so don’t assume they’re unchanged from your last upgrade — diff the new reference docker-compose.yaml and Dockerfile.anchore-db against what you last mirrored if you’re unsure.
This is uncommon for a routine upgrade — most releases don’t touch the database image at all. If it didn’t change, skip this step; there’s nothing new to move for anchore-db.
Move the Images to the High Side
Choose one of the following, matching the equivalent step in the Air-Gapped Docker Compose deployment guide, for only the images that actually changed in step 2 (and step 3, if it applied):
Private container registry (recommended) — re-tag, then push directly, or save/transfer/load/push, exactly as described in Option 1.
Local image tarball — for hosts with no registry available, as described in Option 2.
Update Your Compose File
If this deployment was already deployed air-gapped, your docker-compose.yaml already points every image: line at your private registry or local image names — you only need to bump the tag on the lines that changed. The enterprise image is referenced by many services (api, catalog, component-catalog, queue, policy-engine, analyzer, reports, reports_worker, notifications, data-syncer, db-preflight), so update every occurrence:
api:image:<registry>/anchore/enterprise:v6.2.2
Leave everything else in the file untouched — in particular, do not touch name: at the top of the file or the database volume name. Changing either causes Compose to stand up a new, empty deployment instead of upgrading this one.
Upgrade a Helm deployment of Anchore Enterprise to a newer release within the same major version.
This procedure upgrades a Helm deployment of Anchore Enterprise to a newer release within the same major version. Before you begin, review Prepare for the Upgrade.
This procedure applies to upgrades within v6.x only. If you are migrating from v5.x, follow the v5.x → v6.x Migration Guide.
If you use your own secret (useExistingSecrets: true), add ANCHORE_AUTH_SECRET to your Anchore Enterprise secret before upgrading to v6.1 or later. If you do not, some services will not start after the upgrade.
If you use the chart’s default secret (useExistingSecrets: false), you do not need to do anything. The chart creates this value automatically.
Database column encryption is optional and off by default, so it is not a prerequisite for this upgrade. To enable it, supply a key — either anchoreConfig.database.encryption.currentKey in your values file, or ANCHORE_DB_ENCRYPTION_KEY_CURRENT in your own secret if you use useExistingSecrets: true. You can do this during this upgrade or at any later point. See Encrypting Database Secrets at Rest.
Upgrading a cluster with no outbound internet access? See Air-Gapped Upgrade before you begin — you’ll need to mirror the new chart version and any updated images, including kubectlImage, before running helm upgrade below.
A Helm pre-upgrade hook initiates a Kubernetes job that scales down all active Anchore Enterprise pods and handles the Anchore Enterprise database upgrade.
The Helm upgrade is marked as successful only upon the job’s completion. This process causes the Helm client to pause until the job finishes and new Anchore Enterprise pods are initiated. To monitor the upgrade, you can follow the logs of the upgrade jobs:
kubectl get jobs -n ${NAMESPACE}kubectl logs -f job/<JOB_NAME> -n ${NAMESPACE}
These jobs are automatically removed after a subsequent successful Helm upgrade.
Helm waits for the upgrade job to complete, with a default timeout of 5 minutes. On a very large deployment, or when a release includes database schema changes or similar data migrations, the upgrade job can run for much longer than that; if the timeout is reached, Helm marks the release as failed even though the job may still be working. For such upgrades, consider passing a longer --timeout to the helm upgrade command (for example --timeout 3600s for a one-hour window), sized to your deployment.
An alternative post-upgrade hook is available to perform Anchore Enterprise upgrades without forcing all pods to terminate prior to running the upgrade. To enable the post-upgrade hook, set upgradeJob.usePostUpgradeHook=true in your values file.
Once upgraded, you can review the new state of your Anchore Enterprise install to verify the new version is running using the regular system status command.
anchorectl system status
2.1 - Upgrade Air-Gapped using Helm
A routine v6.x upgrade in an air-gapped cluster needs the new chart version and any updated images mirrored to your registry before you run helm upgrade. This mirrors the same low-side/high-side process as Air-Gapped Helm deployment, but there’s less to move — you’re bumping versions on a running deployment, not standing up a new cluster.
Throughout this guide, the low side is the internet-facing system and the high side is the air-gapped cluster.
Check what images that chart version actually references — redis and kubectlImage can change between chart releases independent of the Anchore Enterprise application version, so don’t assume they’re unchanged from your last upgrade:
helm show values anchore/enterprise --version ${CHART_VERSION} | grep -E "^image:|repository:|tag:"
The v6.2.2 / v6.2.0 shortcodes always resolve to the version this documentation site currently covers. If you are upgrading to a different release, substitute that release’s actual tag instead.
Unlike a fresh install, kubectlImage is always required for an upgrade, minor or major — the pre-upgrade hook (or the post-upgrade hook, if upgradeJob.usePostUpgradeHook: true) uses it to scale Anchore Enterprise pods during the upgrade.
Private container registry (recommended) — re-tag, then save/transfer/load, then push from the high side, exactly as described in Option 1, but for the images pulled above.
Local import onto cluster nodes — for small clusters with no registry available, as described in Option 2.
Also transfer enterprise-${CHART_VERSION}.tgz to the high side along with the images.
Update Your Values File
If this cluster was deployed air-gapped, your existing anchore_values.yaml already points image, ui.image, and ui-redis.image at your private registry — you only need to bump the tags to the new version:
If kubectlImage isn’t already set — for example, if this cluster’s values file hasn’t changed since a fresh install, which never uses it — add it now. See Deploy on the High Side on the deployment air-gapped page for the full registry-override block if you need the other image fields too.
Run the Upgrade from the Local Chart
Substitute the local chart archive — or your internal registry reference — for anchore/enterprise:
Continue with the rest of Upgrade on Kubernetes using Helm — monitoring the upgrade job logs and verifying with anchorectl system status — exactly as written.
3 - Upgrade the Cloud Image
Occasionally, Anchore will release updates to the Anchore Enterprise Cloud Image (AECI) and the subsequent version of Anchore Enterprise shipped with it. Upgrades are managed through the Cloud Image Manager, which will provide you with the upgrades that are available and allow you to determine when you want to upgrade.
If an upgrade is available, the Cloud Image Manager will walk you through the upgrade process. The upgrade involves a period of downtime and reboots, and the Cloud Image Manager tells you what to expect before proceeding. This will allow you to plan for the upgrade when it is convenient for you.
This procedure applies to upgrades within v6.x only. If you are migrating from v5.x, follow the v5.x → v6.x Migration Guide.
Prepare for the Upgrade
AECI runs the Anchore Enterprise GUI, API, and database together on a single virtual machine instance. That unified topology shapes how you prepare: the services share one failure domain, so an upgrade briefly affects all of them at once, and a snapshot of the instance’s volumes captures the whole system (application, configuration, and data) as one consistent restore point.
Before you begin:
Review the release notes. Read the Anchore Enterprise Release Notes for the target version, with particular attention on the Requirements and Recommended Component Versions sections.
Schedule a maintenance window and notify users. The GUI and API will be unavailable while services restart; a typical installation should expect approximately 20 minutes of downtime.
Quiesce the system. Stop submitting new image scans and SBOM imports, and let in-flight analysis complete. Upgrading a quiet system keeps the database consistent and avoids cutting jobs off mid-run. To guarantee nothing new arrives during the window, consider temporarily blocking inbound traffic to the API and GUI in the instance’s network ingress rules (on platforms such as AWS, its security group) by removing the HTTPS (TCP 443) rule or restricting it to administrator addresses. Leave SSH (TCP 22) open, as it carries your Cloud Image Manager session, and restore the rule once you have verified the upgrade.
Confirm the system is healthy. Use the Cloud Image Manager System Status screen to check that all services are running, and note the currently deployed versions so you know your starting point if you need to roll back. Do not upgrade a degraded deployment; resolve service issues first.
Check disk space. The upgrade downloads new container images and may migrate data, so confirm there is free space on both the root and data volumes. If space is tight, expand the disks first; see Expand Disks.
Snapshot your volumes. It is best practice to stop an instance before snapshotting its root volume (on platforms such as AWS, this is the documented recommendation). Once the system is quiesced, stop the instance, create snapshots of both the root and data volumes using your platform’s snapshot mechanism, and start the instance again before beginning the upgrade. Snapshotting while stopped guarantees the whole system, application, configuration, and data, is captured in a consistent state; the snapshots are your recovery point if the upgrade needs to be rolled back. Note that stopping and starting extends the maintenance window, and the instance’s public IP address may change unless you have assigned a static address (such as an Elastic IP on AWS). See Backups for broader backup and restore guidance.
Change one thing at a time. Do not combine the upgrade with other changes to the instance, such as resizing it or expanding disks, in the same window. If those are needed, complete and verify them before you upgrade.
Upgrade using the Cloud Image Manager
Step 1: Connect to the Cloud Image Manager
Connect over SSH using your key pair and the instance address:
Review the System Status screen to confirm all services are healthy, and note the currently deployed versions.
Step 3: Open the Upgrade Screen
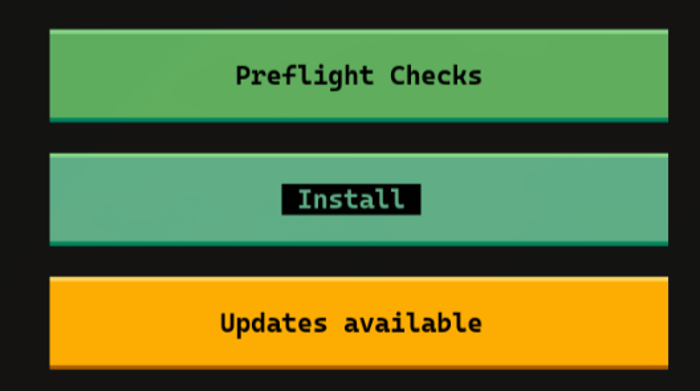
If upgrades are available for your deployment, the Updates available button in the Cloud Image Manager is highlighted yellow. Select it to open the upgrade screen.
The Updates available button is highlighted yellow when an upgrade is ready.
Step 4: Run the Upgrade
Before continuing, ensure you have followed the preparation steps, including taking snapshots or backups of your volumes.
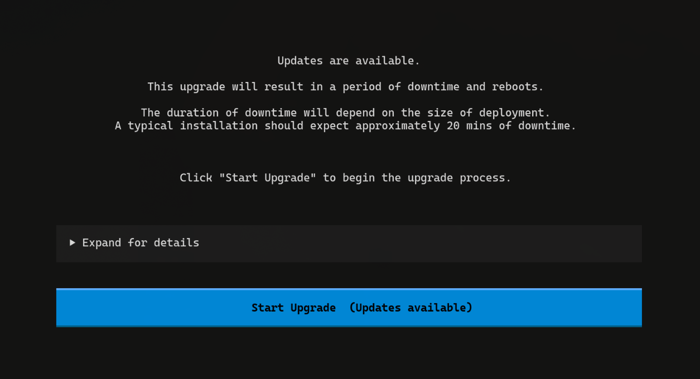
The upgrade screen summarizes what to expect: the upgrade results in a period of downtime and reboots, with a typical installation expecting approximately 20 minutes of downtime. The Cloud Image Manager will prompt you to ensure you have taken your snapshots; it does not create them for you, so confirm the snapshots from your preparation are complete before you continue.
Select Start Upgrade and let the Cloud Image Manager run the upgrade to completion. Keep your SSH session open and do not interrupt the process while the upgrade is in progress.
During the upgrade, your system may need to be restarted; if this occurs, log back into the Cloud Image Manager to continue the upgrade process.
Select Start Upgrade to begin. The screen notes the expected downtime for the upgrade.
Step 5: Verify the Result
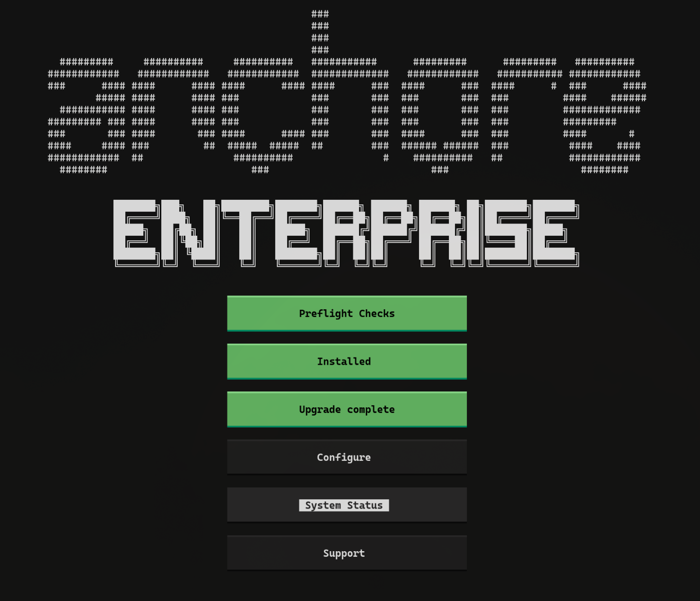
When the upgrade finishes, the Cloud Image Manager shows Upgrade complete. Validate the system status in the Cloud Image Manager by opening the System Status screen and confirming that all services are running and the new versions are deployed.
The Cloud Image Manager shows Upgrade complete when the upgrade has finished.
Consider running a smoke test before handing the system back, for example logging in to the Anchore Enterprise GUI and scanning a known image. Then conduct any tasks needed to make the system available to users again, such as restoring the network ingress rules you changed during preparation and resuming paused CI/CD pipelines and integrations.
Roll Back if Needed
If the upgrade fails or the system does not come back healthy, the volume snapshots from your preparation are your recovery point into a new instance of the appliance. Contact Anchore Customer Success via support.anchore.com for assistance with restoring or troubleshooting.