Anchore Enterprise provides SBOM-powered vulnerability scanning and management capabilities that leverage curated vulnerability intelligence, with a focus on reducing false positives and producing high-confidence results at scale.
It automates continuous vulnerability management across the software supply chain, including:
Identifying vulnerabilities and risks that apply to components in an SBOM
Reducing false positives and noise to improve accuracy
Prioritizing findings to focus attention on meaningful risk
Searching, reporting, and producing evidence for vulnerability findings across the software portfolio
SBOMs Are the Foundation
Anchore Enterprise uses SBOMs as the starting point for vulnerability analysis across software artifacts in build pipelines, registries, and runtime environments.
Anchore Enterprise scans software artifacts to generate high-fidelity SBOMs, imports third-party SBOMs in SPDX or CycloneDX formats, and analyzes them to identify vulnerabilities and other compliance issues.
Because vulnerability analysis is SBOM-based, Anchore Enterprise can continue to assess deployed software as new vulnerability information becomes available, including newly disclosed or zero-day vulnerabilities, without needing to rescan software artifacts.
Two Evaluation Scopes
Anchore Enterprise evaluates vulnerabilities in two distinct scopes — pick the one that matches how your team organizes software. Both scopes draw from the same vulnerability data, though some matching behaviors are tuned differently for each (see What’s Shared and What Differs Between Scopes).
App-version-scoped — vulnerability findings aggregated across every asset attached to an app version. The v6-native surface, where the Anchore Score is used to prioritize vulnerabilities based on a composite index composed of CVSS severity and score, EPSS, and CISA KEV.
Image-scoped — vulnerability findings for a single analyzed container image. The long-standing v5 surface, fully supported in v6.
See Scans for the comparison and worked walkthroughs of each scope.
Identifying Vulnerabilities and Risks
Anchore Enterprise identifies vulnerabilities and risks by matching components in an SBOM to known vulnerability and risk data provided by the Anchore Data Service.
The Anchore Data Service is continuously updated with:
Aggregated vulnerability data from dozens of sources and ecosystems
Risk context including EPSS scores and CISA KEV data
Malware data sourced from ClamAV
Proprietary Anchore-enriched data to improve accuracy and reduce noise
In addition to vulnerabilities, Anchore Enterprise can surface additional risk signals derived from its extensive artifact metadata, including malware indicators, embedded secrets, file permissions, and other insecure practices.
Detailed artifact metadata to improve accuracy of vulnerability matching
Ecosystem-aware matching processes
Optimized vulnerability feed selection
Enriched vulnerability data exclusive to Anchore Enterprise — additional context and corrections that paid customers receive beyond what is available in the open source Grype scanner
Anchore Enterprise also provides two user-controlled mechanisms — Corrections and Hints — that let organizations further refine matching behavior and improve result quality.
Prioritizing Vulnerability Findings
Anchore Enterprise enables organizations to triage vulnerabilities and risks based on technical and operational context.
You can:
Prioritize risks based on severity, exploitability, deployment status, or fix availability
Use the Anchore Score — a composite risk index that combines CVSS severity and score, EPSS, and CISA KEV data — to prioritize vulnerabilities that matter most within an app version
Use policies to generate warnings or stop a build or deployment
Annotate vulnerabilities with VEX data fields to express how each finding impacts your software — see Annotations
Search, Reporting, and Evidence
Anchore Enterprise supports two distinct reporting jobs — both documented under Reporting.
Search — find vulnerabilities across assets through the Reports view in the GUI, saved reports, custom templates, and the query API
Evidence — produce formal documents for downstream consumers: VEX (Vulnerability Exploitability eXchange), VDR (Vulnerability Disclosure Report), and vulnerability data exports from images and app versions
For long-running registry coverage, repositories automatically analyze new image tags as they appear. For runtime visibility, Kubernetes inventory keeps Anchore Enterprise aware of containers active in your clusters, and continuously checks them against the latest set of security vulnerabilities.
1 - How It Works
Vulnerability management is the practice of identifying, categorizing, and remediating security vulnerabilities in software. Anchore Enterprise automates this by matching the contents of an SBOM against curated, Anchore-enriched vulnerability intelligence.
Internally, vulnerability data moves through a pipeline before it ever reaches your results:
Anchore Enterprise evaluates vulnerabilities in two distinct scopes — pick the one that matches how your team organizes software. Both scopes draw from the same vulnerability data, but they differ in what the matching runs against, how some matching behaviors are tuned, and how findings are aggregated. See What’s Shared and What Differs Between Scopes for the scope-specific matching behaviors.
Scope
What is evaluated
Where you read results
App-version-scoped
Every asset attached to an app version, aggregated and deduplicated
The version’s detail page in the GUI; AnchoreCTL: anchorectl app version vuln list; or API GET /apps/{id}/versions/{vid}/vulnerabilities
Image-scoped
A single analyzed container image, identified by digest
The image’s detail page in the GUI; AnchoreCTL: anchorectl image vulnerabilities; or API: GET /images/{digest}/vuln/{type}
The image-scoped surface is the long-standing path and remains fully supported. The app-version-scoped surface is the v6-native path for teams that have adopted the apps, versions, and assets model; it adds deduplicated aggregation across multiple assets in a release and surfaces the Anchore Score as a vulnerability prioritization index.
Vulnerability matching in Anchore Enterprise begins with collecting vulnerability data from multiple sources to identify vulnerabilities in the packages cataloged within an SBOM.
Anchore Enterprise consolidates data from these sources into a format suitable for vulnerability identification in SBOMs. One key source of data is the National Vulnerability Database (NVD). The NVD serves as a widely recognized, vendor-independent resource for vulnerability identification. Additionally, it provides a framework for measuring the severity of vulnerabilities. For instance, the NVD uses the Common Vulnerability Scoring System (CVSS), which assigns numerical scores ranging from 0 to 10 to indicate the severity of vulnerabilities. These scores help organizations prioritize vulnerabilities based on their potential impact.
However, due to known limitations with NVD data, relying on additional vulnerability data sources becomes essential. Anchore Enterprise also presents vulnerability data from vendor-specific databases, which play a crucial role in accurate and efficient detection. These sources enable vulnerability matching from the vendor’s perspective. Examples of such vendor-specific databases include GitHub, the Microsoft Security Response Center (MSRC), and the Red Hat Security Response Database, among many others.
Import and Normalize Data
Anchore’s collection framework reaches out to various data sources, parsing and normalizing that data, then storing it for future use.
There is not one standard format for publishing vulnerability data, and even when there is a standardized data format, such as OVAL or OSV, those formats often have minor incompatible differences in their implementation. The collection framework interprets each data source and outputs a single consistent format that can be used to construct a vulnerability database.
Providers
The process begins with Anchore’s collection framework reaching out to vulnerability data sources. These sources are known as “providers”. The following is a list of providers:
Alpine: Focuses on lightweight Linux distributions and provides vulnerability data tailored specifically to Alpine packages.
Amazon: Offers vulnerability data for its cloud services and Linux distributions, such as Amazon Linux.
Arch Linux / SecureOS: Provides vulnerability data for both Arch Linux and SecureOS.
Chainguard: Specializes in securing software supply chains and delivers vulnerability insights for containerized environments, including Chainguard libraries.
Debian: Maintains a robust security tracker for vulnerabilities in its packages, concentrating on open-source software used in Debian-based systems.
Fedora: Provides vulnerability data including EPEL packages sourced from the Bodhi update system.
GitHub: Provides vulnerability data supported by an extensive advisory database for developers covering numerous language ecosystems.
Mariner (CBL-Mariner): Provides vulnerability data for Microsoft’s CBL-Mariner Linux distribution.
NVD (National Vulnerability Database): Serves as the official U.S. government repository of vulnerability information.
Oracle: Tracks vulnerabilities in Oracle Linux and other Oracle products, focusing on enterprise environments.
RHEL (Red Hat Enterprise Linux): Delivers detailed and timely vulnerability data for Red Hat products, including EUS (Extended Update Support) data.
SLES (SUSE Linux Enterprise Server): Offers vulnerability data for SUSE Linux products, with a strong focus on enterprise solutions, particularly in cloud and container environments.
Ubuntu: Maintains a well-documented vulnerability tracker and provides regular security updates for its popular Linux distribution.
VMware PhotonOS: Provides vulnerability data for PhotonOS.
Wolfi: Provides vulnerability data for a community-driven, secure-by-default Linux distribution that emphasizes supply chain security.
Anchore’s collection framework reaches out to all of these providers, collects and consolidates vulnerability data for use. The result of these operations is the Grype database (GrypeDB).
Build GrypeDB
The data collected from Anchore’s collection framework is consolidated into GrypeDB, a vulnerability database used by Anchore Enterprise for matching vulnerabilities. The Anchore Enterprise database and the Grype database are not the same data. The hosted Anchore Enterprise database contains the consolidated GrypeDB as well as the Exclusion database and Microsoft MSRC vulnerability data. This additional information reserved for Anchore Enterprise both expands the set of known vulnerabilities as well as increases the accuracy of the vulnerability reporting.
Non-Anchore (upstream) Data Updates
When problems are identified in other data sources, Anchore contacts those upstream sources and works with them to correct issues. Anchore has an “upstream first” policy for data corrections — whenever possible, corrections are submitted to upstream data sources rather than applied only to Anchore’s data. This approach creates a better overall vulnerability data ecosystem and fosters beneficial collaboration with upstream projects.
Due to the known issues with the NVD, Anchore Enterprise enhances the quality of its data for analysis by enriching the information obtained from the NVD. This process involves human intervention to review and correct the data. Once this manual process is completed, the cleaned and refined data is stored in the Anchore Enrichment Database.
Before this process was implemented, correcting NVD data was a challenge. The enrichment process provides the flexibility to make changes to affected products and versions, and ensures that the data used by Anchore Enterprise is highly reliable — accurate and free from the common issues associated with NVD data.
Vulnerability Matching Process
Matching is the process of comparing SBOM data against the vulnerability data in Anchore Enterprise. Any vulnerability data surfaced in Anchore Enterprise is the result of a vulnerability match.
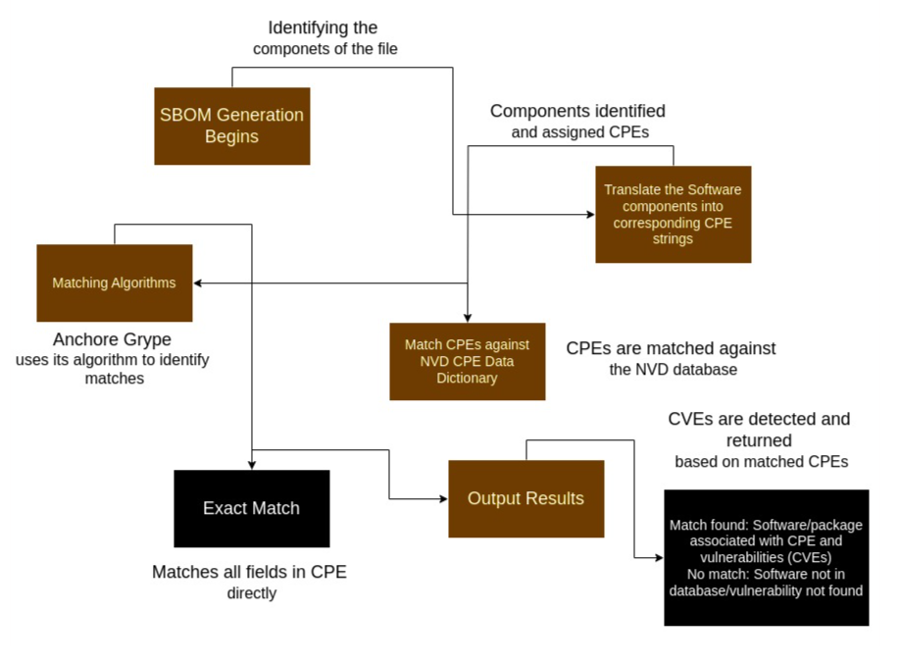
CPE Matching
CPE, which stands for Common Platform Enumeration, is a structured naming scheme standardized by the National Institute of Standards and Technology (NIST) to describe software, hardware, and firmware. It uses a standardized format that helps tools and systems compare and identify products efficiently.
CPE matching involves comparing the CPEs found in the SBOM of a software product against a list of known CPE entries to find a match. The diagram below illustrates the steps involved in CPE matching.
Due to the current state of the NVD data as mentioned above, CPE matching can sometimes lead to false positives. This led to the creation of the exclusions dataset managed within Anchore Enterprise. CPE matching is disabled by default for all GitHub-covered ecosystems to reduce false positives. Vulnerability matching can be further tuned by enabling or disabling CPE matching per ecosystem via the API, Anchore Enterprise GUI, or configuration file. See Vulnerability Matching Configuration for details.
The per-ecosystem CPE matching configuration applies to both image-scoped and app-version-scoped (asset) scans, since both run through the same matching engine.
Synthetic CPE Fallback for Packages Without an Ecosystem PURL
When a package is detected without a Package URL (PURL) that carries ecosystem information — for example, a binary surfaced by Syft that does not map to a known package manager — Anchore Enterprise generates a synthetic pkg:generic/{name}@{version} PURL and runs the matcher with --add-cpes-if-none. The matcher then synthesizes CPEs from the package’s name and version, and those CPEs participate in CPE-based matching against NVD.
This fallback ensures that packages without an ecosystem-specific PURL still receive vulnerability coverage, even when CPE matching is disabled by default for the ecosystems already covered through GHSA. The fallback applies regardless of the per-ecosystem by_cpe configuration — it operates one level below it, against packages that have no ecosystem to configure.
The synthetic-CPE fallback applies only to app-version-scoped (asset) scans; it has no effect on image-scoped scans.
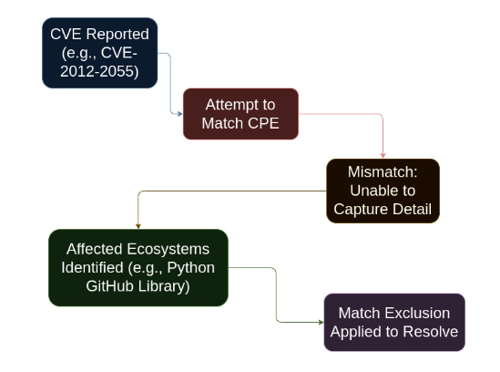
Vulnerability Match Exclusions
When a false positive match cannot be resolved using data alone — generally due to limitations of CPE matching — Anchore Enterprise applies Vulnerability Match Exclusions. These exclusions remove a vulnerability from findings for a specific set of match criteria.
The vulnerability match exclusion data is held in a private repository and is not included in the open source Grype vulnerability data.
For example, CVE-2012-2055 is a vulnerability reported against the GitHub product. When matching a CPE against this CVE, CPE is unable to capture this level of detail, causing GitHub libraries for different ecosystems to appear as affected — the Python GitHub library is one such example. To resolve this, the language ecosystems are excluded using a match exclusion.
The exclusion data is shown below:
exclusions:- constraints:- namespaces:- nvd:cpepackages:- language:java- language:python- language:javascript- language:ruby- language:rust- language:go- language:phpjustification:This vulnerability affects the GitHub product suite, not language-specific clientsid:CVE-2012-2055
Matching
The matching process is the same in both Grype and Anchore Enterprise. The vulnerability data is stored in GrypeDB; details such as vulnerability ID, affected packages and versions, and fix information are part of these records.
For example, for vulnerability CVE-2024-9823, the package name (Jetty), fixed version (9.4.54), and affected ecosystems — such as Debian, NVD, and Java — are stored. These ecosystems are referred to as a namespace in the context of a match.
The namespace used for the match is determined by the package stored in the SBOM. For a Debian package, the Debian namespace is used; for Java, the GitHub namespace is used. CPE matching is disabled by default for all GitHub-covered ecosystems (including Java, Python, Ruby, Go, JavaScript, .NET, and Rust), resulting in higher quality matches with fewer false positives. CPE matching can be re-enabled per ecosystem if needed. See Vulnerability Matching Configuration for more details.
The details about the versions affected are used to determine if the version reported by the SBOM falls within the affected range. If it does, the vulnerability matches.
For a successful match, the fixed details field is used to display which version fixes a particular vulnerability. The fix details are specific to each namespace. The version in Debian that fixes this vulnerability, 9.4.54-1, is not the same as the version that fixes the Java package, 9.4.54.
Vulnerabilities on the match exclusion list are removed from results.
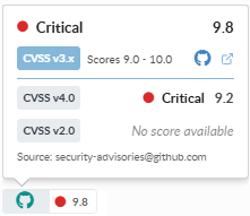
Once a match exists, additional metadata can be surfaced. Details such as severity and CVSS are stored with each match record. If a field is missing — such as severity or CVSS — it is filled in from NVD data when available.
The Anchore Score
The Anchore Score is a composite risk index score, ranging from 0.0 to 100.0. It is used to prioritize vulnerabilities, and is composed of the CVSS severity and score, the EPSS score, and the CISA KEV data:
The score is intended as a single value you can sort by, filter on, or set thresholds against to surface the vulnerabilities within an app version requiring the most urgent attention.
The Anchore Score is surfaced in the app-version-scoped evaluation surface — the version detail page in the Anchore Enterprise GUI, AnchoreCTL: anchorectl app version vuln list, and API: GET /apps/{id}/versions/{vid}/vulnerabilities. The image-scoped surface continues to use individual vulnerability metrics without the composite Anchore Score.
Configure Vulnerability Matching
Search by CPE can be globally configured per supported ecosystem. CPE matching is disabled by default for all GitHub-covered ecosystems, since vulnerability reports from the GitHub Security Advisory Database provide comprehensive coverage for these ecosystems. This reduces false positives caused by CPE matching against NVD data.
These settings can be managed in the following ways:
API: Use the GET /v2/system/configurations and PUT /v2/system/configurations/{uuid} endpoints to view and update individual CPE matching settings. Changes take effect dynamically without requiring a service restart.
Anchore Enterprise GUI: Navigate to System > Configuration to view and toggle CPE matching settings per ecosystem.
Configuration File: Settings can also be defined in the Anchore Enterprise configuration file under the policy_engine section.
The fully-specified default configuration is as follows:
policy_engine:vulnerabilities:matching:default:search:by_cpe:enabled:trueecosystem_specific:dotnet:search:by_cpe:enabled:falsegolang:search:by_cpe:enabled:falsejava:search:by_cpe:enabled:falsejavascript:search:by_cpe:enabled:falsepython:search:by_cpe:enabled:falseruby:search:by_cpe:enabled:falserust:search:by_cpe:enabled:falsestock:search:by_cpe:# Disabling search by CPE for the stock matcher will entirely disable binary-only matches# and is *NOT ADVISED*enabled:true
A shorter form of the default configuration, since the default by_cpe is true and all GitHub-covered ecosystems are disabled:
Anchore Enterprise aggregates vulnerability information from several upstream sources.
Common sources include:
National Vulnerability Database (NVD)
Linux distribution security advisories
GitHub Security Advisories (GHSA)
Vendor-specific advisory feeds
Each source may provide:
CVSS scores
Severity ratings
Vendor-specific metadata
Grype collects this information and normalizes it before returning results to Anchore Enterprise.
Vulnerability Severity and CVSS Scoring
Anchore Enterprise determines vulnerability severity using data from multiple upstream vulnerability providers. The following sections explain how severity ratings and CVSS scores are sourced, normalized, and displayed in vulnerability scan results.
Each vulnerability finding in Anchore Enterprise may contain two related values:
Attribute
Description
Severity
A categorical rating indicating the relative impact of the vulnerability
CVSS Score
A numeric score, ranging from 0.0 to 10.0, representing the quantitative risk value from the Common Vulnerability Scoring System (CVSS)
Severity and CVSS scores are derived from vulnerability data processed by Grype and the Grype vulnerability database (GrypeDB).
Different upstream vulnerability sources may report different severity levels or CVSS scores for the same vulnerability. Anchore Enterprise applies normalization and source-specific rules to determine which values are used.
Severity Levels
Anchore Enterprise uses the severity levels defined by Grype.
Supported severity levels are:
Severity
Description
Unknown
Severity cannot be determined
Negligible
Extremely low impact
Low
Low severity vulnerability
Medium
Moderate severity vulnerability
High
Significant severity vulnerability
Critical
Highest severity vulnerability
These values are normalized across all vulnerability sources to ensure consistent reporting.
Severity Schemes
Upstream vulnerability providers use different classification systems for severity. Grype normalizes these schemes into a common representation.
Supported severity schemes include:
Scheme
Severity Levels
CVSS
Severity derived from a CVSS base score
HML
High / Medium / Low
CHML
Critical / High / Medium / Low
CHMLN
Critical / High / Medium / Low / Negligible
Grype maps source-specific severity data into one of these normalized schemes before returning results to Anchore Enterprise.
When a vulnerability source only provides a numeric CVSS score, severity is derived from the score using the standard CVSS severity ranges.
CVSS Score to Severity Mapping
If a vulnerability record includes only a CVSS score, the severity is derived from the base score using the following mapping for CVSS v3 and v4 scoring:
CVSS Base Score
Severity
9.0 – 10.0
Critical
7.0 – 8.9
High
4.0 – 6.9
Medium
0.1 – 3.9
Low
>0 but <0.1
Negligible
Not available
Unknown
Notes
CVSSv3 scores are preferred over CVSSv2 and CVSSv4 scores when multiples are present. However, all 3 scores are provided when data is available for a given vulnerability.
Severity is derived from the advisory’s urgency field
If the urgency field is not defined, severity falls back to NVD severity
Ubuntu vulnerabilities:
Ubuntu advisories may mark vulnerabilities as won’t fix when the affected package belongs to an end-of-life (EOL) release.
Ubuntu CVE status definitions (including “won’t fix”) are available at ubuntu.com/security/cves.
When vulnerabilities are matched using CPE identifiers:
Severity is derived from NVD data
CVSS scores are also sourced from NVD
If multiple CVSS scores are present in the vulnerability record, Grype typically selects the highest available score, favoring CVSSv3 scores over CVSSv2.
“Won’t Fix” Vulnerabilities
Some vulnerabilities may be marked as won’t fix when vendors indicate that a patch will not be provided.
Debian:
Debian advisories may set the fixed version to 0, indicating that the vulnerability is not expected to be fixed.
Ubuntu:
Ubuntu marks vulnerabilities as won’t fix when the affected package belongs to an end-of-life release.
Red Hat:
Red Hat may mark vulnerabilities as Will not fix or Deferred depending on product lifecycle and support status.
Grype Database Processing:
During GrypeDB processing, vulnerabilities may be marked as won’t fix when:
The fixed version is set to 0, and
The advisory indicates that no fix is available.
Conflicting Severity Between Sources
Different vulnerability sources may report different severity ratings for the same vulnerability.
For example, GitHub Security Advisories and the National Vulnerability Database may assign different severity values.
In these cases:
Grype collects severity data from all available sources.
Anchore Enterprise uses the normalized severity returned by Grype.
Additional Notes
CVSS scores are included in Grype JSON output but are not displayed by default in CLI output.
Scan result exports (such as CSV reports) include all available CVSS scores along with their sources.
Comprehensive Distributions
When matching vulnerabilities against a Linux distribution, such as Alpine, Red Hat, or Ubuntu, there is a concept called “comprehensive distribution”. A comprehensive distribution reports both fixed and unfixed vulnerabilities in its data feed.
For example, Red Hat reports on all vulnerabilities, including unfixed vulnerabilities. Some distros, like Alpine, do not report unfixed vulnerabilities. When a distribution does not contain comprehensive vulnerability information, Anchore Enterprise falls back to other data sources on a best-effort basis to determine vulnerabilities affecting Alpine that have not yet been fixed.
Red Hat Enterprise Linux (RHEL) Extended Update Support (EUS)
Anchore Enterprise supports the use of RHEL EUS data when scanning relevant container images for vulnerabilities.
By default, Anchore Enterprise uses RHEL EUS data for any RHEL-based image that is automatically identified as having EUS support during the image analysis process.
The default behavior can be overridden at the system level by altering your vulnerability scanning configuration, or at the image level by applying the anchore.user/extended_support annotation to individual images.
To specify that a RHEL-based image should use EUS data for vulnerability scanning regardless of EUS support detection, set the anchore.user/extended_support annotation to true.
To specify that a RHEL-based image should not use EUS data for vulnerability scanning regardless of EUS support detection, set the anchore.user/extended_support annotation to false.
For more information on the presentation of Extended Update Support detection and its use in image vulnerability scans, see the API documentation for the /images/{image_digest} and /images/{image_digest}/vuln/{vuln_type} APIs.
There are some additional details for the fixed data from NVD that should be explained. NVD does not contain explicit fix information for a given vulnerability. Other namespaces do, such as GitHub and Debian. There is a concept of “Less Than” and “Less Than or Equal” in the NVD data. When a vulnerability is tagged with “Less Than or Equal”, it could mean there is no fix available, or the fix version could not be determined, or a fix was unavailable at the time NVD looked at it. In those cases, fix details cannot be shown for a vulnerability match.
If NVD uses “Less Than”, it is assumed that the version noted is the fixed version, unless that version is part of the affected range of a subsequent CPE configuration for the same CVE. That version is presented as containing the fix.
For example, given data that looks like this:
some_package LessThan 1.2.3
Version 1.2.3 is assumed to contain the fix, and any version less than that, such as 1.2.2, is vulnerable. Alternatively, given data like:
some_package LessThanOrEqual 1.2.2
Version 1.2.2 and below are known to be vulnerable, but the version containing the fix is not known. It could be in version 1.3.0, or 1.2.3, or even 2.0.0. In these cases, fix details are not surfaced. If such details become available in the future, the CVE data will be updated.
Scan Windows Images
Anchore Enterprise can analyze and provide vulnerability matches for Microsoft Windows images. Anchore Enterprise downloads, unpacks, and analyzes the Microsoft Windows image contents similar to Linux-based images, providing OS information as well as discovered application packages like npms, gems, Python, NuGet, and Java archives.
Vulnerabilities for Microsoft Windows images are matched against the detected operating system version and KBs installed in the image. These are matched using data from the Microsoft Security Response Center (MSRC) data API.
Supported Windows Base Image Versions
The following are the MSRC Product IDs that Anchore Enterprise can detect and provide vulnerability information for. These provide the basis for the main variants of the base Windows containers: Windows, ServerCore, NanoServer, and IoTCore.
Product ID
Name
10481
Windows 8.1 for 32-bit systems
10482
Windows 8.1 for x64-based systems
10484
Windows RT 8.1
10729
Windows 10 for 32-bit Systems
10735
Windows 10 for x64-based Systems
10788
Windows 10 Version 1511 for x64-based Systems
10789
Windows 10 Version 1511 for 32-bit Systems
10852
Windows 10 Version 1607 for 32-bit Systems
10853
Windows 10 Version 1607 for x64-based Systems
10951
Windows 10 Version 1703 for 32-bit Systems
10952
Windows 10 Version 1703 for x64-based Systems
11453
Windows 10 Version 1709 for 32-bit Systems
11454
Windows 10 Version 1709 for x64-based Systems
11583
Windows 10 Version 1709 for ARM64-based Systems
11497
Windows 10 Version 1803 for 32-bit Systems
11498
Windows 10 Version 1803 for x64-based Systems
11563
Windows 10 Version 1803 for ARM64-based Systems
11568
Windows 10 Version 1809 for 32-bit Systems
11569
Windows 10 Version 1809 for x64-based Systems
11570
Windows 10 Version 1809 for ARM64-based Systems
11644
Windows 10 Version 1903 for 32-bit Systems
11645
Windows 10 Version 1903 for x64-based Systems
11646
Windows 10 Version 1903 for ARM64-based Systems
11712
Windows 10 Version 1909 for 32-bit Systems
11713
Windows 10 Version 1909 for x64-based Systems
11714
Windows 10 Version 1909 for ARM64-based Systems
11766
Windows 10 Version 2004 for 32-bit Systems
11767
Windows 10 Version 2004 for ARM64-based Systems
11768
Windows 10 Version 2004 for x64-based Systems
11800
Windows 10 Version 20H2 for x64-based Systems
11801
Windows 10 Version 20H2 for 32-bit Systems
11802
Windows 10 Version 20H2 for ARM64-based Systems
11896
Windows 10 Version 21H1 for x64-based Systems
11897
Windows 10 Version 21H1 for ARM64-based Systems
11898
Windows 10 Version 21H1 for 32-bit Systems
11929
Windows 10 Version 21H2 for 32-bit Systems
11930
Windows 10 Version 21H2 for ARM64-based Systems
11931
Windows 10 Version 21H2 for x64-based Systems
12097
Windows 10 Version 22H2 for x64-based Systems
12098
Windows 10 Version 22H2 for ARM64-based Systems
12099
Windows 10 Version 22H2 for 32-bit Systems
11926
Windows 11 Version 21H2 for x64-based Systems
11927
Windows 11 Version 21H2 for ARM64-based Systems
12085
Windows 11 Version 22H2 for x64-based Systems
12086
Windows 11 Version 22H2 for ARM64-based Systems
10378
Windows Server 2012
10379
Windows Server 2012 (Server Core installation)
10483
Windows Server 2012 R2
10543
Windows Server 2012 R2 (Server Core installation)
10816
Windows Server 2016
10855
Windows Server 2016 (Server Core installation)
11571
Windows Server 2019
11572
Windows Server 2019 (Server Core installation)
11923
Windows Server 2022
11924
Windows Server 2022 (Server Core installation)
11466
Windows Server, version 1709 (Server Core installation)
11499
Windows Server, version 1803 (Server Core installation)
11647
Windows Server, version 1903 (Server Core installation)
11715
Windows Server, version 1909 (Server Core installation)
11769
Windows Server, version 2004 (Server Core installation)
11803
Windows Server, version 20H2 (Server Core installation)
Windows Operating System Packages
Just as Linux images are scanned for packages such as RPMs, DPKG, and APK, Windows images are scanned for the installed components and Knowledge Base patches (KBs). When listing operating system content on a Microsoft Windows image, the results returned are KB identifiers that are numeric. Both the name and version will be identical and are the KB IDs.
2 - Scans
A vulnerability scan in Anchore Enterprise is the result of matching an artifact’s SBOM against the vulnerability data provided by the Anchore Data Service. See How It Works for the underlying matching pipeline that produces every finding.
Anchore Enterprise exposes scan results in two distinct scopes. Pick the one that matches how your team organizes software.
Staying current:App-version-scoped results refresh automatically: findings are re-evaluated whenever the vulnerability database is updated from the Anchore Data Service, and whenever an asset is added to the version. No subscription or manual refresh is required. Image-scoped results refresh when you retrieve them, and can also be kept current automatically with subscriptions. For example, vuln_update re-scans an image and notifies you when its set of vulnerabilities changes.
Two Scan Scopes
The two scopes differ in what the scan runs against and how findings are aggregated. Both draw from the same vulnerability data and share the same matching engine.
Every asset attached to an app version: container images, analyzed filesystems, and externally supplied SBOMs (see Asset Types), deduplicated across the version
Aggregated list across all assets in the version, with Anchore Score prioritization for vulnerabilities
A single analyzed container image, identified by digest
Per-image list of findings with vulnerability attributes and fix details
The app-version-scoped surface is the v6-native path. An app version can hold any mix of asset types (not just container images, but also analyzed filesystems and externally supplied SBOMs), so this scope gives you a single, deduplicated vulnerability view across an entire app version regardless of how each part was analyzed. It also surfaces the Anchore Score as a vulnerability prioritization field.
The image-scoped surface is the long-standing v5 path; it remains the right choice for ad-hoc checks of a single image, image-stage CI gates, and any workflow that has not yet adopted the apps, versions, and assets model.
What’s Shared and What Differs Between Scopes
Both scopes draw from the same vulnerability data: NVD, vendor-specific feeds, GHSA, MSRC, and Anchore’s enrichment dataset all flow through both scopes equally.
The matching engine is shared as well: both scopes run the same matcher, so CPE matching configuration and namespace handling apply identically regardless of scope. One matching behavior is scope-specific:
Synthetic-CPE fallback for packages without an ecosystem PURL applies only to app-version-scoped (asset) scans. It has no effect on image-scoped scans.
The primary difference between the scopes is aggregation: an image-scoped scan returns one list for one image, while an app-version-scoped scan deduplicates across every asset in the version and aggregates the findings into a single list at the version level.
Where to Go Next
Scan an App Version: GUI / CLI / API walkthrough for the app-version-scoped path
For finding vulnerabilities across multiple assets at once (saved reports, custom report templates, and the query API), see Search.
2.1 - Scan an App Version
App-version-scoped vulnerability scanning produces a single, deduplicated list of vulnerabilities for an entire app version — across every asset attached to that version, whether the asset is a container image, an analyzed filesystem, or an externally supplied SBOM. This is the v6-native evaluation surface; for per-image scanning, see Scan a Container Image.
The app-version scope adds two capabilities that the image scope does not surface directly:
Deduplication across assets. A package of a given version contained in two assets produces one record at the version level, not two. The same logic applies across vulnerabilities and compliance issues. All instance data is collapsed into a single record with click-throughs for impacted assets.
Anchore Score prioritization. Every vulnerability includes a composite score combining CVSS severity and score, EPSS, and CISA KEV data. This score reflects a particular vulnerability’s relative ranking across all vulnerabilities for an app version. The Anchore Score can be used to sort or filter vulnerabilities.
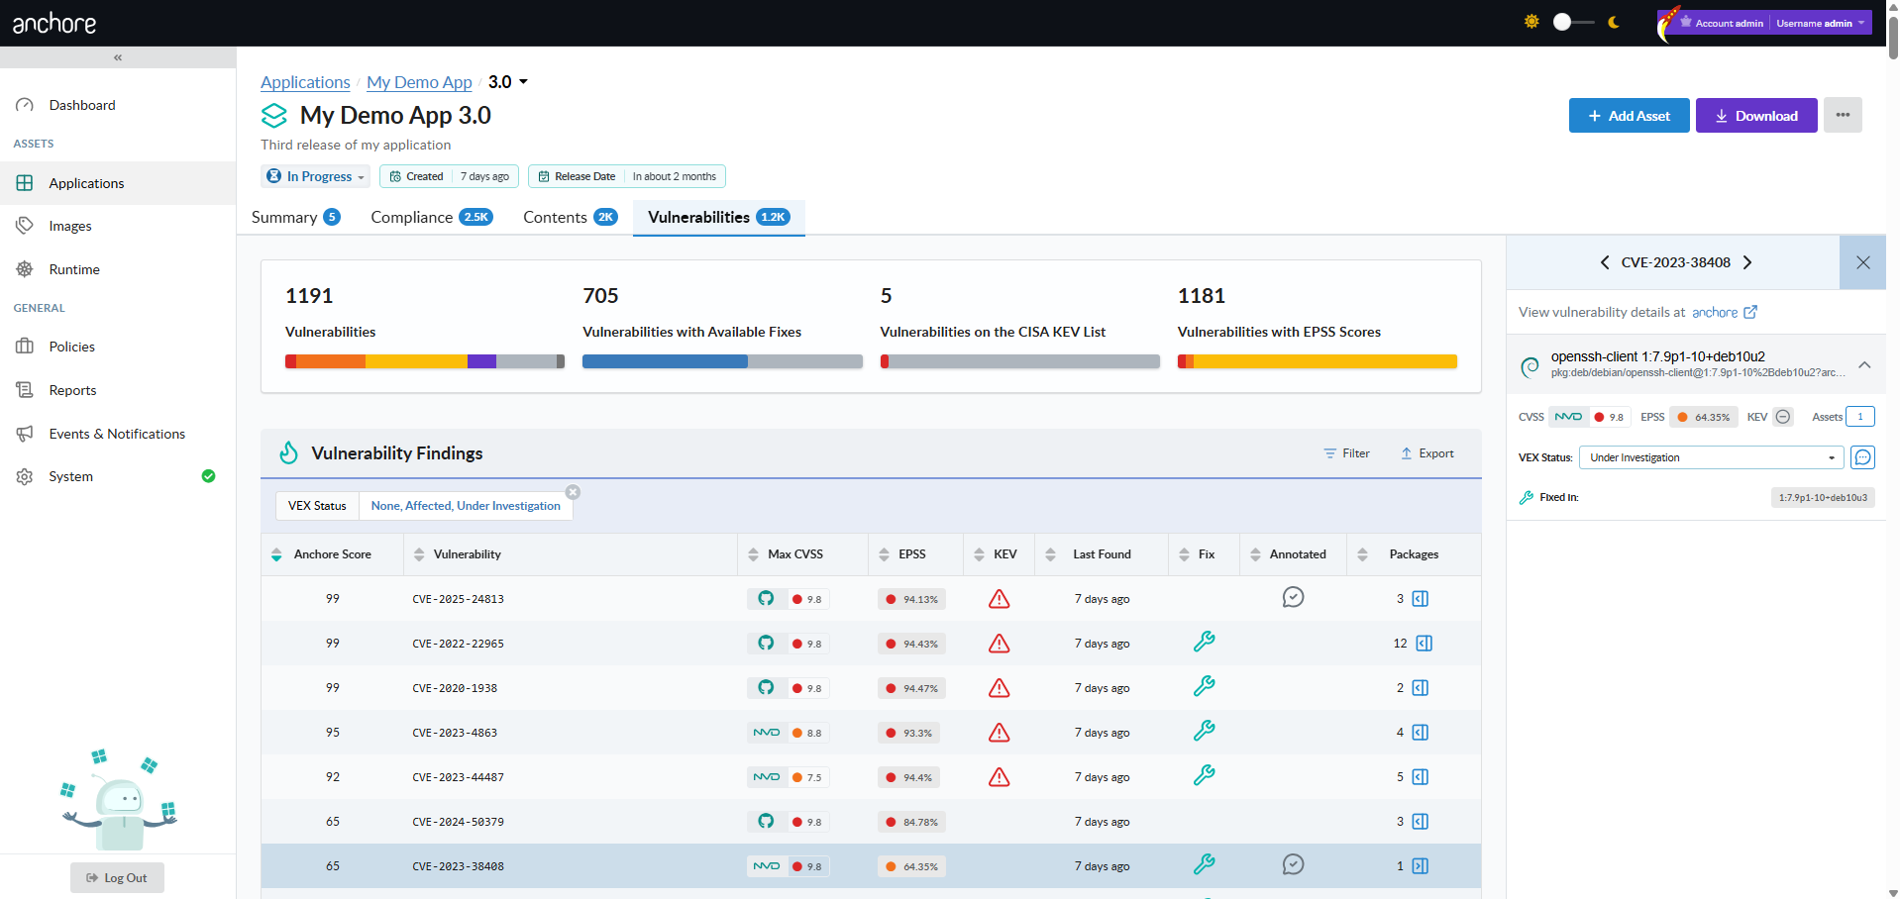
Scan an App Version in the Anchore Enterprise GUI
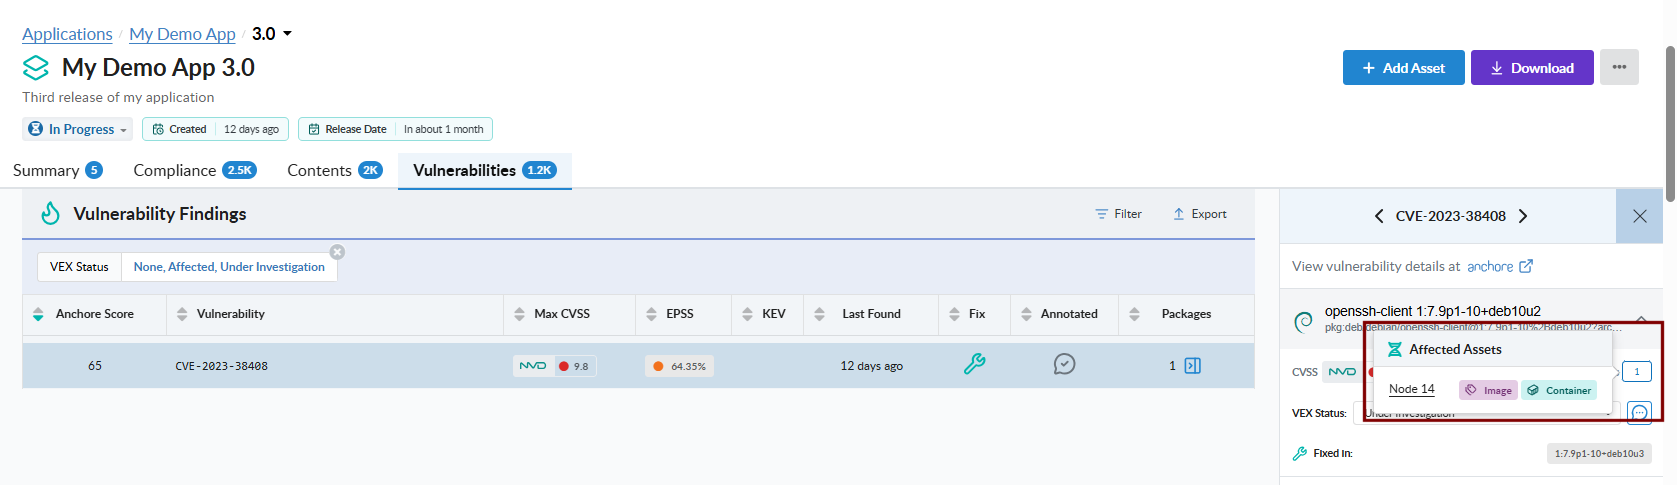
The app version detail page in the GUI aggregates findings across the version’s assets into a single, deduplicated view. The Vulnerabilities tab is the primary surface for triaging findings; the per-asset drill-down and pivot queries answer the follow-on question of where a vulnerability lives.
Triage Findings by Anchore Score
Sort the Vulnerabilities tab by Anchore Score to put the highest-prioritized findings at the top. The score combines CVSS severity and score, EPSS, and CISA KEV data, so a single sort ordering surfaces the work most worth attention against all vulnerabilities in an app version.
Pivot to Affected Assets
From a single vulnerability record, open the affected-assets popup to see every asset in the version that contains the vulnerable package and where the package lives inside each asset. This is the GUI equivalent of the API’s pivot endpoints — packages-by-vulnerability below, and assets-by-package in Viewing an App Version’s SBOM.
Scan an App Version with AnchoreCTL
The vulnerability list for an app version is exposed under anchorectl app version vuln. The command requires the parent app via --app and accepts either the version name or its UUID.
List Vulnerabilities for an App Version
The default output is a terminal-friendly table aggregated across every asset in the version:
anchorectl app version vuln list 1.4.0 --app my-service
For programmatic consumption, use -o json to retrieve the full per-finding record including CVSS, EPSS, CISA KEV flags, source provenance, and the asset-level attribution for each finding:
anchorectl app version vuln list 1.4.0 --app my-service -o json
The app version vuln list command supports the formats text, json, json-raw, and id. For HTML or CSV outputs intended as downstream deliverables, use the export command described below.
Export Vulnerabilities as a Formal Report
To turn an app version’s findings into a formal, shareable document — a CSV vulnerability export, or a VEX or VDR document — use the anchorectl app version export commands. These run as server-side jobs and are documented, alongside the GUI and API equivalents, under Evidence.
Scan an App Version with the API
App-version vulnerability data lives under /apps/{app_id}/versions/{version_id}/vulnerabilities. The full request and response schemas — including the per-finding data shape with CVSS, EPSS, KEV flags, Anchore Score, and per-asset attribution — are in the API browser; search for the App Version Vulnerabilities tag.
Pivot: packages affected by a specific vulnerability
For the export-job endpoints (CSV, VEX, VDR) under the App Jobs tag, see Evidence.
A few conventions worth knowing as you call these endpoints:
Vulnerability deduplication respects each asset’s distro context for filtering, then merges related CVEs across sources. The deduplication logic matches what is applied elsewhere in Anchore Enterprise.
The vulnerabilities endpoint accepts an optional asset_id query parameter to narrow the result to a single asset rather than the aggregated view.
For the package-side query surface across an app version — package listings and the assets-by-package pivot — see Viewing an App Version’s SBOM.
Cross-account requests follow the standard pattern — see Account Scoping.
2.2 - Scan a Container Image
Image-scoped vulnerability scanning analyzes a single container image and returns the vulnerabilities discovered in its contents — packages, OS components, and Knowledge Base patches for Windows images. This is the long-standing v5 evaluation path and remains fully supported in v6. For the v6-native release-stage path that aggregates findings across every asset in an app version, see Scan an App Version.
Centralized vs Distributed Analysis
Anchore Enterprise supports two analysis modes. Both produce identical vulnerability results once analysis completes; they differ in where the image bytes are read and where the SBOM is generated.
Centralized analysis — AnchoreCTL or the API tells Anchore Enterprise to pull the image from your registry and analyze it server-side. This is the default mode. Because the full image contents are available to Anchore Enterprise, centralized analysis is required for malware scanning, which distributed analysis cannot perform.
Distributed analysis — AnchoreCTL pulls or reads the image where you run the command, generates the SBOM locally, and uploads the result. Anchore Enterprise never sees the image bytes.
Scan a Container Image in the Anchore Enterprise GUI
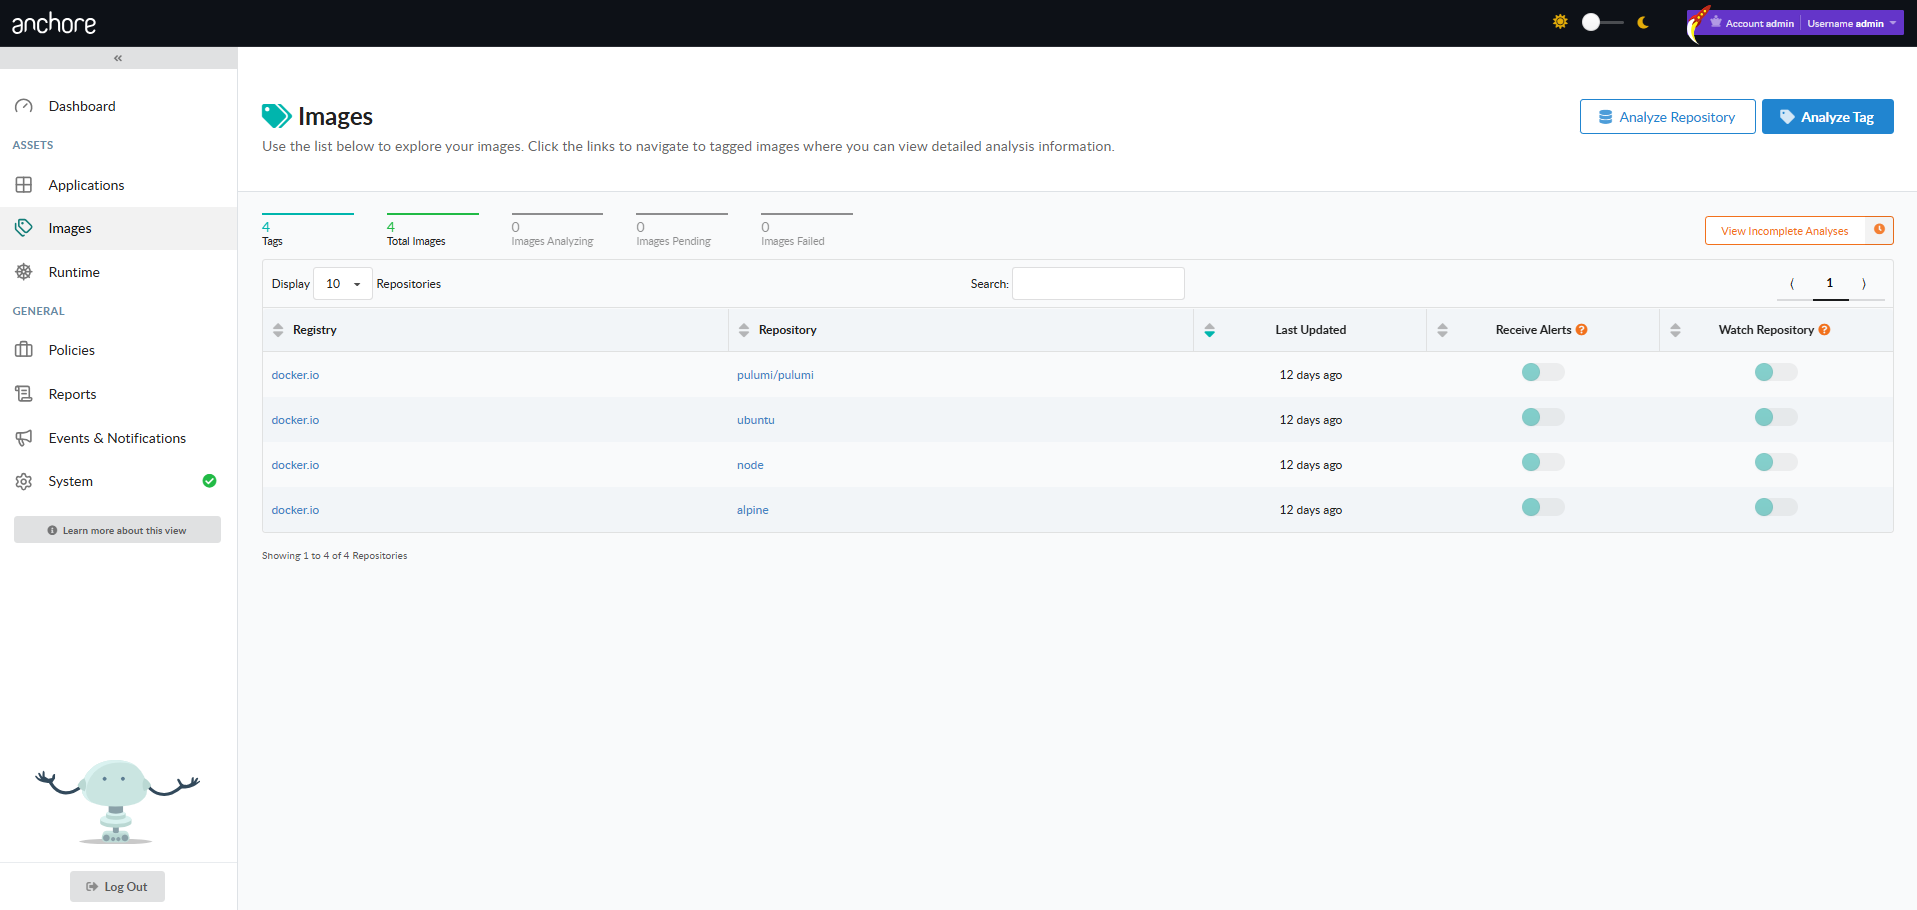
From an authenticated session, the Images menu in the left navigation opens the Image Analysis view. The Image Analysis view lists every image that has been submitted, with Analyze Tag and Analyze Repository controls to submit new work.
Only administrators and standard users with the requisite role-based access control permissions are allowed to submit items for analysis, or remove previously analyzed assets.
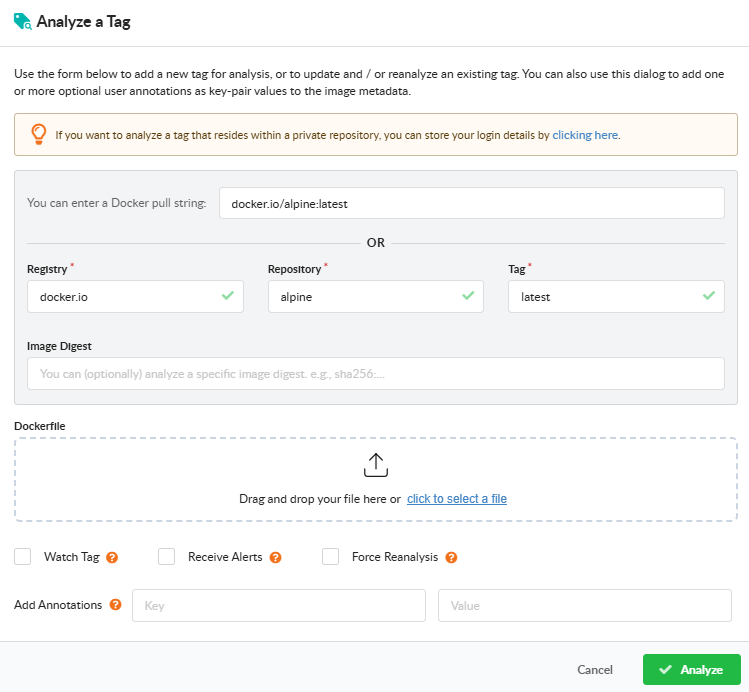
Analyze a Tag
Open Analyze Tag to submit a single image. Fill in the registry, repository, and tag. The dialog also exposes:
Watch Tag — monitor the tag for updates after the initial analysis. Subsequent pushes to the same tag will be picked up and re-analyzed.
Receive Alerts — subscribe the tag to the alerts subscription so Anchore Enterprise raises alerts when new findings are detected for it. See Subscriptions.
Force Reanalysis — re-analyze an already-analyzed tag, regenerating its SBOM. Useful for picking up new analyzer capabilities or a newly attached Dockerfile.
Add Annotation — attach key=value metadata to the image record. Annotations appear in the image overview, in webhook notifications, and in the API responses.
Dockerfile upload — attach the Dockerfile used to build the image so policy checks can evaluate Dockerfile triggers.
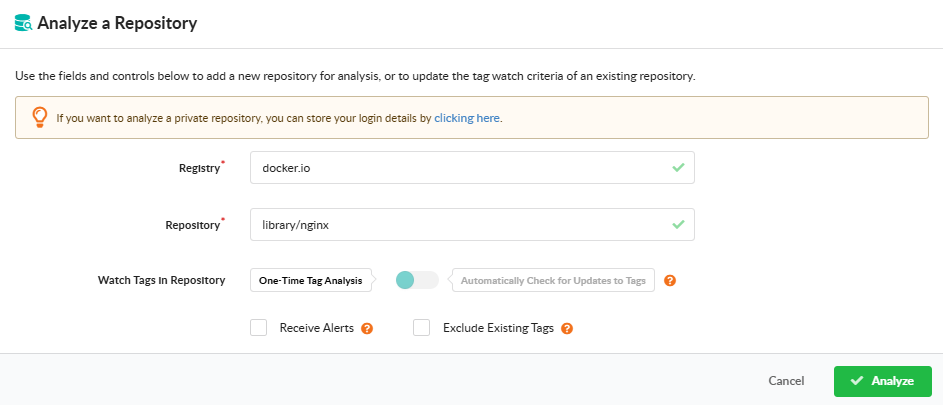
Analyze a Repository
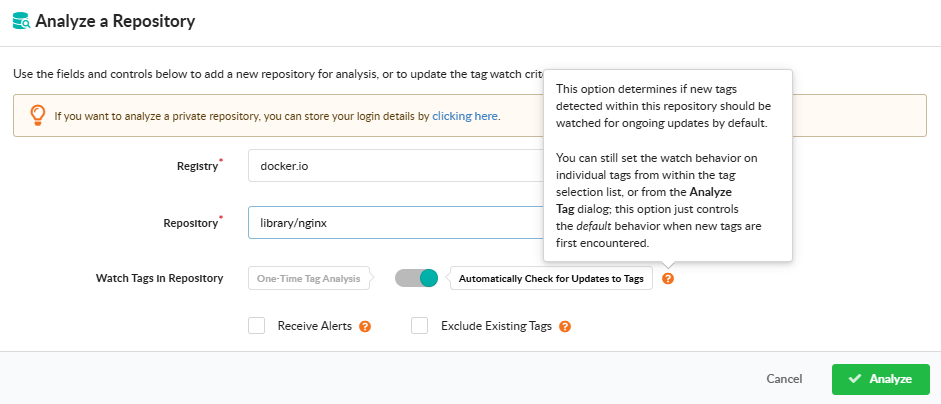
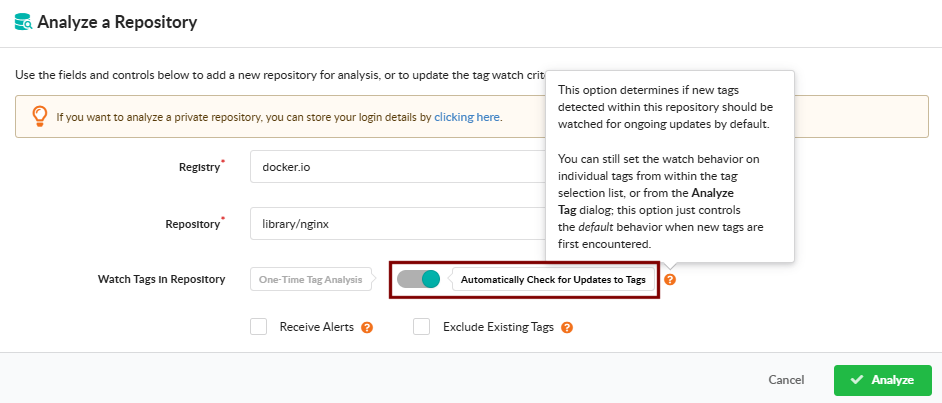
Open Analyze Repository to submit every tag in a repository at once. Provide the registry and repository name, and pick how the repository should be monitored going forward:
One-Time Tag Analysis — analyze the tags currently present in the repository; do not monitor it for future additions.
Automatically Check for Updates to Tags — analyze current tags and continue monitoring the repository so new tags are picked up automatically.
The dialog also offers two checkboxes:
Exclude Existing Tags — when monitoring for updates, analyze only tags added after watching begins; the tags already present in the repository are not analyzed.
Receive Alerts — subscribe the repository to the alerts subscription so Anchore Enterprise raises alerts when new findings are detected across its images. See Subscriptions.
After confirmation, the dialog displays a count of the tags that will be queued for analysis so you can review the workload before committing.
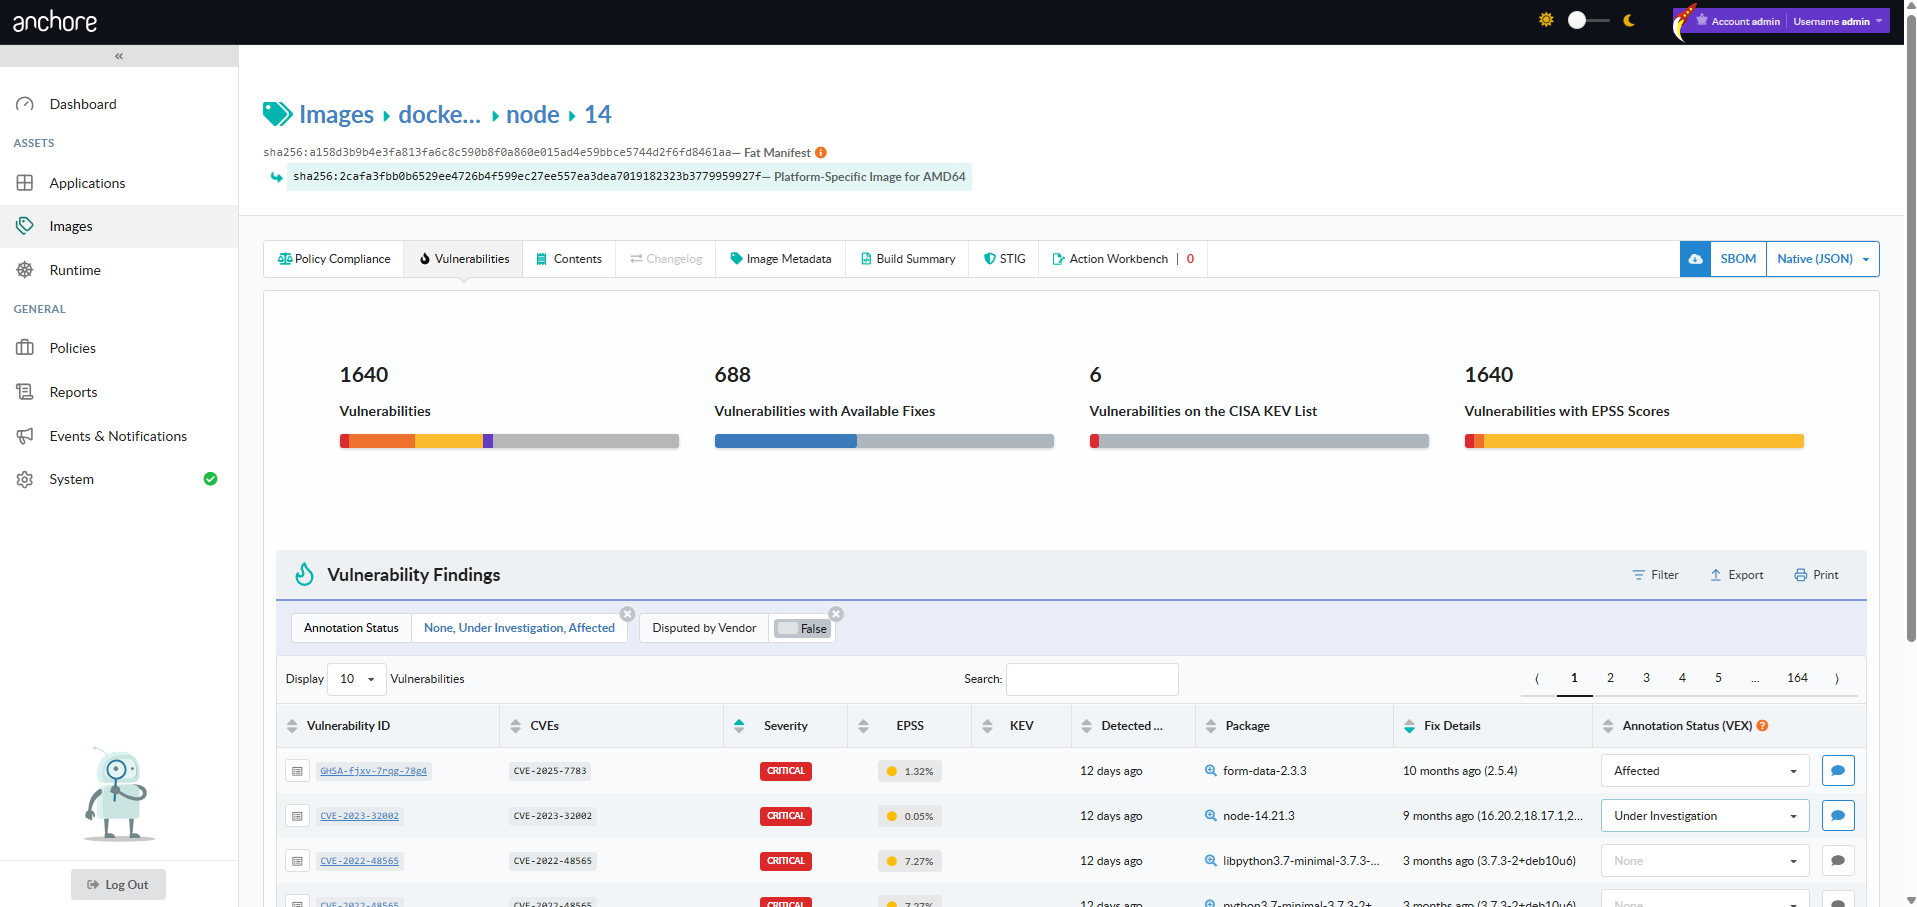
View Vulnerabilities for an Image
From the Images view, drill into a repository, pick an image digest, and open the Vulnerabilities tab. The tab lists every finding for that image with severity, package, CVE, and fix data. The toolbar exposes a vulnerability-report download in JSON or CSV format.
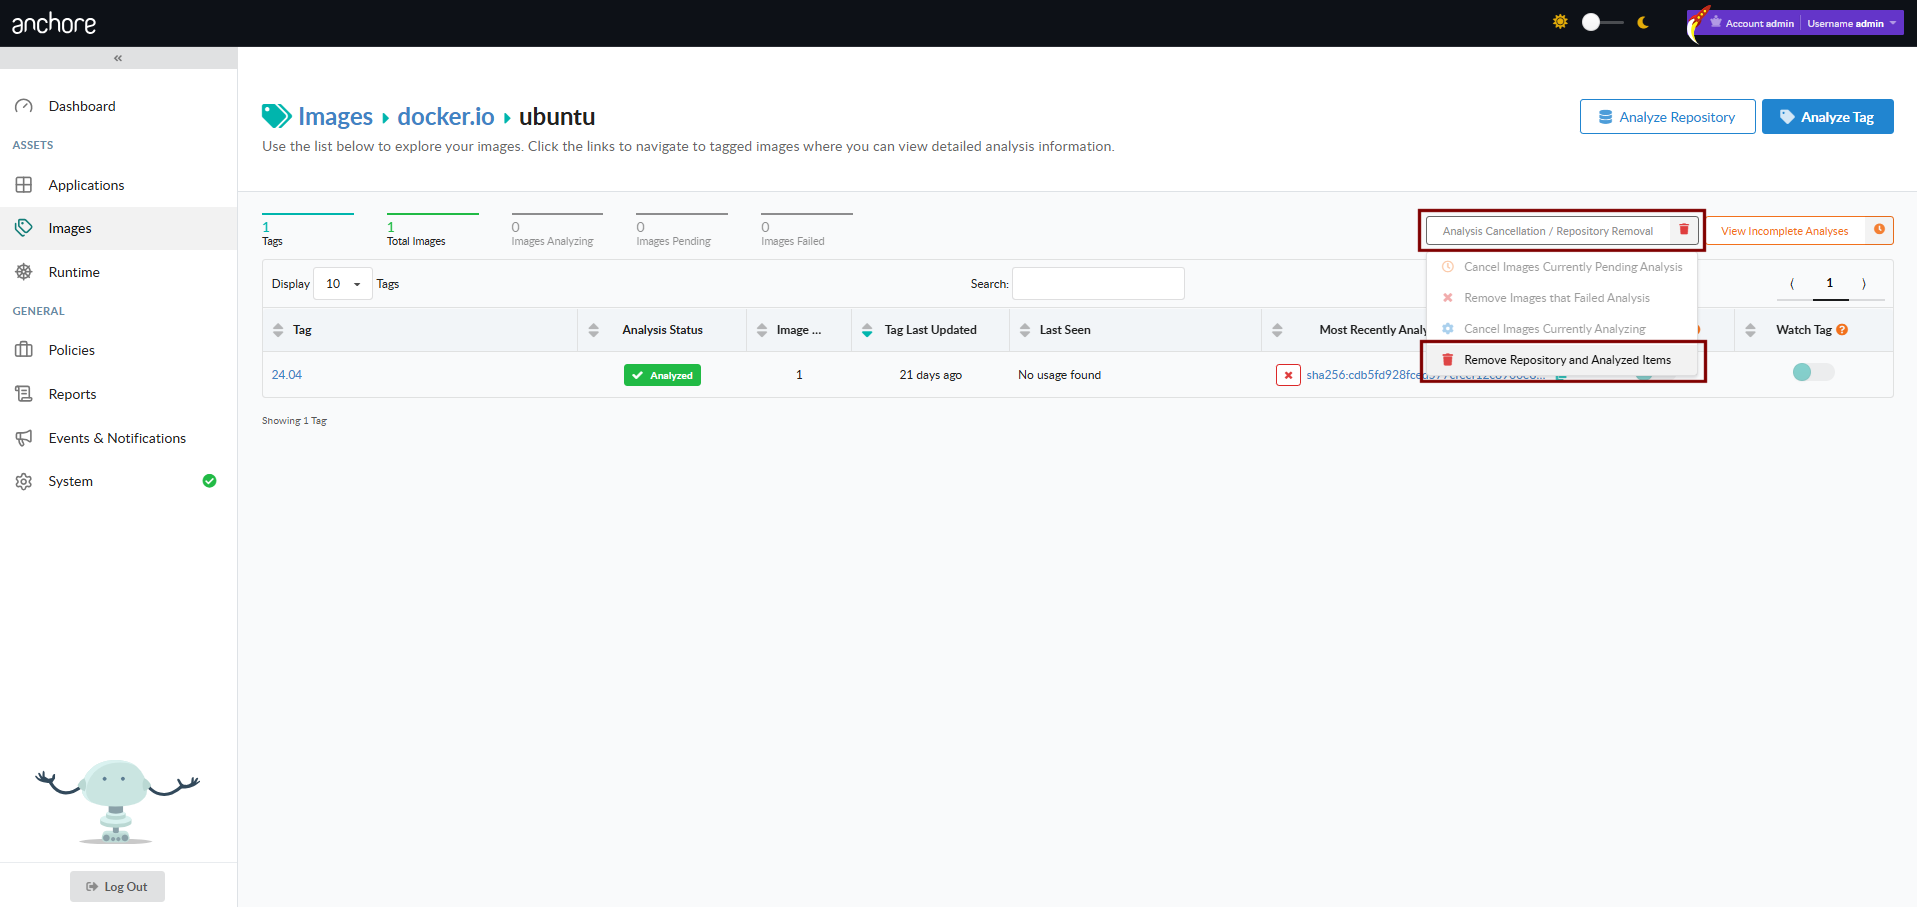
Bulk Removal from a Repository
From a repository view, the Analysis Cancellation / Repository Removal control offers two actions:
Cancel Images Currently Pending Analysis — drain the analysis queue for tags in this repository that have not yet been analyzed
Remove Repository and Analyzed Items — remove the repository from view, including every image currently associated with it. If the repository is being watched, that subscription is also removed.
Scan a Container Image with AnchoreCTL
AnchoreCTL exposes the full image lifecycle under anchorectl image. Examples below use docker.io/my-org/api:1.4.0 as the canonical reference image.
Add an Image (Centralized Analysis)
anchorectl image add instructs Anchore Enterprise to pull and analyze the image server-side. The image record is created immediately with status not_analyzed; the status moves to analyzing once a worker picks it up and to analyzed when complete:
anchorectl image add docker.io/my-org/api:1.4.0
Anchore Enterprise can enforce a maximum image size for analysis. Submissions larger than the configured limit are rejected with an HTTP 400; the limit is disabled by default. See Scanning Configuration.
Add an Image (Distributed Analysis)
Pass --from to switch to distributed analysis. AnchoreCTL pulls or reads the image locally, generates the SBOM, and uploads it:
AnchoreCTL pulls the image from the registry (recommended over docker)
Local Docker daemon
docker
Reads an image already loaded into Docker
Docker archive
docker-archive:/path/to.tar
Loads from a local tar file
Syft SBOM stdin
- (combined with piped Syft output)
Imports a Syft-generated SBOM directly
When analyzing an image that has been pushed to a registry, prefer –from registry over –from docker. The registry source removes the need to have Docker installed locally, produces a consistent image digest, and avoids limitations of the Docker daemon’s manifest and digest handling.
Use --platform to pin a specific platform when the image manifest carries multiple architectures:
Always pass the Dockerfile for images you build yourself. The Dockerfile is stored alongside the image analysis and is used by the dockerfile policy gate:
To change an annotation, re-run the command with the updated value; the prior value is overridden.
Re-Analyze an Image
The --force flag resets an image’s analysis state back to not_analyzed and queues it for re-analysis. Use this when you change the Dockerfile or want to pick up new analyzer capabilities introduced in a later Anchore Enterprise release:
By default, adding an image subscribes the tag to the tag_update subscription so Anchore Enterprise watches the tag for new content. Pass --no-auto-subscribe to skip this:
To register a specific image by digest with its associated tag — useful for images that have moved off the current :latest pointer but are still available in the registry:
Submitting a specific digest with an associated tag tells Anchore Enterprise to treat that digest as the most recent for the tag. If the registry’s actual tag history differs (for example, a newer image has been pushed to that tag), the tag history in Anchore Enterprise may not match the registry.
Get Vulnerabilities for an Image
Once an image is analyzed, anchorectl image vulnerabilities returns its findings. The default output is a terminal-friendly table:
 ✔ Fetched vulnerabilities
┌────────────────┬──────────┬──────────────┬────────────┬──────┐
│ VULN ID        │ SEVERITY │ PACKAGE      │ FIX        │ TYPE │
├────────────────┼──────────┼──────────────┼────────────┼──────┤
│ CVE-2024-3094  │ Critical │ xz-utils     │ 5.6.2-1    │ os   │
│ CVE-2024-1234  │ High     │ openssl      │ won't fix  │ os   │
│ CVE-2023-5678  │ Medium   │ libcurl      │ 7.85.0     │ os   │
└────────────────┴──────────┴──────────────┴────────────┴──────┘
The output format is controlled with -o. Supported formats are text, json, json-raw, csv, cyclonedx-json, cyclonedx-xml, and html. The flags below combine cleanly with any of them:
Flag
Purpose
--type
Filter findings to a specific vulnerability type (for example os, non-os, java)
--vendor-only
Exclude vulnerabilities the vendor has marked as won’t-fix
--annotations
Filter by VEX annotation status (not_affected, affected, fixed, under_investigation)
--include-description
Include the full vulnerability description
--refresh
Re-run vulnerability matching against the latest data before returning
To produce a formatted HTML report suitable for saving as a build artifact, combine -o html with -d to write the result to a directory:
anchorectl image vulnerabilities docker.io/my-org/api:1.4.0 \
  -o html \
  -d ./reports
The same flags work for filtering before export — for example, an HTML report of only the findings the team has not yet annotated:
anchorectl image delete removes an analyzed image record. If the image is the only one associated with a tag, or if any subscriptions are active against the tag, pass --force:
Image scanning is exposed under /images and /images/{image_digest}. The full endpoint inventory, request and response schemas, and error codes are in the API browser; search for the Images tag.
Key endpoints:
Method
Path
Purpose
POST
/images
Submit an image for analysis (centralized)
GET
/images
List analyzed images
GET
/images/{image_digest}
Get an image’s full record
GET
/images/{image_digest}/vuln/{vuln_type}
Get vulnerabilities for an image
GET
/images/{image_digest}/check
Get the policy evaluation for an image
DELETE
/images/{image_digest}
Delete an image
A few conventions worth knowing as you call these endpoints:
The vuln_type path segment accepts os, non-os, all, and specific package types like java, python, npm, etc.
The vulnerabilities endpoint can return CycloneDX VEX-style documents via /images/{image_digest}/vuln/{vuln_type}/cyclonedx-json and cyclonedx-xml.
Cross-account requests use the x-anchore-account header — see Account Scoping.
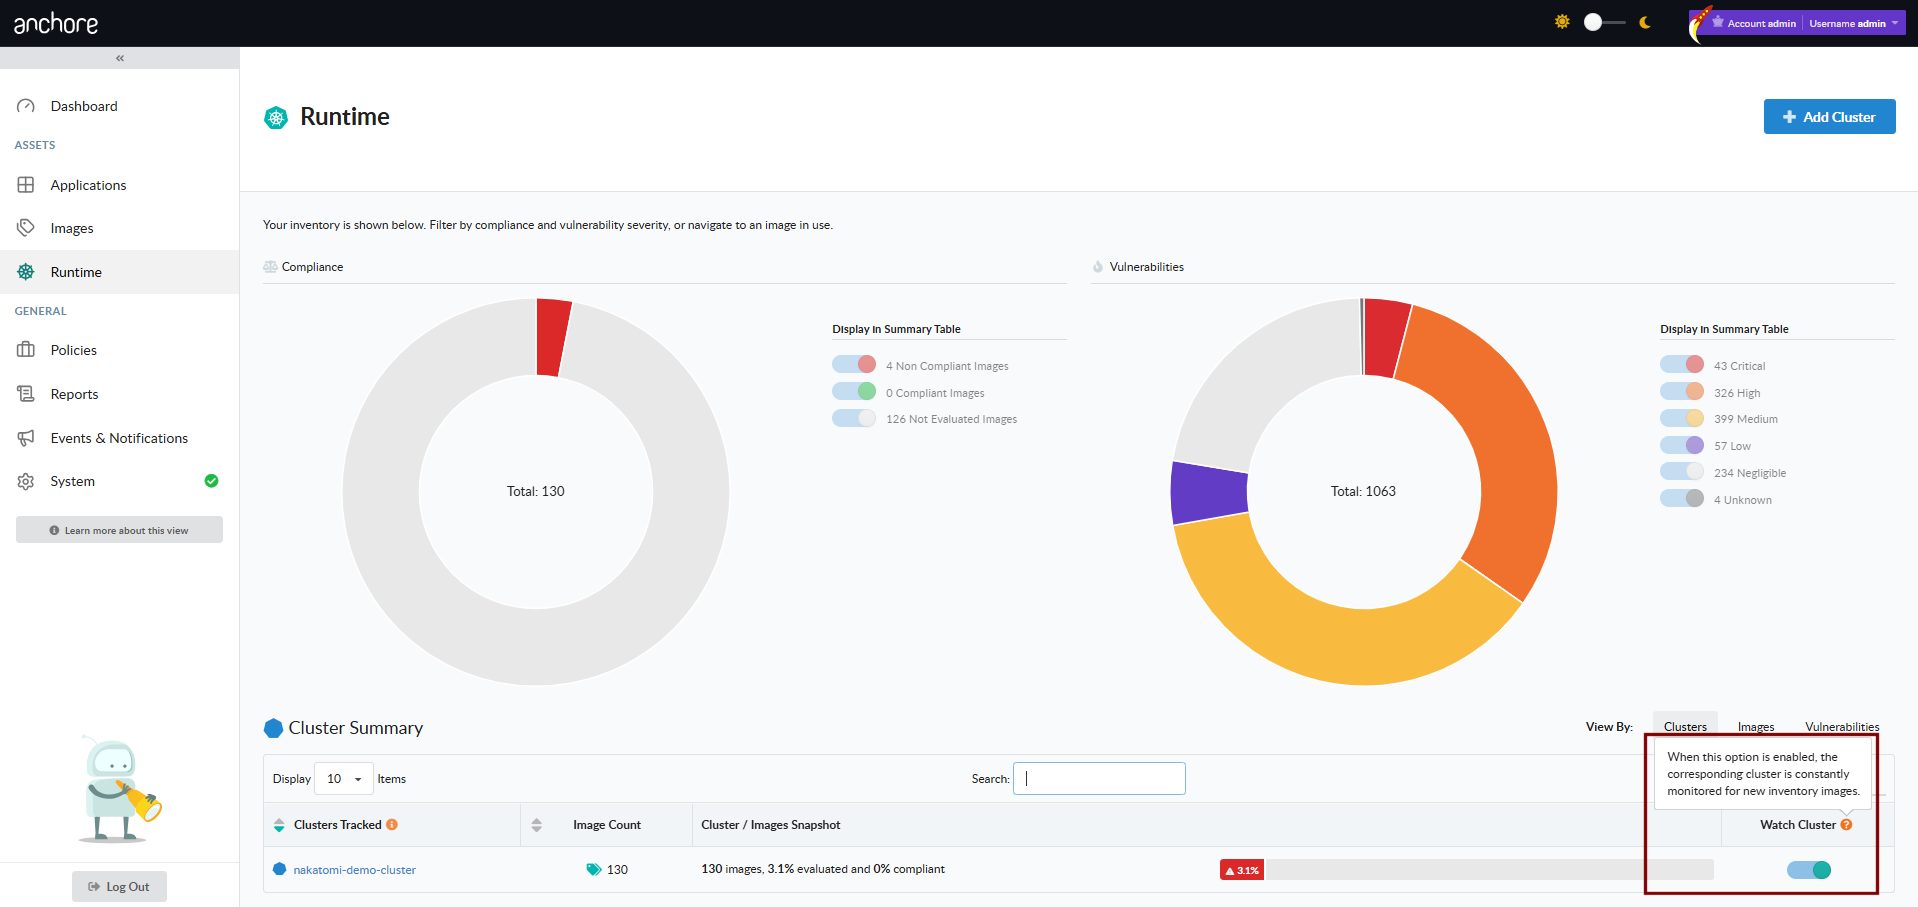
Watch a Repository for New Images
For long-running registry coverage — where every new tag pushed to a repository should be picked up automatically without a manual image add — Anchore Enterprise lets you put a repository under watch. See Watch a Repository for New Images for the full workflow across the GUI, AnchoreCTL, and the API.
2.2.1 - Watch a Repository for New Images
Repositories give Anchore Enterprise a way to monitor a registry repository for new tags and automatically analyze them as they appear. This is a common setup for production registries where every new release tag should be picked up without a manual image add.
Repositories are an extension of the image scanning workflow — once a repository is added and watched, every tag picked up from it follows the same analysis pipeline as a manually added image, and its findings appear in the same image-scoped views.
In Anchore Enterprise, a registry is a stored credential configuration — it tells Anchore how to authenticate to a registry host and does not pull or analyze any images on its own. Repositories are the unit of automatic analysis — once a repository is added and watched, Anchore Enterprise enumerates its tags and pulls them in for analysis. For private repositories, configure the registry credentials first; see Container Registries.
Watch a Repository in the Anchore Enterprise GUI
Open the Images view, click Analyze Repository, and choose Automatically Check for Updates to Tags in the resulting dialog. Anchore Enterprise enumerates the repository’s current tags, queues them for analysis, and continues to monitor the repository for new ones.
Repository watching is managed through anchorectl repo. Each command operates on a registry/repository identifier such as docker.io/my-org/api.
Add a Repository to the Watch List
anchorectl repo add registers a repository and immediately starts watching it. Anchore Enterprise enumerates the current tags and queues them for analysis:
anchorectl repo add docker.io/my-org/api
To watch the repository for new tags without analyzing the existing ones, pass --exclude-existing-tags. To skip the default behavior of auto-subscribing discovered tags to the tag_update subscription, pass --auto-subscribe=false.
List Watched Repositories
anchorectl repo list shows every repository under watch:
anchorectl repo list
Pause and Resume Watching
unwatch pauses monitoring without removing the repository record. The repository stays in the list but no longer picks up new tags:
anchorectl repo unwatch docker.io/my-org/api
Re-enable monitoring with watch:
anchorectl repo watch docker.io/my-org/api
Stop Watching a Repository
anchorectl repo delete removes the repository from the watch list entirely. Existing image records analyzed from the repository are not affected by this command:
anchorectl repo delete docker.io/my-org/api
Remove a Repository and All Its Images
To remove the repository and every image record produced from it — for example, after accidentally watching a repository with a very large tag count — combine the unwatch, repository-delete, and image-delete steps. Unwatch first to prevent new tags from being added during the cleanup:
anchorectl repo unwatch docker.io/my-org/api
anchorectl repo delete docker.io/my-org/api
for digest in $(anchorectl -q image list | grep docker.io/my-org/api | awk '{print $2}'); do
  anchorectl image delete "$digest" --force
done
Image deletion can affect more than the repository being cleaned up — an image with the same digest may have tags in other repositories or even other registries. Verify the scope of the deletion before running the loop.
Watch a Repository with the API
Adding a repository to the watch list is exposed under /repositories; listing and removing watches are managed through /subscriptions, since a repository watch is a repo_update subscription. The full endpoint inventory, request and response schemas, and error codes are in the API browser; search for the Repository and Subscriptions tags.
List subscriptions; filter to repo_update for watched repositories
DELETE
/subscriptions/{subscription_id}
Stop watching a repository (delete its repo_update subscription)
For the per-tag subscription model that drives the auto-analysis behavior — what tag_update subscriptions are, how repo_update differs, and how to manage them in bulk — see Subscriptions.
3 - Reporting
Anchore Enterprise supports two distinct reporting jobs that operate on the vulnerability and package data already produced by scans: looking for vulnerabilities across the image catalog, and producing formal documents for downstream consumers.
Two Reporting Jobs
The two jobs use different surfaces and produce different outputs. Pick the one that matches the question you are answering.
Formal documents in standard formats — VEX, VDR, vulnerability data exports
Sharing with customers, auditors, regulators, downstream consumers
Search is the analytical surface and currently covers the image catalog only. The Reports view in the Anchore Enterprise GUI lets you build custom report templates, save them, and run them on demand. The same data is reachable from the Query API for tooling integrations. App-version-scoped search is on the roadmap — see Search for the full current state.
Evidence is the document-producing surface and covers both image-scoped and app-version-scoped exports today. AnchoreCTL and the API submit jobs that produce a fully-formed document — a VDR (Vulnerability Disclosure Report), a VEX (Vulnerability Exploitability eXchange), or a vulnerability data export — that you can hand to a downstream consumer or attach to a release.
Where to Go Next
Search — find vulnerabilities across assets using the GUI Reports view, saved reports, custom templates, and the query API
Evidence — produce VEX, VDR, and vulnerability data exports from images and app versions
For routing vulnerability findings into external systems like Slack or Jira, the Anchore Enterprise GUI also includes an Action Workbench for building action plans on top of the integrations configured in your account. The Workbench is an additional surface for teams that need to push findings into existing ticketing or notification workflows — the primary day-to-day reporting mechanisms remain the Reports view, the export jobs, and the API.
3.1 - Search
Search answers questions that span more than one image in your catalog: “Which images have a Critical finding with a known KEV?”, “Which images contain a vulnerable version of a specific package?”, “Which images failed a policy evaluation in the last week?”
Coming soon: Applications search capability in the GUI and API.
Current search and reporting capability operates on the image catalog only — the Query API and Reports view below cover image-scoped questions.
Anchore Enterprise exposes two search surfaces over the image catalog. They draw from the same underlying vulnerability and package data — the choice is about who is running the query and what they want back.
For producing formal documents — VEX, VDR, SBOMs, vulnerability data exports — see Evidence. Evidence exports are available at both image and app-version scopes today.
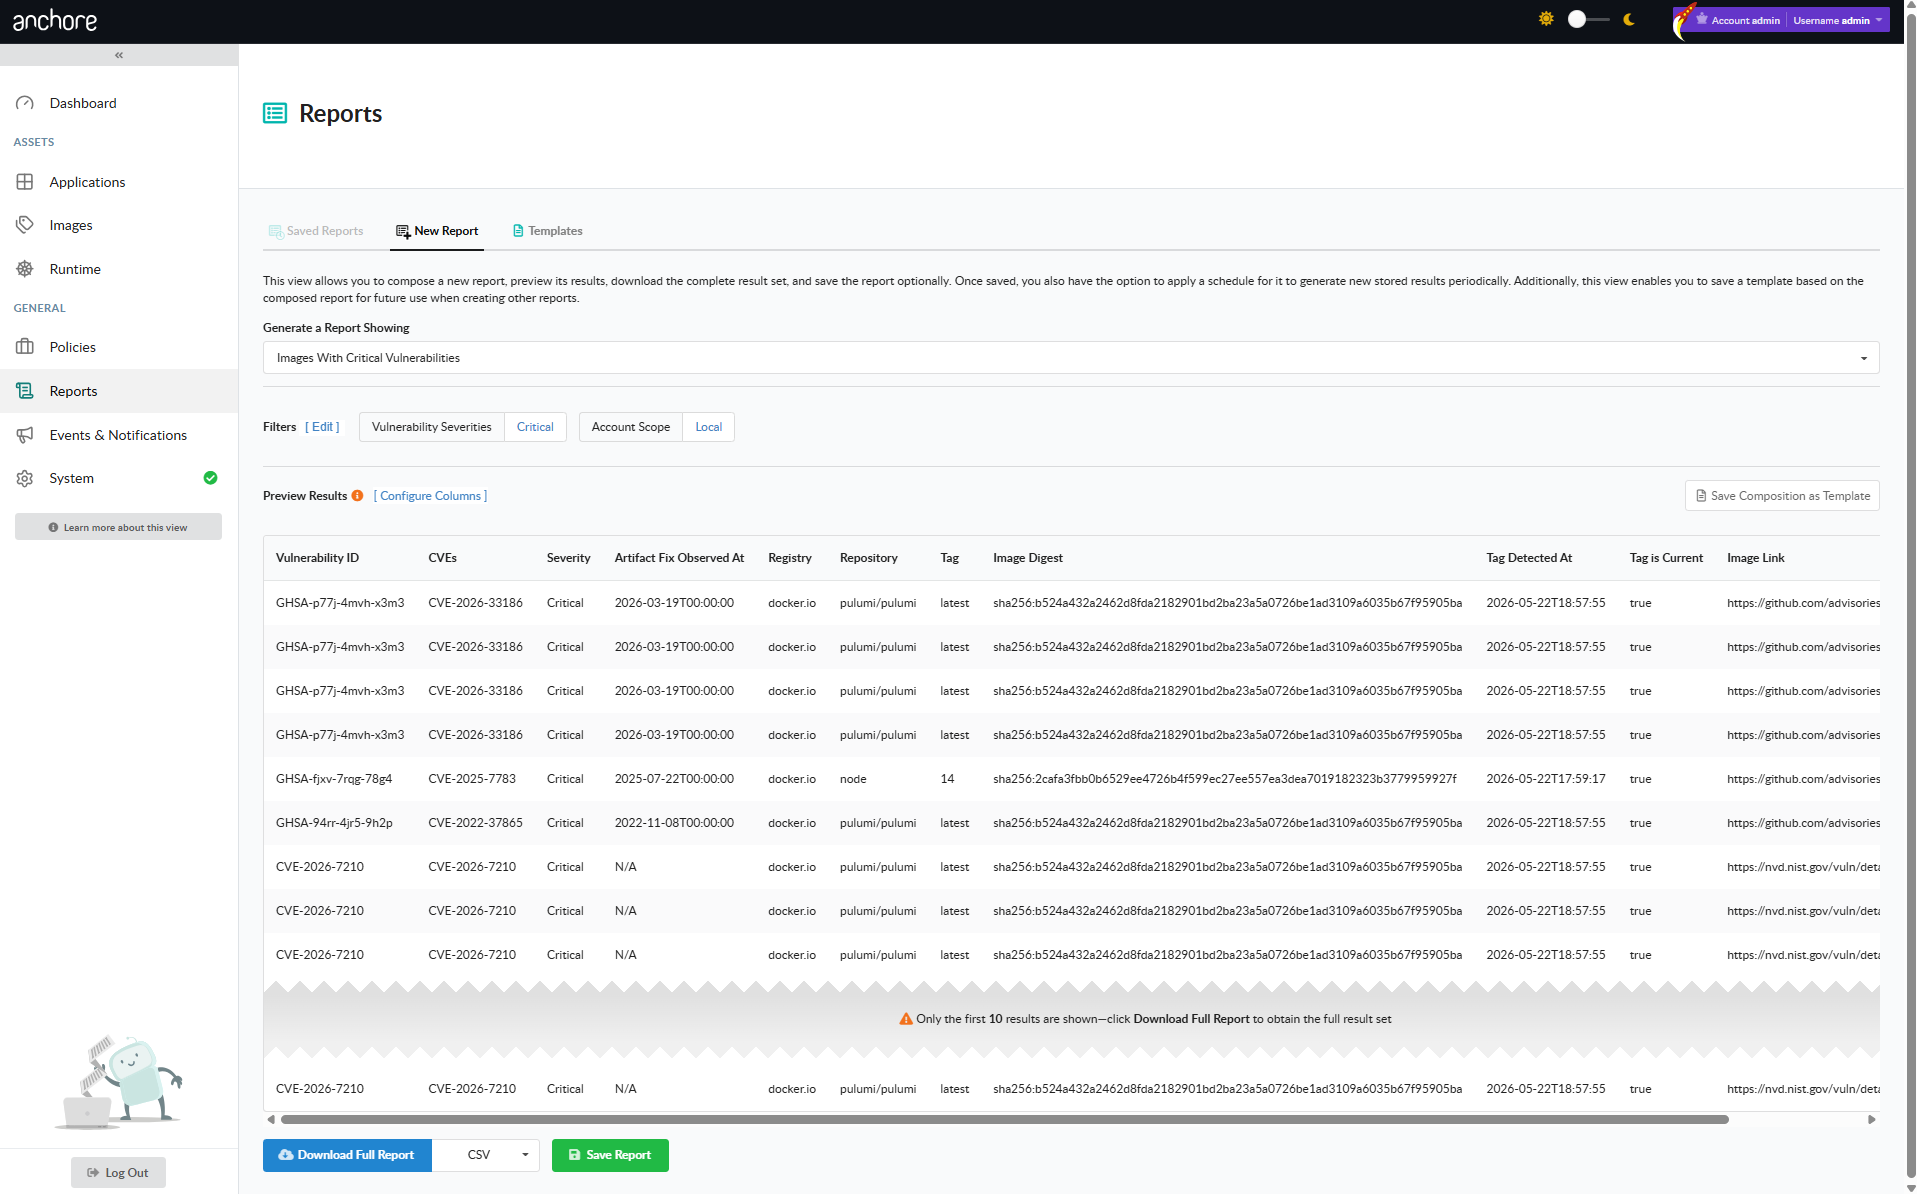
Search via the Reports View
The Reports tab in the Anchore Enterprise GUI is the interactive search surface. Reports are built from templates that define which filters appear on the report form and which columns appear in the result, and from executions that capture the result of running a configured report at a point in time.
New Report
The New Report tab is where reports are composed and executed. Pick a template, set the filter values, and run the report once for an immediate result, or save it for re-use.
Saved Reports
Saved reports retain their template, filter selections, and execution history. From the Saved Reports tab you can:
Run a saved report on demand — Generate Now.
Schedule the report to run on a recurring cadence and notify subscribers when results are ready.
Browse past executions, download their CSVs, or drill into the on-screen results.
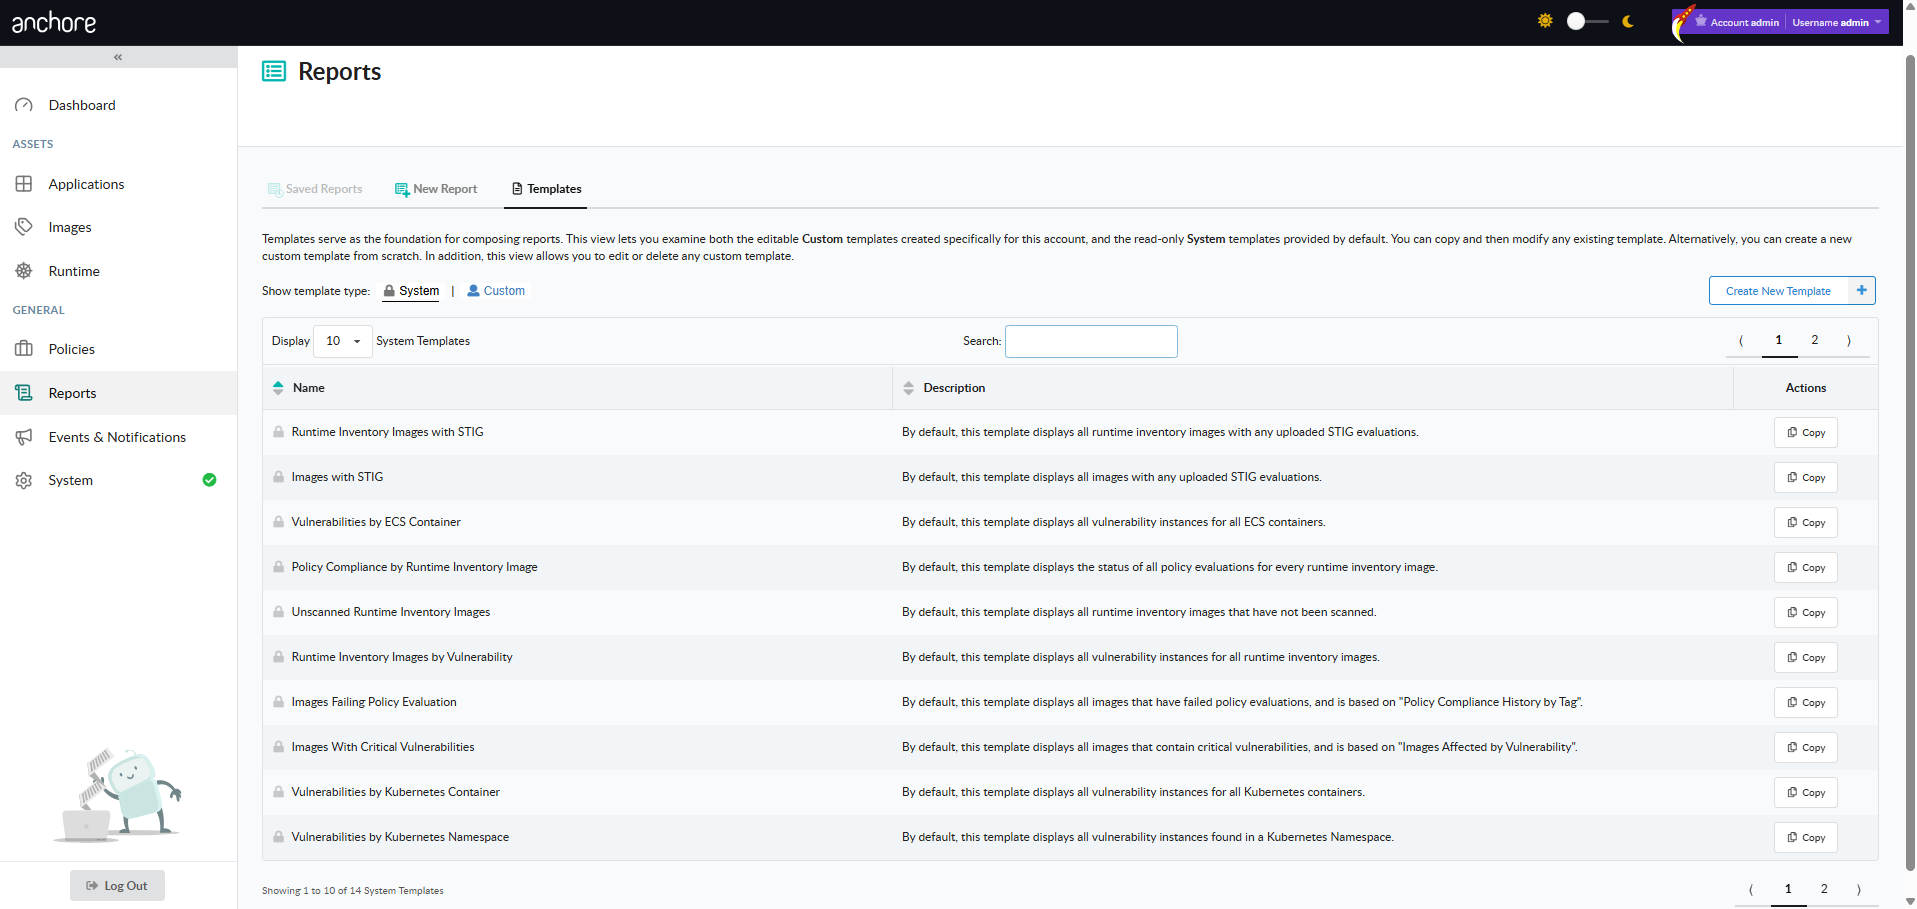
Templates
Templates define the shape of a report: which filters are presented to the user, with what defaults, and which columns appear in the result.
Anchore Enterprise ships a set of system templates as starting points — for example, “Images Affected by Vulnerability”, “Images Failing Policy Evaluation”, and “Tags by Vulnerability”. System templates cannot be modified, but you can copy any of them into a user template and tailor the filter and column set to your team’s needs.
Templates and reports are both account-scoped. Templates created by other users in the same account are visible and can be used as a starting point for further customization.
The reporting data cycle is configurable on the deployment, and results in the Reports view may lag analysis output. See Reporting Service configuration for the cycle frequency and tuning options.
Search via the API
The Query API is the programmatic surface for zero-day investigation and tooling integrations. Two endpoints cover the common patterns: look up a vulnerability by ID, or find images containing a specific package version.
The Query API operates on container images only, matching the current scope of search and reporting in Anchore Enterprise. For known app versions, use anchorectl app version vuln list or the per-version API endpoints documented in Scan an App Version directly.
Find Images by Package
When the vulnerability record is incomplete — common in the first hours after disclosure — search by the affected package version directly. The classic example: locate every image with a vulnerable version of k8s.io/ingress-nginx.
curl -X GET \
'{anchore-url}/v2/query/images/by-package?name=k8s.io%2Fingress-nginx&package_type=go&version=v1.11.0'\
-H 'accept: application/json'
The response is a paginated PaginatedImageList — each entry names the image digest, the tag history that points at it, and the package records that match the filter:
For the full zero-day investigation pattern — including how to escalate from a package match to remediation — see the Find Zero-day Vulnerabilities quickstart.
Look Up a Vulnerability by ID
When the vulnerability ID is known, GET /v2/query/vulnerabilities returns the underlying record and the packages it affects:
curl -X GET \
'{anchore-url}/v2/query/vulnerabilities?id=CVE-2024-3094'\
-H 'accept: application/json'
Useful as a quick “does Anchore Enterprise know about this yet?” check before kicking off a broader hunt.
The full request and response schemas for both endpoints are in the API browser under the Query tag.
Where to Go Next
Evidence — produce formal documents from search results: VEX, VDR, vulnerability data exports.
Annotations — record VEX dispositions on findings; annotations feed the VEX evidence exports and will be filterable through the future app-version search surface.
Evidence is what you hand to a customer, an auditor, a regulator, or a downstream consumer. Anchore Enterprise turns the vulnerability and annotation data it already holds into three kinds of formal, standards-aligned documents:
Document
Format
What’s in it
VEX (Vulnerability Exploitability eXchange)
CycloneDX JSON (app-version)
CycloneDX JSON, CycloneDX XML, OpenVEX (image)
The vulnerabilities found and the VEX annotations recorded against them — your published statement on what affects the product.
VDR (Vulnerability Disclosure Report)
CycloneDX JSON
A combined SBOM-plus-vulnerabilities document: the components, their known vulnerabilities, and the VEX annotations alongside. The single artifact to attach to a release for downstream consumers.
The raw finding rows: vulnerability ID, severity, CVSS, EPSS, KEV, fix availability, affected package, and source. For ingestion into tickets, spreadsheets, and downstream tooling.
Evidence is available at both app-version and image scope.
For SBOM evidence — CycloneDX and SPDX SBOM exports of an app version’s contents — see Export an SBOM.
Evidence from an App Version
App-version evidence runs as an asynchronous job — submit the job, wait for completion, and the result is written to a file or stdout.
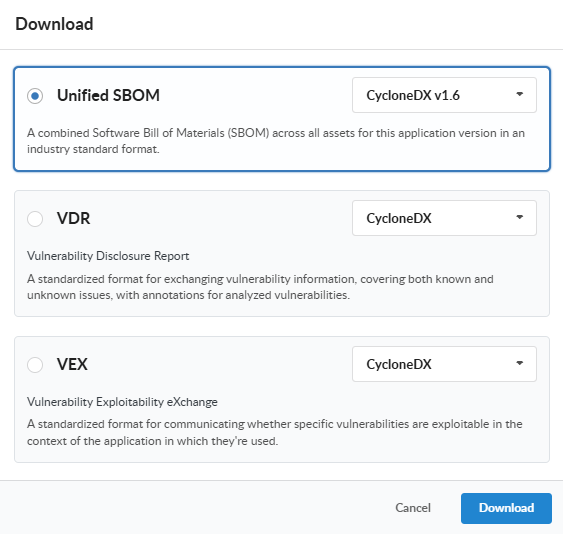
Via the Anchore Enterprise GUI
Open the app version detail page, click on the Download button, and choose the document type from the menu along with the desired format (where supported), and click Download. The My Recent Activity panel on the App Version Summary tab shows the job’s progress and, once complete, the link to download the generated document.
Via AnchoreCTL
Each evidence type has a dedicated subcommand under anchorectl app version export:
Each command submits a job, waits for completion, and writes the resulting document to the path supplied with --file (or to stdout if --file is omitted).
Today the app-version VEX and VDR exports both produce CycloneDX JSON. The vulnerability data export — the raw finding rows surfaced by anchorectl app version export vulnerabilities — is CSV-only at app-version scope; VEX and VDR carry the same findings wrapped in their respective document forms.
Via the API
App-version exports live under the App Jobs tag of the API:
Download the completed document referenced by a finished job
The job lifecycle is: POST to submit, poll GET .../{job_id} until status is completed, then fetch download_id from the job’s response and GET /apps/{app_id}/downloads/{download_id}. The full request and response schemas are in the API browser; search for the App Jobs tag.
Evidence from an Image
Image-scoped evidence is synchronous — the document is generated on the fly when you request it. No job to track, no separate download step.
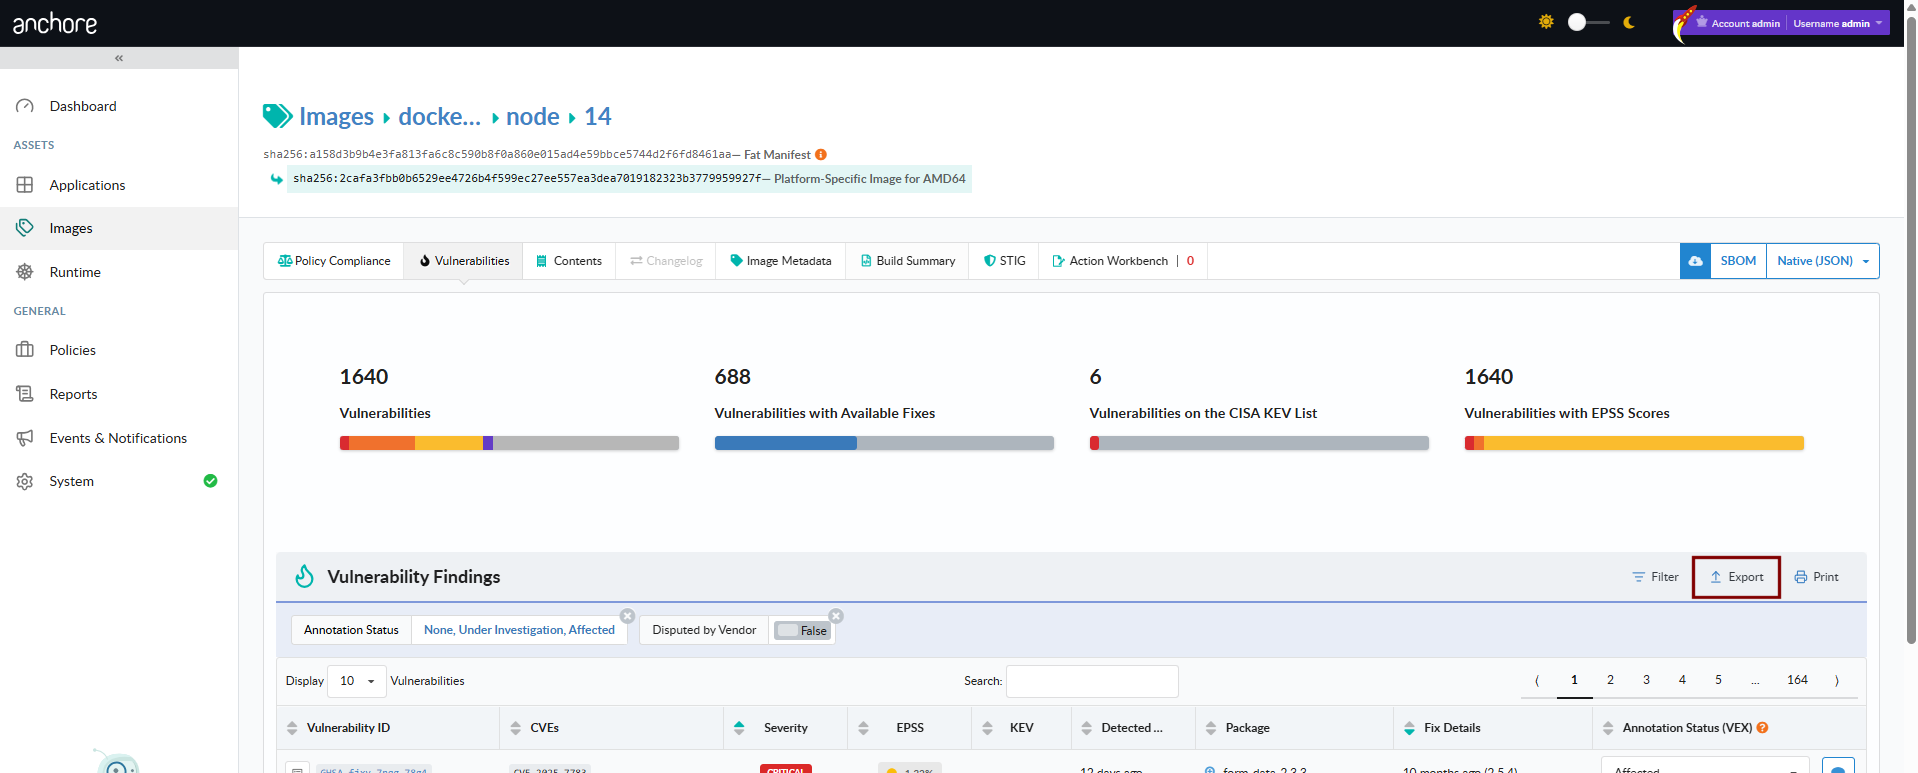
Via the Anchore Enterprise GUI
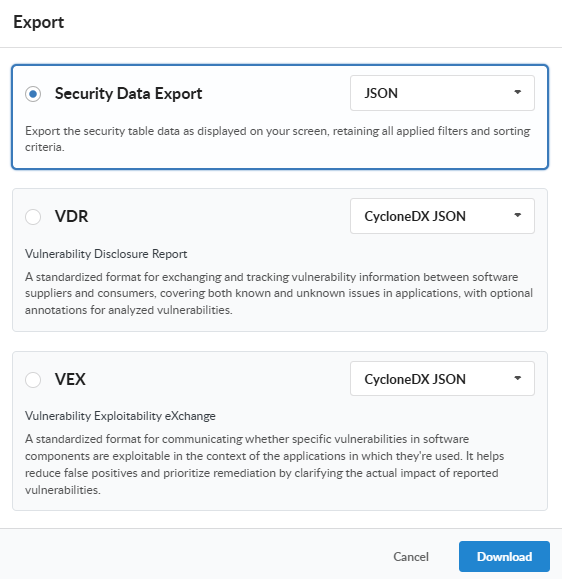
Open the image detail page, switch to the Vulnerabilities tab, and use the Download menu to pick a format. The document streams back to your browser when the request completes.
Via AnchoreCTL
anchorectl image vulnerabilities doubles as the image evidence command — the -o flag selects the output format:
anchorectl image vulnerabilities sha256:<digest> -o csv             > image-vulns.csv
anchorectl image vulnerabilities sha256:<digest> -o cyclonedx-json  > image-vulns.cdx.json
anchorectl image vulnerabilities sha256:<digest> -o html -d ~/reports/  # -d takes a directory; the HTML file is written into ~/reports/
Supported formats are text, json, json-raw, csv, cyclonedx-json, cyclonedx-xml, and html. The CycloneDX outputs embed VEX annotations recorded on the image’s findings; HTML produces a human-readable summary document suitable as a build artifact.
Via the API
Method
Path
Produces
GET
/images/{image_digest}/vex/openvex
OpenVEX document for the image
GET
/images/{image_digest}/vex/cyclonedx-json
VEX in CycloneDX JSON
GET
/images/{image_digest}/vex/cyclonedx-xml
VEX in CycloneDX XML
GET
/images/{image_digest}/vuln/{vuln_type}
Vulnerability data for the image as paginated JSON. vuln_type is one of os, non-os, or all
Image VEX exports support OpenVEX in addition to CycloneDX — useful for downstream consumers that have standardized on the OpenVEX format.
Where to Go Next
Search — investigate vulnerabilities before producing the formal documents.
Annotations — record the VEX dispositions that drive every VEX and VDR document.
Export an SBOM — produce Syft-native, CycloneDX, or SPDX SBOMs for the components that the vulnerability evidence above sits alongside.
4 - Annotations and VEX
A vulnerability annotation records how a specific (vulnerability, package version) pair affects an app version or an individual container image. Each annotation captures a VEX (Vulnerability Exploitability eXchange) status — whether the package is affected, not affected, fixed, or under investigation — along with the justification, supporting notes, and the actions you intend to take.
Annotations serve two purposes:
Internal triage. A not_affected or fixed annotation removes the finding from the default Vulnerabilities view so triage attention stays on the unresolved work. Findings without annotations remain visible; filters can always be adjusted to bring annotated findings back into view.
Downstream evidence. Every annotation becomes part of the unified VEX document generated for an app version. Downstream consumers — customers, certifying bodies, deployment gates — see your analysis state directly rather than having to ask.
Annotations in Anchore Enterprise v6 are anchored at the app version and govern findings across every asset attached to that version. A single annotation against (vulnerability, package version) therefore applies whether the affected package was discovered in a container image asset, a filesystem asset, or an externally supplied SBOM asset — you annotate once at the release level rather than once per asset.
The app-version anchor reflects how VEX works in practice: a VEX statement is a release-level claim about how a product is built and used, not a claim about one specific container image. Anchoring the annotation at the version surfaces it consistently across every asset that makes up the release. For the underlying scan surfaces this annotation governs, see Two Evaluation Scopes.
VEX Status
Every annotation carries one of four statuses:
Status
Meaning
not_affected
The product contains the vulnerable code, but the vulnerability cannot be exploited for various reasons. Additional information should be provided for a detailed explanation.
affected
The vulnerable package is included in the product and the vulnerability can be exploited. Remediation is typically required.
fixed
The product previously contained the vulnerability, but a patch or remediation has been applied to fix it.
under_investigation
The software supplier is still reviewing their product to determine if it is vulnerable.
Annotations with status not_affected and fixed are hidden from the default Vulnerabilities view at the app-version level as well as the individual image vulnerability view so that triage attention stays on the unresolved findings. Use the VEX Status filter on the Vulnerabilities tab to bring them back into view.
Justification
When status is not_affected, supply a justification that names the reason the vulnerability does not impact the product:
Justification
Meaning
component_not_present
The vulnerable component is not included in the product.
vulnerable_code_not_present
The vulnerable component is included, but the vulnerable code is not — usually because of how the component was built or configured.
vulnerable_code_not_in_execute_path
The vulnerable code is present but is never executed by the product.
vulnerable_code_cannot_be_controlled_by_adversary
The vulnerable code runs but cannot be reached or influenced by an attacker.
inline_mitigations_already_exist
The product includes built-in protections that prevent exploitation and cannot be disabled by the attacker.
fix_not_planned
The vulnerability impacts the product but no fix is planned. Anchore-specific extension to the CISA VEX values; available via the API.
The first five justifications are CISA’s minimum requirements for a VEX statement and have direct equivalents in OpenVEX and CycloneDX. fix_not_planned is an Anchore extension and is omitted from CycloneDX exports because it has no CycloneDX justification equivalent.
Supporting Fields
Beyond status and justification, every annotation can carry the following free-text fields. Each is optional except where the VEX format requires it:
Status notes — additional context about why this status was chosen.
Impact statement — required for affected when no justification is supplied; describes how the vulnerability impacts the product.
Action statement — for affected annotations: what steps will be taken to remediate the finding.
Additional details — any other context that should travel with the annotation.
Anchore Enterprise stamps created_at and updated_at timestamps automatically; the two timestamps correspond to “Analysis First Issued” and “Analysis Last Updated” in the exported VEX document.
Roles and Permissions
Creating, editing, and deleting annotations is restricted by RBAC. The built-in role vuln-annotator-editor carries the relevant permissions:
createVulnAnnotation
getVulnAnnotation
listVulnAnnotations
updateVulnAnnotation
deleteVulnAnnotation
Any role that grants listImages (such as read-only) can view annotation data and generate VEX exports — see Evidence for the export surfaces.
The Vulnerabilities tab on an app version detail page is the primary interface for annotation work. Each row is one (vulnerability, package) finding, and the Annotated column shows the current VEX status.
Record an Annotation
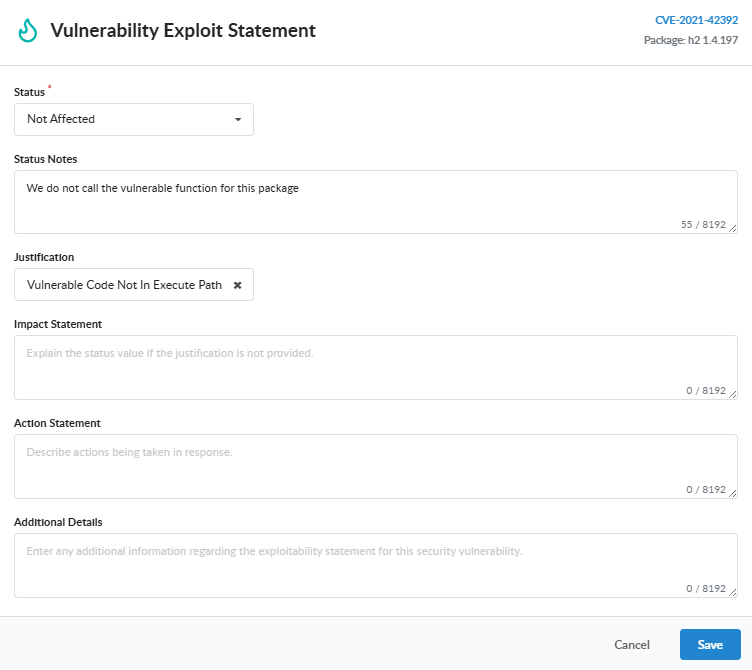
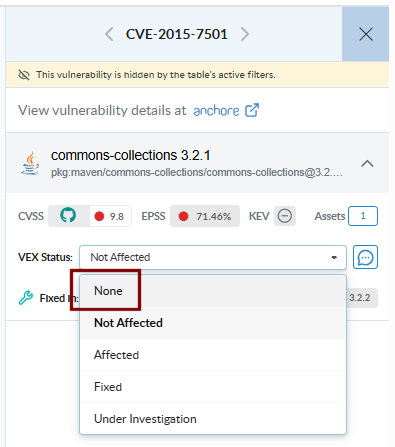
Open the app version’s Vulnerabilities tab and click the finding you want to annotate to open its detail panel. To set the status alone, use the inline VEX Status dropdown in the panel (None, Not Affected, Affected, Fixed, or Under Investigation). For a full annotation, click Add VEX Annotation (it reads Edit VEX Annotation once an annotation exists) to open the Vulnerability Exploit Statement editor, where you set the Status, a Justification when the status is Not Affected, and any of the optional supporting fields: Status Notes, Impact Statement, Action Statement, and Additional Details. Save stays disabled until a status other than None is selected; click Save to record the annotation.
Once saved, the Annotated column reflects the status across every related finding.
Delete an Annotation
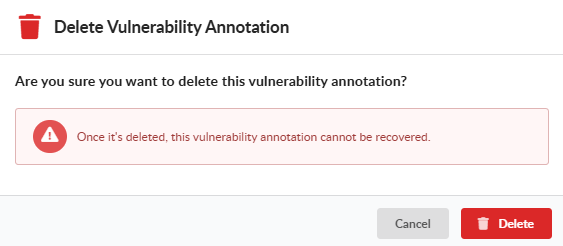
To remove an annotation, open the Edit VEX Annotation editor for an annotated finding and set Status back to None.
A warning confirms that the annotation will be removed and the Save button changes to Delete. Click Delete to clear the annotation.
Filter Annotated Findings
By default the Vulnerabilities tab shows unannotated findings plus those marked Affected or Under Investigation, so unresolved work stays at the top; findings marked Not Affected or Fixed are hidden. Use the VEX Status filter to add Not Affected or Fixed back into view, which is useful when reviewing the triage backlog or preparing a VEX document for export.
Manage Annotations with AnchoreCTL
Annotation management is exposed under anchorectl app version vex. Every command requires the parent app via --app.
Add an Annotation
The package identity (--pkg-name, --pkg-type, --pkg-version) plus --vuln-id together uniquely identify the (vulnerability, package) pair the annotation applies to:
anchorectl app version vex add 1.4.0 \
  --app my-service \
  --vuln-id CVE-2024-3094 \
  --pkg-name xz-utils \
  --pkg-type deb \
  --pkg-version 5.6.0-0.2 \
  --status not_affected \
  --justification vulnerable_code_not_in_execute_path \
  --status-notes "xz-utils is bundled but the affected SSH path is not used by this service."
A second annotation for the same (vuln_id, package_name, package_version, package_type) tuple is rejected with a 409 conflict — update the existing annotation instead.
List Annotations for an App Version
anchorectl app version vex list 1.4.0 --app my-service
The default table output covers status, justification, package identity, and the annotation UUID. Use -o json for the full per-annotation record including all supporting fields.
Update an Annotation
Annotations are updated by UUID (the id returned at creation, or the id field from list):
anchorectl app version vex update 943629bb-83ab-0f2c-3326-f0c011ab16cf \
  --app my-service \
  --version 1.4.0 \
  --status fixed \
  --status-notes "Upgraded to xz-utils 5.6.2-1 in the 1.4.0 release."
Only the fields supplied on the command line are changed; omitted fields keep their existing values.
Deleting an annotation does not affect the underlying vulnerability finding — the finding reappears in the default Vulnerabilities view because nothing is filtering it out anymore.
Export VEX for an App Version
anchorectl app version export vex produces a CycloneDX VEX document for the app version. The export runs as a server-side job; AnchoreCTL waits for completion and writes the result to a file or stdout:
Annotation endpoints live under /apps/{app_id}/versions/{version_id}/vulnerability-annotations. The full request and response schemas are in the API browser; search for the App Version Vulnerability Annotations tag.
A few conventions worth knowing as you call these endpoints:
The uniqueness constraint is (account, app, version, vulnerability_id, package_name, package_version, package_type). Creating a second annotation for the same tuple returns 409.
PATCH accepts a partial body; omitted fields are left untouched. Explicit null is rejected for the status field — drop the key to leave the status unchanged.
VEX exports are produced by the App Jobs export endpoints rather than the annotation endpoints directly — see Evidence.
Cross-version annotation searches — finding every vulnerability annotated as not_affected across an account, for example — are not yet exposed through a programmatic surface. App-version search and reporting is on the roadmap; see Search for the current state and the per-version data sources available in the meantime.
Policy Gating by Annotation Status
The package trigger on the vulnerabilities compliance gate exposes two parameters that filter findings by annotation state — missing annotation and annotation status. These parameters are available only on rule sets whose artifact type is image; SBOM/app-version rule sets do not currently expose annotation-status filtering at the policy layer. App-version-scoped annotation filtering through search or reports is on the roadmap — see Search for the current state.
Anchore Enterprise can compare an image’s findings — both vulnerabilities and policy results — against those of its base image, so developers can focus on issues introduced by their own changes and filter out noise inherited from a platform team’s golden image.
Base-image comparison is image-scoped only — it operates on a pair of analyzed container images and tags each finding by whether the same issue is present in the base. App-version-scoped evaluations do not currently surface a base-image dimension; for the broader v6 evaluation surface, see Scans.
For an overview of how Anchore Enterprise identifies a candidate base image and applies its selection rules, see Base and Parent Images.
How It Works
Both the image policy-check and the image vulnerabilities API accept an optional base_digest query parameter. When supplied, each finding in the response carries an inherited_from_base field:
true — the same finding exists in the base image.
false — the finding is unique to the evaluated image.
null — no comparison was performed (no base_digest was supplied).
base_digest=auto instructs Anchore Enterprise to select the base image automatically using the ancestry rules described in Base and Parent Images.
Compare Policy Checks
The policy-check endpoint evaluates both images against the same policy and tag, which keeps the comparison fair:
curl -X GET -u <username:password> \
  "http://<servername:port>/v2/images/sha256:xyz/check?tag=p/q:r&base_digest=sha256:abc"
Each finding object in the response carries "inherited_from_base": true|false. A dockerfile-instruction trigger that fires on both images will be marked inherited; a vulnerability-package trigger that fires only on the evaluated image will not. The full request and response schemas are in the API browser.
Compare Vulnerabilities
The image-vulnerabilities endpoint also accepts base_digest and tags each matched vulnerability with the same inherited_from_base field:
curl -X GET -u <username:password> \
  "http://<servername:port>/v2/images/sha256:xyz/vuln/all?base_digest=sha256:abc"
A CVE that affects the same package in both images is marked inherited_from_base: true; a CVE that affects a package present only in the evaluated image is false.
Where the Comparison Is Used
Beyond the direct API calls, base-image information shows up in several places:
Policies. The Ancestry gate gates rules on the resolved base or ancestor digests. The vulnerabilities gate’s package trigger accepts an inherited_from_base parameter so you can write rules that fire only on findings unique to the evaluated image — see Vulnerabilities gate.
Reports. Vulnerability reports include an Inherited From Base column populated from the same field.
Anchore Enterprise GUI. The image detail page displays the resolved base image and uses it to flag inherited findings on the Vulnerabilities and Compliance tabs.
For the underlying matching pipeline that produces these findings before the comparison runs, see How It Works.
6 - False Positives
False positives in vulnerability scanning fall into two distinct categories, and Anchore Enterprise gives you a different tool for each:
The package was identified correctly, but its metadata is wrong — the analyzer guessed a CPE or PURL that doesn’t line up with how vulnerability data describes the same component. Findings either appear that shouldn’t, or fail to appear at all. Fix with Corrections.
The package was not identified at all — your build installs software that Anchore Enterprise’s analyzers don’t recognize, so the SBOM (and therefore the scan) misses it entirely. Fix with Hints.
Corrections and Hints apply only to packages discovered through container image analysis — they do not modify externally supplied SBOMs.
Both features are user-controlled refinements that sit alongside Anchore Enterprise’s built-in false-positive controls — see Reducing False Positives and Noise for the broader context. For the matching pipeline that produces every vulnerability finding before these controls apply, see How It Works.
6.1 - Corrections
A correction is a rule that rewrites a package’s metadata at vulnerability-scan time. Anchore Enterprise’s analyzers generate a best-effort PURL and CPE for every package they find, but for some ecosystems — particularly Java archives that ship without a complete manifest — the guess does not match what vulnerability data uses to identify the same component. The result is either spurious matches or missed matches. A correction restates the package’s PURL, CPEs, or other fields so that subsequent scans match against the right vulnerability records.
For the broader context — how SBOM packages get matched against vulnerability data, and the synthetic-CPE fallback that handles unknown ecosystems — see How It Works.
Corrections apply only to packages discovered through container image analysis; they do not modify externally supplied SBOMs.
When to Add a Correction
A worked example: an Anchore Enterprise analysis of a Tomcat image surfaces the catalina.jar archive with this content:
The CPE vendor/product (apache:catalina), the Maven group/artifact in the PURL (org.apache.tomcat-catalina/catalina), and the package name (catalina) all disagree with how the upstream advisory data describes Tomcat Catalina. Vulnerability matches against this package will be unreliable.
Add a Correction
Corrections are managed with anchorectl correction. The command supports both an inline form and a JSON-file form.
description — free-text note describing the correction’s intent.
type — the correction type. Only package is supported.
match.type — the package ecosystem to apply the correction to. In the inline form this is what the --type flag sets; the correction type is always package. Supported values are driven by the analyzers your deployment runs and currently include java, gem, python, npm, os, go, and nuget. Run anchorectl image content --available-types to list the valid content types on a given deployment.
match.field_matches — one or more (field_name, field_value) pairs that select which packages this correction applies to.
replace — the field/value pairs the correction will write. For cpes and purl only, curly-brace templates like {version} are substituted from the matched package at scan time. If a templated field is missing on the package, the CPE component is replaced with * and the PURL replacement is skipped entirely.
Manage Corrections
anchorectl correction list
anchorectl correction get <correction-uuid>
anchorectl correction delete <correction-uuid>
Corrections are referenced by the UUID returned at creation. The same operations are available on the /corrections API — see the API browser for the full request and response schemas.
Verify a Correction
Corrections take effect at the next vulnerability scan. To confirm a correction is matching the way you intended, inspect the analyzed content for a representative image:
A hints file lets a build process tell Anchore Enterprise about packages that its analyzers cannot detect on their own. If you know a container image installs a piece of software through a non-standard mechanism — a manual tar extract, a vendored binary, a build-time install that leaves no package-manager trace — you can declare those packages in a hints file and Anchore Enterprise will include them in the SBOM exactly as if they had been discovered normally.
Hints add packages to the SBOM. They cannot modify or remove findings produced by the regular analyzers — for that, see Corrections. If a hints record names a package the analyzers also find, the hint is ignored and a warning is logged.
Hints apply only during container image analysis; they do not affect externally supplied SBOMs.
The hints feature is disabled by default. Enabling it means whoever builds your container images can inject additional packages into the SBOM — entries the analyzers didn’t produce — which directly affects vulnerability and policy outcomes. Only enable this feature when the build process is fully under your control. See Configuring Content Hints for how to enable it.
How the Hints File Works
When the hints feature is enabled, the Anchore Enterprise analyzer looks for a file at /anchore_hints.json inside every container image it analyzes. Records in that file are added to the image’s SBOM and become part of every subsequent scan.
The file is a JSON object with a single packages array. Each record describes one package:
The schema differs slightly between OS packages and language packages, covered below.
OS Package Records
OS packages represent components installed through an OS distro’s package manager. Supported types are rpm (Red Hat / Rocky / Alma / Amazon), dpkg (Debian / Ubuntu), and apkg (Alpine).
Package names are unique per SBOM in this category. If a hint names an OS package the analyzers already discovered, the hint is ignored (per the rule above); OS hints add only packages the analyzers don’t detect on their own.
Language packages cover the ecosystem-specific package managers. Supported types include java, python, gem, npm, nuget, go, and binary. The full set available on a given deployment is whatever anchorectl image content lists.
Multiple packages with the same name can legitimately co-exist (a project can depend on two versions of the same library installed in different locations), so a location field is the primary disambiguator.
The musl and wicked records from the examples above will appear in the os and gem content listings respectively, as if the analyzers had discovered them directly.
7 - Working with Subscriptions
Subscriptions tell Anchore Enterprise to pay attention to specific things — a tag, an image, a registry repository, a Kubernetes namespace — and either keep them up to date or notify you when their state changes. Every long-running automated behavior in Anchore Enterprise that runs in the background on your behalf is driven by one of these subscription types.
For the configuration-side write-up of each subscription type (granularity, background-process behavior, default state), see Subscriptions.
Subscription keys identify what is being watched and depend on the type. For tag_update, policy_eval, vuln_update, and analysis_update, the key is a fully qualified registry/repo:tag. For repo_update, it is a registry/repo. alerts accepts either form — a registry/repo:tag for tag-scoped alerting, or a registry/repo to alert on every image in the repository. For runtime_inventory, it is a cluster/namespace identifier.
Manage Subscriptions in the Anchore Enterprise GUI
A subset of subscription types can be created and toggled directly in the GUI, from the feature area that owns the watched resource. The remaining types — policy_eval, vuln_update, and analysis_update — are managed through AnchoreCTL or the API, covered below.
Watch a Tag in the GUI
On the Analyze Tag dialog in the Images view, enable Watch Tag to create a tag_update subscription for the tag. See Analyze a Tag for the full dialog.
Watch a Repository in the GUI
On the Analyze Repository dialog in the Images view, choose Automatically Check for Updates to Tags to create a repo_update subscription that picks up new tags as they appear. See Watch a Repository for New Images.
Receive Alerts in the GUI
Both the Analyze Tag and Analyze Repository dialogs include a Receive Alerts checkbox that creates an alerts subscription — tag-scoped from the tag dialog, repository-scoped from the repository dialog.
Watch a Cluster or Namespace in the GUI
From the Kubernetes runtime inventory views, toggle a cluster or namespace watch to create a runtime_inventory subscription. See Kubernetes Inventory.
Manage Subscriptions with AnchoreCTL
Subscriptions are managed with the anchorectl subscription command tree; runtime-inventory watches use anchorectl inventory watch.
List Subscriptions
anchorectl subscription list returns every subscription on the deployment and its current state:
tag_update, policy_eval, vuln_update, and analysis_update subscriptions are tied to a fully qualified registry/repo:tag, not to image digests — a subscription survives the tag pointing at a new digest.
Activate and Deactivate Subscriptions
anchorectl subscription activate enables a subscription for a given key and type:
When AnchoreCTL adds a new image with anchorectl image add, it creates and activates a tag_update subscription for that tag by default. To suppress the auto-subscribe:
The same suppression is available via the environment variable ANCHORECTL_IMAGE_NO_AUTO_SUBSCRIBE=true.
Runtime Inventory Subscriptions
Runtime-inventory subscriptions are managed under a dedicated command tree because they take a cluster/namespace key rather than a tag. anchorectl inventory watch enumerates the watched namespaces and toggles activation:
anchorectl inventory watch list
 ✔ Fetched watches
┌─────────────────────────────────────┬───────────────────┬────────┐
│ KEY                                 │ TYPE              │ ACTIVE │
├─────────────────────────────────────┼───────────────────┼────────┤
│ cluster-one/platform-services       │ runtime_inventory │ true   │
└─────────────────────────────────────┴───────────────────┴────────┘
anchorectl inventory watch activate creates the subscription if one does not already exist.
For the broader Kubernetes integration — the agent, what it reports, and the namespace-scoped views in the Anchore Enterprise GUI — see Kubernetes Inventory.
Manage Subscriptions with the API
Subscriptions are exposed under the /subscriptions collection — create, list, get, update (activate/deactivate), and delete are all available. The full request and response schemas, and error codes, are in the API browser; search for the Subscriptions tag.
Key endpoints:
Method
Path
Purpose
POST
/subscriptions
Create a new subscription of a given type for a key
GET
/subscriptions
List subscriptions; filter with the subscription_key and subscription_type query parameters
GET
/subscriptions/{subscription_id}
Get a single subscription
PUT
/subscriptions/{subscription_id}
Update an existing subscription, including its active state
DELETE
/subscriptions/{subscription_id}
Delete a subscription
A few conventions worth knowing as you call these endpoints:
Create a subscription with POST; change an existing one — including activating or deactivating it — with PUT. The AnchoreCTL activate and deactivate commands change the active state through these endpoints.
GET, PUT, and DELETE address a subscription by its subscription_id. AnchoreCTL accepts the friendlier key-and-type form and resolves the ID for you.
Cross-account requests are scoped via the x-anchore-account header or, from AnchoreCTL, the ANCHORECTL_ACCOUNT environment variable. See Account Scoping for the full mechanism.
8 - Kubernetes Inventory
Kubernetes Inventory gives Anchore Enterprise a continuously updated view of every container image running in your clusters, broken down by cluster, namespace, node, and pod. Once a cluster is wired up, Anchore Enterprise pulls in the images it discovers, analyzes them, and surfaces the resulting vulnerability and policy findings on a Kubernetes-aware view in the Anchore Enterprise GUI — so you can answer “where in production is an image running which contains a vulnerable package for a given CVE?” directly rather than by spreadsheet.
The inventory agent and its deployment are documented separately:
Kubernetes Runtime Inventory — installation and configuration of anchore-k8s-inventory, the in-cluster agent that reports container metadata back to Anchore Enterprise.
Runtime Inventory — deployment-wide runtime configuration: inventory time-to-live, retention behavior, and shared options that apply to both Kubernetes and ECS inventory agents.
The Anchore Kubernetes Inventory Agent is a licensed add-on. Make sure your deployment has a valid runtime license entitlement before configuring it.
Watch a Cluster or Namespace
A runtime_inventory subscription tells Anchore Enterprise to automatically pull and analyze every image the agent reports from a given cluster or namespace. New images discovered in a watched namespace are queued like any other analysis job.
Manage cluster and namespace watches with anchorectl inventory watch, or from the Anchore Enterprise GUI. See Subscriptions for the full management surface across the GUI, AnchoreCTL, and the API.
Before watching a busy namespace, confirm that registry credentials for the images it runs are configured in Anchore Enterprise — see Container Registries. Watching a new cluster can queue a large analysis backlog and affect other workloads on the deployment.
Navigate the Kubernetes View
The Kubernetes Inventory view in the Anchore Enterprise GUI is the primary interface for runtime triage. Summary charts at the top break down compliance — compliant, non-compliant, and non-evaluated images — and vulnerabilities by severity, across every cluster the deployment has analyzed. Drilling into a cluster, namespace, node, or pod scopes the charts and the underlying tables to that selection.
The view can be filtered to read by cluster, by image, or by vulnerability:
By cluster. Browse the cluster and namespace hierarchy and see the compliance and vulnerability posture of each scope.
By container image. List the images running in the selected scope and pivot from any image to the same per-image data surfaced elsewhere — vulnerabilities, policy results, SBOM.
By vulnerability. List vulnerabilities found across the selected scope and, for each one, see which images and which deployments are affected. Hover the “seen in X clusters and Y more…” callout to see the full list of locations — the fastest way to answer the “blast radius” question for a new CVE.
Filtering chips at the top of the view (severity, fixability, namespace) refine both the charts and the underlying tables. A severity filter set to “Critical and High” hides every cluster or namespace that has no findings at those levels.
Data Freshness
The Kubernetes Inventory view is built from two independently scheduled pipelines: the in-cluster agent’s reporting interval, and Anchore Enterprise’s analysis queue. Findings appear after both pipelines have run end-to-end, so the view is near-real-time but not synchronous with the cluster.
The deployment-wide inventory time-to-live (how long Anchore Enterprise retains a container record after the agent last reported it) is set on the catalog service — see Runtime Inventory configuration.
Policy and Account Scoping
Policy results on the Kubernetes Inventory view come from each account’s default policy. If you want a Kubernetes-specific policy to gate the view — for example, a tighter ruleset for runtime than for build-time — set up a dedicated account that hosts the watch, switches its default policy to the desired ruleset, and uses the corresponding registry credentials.