A vulnerability scan in Anchore Enterprise is the result of matching an artifact’s SBOM against the vulnerability data provided by the Anchore Data Service. See How It Works for the underlying matching pipeline that produces every finding.
Anchore Enterprise exposes scan results in two distinct scopes. Pick the one that matches how your team organizes software.
Staying current:App-version-scoped results refresh automatically: findings are re-evaluated whenever the vulnerability database is updated from the Anchore Data Service, and whenever an asset is added to the version. No subscription or manual refresh is required. Image-scoped results refresh when you retrieve them, and can also be kept current automatically with subscriptions. For example, vuln_update re-scans an image and notifies you when its set of vulnerabilities changes.
Two Scan Scopes
The two scopes differ in what the scan runs against and how findings are aggregated. Both draw from the same vulnerability data and share the same matching engine.
Every asset attached to an app version: container images, analyzed filesystems, and externally supplied SBOMs (see Asset Types), deduplicated across the version
Aggregated list across all assets in the version, with Anchore Score prioritization for vulnerabilities
A single analyzed container image, identified by digest
Per-image list of findings with vulnerability attributes and fix details
The app-version-scoped surface is the v6-native path. An app version can hold any mix of asset types (not just container images, but also analyzed filesystems and externally supplied SBOMs), so this scope gives you a single, deduplicated vulnerability view across an entire app version regardless of how each part was analyzed. It also surfaces the Anchore Score as a vulnerability prioritization field.
The image-scoped surface is the long-standing v5 path; it remains the right choice for ad-hoc checks of a single image, image-stage CI gates, and any workflow that has not yet adopted the apps, versions, and assets model.
What’s Shared and What Differs Between Scopes
Both scopes draw from the same vulnerability data: NVD, vendor-specific feeds, GHSA, MSRC, and Anchore’s enrichment dataset all flow through both scopes equally.
The matching engine is shared as well: both scopes run the same matcher, so CPE matching configuration and namespace handling apply identically regardless of scope. One matching behavior is scope-specific:
Synthetic-CPE fallback for packages without an ecosystem PURL applies only to app-version-scoped (asset) scans. It has no effect on image-scoped scans.
The primary difference between the scopes is aggregation: an image-scoped scan returns one list for one image, while an app-version-scoped scan deduplicates across every asset in the version and aggregates the findings into a single list at the version level.
Where to Go Next
Scan an App Version: GUI / CLI / API walkthrough for the app-version-scoped path
For finding vulnerabilities across multiple assets at once (saved reports, custom report templates, and the query API), see Search.
1 - Scan an App Version
App-version-scoped vulnerability scanning produces a single, deduplicated list of vulnerabilities for an entire app version — across every asset attached to that version, whether the asset is a container image, an analyzed filesystem, or an externally supplied SBOM. This is the v6-native evaluation surface; for per-image scanning, see Scan a Container Image.
The app-version scope adds two capabilities that the image scope does not surface directly:
Deduplication across assets. A package of a given version contained in two assets produces one record at the version level, not two. The same logic applies across vulnerabilities and compliance issues. All instance data is collapsed into a single record with click-throughs for impacted assets.
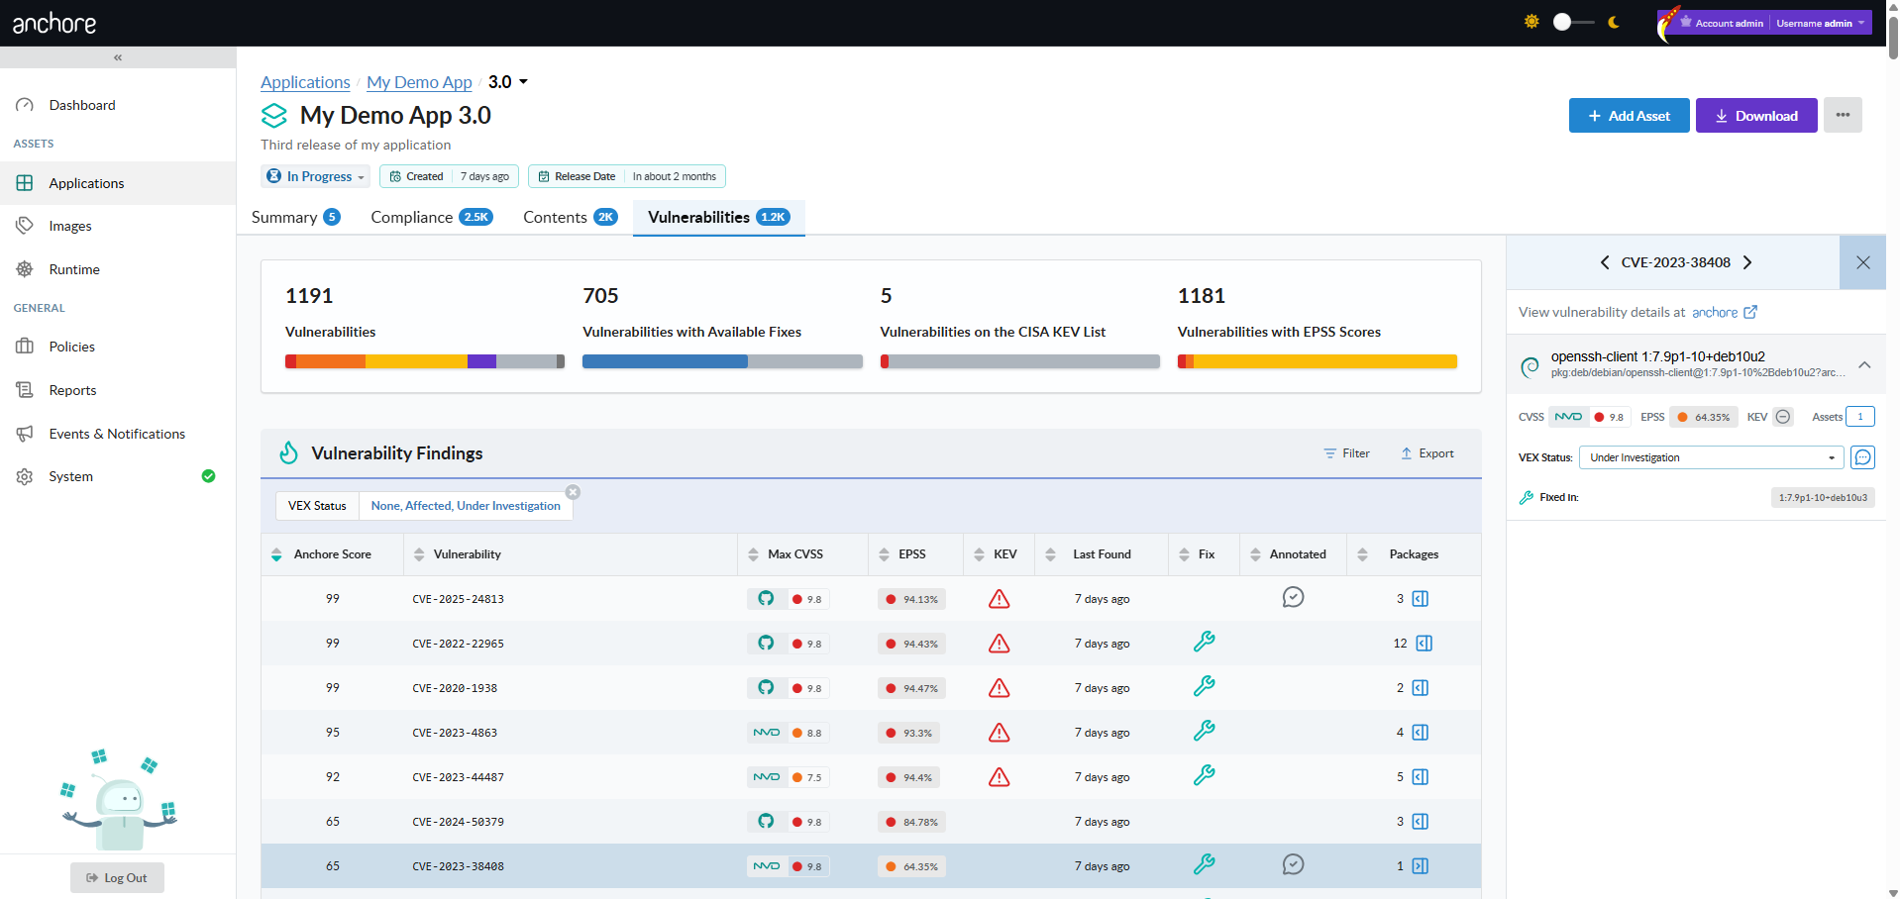
Anchore Score prioritization. Every vulnerability includes a composite score combining CVSS severity and score, EPSS, and CISA KEV data. This score reflects a particular vulnerability’s relative ranking across all vulnerabilities for an app version. The Anchore Score can be used to sort or filter vulnerabilities.
Scan an App Version in the Anchore Enterprise GUI
The app version detail page in the GUI aggregates findings across the version’s assets into a single, deduplicated view. The Vulnerabilities tab is the primary surface for triaging findings; the per-asset drill-down and pivot queries answer the follow-on question of where a vulnerability lives.
Triage Findings by Anchore Score
Sort the Vulnerabilities tab by Anchore Score to put the highest-prioritized findings at the top. The score combines CVSS severity and score, EPSS, and CISA KEV data, so a single sort ordering surfaces the work most worth attention against all vulnerabilities in an app version.
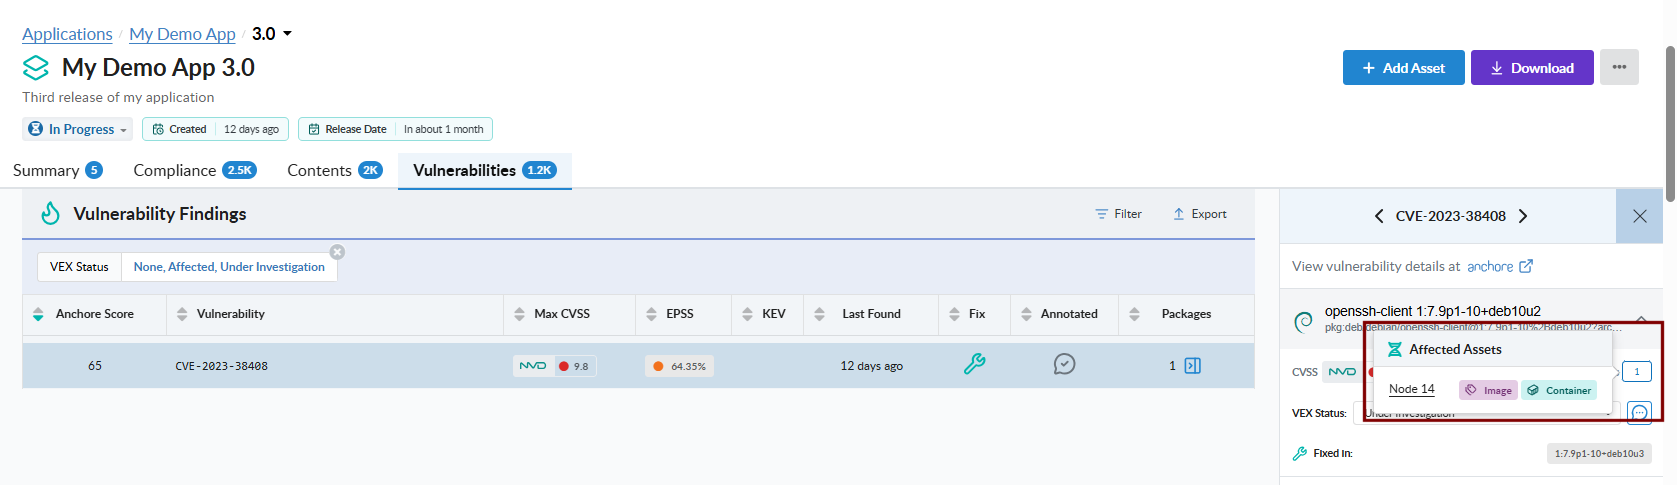
Pivot to Affected Assets
From a single vulnerability record, open the affected-assets popup to see every asset in the version that contains the vulnerable package and where the package lives inside each asset. This is the GUI equivalent of the API’s pivot endpoints — packages-by-vulnerability below, and assets-by-package in Viewing an App Version’s SBOM.
Scan an App Version with AnchoreCTL
The vulnerability list for an app version is exposed under anchorectl app version vuln. The command requires the parent app via --app and accepts either the version name or its UUID.
List Vulnerabilities for an App Version
The default output is a terminal-friendly table aggregated across every asset in the version:
anchorectl app version vuln list 1.4.0 --app my-service
For programmatic consumption, use -o json to retrieve the full per-finding record including CVSS, EPSS, CISA KEV flags, source provenance, and the asset-level attribution for each finding:
anchorectl app version vuln list 1.4.0 --app my-service -o json
The app version vuln list command supports the formats text, json, json-raw, and id. For HTML or CSV outputs intended as downstream deliverables, use the export command described below.
Export Vulnerabilities as a Formal Report
To turn an app version’s findings into a formal, shareable document — a CSV vulnerability export, or a VEX or VDR document — use the anchorectl app version export commands. These run as server-side jobs and are documented, alongside the GUI and API equivalents, under Evidence.
Scan an App Version with the API
App-version vulnerability data lives under /apps/{app_id}/versions/{version_id}/vulnerabilities. The full request and response schemas — including the per-finding data shape with CVSS, EPSS, KEV flags, Anchore Score, and per-asset attribution — are in the API browser; search for the App Version Vulnerabilities tag.
Pivot: packages affected by a specific vulnerability
For the export-job endpoints (CSV, VEX, VDR) under the App Jobs tag, see Evidence.
A few conventions worth knowing as you call these endpoints:
Vulnerability deduplication respects each asset’s distro context for filtering, then merges related CVEs across sources. The deduplication logic matches what is applied elsewhere in Anchore Enterprise.
The vulnerabilities endpoint accepts an optional asset_id query parameter to narrow the result to a single asset rather than the aggregated view.
For the package-side query surface across an app version — package listings and the assets-by-package pivot — see Viewing an App Version’s SBOM.
Cross-account requests follow the standard pattern — see Account Scoping.
2 - Scan a Container Image
Image-scoped vulnerability scanning analyzes a single container image and returns the vulnerabilities discovered in its contents — packages, OS components, and Knowledge Base patches for Windows images. This is the long-standing v5 evaluation path and remains fully supported in v6. For the v6-native release-stage path that aggregates findings across every asset in an app version, see Scan an App Version.
Centralized vs Distributed Analysis
Anchore Enterprise supports two analysis modes. Both produce identical vulnerability results once analysis completes; they differ in where the image bytes are read and where the SBOM is generated.
Centralized analysis — AnchoreCTL or the API tells Anchore Enterprise to pull the image from your registry and analyze it server-side. This is the default mode. Because the full image contents are available to Anchore Enterprise, centralized analysis is required for malware scanning, which distributed analysis cannot perform.
Distributed analysis — AnchoreCTL pulls or reads the image where you run the command, generates the SBOM locally, and uploads the result. Anchore Enterprise never sees the image bytes.
Scan a Container Image in the Anchore Enterprise GUI
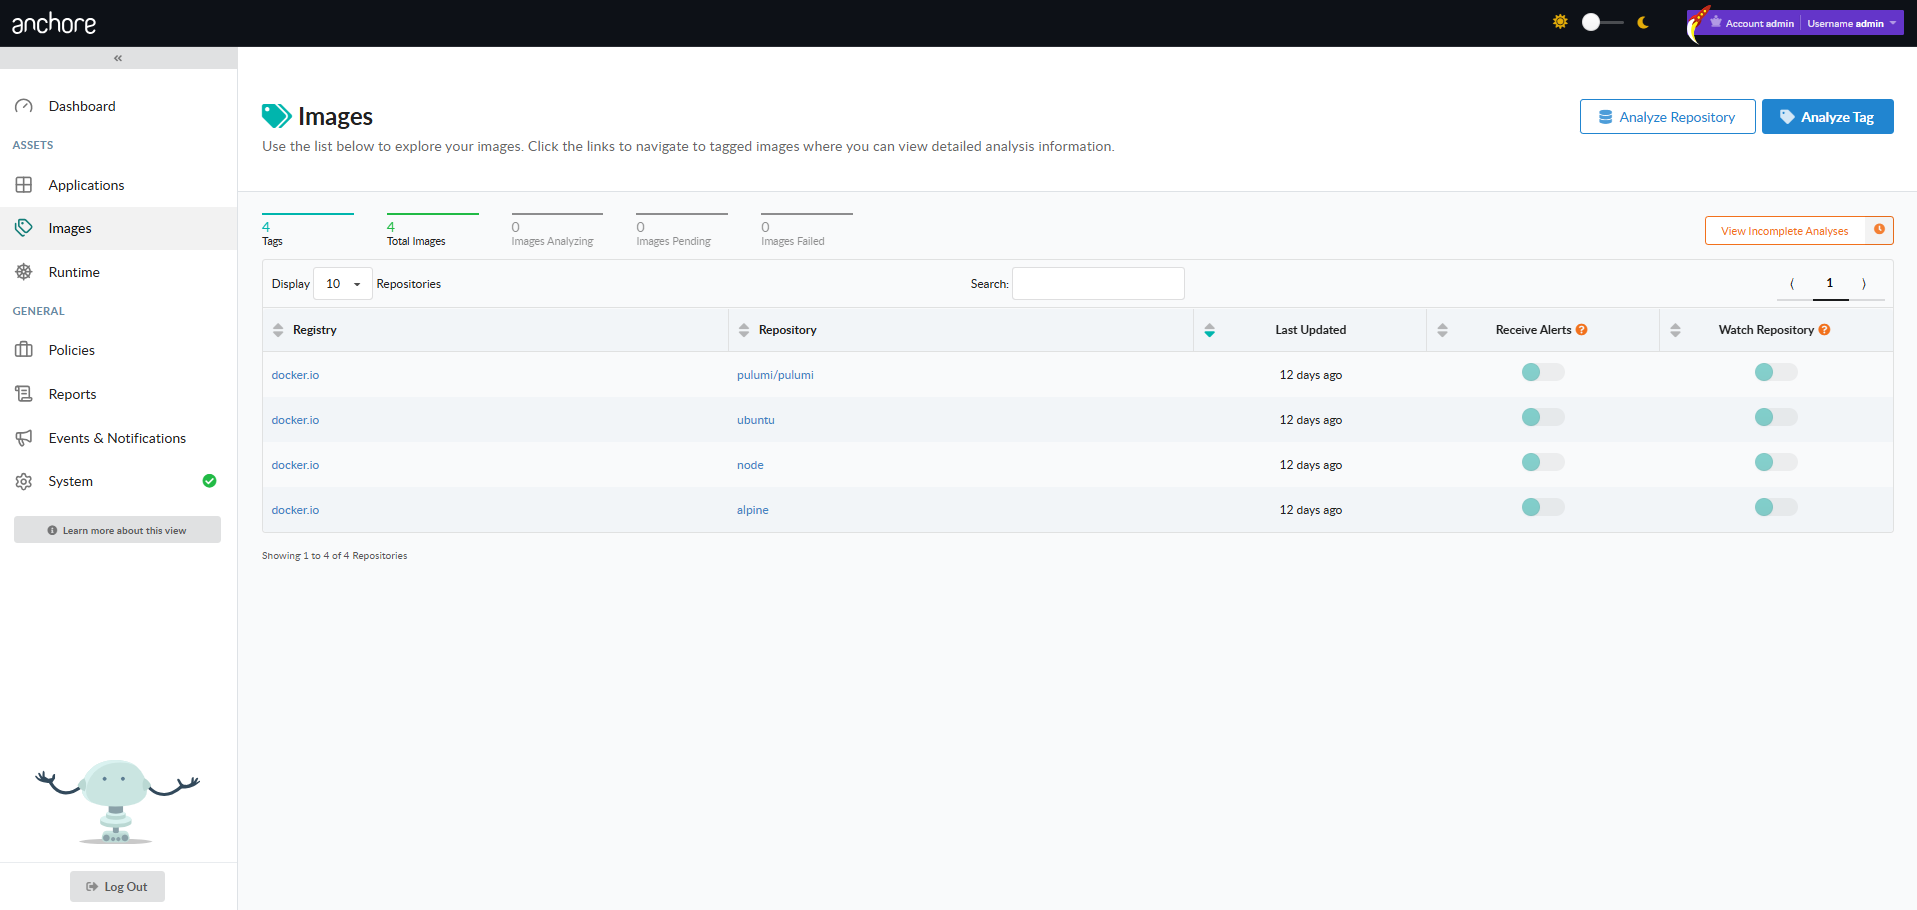
From an authenticated session, the Images menu in the left navigation opens the Image Analysis view. The Image Analysis view lists every image that has been submitted, with Analyze Tag and Analyze Repository controls to submit new work.
Only administrators and standard users with the requisite role-based access control permissions are allowed to submit items for analysis, or remove previously analyzed assets.
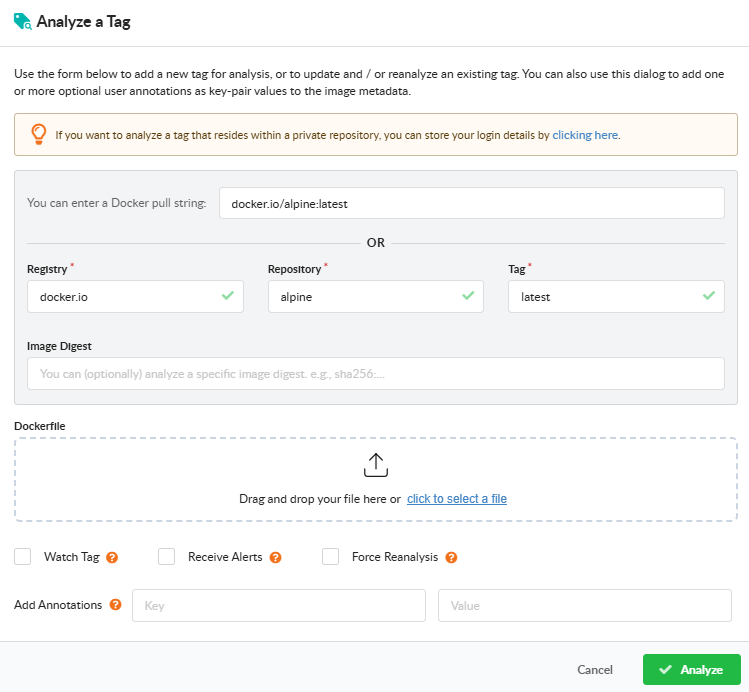
Analyze a Tag
Open Analyze Tag to submit a single image. Fill in the registry, repository, and tag. The dialog also exposes:
Watch Tag — monitor the tag for updates after the initial analysis. Subsequent pushes to the same tag will be picked up and re-analyzed.
Receive Alerts — subscribe the tag to the alerts subscription so Anchore Enterprise raises alerts when new findings are detected for it. See Subscriptions.
Force Reanalysis — re-analyze an already-analyzed tag, regenerating its SBOM. Useful for picking up new analyzer capabilities or a newly attached Dockerfile.
Add Annotation — attach key=value metadata to the image record. Annotations appear in the image overview, in webhook notifications, and in the API responses.
Dockerfile upload — attach the Dockerfile used to build the image so policy checks can evaluate Dockerfile triggers.
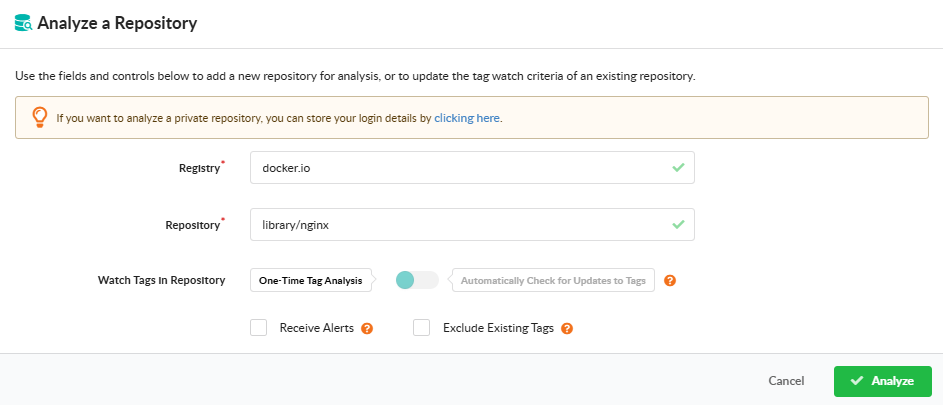
Analyze a Repository
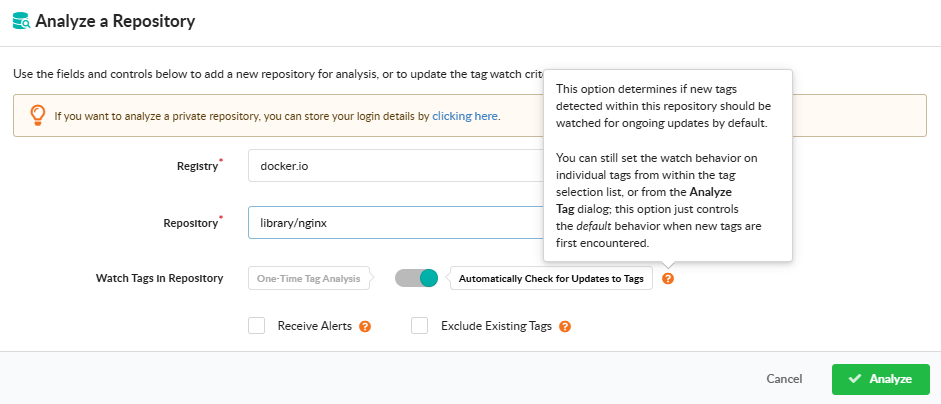
Open Analyze Repository to submit every tag in a repository at once. Provide the registry and repository name, and pick how the repository should be monitored going forward:
One-Time Tag Analysis — analyze the tags currently present in the repository; do not monitor it for future additions.
Automatically Check for Updates to Tags — analyze current tags and continue monitoring the repository so new tags are picked up automatically.
The dialog also offers two checkboxes:
Exclude Existing Tags — when monitoring for updates, analyze only tags added after watching begins; the tags already present in the repository are not analyzed.
Receive Alerts — subscribe the repository to the alerts subscription so Anchore Enterprise raises alerts when new findings are detected across its images. See Subscriptions.
After confirmation, the dialog displays a count of the tags that will be queued for analysis so you can review the workload before committing.
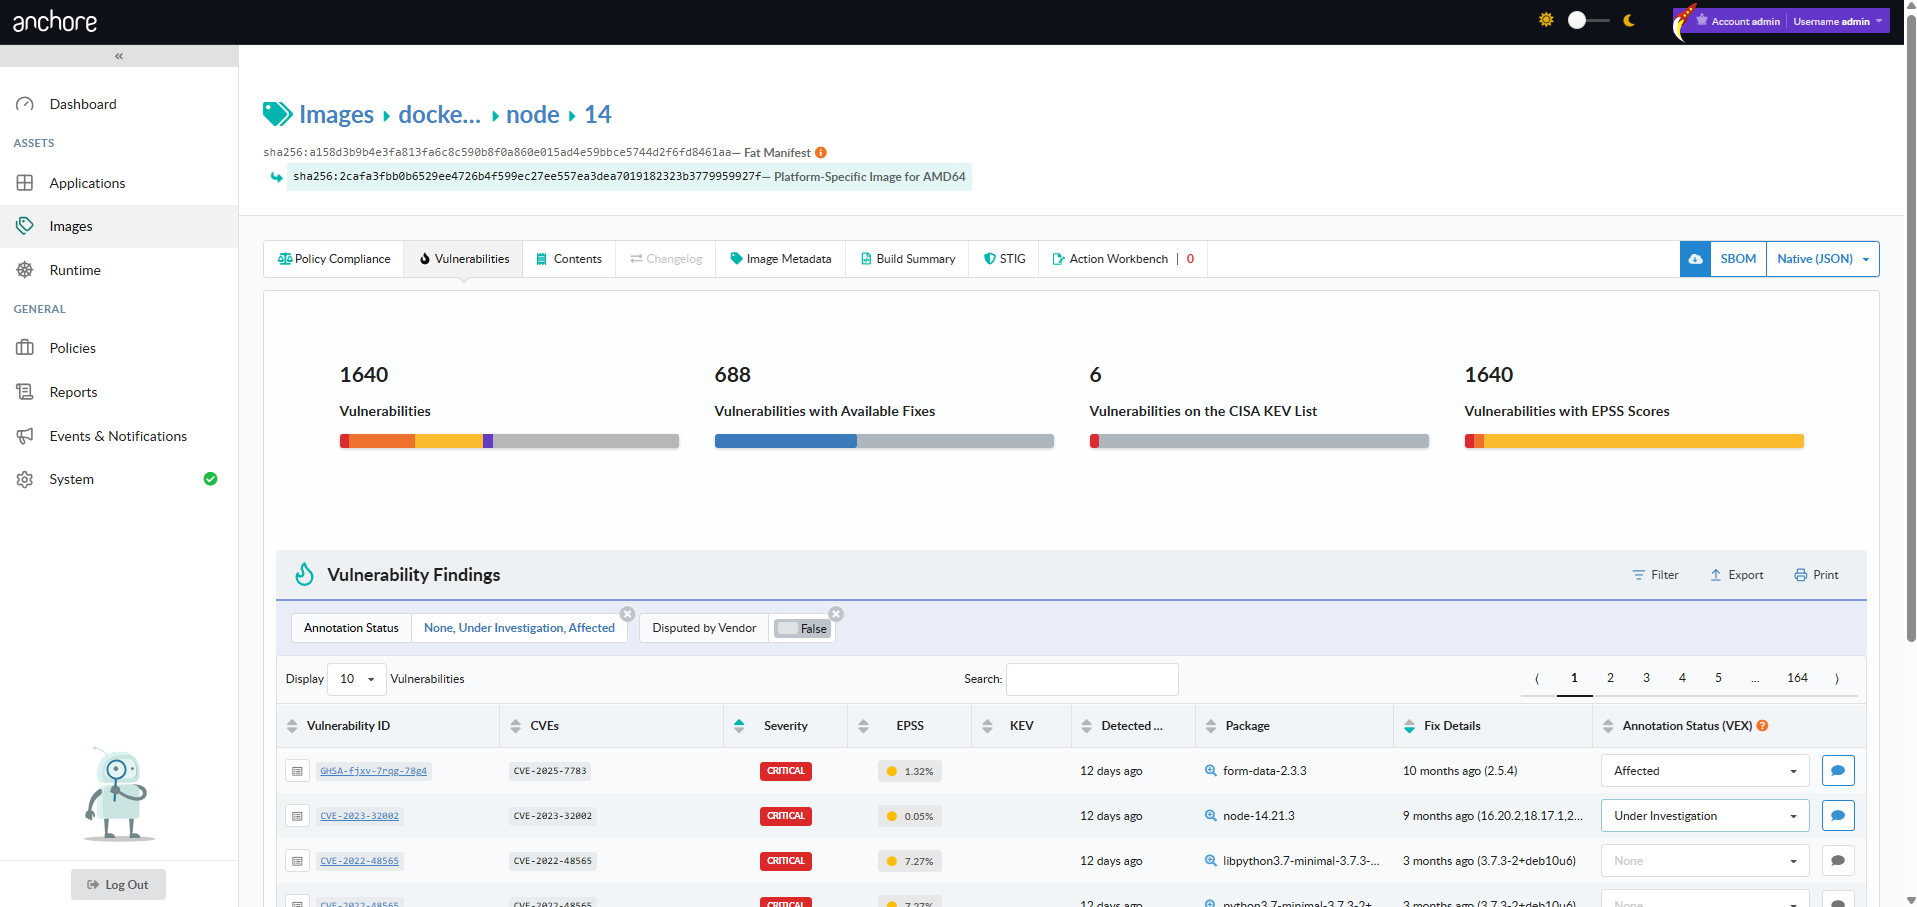
View Vulnerabilities for an Image
From the Images view, drill into a repository, pick an image digest, and open the Vulnerabilities tab. The tab lists every finding for that image with severity, package, CVE, and fix data. The toolbar exposes a vulnerability-report download in JSON or CSV format.
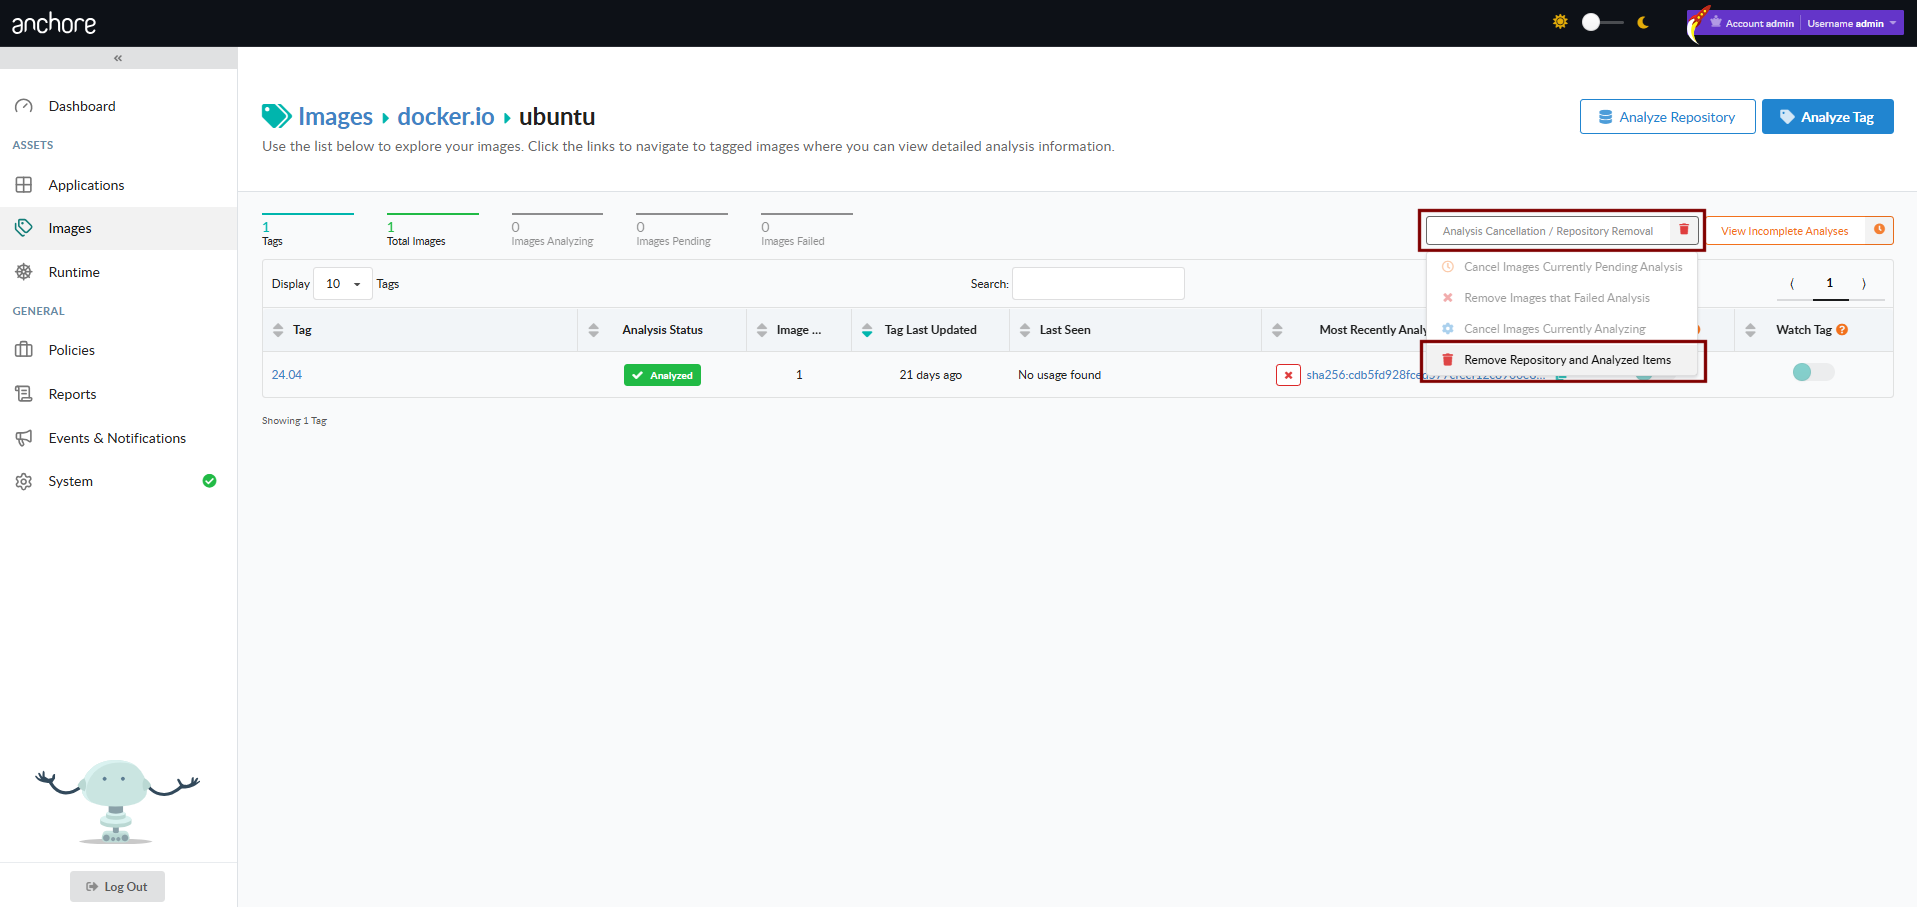
Bulk Removal from a Repository
From a repository view, the Analysis Cancellation / Repository Removal control offers two actions:
Cancel Images Currently Pending Analysis — drain the analysis queue for tags in this repository that have not yet been analyzed
Remove Repository and Analyzed Items — remove the repository from view, including every image currently associated with it. If the repository is being watched, that subscription is also removed.
Scan a Container Image with AnchoreCTL
AnchoreCTL exposes the full image lifecycle under anchorectl image. Examples below use docker.io/my-org/api:1.4.0 as the canonical reference image.
Add an Image (Centralized Analysis)
anchorectl image add instructs Anchore Enterprise to pull and analyze the image server-side. The image record is created immediately with status not_analyzed; the status moves to analyzing once a worker picks it up and to analyzed when complete:
anchorectl image add docker.io/my-org/api:1.4.0
Anchore Enterprise can enforce a maximum image size for analysis. Submissions larger than the configured limit are rejected with an HTTP 400; the limit is disabled by default. See Scanning Configuration.
Add an Image (Distributed Analysis)
Pass --from to switch to distributed analysis. AnchoreCTL pulls or reads the image locally, generates the SBOM, and uploads it:
AnchoreCTL pulls the image from the registry (recommended over docker)
Local Docker daemon
docker
Reads an image already loaded into Docker
Docker archive
docker-archive:/path/to.tar
Loads from a local tar file
Syft SBOM stdin
- (combined with piped Syft output)
Imports a Syft-generated SBOM directly
When analyzing an image that has been pushed to a registry, prefer –from registry over –from docker. The registry source removes the need to have Docker installed locally, produces a consistent image digest, and avoids limitations of the Docker daemon’s manifest and digest handling.
Use --platform to pin a specific platform when the image manifest carries multiple architectures:
Always pass the Dockerfile for images you build yourself. The Dockerfile is stored alongside the image analysis and is used by the dockerfile policy gate:
To change an annotation, re-run the command with the updated value; the prior value is overridden.
Re-Analyze an Image
The --force flag resets an image’s analysis state back to not_analyzed and queues it for re-analysis. Use this when you change the Dockerfile or want to pick up new analyzer capabilities introduced in a later Anchore Enterprise release:
By default, adding an image subscribes the tag to the tag_update subscription so Anchore Enterprise watches the tag for new content. Pass --no-auto-subscribe to skip this:
To register a specific image by digest with its associated tag — useful for images that have moved off the current :latest pointer but are still available in the registry:
Submitting a specific digest with an associated tag tells Anchore Enterprise to treat that digest as the most recent for the tag. If the registry’s actual tag history differs (for example, a newer image has been pushed to that tag), the tag history in Anchore Enterprise may not match the registry.
Get Vulnerabilities for an Image
Once an image is analyzed, anchorectl image vulnerabilities returns its findings. The default output is a terminal-friendly table:
 ✔ Fetched vulnerabilities
┌────────────────┬──────────┬──────────────┬────────────┬──────┐
│ VULN ID        │ SEVERITY │ PACKAGE      │ FIX        │ TYPE │
├────────────────┼──────────┼──────────────┼────────────┼──────┤
│ CVE-2024-3094  │ Critical │ xz-utils     │ 5.6.2-1    │ os   │
│ CVE-2024-1234  │ High     │ openssl      │ won't fix  │ os   │
│ CVE-2023-5678  │ Medium   │ libcurl      │ 7.85.0     │ os   │
└────────────────┴──────────┴──────────────┴────────────┴──────┘
The output format is controlled with -o. Supported formats are text, json, json-raw, csv, cyclonedx-json, cyclonedx-xml, and html. The flags below combine cleanly with any of them:
Flag
Purpose
--type
Filter findings to a specific vulnerability type (for example os, non-os, java)
--vendor-only
Exclude vulnerabilities the vendor has marked as won’t-fix
--annotations
Filter by VEX annotation status (not_affected, affected, fixed, under_investigation)
--include-description
Include the full vulnerability description
--refresh
Re-run vulnerability matching against the latest data before returning
To produce a formatted HTML report suitable for saving as a build artifact, combine -o html with -d to write the result to a directory:
anchorectl image vulnerabilities docker.io/my-org/api:1.4.0 \
  -o html \
  -d ./reports
The same flags work for filtering before export — for example, an HTML report of only the findings the team has not yet annotated:
anchorectl image delete removes an analyzed image record. If the image is the only one associated with a tag, or if any subscriptions are active against the tag, pass --force:
Image scanning is exposed under /images and /images/{image_digest}. The full endpoint inventory, request and response schemas, and error codes are in the API browser; search for the Images tag.
Key endpoints:
Method
Path
Purpose
POST
/images
Submit an image for analysis (centralized)
GET
/images
List analyzed images
GET
/images/{image_digest}
Get an image’s full record
GET
/images/{image_digest}/vuln/{vuln_type}
Get vulnerabilities for an image
GET
/images/{image_digest}/check
Get the policy evaluation for an image
DELETE
/images/{image_digest}
Delete an image
A few conventions worth knowing as you call these endpoints:
The vuln_type path segment accepts os, non-os, all, and specific package types like java, python, npm, etc.
The vulnerabilities endpoint can return CycloneDX VEX-style documents via /images/{image_digest}/vuln/{vuln_type}/cyclonedx-json and cyclonedx-xml.
Cross-account requests use the x-anchore-account header — see Account Scoping.
Watch a Repository for New Images
For long-running registry coverage — where every new tag pushed to a repository should be picked up automatically without a manual image add — Anchore Enterprise lets you put a repository under watch. See Watch a Repository for New Images for the full workflow across the GUI, AnchoreCTL, and the API.
2.1 - Watch a Repository for New Images
Repositories give Anchore Enterprise a way to monitor a registry repository for new tags and automatically analyze them as they appear. This is a common setup for production registries where every new release tag should be picked up without a manual image add.
Repositories are an extension of the image scanning workflow — once a repository is added and watched, every tag picked up from it follows the same analysis pipeline as a manually added image, and its findings appear in the same image-scoped views.
In Anchore Enterprise, a registry is a stored credential configuration — it tells Anchore how to authenticate to a registry host and does not pull or analyze any images on its own. Repositories are the unit of automatic analysis — once a repository is added and watched, Anchore Enterprise enumerates its tags and pulls them in for analysis. For private repositories, configure the registry credentials first; see Container Registries.
Watch a Repository in the Anchore Enterprise GUI
Open the Images view, click Analyze Repository, and choose Automatically Check for Updates to Tags in the resulting dialog. Anchore Enterprise enumerates the repository’s current tags, queues them for analysis, and continues to monitor the repository for new ones.
Repository watching is managed through anchorectl repo. Each command operates on a registry/repository identifier such as docker.io/my-org/api.
Add a Repository to the Watch List
anchorectl repo add registers a repository and immediately starts watching it. Anchore Enterprise enumerates the current tags and queues them for analysis:
anchorectl repo add docker.io/my-org/api
To watch the repository for new tags without analyzing the existing ones, pass --exclude-existing-tags. To skip the default behavior of auto-subscribing discovered tags to the tag_update subscription, pass --auto-subscribe=false.
List Watched Repositories
anchorectl repo list shows every repository under watch:
anchorectl repo list
Pause and Resume Watching
unwatch pauses monitoring without removing the repository record. The repository stays in the list but no longer picks up new tags:
anchorectl repo unwatch docker.io/my-org/api
Re-enable monitoring with watch:
anchorectl repo watch docker.io/my-org/api
Stop Watching a Repository
anchorectl repo delete removes the repository from the watch list entirely. Existing image records analyzed from the repository are not affected by this command:
anchorectl repo delete docker.io/my-org/api
Remove a Repository and All Its Images
To remove the repository and every image record produced from it — for example, after accidentally watching a repository with a very large tag count — combine the unwatch, repository-delete, and image-delete steps. Unwatch first to prevent new tags from being added during the cleanup:
anchorectl repo unwatch docker.io/my-org/api
anchorectl repo delete docker.io/my-org/api
for digest in $(anchorectl -q image list | grep docker.io/my-org/api | awk '{print $2}'); do
  anchorectl image delete "$digest" --force
done
Image deletion can affect more than the repository being cleaned up — an image with the same digest may have tags in other repositories or even other registries. Verify the scope of the deletion before running the loop.
Watch a Repository with the API
Adding a repository to the watch list is exposed under /repositories; listing and removing watches are managed through /subscriptions, since a repository watch is a repo_update subscription. The full endpoint inventory, request and response schemas, and error codes are in the API browser; search for the Repository and Subscriptions tags.
List subscriptions; filter to repo_update for watched repositories
DELETE
/subscriptions/{subscription_id}
Stop watching a repository (delete its repo_update subscription)
For the per-tag subscription model that drives the auto-analysis behavior — what tag_update subscriptions are, how repo_update differs, and how to manage them in bulk — see Subscriptions.