Anchore Enterprise Documentation
Welcome to Anchore Enterprise
Anchore Enterprise is an software bill of materials (SBOM) - powered software supply chain management solution designed for a cloud-native world. It provides continuous visibility into supply chain security risks. Anchore Enterprise takes a developer-friendly approach that minimizes friction by embedding automation into development toolchains to generate SBOMs and accurately identify vulnerabilities, malware, misconfigurations, and secrets for faster remediation.
Start by going to the Overview of Anchore Enterprise to learn more about the basic concepts and functions..
For information about deploying and operating an Anchore Enterprise instance:
For information on using Anchore Enterprise for security and compliance workflows:
Reference information:
Other:
Note: Many topics have nested sub-topics in the navigation pane to the left that become visible when you click a topic.
1 - Overview of Anchore Enterprise
What is Anchore Enterprise?
Anchore Enterprise is a software bill of materials (SBOM) - powered software supply chain management solution designed for a cloud-native world. It provides continuous visibility into supply chain security risks. Anchore Enterprise takes a developer-friendly approach that minimizes friction by embedding automation into development toolchains to generate SBOMs and accurately identify vulnerabilities, malware, misconfigurations, and secrets for faster remediation.
Gaining Visibility with SBOMs
Anchore Enterprise generates detailed SBOMs at each step in the development process, providing a complete inventory of the software components including the direct and transitive dependencies you use. Anchore Enterprise stores all SBOMs in a SBOM repository to enable ongoing monitoring of your software for new or zero-day vulnerabilities that can arise even post-deployment.
Anchore Enterprise also detects SBOM drift in the build process, issuing an alert for changes in SBOMs so they can be assessed for risk, malware, compromised software, and malicious activity.
Identifying Vulnerability and Security Issues
Starting with the SBOM, Anchore Enterprise uses multiple vulnerability feeds along with a precision vulnerability matching algorithm to pinpoint relevant vulnerabilities and minimize false positives. Anchore Enterprise also identifies malware, cryptominers, secrets, misconfigurations, and other security issues.
Automating through Policies
Anchore Enterprise includes a powerful policy engine that enables you to define guardrails and automate compliance with industry standards or internal rules. Using Anchore’s customizable policies, you can automatically identify the security issues that you care about and alert developers or create policy gates for critical issues.
1.1 - Anchore Enterprise Capabilities
SBOM Generation and Management
A software bill of materials (SBOM), is the foundational element that powers Anchore Enterprise’s secure management of the software supply chain. Anchore Enterprise automatically generates and analyzes comprehensive SBOMs at each step of the development lifecycle. SBOMS are stored in a repository to provide visibility into software components and dependencies as well as continuous monitoring for new vulnerabilities and risks throughout the development process and post-deployment.
See SBOM Generation and Management for more information.
About Anchore Enterprise SBOMs
An SBOM is a list of software components and relevant metadata that includes packages, code-snippets, licenses, configurations, and other elements of an application.
Anchore Enterprise generates high-fidelity SBOMs by scanning container images and source code repositories. Anchore’s native SBOM format includes a rich set of metadata that is a superset of data included in SBOM standards such as SPDX and CycloneDX. Using this additional level of metadata, Anchore can identify secrets, file permissions, misconfiguration, malware, insecure practices, and more.
Anchore Enterprise SBOMs identify:
- Open source dependencies including ecosystem type (OS, language, and other metadata)
- Nested dependencies in archive files (WAR files, JAR files and more)
- Package details such as name, version, creator, and license information
- Filesystem metadata such as the file name, size, permissions, creation time, modification time, and hashes
- Malware
- Secrets, keys, and credentials
Anchore Enterprise supported ecosystems
Anchore Enterprise supports the following packaging ecosystems when identifying SBOM content. The Operating System category captures Linux packaging ecosystems. The Binary detector will inspect content to identify binaries that were installed outside of packaging ecosystems.
- Operating System
- NPM
- Ruby Gems
- Python
- Java
- NuGet
- Golang
- Binaries
- Apache httpd
- BusyBox
- Consul
- Golang
- HAProxy
- Helm
- Java
- Memcached
- Nodejs
- PHP
- Perl
- PostgreSQL
- Python
- Redis
- Rust
- Traefik
How Anchore Enterprise Uses SBOMs
Anchore Enterprise generates detailed SBOMs at each stage of the software development lifecycle and stores them in a centralized repository to provide visibility into components and open source dependencies. These SBOMs are analyzed for vulnerabilities, malware, secrets (embedded passwords and credentials), misconfigurations, and other risks. Because SBOMs are stored in a repository, users can then continually monitor SBOMs for new vulnerabilities that arise, even post-deployment.
Detect SBOM Drift
Anchore Enterprise detects SBOM drift in the build process, identifying changes in SBOMs so they can be assessed for new risks or malicious activity. Users can set policy rules that alert them when components are added, changed, or removed so that they can quickly identify new vulnerabilities, developer errors, or malicious efforts to infiltrate builds. See SBOM Drift for more information.
Meet Compliance Requirements
Using the Anchore Enterprise UI or API, users can review SBOMs, generate reports, and export SBOMs as a JSON file. Anchore Enterprise can also export aggregated SBOMs for entire applications that can then be shared externally to meet customer and federal compliance requirements.
Customized Policy Rules
Anchore Enterprise’s high-fidelity SBOMs provide users with a rich set of metadata that can be used in customized policies.
Reduce False Positives
The extensive information provided in SBOMs generated by Anchore Enterprise allows for more accurate vulnerability matching for higher accuracy and reduced false positives.
Vulnerability and Security Scanning
Vulnerability and security scanning is an essential part of any vulnerability management strategy. Anchore Enterprise enables you to scan for vulnerabilities and security risks at any stage of your software development process, including source code repositories, CI/CD pipelines, container registries, and container runtime environments. By scanning at each stage in the process, you will find vulnerabilities and other security risks earlier and avoid delaying software delivery.
Continuous Scanning and Analysis
Anchore Enterprise provides continuous and automated scanning of an application’s code base, including related artifacts such as containers and code repositories. Anchore Enterprise starts the scanning process by generating and storing a high-fidelity SBOM that identifies all of the open source and proprietary components and their direct and transitive dependencies. Anchore uses this detailed SBOM to accurately identify vulnerabilities and security risks.
Identifying Zero-Day Vulnerabilities
When a zero-day vulnerability arises, Anchore Enterprise can instantly identify which components and applications are impacted by simply re-analyzing your stored SBOMs. You don’t need to re-scan applications or components.
Multiple Vulnerability Feeds
Anchore Enterprise uses a broad set of vulnerability feed sources, including the National Vulnerability Database, GitHub Security Advisories, feeds for popular Linux distros and packages, and an Anchore-curated dataset for suppression of known false-positive vulnerability matches. See Feeds Overview for a full list of feed sources.
Precision Vulnerability Matching
Anchore Enterprise applies a best-in-class precision matching algorithm to select vulnerability data from the most accurate feed source. For example, when Anchore’s detailed SBOM data identifies that there is a specific Linux distro, such as RHEL, Anchore Enterprise will automatically use that vendor’s feed source instead of reporting every Linux vulnerability. Anchore’s precision vulnerability matching algorithm reduces false positives and false negatives, saving developer time. See the Managing False Positives section within this topic for additional ways that Anchore Enterprise reduces false positives.
Focusing solely on identifying vulnerability and security issues without remediation is not good enough for today’s modern DevSecOps teams. Anchore Enterprise combines the power of a rich set of SBOM metadata, reporting, and policy management capabilities to enable customers to remediate issues with the flexibility and granularity needed to mitigate disruption or slow down software production.
Managing False Positives
Anchore Enterprise provides a number of innovative capabilities to help reduce the number of false positives and optimize the signal-to-noise ratio. It starts with accurate component identification through Anchore’s high-fidelity SBOMs and a precision vulnerability matching algorithm for fewer false positives. In addition, allowlists and temporary allowlists provide for exceptions, reducing ongoing alerts. Lastly, Anchore Enterprise enables users to correct the false positives to avoid being raised in subsequent scans. “Corrections” help increase results in accuracy over time and lower signal-to-noise ratio.
Flexible Policy Enforcement
Anchore Enterprise enables users to define automated rules that indicate which vulnerabilities violate their organizations’ policies. For example, an organization may raise policy violations for vulnerabilities scored as Critical or High that have a fix available. These policy violations can generate alerts and notifications or be used to stop builds in the CI/CD pipeline or prevent code from moving to production. Policy enforcement can be applied at any stage in the development process, from the selection and usage of open source components through the build, staging, and deployment process. See Policy for more information.
Anchore Enterprise provides capabilities to automatically alert developers of issues through their existing tools, such as Jira or Slack. It also lets users define actionable remediation workflows with automated remediation recommendations.
Open Source Security, Dependencies, and Licenses
Anchore Enterprise gives users the ability to identify and track open source dependencies that are incorporated at any stage in the software lifecycle. Anchore Enterprise scans source code repositories, CI/CD pipelines, and container registries to generate SBOMs that include both direct and transitive dependencies and to identify exactly where those dependencies are found.
Anchore Enterprise also identifies the relevant open source licenses and enables users to ensure that the open source components used along with their dependencies are compliant with all license requirements. License policies are customizable and can be tailored to fit each organization’s open source requirements.
Compliance with Standards
Anchore Enterprise provides a flexible policy engine that enables you to identify and alert on the most important vulnerabilities and security issues, and to meet internal or external compliance requirements. You can leverage out-of-the-box policy packs for common compliance standards, or create custom policies for your organization’s needs. You can define rules against the most complete set of metadata and apply policies at the most granular level with different rules for different applications, teams, and pipelines.
Anchore offers out-of-the-box policy packs to help you comply with NIST and CIS standards that are foundational for such industry-specific standards as HIPAA and PCI DSS.
Flexible Policy Enforcement
Policies are flexible and provide both notifications and gates to prevent code from moving along the development pipeline or into production based on your criteria. You can define policy rules for image and file metadata, file contents, licenses, and vulnerability scoring. And you can define unique rules for each team, for each application, and for each pipeline.
Automated Rules
Anchore Enterprise enables users to define automated rules that indicate which vulnerabilities
violate their organization’s policies. For example, an organization may raise policy violations for vulnerabilities scored as Critical or High that have a fix available. These policy violations can generate alerts and notifications or be used to stop builds in the CI/CD pipeline or prevent code from moving to production. You can apply policy enforcement at any stage in the development process from the selection and usage of open source components through the build, staging, and deployment process.
Anchore Enterprise Policy Packs
Anchore Enterprise provides the following out-of-the-box policy bundles that automate checks for common compliance programs, standards, and laws including CIS, NIST, FedRAMP, CISA vulnerabilities, , and more. Policy Packs comprise bundled policies and are flexible so that you can modify them to meet your organization’s requirements.
FedRAMP
The FedRAMP Policy validates whether container images scanned by Anchore Enterprise are compliant with the FedRAMP Vulnerability Scanning Requirements and also validates them against FedRAMP controls specified in NIST 800-53 Rev 5 and NIST 800-190.
DISA Image Creation and Deployment Guide
The DISA Image Creation and Deployment Guide Policy provides security and compliance checks that align with specific NIST 800-53 and NIST 800-190 security controls and requirements as described in the Department of Defense (DoD) Container Image Creation and Deployment Guide.
DoD Iron Bank
The DoD Iron Bank Policy validates images against DoD security and compliance requirements in alignment with U.S. Air Force security standards at Platform One and Iron Bank.
CIS
The CIS Policy validates a subset of security and compliance checks against container image best practices and NIST 800-53 and NIST 800-190 security controls and requirements. To expand CIS security controls, you can customize the policies in accordance with CIS Benchmarks.
NIST
The NIST policy validates content against NIST 800-53, NIST 800-190, and NIST 800-218.
CISA KEV Vulnerabilities
The CISA Vulnerabilities Policy validates images against the CISA Known Exploited Vulnerabilities Catalog that is maintained by CISA and the U.S. Department of Homeland Security.
SSDF Policy Pack
The NIST 800-218, or SSDF, policy pack provides evidence against container images scanned by Anchore Enterprise. This policy pack is meant to be used during evidence collection during a NIST 800-218 compliance effort, not as a policy enforcement mechanism.
1.2 - Anchore Enterprise Architecture
Anchore Enterprise is a distributed application that runs on supported container runtime platforms. The product is deployed as a series of containers that provide services whose functions are made available through APIs. These APIs can be consumed directly via included clients such as the AnchoreCTL and GUI or via out-of-the-box integrations for use with container registries, Kubernetes, and CI/CD tooling. Alternatively, users can interact directly with the APIs for custom integrations.
Services
The following sections describe the services within Anchore Enterprise.
APIs
Enterprise Public API
The Enterprise API is the primary RESTful API for Anchore Enterprise and is the one used by AnchoreCTL, the GUI and integrations. This API is used to upload data such as a software bill of materials (SBOM) and container images, execute functions and retrieve information (SBOM data, vulnerabilities and the results of policy evaluations). The API also exposes the user and account management functions. See Using the Anchore API for more information.
Stateful Services
Vulnerability Feed Service
The Anchore Enterprise Feed Service downloads vulnerability data from public sources (OS vendors, NVD, and others), normalizes it in a consistent format, and stores it in a local database. This is the only service that requires internet access and so enables air-gapping of all services outlined below. Data sources are defined by individual drivers that can be enabled or disabled by the user with a download frequency also defined by the user. This data is then used as part of the policy engine when performing vulnerability scanning and can also be queried directly through the Enterprise API. See Anchore Enterprise Feeds for more information.
Policy Engine
The policy engine is responsible for loading an SBOM and associated content and then evaluating it against a set of policy rules. This resulting policy evaluation is then passed to the Catalog service. The policies are stored as a series of JSON documents that can be uploaded and downloaded via the Enterprise API or edited via the GUI.
Catalog
The catalog is the primary state manager of the system and provides data access to system services from the backend database service (PostgreSQL).
SimpleQueue
The SimpleQueue is another PostgreSQL-backed queue service that the other components use for task execution, notifications, and other asynchronous operations.
Workers
Analyzers
An Analyzer is the component that generates an SBOM from an artifact or source repo (which may be passed through the API or pulled from a registry), performs the vulnerability and policy analysis, and stores the SBOM and the results of the analysis in the organization’s Anchore Enterprise repository. Alternatively the AnchoreCTL client can be used to locally scan and generate the SBOM and then pass the SBOM to the analyzers via the API. Each Analyzer can process one container image or source repo at a time. You can increase the number of Analyzers (within the limits of your contract) to increase the throughput for the system in order to process multiple artifacts concurrently.
Clients
AnchoreCTL
AnchoreCTL is a Go-based command line client for Anchore Enterprise. It can be used to send commands to the backend API as part of manual or automated operations. It can also be used to generate SBOM content that is local to the machine it is run on.
AnchoreCTL is the recommended client for developing custom integrations with CI/CD systems or other situations where local processing of content needs to be performed before being passed to the Enterprise API.
Anchore Enterprise GUI
The Anchore Enterprise GUI is a front end to the API services and simplifies many of the processes associated with creating policies, viewing SBOMs, creating and running reports, and configuring the overall system (notifications, users, registry credentials, and more).
Integrations
Kubernetes Admission Controller
The Kubernetes Admission Controller is a plugin that can be used to intercept a container image as it is about to be deployed to Kubernetes. The image is passed to Anchore Enterprise which analyzes it to determine if it meets the organization’s policy rules. The policy evaluation result can then allow, warn, or block the deployment.
Kubernetes and ECS Runtime Inventory
anchore-k8s-invetory and anchore-ecs-inventory are agents that creates an ongoing inventory of the images that are running in a Kubernetes or ECS cluster. The agentes run inside the runtime environment (under a service account) and connects to the local runtime API. The agents poll the API on an interval to retrieve a list of container images that are currently in use.
Multi-Tenancy
Accounts
Accounts in Anchore Enterprise are a boundary that separates data, policies, notifications, and users into a distinct domain. An account can be mapped to a team, project, or application that needs its own set of policies applied to a specific set of content. Users may be granted access to multiple accounts.
Users
Users are local to an account and can have roles as defined by RBAC. Usernames must be unique across the entire deployment to enable API-based authentication requests. Certain users can be configured such that they have the ability to switch context between accounts, akin to a super user account.
1.3 - Concepts
How does Anchore Enterprise work?
Anchore takes a data-driven approach to analysis and policy enforcement. The system has the following discrete phases for each image analyzed:
- Fetch the image content and extract it, but never execute it.
- Analyze the image by running a set of Anchore analyzers over the image content to extract and classify as much metadata as possible.
- Save the resulting analysis in the database for future use and audit.
- Evaluate policies against the analysis result, including vulnerability matches on the artifacts discovered in the image.
- Update to the latest external data used for policy evaluation and vulnerability matches (feed sync), and automatically update image analysis results against any new data found upstream.
- Notify users of changes to policy evaluations and vulnerability matches.
Repeat step 5 and 6 on intervals to ensure you have the latest external data and updated image evaluations.

The primary interface is a RESTful API that provides mechanisms to request analysis, policy evaluation, and monitoring of images in registries as well as query for image contents and analysis results. Anchore Enterprise also provides a command-line interface (CLI), and its own container.
The following modes provide different ways to use Anchore within the API:
- Interactive Mode - Use the APIs to explicitly request an image analysis, or get a policy evaluation and content reports. The system only performs operations when specifically requested by a user.
- Watch Mode - Use the APIs to configure Anchore Enterprise to poll specific registries and repositories/tags to watch for new images, and then automatically pull and evaluate them. The API sends notifications when a state changes for a tag’s vulnerability or policy evaluation.
Anchore can be easily integrated into most environments and processes using these two modes of operation.
Next Steps
Now let’s get familiar with Images in Anchore.
1.3.1 - Analyzing Images
Once an image is submitted to Anchore Enterprise for analysis, Anchore Enterprise will attempt to retrieve metadata about the image from the Docker registry and, if successful, will download the image and queue the image for analysis.
Anchore Enterprise can run one or more analyzer services to scale out processing of images. The next available analyzer worker will process the image.

During analysis, every package, software library, and file are inspected, and this data is stored in the Anchore database.
Anchore Enterprise includes a number of analyzer modules that extract data from the image including:
- Image metadata
- Image layers
- Operating System Package Data (RPM, DEB, APKG)
- File Data
- Ruby Gems
- Node.JS NPMs
- Java Archives
- Python Packages
- .NET NuGet Packages
- File content
Once a tag has been added to Anchore Enterprise, the repository will be monitored for updates to that tag. See Image and Tag Watchers for more information about images and tags.
Any updated images will be downloaded and analyzed.
Next Steps
Now let’s get familiar with the Image Analysis Process.
1.3.1.1 - Base and Parent Images
A Docker or OCI image is composed of layers. Some of the layers are created during a build process such as following instructions in a Dockerfile. But many of the layers will come from previously built images. These images likely come from a container team at your organization, or maybe build directly on images from a Linux distribution vendor. In some cases this chain could be many images deep as various teams add standard software or configuration.
Docker uses the FROM clause to denote an image to use as a basis for building a new image. The image provided in this clause is known by Docker as the “Parent Image”, but is commonly referred to as the “Base Image”. This chain of images built from other images using the FROM clause is known as an Image’s ancestry.
Note Docker defines “Base Image” as an image with a FROM SCRATCH clause. Anchore does NOT follow this definition, instead following the more common usage where “Base Image” refers to the image that a given image was built from.
The following is an example of an image with multiple ancestors
A base distro image, for example debian:10
FROM scratch
...
A framework container image from that debian image, for example a node.js image let’s call mynode:latest
FROM debian:10

# Install nodejs
The application image itself built from the framework container, let’s call it myapp:v1
FROM mynode:latest
COPY ./app /
...
In this case, the parent image of myapp:v1 is mynode:latest, while the parent of mynode:latest is debian:10.
Anchore automatically calculates an image’s ancestry as images are scanned. This works by comparing the layer digests of each image to calculate the entire chain of images that produced a given image. The entire ancestry can be retrieved for an image through the GET /v2/images/{image_digest}/ancestors API. See the API docs for more information on the specifics
Some APIs in Anchore accept a base_digest parameter that is used to provide comparison data between two images. These APIs can be used in conjunction with the ancestry API to perform comparisons to the base image so that application developers can focus on results in their direct control.
Some places in Anchore must automatically calculate the comparison image, in these cases the closest ancestor, (the one with the most number of common layers) will be used.
Comparing an Image with its Base or Parent
Anchore Enterprise provides a mechanism to compare the policy checks and security vulnerabilities of an image with those of a base image. This allows clients to
- filter out results that are inherited from a base image and focus on the results relevant to the application image
- reverse the focus and examine the base image for policy check violations and vulnerabilities which could be a deciding factor in choosing the base image for the application
To read more about the base comparison features, jump to
1.3.1.1.1 - Compare Base Image Policy Checks
This feature provides a mechanism to compare the policy checks for an image with those of a base image. You can read more about base images and how to
find them here. Base comparison uses the same policy and tag to evaluate both images to
ensure a fair comparison. The API yields a response similar to the policy checks API with an additional element within each triggered gate check to
indicate whether the result is inherited from the base image.
Usage
This functionality is currently available via the Enterprise UI and API.
API
Refer to API Access section for the API specification. The policy check API (GET /v2/images/{imageDigest}/check) has
an optional base_digest query parameter that can be used to specify an image to compare policy findings to. When this query parameter is provided
each of the finding’s inherited_from_base field will be filled in with true or false to denote if the finding is present in the provided image.
If no image is provided than the inherited_from_base field will be null to indicate no comparison was performed.
Example request using curl to retrieve policy check for an image digest sha256:xyz and tag p/q:r and compare the results to a base image digest sha256:abc
curl -X GET -u {username:password} "http://{servername:port}/v2/images/sha256:xyz/check?tag=p/q:r&base_digest=sha256:abc"
Example output:
{
    "image_digest": "sha256:xyz",
    "evaluated_tag": "p/q:r",
    "evaluations": [
        {
            "comparison_image_digest": "sha256:abc",
            "details": {
                "findings": [
                    {
                        "trigger_id": "41cb7cdf04850e33a11f80c42bf660b3",
                        "gate": "dockerfile",
                        "trigger": "instruction",
                        "message": "Dockerfile directive 'HEALTHCHECK' not found, matching condition 'not_exists' check",
                        "action": "warn",
                        "policy_id": "48e6f7d6-1765-11e8-b5f9-8b6f228548b6",
                        "recommendation": "",
                        "rule_id": "312d9e41-1c05-4e2f-ad89-b7d34b0855bb",
                        "allowlisted": false,
                        "allowlist_match": null,
                        "inherited_from_base": true
                    },
                    {
                        "trigger_id": "CVE-2019-5435+curl",
                        "gate": "vulnerabilities",
                        "trigger": "package",
                        "message": "MEDIUM Vulnerability found in os package type (APKG) - curl (CVE-2019-5435 - http://cve.mitre.org/cgi-bin/cvename.cgi?name=CVE-2019-5435)",
                        "action": "warn",
                        "policy_id": "48e6f7d6-1765-11e8-b5f9-8b6f228548b6",
                        "recommendation": "",
                        "rule_id": "6b5c14e7-a6f7-48cc-99d2-959273a2c6fa",
                        "allowlisted": false,
                        "allowlist_match": null,
                        "inherited_from_base": false
                    }
                ]
                ...
            }
            ...
        }
        ...
    ]
}
Dockerfile directive 'HEALTHCHECK' not found, matching condition 'not_exists' check is triggered by both images and hence inherited_from_base
is marked trueMEDIUM Vulnerability found in os package type (APKG) - curl (CVE-2019-5435 - http://cve.mitre.org/cgi-bin/cvename.cgi?name=CVE-2019-5435) is not
triggered by the base image and therefore the value of inherited_from_base is false
1.3.1.1.2 - Compare Base Image Security Vulnerabilities
This feature provides a mechanism to compare the security vulnerabilities detected in an image with those of a base image. You can read more about base
images and how to find them here. The API yields a response similar to vulnerabilities API with an
additional element within each result to indicate whether the result is inherited from the base image.
Usage
This functionality is currently available via the Enterprise UI and API. Watch this space as we add base comparison support in other tools.
API
Refer to API Access section for the API specification. The vulnerabilities API GET /v2/images/{image_digest}/vuln/{vtype}
has a base_digest query parameter that can be used to specify an image to compare vulnerability findings to. When this query parameter is provided
an additional inherited_from_base field is provided for each vulnerability.
Example request using curl to retrieve security vulnerabilities for an image digest sha:xyz and compare the results to a base image digest sha256:abc
curl -X GET -u {username:password} "http://{servername:port}/v2/images/sha256:xyz/vuln/all?base_digest=sha256:abc"
Example output:
{
  "base_digest": "sha256:abc",
  "image_digest": "sha256:xyz",
  "vulnerability_type": "all",
  "vulnerabilities": [
    {
      "feed": "vulnerabilities",
      "feed_group": "alpine:3.12",
      "fix": "7.62.0-r0",
      "inherited_from_base": true,
      "nvd_data": [
        {
          "cvss_v2": {
            "base_score": 6.4,
            "exploitability_score": 10.0,
            "impact_score": 4.9
          },
          "cvss_v3": {
            "base_score": 9.1,
            "exploitability_score": 3.9,
            "impact_score": 5.2
          },
          "id": "CVE-2018-16842"
        }
      ],
      "package": "libcurl-7.61.1-r3",
      "package_cpe": "None",
      "package_cpe23": "None",
      "package_name": "libcurl",
      "package_path": "pkgdb",
      "package_type": "APKG",
      "package_version": "7.61.1-r3",
      "severity": "Medium",
      "url": "http://cve.mitre.org/cgi-bin/cvename.cgi?name=CVE-2018-16842",
      "vendor_data": [],
      "vuln": "CVE-2018-16842"
    },
    {
      "feed": "vulnerabilities",
      "feed_group": "alpine:3.12",
      "fix": "2.4.46-r0",
      "inherited_from_base": false,
      "nvd_data": [
        {
          "cvss_v2": {
            "base_score": 5.0,
            "exploitability_score": 10.0,
            "impact_score": 2.9
          },
          "cvss_v3": {
            "base_score": 7.5,
            "exploitability_score": 3.9,
            "impact_score": 3.6
          },
          "id": "CVE-2020-9490"
        }
      ],
      "package": "apache2-2.4.43-r0",
      "package_cpe": "None",
      "package_cpe23": "None",
      "package_name": "apache2",
      "package_path": "pkgdb",
      "package_type": "APKG",
      "package_version": "2.4.43-r0",
      "severity": "Medium",
      "url": "http://cve.mitre.org/cgi-bin/cvename.cgi?name=CVE-2020-9490",
      "vendor_data": [],
      "vuln": "CVE-2020-9490"
    }
  ]
}
Note that inherited_from_base is a new element in the API response added to support base comparison. The assigned boolean value indicates whether the
exact vulnerability is present in the base image. In the above example
- CVE-2018-16842 affects libcurl-7.61.1-r3 package in both images, hence
inherited_from_base is marked true - CVE-2019-5482 affects apache2-2.4.43-r0 package does not affect the base image and therefore
inherited_from_base is set to false
1.3.1.2 - Image Analysis Process
There are two types of image analysis:
- Centralized Analysis
- Distributed Analysis
Image analysis is performed as a distinct, asynchronous, and scheduled
task driven by queues that analyzer workers periodically poll.
Image analysis_status states:
stateDiagram
    [*] --> not_analyzed: analysis queued
    not_analyzed --> analyzing: analyzer starts processing
    analyzing --> analyzed: analysis completed successfully
    analyzing --> analysis_failed: analysis fails
    analyzing --> not_analyzed: re-queue by timeout or analyzer shutdown
    analysis_failed --> not_analyzed: re-queued by user request
    analyzed --> not_analyzed: re-queued for re-processing by user request
Centralized Analysis
The analysis process is composed of several steps and utilizes several
system components. The basic flow of that task as shown in the following example:
Centralized analysis high level summary:
sequenceDiagram
    participant A as AnchoreCTL
    participant R as Registry
    participant E as Anchore Deployment
    A->>E: Request Image Analysis
    E->>R: Get Image content
    R-->>E: Image Content
    E->>E: Analyze Image Content (Generate SBOM and secret scans etc) and store results
    E->>E: Scan sbom for vulns and evaluate compliance
The analyzers operate in a task loop for analysis tasks as shown below:

Adding more detail, the API call trace between services looks similar to the following example flow:

Distributed Analysis
In distributed analysis, the analysis of image content takes place outside the Anchore deployment and the result is imported
into the deployment. The image has the same state machine transitions, but the ‘analyzing’ processing of an imported analysis
is the processing of the import data (vuln scanning, policy checks, etc) to prepare the data for internal use, but does not download or touch any image content.
High level example with AnchoreCTL:
sequenceDiagram
    participant A as AnchoreCTL
    participant R as Registry/Docker Daemon
    participant E as Anchore Deployment
    A->>R: Get Image content
    R-->>A: Image Content
    A->>A: Analyze Image Content (Generate SBOM and secret scans etc)
    A->>E: Import SBOM, secret search, fs metadata
    E->>E: Scan sbom for vulns and evaluate compliance
Next Steps
Now let’s get familiar with Watching Images and Tags with Anchore.
1.3.1.2.1 - Malware Scanning
Overview
Anchore Enterprise now supports the use of the open-source ClamAV malware scanner to detect malicious code embedded in container images.
This scan occurs only at analysis time when the image content itself is available, and the scan results are available via the API as well as for consumption
in new policy gates to allow gating of image with malware findings.
Signature DB Updates
Each analyzer service will run a malware signature update before analyzing each image. This does add some latency to the overall analysis time but ensures the signatures
are as up-to-date as possible for each image analyzed. The update behavior can be disabled if you prefer to manage the freshness of the db via another route, such as a shared filesystem
mounted to all analyzer nodes that is updated on a schedule. See the configuration section for details on disabling the db update.
The status of the db update is present in each scan output for each image.
Scan Results
The malware content type is a list of scan results. Each result is the run of a malware scanner, by default clamav.
The list of files found to contain malware signature matches is in the findings property of each scan result. An empty array value indicates no matches found.
The metadata property provides generic metadata specific to the scanner. For the ClamAV implementation, this includes the version data about the signature db used and
if the db update was enabled during the scan. If the db update is disabled, then the db_version property of the metadata will not have values since the only way to get
the version metadata is during a db update.
{
    "content": [
        {
            "findings": [
                {
                    "path": "/somebadfile",
                    "signature": "Unix.Trojan.MSShellcode-40"
                },
                {
                    "path": "/somedir/somepath/otherbadfile",
                    "signature": "Unix.Trojan.MSShellcode-40"
                }
            ],
            "metadata": {
                "db_update_enabled": true,
                "db_version": {
                    "bytecode": "331",
                    "daily": "25890",
                    "main": "59"
                }
            },
            "scanner": "clamav"
        }
    ],
    "content_type": "malware",
    "imageDigest": "sha256:0eb874fcad5414762a2ca5b2496db5291aad7d3b737700d05e45af43bad3ce4d"
}
Policy Rules
A policy gate called malware is available with two new triggers:
scans trigger will fire for each file and signature combination found in the image so that you can fail an evaluation of an image if malware was detected during the analysis scansscan_not_run trigger will fire if there are no malware scans (even empty) available for the image
See policy checks for more details
1.3.1.2.2 - Content Hints
Anchore Enterprise includes the ability to read a user-supplied ‘hints’ file to allow users to add software artifacts to Anchore’s
analysis report. The hints file, if present, contains records that describe a software package’s characteristics explicitly,
and are then added to the software bill of materials (SBOM). For example, if the owner of a CI/CD container build process
knows that there are some
software packages installed explicitly in a container image, but Anchore’s regular analyzers fail to identify them, this mechanism
can be used to include that information in the image’s SBOM, exactly as if the packages were discovered normally.
Hints cannot be used to modify the findings of Anchore’s analyzer beyond adding new packages to the report. If a user specifies
a package in the hints file that is found by Anchore’s image analyzers, the hint is ignored and a warning message is logged
to notify the user of the conflict.
Configuration
See Configuring Content Hints
Once enabled, the analyzer services will look for a file with a specific name, location and format located within the container image - /anchore_hints.json.
The format of the file is illustrated using some examples, below.
OS Package Records
OS Packages are those that will represent packages installed using OS / Distro style package managers. Currently supported package types are rpm, dpkg, apkg
for RedHat, Debian, and Alpine flavored package managers respectively. Note that, for OS Packages, the name of the package is unique per SBOM, meaning
that only one package named ‘somepackage’ can exist in an image’s SBOM, and specifying a name in the hints file that conflicts with one with the same
name discovered by the Anchore analyzers will result in the record from the hints file taking precedence (override).
- Minimum required values for a package record in anchore_hints.json
	{
	    "name": "musl",
	    "version": "1.1.20-r8",
	    "type": "apkg"
	}
- Complete record demonstrating all of the available characteristics of a software package that can be specified
	{
	    "name": "musl",
	    "version": "1.1.20",
	    "release": "r8",
	    "origin": "Timo Ter\u00e4s <[email protected]>",
	    "license": "MIT",
	    "size": "61440",
	    "source": "musl",
	    "files": ["/lib/ld-musl-x86_64.so.1", "/lib/libc.musl-x86_64.so.1", "/lib"],
	    "type": "apkg"
	}
Non-OS/Language Package Records
Non-OS / language package records are similar in form to the OS package records, but with some extra/different characteristics being supplied, namely
the location field. Since multiple non-os packages can be installed that have the same name, the location field is particularly important as it
is used to distinguish between package records that might otherwise be identical. Valid types for non-os packages are currently java, python, gem, npm, nuget, go, binary.
For the latest types that are available, see the anchorectl image content <someimage> output, which lists available types for any given deployment of Anchore Enterprise.
- Minimum required values for a package record in anchore_hints.json
	{
	    "name": "wicked",
	    "version": "0.6.1",
	    "type": "gem"
	}
- Complete record demonstrating all of the available characteristics of a software package that can be specified
	{
	    "name": "wicked",
	    "version": "0.6.1",
	    "location": "/app/gems/specifications/wicked-0.9.0.gemspec",
	    "origin": "schneems",
	    "license": "MIT",
	    "source": "http://github.com/schneems/wicked",
	    "files": ["README.md"],
	    "type": "gem"
	}
Putting it all together
Using the above examples, a complete anchore_hints.json file, when discovered by Anchore Enterprise located in /anchore_hints.json inside any container image, is provided here:
{
    "packages": [
	{
	    "name": "musl",
	    "version": "1.1.20-r8",
	    "type": "apkg"
	},
	{
	    "name": "wicked",
	    "version": "0.6.1",
	    "type": "gem"
	}
    ]
}
With such a hints file in an image based for example on alpine:latest, the resulting image content would report these two package/version records
as part of the SBOM for the analyzed image, when viewed using anchorectl image content <image> -t os and anchorectl image content <image> -t gem
to view the musl and wicked package records, respectively.
Note about using the hints file feature
The hints file feature is disabled by default, and is meant to be used in very specific circumstances where a trusted entity is entrusted with creating
and installing, or removing an anchore_hints.json file from all containers being built. It is not meant to be enabled when the container image builds
are not explicitly controlled, as the entity that is building container images could override any SBOM entry that Anchore would normally discover, which
affects the vulnerability/policy status of an image. For this reason, the feature is disabled by default and must be explicitly enabled in configuration
only if appropriate for your use case .
1.3.1.3 - Image and Tag Watchers
Overview
Anchore has the capability to monitor external Docker Registries for updates to tags as well as new tags. It also watches for updates to vulnerability databases and package metadata (the “Feeds”).
The process for monitoring updates to repositories, the addition of new tag names, is done on a duty cycle and performed by the Catalog component(s). The scheduling and tasks are driven by queues provided by the SimpleQueue service.
- Periodically, controlled by the cycle_timers configuration in the config.yaml of the catalog, a process is triggered to list all the Repository Subscription records in the system and for each record, add a task to a specific queue.
- Periodically, also controlled by the cycle_timers config, a process is triggered to pick up tasks off that queue and process repository scan tasks. Each task looks approximately like the following:

The output of this process is new tag_update subscription records, which are subsequently processed by the Tag Update handlers as described below. You can view the tag_update subscriptions using AnchoreCTL:
anchorectl subscription list -t tag_update
Tag Updates: New Images
To detect updates to tags, mapping of a new image digest to a tag name, Anchore periodically checks the registry and downloads the tag’s image manifest to compare the computed digests. This is done on a duty cycle for every tag_update subscription record. Therefore, the more subscribed tags exist in the system, the higher the load on the system to check for updates and detect changes. This processing, like repository update monitoring, is performed by the Catalog component(s).
The process, the duty-cycle of which is configured in the cycle_timers section of the catalog config.yaml is described below:

As new updates are discovered, they are automatically submitted to the analyzers, via the image analysis internal queue, for processing.
The overall process and interaction of these duty cycles works like:

Next Steps
Now let’s get familiar with Policy in Anchore.
1.3.1.4 - Analysis Archive
Anchore Enterprise is a data intensive system. Storage consumption grows with the number of images analyzed, which leaves the
following options for storage management:
- Over-provisioning storage significantly
- Increasing capacity over time, resulting in downtime (e.g. stop system, grow the db volume, restart)
- Manually deleting image analysis to free space as needed
In most cases, option 1 only works for a while, which then requires using 2 or 3. Managing storage provisioned for a
postgres DB is somewhat complex and may require significant data copies to new volumes to grow capacity over time.
To help mitigate the storage growth of the db itself, Anchore Enterprise already provides an object storage subsystem that
enables using external object stores like S3 to offload the unstructured data storage needs to systems that are
more growth tolerant and flexible. This lowers the db overhead but does not fundamentally address the issue of unbounded
growth in a busy system.
The Analysis Archive extends the object store even further by providing a system-managed way to move an image analysis
and all of its related data (policy evaluations, tags, annotations, etc) and moving it to a location outside of the main
set of images such that it consumes much less storage in the database when using an object store, perserves the last
state of the image, and supports moving it back into the main image set if it is needed in the future without requiring
that the image itself be reanalzyed–restoring from the archive does not require the actual docker image to exist at all.
To facilitate this, the system can be thought of as two sets of analysis with different capabilities and properties:

Working Set Images
The working set is the set of images in the ‘analyzed’ state in the system. These images are stored in the database,
optionally with some data in an external object store. Specifically:
- State = ‘analyzed’
- The set of images available from the /images api routes
- Available for policy evaluation, content queries, and vulnerability updates
Archive Set Images
The archive set of images are image analyses that reside almost entirely in the object store, which can be configured to
be a different location than the object store used for the working set, with minimal metadata in the anchore DB necessary
to track and restore the analysis back into the working set in the future. An archived image analysis preserves all the
annotations, tags, and metadata of the original analysis as well as all existing policy evaluation histories, but
are not updated with new vulnerabilities during feed syncs and are not available for new policy evaluations or content
queries without first being restored into the working set.
- Not listed in /images API routes
- Cannot have policy evaluations executed
- No vulnerability updates automatically (must be restored to working set first)
- Available from the /archives/images API routes
- Point-in-time snapshot of the analysis, policy evaluation, and vulnerability state of an image
- Independently configurable storage location (analysis_archive property in the services.catalog property of config.yaml)
- Small db storage consumption (if using external object store, only a few small records, bytes)
- Able to use different type of storage for cost effectiveness
- Can be restored to the working set at any time to restore full query and policy capabilities
- The archive object store is not used for any API operations other than the restore process
An image analysis, identified by the digest of the image, may exist in both sets at the same time, they are not mutually
exclusive, however the archive is not automatically updated and must be deleted an re-archived to capture updated state
from the working set image if desired.
Benefits of the Archive
Because archived image analyses are stored in a distinct object store and tracked with their own metadata in the db, the
images in that set will not impact the performance of working set image operations such as API operations, feed syncs, or
notification handling. This helps keep the system responsive and performant in cases where the set of images that you’re
interested in is much smaller than the set of images in the system, but you don’t want to delete the analysis because it
has value for audit or historical reasons.
- Leverage cheaper and more scalable cloud-based storage solutions (e.g. S3 IA class)
- Keep the working set small to manage capacity and api performance
- Ensure the working set is images you actively need to monitor without losing old data by sending it to the archive
Automatic Archiving
To help facilitate data management automatically, Anchore supports rules to define which data to archive and when
based on a few qualities of the image analysis itself. These rules are evaluated periodically by the system.
Anchore supports both account-scoped rules, editable by users in the account, and global system rules, editable only by
the system admin account users. All users can view system global rules such that they can understand what will affect
their images but they cannot update or delete the rules.
The process of automatic rule evaluation:
The catalog component periodically (daily by default, but configurable) will run through each rule in the system and
identify image digests should be archived according to either account-local rules or system global rules.
Each matching image analysis is added to the archive.
Each successfully added analysis is deleted from the working set.
For each digest migrated, a system event log entry is created, indicating that the image digest was moved to the
archive.
Archive Rules
The rules that match images are provide 3 selectors:
- Analysis timestamp - the age of the analysis itself, as expressed in days
- Source metadata (registry, repo, tag) - the values of the registry, repo, and tag values
- Tag history depth – the number of images mapped to a tag ordered by detected_at timestamp (the time at which the
system observed the mapping of a tag to a specific image manifest digest)
Rule scope:
- global - these rules will be evaluated against all images and all tags in the system, regardless of the owning account.
(system_global = true)
- account - these rules are only evaluated against the images and tags of the account which owns the rule. (system_global = false)
Example Rule:
{
    "analysis_age_days": 10,
    "created_at": "2019-03-30T22:23:50Z",
    "last_updated": "2019-03-30T22:23:50Z",
    "rule_id": "67b5f8bfde31497a9a67424cf80edf24",
    "selector": {
        "registry": "*",
        "repository": "*",
        "tag": "*"
    },
    "system_global": true,
    "tag_versions_newer": 10,
    "transition": "archive",
    "exclude": {
        "expiration_days": -1,
        "selector": {
            "registry": "docker.io",
            "repository": "alpine",
            "tag": "latest"
        }
    },
    "max_images_per_account": 1000
}
- selector: a json object defining a set of filters on registry, repository, and tag that this rule will apply to.
- Each entry supports wildcards. e.g.
{"registry": "*", "repository": "library/*", "tag": "latest"}
- tag_versions_newer: the minimum number of tag->digest mappings with newer timestamps that must be preset for this rule to
match an image tag.
- analysis_age_days: the minimum age of the analysis to match, as indicated by the ‘analyzed_at’ timestamp on the image record.
- transition: the operation to perform, one of the following
- archive: works on the working set and transitions to archive, while deleting the source analysis upon successful
archive creation. Specifically: the analysis will “move” to the archive and no longer be in the working set.
- delete: works on the archive set and deletes the archived record on a match
- exclude: a json object defining a set of filters on registry, repository, and tag, that will exclude a subset of image(s)
from the selector defined above.
- expiration_days: This allows the exclusion filter to expire. When set to -1, the exclusion filter does not expire
- max_images_per_account: This setting may only be applied on a single “system_global” rule, and controls the maximum number of images
allows in the anchore deployment (that are not archived). If this number is exceeded, anchore will transition (according to the transition field value)
the oldest images exceeding this maximum count.
- last_seen_in_days: This allows images to be excluded from the archive, if there is a corresponding runtime inventory image, where last_seen_in_days is within the specified number of days.
- This field will exclude any images last seen in X number of days regardless of whether it’s in the exclude selector.
Rule conflicts and application:
For an image to be transitioned by a rule it must:
- Match at least 1 rule for each of its tag entries (either in working set if transition is archive or those in the
archive set, if a delete transition)
- All rule matches must be of the same scope, global and account rules cannot interact
Put another way, if any tag record for an image analysis is not defined to be transitioned, then the analysis record is
not transitioned.
Usage
Image analysis can be archived explicitly via the API (and CLI) as well as restored. Alternatively, the API and CLI can
manage the rules that control automatic transitions. For more information see the following:
Archiving an Image Analysis
See: Archiving an Image
Restoring an Image Analysis
See: Restoring an Image
Managing Archive Rules
See: Working with Archive Rules
1.3.2 - Policy
Once an image has been analyzed and its content has been discovered, categorized, and processed, the results can be evaluated against a user-defined set of checks to give a final pass/fail recommendation for an image. Anchore Enterprise policies are how users describe which checks to perform on what images and how the results should be interpreted.
A policy is made up from a set of rules that are used to perform an evaluation a container image. The rules can define checks against an image for things such as:
- security vulnerabilities
- package allowlists and denylists
- configuration file contents
- presence of credentials in image
- image manifest changes
- exposed ports
These checks are defined as Gates that contain Triggers that perform specific checks and emit match results and these define the things that the system can automatically evaluate and return a decision about.
For a full listing of gate, triggers, and their parameters see: Anchore Policy Checks
These policies can be applied globally or customized for specific images or categories of applications.
A policy evaluation can return one of two results:
PASSED indicating that image complies with your policy

FAILED indicating that the image is out of compliance with your policy.

Next Steps
Read more on Policies and Evaluation
1.3.2.1 - Policies and Evaluation
Introduction
Policies are the unit of policy definition and evaluation in Anchore Enterprise. A user may have multiple policies, but for a policy evaluation, the user must specify a policy to be evaluated or default to the policy currently marked ‘active’. See Policies Overview for more detail on manipulating and configuring policies.
Components of a Policy
A policy is a single JSON document, composed of several parts:
- Policies - The named sets of rules and actions.
- Allowlists - Named sets of rule exclusions to override a match in a policy rule.
- Mappings - Ordered rules that determine which policies and allowlists should be applied to a specific image at evaluation time.
- Allowlisted Images - Overrides for specific images to statically set the final result to a pass regardless of the policy evaluation result.
- Blocklisted Images - Overrides for specific images to statically set the final result to a fail regardless of the policy evaluation result.
Example JSON for an empty policy, showing the sections and top-level elements:
{
  "id": "default0",
  "version": "2",
  "name": "My Default policy",
  "comment": "My system's default policy",
  "allowlisted_images": [],
  "denylisted_images": [],
  "mappings": [],
  "allowlists": [],
  "rule_sets": []
}
Policies
A policy contains zero or more rule sets. The rule sets in a policy define the checks to make against an image and the actions to recommend if the checks find a match.
Example of a single rule set JSON object, one entry in the rule_set array of the larger policy document:
{
  "name": "DefaultPolicy",
  "version": "2",
  "comment": "Policy for basic checks",
  "id": "ba6daa06-da3b-46d3-9e22-f01f07b0489a",
  "rules": [
    {
      "action": "STOP",
      "gate": "vulnerabilities",
      "id": "80569900-d6b3-4391-b2a0-bf34cf6d813d",
      "params": [
        { "name": "package_type", "value": "all" },
        { "name": "severity_comparison", "value": ">=" },
        { "name": "severity", "value": "medium" }
      ],
      "trigger": "package"
    }
  ]
}
The above example defines a stop action to be produced for all package vulnerabilities found in an image that are severity medium or higher.
For information on how Rule Sets work and are evaluated, see: Rule Sets
Allowlists
An allowlist is a set of exclusion rules for trigger matches found during policy evaluation. An allowlist defines a specific gate and trigger_id (part of the output of a policy rule evaluation) that should have it’s action recommendation statically set to go. When a policy rule result is allowlisted, it is still present in the output of the policy evaluation, but it’s action is set to go and it is indicated that there was an allowlist match.
Allowlists are useful for things like:
- Ignoring CVE matches that are known to be false-positives
- Ignoring CVE matches on specific packages (perhaps if they are known to be custom patched)
Example of a simple allowlist as a JSON object from a policy:
{
  "id": "allowlist1",
  "name": "Simple Allowlist",
  "version": "2",
  "items": [
    { "id": "item1", "gate": "vulnerabilities", "trigger": "package", "trigger_id": "CVE-10000+libssl" },
    { "id": "item2", "gate": "vulnerabilities", "trigger": "package", "trigger_id": "CVE-10001+*" }
  ]
}
For more information, see Allowlists
Mappings
Mappings are named rules that define which rule sets and allowlists to evaluate for a given image. The list of mappings is evaluated in order, so the ordering of the list matters because the first rule that matches an input image will be used and all others ignored.
Example of a simple mapping rule set:
[
  {
    "name": "DockerHub",
    "registry": "docker.io",
    "repository": "library/postgres",
    "image": { "type": "tag", "value": "latest" },
    "rule_set_ids": [ "policy1", "policy2" ],
    "allowlist_ids": [ "allowlist1", "allowlist2" ]
  },
  {
    "name": "default",
    "registry": "*",
    "repository": "*",
    "image": { "type": "tag", "value": "*" },
    "rule_set_ids": [ "policy1" ],
    "allowlist_ids": [ "allowlist1" ]
  }
]
For more information about mappings see Mappings
Allowlisted Images
Allowlisted images are images, defined by registry, repository, and tag/digest/imageId, that will always result in a pass status for policy evaluation unless the image is also matched in the denylisted images section.
Example image allowlist section:
{
  "name": "AllowlistDebianStable",
  "registry": "docker.io",
  "repository": "library/debian",
  "image": { "type": "tag", "value": "stable" }
}
Denylisted Images
Denylisted images are images, defined by registry, repository, and tag/digest/imageId, that will always result in a policy policy evaluation status of fail. It is important to note that denylisting an image does not short-circuit the mapping evaluation or policy evaluations, so the full set of trigger matches will still be visible in the policy evaluation result.
Denylisted image matches override any allowlisted image matches (e.g. a tag matches a rule in both lists will always be blocklisted/fail).
Example image denylist section:
{
  "name": "BlAocklistDebianUnstable",
  "registry": "docker.io",
  "repository": "library/debian",
  "image": { "type": "tag", "value": "unstable" }
}
A complete policy example with all sections containing data:
{
  "id": "default0",
  "version": "2",
  "name": "My Default policy",
  "comment": "My system's default policy",
  "allowlisted_images": [
    {
      "name": "AllowlistDebianStable",
      "registry": "docker.io",
      "repository": "library/debian",
      "image": { "type": "tag", "value": "stable" }
    }
  ],
  "denylisted_images": [
    {
      "name": "DenylistDebianUnstable",
      "registry": "docker.io",
      "repository": "library/debian",
      "image": { "type": "tag", "value": "unstable" }
    }
  ],
  "mappings": [
    {
      "name": "DockerHub",
      "registry": "docker.io",
      "repository": "library/postgres",
      "image": { "type": "tag", "value": "latest" },
      "rule_set_ids": [ "policy1", "policy2" ],
      "allowlist_ids": [ "allowlist1", "allowlist2" ]
    },
    {
      "name": "default",
      "registry": "*",
      "repository": "*",
      "image": { "type": "tag", "value": "*" },
      "rule_set_ids": [ "policy1" ],
      "allowlist_ids": [ "allowlist1" ]
    }
  ],
  "allowlists": [
    {
      "id": "allowlist1",
      "name": "Simple Allowlist",
      "version": "2",
      "items": [
        { "id": "item1", "gate": "vulnerabilities", "trigger": "package", "trigger_id": "CVE-10000+libssl" },
        { "id": "item2", "gate": "vulnerabilities", "trigger": "package", "trigger_id": "CVE-10001+*" }
      ]
    },
    {
      "id": "allowlist2",
      "name": "Simple Allowlist",
      "version": "2",
      "items": [
        { "id": "item1", "gate": "vulnerabilities", "trigger": "package", "trigger_id": "CVE-1111+*" }
      ]
    }
  ],
  "rule_sets": [
    {
      "name": "DefaultPolicy",
      "version": "2",
      "comment": "Policy for basic checks",
      "id": "policy1",
      "rules": [
        {
          "action": "STOP",
          "gate": "vulnerabilities",
          "trigger": "package",
          "id": "rule1",
          "params": [
            { "name": "package_type", "value": "all" },
            { "name": "severity_comparison", "value": ">=" },
            { "name": "severity", "value": "medium" }
          ]
        }
      ]
    },
    {
      "name": "DBPolicy",
      "version": "1_0",
      "comment": "Policy for basic checks on a db",
      "id": "policy2",
      "rules": [
        {
          "action": "STOP",
          "gate": "vulnerabilities",
          "trigger": "package",
          "id": "rule1",
          "params": [
            { "name": "package_type", "value": "all" },
            { "name": "severity_comparison", "value": ">=" },
            { "name": "severity", "value": "low" }
          ]
        }
      ]
    }
  ]
}
Policy Evaluation
A policy evaluation results in a status of pass or fail and that result based on the evaluation:
- The mapping section to determine which policies and allowlists to select for evaluation against the given image and tag
- The output of the policies’ triggers and applied allowlists.
- Denylisted images section
- Allowlisted images section
A pass status means the image evaluated against the policy and only go or warn actions resulted from the policy evaluation and allowlisted evaluations, or the image was allowlisted. A fail status means the image evaluated against the policy and at least one stop action resulted from the policy evaluation and allowlist evaluation, or the image was denylisted.
The flow chart for policy evaluation:

Next Steps
Read more about the Rule Sets component of a policy.
1.3.2.2 - Rule Sets
Overview
A rule set is a named set of rules, represented as a JSON object within a Policy. A rule set is made up of rules that define a specific check to perform and a resulting action.
A Rule Set is made up of:
- ID: a unique id for the rule set within the policy
- Name: a human readable name to give the policy (may contain spaces etc)
- A list of rules to define what to evaluate and the action to recommend on any matches for the rule
A simple example of a rule_set JSON object (found within a larger policy object):
{
  "name": "DefaultPolicy",
  "version": "2",
  "comment": "Policy for basic checks",
  "id": "policy1",
  "rules": [
      {
        "action": "STOP",
        "gate": "vulnerabilities",
        "id": "rule1",
        "params": [
          { "name": "package_type", "value": "all" },
          { "name": "severity_comparison", "value": ">=" },
          { "name": "severity", "value": "medium" }
        ],
        "trigger": "package",
        "recommendation": "Upgrade the package",
      }
  ]
}
The above example defines a stop action to be produced for all package vulnerabilities found in an image that are severity medium or higher.
Policy evaluation is the execution of all defined triggers in the rule set against the image analysis result and feed data and results in a set of output trigger matches, each of which contains the defined action from the rule definition. The final recommendation value for the policy evaluation is called the final action, and is computed from the set of output matches: stop, go, or warn.

Policy Rules
Rules define the behavior of the policy at evaluation time. Each rule defines:
- Gate - example: dockerfile
- Trigger - example: exposed_ports
- Parameters - parameters specific to the gate/trigger to customize its match behavior
- Action - the action to emit if a trigger evaluation finds a match. One of stop, go, warn. The only semantics of these values are in the aggregation behavior for the policy result.
Gates
A Gate is a logical grouping of trigger definitions and provides a broader context for the execution of triggers against image analysis data. You can think of gates as the “things to be checked”, while the triggers provide the “which check to run” context. Gates do not have parameters themselves, but namespace the set of triggers to ensure there are no name conflicts.
Examples of gates:
- vulnerabilities
- packages
- npms
- files
- …
For a complete listing see: Anchore Policy Checks
Triggers
Triggers define a specific condition to check within the context of a gate, optionally with one or more input parameters. A trigger is logically a piece of code that executes with the image analysis content and feed data as inputs and performs a specific check. A trigger emits matches for each instance of the condition for which it checks in the image. Thus, a single gate/trigger policy rule may result in many matches in final policy result, often with different match specifics (e.g. package names, cves, or filenames…).
Trigger parameters are passed as name, value pairs in the rule JSON:
{
  "action": "WARN",
  "parameters": [
    {  "name": "param1", "value": "value1" },
    {  "name": "param2", "value": "value2" },
    {  "name": "paramN", "value": "valueN" }
  ],
  "gate": "vulnerabilities",
  "trigger": "packages",
}
For a complete listing of gates, triggers, and the parameters, see: Anchore Policy Checks
Policy Evaluation
- All rules in a selected rule_set are evaluated, no short-circuits
- Rules who’s triggers and parameters find a match in the image analysis data, will “fire” resulting in a record of the match and parameters. A trigger may fire many times during an evaluation (e.g. many cves found).
- Each firing of a trigger generates a trigger_id for that match
- Rules may be executed in any order, and are executed in isolation (e.g. conflicting rules are allowed, it’s up to the user to ensure that policies make sense)
A policy evaluation will always contain information about the policy and image that was evaluated as well as the Final Action. The evaluation can optionally include additional detail about the specific findings from each rule in the evaluated rule_set as well as suggested remediation steps.
Policy Evaluation Findings
When extra detail is requested as part of the policy evaluation, the following data is provided for each finding produced by the rules in the evaluated rule_set.
- trigger_id - An ID for the specific rule match that can be used to allowlist a finding
- gate - The name of the gate that generated this finding
- trigger - The name of the trigger within the Gate that generated this finding
- message - A human readable description of the finding
- action - One of go, warn, stop based on the action defined in the rule that generated this finding
- policy_id - The ID for the rule_set that this rule is a part of
- recommendation - An optional recommendation provided as part of the rule that generated this finding
- rule_id - The ID of the rule that generated this finding
- allowlisted - Indicates if this match was present in the applied allowlist
- allowlist_match - Only provided if allowlisted is true, contains a JSON object with details about a allowlist match (allowlist id, name and allowlist rule id)
- inherited_from_base - An optional field that indicates if this policy finding was present in a provided comparison image
Excerpt from a policy evaluation, showing just the policy evaluation output:
...json
"findings": [
  {
    "trigger_id": "CVE-2008-3134+imagemagick-6.q16",
    "gate": "package",
    "trigger": "vulnerabilities",
    "message": "MEDIUM Vulnerability found in os package type (dpkg) - imagemagick-6.q16 (CVE-2008-3134 - https://security-tracker.debian.org/tracker/CVE-2008-3134)",
    "action": "go",
    "policy_id": "48e6f7d6-1765-11e8-b5f9-8b6f228548b6",
    "recommendation": "Upgrade the package",
    "rule_id": "rule1",
    "allowlisted": false,
    "allowlist_match": null,
    "inherited_from_base": false
  },
  {
    "trigger_id": "CVE-2008-3134+libmagickwand-6.q16-2",
    "gate": "package",
    "trigger": "vulnerabilities",
    "message": "MEDIUM Vulnerability found in os package type (dpkg) - libmagickwand-6.q16-2 (CVE-2008-3134 - https://security-tracker.debian.org/tracker/CVE-2008-3134)",
    "action": "go",
    "policy_id": "48e6f7d6-1765-11e8-b5f9-8b6f228548b6",
    "recommendation": "Upgrade the package",
    "rule_id": "rule1",
    "allowlisted": false,
    "allowlist_match": null,
    "inherited_from_base": false
  }
]
Final Action
The final action of a policy evaluation is the policy’s recommendation based on the aggregation of all trigger evaluations defined in the policy and the resulting matches emitted.
The final action of a policy evaluation will be:
- stop - if there are any triggers that match with this action, the policy evaluation will result in an overall stop.
- warn - if there are any triggers that match with this action, and no triggers that match with stop, then the policy evaluation will result in warn.
- go - if there are no triggers that match with either stop or warn, then the policy evaluation is result is a go. go actions have no impact on the evaluation result, but are useful for recording the results of specific checks on an image in the audit trail of policy evaluations over time
The policy findings are one part of the broader policy evaluation which includes things like image allowlists and denylists and makes a final policy evaluation status determination based on the combination of several component executions. See policies for more information on that process.
Next Steps
Read more about the Mappings component of a policy.
1.3.3 - Remediation
After Anchore analyzes images, discovers their contents and matches vulnerabilities, it can suggest possible actions that can be taken.
These actions range from adding a Healthcheck to your Dockerfile to upgrading a package version.
Since the solutions for resolving vulnerabilities can vary and may require several different forms of remediation and intervention, Anchore provides the capability to plan out your course of action.
Action Plans
Action plans group up the resolutions that may be taken to address the vulnerabilities or issues found in a particular image and provide a way for you to take action.
Currently, we support one type of Action Plan, which can be used to notify an existing endpoint configuration of those resolutions. This is a great way to facilitate communication across teams when vulnerabilities need to be addressed.
Here’s an example JSON that describes an Action Plan for notifications:
{
    "type": "notification",
    "image_tag": "docker.io/alpine:latest",
    "image_digest": "sha256:c0e9560cda118f9ec63ddefb4a173a2b2a0347082d7dff7dc14272e7841a5b5a",
    "bundle_id": "anchore_default_bundle",
    "resolutions": [
        {
            "trigger_ids": ["CVE-2020-11-09-fake"],
            "content": "This is a Resolution for the CVE",
        }
    ],
    "subject": "Actions required for image: alpine:latest",
    "message": "These are some issues Anchore found in alpine:latest, and how to resolve them",
    "endpoint": "smtp",
    "configuration_id": "cda118f9ec63ddefb4a173a2b2a03"
}
Parts:
- type: The type of action plan being submitted (currently, only notification supported)
- image_tag: The full image tag of the image requiring action
- image_tag: The image digest of the image requiring action
- bundle_id: the id of the policy bundle that discovered the vulnerabilities
- resolutions: A list composed of the remediations and corresponding trigger IDs
- subject: The subject line for the action plan notification
- message: The body of the message for the action plan notification
- endpoint: The type of notification endpoint the action plan will be sent to
- configuration_id: The uuid of the notification configuration for the above endpoint
1.4 - Anchore Enterprise Feeds
Overview
Anchore Enterprise Feeds is an On-Premises service that supplies operating system and application eco-system vulnerability
data for consumption by the Anchore Policy Engine. The Policy Engine uses this data for finding vulnerabilities
and evaluating policies. For more information about configuration of the Feeds Service see Feeds Overview.
Anchore maintains a public index of Grype databases built and published daily at
https://toolbox-data.anchore.io/grype/databases/listing.json for use by all. However, this public database does not include all Anchore Enterprise sources. The Anchore Enterprise feed capability offers the following benefits over the publicly available pre-built grype databases:
- Access to Enterprise-only vulnerability data, such as MSRC and the Anchore Exclusions Feed.
- Provides a configuration option for running Anchore Enterprise in an Air-Gapped mode (see Air Gapped Configuration for more information).
- Granular control and configuration over feed data due to On-Premises installation. Configure how often the data from
external sources is synced, enable/disable individual data providers responsible for processing normalized data.
Access to an Anchore-curated dataset for suppressing known false positive vulnerability matches
Design
Anchore Enterprise Feeds have three high-level components:
- Drivers – Communicate with upstream sources and fetch data and normalize it for Anchore.
- Database – Stores the current state of the normalized data for use by Anchore.
- API – Serves the data to clients, supporting update-only fetches.
Drivers
A driver downloads raw data from an external source and normalizes it. Each driver outputs normalized data for one of the
four feed types - (os) vulnerabilities, packages, nvd or third party feeds.
- Drivers responsible for operating system package vulnerabilities gather raw data from the respective os resources listed below.
- The nvdv2 driver processes CVEs from the NIST database, and supplies normalized data that is used for matching non-os
packages such as Java, Python, NPM, GEM, NuGet.
All drivers are enabled by default. The service has configuration toggles to enable/disable
each driver individually and tuning driver specific settings.
Vulnerability Drivers
Vulnerability drivers have the ability to run in two modes:
- Direct Mode - where the drivers will directly contact the external data source (see table below for network access points that will be needed).
- Proxy Mode - where the drivers import results produced by Feed Drivers managed by Anchore.
- In this mode, the only network access that is needed is to https://enterprise.vunnel.feed.anchore.io/.
- In this mode, the data is updated every six (6) hours.
- Proxy Mode is not available for MSRC and Anchore Exclusion Feeds Drivers.
Proxy Mode is now the default for all Anchore deployments. Should you wish to use Direct Mode, you will need to explicitly disable Proxy Mode in the values.yaml file of the feed’s helm chart (example below).
    extraEnv:
    - name: ANCHORE_ENTERPRISE_FEEDS_NVD_PROVIDER_IMPORT_RESULTS_ENABLED
      value: "false"
    - name: ANCHORE_ENTERPRISE_FEEDS_AMAZON_PROVIDER_IMPORT_RESULTS_ENABLED
      value: "false"
    - name: ANCHORE_ENTERPRISE_FEEDS_ALPINE_PROVIDER_IMPORT_RESULTS_ENABLED
      value: "false"
    - name: ANCHORE_ENTERPRISE_FEEDS_DEBIAN_PROVIDER_IMPORT_RESULTS_ENABLED
      value: "false"
    - name: ANCHORE_ENTERPRISE_FEEDS_ORACLE_PROVIDER_IMPORT_RESULTS_ENABLED
      value: "false"
    - name: ANCHORE_ENTERPRISE_FEEDS_UBUNTU_PROVIDER_IMPORT_RESULTS_ENABLED
      value: "false"
    - name: ANCHORE_ENTERPRISE_FEEDS_RHEL_PROVIDER_IMPORT_RESULTS_ENABLED
      value: "false"
    - name: ANCHORE_ENTERPRISE_FEEDS_MARINER_PROVIDER_IMPORT_RESULTS_ENABLED
      value: "false"
    - name: ANCHORE_ENTERPRISE_FEEDS_GITHUB_PROVIDER_IMPORT_RESULTS_ENABLED
      value: "false"
    - name: ANCHORE_ENTERPRISE_FEEDS_SLES_PROVIDER_IMPORT_RESULTS_ENABLED
      value: "false"
    - name: ANCHORE_ENTERPRISE_FEEDS_WOLFI_PROVIDER_IMPORT_RESULTS_ENABLED
      value: "false"
    - name: ANCHORE_ENTERPRISE_FEEDS_CHAINGUARD_PROVIDER_IMPORT_RESULTS_ENABLED
      value: "false"
Database
Normalized vulnerability is persisted in the database. In addition, the execution state and updates to the data set are tracked in the database.
Configuration
See Feeds Configuration to read about installation requirements for an air-gapped deployment and optional configuration of drivers.
2 - Deploying Anchore Enterprise
Anchore Enterprise and its components are delivered as Docker container images which can be deployed as co-located, fully distributed, or anything in-between. As such, it can scale out to increase analysis throughput. The only external system required is a PostgreSQL database (13.0 or higher) that all services connect to, but do not use for communication beyond some very simple service registration/lookup processes. The database is centralized simply for ease of management and operation. For more information on the architecture, go to Anchore Enterprise Architecture.
Jump to the following installation guides of your choosing:
2.1 - Requirements
Introduction
This section details the requirements to run Anchore Enterprise.
Resourcing
Use-case and usage patterns will determine the resource requirements for Anchore Enterprise. When deploying via Helm, requests and limits are set in the values.yaml file. When deploying via docker compose, add reservations and limits into your docker compose file. The following recommendations can get you started:
Requests specify the desired resource amounts for the container, while limits specify the maximum resource amounts the container is allowed. We have found that setting the request and limit to the same value provides the best quality of service (QoS) from Kubernetes.
We do not recommend setting less than 1 CPU unit for any containers. Less than this could result in unexpected behaviour and should only be used in testing scenarios.
For the catalog, policeEngine and postgresql containers, we recommend a minimum of 2 CPU units.
We do not recommend setting memory units to less than 8G except for API and UI services, where we recommend starting at 4G. Less than these values could result in OOM errors or containers restarting unexpectedly.
See below for further guidance.
Database
Anchore Enterprise requires a PostgreSQL version 13 or higher database to provide persistent storage for image, policy and analysis data.
The database can be run in a container, as configured in the example Docker Compose file, or it can be provided as an external service to Anchore Enterprise.
PostgreSQL compatible databases, such as Amazon RDS for PostgreSQL, can be used for highly-scalable cloud deployments.
FIPS Enable Hosts
If Anchore Enterprise is deployed on FIPS Enabled Hosts and Amazon RDS (including GovCloud) is hosting the Anchore database, you will be required to have PostgreSQL version 16 or higher.
This is due to RHEL 9 enforcing the FIPS-140-3 requirements. Amazon RDS is only supporting EMS or TLS 1.3 with the use of PostgreSQL 16 or greater.
Network
Anchore requires the following two categories of network access:
- Registry Access
Network connectivity, including DNS resolution, to the registries from which Anchore Enterprise needs to download images.
- Feed Service
Anchore Enterprise Feeds requires access to the upstream data feeds from supported Linux distributions and package registries. See Feeds Endpoints for the full list of the endpoints.
Security
Anchore Enterprise is deployed as source repositories or container images that can be run manually using Docker Compose, Kubernetes or any other supported container platform.
By default, Anchore Enterprise does not require any special permissions. It can be run as an unprivileged container with no access to the underlying Docker host.
Note: Anchore Enterprise can be configured to pull images through the Docker Socket. However, this configuration is not recommended, as it grants the Anchore Enterprise container added privileges, and may incur a performance impact on the Docker Host.
Storage
Anchore Enterprise uses a PostgreSQL database to store persistent data for images, tags, policies, subscriptions and other artifacts. One persistent storage volume is required for configuration information, and two optional storage volumes may be provided as described below.
- Configuration volume
This volume is used to provide persistent storage to the container from which it will read its configuration files, and optionally - certificates. Requirement: Less than 1MB.
- [Optional] Temporary storage
The temporary storage volume is recommended but not required. During the analysis of images, Anchore Enterprise downloads and extracts all of the layers required for an image. These layers are extracted and analyzed, after which, the layers and extracted data are deleted. If a temporary storage is not configured, then the container’s ephemeral storage will be used to store temporary files. However, performance is likely be improved by using a dedicated volume. A temporary storage volume may also be used for image-layer caching to speed up analysis. Requirement: Three times the uncompressed image size to be analyzed.
Note: A temporary volume is required to work around a kernel driver bug for container hosts that use OverlayFS or OverlayFS2 storage, with a kernel older than 4.13.
- [Optional] Object storage
Anchore Enterprise stores documents containing archives of image analysis data and policies as JSON documents. By default, these documents are stored within the PostgreSQL database. However, Anchore Enterprise can be configured to store archive documents in a filesystem (volume), S3 Object store, or Swift Object Store. Requirement: Number of images x 10MB (estimated).
Enterprise UI
The Anchore Enterprise UI module interfaces with Anchore API using the external API endpoint. The UI requires access to the Anchore database where it creates its own namespace for persistent configuration storage. Additionaly, a Redis database is used to store session information.
Runtime
- Docker compatible runtime (version 1.12 or higher)
Storage
- Configuration volume This volume is used to provide persistent storage to the container from which it will read its configuration files and optionally certificates.
Requirement: Less than 1MB
Network
- Ingress
- The Anchore UI module publishes a web UI service by default on port 3000, however, this port can be remapped.
- Engress
- The Anchore UI module requires access to two network services:
- External API endpoint (typically port 8228)
- Redis Database (typically port 6379)
Redis Service
Note: If you’re installing the Anchore Enterprise UI using our installation examples, they include a deployment of a redis service as part of the UI deployment process.
Next Steps
If you feel you have a solid grasp of the requirements for deploying Anchore Enterprise, we recommend following one of our installation guides.
2.2 - Deploy using Docker Compose
In this topic, you’ll learn how to use Docker Compose to get up and running with a stand-alone Anchore Enterprise deployment for trial, demonstration, and review purposes only.
Important supported deployments of Anchore Enterprise should use the Helm-based deployment which enables easier scaling, modular deployment, and fine-grained configuration.
If you would like to gain a deeper understanding of Anchore and its concepts, review the Overview topic prior to deployment of Anchore Enterprise.
Configuration Files for Docker Compose:
Requirements
The following instructions assume you are using a system running Docker v1.12 or higher, and a version of Docker Compose that supports at least v2 of the docker compose configuration format.
- A stand-alone deployment requires at least 4GB of RAM, and enough disk space available to support the largest container images or source repositories that you intend to analyze. It is recommended to consider three times the largest source repository or container image size. For small testing, like basic Linux distro images or database images, between 5GB and 10GB of disk space should be sufficient.
- To access Anchore Enterprise, you need a valid
license.yaml file that has been issued to you by Anchore. If you do not have a license yet, visit the Anchore Contact page to request one.
Step 1: Ensure you can authenticate to DockerHub to pull the images
You’ll need authenticated access to the anchore/enterprise and anchore/enterprise-ui repositories on DockerHub. Anchore support should have granted your DockerHub user access when you received your license.
# docker login
Login with your Docker ID to push and pull images from Docker Hub. If you don't have a Docker ID, head over to https://hub.docker.com to create one.
Username: <your_dockerhub_account>
Password: <your_dockerhub_password>
Step 2: Download compose, copy license, and start.
Now, ensure the license.yaml file you got from Anchore Sales/Support is in the directory where you want to run the containers from, then download the compose file and start it.
You can use the link at the top of this page, or use curl or wget to download it as shown in the following example.
# cp <path/to/your/license.yaml> ./license.yaml
# curl https://docs.anchore.com/current/docs/deployment/docker_compose/docker-compose.yaml > docker-compose.yaml
# docker compose up -d
Step 3: Install AnchoreCTL
Next, we’ll install the lightweight Anchore Enterprise client tool, quickly test using the version operation, and set up a few environment variables to allow it to interact with your quickstart deployment using the following process:
# curl -sSfL  https://anchorectl-releases.anchore.io/anchorectl/install.sh  | sh -s -- -b /usr/local/bin v5.7.0

# ./anchorectl version
Application:        anchorectl
Version:            5.7.0
SyftVersion:        v0.97.1
BuildDate:          2023-11-21T22:09:54Z
GitCommit:          f7604438b45f7161c11145999897d4ae3efcb0c8
GitDescription:     v5.7.0
Platform:           linux/amd64
GoVersion:          go1.21.1
Compiler:           gc

# export ANCHORECTL_URL="http://localhost:8228"
# export ANCHORECTL_USERNAME="admin"
# export ANCHORECTL_PASSWORD="foobar"
NOTE: for this quickstart, we’re installing the tool in your local directory ./ and will be using environment variables throughout. To more permanently install and configure anchorectl to remove the need for setting environment variables and putting the tool in a globally accessible path, see Installing AnchoreCTL.
Step 4: Verify service availability
After a few minutes (depending on system speed) Anchore Enterprise and Anchore UI services should be up and running, ready to use. You can verify the containers are running with docker compose, as shown in the following example.
# docker compose ps
             Name                           Command                  State               Ports
-------------------------------------------------------------------------------------------------------
anchorequickstart_analyzer_1          /docker-entrypoint.sh anch ...   Up (healthy)   8228/tcp
anchorequickstart_anchore-db_1        docker-entrypoint.sh postgres    Up             5432/tcp
anchorequickstart_api_1               /docker-entrypoint.sh anch ...   Up (healthy)   0.0.0.0:8228->8228/tcp
anchorequickstart_catalog_1           /docker-entrypoint.sh anch ...   Up (healthy)   8228/tcp
anchorequickstart_notifications_1     /docker-entrypoint.sh anch ...   Up (healthy)   0.0.0.0:8668->8228/tcp
anchorequickstart_policy-engine_1     /docker-entrypoint.sh anch ...   Up (healthy)   8228/tcp
anchorequickstart_queue_1             /docker-entrypoint.sh anch ...   Up (healthy)   8228/tcp
anchorequickstart_reports_1           /docker-entrypoint.sh anch ...   Up (healthy)   0.0.0.0:8558->8228/tcp
anchorequickstart_reports_worker_1    /docker-entrypoint.sh anch ...   Up (healthy)   0.0.0.0:55427->8228/tcp
anchorequickstart_ui-redis_1          docker-entrypoint.sh redis ...   Up             6379/tcp
anchorequickstart_ui_1                /docker-entrypoint.sh node ...   Up             0.0.0.0:3000->3000/tcp
You can then run a command to get the status of the Anchore Enterprise services:
# ./anchorectl system status
 ✔ Status system
┌─────────────────┬────────────────────┬─────────────────────────────┬──────┬────────────────┬────────────┬──────────────┐
│ SERVICE         │ HOST ID            │ URL                         │ UP   │ STATUS MESSAGE │ DB VERSION │ CODE VERSION │
├─────────────────┼────────────────────┼─────────────────────────────┼──────┼────────────────┼────────────┼──────────────┤
│ analyzer        │ anchore-quickstart │ http://analyzer:8228        │ true │ available      │ 570        │ 5.7.0        │
│ policy_engine   │ anchore-quickstart │ http://policy-engine:8228   │ true │ available      │ 570        │ 5.7.0        │
│ apiext          │ anchore-quickstart │ http://api:8228             │ true │ available      │ 570        │ 5.7.0        │
│ reports         │ anchore-quickstart │ http://reports:8228         │ true │ available      │ 570        │ 5.7.0        │
│ reports_worker  │ anchore-quickstart │ http://reports-worker:8228  │ true │ available      │ 570        │ 5.7.0        │
│ simplequeue     │ anchore-quickstart │ http://queue:8228           │ true │ available      │ 570        │ 5.7.0        │
│ notifications   │ anchore-quickstart │ http://notifications:8228   │ true │ available      │ 570        │ 5.7.0        │
│ catalog         │ anchore-quickstart │ http://catalog:8228         │ true │ available      │ 570        │ 5.7.0        │
└─────────────────┴────────────────────┴─────────────────────────────┴──────┴────────────────┴────────────┴──────────────┘
Note: The first time you run Anchore Enterprise, vulnerability data will sync to the system in a few minutes. If the on-prem feed service is also used, it will take a while for the vulnerability data to get synced into the system (two plus hours in many cases, depending on network speed). For the best experience, wait until the core vulnerability data feeds have completed before proceeding. You can check the status of your feed sync using AnchoreCTL:
# ./anchorectl feed list
 ✔ List feed
┌─────────────────┬─────────────────┬─────────┬──────────────────────┬──────────────┐
│ FEED            │ GROUP           │ ENABLED │ LAST SYNC            │ RECORD COUNT │
├─────────────────┼─────────────────┼─────────┼──────────────────────┼──────────────┤
│ vulnerabilities │ alpine:3.10     │ true    │ 2022-08-26T14:08:51Z │ 2331         │
│ vulnerabilities │ alpine:3.11     │ true    │ 2022-08-26T14:08:51Z │ 2665         │
│ vulnerabilities │ alpine:3.12     │ true    │ 2022-08-26T14:08:51Z │ 3205         │
│ vulnerabilities │ alpine:3.13     │ true    │ 2022-08-26T14:08:51Z │ 3656         │
│ vulnerabilities │ alpine:3.14     │ true    │ 2022-08-26T14:08:51Z │ 4097         │
│ vulnerabilities │ alpine:3.15     │ true    │ 2022-08-26T14:08:51Z │ 4479         │
│ vulnerabilities │ alpine:3.16     │ true    │ 2022-08-26T14:08:51Z │ 4763         │
│ vulnerabilities │ alpine:3.2      │ true    │ 2022-08-26T14:08:51Z │ 306          │
│ vulnerabilities │ alpine:3.3      │ true    │ 2022-08-26T14:08:51Z │ 471          │
│ vulnerabilities │ alpine:3.4      │ true    │ 2022-08-26T14:08:51Z │ 683          │
│ vulnerabilities │ alpine:3.5      │ true    │ 2022-08-26T14:08:51Z │ 903          │
│ vulnerabilities │ alpine:3.6      │ true    │ 2022-08-26T14:08:51Z │ 1077         │
│ vulnerabilities │ alpine:3.7      │ true    │ 2022-08-26T14:08:51Z │ 1462         │
│ vulnerabilities │ alpine:3.8      │ true    │ 2022-08-26T14:08:51Z │ 1675         │
│ vulnerabilities │ alpine:3.9      │ true    │ 2022-08-26T14:08:51Z │ 1962         │
│ vulnerabilities │ amzn:2          │ true    │ 2022-08-26T14:08:51Z │ 925          │
│ vulnerabilities │ amzn:2022       │ true    │ 2022-08-26T14:08:51Z │ 124          │
│ vulnerabilities │ debian:10       │ true    │ 2022-08-26T14:08:51Z │ 28893        │
│ vulnerabilities │ debian:11       │ true    │ 2022-08-26T14:08:51Z │ 26431        │
│ vulnerabilities │ debian:12       │ true    │ 2022-08-26T14:08:51Z │ 25660        │
│ vulnerabilities │ debian:7        │ true    │ 2022-08-26T14:08:51Z │ 20455        │
│ vulnerabilities │ debian:8        │ true    │ 2022-08-26T14:08:51Z │ 24058        │
│ vulnerabilities │ debian:9        │ true    │ 2022-08-26T14:08:51Z │ 28240        │
│ vulnerabilities │ debian:unstable │ true    │ 2022-08-26T14:08:51Z │ 31740        │
│ vulnerabilities │ github:composer │ true    │ 2022-08-26T14:08:51Z │ 1000         │
│ vulnerabilities │ github:gem      │ true    │ 2022-08-26T14:08:51Z │ 473          │
│ vulnerabilities │ github:go       │ true    │ 2022-08-26T14:08:51Z │ 566          │
│ vulnerabilities │ github:java     │ true    │ 2022-08-26T14:08:51Z │ 2057         │
│ vulnerabilities │ github:npm      │ true    │ 2022-08-26T14:08:51Z │ 2585         │
│ vulnerabilities │ github:nuget    │ true    │ 2022-08-26T14:08:51Z │ 216          │
│ vulnerabilities │ github:python   │ true    │ 2022-08-26T14:08:51Z │ 1244         │
│ vulnerabilities │ github:rust     │ true    │ 2022-08-26T14:08:51Z │ 289          │
│ vulnerabilities │ nvd             │ true    │ 2022-08-26T14:08:51Z │ 193942       │
│ vulnerabilities │ ol:5            │ true    │ 2022-08-26T14:08:51Z │ 1255         │
│ vulnerabilities │ ol:6            │ true    │ 2022-08-26T14:08:51Z │ 1666         │
│ vulnerabilities │ ol:7            │ true    │ 2022-08-26T14:08:51Z │ 1837         │
│ vulnerabilities │ ol:8            │ true    │ 2022-08-26T14:08:51Z │ 1028         │
│ vulnerabilities │ ol:9            │ true    │ 2022-08-26T14:08:51Z │ 56           │
│ vulnerabilities │ rhel:5          │ true    │ 2022-08-26T14:08:51Z │ 7827         │
│ vulnerabilities │ rhel:6          │ true    │ 2022-08-26T14:08:51Z │ 8352         │
│ vulnerabilities │ rhel:7          │ true    │ 2022-08-26T14:08:51Z │ 7847         │
│ vulnerabilities │ rhel:8          │ true    │ 2022-08-26T14:08:51Z │ 4198         │
│ vulnerabilities │ rhel:9          │ true    │ 2022-08-26T14:08:51Z │ 1097         │
│ vulnerabilities │ sles:11         │ true    │ 2022-08-26T14:08:51Z │ 594          │
│ vulnerabilities │ sles:11.1       │ true    │ 2022-08-26T14:08:51Z │ 6125         │
│ vulnerabilities │ sles:11.2       │ true    │ 2022-08-26T14:08:51Z │ 3291         │
│ vulnerabilities │ sles:11.3       │ true    │ 2022-08-26T14:08:51Z │ 7081         │
│ vulnerabilities │ sles:11.4       │ true    │ 2022-08-26T14:08:51Z │ 6583         │
│ vulnerabilities │ sles:12         │ true    │ 2022-08-26T14:08:51Z │ 5918         │
│ vulnerabilities │ sles:12.1       │ true    │ 2022-08-26T14:08:51Z │ 6206         │
│ vulnerabilities │ sles:12.2       │ true    │ 2022-08-26T14:08:51Z │ 7625         │
│ vulnerabilities │ sles:12.3       │ true    │ 2022-08-26T14:08:51Z │ 9395         │
│ vulnerabilities │ sles:12.4       │ true    │ 2022-08-26T14:08:51Z │ 9428         │
│ vulnerabilities │ sles:12.5       │ true    │ 2022-08-26T14:08:51Z │ 9810         │
│ vulnerabilities │ sles:15         │ true    │ 2022-08-26T14:08:51Z │ 8500         │
│ vulnerabilities │ sles:15.1       │ true    │ 2022-08-26T14:08:51Z │ 8168         │
│ vulnerabilities │ sles:15.2       │ true    │ 2022-08-26T14:08:51Z │ 7684         │
│ vulnerabilities │ sles:15.3       │ true    │ 2022-08-26T14:08:51Z │ 7830         │
│ vulnerabilities │ sles:15.4       │ true    │ 2022-08-26T14:08:51Z │ 7435         │
│ vulnerabilities │ ubuntu:12.04    │ true    │ 2022-08-26T14:08:51Z │ 14963        │
│ vulnerabilities │ ubuntu:12.10    │ true    │ 2022-08-26T14:08:51Z │ 5652         │
│ vulnerabilities │ ubuntu:13.04    │ true    │ 2022-08-26T14:08:51Z │ 4127         │
│ vulnerabilities │ ubuntu:14.04    │ true    │ 2022-08-26T14:08:51Z │ 29362        │
│ vulnerabilities │ ubuntu:14.10    │ true    │ 2022-08-26T14:08:51Z │ 4456         │
│ vulnerabilities │ ubuntu:15.04    │ true    │ 2022-08-26T14:08:51Z │ 6240         │
│ vulnerabilities │ ubuntu:15.10    │ true    │ 2022-08-26T14:08:51Z │ 6513         │
│ vulnerabilities │ ubuntu:16.04    │ true    │ 2022-08-26T14:08:51Z │ 26480        │
│ vulnerabilities │ ubuntu:16.10    │ true    │ 2022-08-26T14:08:51Z │ 8647         │
│ vulnerabilities │ ubuntu:17.04    │ true    │ 2022-08-26T14:08:51Z │ 9157         │
│ vulnerabilities │ ubuntu:17.10    │ true    │ 2022-08-26T14:08:51Z │ 7943         │
│ vulnerabilities │ ubuntu:18.04    │ true    │ 2022-08-26T14:08:51Z │ 20984        │
│ vulnerabilities │ ubuntu:18.10    │ true    │ 2022-08-26T14:08:51Z │ 8400         │
│ vulnerabilities │ ubuntu:19.04    │ true    │ 2022-08-26T14:08:51Z │ 8669         │
│ vulnerabilities │ ubuntu:19.10    │ true    │ 2022-08-26T14:08:51Z │ 8431         │
│ vulnerabilities │ ubuntu:20.04    │ true    │ 2022-08-26T14:08:51Z │ 14810        │
│ vulnerabilities │ ubuntu:20.10    │ true    │ 2022-08-26T14:08:51Z │ 9996         │
│ vulnerabilities │ ubuntu:21.04    │ true    │ 2022-08-26T14:08:51Z │ 11343        │
│ vulnerabilities │ ubuntu:21.10    │ true    │ 2022-08-26T14:08:51Z │ 12673        │
│ vulnerabilities │ ubuntu:22.04    │ true    │ 2022-08-26T14:08:51Z │ 12992        │
└─────────────────┴─────────────────┴─────────┴──────────────────────┴──────────────┘
As soon as you see RecordCount values set for all vulnerability groups, the system is fully populated and ready to present vulnerability results. Note that feed syncs are incremental, so the next time you start up Anchore Enterprise it will be ready immediately. The AnchoreCTL includes a useful utility that will block until the feeds have completed a successful sync:
# ./anchorectl system wait
 ✔ API available                                                                                        system
 ✔ Services available                        [10 up]                                                    system
 ✔ Vulnerabilities feed ready                                                                           system
Step 4: Start using Anchore
To get started, you can add a few images to Anchore Enterprise using AnchoreCTL. Once complete, you can also run an additional AnchoreCTL command to monitor the analysis state of the added images, waiting until the images move into an ‘analyzed’ state.
# ./anchorectl image add docker.io/library/alpine:latest
 ✔ Added Image                                                                                                              docker.io/library/alpine:latest
Image:
  status:           not-analyzed (active)
  tag:              docker.io/library/alpine:latest
  digest:           sha256:1304f174557314a7ed9eddb4eab12fed12cb0cd9809e4c28f29af86979a3c870
  id:               9c6f0724472873bb50a2ae67a9e7adcb57673a183cea8b06eb778dca859181b5

# ./anchorectl image add docker.io/library/nginx:latest
 ✔ Added Image                                                                                                              docker.io/library/nginx:latest
Image:
  status:           not-analyzed (active)
  tag:              docker.io/library/nginx:latest
  digest:           sha256:89020cd33be2767f3f894484b8dd77bc2e5a1ccc864350b92c53262213257dfc
  id:               2b7d6430f78d432f89109b29d88d4c36c868cdbf15dc31d2132ceaa02b993763
  distro:           debian@11 (amd64)
  layers:           6

# ./anchorectl image list
 ✔ Fetched images
┌───────────────────────────────────────────────────────┬─────────────────────────────────────────────────────────────────────────┬──────────────┬────────┐
│ TAG                                                   │ DIGEST                                                                  │ ANALYSIS     │ STATUS │
├───────────────────────────────────────────────────────┼─────────────────────────────────────────────────────────────────────────┼──────────────┼────────┤
│ docker.io/library/alpine:latest                       │ sha256:1304f174557314a7ed9eddb4eab12fed12cb0cd9809e4c28f29af86979a3c870 │ analyzed     │ active │
│ docker.io/library/nginx:latest                        │ sha256:89020cd33be2767f3f894484b8dd77bc2e5a1ccc864350b92c53262213257dfc │ not_analyzed │ active │
└───────────────────────────────────────────────────────┴─────────────────────────────────────────────────────────────────────────┴──────────────┴────────┘

# ./anchorectl image add docker.io/library/nginx:latest --force --wait
 ⠏ Adding Image                                                                                                              docker.io/library/nginx:latest
 ⠼ Analyzing Image                           [analyzing]                                                                     docker.io/library/nginx:latest
...
...
 ✔ Analyzed Image                                                                                                            docker.io/library/nginx:latest
Image:
  status:           analyzed (active)
  tags:             docker.io/library/nginx:latest
  digest:           sha256:89020cd33be2767f3f894484b8dd77bc2e5a1ccc864350b92c53262213257dfc
  id:               2b7d6430f78d432f89109b29d88d4c36c868cdbf15dc31d2132ceaa02b993763
  distro:           debian@11 (amd64)
  layers:           6

# ./anchorectl image list
 ✔ Fetched images
┌───────────────────────────────────────────────────────┬─────────────────────────────────────────────────────────────────────────┬──────────┬────────┐
│ TAG                                                   │ DIGEST                                                                  │ ANALYSIS │ STATUS │
├───────────────────────────────────────────────────────┼─────────────────────────────────────────────────────────────────────────┼──────────┼────────┤
│ docker.io/library/alpine:latest                       │ sha256:1304f174557314a7ed9eddb4eab12fed12cb0cd9809e4c28f29af86979a3c870 │ analyzed │ active │
│ docker.io/library/nginx:latest                        │ sha256:89020cd33be2767f3f894484b8dd77bc2e5a1ccc864350b92c53262213257dfc │ analyzed │ active │
└───────────────────────────────────────────────────────┴─────────────────────────────────────────────────────────────────────────┴──────────┴────────┘
Now that some images are in place, you can point your browser at the Anchore Enterprise UI by directing it to http://localhost:3000/.
Enter the username admin and password foobar to log in. These are some of the features you can use in the browser:
- Navigate images
- Inspect image contents
- Perform security scans
- Review compliance policy evaluations
- Edit compliance policies with a complete policy editor UI
- Manage accounts, users, and RBAC assignments
- Review system events
Note: This document is intended to serve as a quickstart guide. Before moving further with Anchore Enterprise, it is highly recommended to read the Overview sections to gain a deeper understanding of fundamentals, concepts, and proper usage.
Enable Microsoft Windows Image Support
To enable scanning of Microsoft Windows images, you’ll have to configure the system to deploy a feed service and set up the proper drivers to collect vulnerability data for Microsoft Windows.
For more information, see: Enable Microsoft Windows Scanning.
Next Steps
Now that you have Anchore Enterprise running, you can begin to learn more about Anchore capabilities, architecture, concepts, and more.
Optional: Enabling Prometheus Monitoring
Uncomment the following section at the bottom of the docker-compose.yaml file:
#  # Uncomment this section to add a prometheus instance to gather metrics. This is mostly for quickstart to demonstrate prometheus metrics exported
#  prometheus:
#    image: docker.io/prom/prometheus:latest
#    depends_on:
#      - api
#    volumes:
#      - ./anchore-prometheus.yml:/etc/prometheus/prometheus.yml:z
#    logging:
#      driver: "json-file"
#      options:
#        max-size: 100m
#    ports:
#      - "9090:9090"
#
For each service entry in the docker-compose.yaml, change the following to enable metrics in the API for each service
ANCHORE_ENABLE_METRICS=false
to
ANCHORE_ENABLE_METRICS=true
Download the example prometheus configuration into the same directory as the docker-compose.yaml file, with name anchore-prometheus.yml:
curl https://docs.anchore.com/current/docs/deployment/anchore-prometheus.yml > anchore-prometheus.yml
docker compose up -d
Result: You should see a new container started and can access prometheus via your browser on http://localhost:9090.
Optional: Enabling Swagger UI
Uncomment the following section at the bottom of the docker-compose.yaml file:
#  # Uncomment this section to run a swagger UI service, for inspecting and interacting with the system API via a browser (http://localhost:8080 by default, change if needed in both sections below)
#  swagger-ui-nginx:
#    image: docker.io/nginx:latest
#    depends_on:
#      - api
#      - swagger-ui
#    ports:
#      - "8080:8080"
#    volumes:
#      - ./anchore-swaggerui-nginx.conf:/etc/nginx/nginx.conf:z
#    logging:
#      driver: "json-file"
#      options:
#        max-size: 100m
#  swagger-ui:
#    image: docker.io/swaggerapi/swagger-ui
#    environment:
#      - URL=http://localhost:8080/v2/openapi.json
#    logging:
#      driver: "json-file"
#      options:
#        max-size: 100m
Download the nginx configuration into the same directory as the docker-compose.yaml file, with name anchore-swaggerui-nginx.conf:
curl https://docs.anchore.com/current/docs/deployment/anchore-swaggerui-nginx.conf > anchore-swaggerui-nginx.conf
docker compose up -d
Result: You should see a new container started, and have access Swagger UI via your browser on http://localhost:8080.
2.3 - Deploy on Kubernetes using Helm
The preferred method for deploying Anchore Enterprise on Kubernetes is with Helm. The Anchore Enterprise Helm Chart includes configuration options for a full Enterprise deployment.
The README in the chart repository contains more details on how to configure the Anchore Enterprise Helm chart and should always be consulted before proceeding with a deployment or upgrades.
Note If you are moving from the Anchore Engine Helm chart deployment to the updated Anchore Enterprise Helm chart, see here for further guidance.
About the Helm Chart
The chart is split into global and service specific configurations for the core features, as well as global and services specific configurations for the optional Enterprise services.
- The
anchoreConfig section of the values file contains the application configuration for Anchore Enterprise. This includes the database connection information, credentials, and other application settings. - Anchore services run as a kubernetes deployment when installed with the Helm chart. Each service has its own section in the values file for making customizations and configuring the kubernetes deployment spec.
For a description of each service component see Anchore Enterprise Service Overview
Important Release Notes can be found in the README in the chart repository
Prerequisites
Always check the README in the chart repository for prequisities before starting the deployment.
Installing the Chart
This guide covers deploying Anchore Enterprise on a Kubernetes cluster with the default configuration. Refer to the Configuration section of the chart README for additional guidance on production deployments.
Create a Kubernetes Secret for License File: Generate a Kubernetes secret to store your Anchore Enterprise license file.
export NAMESPACE=anchore
export LICENSE_PATH="license.yaml"

kubectl create secret generic anchore-enterprise-license --from-file=license.yaml=${LICENSE_PATH} -n ${NAMESPACE}
Create a Kubernetes Secret for DockerHub Credentials: Generate another Kubernetes secret for DockerHub credentials. These credentials should have access to private Anchore Enterprise repositories. We recommend that you create a brand new DockerHub user for these pull credentials. Contact Anchore Support to obtain access.
export NAMESPACE=anchore
export DOCKERHUB_PASSWORD="password"
export DOCKERHUB_USER="username"
export DOCKERHUB_EMAIL="[email protected]"

kubectl create secret docker-registry anchore-enterprise-pullcreds --docker-server=docker.io --docker-username=${DOCKERHUB_USER} --docker-password=${DOCKERHUB_PASSWORD} --docker-email=${DOCKERHUB_EMAIL} -n ${NAMESPACE}
Add Chart Repository & Deploy Anchore Enterprise: Create a custom values file, named anchore_values.yaml, to override any chart parameters. Refer to the Parameters section for available options.
Important: Default passwords are specified in the chart. It’s highly recommended to modify these before deploying.
export NAMESPACE=anchore
export RELEASE=my-release

helm repo add anchore https://charts.anchore.io
helm install ${RELEASE} -n ${NAMESPACE} anchore/enterprise -f anchore_values.yaml
Note: This command installs Anchore Enterprise with a chart-managed PostgreSQL database, which may not be suitable for production use. See the External Database section of the chart README for details on using an external database.
Post-Installation Steps: Anchore Enterprise will take some time to initialize. After the bootstrap phase, it will begin a vulnerability feed sync. Image analysis will show zero vulnerabilities, and the UI will show errors until this sync is complete. This can take several hours based on the enabled feeds. Use the following anchorectl commands to check the system status:
export NAMESPACE=anchore
export RELEASE=my-release
export ANCHORECTL_URL=http://localhost:8228
export ANCHORECTL_PASSWORD=$(kubectl get secret "${RELEASE}-enterprise" -o jsonpath='{.data.ANCHORE_ADMIN_PASSWORD}' | base64 -d -)

kubectl port-forward -n ${NAMESPACE} svc/${RELEASE}-enterprise-api 8228:8228 # port forward for anchorectl in another terminal
anchorectl system status # anchorectl defaults to the user admin, and to the password ${ANCHORECTL_PASSWORD} automatically if set
Tip: List all releases using helm list
Next Steps
Now that you have Anchore Enterprise running, you can begin to learning more about Anchore Enterprise architecture, Anchore concepts, and Anchore usage.
- To learn more about Anchore Enterprise, go to Overview
- To learn more about Anchore Concepts, go to Concepts
2.3.1 - Deploying Anchore Enterprise on Azure Kubernetes Service (AKS)
This document will walk you through the deployment of Anchore Enterprise in an Azure Kubernetes Service (AKS) cluster and expose it on the public Internet.
Prerequisites
- A running AKS cluster with worker nodes launched. See AKS Documentation for more information on this setup.
- Helm client on local host.
- AnchoreCTL installed on a local host.
Once you have an AKS cluster up and running with worker nodes launched, you can verity via the following command.
$ kubectl get nodes

NAME                       STATUS   ROLES   AGE     VERSION
aks-nodepool1-28659018-0   Ready    agent   4m13s   v1.13.10
aks-nodepool1-28659018-1   Ready    agent   4m15s   v1.13.10
aks-nodepool1-28659018-2   Ready    agent   4m6s    v1.13.10
Anchore Helm Chart
Anchore maintains a Helm chart to simplify the software deployment process. An Anchore Enterprise deployment of the chart will include the following:
- Anchore Enterprise software
- PostgreSQL (13 or higher)
- Redis (4)
To make the necessary configurations to the Helm chart, create a custom anchore_values.yaml file and reference it during deployment. There are many options for configuration with Anchore, this document is intended to cover the minimum required changes to successfully deploy Anchore Enterprise in AKS.
Note: For this installation, an NGINX ingress controller will be used. You can read more about Kubernetes Ingress in AKS here.
Configurations
Make the following changes below to your anchore_values.yaml
Ingress
ingress:
  enabled: true
  labels: {}
  apiPaths:
    - /v2/
  uiPath: /
  annotations:
    kubernetes.io/ingress.class: nginx
Note: Configuring ingress is optional. It is used throughout this guide to expose the Anchore deployment on the public internet.
Anchore API Service
# Pod configuration for the anchore api service.
api:
  # kubernetes service configuration for anchore external API
  service:
    type: NodePort
    port: 8228
    annotations: {}
Note: Changed the service type to NodePort
Anchore Enterprise UI
ui:
  # kubernetes service configuration for anchore UI
  service:
    type: NodePort
    port: 80
    annotations: {}
    sessionAffinity: ClientIP
Note: Changed service type to NodePort.
Install NGINX Ingress Controller
Using Helm, install an NGINX ingress controller in your AKS cluster.
helm install stable/nginx-ingress --set controller.nodeSelector."beta\.kubernetes\.io/os"=linux --set defaultBackend.nodeSelector."beta\.kubernetes\.io/os"=linux
Deploy Anchore Enterprise
Enterprise services require an Anchore Enterprise license, as well as credentials with permission to access the private DockerHub repository containing the enterprise software.
Create a Kubernetes secret containing your license file:
kubectl create secret generic anchore-enterprise-license --from-file=license.yaml=<PATH/TO/LICENSE.YAML>
Create a Kubernetes secret containing DockerHub credentials with access to the private Anchore Enterprise software:
kubectl create secret docker-registry anchore-enterprise-pullcreds --docker-server=docker.io --docker-username=<DOCKERHUB_USER> --docker-password=<DOCKERHUB_PASSWORD> --docker-email=<EMAIL_ADDRESS>
Deploy Anchore Enterprise:
helm repo add anchore https://charts.anchore.io
helm install anchore anchore/enterprise -f anchore_values.yaml
It will take the system several minutes to bootstrap. You can checks on the status of the pods by running kubectl get pods:
$ kubectl get pods

NAME                                                              READY   STATUS    RESTARTS   AGE
anchore-enterprise-analyzer-7f9c7c65c8-tp8cs                      1/1     Running   0          13m
anchore-enterprise-api-754cdb48bc-x8kxt                           3/3     Running   0          13m
anchore-enterprise-catalog-64d4b9bb8-x8vmb                        1/1     Running   0          13m
anchore-enterprise-notifications-65bd45459f-q28h2                 2/2     Running   0          13m
anchore-enterprise-policy-657fdfd7f6-gzkmh                        1/1     Running   0          13m
anchore-enterprise-reports-596cb47894-q8g49                       1/1     Running   0          13m
anchore-enterprise-simplequeue-98b95f985-5xqcv                    1/1     Running   0          13m
anchore-enterprise-ui-6794bbd47-vxljt                             1/1     Running   0          13m
anchore-feeds-77b8976c4c-rs8h2                                    1/1     Running   0          13m
anchore-feeds-db-0                                                1/1     Running   0          13m
anchore-postgresql-0                                              1/1     Running   0          13m
anchore-ui-redis-master-0                                         1/1     Running   0          13m
mangy-serval-nginx-ingress-controller-788dd98c8b-jv2wg            1/1     Running   0          21m
mangy-serval-nginx-ingress-default-backend-8686cd585b-4m2bt       1/1     Running   0          21m
We can see that NGINX ingress controller has been installed as well from the previous step. You can view the services by running the following command:
$ kubectl get services | grep ingress

mangy-serval-nginx-ingress-controller                LoadBalancer   10.0.30.174    40.114.26.147   80:31176/TCP,443:30895/TCP                     22m
mangy-serval-nginx-ingress-default-backend           ClusterIP      10.0.243.221   <none>          80/TCP                                         22m
Note: The above output shows us that IP address of the NGINX ingress controller is 40.114.26.147. Going to this address in the browser will take us to the Anchore login page.

Anchore System
Check the status of the system with AnchoreCTL to verify all of the Anchore services are up:
Note: Read more on Deploying AnchoreCTL
ANCHORECTL_URL=http://40.114.26.147/v2/ ANCHORECTL_USERNAME=admin ANCHORECTL_PASSWORD=foobar anchorectl system status
Anchore Feeds
It can take some time to fetch all of the vulnerability feeds from the upstream data sources. Check on the status of feeds with AnchoreCTL:
ANCHORECTL_URL=http://40.114.26.147/v2/ ANCHORECTL_USERNAME=admin ANCHORECTL_PASSWORD=foobar anchorectl feed list
Note: It is not uncommon for the above command to return a: [] as the initial feed sync occurs.
Once the vulnerability feed sync is complete, Anchore can begin to return vulnerability results on analyzed images. Please continue to the Vulnerability Management section of our documentation for more information.
2.3.2 - Deploying Anchore Enterprise on Amazon EKS
Get an understanding of the deployment of Anchore Enterprise on an Amazon EKS cluster and expose it on the public Internet.
Note when using AWS consider utilizing Amazon RDS for a managed database service.
Prerequisites
- A running Amazon EKS cluster with worker nodes launched. See EKS Documentation for more information on this setup.
- Helm client installed on local host.
- AnchoreCTL installed on local host.
Once you have an EKS cluster up and running with worker nodes launched, you can verify it using the following command.
$ kubectl get nodes
NAME                             STATUS   ROLES    AGE   VERSION
ip-192-168-2-164.ec2.internal    Ready    <none>   10m   v1.14.6-eks-5047ed
ip-192-168-35-43.ec2.internal    Ready    <none>   10m   v1.14.6-eks-5047ed
ip-192-168-55-228.ec2.internal   Ready    <none>   10m   v1.14.6-eks-5047ed
Anchore Helm Chart
Anchore maintains a Helm chart to simplify the software deployment process. An Anchore Enterprise deployment of the chart will include the following:
- Anchore Enterprise software
- PostgreSQL (13 or higher)
- Redis (4)
To make the necessary configurations to the Helm chart, create a custom anchore_values.yaml file and reference it during deployment. There are many options for configuration with Anchore. The following is intended to cover the minimum required changes to successfully deploy Anchore Enterprise on Amazon EKS.
Note: For this installation, an ALB ingress controller will be used. You can read more about Kubernetes Ingress with AWS ALB Ingress Controller here
Configurations
Make the following changes below to your anchore_values.yaml
Ingress
ingress:
  enabled: true
  apiPaths:
    - /v2/*
  uiPath: /*
  annotations:
    kubernetes.io/ingress.class: alb
    alb.ingress.kubernetes.io/scheme: internet-facing
Note: Configuring ingress is optional. It is used throughout this guide to expose the Anchore deployment on the public internet.
Anchore API Service
# Pod configuration for the anchore engine api service.
api:
  replicaCount: 1
  # kubernetes service configuration for anchore external API
  service:
    type: NodePort
    port: 8228
    annotations: {}
Note: Changed the service type to NodePort
Anchore Enterprise UI
ui:
  # kubernetes service configuration for anchore UI
  service:
    type: NodePort
    port: 80
    annotations: {}
    sessionAffinity: ClientIP
Note: Changed service type to NodePort.
AWS EKS Configurations
Create the IAM policy to give the Ingress controller the right permissions
- Go to the IAM Console.
- Choose the section Roles and search for the NodeInstanceRole of your EKS worker nodes.
- Create and attach a policy using the contents of the template iam-policy.json
Deploy RBAC Roles and RoleBindings needed by the AWS ALB Ingress controller from the template below:
wget https://raw.githubusercontent.com/kubernetes-sigs/aws-alb-ingress-controller/v1.0.0/docs/examples/rbac-role.yaml
kubectl apply -f https://raw.githubusercontent.com/kubernetes-sigs/aws-alb-ingress-controller/v1.0.0/docs/examples/rbac-role.yaml
Update ALB Ingress
Download the ALB Ingress manifest and update the cluster-name section with the name of your EKS cluster name.
wget https://raw.githubusercontent.com/kubernetes-sigs/aws-alb-ingress-controller/v1.0.1/docs/examples/alb-ingress-controller.yaml
# Name of your cluster. Used when naming resources created
# by the ALB Ingress Controller, providing distinction between
# clusters.
- --cluster-name=anchore-prod
Deploy the AWS ALB Ingress controller YAML:
kubectl apply -f alb-ingress-controller.yaml
Anchore Enterprise Deployment
Create Secrets
Enterprise services require an Anchore Enterprise license, as well as credentials with permission to access the private DockerHub repository containing the enterprise software.
Create a Kubernetes secret containing your license file:
kubectl create secret generic anchore-enterprise-license --from-file=license.yaml=<PATH/TO/LICENSE.YAML>
Create a Kubernetes secret containing DockerHub credentials with access to the private Anchore Enterprise software:
kubectl create secret docker-registry anchore-enterprise-pullcreds --docker-server=docker.io --docker-username=<DOCKERHUB_USER> --docker-password=<DOCKERHUB_PASSWORD> --docker-email=<EMAIL_ADDRESS>
Deploy Anchore Enterprise:
helm repo add anchore https://charts.anchore.io
helm install anchore anchore/enterprise -f anchore_values.yaml
It will take the system several minutes to bootstrap. You can checks on the status of the pods by running kubectl get pods:
$ kubectl get pods
NAME                                                              READY   STATUS    RESTARTS   AGE
anchore-enterprise-analyzer-7f9c7c65c8-tp8cs                      1/1     Running   0          13m
anchore-enterprise-api-754cdb48bc-x8kxt                           3/3     Running   0          13m
anchore-enterprise-catalog-64d4b9bb8-x8vmb                        1/1     Running   0          13m
anchore-enterprise-notifications-65bd45459f-q28h2                 2/2     Running   0          13m
anchore-enterprise-policy-657fdfd7f6-gzkmh                        1/1     Running   0          13m
anchore-enterprise-reports-596cb47894-q8g49                       1/1     Running   0          13m
anchore-enterprise-simplequeue-98b95f985-5xqcv                    1/1     Running   0          13m
anchore-enterprise-ui-6794bbd47-vxljt                             1/1     Running   0          13m
anchore-feeds-77b8976c4c-rs8h2                                    1/1     Running   0          13m
anchore-feeds-db-0                                                1/1     Running   0          13m
anchore-postgresql-0                                              1/1     Running   0          13m
anchore-ui-redis-master-0                                         1/1     Running   0          13m
Run the following command for details on the deployed ingress resource:
$ kubectl describe ingress
Name:             anchore-enterprise
Namespace:        default
Address:          xxxxxxx-default-anchoreen-xxxx-xxxxxxxxx.us-east-1.elb.amazonaws.com
Default backend:  default-http-backend:80 (<none>)
Rules:
  Host  Path  Backends
  ----  ----  --------
  *
        /v2/*   anchore-enterprise-api:8228 (192.168.42.122:8228)
        /*      anchore-enterprise-ui:80 (192.168.14.212:3000)
Annotations:
  alb.ingress.kubernetes.io/scheme:  internet-facing
  kubernetes.io/ingress.class:       alb
Events:
  Type    Reason  Age   From                    Message
  ----    ------  ----  ----                    -------
  Normal  CREATE  14m   alb-ingress-controller  LoadBalancer 904f0f3b-default-anchoreen-d4c9 created, ARN: arn:aws:elasticloadbalancing:us-east-1:077257324153:loadbalancer/app/904f0f3b-default-anchoreen-d4c9/4b0e9de48f13daac
  Normal  CREATE  14m   alb-ingress-controller  rule 1 created with conditions [{    Field: "path-pattern",    Values: ["/v2/*"]  }]
  Normal  CREATE  14m   alb-ingress-controller  rule 2 created with conditions [{    Field: "path-pattern",    Values: ["/*"]  }]
The output above shows that an ELB has been created. Navigate to the specified URL in a browser:
Anchore System
Check the status of the system with AnchoreCTL to verify all of the Anchore services are up:
Note: Read more on Deploying AnchoreCTL
ANCHORECTL_URL=http://xxxxxx-default-anchoreen-xxxx-xxxxxxxxxx.us-east-1.elb.amazonaws.com ANCHORECTL_USERNAME=admin ANCHORECTL_PASSWORD=foobar anchorectl system status
Anchore Feeds
It can take some time to fetch all of the vulnerability feeds from the upstream data sources. Check on the status of feeds with AnchoreCTL:
ANCHORECTL_URL=http://xxxxxx-default-anchoreen-xxxx-xxxxxxxxxx.us-east-1.elb.amazonaws.com ANCHORECTL_USERNAME=admin ANCHORECTL_PASSWORD=foobar anchorectl feed list
Note: It is not uncommon for the above command to return a: [] as the initial feed sync occurs.
Once the vulnerability feed sync is complete, Anchore can begin to return vulnerability results on analyzed images. Please continue to the Vulnerability Management section of our documentation for more information.
2.3.3 - Deploying Anchore Enterprise on Google Kubernetes Engine (GKE)
Get an understanding of deploying Anchore Enterprise on a Google Kubernetes Engine (GKE) cluster and exposing it on the public Internet.
Note when using Google Cloud, consider utilizing Cloud SQL for PostgreSQL as a managed database service.
Prerequisites
- A running GKE cluster with worker nodes launched. See GKE Documentation for more information on this setup.
- Helm client installed on local host.
- AnchoreCTL installed on local host.
Once you have a GKE cluster up and running with worker nodes launched, you can verify it by using the followiing command.
$ kubectl get nodes
NAME                                                STATUS   ROLES    AGE   VERSION
gke-standard-cluster-1-default-pool-c04de8f1-hpk4   Ready    <none>   78s   v1.13.7-gke.24
gke-standard-cluster-1-default-pool-c04de8f1-m03k   Ready    <none>   79s   v1.13.7-gke.24
gke-standard-cluster-1-default-pool-c04de8f1-mz3q   Ready    <none>   78s   v1.13.7-gke.24
Anchore Helm Chart
Anchore maintains a Helm chart to simplify the software deployment process. An Anchore Enterprise deployment of the chart will include the following:
- Anchore Enterprise software
- PostgreSQL (13 or higher)
- Redis (4)
To make the necessary configurations to the Helm chart, create a custom anchore_values.yaml file and reference it during deployment. There are many options for configuration with Anchore. The following is intended to cover the minimum required changes to successfully deploy Anchore Enterprise on Google Kubernetes Engine.
Note: For this deployment, a GKE ingress controller will be used. You can read more about Kubernetes Ingress with a GKE Ingress Controller here
Configurations
Make the following changes below to your anchore_values.yaml
Ingress
ingress:
  enabled: true
  apiPaths:
    - /v2/*
  uiPath: /*
Note: Configuring ingress is optional. It is used throughout this guide to expose the Anchore deployment on the public internet.
Anchore API Service
api:
  replicaCount: 1
  # kubernetes service configuration for anchore external API
  service:
    type: NodePort
    port: 8228
    annotations: {}
Note: Changed the service type to NodePort
Anchore Enterprise UI
ui:
  # kubernetes service configuration for anchore UI
  service:
    type: NodePort
    port: 80
    annotations: {}
    sessionAffinity: ClientIP
Note: Changed service type to NodePort.
Anchore Enterprise Deployment
Create Secrets
Enterprise services require an Anchore Enterprise license, as well as credentials with permission to access the private DockerHub repository containing the enterprise software.
Create a Kubernetes secret containing your license file:
kubectl create secret generic anchore-enterprise-license --from-file=license.yaml=<PATH/TO/LICENSE.YAML>
Create a Kubernetes secret containing DockerHub credentials with access to the private Anchore Enterprise software:
kubectl create secret docker-registry anchore-enterprise-pullcreds --docker-server=docker.io --docker-username=<DOCKERHUB_USER> --docker-password=<DOCKERHUB_PASSWORD> --docker-email=<EMAIL_ADDRESS>
Deploy Anchore Enterprise:
helm repo add anchore https://charts.anchore.io
helm install anchore anchore/enterprise -f anchore_values.yaml
It will take the system several minutes to bootstrap. You can checks on the status of the pods by running kubectl get pods:
$ kubectl get pods
NAME                                                              READY   STATUS    RESTARTS   AGE
anchore-enterprise-analyzer-7f9c7c65c8-tp8cs                      1/1     Running   0          13m
anchore-enterprise-api-754cdb48bc-x8kxt                           3/3     Running   0          13m
anchore-enterprise-catalog-64d4b9bb8-x8vmb                        1/1     Running   0          13m
anchore-enterprise-notifications-65bd45459f-q28h2                 2/2     Running   0          13m
anchore-enterprise-policy-657fdfd7f6-gzkmh                        1/1     Running   0          13m
anchore-enterprise-reports-596cb47894-q8g49                       1/1     Running   0          13m
anchore-enterprise-simplequeue-98b95f985-5xqcv                    1/1     Running   0          13m
anchore-enterprise-ui-6794bbd47-vxljt                             1/1     Running   0          13m
anchore-feeds-77b8976c4c-rs8h2                                    1/1     Running   0          13m
anchore-feeds-db-0                                                1/1     Running   0          13m
anchore-postgresql-0                                              1/1     Running   0          13m
anchore-ui-redis-master-0                                         1/1     Running   0          13m
Run the following command for details on the deployed ingress resource:
$ kubectl describe ingress
Name:             anchore-enterprise
Namespace:        default
Address:          34.96.64.148
Default backend:  default-http-backend:80 (10.8.2.6:8080)
Rules:
  Host  Path  Backends
  ----  ----  --------
  *
        /v2/*   anchore-enterprise-api:8228 (<none>)
        /*      anchore-enterprise-ui:80 (<none>)
Annotations:
  kubernetes.io/ingress.class:            gce
  ingress.kubernetes.io/backends:         {"k8s-be-31175--55c0399dc5755377":"HEALTHY","k8s-be-31274--55c0399dc5755377":"HEALTHY","k8s-be-32037--55c0399dc5755377":"HEALTHY"}
  ingress.kubernetes.io/forwarding-rule:  k8s-fw-default-anchore-enterprise--55c0399dc5750
  ingress.kubernetes.io/target-proxy:     k8s-tp-default-anchore-enterprise--55c0399dc5750
  ingress.kubernetes.io/url-map:          k8s-um-default-anchore-enterprise--55c0399dc5750
Events:
  Type    Reason  Age   From                     Message
  ----    ------  ----  ----                     -------
  Normal  ADD     15m   loadbalancer-controller  default/anchore-enterprise
  Normal  CREATE  14m   loadbalancer-controller  ip: 34.96.64.148
The output above shows that an Load Balancer has been created. Navigate to the specified URL in a browser:
Anchore System
Check the status of the system with AnchoreCTL to verify all of the Anchore services are up:
Note: Read more on Deploying AnchoreCTL
ANCHORECTL_URL=http://34.96.64.148 ANCHORECTL_USERNAME=admin ANCHORECTL_PASSWORD=foobar anchorectl system status
Anchore Feeds
It can take some time to fetch all of the vulnerability feeds from the upstream data sources. Check on the status of feeds with Anchore CTL:
ANCHORECTL_URL=http://34.96.64.148 ANCHORECTL_USERNAME=admin ANCHORECTL_PASSWORD=foobar anchorectl feed list
Note: It is not uncommon for the above command to return a: [] as the initial feed sync occurs.
Once the vulnerability feed sync is complete, Anchore can begin to return vulnerability results on analyzed images. Please continue to the Vulnerability Management section of our documentation for more information.
2.3.4 - Deploying Anchore Enterprise on OpenShift
This document will walkthrough the deployment of Anchore Enterprise on an OpenShift Kubernetes Distribution (OKD) 3.11 cluster and expose it on the public internet.
Note: While this document walks through deploying on OKD 3.11, it has been successfully deployed and tested on OpenShift 4.2.4 and 4.2.7.
Prerequisites
- A running OpenShift Kubernetes Distribution (OKD) 3.11 cluster. Read more about the installation requirements here.
- Note: If deploying to a running OpenShift 4.2.4+ cluster, read more about the installation requirements here.
- Helm client and server installed and configured with your cluster.
- AnchoreCTL installed on local host.
Anchore Helm Chart
Anchore maintains a Helm chart to simplify the software deployment process. An Anchore Enterprise installation of the chart will include the following:
- Anchore Enterprise Software
- PostgreSQL (13)
- Redis 4
To make the necessary configurations to the Helm chart, create a custom anchore_values.yaml file and reference it during deployment. There are many options for configuration with Anchore, this document is intended to cover the minimum required changes to successfully deploy Anchore Enterprise on OKD 3.11.
OpenShift Configurations
Create a new project
Create a new project called anchore-enterprise:
oc new-project anchore-enterprise
Create secrets
Two secrets are required for an Anchore Enterprise deployment.
Create a secret for the license file:
oc create secret generic anchore-enterprise-license --from-file=license.yaml=license.yaml
Create a secret for pulling the images:
oc create secret docker-registry anchore-enterprise-pullcreds --docker-server=docker.io --docker-username=<username> --docker-password=<password> --docker-email=<email>
Verify these secrets are in the correct namespace: anchore-enterprise
oc describe secret <secret-name>
Link ImagePullSecret
Link the above Docker registry secret to the default service account:
oc secrets link default anchore-enterprise-pullcreds --for=pull --namespace=anchore-enterprise
Verify this by running the following:
oc describe sa
Note: Validate your OpenShift SCC. Based on the security constraints of your environment, you may need to change SCC. oc adm policy add-scc-to-user anyuid -z default
Anchore Configurations
Create a custom anchore_values.yaml file for your Anchore Enterprise deployment:
# NOTE: This is not a production ready values file for an openshift deployment.

securityContext:
  fsGroup: null
  runAsGroup: null
  runAsUser: null
feeds:
  securityContext:
    fsGroup: null
    runAsGroup: null
    runAsUser: null
  feeds-db:
    primary:
      containerSecurityContext:
        enabled: false
      podSecurityContext:
        enabled: false
postgresql:
  primary:
    containerSecurityContext:
      enabled: false
    podSecurityContext:
      enabled: false
ui-redis:
  master:
    podSecurityContext:
      enabled: false
    containerSecurityContext:
      enabled: false
Install software
Run the following command to install the software:
helm repo add anchore https://charts.anchore.io
helm install anchore -f values.yaml anchore/enterprise
It will take the system several minutes to bootstrap. You can checks on the status of the pods by running oc get pods:
$ oc get pods
NAME                                                              READY     STATUS    RESTARTS   AGE
anchore-enterprise-analyzer-7f9c7c65c8-tp8cs                      1/1     Running   0          13m
anchore-enterprise-api-754cdb48bc-x8kxt                           3/3     Running   0          13m
anchore-enterprise-catalog-64d4b9bb8-x8vmb                        1/1     Running   0          13m
anchore-enterprise-notifications-65bd45459f-q28h2                 2/2     Running   0          13m
anchore-enterprise-policy-657fdfd7f6-gzkmh                        1/1     Running   0          13m
anchore-enterprise-reports-596cb47894-q8g49                       1/1     Running   0          13m
anchore-enterprise-simplequeue-98b95f985-5xqcv                    1/1     Running   0          13m
anchore-enterprise-ui-6794bbd47-vxljt                             1/1     Running   0          13m
anchore-feeds-77b8976c4c-rs8h2                                    1/1     Running   0          13m
anchore-feeds-db-0                                                1/1     Running   0          13m
anchore-postgresql-0                                              1/1     Running   0          13m
anchore-ui-redis-master-0                                         1/1     Running   0          13m
Create route objects
Create two route object in the OpenShift console to expose the UI and API services on the public internet:
Note: Route configuration is optional. It is used throughout this guide to expose the Anchore deployment on the public internet.
API Route

UI Route

Routes

Verify by navigating to the anchore-enterprise-ui route hostname:

Anchore System
Verify API route hostname with AnchoreCTL:
Note: Read more on Deploying AnchoreCTL
# ANCHORECTL_URL=http://anchore-engine-anchore-enterprise.apps.54.84.147.202.nip.io ANCHORECTL_USERNAME=admin ANCHORECTL_PASSWORD=foobar anchorectl system status
...
...
Anchore Feeds
It can take some time to fetch all of the vulnerability feeds from the upstream data sources. Check on the status of feeds with AnchoreCTL:
# ANCHORECTL_URL=http://anchore-engine-anchore-enterprise.apps.54.84.147.202.nip.io ANCHORECTL_USERNAME=admin ANCHORECTL_PASSWORD=foobar anchorectl feed list
...
...
Note: It is not uncommon for the above command to return a: [] as the initial feed sync occurs.
Once the vulnerability feed sync is complete, Anchore can begin to return vulnerability results on analyzed images. Please continue to the Vulnerability Management section of our documentation for more information.
2.4 - Deploying AnchoreCTL
In this section you will learn how to deploy and configure AnchoreCTL, the Anchore Enterprise Command Line Interface.
AnchoreCTL is published as a simple binary that can be installed by downloading it or using provided packages for installation in different platforms.
Using AnchoreCTL, you can manage and inspect all aspects of your Anchore Enterprise deployments, either as a manual
human-readable configuration/instrumentation/control tool or as a CLI that is designed to be used in scripted environments
such as CI/CD and other automation environments.
Important Starting with Enterprise v4.9.0 and continuing forward, AnchoreCTL will be version-aligned with Anchore Enterprise for major/minor
releases
Installation
AnchoreCTL’s release version coincides with the release version of Anchore Enterprise. For example,
- Enterprise v5.7.0
- AnchoreCTL v5.7.0
Important It is highly recommended that the version of AnchoreCTL you are using is supported by the deployed version of Enterprise. Please refer to the Enterprise Release Notes for the supported version of AnchoreCTL.
MacOS/Linux
Specify a release version and destination directory for the installation:
curl -sSfL https://anchorectl-releases.anchore.io/anchorectl/install.sh | sh -s -- -b <DESTINATION_DIR> v5.7.0
Alternatively, you can download a specific version without installation:
curl -o anchorectl.tar.gz https://anchorectl-releases.anchore.io/anchorectl/v5.7.0/anchorectl_5.7.0_linux_amd64.tar.gz
Windows
For windows, you must specify the version of AnchoreCTL to download if using a script.
curl -o anchorectl.zip https://anchorectl-releases.anchore.io/anchorectl/v5.7.0/anchorectl_5.7.0_windows_amd64.zip
Configuration
Anchorectl configuration search paths have the following precedence:
- .anchorectl.yaml
- anchorectl.yaml
- .anchorectl/config.yaml
- ~/.anchorectl.yaml
- ~/anchorectl.yaml
- $XDG_CONFIG_HOME/anchorectl/config.yaml
Required options:
Default options:
# the Anchore Enterprise account that the user is a part of (env var: "ANCHORECTL_ACCOUNT")
account: ""

# the Anchore Enterprise user's login password (env var: "ANCHORECTL_PASSWORD")
password: ""

# the Anchore Enterprise username (env var: "ANCHORECTL_USERNAME")
username: ""

# the URL to the Anchore Enterprise API (env var: "ANCHORECTL_URL")
url: ""

debug:
  # log HTTP requests, responses, headers, and body (requires log level debug or trace) (env var: "ANCHORECTL_DEBUG_API")
  api: false

  # log all events on the internal event bus and poll rich objects read from the bus (env var: "ANCHORECTL_DEBUG_EVENTS")
  events: false


http:
  # default HTTP headers to add to all HTTP requests (env var: "ANCHORECTL_HTTP_HEADERS")
  headers: {}

  # disable SSL certificate verification for all HTTP calls (not recommended) (env var: "ANCHORECTL_HTTP_TLS_INSECURE")
  tls-insecure: false

  # time in seconds before cancelling an HTTP request (env var: "ANCHORECTL_HTTP_TIMEOUT")
  timeout: 180


log:
  # error, warn, info, debug, trace (env var: "ANCHORECTL_LOG_LEVEL")
  level: "warn"

  # file to write all loge entries to (env var: "ANCHORECTL_LOG_FILE")
  file: ""


update:
  # check for a new version of anchorectl at startup (env var: "ANCHORECTL_UPDATE_CHECK")
  check: true

  # the URL used to check for application updates (env var: "ANCHORECTL_UPDATE_URL")
  url: "https://anchorectl-releases.anchore.io/anchorectl/releases/latest/metadata.json"
Usage
The anchorectl tool has extensive built-in help information for each command and operation, with many of the parameters allowing for environment overrides. To start with anchorectl, you can run the command with --help to see all the operation sections available:
# anchorectl --help
Usage:
   [flags]
   [command]

Application Config:

  (search locations: .anchorectl.yaml, anchorectl.yaml, .anchorectl/config.yaml, ~/.anchorectl.yaml, ~/anchorectl.yaml, $XDG_CONFIG_HOME/anchorectl/config.yaml)

  # the URL to the Anchore Enterprise API (env var: "ANCHORECTL_URL")
  url: ""

  # the Anchore Enterprise username (env var: "ANCHORECTL_USERNAME")
  username: ""

  # the Anchore Enterprise user's login password (env var: "ANCHORECTL_PASSWORD")
  password: ""

  # the Anchore Enterprise account that the user is a part of (env var: "ANCHORECTL_ACCOUNT")
  account: ""

  update:
    # check for a new version of anchorectl at startup (env var: "ANCHORECTL_UPDATE_CHECK")
    check: true

    # the URL used to check for application updates (env var: "ANCHORECTL_UPDATE_URL")
    url: "https://anchorectl-releases.anchore.io/anchorectl/releases/latest/metadata.json"

  # suppress logging output (env var: "ANCHORECTL_QUIET")
  quiet: false

  log:
    # error, warn, info, debug, trace (env var: "ANCHORECTL_LOG_LEVEL")
    level: "warn"

    # file to write all loge entries to (env var: "ANCHORECTL_LOG_FILE")
    file: ""

  debug:
    # log HTTP requests, responses, headers, and body (requires log level debug or trace) (env var: "ANCHORECTL_DEBUG_API")
    api: false

    # log all events on the internal event bus and poll rich objects read from the bus (env var: "ANCHORECTL_DEBUG_EVENTS")
    events: false

  http:
    # disable SSL certificate verification for all HTTP calls (not recommended) (env var: "ANCHORECTL_HTTP_TLS_INSECURE")
    tls-insecure: false

    # time in seconds before cancelling an HTTP request (env var: "ANCHORECTL_HTTP_TIMEOUT")
    timeout: 180

    # default HTTP headers to add to all HTTP requests (env var: "ANCHORECTL_HTTP_HEADERS")
    headers: map[]

Available Commands:
  account      Account related operations
  application  Application related operations
  archive      Archive rule and image operations
  completion   Generate the autocompletion script for the specified shell
  compliance   Compliance report operations
  correction   Correction related operations
  event        Event related operations
  feed         Feed related operations
  help         Help about any command
  image        Image related operations
  policy       Policy related operations
  registry     Registry credential operations
  repo         Repository related operations
  source       Source repository related operations
  subscription Subscription related operations
  system       System related operations
  user         User related operations
  version      show anchorectl version information

Global Flags:
  -c, --config string   application config file (env: ANCHORECTL_CONFIG)
  -h, --help            help for this command
  -q, --quiet           suppress all logging output (env: ANCHORECTL_QUIET)
  -v, --verbose count   increase verbosity (-v = info, -vv = debug) (env: ANCHORECTL_VERBOSITY)
      --version         version for this command

Use "[command] --help" for more information about a command.
Once installed and configured, a good way to quickly test that your anchorectl client is ready to use against a deployed and running Anchore Enterprise endpoint is to exercise the system status call, which will display status information fetched from your Enterprise deployment.
With ~/.anchorectl.yaml installed and populated correctly, no environment or parameters are required:
# anchorectl system status
 ✔ Status system
┌─────────────────┬────────────────────┬─────────────────────────────┬──────┬────────────────┬────────────┬──────────────┐
│ SERVICE         │ HOST ID            │ URL                         │ UP   │ STATUS MESSAGE │ DB VERSION │ CODE VERSION │
├─────────────────┼────────────────────┼─────────────────────────────┼──────┼────────────────┼────────────┼──────────────┤
│ reports         │ anchore-quickstart │ http://reports:8228         │ true │ available      │ 570        │ 5.7.0        │
│ analyzer        │ anchore-quickstart │ http://analyzer:8228        │ true │ available      │ 570        │ 5.7.0        │
│ notifications   │ anchore-quickstart │ http://notifications:8228   │ true │ available      │ 570        │ 5.7.0        │
│ apiext          │ anchore-quickstart │ http://api:8228             │ true │ available      │ 570        │ 5.7.0        │
│ policy_engine   │ anchore-quickstart │ http://policy-engine:8228   │ true │ available      │ 570        │ 5.7.0        │
│ reports_worker  │ anchore-quickstart │ http://reports-worker:8228  │ true │ available      │ 570        │ 5.7.0        │
│ simplequeue     │ anchore-quickstart │ http://queue:8228           │ true │ available      │ 570        │ 5.7.0        │
│ catalog         │ anchore-quickstart │ http://catalog:8228         │ true │ available      │ 570        │ 5.7.0        │
└─────────────────┴────────────────────┴─────────────────────────────┴──────┴────────────────┴────────────┴──────────────┘
Without setting up ~/.anchorectl.yaml or any configuration file, you can interact using environment variables:
ANCHORECTL_URL="http://localhost:8228" ANCHORECTL_USERNAME="admin" ANCHORECTL_PASSWORD="foobar" anchorectl system status
 ✔ Status system
┌─────────────────┬────────────────────┬─────────────────────────────┬──────┬────────────────┬────────────┬──────────────┐
│ SERVICE         │ HOST ID            │ URL                         │ UP   │ STATUS MESSAGE │ DB VERSION │ CODE VERSION │
├─────────────────┼────────────────────┼─────────────────────────────┼──────┼────────────────┼────────────┼──────────────┤
│ reports         │ anchore-quickstart │ http://reports:8228         │ true │ available      │ 570        │ 5.7.0        │
│ analyzer        │ anchore-quickstart │ http://analyzer:8228        │ true │ available      │ 570        │ 5.7.0        │
│ notifications   │ anchore-quickstart │ http://notifications:8228   │ true │ available      │ 570        │ 5.7.0        │
│ apiext          │ anchore-quickstart │ http://api:8228             │ true │ available      │ 570        │ 5.7.0        │
│ policy_engine   │ anchore-quickstart │ http://policy-engine:8228   │ true │ available      │ 570        │ 5.7.0        │
│ reports_worker  │ anchore-quickstart │ http://reports-worker:8228  │ true │ available      │ 570        │ 5.7.0        │
│ simplequeue     │ anchore-quickstart │ http://queue:8228           │ true │ available      │ 570        │ 5.7.0        │
│ catalog         │ anchore-quickstart │ http://catalog:8228         │ true │ available      │ 570        │ 5.7.0        │
└─────────────────┴────────────────────┴─────────────────────────────┴──────┴────────────────┴────────────┴──────────────┘
Next Steps
Once the AnchoreCTL has been installed and configured, learn about Vulnerability Management
2.5 - Feeds Service
Note Well
Up-to-date vulnerability data is critical to a fully functioning Anchore Enterprise deployment.Anchore Enterprise uses security vulnerability and package data from a number of different sources.
The Anchore Feed Service collects vulnerability and package data from the upstream sources and normalizes this data to be published
as feeds that Anchore Enterprise can subscribe to.
Anchore Enterprise polls the feed service at a user defined interval, by default every six hours, and will download feed data
updated since the last sync.
Anchore hosts a public service on the Anchore Cloud which provides access, for free, to all public feeds.
An on-premises feed service is available for commercial customers allowing Anchore Enterprise to synchronize with a locally
deployed feed service, without any reliance on Anchore Cloud.
For further information on configuration of the feeds service, see Configuration - Feeds
3 - Integration
Integrations that Anchore Supports
3.1 - Container Registries via the API
Using the API or CLI, Anchore Enterprise can be instructed to download an image from a public or private container registry.
Anchore Enterprise will attempt to download images from any registry without requiring further configuration. However if
your registry requires authentication then the registry and corresponding credentials will need to be defined.
Anchore Enterprise can analyze images from any Docker V2 compatible registry.

Jump to the registry configuring guide for your registry:
3.1.1 - Amazon Elastic Container Registry
Amazon AWS typically uses keys instead of traditional usernames & passwords. These keys consist of an access key ID and a secret access key. While it is possible to use the aws ecr get-login command to create an access token, this will expire after 12 hours so it is not appropriate for use with Anchore Enterprise, otherwise a user would need to update their registry credentials regularly. So when adding an Amazon ECR registry to Anchore Enterprise you should pass the aws_access_key_id and aws_secret_access_key.
# ANCHORECTL_REGISTRY_PASSWORD=<MY_AWS_SECRET_ACCESS_KEY> anchorectl registry add 1234567890.dkr.ecr.us-east-1.amazonaws.com --username <MY_AWS_ACCESS_KEY_ID> --type awsecr
The registry-type parameter instructs Anchore Enterprise to handle these credentials as AWS credentials rather than traditional usernames and passwords. Currently Anchore Enterprise supports two types of registry authentication standard username and password for most Docker V2 registries and Amazon ECR. In this example we specified the registry type on the command line however if this parameter is omitted then AnchoreCTL will attempt to guess the registry type from the URL which uses a standard format.
Anchore Enterprise will use the AWS access key and secret access keys to generate authentication tokens to access the Amazon ECR registry, Anchore Enterprise will manage regeneration of these tokens which typically expire after 12 hours.
In addition to supporting AWS access key credentials Anchore also supports the use of IAM roles for authenticating with Amazon ECR if Anchore Enterprise is run on an EC2 instance.
In this case you can configure Anchore Enterprise to inherit the IAM role from the EC2 instance hosting the system.
When launching the EC2 instance that will run Anchore Enterprise you need to specify a role that includes the AmazonEC2ContainerRegistryReadOnly policy.
While this is best performed using a CloudFormation template, you can manually configure from the launch instance wizard.
Step 1: Select Create new IAM role.
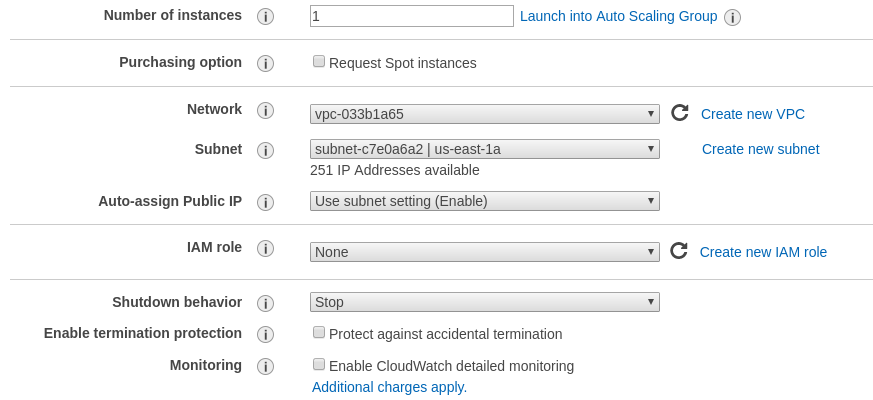
Step 2: Under type of trusted entity select EC2.
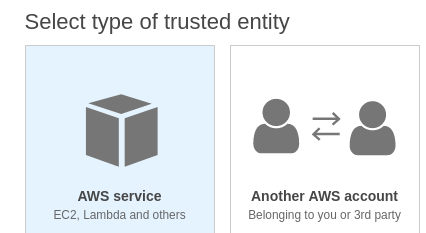
Ensure that the AmazonEC2ContainerRegistryReadOnly policy is selected.
Step 3: Attach Permissions to the Role.
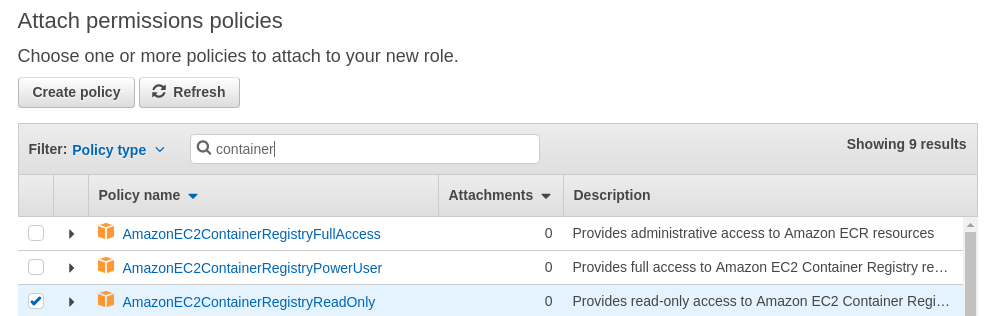
Step 4: Name the role.
Give a name to the role and add this role to the Instance you are launching.
On the running EC2 instance you can manually verify that the instance has inherited the correct role by running the following command:
# curl http://169.254.169.254/latest/meta-data/iam/info
{
 "Code" : "Success",
 "LastUpdated" : "2018-01-1218:45:12Z",
 "InstanceProfileArn" : "arn:aws:iam::123456789012:instance-profile/ECR-ReadOnly",
 "InstanceProfileId" : "ABCDEFGHIJKLMNOP”
}
Step 5: Enable IAM Authentication in Anchore Enterprise.
By default the support for inheriting the IAM role is disabled.
To enable IAM based authentication add the following entry to the top of Anchore Enterprise config.yaml file:
allow_awsecr_iam_auto: True
Step 6: Add the Registry using the AWSAUTO user.
When IAM support is enabled instead of passing the access key and secret access key use “awsauto” for both username and password. This will instruct Anchore Enterprise to inherit the role from the underlying EC2 instance.
# ANCHORECTL_REGISTRY_PASSWORD=awsauto anchorectl registry add 1234567890.dkr.ecr.us-east-1.amazonaws.com --username awsauto --type awsecr
3.1.2 - Azure Container Registry
To use an Azure Registry, you can configure Anchore to use either the admin credential(s) or a service principal. Refer to Azure documentation for differences and how to setup each. When you’ve chosen a credential type, use the following to determine which registry command options correspond to each value for your credential type
Admin Account
- Registry: The login server (Ex. myregistry1.azurecr.io)
- Username: The username in the ‘az acr credential show –name ’ output
- Password: The password or password2 value from the ‘az acr credential show’ command result
Service Principal
- Registry: The login server (Ex. myregistry1.azurecr.io)
- Username: The service principal app id
- Password: The service principal password
Note: You can follow Microsoft Documentation for creating a Service Principal.
To add an azure registry credential, invoke anchorectl as follows:
ANCHORECTL_REGISTRY_PASSWORD=<password> anchorectl registry add <registry> --username <username> <Password>
Once a registry has been added, any image that is added (e.g. anchorectl image add <Registry>/some/repo:sometag) will use the provided credential to download/inspect and analyze the image.
3.1.3 - Google Container Registry
When working with Google Container Registry it is recommended that you use JSON keys rather than the short lived access tokens.
JSON key files are long-lived and are tightly scoped to individual projects and resources. You can read more about JSON credentials in Google’s documentation at the following URL: Google Container Registry advanced authentication
Once a JSON key file has been created with permissions to read from the container registry then the registry should be added with the username _json_key and the password should be the contents of the key file.
In the following example a file named key.json in the current directory contains the JSON key with readonly access to the my-repo repository within the my-project Google Cloud project.
# ANCHORECTL_REGISTRY_PASSWORD="$(cat key.json)" anchorectl registry add us.gcr.io --username _json_key
3.1.4 - Harbor Container Registry
3.1.5 - Managing Registries
Anchore Enterprise will attempt to download images from any registry without requiring further configuration.
However if your registry requires authentication then the registry and corresponding credentials will need to be defined.
Listing Registries
Running the following command lists the defined registries.
# anchorectl registry list
 ✔ Fetched registries
┌───────────────────┬───────────────┬───────────────┬─────────────────┬──────────────────────┬─────────────┬───────────────────┐
│ REGISTRY NAME     │ REGISTRY TYPE │ REGISTRY USER │ REGISTRY VERIFY │ CREATED AT           │ LAST UPATED │ REGISTRY          │
├───────────────────┼───────────────┼───────────────┼─────────────────┼──────────────────────┼─────────────┼───────────────────┤
│ docker.io         │ docker_v2     │ anchore       │ true            │ 2022-08-24T21:37:08Z │             │ docker.io         │
│ quay.io           │ docker_v2     │ anchore       │ true            │ 2022-08-25T20:55:33Z │             │ quay.io           │
│ 192.168.1.89:5000 │ docker_v2     │ johndoe       │ true            │ 2022-08-25T20:56:01Z │             │ 192.168.1.89:5000 │
└───────────────────┴───────────────┴───────────────┴─────────────────┴──────────────────────┴─────────────┴───────────────────┘
Here we can see that 3 registries have been defined. If no registry was defined Anchore Enterprise would attempt to
pull images without authentication but a registry is defined then all pulls for images from that registry will use the specified username and password.
Adding a Registry
Registries can be added using the following syntax.
# ANCHORECTL_REGISTRY_PASSWORD=<password> anchorectl registry add <registry> --username <username>
The REGISTRY parameter should include the fully qualified hostname and port number of the registry. For example: registry.anchore.com:5000
Anchore Enterprise will only pull images from a TLS/SSL enabled registry. If the registry is protected with a self signed certificate or a certificated
signed by an unknown certificate authority then the --secure-conection=<true|false> parameter can be passed which instructs Anchore Enterprise not to validate the certificate.
Most Docker V2 compatible registries require username and password for authentication. Amazon ECR, Google GCR and Microsoft Azure include support
for their own native credentialing. See Working with AWS ECR Registry Credentials,
Working with Google GCR Registry Credentials and
Working with Azure Registry Credentials for more details.
Getting Registry Details
The registry get command allows the user to retrieve details about a specific registry.
For example:
# anchorectl registry get registry.example.com
 ✔ Fetched registry
┌──────────────────────┬───────────────┬───────────────┬─────────────────┬──────────────────────┬─────────────┬──────────────────────┐
│ REGISTRY NAME        │ REGISTRY TYPE │ REGISTRY USER │ REGISTRY VERIFY │ CREATED AT           │ LAST UPATED │ REGISTRY             │
├──────────────────────┼───────────────┼───────────────┼─────────────────┼──────────────────────┼─────────────┼──────────────────────┤
│ registry.example.com │ docker_v2     │ johndoe       │ false           │ 2022-08-25T20:58:33Z │             │ registry.example.com │
└──────────────────────┴───────────────┴───────────────┴─────────────────┴──────────────────────┴─────────────┴──────────────────────┘
In this example we can see that the registry.example.com registry was added to Anchore Enterprise on the 25th August at 20:58 UTC.
The password for the registry cannot be retrieved through the API or AnchoreCTL.
Updating Registry Details
Once a registry had been defined the parameters can be updated using the update command. This allows a registry’s username, password and secure-connection (validate TLS) parameters to be updated using the same syntax as is used in the ‘add’ operation.
# ANCHORECTL_REGISTRY_PASSWORD=<newpassword> anchorectl registry update registry.example.com --username <newusername> --validate=<true|false> --secure-connection=<true|false>
Deleting Registries
A Registry can be deleted from Anchore’s configuration using the del command.
For example to delete the configuration for registry.example.com the following command should be issued:
# anchorectl registry delete registry.example.com
 ✔ Deleted registry
No results
Note: Deleting a registry record does not delete the records of images/tags associated with that registry.
Advanced
Anchore Enterprise attempts to perform a credential validation upon registry addition, but there are cases where a credential can be valid but the validation routine can fail (in particular, credential
validation methods are changing for public registries over time). If you are unable to add a registry but believe that the credential you are providing is valid, or you wish to add a
credential to anchore before it is in place in the registry, you can bypass the registry credential validation process using the --validate=false option to the registry add or registry update command.
3.2 - Configuring Registries via the GUI
Introduction
In this section you will learn how to configure access to registries within the Anchore Enterprise UI.
Assumptions
- You have a running instance of Anchore Enterprise and access to the UI.
- You have the appropriate permissions to list and create registries. This means you are either a user in the admin account, or a user that is already a member of the read-write role for your account.
The UI will attempt to download images from any registry without requiring further configuration. However, if your registry requires authentication then the registry and corresponding credentials will need to be defined.
First off, after a successful login, navigate to the Configuration tab in the main menu.

Add a New Registry
In order to define a registry and its credentials, navigate to the Registries tab within Configuration. If you have not yet defined any registries, select the Let’s add one! button. Otherwise, select the Add New Registry button on the right-hand side.
Upon selection, a modal will appear:

A few items will be required:
- Registry
- Type (e.g. docker_v2 or awsecr)
- Username
- Password
As the required field values may vary depending on the type of registry and credential options, they will be covered in more depth below. A couple additional options are also provided:
Allow Self Signed
By default, the UI will only pull images from a TLS/SSL enabled registry. If the registry is protected with a self signed certificate or a certificate signed by an unknown certificate authority, you can enable this option by sliding the toggle to the right to instruct the UI not to validate the certificate.
Validate on Add
Credential validation is attempted by default upon registry addition although there may be cases where a credential can be valid but the validation routine can fail (in particular, credential validation methods are changing for public registries over time). Disabling this option by sliding the toggle to the left will instruct the UI to bypass the validation process.
Once a registry has been successfully configured, its credentials as well as the options mentioned above can be updated by clicking Edit under the Actions column. For more information on analyzing images with your newly defined registry, refer to: UI - Analyzing Images.

The instructions provided below for setting up the various registry types can also be seen inline by clicking ‘Need some help setting up your registry?’ near the bottom of the modal.
Docker V2 Registry
Regular docker v2 registries include dockerhub, quay.io, artifactory, docker registry v2 container, redhat public container registry, and many others. Generally, if you can execute a ‘docker login’ with a pair of credentials, Anchore can use those.
Registry
Hostname or IP of your registry endpoint, with an optional port
Ex: docker.io, mydocker.com:5000, 192.168.1.20:5000
Type
Set this to docker_v2
Username
Username that has access to the registry
Password
Password for the specified user
Amazon Web Services Registry (AWS ECR)
For Username and Password, there are three different modes that require different settings when adding an ECR registry, depending on where your Anchore Enterprise is running and how your AWS IAM settings are configured to allow access to a given ECR registry.
API Keys
Provide access/secret keys from an account or IAM user. We highly recommend using a dedicated IAM user with specific access restrictions for this mode.
Username
AWS access key
Password
AWS secret key
Local Credentials
Uses the AWS credentials found in the local execution environment for Anchore Enterprise (Ex. env vars, ~/.aws/credentials, or instance profile).
ECR Assume Role
To have Anchore Enterprise assume a specific role different from the role it currently runs within, specify a different role ARN. Anchore Enterprise will use the execution role (as in iamauto mode from the instance/task profile) to assume a different role. The execution role must have permissions to assume the role requested.
For more information, see: Working with Amazon ECR Registry Credentials
Google Container Registry (GCR)
When working with Google Container Registry, it is recommended that you use service account JSON keys rather than the short lived access tokens. Learn more about how to generate a JSON key here.
Registry
GCR registry hostname endpoint
Ex: gcr.io, us.gcr.io, eu.gcr.io, asia.gcr.io
Type
Set this to docker_v2
Username
Set this to _json_key
Password
Full JSON string of your JSOn key (the content of the key.json file you got from GCR)
For more information, see: Working with Google Container Registry (GCR) Credentials
Microsoft Azure Registry
To use an Azure Registry, you can configure Anchore to use either the admin credential(s) or a service principal. Refer to Azure documentation for differences and how to setup each.
Admin Account
Username
The username in the ‘az acr credentials show –name ’ output
Password
The password or password2 value from the ‘az acr credentials show’ command result
Service Principal
Username
The service principal app id
Password
The service principal password
For more information, see: Working with Azure Registry Credentials
3.3 - CI / CD Integration
Anchore Enterprise can be integrated into CI/CD systems such as Jenkins, GitHub, or GitLab to secure pipelines by adding automatic scanning.
If an artifact does not pass the policy checks then users can configure either a gating workflow which fails the build or allow the pipeline to continue with a warning to the build job owner. Notifications can be handled via the CI/CD system itself or using Anchore’s native notification system and can provide information about the CVEs discovered and the complete policy analysis. Images that pass the policy check can be promoted to the production registry.
There are two ways to use CI/CD with Anchore: distributed mode or centralized mode. Both modes work with any CI/CD system as long as the AnchoreCTL binary can be installed and run, or you can access the Enterprise APIs directly.
Distributed mode
The build job invokes a tool called AnchoreCTL locally on the CI/CD runner to generate both data and metadata about the artifact being scanned, such as source code or a container image, in the form of a software bill of materials (SBOM). The SBOM is then passed to Anchore Enterprise for analysis. The policy analysis can look for known CVEs, exposed secrets, incorrect configurations, licenses, and more.
Centralized mode
The build job will upload the container image to a repo and then request Anchore Enterprise pulls it down, generate the SBOM on the backend, and return the policy analysis result.
Requirements
Anchore Enterprise is deployed in your environment with the API accessible from your pipeline runner.
Centralized Mode: Credentials for your container registry are added to Anchore Enterprise, under the Anchore account that you intend to use with this pipeline. See Registries. For information on what registry/credentials must be added to allow Anchore Enterprise to access your container registry, refer to your container registry’s documentation.
Further Reading
To learn more about distributed and centralized modes, please review the Analyzing Images via CTL documentation.
3.3.1 - GitLab
Requirements
- Anchore Enterprise is deployed in your environment, with the API accessible from your GitLab CI environment.
- Credentials for your GitLab Container Registry are added to Anchore Enterprise, under the Anchore account that you intend to use with GitLab CI. See Registries. For information on what registry/credentials must be added to allow Anchore Enterprise to access your GitLab Container Registry, see https://docs.gitlab.com/ee/user/packages/container_registry/.
Ensure that the following variables are set in your GitLab repository (settings -> CI/CD -> Variables -> Expand -> Add variable):
ANCHORECTL_USERNAME  (protected)
ANCHORECTL_PASSWORD (protected and masked)
ANCHORECTL_URL (protected)
Note Gitlab has a minimum length of 8 for variables. Please ensure both your username and password meet this requirement.

2. Create config file
Create a new file in your repository. Name the file .gitlab-ci.yml.

a) Distributed Mode
This is the most easily scalable method for scanning images. Distributed scanning uses the anchorectl utility to build the SBOM directly on the build runner and then pushes the SBOM to Anchore Enterprise through the API. To use this scanning method, paste the following workflow script into your new .gitlab-ci.yml file. After building the image from your Dockerfile and scanning it with anchorectl, this workflow will display vulnerabilities and policy results in the build log. After pasting, click “Commit changes” to save the new file.
### Anchore Distributed Scan
  # you will need three variables defined:
  # ANCHORECTL_USERNAME
  # ANCHORECTL_PASSWORD
  # ANCHORECTL_URL

image: docker:latest
services:
- docker:dind
stages:
- build
- anchore
variables:
  ANCHORECTL_FAIL_BASED_ON_RESULTS: "false"
  ANCHORE_IMAGE: ${CI_REGISTRY_IMAGE}:${CI_COMMIT_REF_SLUG}

Build:
  stage: build
  script:
    ### build and push docker image
    - docker login -u gitlab-ci-token -p $CI_JOB_TOKEN registry.gitlab.com
    - docker build -t ${ANCHORE_IMAGE} .
    - docker push ${ANCHORE_IMAGE}

Anchore:
  stage: anchore
  script:
    ### install anchorectl binary
    - apk add --no-cache curl
    - curl -sSfL https://anchorectl-releases.anchore.io/anchorectl/install.sh | sh -s -- -b ${HOME}/.local/bin
    - export PATH="${HOME}/.local/bin/:${PATH}"
    ### scan image and push to anchore enterprise
    - anchorectl image add --no-auto-subscribe --wait --dockerfile ./Dockerfile --from registry ${ANCHORE_IMAGE}
    ### then get the results:
    - anchorectl image vulnerabilities ${ANCHORE_IMAGE}
    - anchorectl image check --detail ${ANCHORE_IMAGE}
b) Centralized Mode
This method uses the “analyzer” pods in the Anchore Enterprise deployment to build the SBOM. This can create queuing if there are not enough analyzer processes, and this method may require the operator to provide registry credentials in the Enterprise backend (if the images to be scanned are in private registries). This method may be preferred in cases where the Anchore Enterprise operator does not control the image build process (the analyzers can simply poll registries to look for new image builds as they are pushed), and this method also allows the operator to simply queue up the image for asynchronous scanning later if vulnerability and policy results are not required immediately. If the user wants malware scanning results from Anchore Enterprise’s clamav integration, the Centralized Scanning method is required. To use this scanning method, paste the following workflow script into your new .gitlab-ci.yml file. After building the image from your Dockerfile,, this workflow will tell Anchore Enterprise to scan the image, then it will display the vulnerability and policy results in the build log. After pasting, click “Commit changes” to save the new file.
### Anchore Centralized Scan
  # you will need three variables defined:
  # ANCHORECTL_USERNAME
  # ANCHORECTL_PASSWORD
  # ANCHORECTL_URL

image: docker:latest
services:
- docker:dind
stages:
- build
- anchore
variables:
  ANCHORECTL_FAIL_BASED_ON_RESULTS: "false"
  ANCHORE_IMAGE: ${CI_REGISTRY_IMAGE}:${CI_COMMIT_REF_SLUG}

Build:
  stage: build
  script:
    ### build and push docker image
    - docker login -u gitlab-ci-token -p $CI_JOB_TOKEN registry.gitlab.com
    - docker build -t ${ANCHORE_IMAGE} .
    - docker push ${ANCHORE_IMAGE}

Anchore:
  stage: anchore
  script:
    ### install anchorectl binary
    - apk add --no-cache curl
    - curl -sSfL https://anchorectl-releases.anchore.io/anchorectl/install.sh | sh -s -- -b ${HOME}/.local/bin
    - export PATH="${HOME}/.local/bin/:${PATH}"
    ### queue image for scanning
    - anchorectl image add --no-auto-subscribe --wait --dockerfile ./Dockerfile ${ANCHORE_IMAGE}
    ### then get the results:
    - anchorectl image vulnerabilities ${ANCHORE_IMAGE}
    - anchorectl image check --detail ${ANCHORE_IMAGE}
4. View pipeline
Gitlab will automatically start a pipeline. Navigate to “Build” -> “Pipelines” and then on your running pipeline.

5. View output
Once the build is complete, click on the “anchore” stage and view the output of the job. You will see the results of the vulnerability match and policy evaluation in the output.
3.3.2 - GitHub
Image Scanning can be easily integrated into your GitHub Actions pipeline using anchorectl.
Ensure that the following variables/secrets are set in in your GitHub repository (repository settings -> secrets and variables -> actions):
- Variable ANCHORECTL_URL
- Variable ANCHORECTL_USERNAME
- Secret ANCHORECTL_PASSWORD
These are necessary for the integration to access your Anchore Enterprise deployment. The ANCHORECTL_PASSWORD value should be created as a repository secret to prevent exposure of the value in job logs, while ANCHORECTL_URL and ANCHORECTL_USERNAME can be created as repository variables.

(“Settings” -> “Actions” -> “General” -> “Workflow permissions”) select “Read and write permissions” and click “Save”.

3. Create config file
In your repository, create a new file ( “Add file” -> “Create new file”) and name it .github/workflows/anchorectl.yaml.

4. Set scanning mode
a) Distributed Mode
This is the most easily scalable method for scanning images. Distributed scanning uses the anchorectl utility to build the SBOM directly on the build runner and then pushes the SBOM to Anchore Enterprise through the API. To use this scanning method, paste the following workflow script into your new anchorectl.yaml file. After building the image from your Dockerfile and scanning it with anchorectl, this workflow will display vulnerabilities and policy results in the build log.
name: Anchore Enterprise Distributed Scan

on:
  workflow_dispatch:
    inputs:
      mode:
        description: 'On-Demand Build'

env:
  ANCHORECTL_URL: ${{ vars.ANCHORECTL_URL }}
  ANCHORECTL_USERNAME: ${{ vars.ANCHORECTL_USERNAME }}
  ANCHORECTL_PASSWORD: ${{ secrets.ANCHORECTL_PASSWORD }}
  ## set ANCHORECTL_FAIL_BASED_ON_RESULTS to true if you want to break the pipeline based on the evaluation
  ANCHORECTL_FAIL_BASED_ON_RESULTS: false
  REGISTRY: ghcr.io

jobs:
  Build:
    runs-on: ubuntu-latest
    steps:

    - name: "Set IMAGE environmental variables"
      run: |
        echo "IMAGE=${REGISTRY}/${GITHUB_REPOSITORY}:${GITHUB_REF_NAME}" >> $GITHUB_ENV

    - name: Checkout Code
      uses: actions/checkout@v3

    - name: Log in to the Container registry
      uses: docker/login-action@v2
      with:
        registry: ${{ env.REGISTRY }}
        username: ${{ github.actor }}
        password: ${{ secrets.GITHUB_TOKEN }}

    - name: Set up Docker Buildx
      uses: docker/setup-buildx-action@v2


    - name: build local container
      uses: docker/build-push-action@v3
      with:
        tags: ${{ env.IMAGE }}
        push: true
        load: false


  Anchore:
    runs-on: ubuntu-latest
    needs: Build
    steps:

    - name: "Set IMAGE environmental variables"
      run: |
        echo "IMAGE=${REGISTRY}/${GITHUB_REPOSITORY}:${GITHUB_REF_NAME}" >> $GITHUB_ENV

    - name: Checkout Code
      ### only need to do this if you want to pass the dockerfile to Anchore during scanning
      uses: actions/checkout@v3

    - name: Install Latest anchorectl Binary
      run: |
        curl -sSfL https://anchorectl-releases.anchore.io/anchorectl/install.sh | sh -s -- -b ${HOME}/.local/bin v1.6.0
        export PATH="${HOME}/.local/bin/:${PATH}"

    - name: Generate SBOM and Push to Anchore
      run: |
        anchorectl image add --no-auto-subscribe --wait --from registry --dockerfile Dockerfile ${IMAGE}

    - name: Pull Vulnerability List
      run: |
        anchorectl image vulnerabilities ${IMAGE}

    - name: Pull Policy Evaluation
      run: |
        # set "ANCHORECTL_FAIL_BASED_ON_RESULTS=true" (see above in the "env:" section) to break the pipeline here if the
        # policy evaluation returns FAIL or add -f, --fail-based-on-results to this command for the same result
        #
        anchorectl image check --detail ${IMAGE}
b) Centralized Mode
This method uses the “analyzer” pods in the Anchore Enterprise deployment to build the SBOM. This can create queuing if there are not enough analyzer processes, and this method may require the operator to provide registry credentials in the Enterprise backend (if the images to be scanned are in private registries). This method may be preferred in cases where the Anchore Enterprise operator does not control the image build process (the analyzers can simply poll registries to look for new image builds as they are pushed), and this method also allows the operator to simply queue up the image for asynchronous scanning later if vulnerability and policy results are not required immediately. If the user wants malware scanning results from Anchore Enterprise’s clamav integration, the Centralized Scanning method is required. To use this scanning method, paste the following workflow script into your new anchorectl.yaml file. After building the image from your Dockerfile,, this workflow will tell Anchore Enterprise to scan the image, then it will display the vulnerability and policy results in the build log.
name: Anchore Enterprise Centralized Scan

on:
  workflow_dispatch:
    inputs:
      mode:
        description: 'On-Demand Build'

env:
  ANCHORECTL_URL: ${{ vars.ANCHORECTL_URL }}
  ANCHORECTL_USERNAME: ${{ vars.ANCHORECTL_USERNAME }}
  ANCHORECTL_PASSWORD: ${{ secrets.ANCHORECTL_PASSWORD }}
  ## set ANCHORECTL_FAIL_BASED_ON_RESULTS to true if you want to break the pipeline based on the evaluation
  ANCHORECTL_FAIL_BASED_ON_RESULTS: false
  REGISTRY: ghcr.io

jobs:

  Build:
    runs-on: ubuntu-latest
    steps:

    - name: "Set IMAGE environmental variables"
      run: |
        echo "IMAGE=${REGISTRY}/${GITHUB_REPOSITORY}:${GITHUB_REF_NAME}" >> $GITHUB_ENV

    - name: Checkout Code
      uses: actions/checkout@v3

    - name: Log in to the Container registry
      uses: docker/login-action@v2
      with:
        registry: ${{ env.REGISTRY }}
        username: ${{ github.actor }}
        password: ${{ secrets.GITHUB_TOKEN }}

    - name: Set up Docker Buildx
      uses: docker/setup-buildx-action@v2


    - name: build local container
      uses: docker/build-push-action@v3
      with:
        tags: ${{ env.IMAGE }}
        push: true
        load: false

  Anchore:
    runs-on: ubuntu-latest
    needs: Build

    steps:

    - name: "Set IMAGE environmental variables"
      run: |
        echo "IMAGE=${REGISTRY}/${GITHUB_REPOSITORY}:${GITHUB_REF_NAME}" >> $GITHUB_ENV

    - name: Checkout Code
      uses: actions/checkout@v3

    - name: Install Latest anchorectl Binary
      run: |
        curl -sSfL https://anchorectl-releases.anchore.io/anchorectl/install.sh | sh -s -- -b ${HOME}/.local/bin
        export PATH="${HOME}/.local/bin/:${PATH}"

    - name: Queue Image for Scanning by Anchore Enterprise
      run: |
       anchorectl image add --no-auto-subscribe --wait --dockerfile ./Dockerfile ${IMAGE}

    - name: Pull Vulnerability List
      run: |
        anchorectl image vulnerabilities ${IMAGE}

    - name: Pull Policy Evaluation
      run: |
        # set "ANCHORECTL_FAIL_BASED_ON_RESULTS=true" (see above in the "env:" section) to break the pipeline here if the
        # policy evaluation returns FAIL or add -f, --fail-based-on-results to this command for the same result
        #
        anchorectl image check --detail ${IMAGE}
5. Run Workflow
Go to “Actions” -> “Anchore Enterprise with anchorectl” and hit “Run workflow”.

6. View Results
When the workflow completes, view the results by clicking on the workflow name (“Anchore Enterprise with anchorectl”), then on the job (“Anchore”), then expand the “Pull Vulnerability List” and/or “Pull Policy Evaluation” steps to see the details.

7. Notifications
You can also integrate your Anchore deployment into GitHub API whereby Anchore notifications can sent over to GitHub Notifications to GitHub in the form of new issues in a repository.
To configure and enable this please review the GitHub Notifications documentation.
3.3.3 - Jenkins
Ensure that the following credentials are set in in your Jenkins instance (Dashboard -> Manage Jenkins -> Credentials) as credential type “secret text”:
ANCHORECTL_USERNAME
ANCHORECTL_PASSWORD
ANCHORECTL_URL
These are necessary for the integration to access your Anchore Enterprise deployment. The ANCHORECTL_PASSWORD value should be created as a repository secret to prevent exposure of the value in job logs, while ANCHORECTL_URL and ANCHORECTL_USERNAME can be created as repository variables.
a) Distributed
This is the most easily scalable method for scanning images. Distributed scanning uses the anchorectl utility to build the SBOM directly on the build runner and then pushes the SBOM to Anchore Enterprise through the API. To use this scanning method, paste the following stage anywhere after your target container image has been built:
stage('Analyze Image w/ anchorectl') {
      environment {
        ANCHORECTL_URL = credentials("Anchorectl_Url")
        ANCHORECTL_USERNAME = credentials("Anchorectl_Username")
        ANCHORECTL_PASSWORD = credentials("Anchorectl_Password")
        // change ANCHORECTL_FAIL_BASED_ON_RESULTS to "true" if you want to break on policy violations
        ANCHORECTL_FAIL_BASED_ON_RESULTS = "false"
      }
      steps {
        script {
          sh """
            ### install latest anchorectl
            curl -sSfL  https://anchorectl-releases.anchore.io/anchorectl/install.sh  | sh -s -- -b $HOME/.local/bin
            export PATH="$HOME/.local/bin/:$PATH"
            #
            ### actually add the image to the queue to be scanned
            #
            ### --wait tells anchorectl to block until the scan
            ### is complete (this isn't always necessary but if
            ### you want to pull the vulnerability list and/or
            ### policy report, you need to wait
            #
            anchorectl image add --wait --from registry  ${REGISTRY}/${REPOSITORY}:${TAG}
            #
            ### pull vulnerability list (optional)
            anchorectl image vulnerabilities ${REGISTRY}/${REPOSITORY}:${TAG}
            ###
            ### check policy evaluation (omit –detail if you just
            ### want a pass/fail determination)
            anchorectl image check --detail ${REGISTRY}/${REPOSITORY}:${TAG}
            ###
            ### if you want to break the pipeline on a policy violation, add "--fail-based-on-results"
            ### or change the ANCHORECTL_FAIL_BASE_ON_RESULTS variable above to "true"
          """
        } // end script
      } // end steps
    } // end stage "analyze with anchorectl"
b ) Centralized
Centralized Scanning: this method uses the “analyzer” pods in the Anchore Enterprise deployment to build the SBOM. This can create queuing if there are not enough analyzer processes, and this method may require the operator to provide registry credentials in the Enterprise backend (if the images to be scanned are in private registries). This method may be preferred in cases where the Anchore Enterprise operator does not control the image build process (the analyzers can simply poll registries to look for new image builds as they are pushed), and this method also allows the operator to simply queue up the image for asynchronous scanning later if vulnerability and policy results are not required immediately. If the user wants malware scanning results from Anchore Enterprise’s clamav integration, the Centralized Scanning method is required. To use this scanning method, paste the following stage anywhere after your target container image has been built. After building the image from your Dockerfile, this stage will tell Anchore Enterprise to scan the image, then it will display the vulnerability and policy results in the build log.
stage('Analyze Image w/ anchorectl') {
      environment {
        ANCHORECTL_URL = credentials("Anchorectl_Url")
        ANCHORECTL_USERNAME = credentials("Anchorectl_Username")
        ANCHORECTL_PASSWORD = credentials("Anchorectl_Password")
        // change ANCHORECTL_FAIL_BASED_ON_RESULTS to "true" if you want to break on policy violations
        ANCHORECTL_FAIL_BASED_ON_RESULTS = "false"
      }
      steps {
        script {
          sh """
            ### install latest anchorectl
            curl -sSfL  https://anchorectl-releases.anchore.io/anchorectl/install.sh  | sh -s -- -b $HOME/.local/bin
            export PATH="$HOME/.local/bin/:$PATH"
            #
            ### actually add the image to the queue to be scanned
            #
            ### --wait tells anchorectl to block until the scan
            ### is complete (this isn't always necessary but if
            ### you want to pull the vulnerability list and/or
            ### policy report, you need to wait
            #
            anchorectl image add --wait ${REGISTRY}/${REPOSITORY}:${TAG}
            #
            ### pull vulnerability list (optional)
            anchorectl image vulnerabilities ${REGISTRY}/${REPOSITORY}:${TAG}
            ###
            ### check policy evaluation (omit –detail if you just
            ### want a pass/fail determination)
            anchorectl image check --detail ${REGISTRY}/${REPOSITORY}:${TAG}
            ###
            ### if you want to break the pipeline on a policy violation, add "--fail-based-on-results"
            ### or change the ANCHORECTL_FAIL_BASE_ON_RESULTS variable above to "true"
          """
        } // end script
      } // end steps
    } // end stage "analyze with anchorectl"
3.4 - Kubernetes
3.4.1 - Kubernetes Admission Controller
For installation see - Kubernetes Installation
Anchore Enterprise can be integrated with Kubernetes to ensure that only certified images are started within a Kubernetes POD.
Kubernetes can be configured to use an Admission Controller to validate that the container image is compliant with the user’s policy.
The admission controller can be configured to make a webhook call into Anchore Enterprise. Anchore Enterprise exports a Kubernetes-specific API endpoint and will return the pass of fail response in the form of an ImageReview response.

This approach allows the Kubernetes system to make the final decision on running an container image and does not require installation of any per-node plugins into Kubernetes.
Using native Kubernetes features allows this approach to be used in both on-prem and cloud hosted Kubernetes environments.
3.4.2 - Kubernetes Runtime Inventory
Overview
Anchore uses a go binary called anchore-k8s-inventory that leverages the Kubernetes Go SDK
to reach out and list containers in a configurable set of namespaces to determine which images are running.
anchore-k8s-inventory can be deployed via its helm chart, embedded within your Kubernetes cluster as an agent. It will require access to the Anchore API.
KAI (Kubernetes Automated Inventory) - Deprecated
Prior to the v1.0.0 release of anchore-k8s-inventory Kubernetes inventory was called kai. Anchore Enterprise 5.X+ no longer supports kai. For documentation related to the integration & configuration of kai
please refer to the Anchore Enterprise v4.6 documentation.
Deployment
The most common way to track inventory is to install anchore-k8s-inventory as an agent in your cluster. To do this you will need to configure credentials
and information about your deployment in the values file. It is recommended to first configure a specific robot user
for the account where you’ll want to track your Kubernetes inventory.
As an agent anchore-k8s-inventory is installed using helm and the helm chart is hosted as part of the https://charts.anchore.io repo.
It is based on the anchore/k8s-inventory docker image.
To install the helm chart, follow these steps:
- Configure your username, password, Anchore URL and cluster name in the values file.
k8sInventory:
  # Path should not be changed, cluster value is used to tell Anchore which cluster this inventory is coming from
  kubeconfig:
    cluster: <unique-name-for-your-cluster>

  anchore:
    url: <URL for your>

    # Note: recommend using the inventory-agent role
    user: <user>
    password: <password>
- Run helm install in the cluster(s) you wish to track
$ helm repo add anchore https://charts.anchore.io
$ helm install <release> -f <values.yaml> anchore/k8s-inventory
anchore-k8s-inventory must be able to resolve the Anchore URL and requires API credentials. Review the anchore-k8s-inventory logs if you are not able to see the inventory results in the UI.
Note: the Anchore API Password can be provided via a Kubernetes secret, or injected into the environment of the anchore-k8s-inventory container
- For injecting the environment variable, see: injectSecretsViaEnv
- For providing your own secret for the Anchore API Password, see: useExistingSecret. K8s Inventory creates it’s own secret based on your values.yaml file for key
k8sInventory.anchore.password, but the k8sInventory.useExistingSecret key allows you to create your own secret and provide it in the values file. See the K8s Inventory repo for more information about the K8s Inventory specific configuration
Usage
To verify that you are tracking Kubernetes Inventory you can access inventory results with the command anchorectl inventory list and look for results where the TYPE is kubernetes.
The UI also displays the Kubernetes Inventory and allows operators to visually navigate the images, vulnerability results, and see the results of the policy evaluation.
For more details about watching clusters, and reviewing policy results see the Using Kubernetes Inventory section.
General Runtime Management
See Data Management
3.5 - ECS
Overview
Anchore uses a go binary called anchore-ecs-inventory that leverages the AWS Go SDK
to gather an inventory of containers and their images running on ECS and report back to Anchore.
Deployment
Via Helm Chart
You can install the chart via:
helm repo add anchore https://charts.anchore.io
helm install <release-name> -f <values.yaml> anchore/ecs-inventory
A basic values file can always be found here. The key configurations are in the ecsInventory section.
Anchore ECS Inventory creates it’s own secret based on your values.yaml file for the following keys that are required for successfully deploying and connecting the ecs-inventory service to the Anchore Platform and AWS ECS Service:
- ecsInventory.awsAccessKeyId
- ecsInventory.awsSecretAccessKey
Using your own secrets
The (ecsInventory.useExistingSecret and ecsInventory.existingSecretName) or ecsInventory.injectSecretsViaEnv keys allows you to create your own secret and provide it in the values file or place the required secret into the pod via different means such as injecting the secrets into the pod using hashicorp vault.
For example:
Create a secret in kubernetes:
apiVersion: v1
kind: Secret
metadata:
  name: ecs-inventory-secrets
type: Opaque
stringData:
  ANCHORE_ECS_INVENTORY_ANCHORE_PASSWORD: foobar
  AWS_ACCESS_KEY_ID: someKeyId
  AWS_SECRET_ACCESS_KEY: someSecretAccessKey
Provide it to the helm chart via the values file:
ecsInventory:
    useExistingSecret: true
    existingSecretName: "ecs-inventory-secrets"
The Anchore API Password and required AWS secret values can also be injected into the environment of the ecs-inventory container. For injecting the environment variable
# set
ecsInventory:
  injectSecretsViaEnv=true
See the ecs-inventory repo for more information about the ECS Inventory specific configuration
Via ECS
It is also possible to deploy the ecs-inventory container on ECS. Here is an sample task definition that could be used to deploy ecs-inventory with a default configuration:
{
    "family": "anchore-ecs-inventory-example-task-definition",
    "containerDefinitions": [
        {
            "name": "ecs-inventory",
            "image": "docker.io/anchore/ecs-inventory:latest",
            "cpu": 0,
            "essential": true,
            "environment": [
                {
                    "name": "ANCHORE_ECS_INVENTORY_ANCHORE_URL",
                    "value": "https://anchore.url"
                },
                {
                    "name": "ANCHORE_ECS_INVENTORY_ANCHORE_USER",
                    "value": "admin"
                },
                {
                    "name": "ANCHORE_ECS_INVENTORY_ANCHORE_ACCOUNT",
                    "value": "admin"
                },
                {
                    "name": "ANCHORE_ECS_INVENTORY_REGION",
                    "value": "us-east-2"
                }
            ],
            "secrets": [
                {
                    "name": "ANCHORE_ECS_INVENTORY_ANCHORE_PASSWORD",
                    "valueFrom": "arn:aws:ssm:${region}:${aws_account_id}:parameter/ANCHORE_ADMIN_PASS"
                },
                {
                    "name": "AWS_ACCESS_KEY_ID",
                    "valueFrom": "arn:aws:ssm:${region}:${aws_account_id}:parameter/ECS_INVENTORY_AWS_ACCESS_KEY_ID"
                },
                {
                    "name": "AWS_SECRET_ACCESS_KEY",
                    "valueFrom": "arn:aws:ssm:${region}:${aws_account_id}:parameter/ECS_INVENTORY_AWS_SECRET_ACCESS_KEY"
                }
            ],
            "logConfiguration": {
                "logDriver": "awslogs",
                "options": {
                    "awslogs-create-group": "true",
                    "awslogs-group": "/anchore/ecs-inventory",
                    "awslogs-region": "us-east-2",
                    "awslogs-stream-prefix": "ecs"
                }
            }
        }
    ],
    "executionRoleArn": "arn:aws:iam::${aws_account_id}:role/ecsTaskExecutionRole",
    "networkMode": "awsvpc",
    "requiresCompatibilities": [
        "FARGATE"
    ],
    "cpu": "512",
    "memory": "1024",
    "runtimePlatform": {
        "cpuArchitecture": "X86_64",
        "operatingSystemFamily": "LINUX"
    }
Usage
To verify that you are tracking ECS Inventory you can access inventory results with the command anchorectl inventory list and look for results where the TYPE is ecs.
Watching ECS Inventory to auto analyze
It is possible to create a subscription to watch for new ECS Inventory that is reported to Anchore and automatically schedule those images for
analysis.
1. Create the subscription
A subscription can be created by sending a POST to /v1/subscriptions with the following payload:
{
  "subscription_key": "<SUBSCRIPTION_KEY>",
  "subscription_type": "runtime_inventory"
}
Curl example:
curl -X POST -u USERNAME:PASSWORD --url ANCHORE_URL/v1/subscriptions --header 'Content-Type: application/json' --data '{
  "subscription_key": "arn:aws:ecs:eu-west-2:123456789012:cluster/myclustername",
  "subscription_type": "runtime_inventory"
}'
The subscription_key can be set to any part of an ECS ClusterARN. For example setting the subscription_key to the:
- full ClusterARN
arn:aws:ecs:us-east-1:012345678910:cluster/telemetry will create a subscription that only watches this cluster - partial ClusterARN
arn:aws:ecs:eu-west-2:988505687240 will result in a subscription that watches every cluster within the account 988505687240
2. Activate the subscription
After a subscription has been created it needs to be activated. This can be achieved with anchorectl.
anchorectl subscription activate <SUBSCRIPTION_KEY> runtime_inventory
General Runtime Management
See Data Management
3.6 - Git for Source Code
Use anchorectl to generate a software bill of materials (SBOM) and import a source repository artifact from a file location on disk. You can also get information about the source repository, investigate vulnerability packages by requesting vulnerabilities for a single analyzed source repository, or get any policy evaluations.
The workflow would generally be as follows.
- Generate an SBOM. The format is similar to the following:
syft <path> -o json > <resulting filename>.json
For example:
$ syft dir:/path/to/your/source/code -o json > my_sbom.json
- Import the SBOM from a source with metadata. This would normally occur as part of a CI/CD pipeline, and the various metadata would be programmatically added via environment variables. The response from anchorectl includes the new ID of the Source in Anchore Enterprise. For example:
# anchorectl source add github.com/my-project@12345 --branch test --author [email protected] --workflow-name default --workflow-timestamp 2002-10-02T15:00:00Z --from ./my_sbom.json
 ✔ Added Source                                                                          github.com/my-project@12345
 ✔ Imported SBOM                                                                                         /tmp/s.json
Source:
  status:           not-analyzed (active)
  uuid:             fa416998-59fa-44f7-8672-dc267385e799
  source:           github.com/my-project@12345
  vcs:              git
  branch:           test
  workflow:         default
  author:           [email protected]
- List the source repositories that you have sent to Anchore Enterprise. This command will allow the operator to list all available source repositories within the system and their current status.
# anchorectl source list
 ✔ Fetched sources
┌──────────────────────────────────────┬────────────┬─────────────────────┬──────────────────────────────────────────┬─────────────────┬───────────────┐
│ UUID                                 │ HOST       │ REPOSITORY          │ REVISION                                 │ ANALYSIS STATUS │ SOURCE STATUS │
├──────────────────────────────────────┼────────────┼─────────────────────┼──────────────────────────────────────────┼─────────────────┼───────────────┤
│ fa416998-59fa-44f7-8672-dc267385e799 │ github.com │ my-project          │ 12345                                    │ analyzed        │ active        │
└──────────────────────────────────────┴────────────┴─────────────────────┴──────────────────────────────────────────┴─────────────────┴───────────────┘
- Fetch the uploaded SBOM for a source repository from Anchore Enterprise.
The for this command is taken from the UUID(s) of the listed source repositories.
# anchorectl source sbom fa416998-59fa-44f7-8672-dc267385e799 -f /tmp/sbom.json
 ✔ Fetched SBOM
- Get detailed information about a source. For example:
# anchorectl source get fa416998-59fa-44f7-8672-dc267385e799
 ✔ Fetched source
Uuid: fa416998-59fa-44f7-8672-dc267385e799
Host: github.com
Repository: my-project
Revision: 12345
Vcs Type: git
Metadata Records:
  - branchName: test
    changeAuthor: [email protected]
    ciWorkflowExecutionTime: "2002-10-02T15:00:00Z"
    ciWorkflowName: default
    uuid: ae5f6617-5ad5-47dd-81ca-8fcb10391fed
Analysis Status: analyzed
Source Status: active
- Use anchorectl to investigate vulnerability packages by requesting vulnerabilities for a single analyzed source repository. You can choose os, non-os, or all. For example:
# anchorectl source vulnerabilities fa416998-59fa-44f7-8672-dc267385e799
 ✔ Fetched vulnerabilities                   [48 vulnerabilities]                                                                                                                                                             fa416998-59fa-44f7-8672-dc267385e799
┌─────────────────────┬──────────┬────────────┬─────────┬────────┬──────────────┬──────┬─────────────┬───────────────────────────────────────────────────┐
│ ID                  │ SEVERITY │ NAME       │ VERSION │ FIX    │ WILL NOT FIX │ TYPE │ FEED GROUP  │ URL                                               │
├─────────────────────┼──────────┼────────────┼─────────┼────────┼──────────────┼──────┼─────────────┼───────────────────────────────────────────────────┤
│ GHSA-p6xc-xr62-6r2g │ High     │ log4j-core │ 2.14.1  │ 2.17.0 │ false        │ java │ github:java │ https://github.com/advisories/GHSA-p6xc-xr62-6r2g │
│ GHSA-7rjr-3q55-vv33 │ Critical │ log4j-core │ 2.14.1  │ 2.16.0 │ false        │ java │ github:java │ https://github.com/advisories/GHSA-7rjr-3q55-vv33 │
│ GHSA-8489-44mv-ggj8 │ Medium   │ log4j-core │ 2.14.1  │ 2.17.1 │ false        │ java │ github:java │ https://github.com/advisories/GHSA-8489-44mv-ggj8 │
│ CVE-2021-45105      │ Medium   │ log4j-api  │ 2.14.1  │ None   │ false        │ java │ nvd         │ https://nvd.nist.gov/vuln/detail/CVE-2021-45105   │
...
- Use anchorectl to compute a policy evaluation for a source. For example:
# anchorectl source check fa416998-59fa-44f7-8672-dc267385e799
 ✔ Evaluated against policy                  [failed]                                                                                                                                                                         fa416998-59fa-44f7-8672-dc267385e799
Evaluation ID: 3e490750b404eb1b09baf019a4df3942
Source ID: fa416998-59fa-44f7-8672-dc267385e799
Host: github.com
Repository: my-project
Policy ID: 2c53a13c-1765-11e8-82ef-23527761d060
Updated: 2022-08-30T15:58:24Z
Evaluation: fail
(Use -o json option to get more detailed output)
- Use anchorectl to delete any individual source repository artifacts from Anchore Enterprise. For example:
# anchorectl source delete fa416998-59fa-44f7-8672-dc267385e799
 ✔ Deleted source
Uuid: fa416998-59fa-44f7-8672-dc267385e799
Host: github.com
Repository: my-project
Revision: 12345
Vcs Type: git
Metadata Records:
  - branchName: test
    changeAuthor: [email protected]
    ciWorkflowExecutionTime: "2002-10-02T15:00:00Z"
    ciWorkflowName: default
    uuid: ae5f6617-5ad5-47dd-81ca-8fcb10391fed
Analysis Status: analyzed
Source Status: deleting
4 - Configuring Anchore
Configuring Anchore Enterprise starts with configuring each of the core services. Anchore Enterprise deployments using docker compose for trials or Helm for production are designed to run by default with no modifications necessary to get started. Although, many options are available to tune your production deployment to fit your needs.
About Configuring Anchore Enterprise
All system services (except the UI, which has its own configuration) require a single configuration which is read from /config/config.yaml when each service starts up. Settings in this file are mostly related to static settings that are fundamental to the deployment of system services. They are most often updated when the system is being initially tuned for a deployment. They may, infrequently, need to be updated after they have been set as appropriate for any given deployment.
By default, Anchore Enterprise includes a config.yaml that is functional out-of-the-box, with some parameters set to an environment variable for common site-specific settings. These settings are then set either in docker-compose.yaml, by the Helm chart, or as appropriate for other orchestration/deployment tools.
When deploying Anchore Enterprise using the Helm chart, you can configure it by modifying the anchoreConfig section in your values file. This section corresponds to the default config.yaml file included in the Anchore Enterprise container image. The values file serves to override the default configurations and should be modified to suit your deployment.
4.1 - General Configuration
Initial Configuration
A single configuration file config.yaml is required to run Anchore - by default, this file is embedded in the Enterprise container image, located in /config/config.yaml. The default configuration file is provided as a way to get started, which is functional out of the box, without modification, when combined with either the Helm method or docker compose method of installing Enterprise. The default configuration is set up to use environment variable substitutions so that configuration values can be controlled by setting the corresponding environment variables at deployment time (see Using Environment Variables in Anchore.
Each environment variable (starting with ANCHORE_) in the default config.yaml is set (either the baseline as set in the Dockerfile, or an override in docker compose or Helm) to ensure that the system comes up with a fully populated configuration.
Some examples of useful initial settings follow.
- Default admin credentials: A default admin email and password is required to be defiend in the catalog service for the initial bootstrap of enterprise to succeed, which are both set through the default config file using the ANCHORE_ADMIN_PASSWORD and ANCHORE_ADMIN_EMAIL environment variables respectively. The Dockerfile defines a default email admin@myanchore, but does not define a default password. If using the default config file, the user must set a value for ANCHORE_ADMIN_PASSWORD in order to succeed the initial bootstrap of the system. To set the default password or to override the default email, simply add overrides for ANCHORE_ADMIN_PASSWORD and ANCHORE_ADMIN_EMAIL environment variables, set to your preferred values prior to deploying Anchore Enterprise. After the initial bootstrap, this can be removed if desired. The docker compose file referenced in the quickstart installation guide has set ANCHORE_ADMIN_PASSWORD to
foobar on the catalog service already
default_admin_password: '${ANCHORE_ADMIN_PASSWORD}'
default_admin_email: '${ANCHORE_ADMIN_EMAIL}'
- Log level: Anchore Enterprise is configured to run at the INFO log level by default. The full set of options are FATAL, ERROR, WARN, INFO, and DEBUG (in ascending order of log output verbosity). To set the log level of Anchore Enterprise Services, add an override for ANCHORE_LOG_LEVEL prior to deploying Anchore Enterprise.
log_level: '${ANCHORE_LOG_LEVEL}'
- Postgres Database: Anchore Enterprise requires access to a PostgreSQL database to operate. The database can be run as a container with a persistent volume or outside of your container environment (which is set up automatically if the example docker-compose.yaml is used). If you wish to use an external Postgres Database, the elements of the connection string in the config.yaml can be specified as environment variable overrides. The default configuration is set up to connect to a postgres DB that is deployed alongside Anchore Enterprise Services when using docker-compose or Helm, to the internal host anchore-db on port 5432 using username postgres with password mysecretpassword and db postgres. If an external database service is being used then you will need to provide the use, password, host, port and DB name environment variables, as shown below.
db_connect: 'postgresql://${ANCHORE_DB_USER}:${ANCHORE_DB_PASSWORD}@${ANCHORE_DB_HOST}:${ANCHORE_DB_PORT}/${ANCHORE_DB_NAME}'
Manual Configuration File Override
While Anchore Enterprise is set up to run out of the box without modifications, and many useful values can be overriden using environment variables as described above, one can always opt to have full control over the configuration by providing a config.yaml file explicitly, typically by generating the file and making it available from an external mount/configmap/etc. at deployment time. A good method to start if you wish to provide your own config.yaml is to extract the default config.yaml from the Anchore Enterprise container image, modify it, and then override the embedded /config/config.yaml at deployment time. For example:
- Extract the default config file from the anchore/enterprise container image:
# docker pull docker.io/anchore/enterprise:latest
# docker create --name ae docker.io/anchore/enterprise:latest
# docker cp ae:/config/config.yaml ./my_config.yaml
# docker rm ae
Modify the configuration file to your liking.
Set up your deployment to override the embedded /config/config.yaml at run time (below example shows how to achieve this with docker compose). Edit the docker-compose.yaml to include a volume mount that mounts your my_config.yaml over the embedded /config/config.yaml, resulting in a volume section for each Anchore Enterprise service definition.
...
  api:
...
    volumes:
     - /path/to/my_config.yaml:/config/config.yaml:z
...
  catalog:
...
    volumes:
     - /path/to/my_config.yaml:/config/config.yaml:z
...
  simpleq:
...
    volumes:
     - /path/to/my_config.yaml:/config/config.yaml:z
...
  policy-engine:
...
    volumes:
     - /path/to/my_config.yaml:/config/config.yaml:z
...
  analyzer:
...
    volumes:
     - /path/to/my_config.yaml:/config/config.yaml:z
...
Now, each service will come up with your external my_config.yaml mounted over the embedded /config/config.yaml.
4.2 - Windows Container Scanning
Anchore can analyze and provide vulnerability matches for Microsoft Windows images. Anchore downloads, unpacks, and analyzes the Microsoft Windows image contents similar to Linux-based images, providing OS information as well as discovered application packages like npms, gems, python, NuGet, and java archives.
Vulnerabilities for Microsoft Windows images are matched against the detected operating system version and KBs installed in the image. These are matched using data from the Microsoft Security Research Center (MSRC) data API.
Requirements
Analyzing Microsoft Windows images is supported out-of-the-box with no configuration changes - but to get vulnerability results, your deployment must meet the following criteria:
- Deploy an on-premises feed service
- Have the microsoft vulnerability provider enabled in the feed service
Configuring Microsoft Provider
In the feed service configuration, enable the msrc driver.
services:
  feeds:
    ...
    drivers:
      ...
      msrc:
        enabled: true
Supported Windows Base Image Versions
The following are the MSRC Product IDs that Anchore can detect and provide vulnerability information for. These provide the basis for the main variants of the base
Windows containers: Windows, ServerCore, NanoSerer, and IoTCore
| Product ID | Name |
|---|
| 10951 | Windows 10 Version 1703 for 32-bit Systems |
| 10952 | Windows 10 Version 1703 for x64-based Systems |
| 10729 | Windows 10 for 32-bit Systems |
| 10735 | Windows 10 for x64-based Systems |
| 10789 | Windows 10 Version 1511 for 32-bit Systems |
| 10788 | Windows 10 Version 1511 for x64-based Systems |
| 10852 | Windows 10 Version 1607 for 32-bit Systems |
| 10853 | Windows 10 Version 1607 for x64-based Systems |
| 11497 | Windows 10 Version 1803 for 32-bit Systems |
| 11498 | Windows 10 Version 1803 for x64-based Systems |
| 11563 | Windows 10 Version 1803 for ARM64-based Systems |
| 11568 | Windows 10 Version 1809 for 32-bit Systems |
| 11569 | Windows 10 Version 1809 for x64-based Systems |
| 11570 | Windows 10 Version 1809 for ARM64-based Systems |
| 11453 | Windows 10 Version 1709 for 32-bit Systems |
| 11454 | Windows 10 Version 1709 for x64-based Systems |
| 11583 | Windows 10 Version 1709 for ARM64-based Systems |
| 11644 | Windows 10 Version 1903 for 32-bit Systems |
| 11645 | Windows 10 Version 1903 for x64-based Systems |
| 11646 | Windows 10 Version 1903 for ARM64-based Systems |
| 11712 | Windows 10 Version 1909 for 32-bit Systems |
| 11713 | Windows 10 Version 1909 for x64-based Systems |
| 11714 | Windows 10 Version 1909 for ARM64-based Systems |
| 10379 | Windows Server 2012 (Server Core installation) |
| 10543 | Windows Server 2012 R2 (Server Core installation) |
| 10816 | Windows Server 2016 |
| 11571 | Windows Server 2019 |
| 10855 | Windows Server 2016 (Server Core installation) |
| 11572 | Windows Server 2019 (Server Core installation) |
| 11499 | Windows Server, version 1803 (Server Core Installation) |
| 11466 | Windows Server, version 1709 (Server Core Installation) |
| 11647 | Windows Server, version 1903 (Server Core installation) |
| 11715 | Windows Server, version 1909 (Server Core installation) |
Windows Operating System Packages
Just as Linux images are scanned for packages such as RPMs, DPKG, and APK, Windows images are scanned for the installed components and Knowledge Base patches (KBs). When listing operating system content on a Microsoft Windows image, the results returned are KB identifiers that are numeric. Both the name and version will
be identical and are the KB IDs.
4.3 - Running Anchore Enterprise in an Air-Gapped Environment
Anchore Enterprise can run in an isolated environment with no outside internet connectivity. It does require a network connection to its own components and must be able to reach the Docker image registries (v2 API compatible) where the images to be analyzed are hosted.

Components
- Private Network
- Public Network (internet is reachable)
- Anchore Enterprise
- Anchore Enterprise Feeds
- Anchore Enterprise Feeds in Read-Only Mode
- Docker Image Registry (any registry that is compatible with the Docker Registry v2 API)
Assumptions
- The docker images to be analyzed are available within the Private Network.
- Anchore Enterprise will be accessed from within the private network by the components in the infrastructure that need to query for analysis results.
- There exists a way to move a data file from the Public Network to the Private Network.
Installation
- Refer to the feed data migration content for configuring a Read-Only Feeds in Private Network.
- Install Anchore Enterprise in Private Network.
- Configure the Anchore Enterprise to use the Read-Only Feeds installation, see configuration.
- Start Anchore Enterprise.
Periodically Updating Feed Data
To ensure that the Anchore Enterprise installation has up-to-date vulnerability data from the vulnerability sources, you need to update the Read-Only Feed Service with data from the feed service running on the public network. This is essentially the same process that was used at installation to initialize the Read-Only Feed Service. It should be done on a regular schedule, or when the Public Network Feed Service task execution indicates new data was detected.
4.4 - Using the Analysis Archive
As mentioned in concepts, there are two locations for image analysis to be stored:
- The working set: the standard state after analysis completes. In this location, the image is fully loaded and available for policy evaluation, content, and vulnerability queries.
- The archive set: a location to keep image analysis data that cannot be used for policy evaluation or queries but can use cheaper storage and less db space and can be reloaded into the working set as needed.
Working with the Analysis Archive
List archived images:
anchorectl archive image list
 ✔ Fetched archive-images
┌─────────────────────────────────────────────────────────────────────────┬────────────────────────┬──────────┬──────────────┬──────────────────────┐
│ IMAGE DIGEST                                                            │ TAGS                   │ STATUS   │ ARCHIVE SIZE │ ANALYZED AT          │
├─────────────────────────────────────────────────────────────────────────┼────────────────────────┼──────────┼──────────────┼──────────────────────┤
│ sha256:89020cd33be2767f3f894484b8dd77bc2e5a1ccc864350b92c53262213257dfc │ docker.io/nginx:latest │ archived │ 1.4 MB       │ 2022-08-23T21:08:29Z │
└─────────────────────────────────────────────────────────────────────────┴────────────────────────┴──────────┴──────────────┴──────────────────────┘
To add an image to the archive, use the digest. All analysis, policy evaluations, and tags will be added to the archive.
NOTE: this does not remove it from the working set. To fully move it you must first archive and then delete image in the working set using AnchoreCTL or the API directly.
Archiving Images
Archiving an image analysis creates a snapshot of the image’s analysis data, policy evaluation history, and tags and stores in a different storage location and
different record location than working set images.
# anchorectl image list
 ✔ Fetched images
┌───────────────────────────────────────────────────────┬─────────────────────────────────────────────────────────────────────────┬──────────┬────────┐
│ TAG                                                   │ DIGEST                                                                  │ ANALYSIS │ STATUS │
├───────────────────────────────────────────────────────┼─────────────────────────────────────────────────────────────────────────┼──────────┼────────┤
│ docker.io/ubuntu:latest                               │ sha256:33bca6883412038cc4cbd3ca11406076cf809c1dd1462a144ed2e38a7e79378a │ analyzed │ active │
│ docker.io/ubuntu:latest                               │ sha256:42ba2dfce475de1113d55602d40af18415897167d47c2045ec7b6d9746ff148f │ analyzed │ active │
│ docker.io/localimage:latest                           │ sha256:74c6eb3bbeb683eec0b8859bd844620d0b429a58d700ea14122c1892ae1f2885 │ analyzed │ active │
│ docker.io/nginx:latest                                │ sha256:89020cd33be2767f3f894484b8dd77bc2e5a1ccc864350b92c53262213257dfc │ analyzed │ active │
└───────────────────────────────────────────────────────┴─────────────────────────────────────────────────────────────────────────┴──────────┴────────┘

# anchorectl archive image add sha256:89020cd33be2767f3f894484b8dd77bc2e5a1ccc864350b92c53262213257dfc
 ✔ Added image to archive
┌─────────────────────────────────────────────────────────────────────────┬──────────┬────────────────────────┐
│ DIGEST                                                                  │ STATUS   │ DETAIL                 │
├─────────────────────────────────────────────────────────────────────────┼──────────┼────────────────────────┤
│ sha256:89020cd33be2767f3f894484b8dd77bc2e5a1ccc864350b92c53262213257dfc │ archived │ Completed successfully │
└─────────────────────────────────────────────────────────────────────────┴──────────┴────────────────────────┘
Then to delete it in the working set (optionally):
NOTE: You may need to use –force if the image is the newest of its tags and has active subscriptions_
# anchorectl image delete sha256:89020cd33be2767f3f894484b8dd77bc2e5a1ccc864350b92c53262213257dfc  --force
┌─────────────────────────────────────────────────────────────────────────┬──────────┐
│ DIGEST                                                                  │ STATUS   │
├─────────────────────────────────────────────────────────────────────────┼──────────┤
│ sha256:89020cd33be2767f3f894484b8dd77bc2e5a1ccc864350b92c53262213257dfc │ deleting │
└─────────────────────────────────────────────────────────────────────────┴──────────┘
At this point the image in the archive only.
Restoring images from the archive into the working set
This will not delete the archive entry, only add it back to the working set. Restore and image to working set from archive:
# anchorectl archive image restore sha256:89020cd33be2767f3f894484b8dd77bc2e5a1ccc864350b92c53262213257dfc
 ✔ Restore image
┌────────────────────────┬─────────────────────────────────────────────────────────────────────────┬──────────┬────────┐
│ TAG                    │ DIGEST                                                                  │ ANALYSIS │ STATUS │
├────────────────────────┼─────────────────────────────────────────────────────────────────────────┼──────────┼────────┤
│ docker.io/nginx:latest │ sha256:89020cd33be2767f3f894484b8dd77bc2e5a1ccc864350b92c53262213257dfc │ analyzed │ active │
└────────────────────────┴─────────────────────────────────────────────────────────────────────────┴──────────┴────────┘
To view the restored image:
# anchorectl image get sha256:89020cd33be2767f3f894484b8dd77bc2e5a1ccc864350b92c53262213257dfc
Tag: docker.io/nginx:latest
Digest: sha256:89020cd33be2767f3f894484b8dd77bc2e5a1ccc864350b92c53262213257dfc
ID: 2b7d6430f78d432f89109b29d88d4c36c868cdbf15dc31d2132ceaa02b993763
Analysis: analyzed
Status: active
Working with Archive rules
As with all AnchoreCTL commands, the --help option will show the arguments, options and descriptions of valid values.
List existing rules:
# anchorectl archive rule list
 ✔ Fetched rules
┌──────────────────────────────────┬────────────┬──────────────┬────────────────────┬────────────┬─────────┬───────┬──────────────────┬──────────────┬─────────────┬──────────────────┬────────┬──────────────────────┐
│ ID                               │ TRANSITION │ ANALYSIS AGE │ TAG VERSIONS NEWER │ REGISTRY   │ REPO    │ TAG   │ REGISTRY EXCLUDE │ REPO EXCLUDE │ TAG EXCLUDE │ EXCLUDE EXP DAYS │ GLOBAL │ LAST UPDATED         │
├──────────────────────────────────┼────────────┼──────────────┼────────────────────┼────────────┼─────────┼───────┼──────────────────┼──────────────┼─────────────┼──────────────────┼────────┼──────────────────────┤
│ 2ca9284202814f6aa41916fd8d21ddf2 │ archive    │ 90d          │ 90                 │ *          │ *       │ *     │                  │              │             │ -1               │ false  │ 2022-08-19T17:58:38Z │
│ 6cb4011b102a4ba1a86a5f3695871004 │ archive    │ 90d          │ 90                 │ foobar.com │ myimage │ mytag │ barfoo.com       │ *            │ *           │ -1               │ false  │ 2022-08-22T18:47:32Z │
└──────────────────────────────────┴────────────┴──────────────┴────────────────────┴────────────┴─────────┴───────┴──────────────────┴──────────────┴─────────────┴──────────────────┴────────┴──────────────────────┘
Add a rule:
anchorectl archive rule add --transition archive --analysis-age-days 90 --tag-versions-newer 1 --selector-registry 'docker.io' --selector-repository 'library/*' --selector-tag 'latest'
 ✔ Added rule
ID: 0031546b9ce94cf0ae0e60c0f35b9ea3
Transition: archive
Analysis Age: 90d
Tag Versions Newer: 1
Selector:
  Registry: docker.io
  Repo: library/*
  Tag: latest
Exclude:
  Selector:
    Registry Exclude:
    Repo Exclude:
    Tag Exclude:
  Exclude Exp Days: -1
Global: false
Last Updated: 2022-08-24T22:57:51Z
The required parameters are: minimum age of analysis in days, number of tag versions newer, and the transition to use.
There is also an optional --system-global flag available for admin account users that makes the rule apply to all accounts
in the system.
As a non-admin user you can see global rules but you cannot update/delete them (will get a 404):
# ANCHORECTL_USERNAME=test1user ANCHORECTL_PASSWORD=password ANCHORECTL_ACCOUNT=test1acct anchorectl archive rule list
 ✔ Fetched rules
┌──────────────────────────────────┬────────────┬──────────────┬────────────────────┬───────────┬───────────┬────────┬──────────────────┬──────────────┬─────────────┬──────────────────┬────────┬──────────────────────┐
│ ID                               │ TRANSITION │ ANALYSIS AGE │ TAG VERSIONS NEWER │ REGISTRY  │ REPO      │ TAG    │ REGISTRY EXCLUDE │ REPO EXCLUDE │ TAG EXCLUDE │ EXCLUDE EXP DAYS │ GLOBAL │ LAST UPDATED         │
├──────────────────────────────────┼────────────┼──────────────┼────────────────────┼───────────┼───────────┼────────┼──────────────────┼──────────────┼─────────────┼──────────────────┼────────┼──────────────────────┤
│ 16dc38cef54e4ce5ac87d00e90b4a4f2 │ archive    │ 90d          │ 1                  │ docker.io │ library/* │ latest │                  │              │             │ -1               │ true   │ 2022-08-24T23:01:05Z │
└──────────────────────────────────┴────────────┴──────────────┴────────────────────┴───────────┴───────────┴────────┴──────────────────┴──────────────┴─────────────┴──────────────────┴────────┴──────────────────────┘

# ANCHORECTL_USERNAME=test1user ANCHORECTL_PASSWORD=password ANCHORECTL_ACCOUNT=test1acct anchorectl archive rule delete 16dc38cef54e4ce5ac87d00e90b4a4f2
 ⠙ Deleting rule
error: 1 error occurred:
	* unable to delete rule:
{
  "detail": {
    "error_codes": []
  },
  "httpcode": 404,
  "message": "Rule not found"
}

# ANCHORECTL_USERNAME=test1user ANCHORECTL_PASSWORD=password ANCHORECTL_ACCOUNT=test1acct anchorectl archive rule get 16dc38cef54e4ce5ac87d00e90b4a4f2
 ✔ Fetched rule
ID: 16dc38cef54e4ce5ac87d00e90b4a4f2
Transition: archive
Analysis Age: 90d
Tag Versions Newer: 1
Selector:
  Registry: docker.io
  Repo: library/*
  Tag: latest
Exclude:
  Selector:
    Registry Exclude:
    Repo Exclude:
    Tag Exclude:
  Exclude Exp Days: -1
Global: true
Last Updated: 2022-08-24T23:01:05Z
Delete a rule:
# anchorectl archive rule delete 16dc38cef54e4ce5ac87d00e90b4a4f2
 ✔ Deleted rule
No results
4.5 - Configuring AnchoreCTL
The anchorectl command can be configured with command-line arguments, environment variables, and/or a configuration file. Typically, a configuration file should be created to set any static configuration parameters (your Anchore Enterprise’s URL, logging behavior, cataloger configurations, etc), so that invocations of the tool only require you to provide command-specific parameters as environment/cli options. However, to fully support stateless scripting, a configuration file is not strictly required (settings can be put in environment/cli options).
In this document, we focus on the anchorectl configuration file setup and options.
API Version Compatibility
It is highly recommended that the version of AnchoreCTL you are using is supported by the deployed version of Enterprise. Please refer to the Enterprise Release Notes for the supported version of AnchoreCTL.
The release of Anchore Enterprise v4.9.x, contains both the deprecated V1 API and the new V2 API.
- AnchoreCTL v1.8.0 is compatible with the Anchore Enterprise v4.9.x V1 API.
- AnchoreCTL v4.9.0 is compatible with the Anchore Enterprise v4.9.x V2 API.
Anchore Enterprise v5.x Releases, contain only the new V2 API.
- AnchoreCTL v5.7.0 is compatible with the Anchore Enterprise v5.7.0 V2 API.
In AnchoreCTL v1.8.0, a version check was introduced to prevent accidental use of AnchoreCTL v1.8.x with an incompatible API endpoint. If the check fails but you are sure that the configured URL you have set is a V1 API endpoint, you can bypass the check by setting the skip-api-version-check field in the configuration to boolean true as in th example below.
url: "http://localhost:8228"
username: "admin"
password: "foobar"
skip-api-version-check: true
...
This can also be done with the environment variable: ANCHORECTL_SKIP_API_VERSION_CHECK=true
Config File Search Locations
The anchorectl tool will search for an available configuration file using the following search order, until it finds a match:
.anchorectl.yaml, anchorectl.yaml, .anchorectl/config.yaml, ~/.anchorectl.yaml, ~/anchorectl.yaml, $XDG_CONFIG_HOME/anchorectl/config.yaml
Generating Your First .anchorectl.yaml
For the most basic functional invocation of anchorectl, the only parameters that should be set are listed here:
  # the URL to the Anchore Enterprise API (env var: "ANCHORECTL_URL")
  url: ""

  # the Anchore Enterprise username (env var: "ANCHORECTL_USERNAME")
  username: ""

  # the Anchore Enterprise user's login password (env var: "ANCHORECTL_PASSWORD")
  password: ""
For example, with a quickstart deployment of Anchore Enterprise running on your local system:
  url: "http://localhost:8228"
  username: "admin"
  password: "foobar"
Using API Keys
If you do not want to expose your private credentials in the configuration file, you can generate an API Key that allows most of the functionality of anchorectl.
Please see Generating API Keys
Once you generate the API Key, the UI will give you a key value. You can use this key with the anchorectl configuration:
  url: "http://localhost:8228"
  username: "_api_key"
  password: <API Key Value>
NOTE: API Keys authenticate using HTTP basic auth. The username for API keys has to be _api_key.
AnchoreCTL Debug
A convenient way to see your changes taking effect is to instruct anchorectl to output DEBUG level logs to the screen using the -vv flag, which will display the full configuration that the tool is using (including the options you set, plus all the defaults and additional configuration file options available).
# anchorectl -vv
[0000]  INFO anchorectl version: 1.6.0
[0000] DEBUG application config:
  url: http://localhost:8228
  username: admin
  password: '******'
  account: ""
  skip-api-version-check: false
  config: /your/homedir/.anchorectl.yaml
  update:
    check: true
    url: https://anchorectl-releases.anchore.io/anchorectl/releases/latest/metadata.json
  quiet: false
  log:
    level: debug
    file: ""
  debug:
    api: false
    events: false
  http:
    tls-insecure: false
    timeout: 180
    headers: {}
  dev:
    profile-cpu: false
    profile-mem: false
  registry:
    insecure-skip-tls-verify: false
    insecure-use-http: false
    auth: []
  secret-search:
    cataloger:
      enabled: false
      scope: AllLayers
    additional-patterns: {}
    exclude-pattern-names: []
    reveal-values: false
    skip-files-above-size: 1048576
  content-search:
    cataloger:
      enabled: false
      scope: AllLayers
    patterns: {}
    reveal-values: false
    skip-files-above-size: 1048576
  file-contents:
    cataloger:
      enabled: false
      scope: Squashed
    skip-files-above-size: 1048576
    globs: []
NOTE: if you would like to capture the full default configuration as displayed when running with -vv, you can paste that output as the contents of your .anchorectl.yaml, and then work with the settings for full control.
Once you verify that your baseline configuration parameters are set, the tools is correctly consuming them, we recommend a quick test to confirm that your enterprise deployment is accessible and the tool is ready to go:
# anchorectl system status
 ✔ Status system
┌─────────────────┬────────────────────┬─────────────────────────────┬──────┬────────────────┬────────────┬──────────────┐
│ SERVICE         │ HOST ID            │ URL                         │ UP   │ STATUS MESSAGE │ DB VERSION │ CODE VERSION │
├─────────────────┼────────────────────┼─────────────────────────────┼──────┼────────────────┼────────────┼──────────────┤
│ analyzer        │ anchore-quickstart │ http://analyzer:8228        │ true │ available      │ 570        │ 5.7.0        │
│ notifications   │ anchore-quickstart │ http://notifications:8228   │ true │ available      │ 570        │ 5.7.0        │
│ policy_engine   │ anchore-quickstart │ http://policy-engine:8228   │ true │ available      │ 570        │ 5.7.0        │
│ reports         │ anchore-quickstart │ http://reports:8228         │ true │ available      │ 570        │ 5.7.0        │
│ reports_worker  │ anchore-quickstart │ http://reports-worker:8228  │ true │ available      │ 570        │ 5.7.0        │
│ simplequeue     │ anchore-quickstart │ http://queue:8228           │ true │ available      │ 570        │ 5.7.0        │
│ apiext          │ anchore-quickstart │ http://api:8228             │ true │ available      │ 570        │ 5.7.0        │
│ catalog         │ anchore-quickstart │ http://catalog:8228         │ true │ available      │ 570        │ 5.7.0        │
└─────────────────┴────────────────────┴─────────────────────────────┴──────┴────────────────┴────────────┴──────────────┘
Configuring Catalogers for Distributed Analysis Mode
If you intend to use anchorectl in Distributed Analysis mode, then you’ll need to enable two additional catalogers (secret-search, and file-contents) to mirror the behavior of Anchore Enterprise defaults, when performing an image analysis in Centralized Analysis mode. Below are the settings to mirror the Anchore Enterprise defaults.
  secret-search:
    cataloger:
      enabled: true
      scope: Squashed
    additional-patterns: {}
    exclude-pattern-names: []
    reveal-values: false
    skip-files-above-size: 10000
  content-search:
    cataloger:
      enabled: false
      scope: Squashed
    patterns: {}
    reveal-values: false
    skip-files-above-size: 10000
  file-contents:
    cataloger:
      enabled: true
      scope: Squashed
    skip-files-above-size: 1048576
    globs: ['/etc/passwd']
For more information on using anchorectl in Distributed Analysis mode, see Concepts: Image Analysis and AnchoreCTL Usage: Images.
4.6 - Artifact Lifecycle Policies
Artifact Lifecycle Policies are instruction sets which perform lifecycle events on certain types of artifacts.
Each policy can perform an action on a given artifact_type based on configured policy_conditions (rules/selectors).
As an example, a system administrator may create an Artifact Lifecycle Policy that will automatically delete any image that has an analysis date older than 180
days.
WARNING ⚠️
- ⚠️ These policies have the ability to delete data without archive/backup. Proceed with caution!
- ⚠️ These policies are GLOBAL they will impact every account on the system.
- ⚠️ These policies can only be created and managed by a system administrator.
Policy Components
Artifact Lifecycle Policies are global policies that will execute on a schedule defined by a cycle_timer within the
catalog service. services.catalog.cycle_timers.artifact_lifecycle_policy_tasks has a default time of every 12 hours.
The policy is constructed with the following parameters:
Artifacts Types - The type of artifacts the policy will consider. The current supported type is image.
Inclusion Rules - The set of criteria which will be used to determine the set of artifacts to work on.
All criteria must be satisfied for the policy to enact on an artifact.
- days_since_analyzed
- Selects artifacts whose
analyzed_at date is n days old. - If this value is set to less than zero, this rule is disabled.
- An artifact that has not been analyzed, either because it failed analysis or the analysis is pending, will not be included.
- even_if_exists_in_runtime_inventory
- When
true, an artifact will be included even if it exists in the Runtime Inventory. - When
false, an artifact will not be included if it exists in the Runtime Inventory. Essentially protecting artifacts found in your runtime inventory. Please review the Inventory Time-To-Live for information on how to prune the Runtime Inventory.
- include_base_images
- When
true, images that have ancestral children will be included. - When
false, images that have ancestral children will not be included. - Note: These are evaluated per run. As children are deleted, a previously excluded parent image may too become eligible for deletion.
Policy Actions - After the policy determines a set of artifacts that satisfy the Inclusion Rules, this
is the action which will be performed on them. The current supported action is delete.
Actioned artifacts will have a matching system Event created for audit and notification purposes.
Policy Interaction
If more than one policy is enabled, each policy will work independently, using its set of rules to determine if any
artifacts satisfy its criteria. Each policy will apply its action on the set of artifacts.
Creating a new Artifact Lifecycle Policy
Due to the potentially destructive nature of these policies every parameter must be explicitly declared when creating a
new policy. This means all policy rules must be explicitly configured or explicitly disabled.
# anchorectl system artifact-lifecycle-policy add --action=delete --artifact-type=image --name="example policy" --description=example --enabled=false --days-since-analyzed=30 --even-if-exists-in-runtime=true
 ✔ Added artifact-lifecycle-policy
Name: example lifecycle policy
Policy Conditions:
  - artifactType: image
    daysSinceAnalyzed: 30
    evenIfExistsInRuntimeInventory: true
    includeBaseImages: false
    version: 1
Uuid: 73226831-9140-4d27-a922-4a61e43dbb0d
Action: delete
Deleted At:
Enabled: false
Updated At: 2023-11-22T13:38:49Z
Created At: 2023-11-22T13:38:49Z
Description: example
Updating an existing Artifact Lifecycle Policy
# anchorectl system artifact-lifecycle-policy update 5620b641-a25f-4b1f-966c-929281a41e16 --action=delete --name=example --artifact-type=image --days-since-analyzed=60 --even-if-exists-in-runtime=false
 ✔ Update artifact-lifecycle-policy
Name: example
Policy Conditions:
  - artifactType: image
    daysSinceAnalyzed: 60
    evenIfExistsInRuntimeInventory: false
    includeBaseImages: false
    version: 2
Uuid: 5620b641-a25f-4b1f-966c-929281a41e16
Action: delete
Deleted At:
Enabled: false
Updated At: 2023-11-22T13:58:04Z
Created At: 2023-11-22T13:02:24Z
Description: test description
Enabling the Artifact Lifecycle Policy
# anchorectl system artifact-lifecycle-policy update 5620b641-a25f-4b1f-966c-929281a41e16 --action=delete --name=example --artifact-type=image --days-since-analyzed=60 --even-if-exists-in-runtime=false --enable=true
 ✔ Update artifact-lifecycle-policy
Name: example
Policy Conditions:
  - artifactType: image
    daysSinceAnalyzed: 60
    evenIfExistsInRuntimeInventory: false
    includeBaseImages: false
    version: 2
Uuid: 5620b641-a25f-4b1f-966c-929281a41e16
Action: delete
Deleted At:
Enabled: true
Updated At: 2023-11-22T13:58:04Z
Created At: 2023-11-22T13:02:24Z
Description: test description
List Artifact Lifecycle Policies
anchorectl system artifact-lifecycle-policy list
 ✔ Fetched artifact-lifecycle-policies
Items:
  - action: delete
    createdAt: "2023-11-22T13:02:24Z"
    description: example description
    enabled: true
    name: "example policy"
    policyConditions:
      - artifactType: image
        daysSinceAnalyzed: 1
        evenIfExistsInRuntimeInventory: true
        includeBaseImages: false
        version: 2
    updatedAt: "2023-11-22T13:02:24Z"
    uuid: 5620b641-a25f-4b1f-966c-929281a41e16
Get specific Artifact Lifecycle Policy
Note: it is possible to request “deleted” policies through this API for audit reasons. The deleted_at field will be null, and enabled will be true if the policy is active.
anchorectl system artifact-lifecycle-policy get 5620b641-a25f-4b1f-966c-929281a41e16
 ✔ Fetched artifact-lifecycle-policy
Name: 2023-11-22T13:02:24.621Z
Policy Conditions:
  - artifactType: image
    daysSinceAnalyzed: 1
    evenIfExistsInRuntimeInventory: true
    includeBaseImages: false
    version: 1
Uuid: 5620b641-a25f-4b1f-966c-929281a41e16
Action: delete
Deleted At:
Enabled: true
Updated At: 2023-11-22T13:02:24Z
Created At: 2023-11-22T13:02:24Z
Description: test description
Delete a policy
Note: for the purposes of audit the policy will still remain in the system. It will be disabled and marked deleted. This will effectively make it hidden unless explicitly requested by its UUID through the API.
# anchorectl system artifact-lifecycle-policy delete 73226831-9140-4d27-a922-4a61e43dbb0d
 ✔ Deleted artifact-lifecycle-policy
No results
4.7 - Content Hints
For an overview of the content hints and overrides features, see the feature overview
Enabling Content Hints
This feature is disabled by default to ensure that images may not exercise this feature without the admin’s explicit approval.
In each analyzer’s config.yaml file (by default at /config/config.yaml):
Set the enable_hints: true setting in the analyzer service section of config.yaml.
If using the default config.yaml included in the image, you may instead set an environment variable (e.g for use in our provided config for Docker Compose):
ANCHORE_HINTS_ENABLED=true environment variable for the analyzer service.
For Helm: see the Helm installation instructions for enabling the hints file mechanism when deploying with Helm.
4.8 - Custom Certificate Authority
If a custom CA certificate is required to access an external resource then the Trust Store in the Anchore container needs to be updated in two places.
- The operating system provided trust store.
- The Certifi trust store.
The operating system trust store is read by the skopeo utility and python requests library that is used to access container registries to read manifests and pull image layers.
If your container registry users a custom CA then you can update the trust store to trust the certificate or use the –insecure option when configuring the registry.
To add a certificate to the operating system trust store the CA certificate should be placed in the /etc location that is appropriate for the container image being used.
- For anchore 0.2.X and earlier, the base container is CentOS 7, which stores certs in
/etc/pki/ca-trust/source/anchors/ and requires user to run update-ca-trust command as root to update the system certs. - For anchore 0.3.X, the base container is Ubuntu 18.04, which stores certs in
/usr/local/share/ca-certificates/<new_directory>/<new_cert_file>.crt and requires the user to run update-ca-certificates command as root to update the system certs. - For anchore 0.4.X and newer, the base container is Red Hat Universal Base Image 7, which stores certs in
/etc/pki/ca-trust/source/anchors/ and requires user to run update-ca-trust command as root to update the system certs. - For anchore 0.7.X and newer, the base container is Red Hat Universal Base Image 8, which stores certs in
/etc/pki/ca-trust/source/anchors/ and requires user to run update-ca-trust command as root to update the system certs. - For anchore 4.5.X and newer, the base container is Red Hat Universal Base Image 9.X, which stores certs in
/etc/pki/ca-trust/source/anchors/ and requires user to run update-ca-trust command as root to update the system certs.
Certifi is a curated list of trusted certificate authorities that is used by the Python requests HTTP client library. The Python requests library is used by Anchore for all HTTP interactions, including when communicating with Anchore Feed service, when webhooks are sent to a TLS enabled endpoint and inbetween Anchore services if TLS has been configured. To update the Certifi trust store the CA certificate should be appended onto the cacert.pem file provided by the Certifi library.
For Enterprise 2.3.x and newer, the base container is Red Hat Universal Base Image 8, certifi’s cacert.pem is installed in /usr/local/lib/python3.6/site-packages/certifi/cacert.pem
For Enterprise 3.0.x and newer, the Python version was updated from 3.6 to 3.8, certifi’s cacert.pem is installed in /usr/local/lib/python3.8/site-packages/certifi/cacert.pem
For Enterprise 4.4.x and newer, the Python version was updated from 3.8 to 3.9, certifi’s cacert.pem is installed in /usr/local/lib/python3.9/site-packages/certifi/cacert.pem
For Enterprise 4.5.x and newer, the base image was upgraded to RHEL UBI9 and Python was moved to a virtual environment, certifi’s cacert.pem is installed in /home/anchore/venv/lib/python3.9/site-packages/certifi/cacert.pem
For Enterprise 5.1.x and newer, Python was upgraded to python 3.11, certifi’s cacert.pem is installed in /home/anchore/venv/lib/python3.11/site-packages/certifi/cacert.pem
The following Dockerfile illustrates an example of how this general process can be automated to produce your own container with a new custom CA cert installed.
Dockerfile
FROM docker.io/anchore/enterprise:v5.X.X

USER root:root
COPY ./custom-ca.pem /usr/local/lib/python3.11/site-packages/certifi/
RUN update-ca-trust
RUN /usr/bin/cat /usr/local/lib/python3.11/site-packages/certifi/custom-ca.pem >> /usr/lib/python3.11/site-packages/certifi/cacert.pem
USER anchore:anchore
Build Custom Image
sudo docker build -t anchore/enterprise:v5.X.Xcustom .
4.9 - Using Dashboard
Overview
The Dashboard is your configurable landing page where insights into the collective status of your container image environment can be displayed through various widgets. Utilizing the Enterprise Reporting Service, the widgets are hydrated with metrics which are generated and updated on a cycle, the duration of which is determined by application configuration.
Note: Because the reporting data cycle is configurable, the results shown in this view may not precisely reflect actual analysis output at any given time.
For more information on how to modify this cycle or the Reporting Service in general, please refer to the Reporting Service.
The following sections in this document describe how to add widgets to the dashboard and how to customize the dashboard layout to your preference.
To add a new widget, click the Add New Widget button present in the Dashboard view. Or, if no widgets are defined, click the Let’s add one! button shown.
Upon doing so, a modal will appear with several properties described below:
| Property | Description |
|---|
| Name | The name shown within the Widget’s header. |
| Mode | ‘Compact’ a widget to keep data easily digestable at a glance. ‘Expand’ to view how your data has evolved over a configurable time period. |
| Collection | The collection of tags you’re interested in. Toggle to view metrics for all tags - including historical ones. |
| Time Series Settings | The time period you wish to view metrics for within the expanded mode. |
| Type | The category of information such as ‘Vulnerabilities’ or ‘Policy Evaluations’ which denotes what metrics are capable of being shown. |
| Metrics | The list of metrics available based on Type. |
Once you enter the required properties and click OK, the widget will be created and any metrics needed to hydrate your Dashboard will be fetched and updated.
Note: All fields except Type are editable by clicking the button shown on the top right of the header when hovering over a widget.
Viewing Results
The Reporting Service at its core aggregates data on resources across accounts and generates metrics. These metrics, in turn, fuel the Dashboard’s mission to provide actionable items straight to the user - that’s you!
Leverage these results to dive into the exact reason for a failed policy evaluation or the cause and fix of a critical vulnerability.
Vulnerabilities
Vulnerabilities are grouped and colored by severity. Critical, High, and Medium vulnerabilities are included by default but you can toggle which ones are relevant to your interests by clicking the button.
Clicking one of these metrics navigates you to a view (shown below) where you can browse the filtered set of vulnerabilities matching that severity.
For more info on a particular vulnerability, click on its corresponding button visible in the Links column. To view the exact tags affected, drill down to a specific repository by expanding the arrows ().
View that tag’s in-depth analysis by clicking on the value within its Image Digest column.
Policy Evaluations
Policy Evaluations are grouped by their evaluation outcome such as Pass or Fail and can be further filtered by the reason for that result. All reasons are included by default but as with other widget properties, they can be edited by clicking the button.
Clicking one of these results navigates you to a view (shown below) where you can browse the affected and filtered set of tags.
Dig down to a specific tag by expanding the arrow () shown on the left side of the row.
Navigate using the Image Digest value to view even more info such as the specific policy being triggered and what exactly is triggering it. If you’re interested in viewing the contents of your policy, click on the Policy ID value.
Dashboard Configuration
After populating your Dashboard with various widgets, you can easily modify the layout by using some methods explained below:
Click this icon shown in the top right or the header of a widget to Drag and Drop it into a new location.
Click this icon shown in the top right of a widget to Expand it and include a graphical representation of how your data has evolved over a time period of your choice.
Click this icon shown in the top right of a widget to Compact it into an easily digestable view of the metrics you’re interested in.
Click this icon shown in the top right of a widget to Delete it from the dashboard.
4.10 - Data Context Switching
Overview
Administrators and specially-entitled standard users are offered the ability to context switch between the image analysis data contexts of different accounts. This capability allows you to view the analysis data held inside a different account while still retaining your own user profile configuration.
When you switch data context, the data-oriented aspects of the application will change but the qualities specific to your original account—herein referred to as your actual account—remain the same. Administrators keep their original permission set and have full control within the switched account. The account availability and associated permission set for standard users is decided by the role configuration of their switching entitlement, and these roles can be additionally set to differ per account.
This feature allows users to gain insights into multiple datasets, can be used by administrators for troubleshooting purposes or to make ad-hoc modifications to the data-oriented aspects of any account, and provides standard users with an additional level and vector of access control.
This following sections in this document describes how to switch and reset data contexts—both as an administrator and as a standard user—and how administrators can assign this capability to standard users.
Administrative Users
Context switching as as an administrator is available without prior configuration, and only requires that an account other than your own be available. When you click the account button in the top-right of the screen you are presented with a menu that contains an entry called Switch Account Data Context, which will be enabled when one or more accounts other than your own are present.
Clicking this item displays a submenu that describes all currently available accounts—both active and disabled—into which you can switch context:
Your home account is represented by the label Actual. If an account is disabled, this is indicated by the label Disabled (note that only administrators can context switch into disabled accounts). The account category—administrator or standard user—is indicated by the user-type icon.
Your current data context is represented by an entry with an emphasized title and checkmark prefix. When you click an entry for a different account, the application view will switch to use the data provided by this new context. The account button and dropdown items are similarly updated to reflect this change:
You will also notice a change to the background color of the main view, which serves as a reminder that your current data context is now different than the one provided by your actual account. In addition, a button is now present on the navigation bar that allows you to immediately revert to your actual data context when clicked (you can of course also use the menu to do this):
In the above example, the analysis information now presented is exactly what a user of the standard account would see in their actual account. As an administrator, you are now free to browse and interact with this data, add tags or repositories for analysis, create policies etc., and there are no permission restrictions on any of these operations.
Note: only the analysis data context has switched, and this new state does not extend to application data items such a private registry configurations.
Standard Users
Non-administrative users can also switch context if this capability has been conferred upon them by an administrator.
When you add a new standard user (or modify an existing one) you can optionally associate them with one or more additional accounts, providing those accounts are not currently disabled. The Add a New User dialog, which is accessed from within the account editor in the Configuration > Accounts view, is shown below:
Note: If an account is currently active and available for addition, but is subsequently disabled, the standard user will not be able to switch into that account.
For each associated account you must also provide one or more RBAC roles that determine how the standard user can interact with that account after they have switched context:
For example, a user may have full-control within their actual account, but could be restricted to read-only operations after switching context. You can provide multiple different roles for different accounts, but you must provide at least one role per account association:
Account associations can also be removed by clicking the X adjacent to each role list, or by removing the labels directly from the Associate Account(s) dropdown control.
Once you are satisfied with the user configuration, click OK to create (or update) these associations. The standard user will now be able to switch account data context using the same procedure as the one described for administrators, presented earlier in this document.
4.11 - Environment Variables
Environment variable references may be used in the Anchore config.yaml file to set values that need to be configurable during deployment.
Using this mechanism a common configuration file can be used with multiple Anchore instances with key values being passed using environment variables.
The config.yaml configuration file is read by Anchore and any references to variables prefixed with ANCHORE will be replaced by the value of the matching environment variable.
For example in the sample configuration file the host_id parameter is set be appending the ANCHORE_HOST_ID variable to the string dockerhostid
host_id: 'dockerhostid-${ANCHORE_HOST_ID}'
Notes:
- Only variables prefixed with ANCHORE will be replaced
- If an environment variable is referenced in the configuration file but not set in the environment then a warning will be logged
- It is recommend to use curly braces, for example ${ANCHORE_PARAM} to avoid potentially ambiguous cases
Passing Environment Variables as a File
Environment Variables may also be passed as a file contained key value pairs.
ANCHORE_HOST_ID=myservice1
ANCHORE_LOG_LEVEL=DEBUG
The system will check for an environment variable named ANCHORE_ENV_FILE if this variable is set then Anchore will attempt to read a file at the location specified in this variable.
The Anchore environment file is read before any other Anchore environment variables so any ANCHORE variables passed in the environment will override the values set in the environment file.
4.12 - Feeds
Introduction
In this section, you’ll learn about the requirements for installing Anchore Enterprise Feeds and configuring its
components. You can read more about how Feeds works in the feature overview.
Requirements
Network Ingress
Anchore Enterprise Feeds exposes a RESTful API by default on port 8228 however this port can be remapped.
The policy engine service(s) in your Anchore deployment will use this endpoint and API to get the latest updates aggregated
into Anchore-specific formats.
Network Egress
Anchore Enterprise Feeds requires access to the upstream data feeds from supported Linux distributions and package
registries. See Feeds Endpoints for the full list of the endpoints.
Database
Note
Important Note: The Feed service DB must be version PostgreSQL 13 or newer for 5.0.
See 5.0 Migration Guide for details.
Ruby Gems project publishes package data as a PostgreSQL dump. Enabling the gem driver in Anchore Enterprise Feeds will
increase the load on the PostgreSQL database used by the service. We recommend using a different PostgreSQL instance
for the gem driver to avoid load spikes and interruptions to the service. The database endpoint for the gem driver can
be configured using services.feeds.drivers.gem.db_connect parameter in config.yaml
Vulnerability Provider Configuration
Some of the vulnerability data providers will require additional configuration steps, like retrieving an API or token
key from a provider.
GitHub Provider
The GitHub provider requires generation of a Personal Access Token (PAT) which is associated with a GitHub Account. To
generate this token, the user will be required to log in to GitHub and use the following
url: https://github.com/settings/tokens/new
There are no special permissions needed for the token, so there is no need to select any scopes. A note may be added as
a reminder for what the token is being used. At the bottom of the tokens page, click the Generate token button which
will show a new page displaying the generated token. Make sure you copy that token and use it to configure the GitHub
provider, the token will only be seen once in the GitHub interface.
Use the new token in config.yaml in the feeds section: for all components of the deployment:
  feeds:
      ...
      github:
        enabled: true
        token: "****************************************"
It is also possible to set the token with the following environment variable: ANCHORE_ENTERPRISE_FEEDS_GITHUB_DRIVER_TOKEN.
Note that this is only valid when using the config.yaml provided in the image due to that file referencing them
explicitly as replacement values.
Microsoft Security Response Center (MSRC) Provider
The MSRC provider is not enabled by default so must be explicitly enabled in order to execute. This provider is required
in order for Anchore to get data about vulnerabilities and fixes for Microsoft Windows and its associated KBs (patches).
For quickstart and deployments using docker-compose.yaml, find the feeds service definition and uncomment or add
the following environment variables:
services:
  ...
  feeds:
  ...
    environment:
    ...
    - ANCHORE_ENTERPRISE_FEEDS_MSRC_DRIVER_ENABLED=true
For deployments using config.yaml, update the feeds configuration section:
services:
  ...
  feeds:
  ...
    drivers:
      msrc:
        enabled: true
Anchore Vulnerability Match Exclusion Provider
The Anchore Vulnerability Match Exclusion provider is available to users that meet specific license requirements. Please
contact Anchore Support for details.
For quickstart and deployments using docker-compose.yaml, find the feeds service definition and uncomment or add the
following environment variables:
services:
  ...
  feeds:
  ...
    environment:
    ...
    - ANCHORE_ENTERPRISE_FEEDS_VULN_MATCH_EXCLUSION_DRIVER_ENABLED=true
For deployments using config.yaml, update the feeds configuration section:
services:
  ...
  feeds:
  ...
    drivers:
      anchore_match_exclusion:
        enabled: true
Ubuntu Provider
The Ubuntu https endpoint is heavily throttled and can be seen as unreliable.
A configuration option is provided to switch the Ubuntu provider’s access to the git protocol endpoint instead.
This endpoint has improved reliability but is not validated or encrypted and uses a different port than https.
Please contact Anchore Support for additional details.
NVD Provider
There are now three configurations options for the NVD Provider.
NVD Direct Mode
The NVD provider uses the v2 NVD API.
It is recommended to pass an API key to avoid aggressive throttling done by NVD.
Request an API key via https://nvd.nist.gov/developers/request-an-api-key.
Use the new api key in config.yaml in the feeds section: for all components of the deployment:
  services:
    feeds:
      drivers:
        nvdv2:
          enabled: true
          api_key: "****************************************"
It is also possible to set the token with the following environment variable: ANCHORE_NVD_API_KEY.
Note that this is only valid when using the config.yaml provided in the image due to that file referencing them
explicitly as replacement values.
NVD Direct Mode with Anchore Enrichment
With this option, Anchore will provide additional CPE data on top of what NVD is providing.
This data is maintained in a GitHub repository. Your deployment will need access to GitHub for this configuration.
  services:
    feeds:
      drivers:
        nvdv2:
          enabled: true
          api_key: "****************************************"
          overrides:
            enabled: true
NVD Proxy Mode with Anchore Enrichment
With this option, Anchore produces the resulting workspace of the NVD Direct Mode with Anchore Enrichment and
publishes it in https://enterprise.vunnel.feed.anchore.io. This allows users to consume the NVD Direct Mode with Anchore Enrichment data
without needing access to GitHub.
  services:
    feeds:
      drivers:
        nvdv2:
          enabled: true
          import_results:
            enabled: true
4.12.1 - Feed Configuration
Note If you are using Helm to deploy Anchore Enterprise, configuration options for feeds can be found nested under the feeds property in the values file.
Feed Synchronization Interval
The default configuration for Anchore Enterprise will download vulnerability data from Anchore’s feed service every 21,600 seconds (6hours).
For most users the only configuration option that is typically updated is the feed synchronization interval - the time interval (in seconds) at which the feed sync is run.
    .....

    cycle_timers:
      ...
      feed_sync: 14400
Feed Data Settings
Feed data configuration is set in the config.yaml file used by policy engine service. The services.policy_engine.vulnerabilities.sync.data section
of the configuration file controls the behavior of data to be synced. In addition, the data groups that can be synced depend on the services.policy_engine.vulnerabilities.provider,
and are explained in detail in the following sections.
Feed Groups
Anchore Enterprise is configured with grype as the services.policy_engine.vulnerabilities.provider and grypedb feed group enabled.
The grypedb feed group syncs a single Grype database to the policy engine.
A Grype database contains data that spans multiple groups. Due to this encapsulation, it is not possible to enable or disable individual feed groups.
Anchore Enterprise will default to downloading the feed group from a publicly accessible URL maintained by Grype https://toolbox-data.anchore.io/grype/databases/listing.json.
The Grype database available from this endpoint does not include third-party/proprietary groups such as MSRC.
To get those groups, set url (or override the environment variable ANCHORE_GRYPE_DB_URL) to your local feed service.
services:
  ...
  policy_engine:
    ...
    vulnerabilities:
      provider: grype
      ...
      sync:
        ...
        data:
          grypedb:
            enabled: true
            url: ${ANCHORE_GRYPE_DB_URL}
Read Timeout
Under rare circumstances you may see syncs failing with errors to fetch data due to timeouts. This is typically due to load on the feed service, network issues, or
some other temporary condition. However, if you want to increase the timeout to increase the likelihood of success, modify the read_timeout_seconds of the feeds configuration:
feeds:
  ...
  read_timeout_seconds: 180
Controlling Which Feeds and Groups are Synced
Note: The package and nvd data feeds are large, resulting in the initial sync taking some time to sync.
During initial feed sync, you can always query the progress and status of the feed sync using anchorectl.
# anchorectl feed list
 ✔ List feed
┌─────────────────┬────────────────────┬─────────┬──────────────────────┬──────────────┐
│ FEED            │ GROUP              │ ENABLED │ LAST SYNC            │ RECORD COUNT │
├─────────────────┼────────────────────┼─────────┼──────────────────────┼──────────────┤
│ vulnerabilities │ github:composer    │ true    │ 2023-08-21T16:41:04Z │ 2148         │
│ vulnerabilities │ github:gem         │ true    │ 2023-08-21T16:41:04Z │ 700          │
│ vulnerabilities │ github:go          │ true    │ 2023-08-21T16:41:04Z │ 1176         │
│ vulnerabilities │ github:java        │ true    │ 2023-08-21T16:41:04Z │ 3848         │
│ vulnerabilities │ github:npm         │ true    │ 2023-08-21T16:41:04Z │ 3450         │
│ vulnerabilities │ github:nuget       │ true    │ 2023-08-21T16:41:04Z │ 496          │
│ vulnerabilities │ github:python      │ true    │ 2023-08-21T16:41:04Z │ 1966         │
│ vulnerabilities │ github:rust        │ true    │ 2023-08-21T16:41:04Z │ 628          │
│ vulnerabilities │ nvd                │ true    │ 2023-08-21T16:41:04Z │ 223049       │
│ vulnerabilities │ alpine:3.10        │ true    │ 2023-08-21T16:41:04Z │ 2321         │
│ vulnerabilities │ alpine:3.11        │ true    │ 2023-08-21T16:41:04Z │ 2659         │
│ vulnerabilities │ alpine:3.12        │ true    │ 2023-08-21T16:41:04Z │ 3193         │
│ vulnerabilities │ alpine:3.13        │ true    │ 2023-08-21T16:41:04Z │ 3684         │
│ vulnerabilities │ alpine:3.14        │ true    │ 2023-08-21T16:41:04Z │ 4265         │
│ vulnerabilities │ alpine:3.15        │ true    │ 2023-08-21T16:41:04Z │ 4760         │
│ vulnerabilities │ alpine:3.16        │ true    │ 2023-08-21T16:41:04Z │ 5146         │
│ vulnerabilities │ alpine:3.17        │ true    │ 2023-08-21T16:41:04Z │ 5399         │
│ vulnerabilities │ alpine:3.18        │ true    │ 2023-08-21T16:41:04Z │ 5566         │
│ vulnerabilities │ alpine:3.2         │ true    │ 2023-08-21T16:41:04Z │ 305          │
│ vulnerabilities │ alpine:3.3         │ true    │ 2023-08-21T16:41:04Z │ 470          │
│ vulnerabilities │ alpine:3.4         │ true    │ 2023-08-21T16:41:04Z │ 679          │
│ vulnerabilities │ alpine:3.5         │ true    │ 2023-08-21T16:41:04Z │ 902          │
│ vulnerabilities │ alpine:3.6         │ true    │ 2023-08-21T16:41:04Z │ 1075         │
│ vulnerabilities │ alpine:3.7         │ true    │ 2023-08-21T16:41:04Z │ 1461         │
│ vulnerabilities │ alpine:3.8         │ true    │ 2023-08-21T16:41:04Z │ 1671         │
│ vulnerabilities │ alpine:3.9         │ true    │ 2023-08-21T16:41:04Z │ 1955         │
│ vulnerabilities │ alpine:edge        │ true    │ 2023-08-21T16:41:04Z │ 5571         │
│ vulnerabilities │ amzn:2             │ true    │ 2023-08-21T16:41:04Z │ 1381         │
│ vulnerabilities │ amzn:2022          │ true    │ 2023-08-21T16:41:04Z │ 276          │
│ vulnerabilities │ amzn:2023          │ true    │ 2023-08-21T16:41:04Z │ 300          │
│ vulnerabilities │ chainguard:rolling │ true    │ 2023-08-21T16:41:04Z │ 378          │
│ vulnerabilities │ debian:10          │ true    │ 2023-08-21T16:41:04Z │ 27731        │
│ vulnerabilities │ debian:11          │ true    │ 2023-08-21T16:41:04Z │ 27886        │
│ vulnerabilities │ debian:12          │ true    │ 2023-08-21T16:41:04Z │ 26675        │
│ vulnerabilities │ debian:13          │ true    │ 2023-08-21T16:41:04Z │ 26359        │
│ vulnerabilities │ debian:7           │ true    │ 2023-08-21T16:41:04Z │ 20455        │
│ vulnerabilities │ debian:8           │ true    │ 2023-08-21T16:41:04Z │ 24058        │
│ vulnerabilities │ debian:9           │ true    │ 2023-08-21T16:41:04Z │ 28240        │
│ vulnerabilities │ debian:unstable    │ true    │ 2023-08-21T16:41:04Z │ 30185        │
│ vulnerabilities │ mariner:1.0        │ true    │ 2023-08-21T16:41:04Z │ 2096         │
│ vulnerabilities │ mariner:2.0        │ true    │ 2023-08-21T16:41:04Z │ 1774         │
│ vulnerabilities │ ol:5               │ true    │ 2023-08-21T16:41:04Z │ 1255         │
│ vulnerabilities │ ol:6               │ true    │ 2023-08-21T16:41:04Z │ 1695         │
│ vulnerabilities │ ol:7               │ true    │ 2023-08-21T16:41:04Z │ 2005         │
│ vulnerabilities │ ol:8               │ true    │ 2023-08-21T16:41:04Z │ 1372         │
│ vulnerabilities │ ol:9               │ true    │ 2023-08-21T16:41:04Z │ 359          │
│ vulnerabilities │ rhel:5             │ true    │ 2023-08-21T16:41:04Z │ 6995         │
│ vulnerabilities │ rhel:6             │ true    │ 2023-08-21T16:41:04Z │ 8720         │
│ vulnerabilities │ rhel:7             │ true    │ 2023-08-21T16:41:04Z │ 8452         │
│ vulnerabilities │ rhel:8             │ true    │ 2023-08-21T16:41:04Z │ 4828         │
│ vulnerabilities │ rhel:9             │ true    │ 2023-08-21T16:41:04Z │ 1752         │
│ vulnerabilities │ sles:11            │ true    │ 2023-08-21T16:41:04Z │ 594          │
│ vulnerabilities │ sles:11.1          │ true    │ 2023-08-21T16:41:04Z │ 6125         │
│ vulnerabilities │ sles:11.2          │ true    │ 2023-08-21T16:41:04Z │ 3291         │
│ vulnerabilities │ sles:11.3          │ true    │ 2023-08-21T16:41:04Z │ 7081         │
│ vulnerabilities │ sles:11.4          │ true    │ 2023-08-21T16:41:04Z │ 6583         │
│ vulnerabilities │ sles:12            │ true    │ 2023-08-21T16:41:04Z │ 5948         │
│ vulnerabilities │ sles:12.1          │ true    │ 2023-08-21T16:41:04Z │ 6205         │
│ vulnerabilities │ sles:12.2          │ true    │ 2023-08-21T16:41:04Z │ 8306         │
│ vulnerabilities │ sles:12.3          │ true    │ 2023-08-21T16:41:04Z │ 10161        │
│ vulnerabilities │ sles:12.4          │ true    │ 2023-08-21T16:41:04Z │ 10121        │
│ vulnerabilities │ sles:12.5          │ true    │ 2023-08-21T16:41:04Z │ 10728        │
│ vulnerabilities │ sles:15            │ true    │ 2023-08-21T16:41:04Z │ 8738         │
│ vulnerabilities │ sles:15.1          │ true    │ 2023-08-21T16:41:04Z │ 8852         │
│ vulnerabilities │ sles:15.2          │ true    │ 2023-08-21T16:41:04Z │ 8455         │
│ vulnerabilities │ sles:15.3          │ true    │ 2023-08-21T16:41:04Z │ 8753         │
│ vulnerabilities │ sles:15.4          │ true    │ 2023-08-21T16:41:04Z │ 8678         │
│ vulnerabilities │ sles:15.5          │ true    │ 2023-08-21T16:41:04Z │ 7753         │
│ vulnerabilities │ ubuntu:12.04       │ true    │ 2023-08-21T16:41:04Z │ 14934        │
│ vulnerabilities │ ubuntu:12.10       │ true    │ 2023-08-21T16:41:04Z │ 5641         │
│ vulnerabilities │ ubuntu:13.04       │ true    │ 2023-08-21T16:41:04Z │ 4117         │
│ vulnerabilities │ ubuntu:14.04       │ true    │ 2023-08-21T16:41:04Z │ 32822        │
│ vulnerabilities │ ubuntu:14.10       │ true    │ 2023-08-21T16:41:04Z │ 4437         │
│ vulnerabilities │ ubuntu:15.04       │ true    │ 2023-08-21T16:41:04Z │ 6220         │
│ vulnerabilities │ ubuntu:15.10       │ true    │ 2023-08-21T16:41:04Z │ 6489         │
│ vulnerabilities │ ubuntu:16.04       │ true    │ 2023-08-21T16:41:04Z │ 29968        │
│ vulnerabilities │ ubuntu:16.10       │ true    │ 2023-08-21T16:41:04Z │ 8607         │
│ vulnerabilities │ ubuntu:17.04       │ true    │ 2023-08-21T16:41:04Z │ 9094         │
│ vulnerabilities │ ubuntu:17.10       │ true    │ 2023-08-21T16:41:04Z │ 7900         │
│ vulnerabilities │ ubuntu:18.04       │ true    │ 2023-08-21T16:41:04Z │ 24446        │
│ vulnerabilities │ ubuntu:18.10       │ true    │ 2023-08-21T16:41:04Z │ 8368         │
│ vulnerabilities │ ubuntu:19.04       │ true    │ 2023-08-21T16:41:04Z │ 8635         │
│ vulnerabilities │ ubuntu:19.10       │ true    │ 2023-08-21T16:41:04Z │ 8416         │
│ vulnerabilities │ ubuntu:20.04       │ true    │ 2023-08-21T16:41:04Z │ 18500        │
│ vulnerabilities │ ubuntu:20.10       │ true    │ 2023-08-21T16:41:04Z │ 9979         │
│ vulnerabilities │ ubuntu:21.04       │ true    │ 2023-08-21T16:41:04Z │ 11310        │
│ vulnerabilities │ ubuntu:21.10       │ true    │ 2023-08-21T16:41:04Z │ 12627        │
│ vulnerabilities │ ubuntu:22.04       │ true    │ 2023-08-21T16:41:04Z │ 16763        │
│ vulnerabilities │ ubuntu:22.10       │ true    │ 2023-08-21T16:41:04Z │ 14506        │
│ vulnerabilities │ ubuntu:23.04       │ true    │ 2023-08-21T16:41:04Z │ 14044        │
│ vulnerabilities │ wolfi:rolling      │ true    │ 2023-08-21T16:41:04Z │ 353          │
└─────────────────┴────────────────────┴─────────┴──────────────────────┴──────────────┘
Using the Config File to Include/Exclude Feeds at System Bootstrap
The most common way to set which feeds are synced is in the config.yaml for the policy engine. By default,
the vulnerabilities, nvdv2, and github feeds are synced to provide good vulnerability matching support for a variety of Linux distros
and application package types. Normally it will not be necessary to modify that set.
To disable a feed or enable a disabled feed, modify the config.yaml’s feeds section to:
feeds:
  selective_sync:
    enabled: true
    feeds:
      vulnerabilities: true
      nvdv2: true
      github: true
      packages: false
Those boolean values can be used to enable/disable the feeds. Note that changes will require a restart of the policy engine to take effect and settng
a feed to ‘false’ will not remove any data or show in the API or via AnchoreCTL, it will simply skip updates during sync operations.
4.12.2 - Migrating Data Between On-Premises Anchore Enterprise Feeds Installations
The On-Premises Anchore Enterprise Feeds has two high level functions:
- Gather vulnerability data from external sources, normalize and persist the data
- Serve persisted normalized vulnerability data from via an API
These two high level functions are decoupled and can be executed independently of each other. This design allows the service to operate in a Read-Only mode and service API requests with the vulnerability data in the service’s database. It is used for running Anchore Enterprise in Air-Gapped mode
Warning: The following process deletes the database of the Read-Only installation. Ensure the database is not used by other services such as Anchore Engine
Start with the public network
- Install Anchore Enterprise Feeds in a public network with access to internet, see network requirements
- Start the service and use the tasks API to query the status of the FeedSyncTask that should have started
- Wait for the FeedSyncTask to complete and populate the database
- Stop the service
- Create a database dump using pg_dump tool
pg_dump -h <public-network-db-hostname> -p 5432 -U postgres -Fc -v -f anchore-enterprise-feeds.dump postgres - Copy it to a location where it can be restored from in the following steps
Next, switch to the private network where Anchore Engine is installed
Install Anchore Enterprise Feeds in the private network alongside Anchore Engine, don’t start the service.
Configure Read-Only mode by setting api_only: True property in the config.yaml
feeds:
  ...
  api_only: True
  ...
- Restore the database from the anchore-enterprise-feeds.dump file created in the previous section
pg_restore -h <private-network-db-hostname> -p 5432 -U postgres -C -d postgres anchore-enterprise-feeds.dump
- Start the service
Note: PostgreSQL version must be the same across both databases for the pg_dump and pg_restore utility to work correctly
4.12.3 - Feed Synchronization
When Anchore Enterprise runs it will begin to synchronize security feed data from the Anchore feed service.
CVE data for Linux distributions such as Alpine, CentOS, Debian, Oracle, Red Hat and Ubuntu will be downloaded. The initial sync may take anywhere from 10 to 60 minutes depending on the speed of your network connection.
Checking Feed Status
Feed information can be retrieved through the API and AnchoreCTL.
# anchorectl feed list
 ✔ List feed
┌─────────────────┬────────────────────┬─────────┬──────────────────────┬──────────────┐
│ FEED            │ GROUP              │ ENABLED │ LAST SYNC            │ RECORD COUNT │
├─────────────────┼────────────────────┼─────────┼──────────────────────┼──────────────┤
│ vulnerabilities │ github:composer    │ true    │ 2023-08-21T16:41:04Z │ 2148         │
│ vulnerabilities │ github:gem         │ true    │ 2023-08-21T16:41:04Z │ 700          │
│ vulnerabilities │ github:go          │ true    │ 2023-08-21T16:41:04Z │ 1176         │
│ vulnerabilities │ github:java        │ true    │ 2023-08-21T16:41:04Z │ 3848         │
│ vulnerabilities │ github:npm         │ true    │ 2023-08-21T16:41:04Z │ 3450         │
│ vulnerabilities │ github:nuget       │ true    │ 2023-08-21T16:41:04Z │ 496          │
│ vulnerabilities │ github:python      │ true    │ 2023-08-21T16:41:04Z │ 1966         │
│ vulnerabilities │ github:rust        │ true    │ 2023-08-21T16:41:04Z │ 628          │
│ vulnerabilities │ nvd                │ true    │ 2023-08-21T16:41:04Z │ 223049       │
│ vulnerabilities │ alpine:3.10        │ true    │ 2023-08-21T16:41:04Z │ 2321         │
│ vulnerabilities │ alpine:3.11        │ true    │ 2023-08-21T16:41:04Z │ 2659         │
│ vulnerabilities │ alpine:3.12        │ true    │ 2023-08-21T16:41:04Z │ 3193         │
│ vulnerabilities │ alpine:3.13        │ true    │ 2023-08-21T16:41:04Z │ 3684         │
│ vulnerabilities │ alpine:3.14        │ true    │ 2023-08-21T16:41:04Z │ 4265         │
│ vulnerabilities │ alpine:3.15        │ true    │ 2023-08-21T16:41:04Z │ 4760         │
│ vulnerabilities │ alpine:3.16        │ true    │ 2023-08-21T16:41:04Z │ 5146         │
│ vulnerabilities │ alpine:3.17        │ true    │ 2023-08-21T16:41:04Z │ 5399         │
│ vulnerabilities │ alpine:3.18        │ true    │ 2023-08-21T16:41:04Z │ 5566         │
│ vulnerabilities │ alpine:3.2         │ true    │ 2023-08-21T16:41:04Z │ 305          │
│ vulnerabilities │ alpine:3.3         │ true    │ 2023-08-21T16:41:04Z │ 470          │
│ vulnerabilities │ alpine:3.4         │ true    │ 2023-08-21T16:41:04Z │ 679          │
│ vulnerabilities │ alpine:3.5         │ true    │ 2023-08-21T16:41:04Z │ 902          │
│ vulnerabilities │ alpine:3.6         │ true    │ 2023-08-21T16:41:04Z │ 1075         │
│ vulnerabilities │ alpine:3.7         │ true    │ 2023-08-21T16:41:04Z │ 1461         │
│ vulnerabilities │ alpine:3.8         │ true    │ 2023-08-21T16:41:04Z │ 1671         │
│ vulnerabilities │ alpine:3.9         │ true    │ 2023-08-21T16:41:04Z │ 1955         │
│ vulnerabilities │ alpine:edge        │ true    │ 2023-08-21T16:41:04Z │ 5571         │
│ vulnerabilities │ amzn:2             │ true    │ 2023-08-21T16:41:04Z │ 1381         │
│ vulnerabilities │ amzn:2022          │ true    │ 2023-08-21T16:41:04Z │ 276          │
│ vulnerabilities │ amzn:2023          │ true    │ 2023-08-21T16:41:04Z │ 300          │
│ vulnerabilities │ chainguard:rolling │ true    │ 2023-08-21T16:41:04Z │ 378          │
│ vulnerabilities │ debian:10          │ true    │ 2023-08-21T16:41:04Z │ 27731        │
│ vulnerabilities │ debian:11          │ true    │ 2023-08-21T16:41:04Z │ 27886        │
│ vulnerabilities │ debian:12          │ true    │ 2023-08-21T16:41:04Z │ 26675        │
│ vulnerabilities │ debian:13          │ true    │ 2023-08-21T16:41:04Z │ 26359        │
│ vulnerabilities │ debian:7           │ true    │ 2023-08-21T16:41:04Z │ 20455        │
│ vulnerabilities │ debian:8           │ true    │ 2023-08-21T16:41:04Z │ 24058        │
│ vulnerabilities │ debian:9           │ true    │ 2023-08-21T16:41:04Z │ 28240        │
│ vulnerabilities │ debian:unstable    │ true    │ 2023-08-21T16:41:04Z │ 30185        │
│ vulnerabilities │ mariner:1.0        │ true    │ 2023-08-21T16:41:04Z │ 2096         │
│ vulnerabilities │ mariner:2.0        │ true    │ 2023-08-21T16:41:04Z │ 1774         │
│ vulnerabilities │ ol:5               │ true    │ 2023-08-21T16:41:04Z │ 1255         │
│ vulnerabilities │ ol:6               │ true    │ 2023-08-21T16:41:04Z │ 1695         │
│ vulnerabilities │ ol:7               │ true    │ 2023-08-21T16:41:04Z │ 2005         │
│ vulnerabilities │ ol:8               │ true    │ 2023-08-21T16:41:04Z │ 1372         │
│ vulnerabilities │ ol:9               │ true    │ 2023-08-21T16:41:04Z │ 359          │
│ vulnerabilities │ rhel:5             │ true    │ 2023-08-21T16:41:04Z │ 6995         │
│ vulnerabilities │ rhel:6             │ true    │ 2023-08-21T16:41:04Z │ 8720         │
│ vulnerabilities │ rhel:7             │ true    │ 2023-08-21T16:41:04Z │ 8452         │
│ vulnerabilities │ rhel:8             │ true    │ 2023-08-21T16:41:04Z │ 4828         │
│ vulnerabilities │ rhel:9             │ true    │ 2023-08-21T16:41:04Z │ 1752         │
│ vulnerabilities │ sles:11            │ true    │ 2023-08-21T16:41:04Z │ 594          │
│ vulnerabilities │ sles:11.1          │ true    │ 2023-08-21T16:41:04Z │ 6125         │
│ vulnerabilities │ sles:11.2          │ true    │ 2023-08-21T16:41:04Z │ 3291         │
│ vulnerabilities │ sles:11.3          │ true    │ 2023-08-21T16:41:04Z │ 7081         │
│ vulnerabilities │ sles:11.4          │ true    │ 2023-08-21T16:41:04Z │ 6583         │
│ vulnerabilities │ sles:12            │ true    │ 2023-08-21T16:41:04Z │ 5948         │
│ vulnerabilities │ sles:12.1          │ true    │ 2023-08-21T16:41:04Z │ 6205         │
│ vulnerabilities │ sles:12.2          │ true    │ 2023-08-21T16:41:04Z │ 8306         │
│ vulnerabilities │ sles:12.3          │ true    │ 2023-08-21T16:41:04Z │ 10161        │
│ vulnerabilities │ sles:12.4          │ true    │ 2023-08-21T16:41:04Z │ 10121        │
│ vulnerabilities │ sles:12.5          │ true    │ 2023-08-21T16:41:04Z │ 10728        │
│ vulnerabilities │ sles:15            │ true    │ 2023-08-21T16:41:04Z │ 8738         │
│ vulnerabilities │ sles:15.1          │ true    │ 2023-08-21T16:41:04Z │ 8852         │
│ vulnerabilities │ sles:15.2          │ true    │ 2023-08-21T16:41:04Z │ 8455         │
│ vulnerabilities │ sles:15.3          │ true    │ 2023-08-21T16:41:04Z │ 8753         │
│ vulnerabilities │ sles:15.4          │ true    │ 2023-08-21T16:41:04Z │ 8678         │
│ vulnerabilities │ sles:15.5          │ true    │ 2023-08-21T16:41:04Z │ 7753         │
│ vulnerabilities │ ubuntu:12.04       │ true    │ 2023-08-21T16:41:04Z │ 14934        │
│ vulnerabilities │ ubuntu:12.10       │ true    │ 2023-08-21T16:41:04Z │ 5641         │
│ vulnerabilities │ ubuntu:13.04       │ true    │ 2023-08-21T16:41:04Z │ 4117         │
│ vulnerabilities │ ubuntu:14.04       │ true    │ 2023-08-21T16:41:04Z │ 32822        │
│ vulnerabilities │ ubuntu:14.10       │ true    │ 2023-08-21T16:41:04Z │ 4437         │
│ vulnerabilities │ ubuntu:15.04       │ true    │ 2023-08-21T16:41:04Z │ 6220         │
│ vulnerabilities │ ubuntu:15.10       │ true    │ 2023-08-21T16:41:04Z │ 6489         │
│ vulnerabilities │ ubuntu:16.04       │ true    │ 2023-08-21T16:41:04Z │ 29968        │
│ vulnerabilities │ ubuntu:16.10       │ true    │ 2023-08-21T16:41:04Z │ 8607         │
│ vulnerabilities │ ubuntu:17.04       │ true    │ 2023-08-21T16:41:04Z │ 9094         │
│ vulnerabilities │ ubuntu:17.10       │ true    │ 2023-08-21T16:41:04Z │ 7900         │
│ vulnerabilities │ ubuntu:18.04       │ true    │ 2023-08-21T16:41:04Z │ 24446        │
│ vulnerabilities │ ubuntu:18.10       │ true    │ 2023-08-21T16:41:04Z │ 8368         │
│ vulnerabilities │ ubuntu:19.04       │ true    │ 2023-08-21T16:41:04Z │ 8635         │
│ vulnerabilities │ ubuntu:19.10       │ true    │ 2023-08-21T16:41:04Z │ 8416         │
│ vulnerabilities │ ubuntu:20.04       │ true    │ 2023-08-21T16:41:04Z │ 18500        │
│ vulnerabilities │ ubuntu:20.10       │ true    │ 2023-08-21T16:41:04Z │ 9979         │
│ vulnerabilities │ ubuntu:21.04       │ true    │ 2023-08-21T16:41:04Z │ 11310        │
│ vulnerabilities │ ubuntu:21.10       │ true    │ 2023-08-21T16:41:04Z │ 12627        │
│ vulnerabilities │ ubuntu:22.04       │ true    │ 2023-08-21T16:41:04Z │ 16763        │
│ vulnerabilities │ ubuntu:22.10       │ true    │ 2023-08-21T16:41:04Z │ 14506        │
│ vulnerabilities │ ubuntu:23.04       │ true    │ 2023-08-21T16:41:04Z │ 14044        │
│ vulnerabilities │ wolfi:rolling      │ true    │ 2023-08-21T16:41:04Z │ 353          │
└─────────────────┴────────────────────┴─────────┴──────────────────────┴──────────────┘
This command will report list the feeds synchronized by Anchore Enterprise, last sync time and current record count.
Note: Time is reported as UTC, not local time.
Manually initiating feed sync
After the initial sync has completed the system will run an incremental sync at a user defined period, by default every 4 hours. At any time a feed sync can be initiated through the API or AnchoreCTL.
A sync operation can be manually initiated by running the system feeds sync command however this should not be required under normal operation.
# anchorectl feed sync
 ✔ Sync feed
┌─────────────────┬─────────┬──────────────┐
│ FEED            │ STATUS  │ TIME TO SYNC │
├─────────────────┼─────────┼──────────────┤
│ vulnerabilities │ success │ 0            │
└─────────────────┴─────────┴──────────────┘
Anchore Enterprise can be instructed to flush the current feed data and perform a full synchronization.
NOTE: Under normal circumstances this operation should not be performed since Anchore Enterprise performs regular incremental sync.
NOTE: This process may take anywhere from 10 to 60 minutes depending on the speed of your network connection, and will cause interruptions in regular operations during sync. It is included for testing and troubleshooting scenarios only.
# anchorectl feed sync --flush
 ✔ Sync feed
┌─────────────────┬─────────┬──────────────┐
│ FEED            │ STATUS  │ TIME TO SYNC │
├─────────────────┼─────────┼──────────────┤
│ vulnerabilities │ success │ 0            │
└─────────────────┴─────────┴──────────────┘
4.13 - LDAP
Overview
The Lightweight Directory Access Protocol (LDAP) is a standardized and widely-used client-server protocol for accessing directory information, and can be enabled in Anchore Enterprise Client to authenticate users against an existing directory server.
In order to configure Anchore Enterprise Client for use with LDAP, the requisite information for connecting and authenticating with an LDAP directory server must first be provided by an administrator. For the purposes of determining what users can see and do once they are logged in, the administrator must also create one or more account association entries, called user mappings.
When an LDAP user authenticates, the Anchore Enterprise account associated with their session is determined by the first user mapping containing a search filter that matches the information in their LDAP record. LDAP authentication will fail if no matches are found, if the associated account is disabled, or if the user’s login credentials are incorrect.
The following sections in this document describe how to configure the Anchore Enterprise Client for use with an LDAP directory server, how to add user mappings, and how to log in to the application as an LDAP user.
Server Connection Properties
Administrators can provide the information used to connect Anchore Enterprise Client to an LDAP server from the LDAP sidetab in the Configuration view. Please note that this sidetab is not visible to non-administrative users.
The connection property fields shown in this view are described below:
| Property | Description |
|---|
| Server URI | The ldap:// or ldaps:// URI of the LDAP directory server to query. |
| Manager DN | The distinguished name (DN) of an LDAP directory manager that the Anchore Enterprise Client can use to perform further queries about LDAP users during login. The directory manager is typically a privileged server administrator who, once authenticated, can access the LDAP record of any user intended to access the application. |
| Manager Password | The password associated with the Manager DN. |
| Base DN | The relative distinguished name in the LDAP directory tree hierarchy under which queries about users should be performed. |
After you have entered the required connection properties, click the Save button to store them. Once stored, you can click the Test button to verify that the application can authenticate with the LDAP server using the details you’ve provided.
Note: Clicking Save when no values are provided in any of the fields will disable LDAP in the application and prevent LDAP from being displayed as an authentication option on the login screen.
User Mappings
LDAP user mappings contain search filters that unite the results of searches made against the data attributes of LDAP records with account information stored in Anchore Enterprise.
When an LDAP user submits their credentials on the login page, the first match encountered will provide Anchore Enterprise Client with an associated Anchore Enterprise account that is used to define the scope of what the user can see and do once they are fully authenticated.
If a match is detected, the submitted password is then validated against the one stored inside the matched LDAP record. If the password is correct and the associated Anchore Enterprise account is not suspended, the user will be successfully logged in. If no match is found or the password is incorrect, authentication will fail.
Adding a User Mapping
User mappings can be created by administrators from inside an account within the Accounts sidetab in the Configuration view, or from the LDAP sidetab in the area below the server connection properties form.
To add a new user mapping containing an LDAP search filter, click the Add New LDAP User Mapping button—or if no user mappings are currently defined, click the Let’s add one! button in the empty table.
You will be presented a dialog, similar to the one shown below, where you can provide an LDAP search filter:
LDAP Search Filters
The LDAP search filter in each mapping provides the criteria for associating that mapping with an Anchore Enterprise account. For example:
uid=$USERNAME
In the above example, the user mapping requires that the uid (user ID) attribute in an LDAP record matches the data represented by the $USERNAME token.
The =$USERNAME string is a required entry, and the actual value of the token resolves to whatever value the user enters in the Username field when they log in to Anchore Enterprise Client.
In Microsoft® Active Directory® (AD) implementations that support the LDAP protocol, the sAMAccountName attribute is the broad equivalent of uid:
sAMAccountName=$USERNAME
Note: The submitted value of $USERNAME should always correspond to an attribute with a unique value within the LDAP user record, or one that is unique in combination with other criteria. In Active Directory, the uniqueness of sAMAccountName is enforced, whereas this may not be true for uid (which is an optional attribute in AD).
Additional filter criteria beyond the user identity can be provided to assert granular control over user access. The following examples describe filters with narrower scope:
(&(cn=$USERNAME)(|(ou:dn:=Administrative)(ou:dn:=Management)))
(&(ou=devops)(uniqueMember=uid=$USERNAME,dc=example,dc=org))
A detailed summary of the syntax and formula of LDAP search filters is beyond the scope of this document, however RFC 1558 provides a comprehensive description of how these entries are structured.
Mapping Order
By default, mappings are evaluated in priority order, with new entries being stored at the lowest priority. It can be challenging to infer the exact order of all mappings when they are spread across multiple accounts, so the table listing all current mappings the LDAP sidetab shows the priority of every item and includes the account with which they are associated. Example:

From here you can move row entries to a higher or lower order of precedence by clicking down on a hotspot () and then dragging the row up or down the list.
The priority order of user mappings determines the order in which search filters are evaluated when a user logs in. The first mapping to successfully locate an LDAP user record that matches the $USERNAME and any other criteria in its search filter will be used to determine the Anchore Enterprise account association for that user.
Once a user is located, subsequent mapping entries will be ignored, regardless of (possibly narrower) specificity, as only priority order matters here.
Test Mapping Behavior
You can evaluate the behavior of your user mappings by entering $USERNAME data (for example, the uid of a user) in the Check $USERNAME Against LDAP Mappings search field.
If an LDAP record is located that matches the search filter criteria of a mapping, you’ll be informed of which mapping provided the match, the associated Anchore Enterprise user, and the distinguished name of the user whose LDAP record was returned.
Login With LDAP Credentials
If a set of valid LDAP server connection properties have been stored by an administrator, the LDAP authentication option is activated in the application login view, in addition to the Default option of authenticating against the user records stored in Anchore Enterprise:
The value entered in the Username field will be used by the application to populate the $USERNAME token when evaluating each user mapping. The value entered in the Password field will be used to authenticate the matched user with the LDAP directory server.
Once these operations have completed, and providing the account associated with the mapping is not disabled, the user will be logged in.
4.14 - Malware Scans of Images
Malware Scanning Overview
See Malware Scanning for an overview of the feature and how it works. This section is for configuration of scan behavior.
Customizing the analyzer_config.yaml requires a restart of the analyzer container. The typical process is to mount it externally into /anchore_service/analyzer_config.yaml from a host volume or as a ConfigMap in Kubernetes and
all analyzers in the deployment share the same configuration.
Limitations and Resource Usage
ClamAV has a maximum size of file that it can scan: 4GB. That means that it is only capable of scanning a 4GB squashed filesystem for a container. If you analyze
an image larger than that with malware scanning enabled, you’ll see an error in the logs and the analyzer will not register a valid malware scan for the image. This condition
can be caught using policy rules requiring a scan to be run for an image.
Enabling & Disabling Malware Scans
Each analyzer needs to have it’s analyzer_config.yaml file updated to include:
malware:
  clamav:
    enabled: true
    db_update_enabled: true
malware.clamav.enabled = true will enable the analyzer that runs the scan. If not enabled, the analyzer will run but will not execute a ClamAV scan so no scan results
will be reported.
:warning: Malware Scanning currently only supports image sizes up to 4gb.
Disabling DB Updates for ClamAV
The db_update_enabled property of the malware.clamav object shown above in the analyzer_config.yaml controls whether the analyzer will invoke a refreshclam call prior to each
analysis execution. By default it is enabled and should be left on for up-to-date scan results. The db version is returned in the metadata section of the scan results available from the Anchore Enterprise API.
You can disable the update if you want to mount an external volume to provide the db data in /home/anchore/clamav/db inside the container (must be read-write for the anchore user) This can be used
to cache or share a db across multiple analyzers (e.g. using AWS EFS) or to support air-gapped deployments where the db cannot be automatically updated from deployment itself.
Advanced Configuration
The path for the db and db update configuration are also available as environment variables inside the analyzer containers. These should not need to be used in most cases, but
for air-gapped or other installation where the default configuration is not sufficient they are available for customization.
| Name | Description | Default |
|---|
| ANCHORE_FRESHCLAM_CONFIG_FILE | Location of freshclam.conf to use | /home/anchore/clamav/freshclam.conf |
| ANCHORE_CLAMAV_DB_DIR | Location of the db dir to read/write | /home/anchore/clamav/db |
For most cases, anchore uses the default values for the clamscan and freshclam invocations.
If you would like to override any of the default values of those commands or replace existing ones, you can add the following to the analyzer_config.yaml:
malware:
  clamav:
    clamscan_args:
      - max-filesize=1000m
      - max-scansize=1000m
    freshclam_args:
      - datadir=/tmp/different/datadir
Please note that the value above will be passed directly to the corresponding commands, e.g.:
clamscan --suppress-ok-results --infected --recursive --allmatch --archive-verbose --tempdir={tempdir} --database={database} --max-filesize=1000m --max-scansize=1000m <path_to_tar>
4.15 - Max Image Size
Setting Size Filter
As of v3.0, Anchore Enterprise can be configured to have a size limit for images being added for analysis. Images that exceed the configured maximum size will not be added to Anchore and the catalog service will log an error message providing details of the failure. This size limit is applied when adding images to anchore via the api/anchoreclt, tag subscriptions, and repository watchers.
The max size feature is disabled by default but can be enabled via max_compressed_image_size_mb in the configuration file, which represents the size limit in MB of the compressed image. Values less than 0 will disable the feature and allow images of any size to be added to Anchore. A value of 0 will be enforced and prevent any images from being added. Non-integer values will cause bootstrap of the service to fail. If using compose with the default config, this can be set through the ANCHORE_MAX_COMPRESSED_IMAGE_SIZE_MB env variable on the catalog service. If using helm, it can be defined in the values file via anchoreGlobal.maxCompressedImageSizeMB
4.16 - Network Proxies
As covered in the Network sections of the requirements document, Anchore requires three categories of network connectivity.
Registry Access
Network connectivity, including DNS resolution, to the registries from which Anchore needs to download images.
Feed Service
Anchore synchronizes feed data such as operating system vulnerabilities (CVEs) from Anchore Cloud Service. See Feeds Overview for the full list of endpoints.
Access to Anchore Internal Services
Anchore is composed of six smaller services that can be deployed in a single container or scaled out to handle load. Each Anchore service should be able to connect the other services over the network.
In environments were access to the public internet is restricted then a proxy server may be required to allow Anchore to connect to Anchore Cloud Feed Service or to a publicly hosted container registry.
Anchore can be configured to access a proxy server by using environment variables that are read by Anchore at run time.
https_proxy:
Address of the proxy service to use for HTTPS traffic in the following form: {PROTOCOL}://{IP or HOSTNAME}:{PORT}
eg. https://proxy.corp.example.com:8128
http_proxy:
Address of the proxy service to use for HTTP traffic in the following form: {PROTOCOL}://{IP or HOSTNAME}:{PORT}
eg. http://proxy.corp.example.com:8128
no_proxy:
Comma delimited list of hostnames or IP address which should be accessed directly without using the proxy service.
eg. localhost,127.0.0.1,registry,example.com
Environment Variables to Control Proxy Behavior
- Setting the endpoints to HTTP proxy:
- Set both
HTTP_PROXY and http_proxy environment variables for regular HTTP protocol use. - Set both
HTTPS_PROXY and https_proxy environment variables for HTTP + TLS (HTTPS) protocol use.
- Setting endpoints to exclude from proxy use:
- Set both
NO_PROXY and no_proxy environment variables to exclude those domains from proxy use defined in the preceding proxy configurations.
If using Docker Compose these need to be set in each service entry.
If using Helm Chart, set these in the extraEnv entry for each service.
Notes:
- Do not use double quotes (") around the proxy variable values.
Authentication
For proxy servers that require authentication the username and password can be provided as part of the URL:
eg. https_proxy=https://user:[email protected]:8128
If the username or password contains and non-url safe characters then these should be urlencoded.
For example:
The password F@oBar! would be encoded as F%40oBar%21
Setting Environment Variables
Docker Compose: https://docs.docker.com/compose/environment-variables/
Kubernetes: https://kubernetes.io/docs/tasks/inject-data-application/define-environment-variable-container/
Deployment Architecture Notes
When setting up a network proxy, keep in mind that you will need to explicitly allow inter-service communication within the anchore engine deployment to bypass the proxy, and potentially other hostnames as well (e.g. internal registries) to ensure that traffic is directed correctly. In general, all anchore engine service endpoints (the URLs for enabled services in the output of an ‘anchorectl system status’ command) as well as any internal registries (the hostnames you may have set up with ‘anchorectl registry add –username …’ or as part of an un-credentialed image add ‘anchorectl image add registry:port/….’), should not be proxied (i.e. added to the no_proxy list, as described above).
If you wish to tune this further, below is a list of each component that makes an external URL fetch for various purposes:
- Catalog: makes connections to image registries (any host added via ‘anchorectl registry add’ or directly via ‘anchorectl image add’)
- Analyzer: same as catalog
- Policy Engine: by default, makes HTTPS connection to https://toolbox.anchore.io for the public GrypeDB data unless a local feed service is deployed.
- Feeds: connects to public and Anchore-private data sources for downloading vulnerability data. See Feed Drivers for the full list.
4.17 - Notifications
Overview
Alert external endpoints (Email, GitHub, Slack, and more) about Anchore events such as policy evaluation results, vulnerability updates, and system errors with our new Notifications service. Configure notification endpoints and manage which specific events you need through Anchore Enterprise UI.
For more information on the Notifications Service in general, its concepts, and details on its configuration, please refer to the Notifications Service.
The following sections in this document describe the current endpoints available for configuration, the options provided for selecting events, the various actions you can do with a configuration (add, edit, test, and remove), and how to disable an endpoint as an admin.
Anchore Enterprise includes Notifications service to alert external endpoints about the system’s activity. Services that make up Anchore Enterprise generate events to record significant activity, such as an update, in the policy evaluation result or vulnerabilities for a tag, or an error analyzing an image. This service provides a mechanism to selectively notify events of interest to supported external endpoints. The actual notification itself depends on the endpoint - formatted message to Slack, email and MS Teams endpoints, tickets in GitHub and Jira endpoints, and JSON payload to webhook endpoint.
Glossary
- Event
- An information packet generated by Anchore Enterprise service to indicate some activity.
- Endpoint
- External tool capable of receiving messages such as Slack, GitHub, Jira, MS Teams, email or webhook.
- Endpoint Configuration
- Connection information of the endpoint used for sending messages.
- Selector
- Criteria for selecting events to be notified.
Installation
Anchore Enterprise Notifications is included with Anchore Enterprise, and is installed by default when deploying a trial quickstart with Docker Compose, or a production deployment Kubernetes.
Configuration
Enterprise Notifications Service
The service loads configuration from the notifications section of the config.yaml. See the following snippet of the configuration:
...
services:
  notifications:
    enabled: true
    require_auth: true
    endpoint_hostname: "<hostname>"
    listen: '0.0.0.0'
    port: 8228
    cycle_timers:
      notifications: 30
    # Set Anchore Enterprise UI base URL to receive UI links in notifications
    ui_url: "<enterprise-ui-url>"
The cycle_timers -> notifications controls how often the service checks for events in the system that need to be processed for notifications. Default is every 30 seconds.
The ui_url is used for constructing links to Enterprise UI pages in the notifications. Configure this property to the Enterprise UI’s base URL. This URL should be accessible from the endpoint receiving the notification for the links to work correctly. If the value is not set, the notification message is still be sent to the endpoint, but it won’t contain a clickable link to the Enterprise UI.
Note: Any changes to the configuration requires a restart of the service for the updates to take effect.
RBAC Permissions
In the Anchore Enterprise deployment, the table below lists the required actions and containing roles:
| Description | Action | Roles |
|---|
| List all the available notification endpoints and their status | listNotificationEndpoints | Read Only, Read Write |
| List all available configurations for an endpoint | listNotificationEndpointConfigurations | Read Only, Read Write |
| Get an endpoint configuration and associated selectors | getNotificationEndpointConfiguration | Read Only, Read Write |
| Create an endpoint configuration and associated selectors | createNotificationEndpointConfiguration | Read Write |
| Update an endpoint configuration and associated selectors | updateNotificationEndpointConfiguration | Read Write |
| Delete an endpoint configuration and associated selectors | deletetNotificationEndpointConfiguration | Read Write |
To send notifications to an external tool/endpoint, the service requires connection information to that endpoint. See the following for the required information for each endpoint:
Concepts
Endpoint Status
All endpoints in the Notifications service can be toggled as Enabled or Disabled. The endpoint status reflects the eabled or disabled state. By default, the status for all endpoints is enabled by default. Setting the endpoint status to disabled stops all notifications from going out to any configurations of that specific endpoint. This is a system-wide setting that can only be updated by the admin account. It is read-only for remaining accounts.
Endpoint Configuration
The endpoint configuration is the connection information such as URL, user credentials, and so on for an endpoint. The service allows multiple configurations per endpoint. Endpoint configurations are scoped to the account.
Selector
The services provides a mechanism to selectively choose notifications and route them to a configured endpoint. This is achieved using a Selector, which is a collection of filtering criteria. Each event is processed against a Selector to determine whether it is a match or not. If the Selector matches the event, a notification is sent to the configured endpoint by the service.
For a quick list of useful notifications and associated Selector configurations, see Quick Selection.
A Selector encapsulates the following distinct filtering criteria: scope, level, type, and resource type. Some allow a limited set of values, and others wildcards. The value for each criteria has to be set for the matching to compute correctly.
Scope
Allowed values: account, global
Events are scoped to the account responsible for the event creation.
account scope matches events associated with a user account.global scope matches events of any and all users. global scope is limited to admin account only. Non-admin account users can only specify account as the scope.
Level
Allowed values: info, error, *
Events are associated with a level that indicates whether the underlying activity is informational or resulted in an error. - info matches informational events such as policy evaluation or vulnerabilities update, image analysis completion and so on.
error matches failures such as image analysis failure.* will match all events.
Type
Allowed values: strings with or without regular expressions
Event types have a structured format <category>.<subcategory>.<event>. Thus, * matches all types of events. Category is indicative of the origin of the event.
system.* matches all system events.user.* matches events that are relevant to individual consumption.- Omitting an asterisk will do an exact match. See the GET /event_types route definition in the external API for the list of event types.
Resource Type
Allowed values: *, image_digest, image_tag, image_reference, repository, feeds, feed, feed_group, *
In most cases, events are generated during an operation involving a resource. Resource type is metadata of that resource. For instance image_tag is the resource type in a policy evaluation update event. * matches all resource types if you are uncertain what resource type to use.
Quick Selection
The following Selector configurations are for notifying a few interesting events.
| Receive | Scope | Level | Type | Resource Type |
|---|
| Policy evaluation and vulnerabilities updates | account | * | user.checks.* | * |
| User errors | account | error | user.* | * |
| User infos | account | info | user.* | * |
| Everything user related | account | * | user.* | * |
| System errors | account | error | system.* | * |
| System infos | account | info | system.* | * |
| Everything system related | account | * | system.* | * |
| All | account | * | * | * |
| All for every account (admin account only) | global | * | * | * |
Notifications UI Walkthrough

Supported Endpoints
- Email
- Send notifications to a specific SMTP mail service.
- GitHub
- Version control for software development using Git.
- JIRA
- Issue tracking and agile product management software by Atlassian.
- Slack
- Team collaboration software tools and online services by Slack Technologies.
- Teams
- Team collaboration software tools and online services by Microsoft.
- Webhook
- Send notifications to a specific API endpoint.
Event Selector Options

When adding or editing a configuration, selecting which events to be notified on can be as easy as choosing one of the above three options: All Notification Events, Policy & Vulnerability Events, or Error Events.
Advanced users can select Add Custom Selector for more granularity:

In the example shown, we configure to be notified on all system info events affecting any resource associated with the user’s account. For an in-depth explanation on the provided properties and their possible values, view our Selector documentation.
Adding a Configuration

If you haven’t already defined a configuration for an endpoint, simply click Let’s Add One! as shown above. Once you have, add additional configurations with Add New Configuration as shown below.

Upon doing so, a modal will appear with various properties shown on the left side. Note that based on the type of endpoint, these properties may differ.
To view the various requirements, check the documentation for Email, GitHub, JIRA, Slack, and Teams.

For more information on adding a custom selector, please view our Selector documentation.
Prior to saving your new configuration, feel free to test with the Test Configuration button. Then save with OK.
Note: If OK is not enabled, be sure all required fields have been filled out.
Editing a Configuration

The process to edit a configuration entry is started by clicking Edit which is found within the Actions column as shown above.

The various fields available for editing are the same shown when adding the configuration. For additional info on a specific field, hover over the provided question icon circled with an orange ring next to the field name.
At any time, you can select Cancel to disregard any changes you’ve made.
For testing any new changes prior to saving them, click Test Configuration.
To save your changes, click OK. If OK is not enabled, be sure all required fields have been filled out.
Testing a Configuration

When viewing your configurations, testing is easy - just look under the Actions column and click Test for that entry.

Otherwise, when adding or editing a configuration, search for the test button pictured above. It can be found near the bottom of the modal, next to the Cancel and OK buttons.
Removing a Configuration

To remove a specific notification configuration, simply click on the Remove button (as shown above) within the Actions column for that entry.
Select Yes to proceed with the deletion process or No to cancel. Please note that once you agree to remove the configuration, you won’t be able to recover it.
Admin-specific Actions

Disabling Endpoints
As an admin, navigate to System > Notifications and click on the toggle visible in the lower-right corner of the specific endpoint you’re aiming to disable.
By default, all endpoints (such as Email, Slack, and Webhook) are enabled out of the box. Disabling a specific endpoint requires admin privileges as it ensures all notifications are stopped from going out to any configuration for that endpoint system-wide.
Note that users are still able to add, edit, test, and remove notification configuration items, but no event messages will be sent for that endpoint until it is re-enabled.
4.17.1 - Slack
Notifications to Slack are in the form of messages to a channel.
Requirements
Do the following to receive Slack notifications.
- An Incoming Webhook URL is required. Follow instructions to create one.
- Copy the Incoming Webhook URL.
- Create a Slack endpoint configuration in the Notifications service either via Enterprise UI or the API directly.
4.17.2 - GitHub
Notifications to GitHub are in the form of new issues in a repository.
Requirements
Do the following to receive GitHub notifications.
- Provide the following required GitHub account and repository-related information.
- Username of the account for creating issues.
- Token with repository access. Follow instructions to create a new Access Token in the account used for creating issues.
- Name of the repository where the issues are created.
- Owner of the repository.
- (Optional) GitHub API URL, defaults to https://api.github.com if not specified.
- (Optional) milestone assigned to the issue.
- (Optional) one or more labels assigned to the issue.
- (Optional) one or more GitHub users assigned to the issue.
- Create a GitHub endpoint configuration in the Notifications service either via Enterprise UI, or the API directly.
4.17.3 - Jira
Notifications to Jira are in the form of new issues in a project.
Requirements
Do the following to receive Jira notifications.
- Provide the following required Jira account and project related information.
- URL of the Jira project.
- Username of the account for creating issues.
- API token or password depending on the Jira project.
- For Jira Cloud projects an API token is required. Follow instructions to create a new API token for the account creating issues.
- For Jira Self-managed projects password of the account creating issues is required.
- Project key, same as the prefix in the issue identifier. For instance, issue
TEST-1 has the project key TEST. - Type of the issue created such as
Bug, Task, Story, and so on. - (Optional) priority assigned to the issue such as
Low, Medium, High, and so on. - (Optional) one or more labels to be assigned to the issue.
- (Optional) Jira user to be assigned to the issue.
- Create a Jira endpoint configuration in the Notifications service either via Enterprise UI, or the API directly.
4.17.4 - SMTP
Notifications to SMTP server are in the form of html and plain text message packets.
Requirements
Do the following to receive SMTP notifications.
- Provide the following required SMTP server information.
- Host name/address
- Port number
- From address
- To address
- (Optional) username
- (Optional) password
- (Optional) use tls to encrypt connection
- Create an SMTP endpoint configuration in the Notifications service either via Enterprise UI, or the API directly.
4.17.5 - Microsoft Teams
Notifications to Microsoft Teams are in the form of messages to a channel.
Requirements
Do the following to receive Microsoft Teams notifications.
- An incoming webhook URL is required. See the Microsoft instructions to create one.
- Copy the incoming webhook URL.
- Create a Microsoft Teams endpoint configuration in the Notifications service either via Enterprise UI, or the API directly.
4.18 - Role-Based Access Control
Overview
Anchore Enterprise includes support for using Role-Based Access Control (RBAC) to control the permissions that a specific user has to a specific set of resources in the system. This allows administrators to configure specific, limited permissions on user enabling limited access usage for things like CI/CD automation accounts, read-only users for browsing analysis output, or security team users that can modify policy but not change image analysis configuration.
Anchore Enterprise provides a predefined of roles. Please see table below for complete list.
The Enterprise UI contains an enumeration of the specific permissions granted to users that are members of each of the roles.
Roles, Users, and Accounts
Roles are applied within the existing account and user frameworks defined in Anchore Enterprise. Resources are still scoped to the account namespace and accounts provide full resource isolation (e.g. an image must be analyzed within an account to be referenced in that account). Roles allow users to be granted permissions in both the account to which they belong as well as external accounts to facilitate resource-sharing.
Terminology
User: An authenticated identity (a principal in rbac-speak).
Account: A resource namespace and user grouping that also defines an authorization domain to which permissions are applied.
Role: A named set of permissions.
Permission: An action to grant an operation on a set of resources.
Action: The operation to be executed, such as listImages, createRegistry, and updateUser.
Target: The resource to be operated on, such as an image digest.
Role Membership: Mapping a username to a role within a specific account. This confers the permissions defined by the role to resources in the specified account to the specified user. The user is not required to be a member of the account itself.
Constraints
- A user may be a member of a role within one or more accounts.
- A user may be a member of many roles, or no roles.
- There is no default role set on a user when a user is created. Membership must be explicitly set.
- Roles are immutable. The set of actions they grant is static.
- Creating and deleting accounts is only available to users in the admin account. The scope of accounts and roles is different than other resources because they are global. The authorization domain for those resources is not the account name but rather the global domain: system.
Role Summary and Permissions
| Role | Allowed Actions | Description |
|---|
| full-control | * | Full control over any account granted for. USE WITH EXTREME CAUTION |
| account-user-admin | listUsers, createUser, updateUser, deleteUser, listRoles, getRole, listRoleMembers, createRoleMember, deleteRoleMember, getAccount, listApiKeys, createApiKey, getApiKey, updateApiKey, deleteApiKey, selfListApiKeys, selfCreateApiKey, selfUpdateApiKey, selfDeleteApiKey, selfGetApiKey, selfGetCredentials, selfAddCredential, selfDeleteCredential | Manage account creation and addition of users to accounts |
| account-viewer | listAccounts | Role which can list all accounts on the system. This role is only available for use in the system domain. This role can only be conferred by a system administrator. |
| image-analyzer | listImages, getImage, createImage, getImageEvaluation, listEvents, getEvent, listSubscriptions, importImage, importSource, getSubscription, getAccount, listSources, getSource, importSource, getSourceEvaluation, listSubscriptions, updateSubscription, getSubscription, deleteSubscription, createSubscription, createArtifactRelationships, listArtifactRelationships, viewReports, selfListApiKeys, selfCreateApiKey, selfUpdateApiKey, selfDeleteApiKey, selfGetApiKey, selfGetCredentials, selfAddCredential, selfDeleteCredential | Submit images for analysis, get results, but not change config. Intended for CI/CD systems and automation |
| image-developer | listImages, getImage, listPolicies, getPolicy, listSubscriptions, getSubscription, listRegistries, getRegistry, getImageEvaluation, listFeeds, listServices, getService, listEvents, getEvent, listArchives, listArchiveTransitionRules, getArchiveTransitionRule, listArchivedImageAnalysis, getArchivedImageAnalysis, getArchiveTransitionRuleHistory, getAccount, listNotificationEndpoints, listNotificationEndpointConfigurations, getNotificationEndpointConfiguration, getActions, listAlerts, getAlert, getCorrection, getApplication, listSources, getSource, getSourceEvaluation, listArtifactRelationships, selfListApiKeys, selfCreateApiKey, selfUpdateApiKey, selfDeleteApiKey, selfGetApiKey, selfGetCredentials, selfAddCredential, selfDeleteCredential | Permissions view images, vulnerabilities and policy evaluations. |
| image-lifecycle | createArchivedImageAnalysis, createArchiveTransitionRule, deleteArchivedImageAnalysis, deleteArchiveTransitionRule, deleteArchiveTransitionRuleHistory, getArchivedImageAnalysis, getArchiveTransitionRule, getArchiveTransitionRuleHistory, listArchivedImageAnalysis, listArchives, listArchiveTransitionRules, selfListApiKeys, selfCreateApiKey, selfUpdateApiKey, selfDeleteApiKey, selfGetApiKey, selfGetCredentials, selfAddCredential, selfDeleteCredential | Permissions to manage archives and archival rules. |
| inventory-agent | syncInventory, selfListApiKeys, selfCreateApiKey, selfUpdateApiKey, selfDeleteApiKey, selfGetApiKey, selfGetCredentials, selfAddCredential, selfDeleteCredential | Minimal permissions for use with runtime inventory agents (k8s or ECS) |
| read-write | createImage, createPolicy, createRegistry, createRepository, createSubscription, deleteEvents, deleteImage, deletePolicy, deleteRegistry, deleteSubscription, getAccount, getEvent, getImage, getImageEvaluation, getPolicy, getRegistry, getService, getSubscription, importImage, importSource, listEvents, listFeeds, listImages, listPolicies, listRegistries, listServices, listSubscriptions, updateFeeds, updatePolicy, updateRegistry, updateSubscription, listArchives, listArchiveTransitionRules, getArchiveTransitionRule, createArchiveTransitionRule, deleteArchiveTransitionRule, listArchivedImageAnalysis, getArchivedImageAnalysis, createArchivedImageAnalysis, deleteArchivedImageAnalysis, getArchiveTransitionRuleHistory, listNotificationEndpoints, listNotificationEndpointConfigurations, getNotificationEndpointConfiguration, createNotificationEndpointConfiguration, updateNotificationEndpointConfiguration, deleteNotificationEndpointConfiguration, listRuntimeInventories, getRuntimeInventory, createRuntimeInventory, syncInventory, deleteInventory, getActions, addAction, listAlerts, getAlert, createAlert, updateAlert, getCorrection, addCorrection, updateCorrection, deleteCorrection, createApplication, getApplication, deleteApplication, updateApplication, listSources, getSource, importSource, getSourceEvaluation, createArtifactRelationship, listArtifactRelationships, deleteArtifactRelationships, getArtifactRelationshipDiff, createScheduledQuery, updateScheduledQuery, executeScheduledQuery, deleteScheduledQuery, deleteScheduledQueryResult, viewReports, selfListApiKeys, selfCreateApiKey, selfUpdateApiKey, selfDeleteApiKey, selfGetApiKey, selfGetCredentials, selfAddCredential, selfDeleteCredential, getKubernetesContainers, getKubernetesClusters, getKubernetesNamespaces, getKubernetesNodes, getKubernetesPods, getKubernetesVulnerabilities, listRuntimeInventories, getECSContainers, getECSServices, getECSTasks | Full read-write permissions for regular account-level resources, excluding user/role management |
| read-only | listImages, getImage, listPolicies, getPolicy, listSubscriptions, getSubscription, listRegistries, getRegistry, getImageEvaluation, listFeeds, listServices, getService, listEvents, getEvent, listArchives, listArchiveTransitionRules, getArchiveTransitionRule, listArchivedImageAnalysis, getArchivedImageAnalysis, getArchiveTransitionRuleHistory, getAccount, listNotificationEndpoints, listNotificationEndpointConfigurations, getNotificationEndpointConfiguration, listRuntimeInventories, getRuntimeInventory, getActions, listAlerts, getAlert, getCorrection, getApplication, listSources, getSource, getSourceEvaluation, listArtifactRelationships, viewReports, selfListApiKeys, selfCreateApiKey, selfUpdateApiKey, selfDeleteApiKey, selfGetApiKey, selfGetCredentials, selfAddCredential, selfDeleteCredential, getKubernetesContainers, getKubernetesClusters, getKubernetesNamespaces, getKubernetesNodes, getKubernetesPods, getKubernetesVulnerabilities, listRuntimeInventories, getECSContainers, getECSServices, getECSTasks | Read only access to account resources, but includes policy evaluation permission |
| policy-editor | listImages, listSubscriptions, listPolicies, getImage, getPolicy, getImageEvaluation, createPolicy, updatePolicy, deletePolicy, getAccount, getCorrection, listSources, getSource, getSourceEvaluation, viewReports, selfListApiKeys, selfCreateApiKey, selfUpdateApiKey, selfDeleteApiKey, selfGetApiKey, selfGetCredentials, selfAddCredential, selfDeleteCredential | Edit policies, get evaluations of images, intended for users to set policies but not change the scanning configurations |
| repo-analyzer | createRepository, selfListApiKeys, selfCreateApiKey, selfUpdateApiKey, selfDeleteApiKey, selfGetApiKey, selfGetCredentials, selfAddCredential, selfDeleteCredential | Permission to add to other roles (e.g. read-only) to allow analysis of repositories only |
| report-admin | listImages, createScheduledQuery, updateScheduledQuery, executeScheduledQuery, deleteScheduledQuery, deleteScheduledQueryResult, viewReports, selfListApiKeys, selfCreateApiKey, selfUpdateApiKey, selfDeleteApiKey, selfGetApiKey, selfGetCredentials, selfAddCredential, selfDeleteCredential | Permissions to administer reports and schedules |
| registry-editor | createRegistry, deleteRegistry, getRegistry, listRegistries, updateRegistry, selfListApiKeys, selfCreateApiKey, selfUpdateApiKey, selfDeleteApiKey, selfGetApiKey, selfGetCredentials, selfAddCredential, selfDeleteCredential | Permissions to manage registry credentials. |
Granting Cross-Account Access
The Anchore API supports a specific mechanism for allowing a user to make requests in another account’s namespace, the x-anchore-account header. By including x-anchore-account: "desiredaccount" on a request, a user can attempt that request in the namespace of the other account. This is subject to full authorization and RBAC.
To grant a username the ability to execute operations in another account, simply make the username a member of a role in the desired account. This can be accomplished in the UI or via API against the RBAC Manager service endpoint. For example, using curl:
curl -u admin:foobar -X POST -H "Content-Type: application/json" -d '{"username": "someuser", "for_account": "some_other_account"}' http://localhost:8229/roles/policy-editor/members
This should be done with caution as there is currently no support for resource-specific access controls. A user will have the permitted actions on all resources in the other account (based on the permissions of the role). For example, making a user a member of policy-editor role for another account will enable full ability to create, delete, and update that account’s policy bundles.
WARNING: Because roles do not currently provide custom target/resource definitions, assigning users to the Account User Admin role for an account other than their own is dangerous because there are no guards against that user then removing permissions of the granting user (unless that user is an ‘admin’ account user), so use with extreme caution.
NOTE: admin account users are not subject to RBAC constraints and therefore always have full access to add/remove users to roles in any account. So, while it is possible to grant them role membership, the result is a no-op and does not change the permissions of the user in any way.
4.18.1 - User Groups
Overview
User groups are abstractions that allow an administrator to manage permissions for users across the system without having to manage each individual user’s permissions.
Administrators simply have to create a user group, define roles per accounts within the user group and then associate users with it. Users can be associated with multiple user-groups. Each user inherits roles from their user group as well as any explicitly defined roles.
Users can be explicitly added to a User Group (as described above) or SAML users can have an indirect membership of a user group based on their IDP associations.
Note: User Group management is strictly limited to admin users only.
Terminology
- User Group: A basic resource that grants roles and permissions to users on various accounts
        "name": "user-group-engineers",
        "description": "The group permissions for all engineers",
- User Group Roles: A collection of roles associated with a user group, this can span multiple accounts and have multiple roles per account. E.g.
    [
        {Account: "devs_account",    Roles: [“policy-editor”,”image-analyzer”]},
        {Account: "devops_account",  Roles: [“read-write”]},
        {Account: "preview_account", Roles: [“read-only”]}
    ]
- IDP User Group Mappings: A set of User Groups that are mapped to a single Identity provider. E.g.
    {
        IDP Name: "keycloak",
        User Groups: [“user-group-engineers”, ”user-group-devsec”, ”user-group-auditors”]}
- User Group Native User Member: A native user who has been explicitly associated with a User Group. This user inherits all roles from the User Group in addition to any roles assigned directly to this user.
- User Group IDP Member: An SAML user who is an indirect member of a User Group. As the SAML user authenticates, the IDP’s User Group Mappings are used to determine if this user should be associated with a User Group.
Native users
Native users are users that are defined in Anchore Enterprise and do not authenticate using an external SSO endpoint.
These users can be added to User Groups directly and inherit roles from the User Groups they are members of.
SAML(SSO) users
SAML users are users that authenticate using an external SAML IDP.
These users can be associated with User Groups based on their group memberships in the SAML IDP.
SAML users are automatically added to a User Group based on their group memberships in the SAML IDP and the IDP’s User Group associations.
User Group management
User Groups can be managed from the Anchore Enterprise UI or using the Anchore Enterprise API.
AnchoreCTL
User Groups can be managed using the anchorectl CLI tool. The following commands are available for User Group management:
- To create a new User Group, use the following command:
# anchorectl usergroup add development --description "The development team"
 ✔ Added usergroup
Name: development
Description: The development team
Group Uuid: 4a5d8357-1fc3-44cf-8a1c-9882406df656
Created At: 2024-03-20T15:57:20.086665Z
Last Updated: 2024-03-20T15:57:20.086669Z
Account Roles:
  Items:
- To list all User Group, use the following command:
# anchorectl usergroup list
┌─────────────┬──────────────────────┬──────────────────────────────────────┐
│ NAME        │ DESCRIPTION          │ GROUP UUID                           │
├─────────────┼──────────────────────┼──────────────────────────────────────┤
│ development │ The development team │ 4a5d8357-1fc3-44cf-8a1c-9882406df656 │
└─────────────┴──────────────────────┴──────────────────────────────────────┘
- To edit the description of a User Group, use the following command:
# anchorectl usergroup update development --description "New development team description"
 ✔ Update usergroup
Name: development
Description: New development team description
Group Uuid: 4a5d8357-1fc3-44cf-8a1c-9882406df656
Created At: 2024-03-20T15:57:20.086665Z
Last Updated: 2024-03-20T16:00:17.989822Z
Account Roles:
  Items:
- To delete a User Group, use the following command:
# anchorectl usergroup delete development
 ✔ Deleted usergroup
No results
- To add an account role to a User Group, use the following command:
# anchorectl usergroup role add development dev_account --role image-analyzer,image-developer,read-only,repo-analyzer
 ✔ Added account and role(s)
┌────────────────┬───────────────────────────────────────────────────────────┐
│ ACCOUNT/DOMAIN │ ROLES                                                     │
├────────────────┼───────────────────────────────────────────────────────────┤
│ dev_account    │ image-analyzer, image-developer, read-only, repo-analyzer │
└────────────────┴───────────────────────────────────────────────────────────┘

# anchorectl usergroup role add development devops_account --role read-only
 ✔ Added account and role(s)
┌────────────────┬───────────────────────────────────────────────────────────┐
│ ACCOUNT/DOMAIN │ ROLES                                                     │
├────────────────┼───────────────────────────────────────────────────────────┤
│ dev_account    │ image-analyzer, image-developer, read-only, repo-analyzer │
│ devops_account │ read-only                                                 │
└────────────────┴───────────────────────────────────────────────────────────┘
- To list all account roles for a User Group, use the following command:
# anchorectl usergroup role list development
 ✔ Fetched usergroups accounts and roles
┌────────────────┬───────────────────────────────────────────────────────────┐
│ ACCOUNT/DOMAIN │ ROLES                                                     │
├────────────────┼───────────────────────────────────────────────────────────┤
│ dev_account    │ image-analyzer, image-developer, read-only, repo-analyzer │
│ devops_account │ read-only                                                 │
└────────────────┴───────────────────────────────────────────────────────────┘
- To remove account role(s) from a User Group, use the following command:
# anchorectl usergroup role delete development dev_account --role image-analyzer,image-developer
 ✔ Deleted role
No results
- To add a native user to a User Group, use the following command:
# anchorectl usergroup user add development -u dev_user
 ✔ Added user(s)
┌──────────┬─────────────────────────────┐
│ USERNAME │ ADDED TO USER GROUP ON      │
├──────────┼─────────────────────────────┤
│ dev_user │ 2024-03-20T16:30:20.092909Z │
└──────────┴─────────────────────────────┘
- To list all members of a User Group, use the following command:
# anchorectl usergroup user list development
 ✔ Fetched users within usergroup
┌──────────┬─────────────────────────────┐
│ USERNAME │ ADDED TO USER GROUP ON      │
├──────────┼─────────────────────────────┤
│ dev_user │ 2024-03-20T16:30:20.092909Z │
└──────────┴─────────────────────────────┘
- To remove a native user from a User Group, use the following command:
# anchorectl usergroup user delete development -u dev_user
 ✔ Deleted user(s)
No results
4.19 - Reports
Overview
Anchore Enterprise Reports aggregates data to provide insightful analytics and metrics for account-wide artifacts.
The service employs GraphQL to expose a rich API for querying the aggregated data and metrics.
NOTE: This service captures a snapshot of artifacts in Anchore Enterprise at a given point in time. Therefore,
analytics and metrics computed by the service are not in real time, and may not reflect most up-to-date state
in Anchore Enterprise.
Installation
Anchore Enterprise Reports is included with Anchore Enterprise, and is installed by default when deploying a trial
quickstart with Docker Compose, or a production deployment
Kubernetes.
How it works
One of the main functions of Anchore Enterprise Reports is aggregating data. The service keeps a summary of all current
and historical images and tags for every account known to Anchore Enterprise. It also maintains vulnerability reports
and policy evaluations generated using the active bundle for all the images and tags respectively.
WARNING: Anchore Enterprise Reports shares a persistence layer with Anchore Enterprise. Ensure sufficient storage is
provisioned.
Configuration
Anchore Enterprise Reports are broken up into two services:
- The
reports_worker service which is responsible for the ingress and egress of data into our reports. - The
reports service which is responsible for the report generation.
Each service has a configuration section in the values file. Below are sample configurations and the default values.
...
services:
  reports_worker:
    # Set enable_data_ingress to true for periodically syncing data from anchore enterprise into the reports service
    enable_data_ingress: true

    # Set enable_data_egress to true to periodically remove reporting data that has been removed in other parts of system
    enable_data_egress: false

    # data_egress_window defines a number of days to keep reporting data following its deletion in the rest of system.
    # Default value of 0 will remove it on next task run
    data_egress_window: 0

    # data_refresh_max_workers is the maximum number of concurrent threads to refresh existing results (etl vulnerabilities and evaluations) in reports service. Set non-negative values greater than 0, otherwise defaults to 10
    data_refresh_max_workers: 10

    # data_load_max_workers is the maximum number of concurrent threads to load new results (etl vulnerabilities and evaluations) to reports service. Set non-negative values greater than 0, otherwise defaults to 10
    data_load_max_workers: 10

    cycle_timers:
      # Timers that describe how often each operation should run
      reports_image_load: 600  # MIN 300 MAX 100000 Default 600
      reports_tag_load: 600  # MIN 300 MAX 100000 Default 600
      reports_runtime_inventory_load: 600  # MIN 300 MAX 100000 Default 600
      reports_extended_runtime_vuln_load: 1800 # MIN 300 MAX 100000 Default 1800
      reports_image_refresh: 7200  # MIN 3600 MAX 100000 Default 7200
      reports_tag_refresh: 7200  # MIN 3600 MAX 100000 Default 7200
      reports_metrics: 3600  # MIN 1800 MAX 100000 Default 3600
      reports_image_egress: 600  # MIN 300 MAX 100000 Default 600
      reports_tag_egress: 600  # MIN 300 MAX 100000 Default 600

    runtime_report_generation:
      # Provides the ability to enable/disable individual runtime report loading.
      inventory_images_by_vulnerability: true
      vulnerabilities_by_k8s_namespace: true
      vulnerabilities_by_k8s_container: true
      vulnerabilities_by_ecs_container: true

  reports:
    # GraphiQL is a GUI for editing and testing GraphQL queries and mutations.
    # Set enable_graphiql to true and open http://<host>:<port>/v2/reports/graphql in a browser for reports API
    enable_graphiql: true

    # This is the number of execution threads which will be used during report generation.
    max_async_execution_threads: 1

    # Configure async_execution_timeout to adjust how long a scheduled query must be running for before it is considered timed out
    # This may need to be adjusted if the system has large amounts of data and reports are being prematurely timed out.
    # The value should be a number followed by "w", "d", or "h" to represent weeks, days or hours
    async_execution_timeout: "48h"

    # Set use_volume to `true` to have the reports worker buffer report generation to disk instead of in memory. This should be configured
    # in production systems with large amounts of data (10s of thousands of images or more). Scratch volumes should be configured for the reports pods
    # when this option is enabled.
    use_volume: false
NOTE: Any changes to the configuration requires a restart of the service for the updates to take effect.
In an Anchore Enterprise deployment, any non-admin account user must at least have listImages permission
to execute queries against Reports API. There RBAC Role available called report-admin which provides permissions to administer reports and schedules. Please see Role-Based Access Control
for more information.
Data ingress
Reports_worker service handles data ingress from Anchore Enterprise via the following asynchronous processes triggered
periodically:
Loader: Compares the working set of images and tags in Anchore Enterprise with its own records. Based on the
difference, images and tags along with the vulnerability report and policy evaluations are loaded into the service.
Artifacts deleted from Anchore Enterprise are marked inactive in the service.
This process is triggered periodically as described by the cycle timers listed above.
Refresher: Refreshes the vulnerability report and policy evaluations of all the images and tags actively
maintained by the service.
This process is triggered periodically as described by the cycle timers listed above.
WARNING: Reports service may miss updates to artifacts if they are added and deleted in between consecutive ingress processes.
Data ingress is enabled by default. It can be turned off with enable_data_ingress: false in the config.yaml snippet
shown previously. In a quickstart deployment, add ANCHORE_ENTERPRISE_REPORTS_ENABLE_DATA_INGRESS=false to the
environment variables section of the reports service in docker-compose.yaml. When the ingress is turned off, Reports
service will no longer aggregate data from Anchore Enterprise, metric computations will also come to a halt. However,
the service will continue to serve API requests/queries with the existing data.
Data egress
Provides the ability to remove data which is no longer active in Anchore Enterprise from the stored report data.
This process is disabled by default and controlled by the value enable_data_egress. A configuration setting to determine how old this data is prior to its removal data_egress_window is also available.
Metrics
Reports service comes loaded with a few pre-defined/canned metric definitions. A metric definition consists of an
identifier, readable name, description and the type of the metric. The type is loosely based on statsd metric types.
Currently, all the pre-defined metrics are of type ‘counter’ - a measure of the number of items that match certain
criteria. A value for each of these metric definitions is computed using the data aggregated by the service.
All metric values are computed periodically every hour (3600 seconds). To modify the interval, update
cycle_timers -> reports_metrics in the config.yaml snippet above. In a quickstart deployment, add
ANCHORE_ENTERPRISE_REPORTS_METRICS_INTERVAL_SEC=<interval-in-seconds> to the environment variables section of the
reports service in docker-compose.yaml.
See it in action
To see Reports service in the Enterprise UI, see Dashboard or
Reports view. The dashboard view utilizes metrics generated by the
service and renders customizable widgets. The reports view employs graphQL queries and aggregates the results into
multiple formats (CSV, JSON, and so on).
For using the API directly, see API Access.
4.20 - Runtime Inventory
Overview
Using Anchore’s runtime inventory agents provides Anchore Enterprise access to what images are being used
in your deployments. This can help give insight into where vulnerabilities or policy violations are in your
production workloads.
Agents
Anchore provides agents for collecting the inventory of different container runtime environments:
General Runtime Configuration
Inventory Time-To-Live
As part of reporting on your runtime environment, Anchore maintains an active record of the containers, the images they run,
and other related metadata based on time they were last reported by an inventory agent.
The configuration setting below allow you to specify how long inventory should remain part of the Catalog Service’s working set.
These are the default settings found in the values file.
services:
  catalog:
    runtime_inventory:
      inventory_ingest_overwrite: false
      inventory_ttl_days: 120
Below are a few examples on how you may want to use this feature.
Keep most recently reported inventory
inventory_ingest_overwrite: true
inventory_ttl_days: 7
For each cluster/namespace reported from the inventory agent, the system will delete any previously reported
containers and images and replace it with the new inventory.
Note: The inventory_ttl_days is still needed to remove any cluster/namespaces that are no longer reported as well as
some of the supporting metadata (ie. pods, nodes). This value should be configured to be long enough that inventory isn’t incorrectly removed in case of an outage from the reporting agent.
The exact value depends on each deployment, but 7 days is a reasonable value here.
Keep inventory reported over a time period
inventory_ingest_overwrite: false
inventory_ttl_days: 14
This will delete any container and image that has not been reported by an agent in the last 14 days. This includes its supporting metadata (ie. pods, nodes).
Keep inventory indefinitely
inventory_ingest_overwrite: false
inventory_ttl_days: 0
This will keep any containers, images, and supporting metadata reported by an inventory agent indefinitely.
Deleting Inventory via API
Where it is not desirable to wait for the Image TTL to remove runtime inventory images it is possible to manually delete inventory items via the API by issuing a DELETE to /v2/inventories with the following query parameters.
inventory_type (required) - either ecs or kubernetescontext (required) - it must match a context as seen by the output of anchorectl inventory list- Kubernetes - this is a combination of cluster name (as defined by the anchore-k8s-inventory config) and a namespace containing running containers e.g.
cluster1/default. - ECS - this is the cluster ARN e.g.
arn:aws:ecs:eu-west-2:123456789012:cluster/myclustername
image_digest (optional) - set if you only want to remove a specific image
e.g. DELETE /v2/inventories?inventory_type=<string>&context=<string>&image_digest=<string>
Using curl: curl -X DELETE -u username:password "http://{servername:port}/v2/inventories?inventory_type=&context=&image_digest=
4.21 - SSO Support
Overview
Anchore Enterprise can be configured to support user login to the UI using identities from external identity providers
that support SAML 2.0. Anchore never stores any credentials for the users, only their usernames
and Anchore permissions. All UI access is gated through a user’s valid login into the identity provider. Anchore uses the external
provider to verify username identity and initialize a username, account, and roles on first login for a new user. Once a
user’s identity is initialized in Anchore, the Anchore administrator can manage user permissions by managing the roles
associated with the user’s identity in Anchore itself.
Terms
SAML Terms:
- Identity Provider (IDP) - The service that stores the identity database and provides identity and authentication services to Anchore.
- Service Provider (SP) - The service providing resources to the end user, in this case, the Anchore Enterprise deployment.
- Assertion Consumer Service (ACS) - The consumer of SAML assertions generated by the Identity Provider. For Anchore Enterprise,
the UI proxies the SAML assertion to the Anchore Enterprise API service which consumes it, but the UI is the network
endpoint the user’s browser interacts with.
Anchore Terms:
- Native User - A user that exists in the Anchore DB and has login credentials (passwords).
- SAML User - A user that exists in the Anchore DB only with a username and permissions, but no credentials. This prevents any username
conflicts. SAML users will also be associated with a single Identity Provider. This prevents overlapping usernames from multiple Identity Providers gaining access to unexpected users or accounts.
How SAML integration works
When a user logs into the Anchore Enterprise UI, they can choose which Identity Provider to authenticate with. User credentials are never passed to Anchore Enterprise. Instead, other information about the user is passed from the Identity Provider to Anchore. Some information used by Anchore during login include the username, authenticating Identity Provider, associated account, and initial RBAC permissions.
After the initial login, RBAC permissions can be adjusted for this user directly by an Anchore administrator. This allows the Anchore administrator the ability to control access of Anchore users without having to gain access to the corporate IDP system.
Dynamic SAML User Provisioning
The first time a SAML User logs into Anchore, if the username is not found within the Anchore DB, a record will be automatically created for the user. If the user’s associated account is not found within the Anchore DB, an account record will also be automatically created at this time.
This is often referred to as Just In Time Provisioning (JIT).
Explicit Creation of SAML Users
An Anchore administrator has the ability to create other users with administrator privileges. This includes Native and SAML Users. When creating a SAML Administrator User, the username and the Identity Provider’s name will be required. Upon SSO login by this new user, it will be associated with account admin and have all the permissions of an Anchore administrator.
A global configuration mode is also available if SSO is the preferred method of login, but the Anchore administrator would like
explicit control over which users can gain access to Anchore Enterprise.
`sso_require_existing_users: ${ANCHORE_SSO_REQUIRES_EXISTING_USERS}`
When this configuration mode is set to true, any users who have permissions to create other users, will now have the ability to explicitly create SAML Users. As stated above, when creating a SAML User, the username and the Identity Provider’s name will be required. In addition, an RBAC role will also be needed for each SAML User creation. Upon SSO login by this new user, it will be associated with the account it was created in and have all the RBAC permissions provided for it.
When this configuration mode is set to true, SSO logins are only permitted within Anchore for users who have existing SAML user records fround in Anchore DB.
When explicitly creating SAML Users, the account and RBAC role provided will take precedent over any default values or IDP Attributes which may be configured in the SAML Configuration described below. For more information, please see Mapping.
Note: Any users that have previously authenticated via SSO will continue to have access regardless of the configuration mode setting. If you wish to prevent future access when setting sso_require_existing_users to true, simply delete the user record in Anchore.
SSO Login Validation
During subsequent SSO logins, Anchore will find an existing user record in the Anchore DB. The following information will be validated:
- The user record must be a SAML User. If the user was previously configured as a Native User and you want to convert it to a SAML User, simply delete the user record in Anchore and have the user log in again via SSO.
- The user record must be authenticating from the same Identity Provider. If the user has been changed to authenticate via a different Identity Provider, simply delete the user record in Anchore and have the user log in again via SSO.
Configuration Overview
In order to use SAML SSO, the Anchore Enterprise deployment must:
Have Oauth enabled. This is required so that Anchore can issue bearer tokens for subsequent API usage by the UI to the system APIs.
Using hashed passwords is optional but highly recommended. See User Authentication
for more information on configuring OAuth and hashed password storage.
Be able to reach the IDP login URL from the user’s browser.
Be able to reach the metadata XML endpoint in the IDP (if using url).
Configuration of SAML SSO is done via API/UI operations but requires configuration both in your Identity Provider and in Anchore.
In the IDP:
- Must support HTTP Redirect binding
- Should support signed assertions and signed documents
- Must allow unsigned client requests from Anchore
- Must allow unencrypted requests and responses
Anchore IDP Configuration Fields are as follows.
- Name - The name to use for this configuration. It will be part of the UI’s /service/auth/sso/ route as well as
the /saml/sso/ and /saml/login/ routes that are used to implement SSO.
- Enabled - Whether auth via this configuration is allowed.
- ACS HTTPS Port - HTTPS port if non-standard. If omitted or -1, 443 is used.
- SP Entity ID - The identity for the Anchore system to present when requesting auth from the SAML IDP. This is typically
a URL identifying the Anchore deployment.
- ACS URL - The URL to which SAML Responses should be sent from the IDP. For UI usage, this should be the hostname and
port of the UI deployment and a path: /service//sso/auth/{idp config name}.
- Default Account - If set, this is the account that SSO users will be initialized to be members of upon sign-in the
first time. This property or IDP Account Attribute must be set.
- Default Role - The role that will be granted to new users on first sign-in. Use this setting to apply a
consistent role to all users if you do not want that data imported from the IDP. This property or IDP Role Attribute must be set.
- IDP Account Attribute - A SAML assertion attribute name from the SAML responses that Anchore will use to determine
the account name to initialize the user into. If the account does not exist, it is created. For more information on the
initialization process see Initializing User Identities below. This property or Default Account must be set.
- IDP Username Attribute - A SAML assertion attribute name from the SAML responses that Anchore will use to determine
the username for the anchore identity. This is optional and typically will not need to be set. If omitted, the SAML Subject is used and this should meet most needs.
- IDP Metadata URL - URL to retrieve the IDP metadata xml from. This value is mutually exclusive with IDP Metadata XML,
so only one of the two properties may be specified.
- IDP Metadata XML - Raw XML for the IDP metadata. This value is mutually exclusive with IDP Metadata URL, so only one
of the two properties may be specified.
- IDP Role Attribute - The SAML assertion attribute from the SAML responses that Anchore will use to initialize a user’s
roles. This may be a multi-value property. This property or Default Account must be set.
- Require Signed Assertions - If true, require the individual assertions in the SAML response to be signed by the IDP.
- Require Signed Response - If true, require the SAML response document to be signed.
Using SAML Attributes to Initialize Users and Account in Anchore
The properties of the user including the account it belongs to, the roles it has in that account as well as any other accounts the user has role access to
are all initialized based on the combination of the Anchore IDP configuration and the SAML response presented by the IDP at the user’s first login.
See Mapping for more information on that process and how the configuration works.
Deleting SAML SSO Configuration
An Anchore administrator has the ability to create, modify, and delete the SAML Configuration. During deletion of the SAML Configuration, any user that was created with this Identity Provider, either dynamically or explicitly, will also be deleted.
4.21.1 - Mapping SSO Identities into Anchore
Overview of Mapping External Identities into Anchore
Anchore SSO support provides a way to keep users’ credentials centrally stored in a corporate Identity
Provider and outside of the Anchore deployment. Anchore’s SSO approach uses the external identity
store to authenticate a user and bootstrap its permissions using Anchore’s RBAC system. For each login, the user’s
identity is verified against the external provider but once the identity is initialized inside the Anchore deployment, its
access to resources is controlled by the Anchore Enterprise RBAC system. This approach allows Anchore admins to manage user
access without having to require administrator access to a corporate or central IT identity system while still being able
to leverage that system for defining identity and securing access credentials.
The identity mapping process has two distinct phases:
- Initial identity bootstrap - Occurs on the first login of a user to Anchore causing dynamic construction of an Anchore user record.
- Identity verification and assertion validation - Validates the administrators requirements against the external identity record on each login.
Defining the Username
By default, with SSO, the SAML Assertion’s “Subject” attribute is used to define the username. Using the subject is the
right solution in most situations, but in extreme cases it may be necessary to provide the username in some other form via
attributes in the SAML Response. This behavior can be configured by setting: idp_username_attribute in the SAML Configuration
within Anchore. This should only be used when the subject either cannot be used due to it being a transient ID as configured by the
IDP itself, or you want the username to map to some form other than the IDP’s username, email, or persistent ID.
If the idp_username_attribute is set to an attribute name, and that attribute is not found or has no value in the SAML
Response presented during login, then that user login will be rejected by Anchore.
If idp_username_attribute is an empty string or null, then the SAML Response’s subject attribute is used as the username.
This is the default behavior.
Defining the Account the User Belongs To
In Anchore, all users belong to an Account. When an SSO user logs into Anchore UI for the first time, the identity is initialized
with the username (as defined above), but the account to which the user belongs is configurable via a separate pair of configuration
properties in the SAML Configuration within Anchore. These configuration properties are mutually exclusive.
idp_account_attribute - If set in the SAML Configuration, this attribute must be found within the
SAML Response during each login for every user. The attribute value received is the ‘account name’. It must also be valid.
A valid value must be greater than three characters and must not be a reserved account name such as ‘admin’ or ‘anchore-system’
If the attribute is not found within the SAML Response or the value is not valid, the login is rejected.
default_account - If set in the SAML Configuration, it’s value is the account all users that login
from this IDP will be assigned.
- In both cases, on the initial login by the user, if the account does not already exist within Anchore, an
external account with that name is created.
Defining the User’s Initial Roles
In Anchore, all users are allowed to have one or more Roles that describe a set of access permissions.
Roles are assigned to the user via a separate pair of configuration properties in the SAML Configuration within Anchore.
These configuration properties are mutually exclusive.
idp_role_attribute - If set in the SAML Configuration, the attribute must be found within the
SAML Response during each login for every user. The attribute value received is one or more ‘role name’. The value must also be valid.
If the attribute is not found within the SAML Response or the value is not valid, the login is rejected.
default_role - If set in the SAML Configuration, it’s value will be the single role set for all users that login with this IDP.
During a user’s first login, this role will be set on the account during user identity initialization. On subsequent logins for this user, the value will be ignored.
Revoking SSO User Access
- Disable the Anchore account. Any user, SSO or otherwise, that is a member of a disabled account cannot log in or perform API operations.
- If using
idp_account_attribute or idp_role_attribute, simply remove or zero that attribute at the IDP for that user or group.
All affected users will no longer be able to log in to Anchore.
Changing the Anchore SAML Configuration
Initialization of identities and roles occurs on the user’s first login. Once initialized, the configuration must match the
SAML Response presented during each login for the user to log in.
Thus, changes to the SAML Configuration within Anchore may affect subsequent logins for your users.
For instance, if you change the SAML Configuration within Anchore to start using attributes
instead of defaults, a user’s SAML Response will need to contain the same attributes. Failure to find the correct attribute(s) with valid values will prevent the user’s login.
Example SSO configurations
Anchore and an external Identity Provider
Here are examples for both Okta and KeyCloak that provide simple defaults and identity mappings.
Identity Mapping configuration
Below are example configuration values for a single SAML Configuration within Anchore to achieve different behavior:
All SSO users in one account with the same read-write permissions:
- default_account = ‘account’
- default_role = ‘read-write’
SSO users in accounts managed by the IDP property, for example a ‘groups’ property:
default_account = nulldefault_role = nullidp_account_attribute = "primary_group"idp_role_attribute = "roles"- Will initialize the user with the roles specified in the ‘roles’ attribute for the accounts in the ‘primary_group’ attribute.
- E.g. if ‘primary_group’ = [’testers’], and ‘roles’ = [‘read-only’] for a user, [email protected]
- [email protected] will be initialized at login as username = [email protected] in account testers with role read-only
- Because the account is from an attribute, [email protected] might have ‘primary_group’ = [‘security_engineers’] and
thus be initialized in a different account in Anchore.
4.21.1.1 - KeyCloak SAML Example
Configuring SAML SSO for Anchore with KeyCloak
The JBoss KeyCloak system is a widely used and open-source identity management system that supports integration with applications via SAML and OpenID Connect. It also can operate as an identity broker
between other providers such as LDAP or other SAML providers and applications that support SAML or OpenID Connect.
The following is an example of how to configure a new client entry in KeyCloak and configure Anchore to use it to permit UI login by KeyCloak users that are granted access via KeyCloak configuration.
Configuring KeyCloak
Anchore supports multiple IDP configurations, each given a name. For this example we’ll choose the name “keycloak” for our configuration.
This important as that name is used in several URL paths to ensure that the correct configuration is used for validating responses,
so make sure you pick a name that is meaningful to your users (they will see it in the login screen) and also that is url friendly.
Some config choices and assumptions specifically for this example:
- Let’s assume that you are running Anchore Enterprise locally. Anchore Enterprise UI is available at:
https://localhost:3000. Replace with the appropriate url as needed. - We’re going to choose
keycloak as the name of this saml/sso configuration within Anchore. This will identify the specific configuration and is used in urls. - Based on that, the Single-SignOn URL for this deployment will be:
https://localhost:3000/service/sso/auth/keycloak - Our SP Entity ID will use the same url:
http://localhost:3000/service/sso/auth/keycloak
Add a Client entry in KeyCloak
See SAML Clients in KeyCloak documentation
For this example, set the following values in “Add Client” screen (these are specific to the settings in this example described above):
- Client ID -
http://localhost:3000/service/sso/auth/keycloak - This will be the SP Entity ID used in the Anchore configuration later - Client Protocol: “saml”
- Client SAML Endpoint: “http://localhost:3000/service/sso/auth/keycloak”
In the next screen, Client Settings

Name - “Anchore Enterprise”. This is only used to display a friendly name to Keycloak users in the KeyCloak UI. Can use any name you like.
Enabled - Select on
Include Authn Statement - Select on
Sign Documents - Select on
Client Sign Authn Requests - Select Off
Sign Assertions - Select off
Encrypt Assertions - Select off
Client Signature Required - Select off
Force Post Binding - Select off. Anchore requires the HTTP Redirect Binding to work, so this setting must be off to enable that.
Force Name ID Format - Select on
Name ID Format - Select username or email (transient uses a generated UUID per login and persistent use the Keycloak user’s UUID)
Root URL - Leave empty
Valid Redirect URIs - Add http://localhost:3000/service/sso/auth/keycloak
Base URL - Leave empty
Master SAML Processing URL - http://localhost:3000/service/sso/auth/keycloak
Fine Grain SAML Endpoint Configuration
- Assertion Consumer Service Redirect Binding URL -
http://localhost:3000/service/sso/auth/keycloak
Save the configuration

Download the metadata xml to import into Anchore
- Select ‘Installation’ tab.
- Select Format
- Select Format Option - SAML Metadata IDPSSODescriptor

- Select Format Option - Mod Auth Mellon files

- Unzip the downloaded .zip and locate
idp-metadata.xml

- Download or copy the XML to save in the Anchore configuration
You’ll need the following information from keycloak in order to configure the SAML record within Anchore:
The name to use fo the configuration, in this example keycloak
Metadata XML downloaded or copied from the previous section
In the Anchore UI, create an SSO IDP Configuration:
Login as admin
Select “Configuration” Tab on the top
Select “SSO” on the left-side menu
Click “Let’s Add One” in the configuration listing

- Enter the values:
- Name: “keycloak” - This is the name of the configuration and will be referenced in login and sso URLs, so we use the value chosen at the beginning of this example
- Enabled: True - This controls whether or not users will be able to login with this configuration. We’ll enable it for the example but can disable later if no longer needed.
- ACS HTTPS Port: -1 or 443 - This is the port to use for HTTPS to the ACS (Assertion Consumer Service, in this case the UI). It is only needed if you need to use a non-standard https port
- SP Entity ID:
http://localhost:3000/service/sso/auth/keycloak (NOTE: this must match the Client ID you used for the Client in the KeyCloak setup - ACS URL:
http://localhost:3000/service/sso/auth/keycloak - Default Account:
keycloakusers for this example, but can be any account name (existing or not) that you’d like the users to be members of. See Mappings for more information on how this - Default Role:
read-write for this example so that the users have full access to the account to analyze images, setup policies, etc. - IDP Metadata XML: Paste the downloaded or copied XML from KeyCloak in step 4.3 above
- Require Signed Assertions - Select off
- Require Signed Response - Select on
- Save the configuration

You should now see a ‘keycloak’ option in the login screen for the Anchore Enterprise UI. This will redirect users to login to the KeyCloak instance for their username/password and will create a new user in Anchore in the keycloakusers account with read-write role.
4.21.1.2 - Okta SAML Example
Configuring SAML SSO for Anchore with Okta
Some config choices and assumptions specifically for this example:
- Anchore UI endpoint:
http://localhost:3000. Replace with the appropriate url as needed. - IDP Config Name:
okta. This will identify the specific configuration and is used in urls, and can be any url-safe string you’d like. - The Single Sign-on URL (also called the Assertion Consumer Service/ACS URL) for this deployment will be:
http://localhost:3000/service/sso/auth/okta.
This is constructed with the UI endpoint and path /service/sso/auth/{IDP Config Name} - Our SP Entity ID will use the same url:
http://localhost:3000/service/sso/auth/okta. This could be different but for simplicity we use the same value.
See Okta SAML config to see how to create a new
application authorization server. The following steps are used during specific steps of that walk-thru

- In step #6
Single sign on URL, this is the URL Okta will direct users to. This must be a URL in the Anchore Enterprise UI
based on the name you chose for the configuration. In our example: http://localhost:3000/service/sso/auth/okta- Set the
Use this for Recipient URL and Destination URL checkbox as well.
a1. Set the Audience URI(SP Entity ID) to a URI that will identify the anchore installation. This can be the same as
the single-sign-on URL for simplicity. We’ll need to enter this value later in the Anchore config as well. - Leave
Default RelayState empty Name ID format can be left “Unspecified” or set to an email or username format.- Choose the application username that makes sense for your install. Anchore can support a regular username or email address for the usernames.
- In step #7, these attribute statements are not required but can be set. This is, however, where you can set additional
attributes that you want Anchore to use to initialize the user’s Anchore account or permission set. Later in the SAML Configuration
you can specify attributes that Anchore will look for to extract the account name and roles for initializing a user that doesn’t yet exist in Anchore.
- In step #9, be sure to copy the metadata URL link so you have that. Anchore will need that value.
- Right-click here and copy the link address:
 The
URL should be something like:
The
URL should be something like: https://<youraccount>.okta.com/app/<appid>/sso/saml/metadata
- Finish the setup and save the Application entry.
- Important: To allow Okta users to login to Anchore you need to assign the Okta user to this new Application entry. See
Assign and unassign apps to users for information on this process.
You’ll need the following information from okta to enter in the Anchore UI:
- The name chosen for the configuration:
okta in this case - Metadata XML URL (from “configuring okta” step 3.1 above)
- The Single Sign-on/ACS URL described in Step 3
In the Anchore UI, create an SSO Idp Configuration:
- Login as admin
- Select “Configuration” Tab on the top
- Select “SSO” on the left-side menu
- Click “Let’s Add One” in the configuration listing

And…

Enter the values:
- Name:
okta - This is the name of the configuration and will be referenced in login and sso URLs, so we use the value
chosen at the beginning of this example - Enabled: True - This controls whether or not users will be able to login with this configuration. We’ll enable it for
the example but can disable later if no longer needed.
- ACS HTTPS Port: -1 or 443 - This is the port to use for HTTPS to the ACS (Assertion Consumer Service, in this case the UI). It is only needed if you need to use a non-standard https port
- ACS URL:
http://localhost:3000/service/sso/auth/okta - Default Account - The account to add all okta users to when they login, for this example we use
oktausers - Default Role - The role to grant okta users when they login in initially. For this example, we use
read-write, the standard user type that has most abilities except user management. - IDP Metadata URL - The url from “Configure Okta” step 3.1
- Require Signed Assertions - Select On
- Require Signed Response - Select On
Save the configuration, configuration is complete when you see a login with ‘okta’ option on the login screen.
Users can now log in to your Anchore deployment using this Okta endpoint.
See: Mapping Users and Roles in SSO for more information on using the account
and role defaults, IDP attribute values and understanding how identities are mapped into Anchore’s RBAC system.
4.22 - Storage Overview
Storage During Analysis
Scratch Space
Anchore uses a local directory for image analysis operations including downloading layers and unpacking the image content
for the analysis process. This space is necessary on each analyzer worker service and should not be shared. The scratch
space is ephemeral and can have its lifecycle bound to that of the service container.
Layer Cache
The layer cache is an extension of the analyzer’s scratch space that is used to cache layer downloads to reduce analysis
time and network usage during the analysis process itself. For more informaiton, see, Layer Caching.
Storing Analysis Results
Anchore Enterprise is a data intensive system and uses external storage systems for all data persistence. None of the services
are stateful in themselves.
For structured data that must be quickly queried and indexed, Anchore relies on PostgreSQL as its primary data store. Any
database that is compatible with PostgresSQL 13 or higher should work, such as Amazon Aurora and Google Cloud SQL.
For more information, see, Database
For less structured data, Anchore implements an internal object store that can be overlayed on different backend providers,
but defaults to also using the main postgres db to reduce the out-of-the-box dependencies. However, S3 is supported for leveraging external systems.
For more information on configuration and requirements for the core database and object stores see, Object Storage.
Analysis Archive
To aid in capacity management, Anchore provides a separate storage location where completed image analysis can be moved to. This reduces consumption of database capacity and primary object storage. It also removes the analysis from most API actions
but makes it available to restore into the primary storage systems as needed. The analysis archive is
configured as an alternate object store. For more information, see: Configuring Analysis Archive.
4.22.1 - Analysis Archive Storage Configuration
For information on what the analysis archive is and how it works, see Concepts: Analysis Archive
The Analysis Archive is an object store with specific semantics and thus is configured as an object store using the same
configuration options, just with a different config key: analysis_archive
Example configuration snippet for using the db for working set object store and S3 for the analysis archive:
...
services:
  ...
  catalog:
  ...
  object_store:
    compression:
      enabled: false
      min_size_kbytes: 100
    storage_driver:
      name: db
      config: {}
  analysis_archive:
      compression:
        enabled: False
        min_size_kbytes: 100
      storage_driver:
        name: 's3'
        config:
          access_key: 'MY_ACCESS_KEY'
          secret_key: 'MY_SECRET_KEY'
          #iamauto: True
          url: 'https://S3-end-point.example.com'
          region: False
          bucket: 'anchorearchive'
          create_bucket: True
Default Configuration
By default, if no analysis_archive config is found or the property is not present in the config.yaml, the analysis archive
will use the object_store or archive (for backwards compatibility) config sections and those defaults (e.g. db if found).
Anchore stores all of the analysis archive objects in an internal logical bucket: analysis_archive that is distinct in
the configured backends (e.g a key prefix in the s3 bucket)
Changing Configuration
Unless there are image analyses actually in the archive, there is no data to move if you need to update the configuration
to use a different backend, but once an image analysis has been archived to update the configuration you must follow
the object storage data migration process found here. As noted in that guide, if you need
to migrate to/from an analysis_archive config you’ll need to use the –from-analysis-archive/–to-analysis-archive
options as needed to tell the migration process which configuration to use in the source and destination config files
used for the migration.
Common Configurations
Single shared object store backend: omit the analysis_archive config, or set it to null or {}
Different bucket/container: the object_store and analysis_archive configurations are both specified and identical
with the exception of the bucket or container values for the analysis_archive so that its data is split into a
different backend bucket to allow for lifecycle controls or cost optimization since its access is much less frequent (if ever).
Primary object store in DB, analysis_archive in external S3: this keeps latency low as no external service is
needed for the object store and active data but lets you use more scalable external object storage for archive data. This
approach is most beneficial if you can keep the working set of images small and quickly transition old analysis to the
archive to ensure the db is kept small and the analysis archive handles the data scaling over time.
4.22.2 - Database Storage
Anchore stores all metadata in a structured format in a PostgreSQL database to support API operations and searches.
Examples of data persisted in the database:
- Image metadata (distro, version, layer counts, …)
- Image digests to tag mapping (docker.io/nginx:latest is hash sha256:abcd at time t)
- Image analysis content indexed for policy evaluation (files, packages, ..)
- Feed data
- vulnerability info
- package info from upstream (gem/npm)
- Accounts, users…
- …
If the object store is not explicitly set to an external provider, then that data is also persisted in
the database but can be migrated
Reducing Database Storage Usage
Beyond enabling a non-DB object store there are some configuration
options to reduce database storage and IO used by Anchore.
Configuration of Indexed DB Storage for Package DB File Entries
There is a configuration option for the policy engine service to disable the usage of
the database for storing indexed package database entries from each analyzed image. This data represents the files in
each distro package and their metadata (digests and permissions) from each scanned image in the image_package_db_entries table.
That table is only used by the policy engine to deliver the policy trigger [‘packages.verify’],
but if you do not use that trigger then the use of the storage can be disabled thereby reducing database load and resource usage.
The data can be quite large, often in the thousands of rows per analyzed image, so for some customers that do not use this
data for policy, disabling the loading of this data can reduce database consumption significantly.
Disabling Indexed DB Storage for Package DB File Entries
In each policy engine’s config.yaml file, change:
enable_package_db_load: true
to
enable_package_db_load: false
Note that disabling the table usage will also disable support for the packages.verify trigger and any policies that have the
trigger in a rule will be considered invalid and return errors on evaluation. Any new policies that attempt to use the trigger
will be rejected on upload as invalid if the trigger is included.
Once this configuration is set, you may delete data in that db table to reclaim some database storage capacity. If
you’re interested in this option please contact support for guidance on this process.
Enabling Indexed DB Storage for Package DB File Entries
If you find that you do need the trigger, you can change the configuration to use the table then support will be
restored. However, any images analyzed while the setting was ‘false’ will need to be re-analyzed in order to
populate their data in that table correctly.
4.22.3 - Layer Caching
Once an image is submitted to Anchore Enterprise for analysis the system will attempt to retrieve metadata about the image from the Docker registry and if successful will download the image and queue the image for analysis.
Anchore Enterprise can run one or more analyzer services to scale out processing of images. The next available analyzer worker will process the image.
Docker Images are made up of one or more layers, which are described in the manifest. The manifest lists the layers which are typically stored as gzipped compressed TAR files.
As part of image analysis Anchore Enterprise will:
- Download all layers that comprise an image
- Extract the layers to a temporary file system location
- Perform analysis on the contents of the image including:
- Digest of every file (SHA1, SHA256 and MD5)
- File attributes (size, owner, permissions, etc)
- Operating System package manifest
- Software library package manifest (NPM, GEM, Java, Python, NuGet)
- Scan for secret materials (api keys, private keys, etc
Following the analysis the extracted layers and downloaded layer tar files are deleted.
In many cases the images will share a number of common layers, especially if images are built form a consistent set of base images. To speed up Anchore Enterprise can be configure to cache image layers to eliminate the need to download the same layer for many different images. The layer cache is displayed in the default Anchore Enterprise configuration. To enable the cache the following changes should be made:
- Define temporary directory for cache data
It is recommended that the cache data is stored in an external volume to ensure that the cache does not use up the ephemeral storage space allocated to the container host.
By default Anchore Enterprise uses the /tmp directory within the container to download and extract images. Configure a volume to be mounted into the container at a specified path and configure this path in config.yaml
tmp_dir: '/scratch'
In this example a volume has been mounted as /scratch within the container and config.yaml updated to use /scratch as the temporary directory for image analysis.
With the cache disabled the temporary directory should be sized to at least 3 times the uncompressed image size to be analyzed.
To enable layer caching the layer_cache_enable parameter and layer_cache_max_gigabytes parameter should be added to the analyzer section of the Anchore Enterprise configuration file config.yaml.
analyzer:
    enabled: True
    require_auth: True
    cycle_timer_seconds: 1
    analyzer_driver: 'nodocker'
    endpoint_hostname: '${ANCHORE_HOST_ID}'
    listen: '0.0.0.0'
    port: 8084
    layer_cache_enable: True
    layer_cache_max_gigabytes: 4
In this example the cache is set to 4 gigabytes. The temporary volume should be sized to at least 3 times the uncompressed image size + 4 gigabytes.
- The minimum size for the cache is 1 gigabyte.
- The cache users a least recently used (LRU) policy.
- The cache files will be stored in the anchore_layercache directory of the /tmp_dir volume.
4.22.4 - Object Storage
Anchore Enterprise uses a PostgreSQL database to store structured data for images, tags, policies, subscriptions and metdata
about images, but other types of data in the system are less structured and tend to be larger pieces of data. Because of
that, there are benefits to supporting key-value access patterns for things like image manifests, analysis reports, and
policy evaluations. For such data, Anchore has an internal object storage interface that, while defaulted to use the
same Postgres database for storage, can be configured to use external object storage providers to support simpler capacity
management and lower costs. The options are:
- PostgreSQL database (default)
- S3 Object Store
The configuration for the object store is set in the catalog’s service configuration in the config.yaml.
4.22.4.1 - Migrating Data to New Drivers
Overview
To cleanly migrate data from one archive driver to another, Anchore Enterprise includes some tooling that automates the process in the ‘anchore-manager’ tool packaged with the system.
The migration process is an offline process; Anchore Enterprise is not designed to handle an online migration.
For the migration process you will need:
- The original config.yaml used by the services already, if services are split out or using different config.yaml for different services, you need the config.yaml used by the catalog services
- An updated config.yaml (named dest-config.yaml in this example), with the archive driver section of the catalog service config set to the config you want to migrate to
- The db connection string from config.yaml, this is needed by the anchore-manager script directly
- Credentials and resources (bucket etc) for the destination of the migration
At a high-level the process is:
- Shutdown all anchore enterprise services and components. The system should be fully offline, but the database must be online and available. For a docker compose install, this is achieved by simply stopping the engine container, but not deleting it.
- Prepare a new config.yaml that includes the new driver configuration for the destination of the migration (dest-config.yaml) in the same location as the existing config.yaml
- Test the new dest-config.yaml to ensure correct configuration
- Run the migration
- Get coffee… this could take a while if you have a lot of analysis data
- When complete, view the results
- Ensure the dest-config.yaml is in place for all the components as config.yaml
- Start anchore-engine
Migration Example Using Docker Compose Deployed Anchore Engine
The following is an example migration for an anchore-engine deployed via docker compose on a single host with a local postgresql container–basically the example used in ‘Installing Anchore Engine’ documents. At the end of this section, we’ll cover the caveats and things to watch for a multi-node install of anchore engine.
This process requires that you run the command in a location that has access to both the source archive driver configuration and the new archive driver configuration.
Step 1: Shutdown all services
All services should be stopped, but the postgresql db must still be available and running.
docker compose stop anchore-engine
Step 2: Prepare a new config.yaml
Both the original and new configurations are needed, so create a copy and update the archive driver section to the configuration you want to migrate to
cd config
cp config.yaml dest-config.yaml
<edit dest-config.yaml>
Step 3: Test the destination config
Assuming that config is dest-config.yaml:
[user@host aevolume]$ docker compose run anchore-engine /bin/bash
[root@3209ad44d7bb ~]# anchore-manager objectstorage --db-connect ${db} check /config/dest-config.yaml
[MainThread] [anchore_manager.cli.utils/connect_database()] [INFO] DB params: {"db_pool_size": 30, "db_connect": "postgresql+pg8000://postgres:postgres.dev@postgres-dev:5432/postgres", "db_connect_args": {"ssl": false, "connect_timeout": 120, "timeout": 30}, "db_pool_max_overflow": 100}
[MainThread] [anchore_manager.cli.utils/connect_database()] [INFO] DB connection configured: True
[MainThread] [anchore_manager.cli.utils/connect_database()] [INFO] DB attempting to connect...
[MainThread] [anchore_manager.cli.utils/connect_database()] [INFO] DB connected: True
[MainThread] [anchore_manager.cli.objectstorage/check()] [INFO] Using config file /config/dest-config.yaml
[MainThread] [anchore_engine.subsys.object_store.operations/initialize()] [INFO] Archive initialization complete
[MainThread] [anchore_manager.cli.objectstorage/check()] [INFO] Checking existence of test document with user_id = test, bucket = anchorecliconfigtest and archive_id = cliconfigtest
[MainThread] [anchore_manager.cli.objectstorage/check()] [INFO] Creating test document with user_id = test, bucket = anchorecliconfigtest and archive_id = cliconfigtest
[MainThread] [anchore_manager.cli.objectstorage/check()] [INFO] Checking document fetch
[MainThread] [anchore_manager.cli.objectstorage/check()] [INFO] Removing test object
[MainThread] [anchore_manager.cli.objectstorage/check()] [INFO] Archive config check completed successfully
Step 3a: Test the current config.yaml
If you are running the migration for a different location than one of the anchore engine containers
Same as above but using /config/config.yaml as the input to check (skipped in this instance since we’re running the migration from the same container)
Step 4: Run the Migration
By default, the migration process will remove data from the source once it has confirmed it has been copied to the destination and the metadata has been updated in the anchore db. To skip the deletion on the source, use the ‘–nodelete’ option. it is the safest option, but if you use it, you are responsible for removing the data later.
[root@3209ad44d7bb ~]# anchore-manager objectstorage --db-connect ${db} migrate /config/config.yaml /config/dest-config.yaml
[MainThread] [anchore_manager.cli.utils/connect_database()] [INFO] DB params: {"db_pool_size": 30, "db_connect": "postgresql+pg8000://postgres:postgres.dev@postgres-dev:5432/postgres", "db_connect_args": {"ssl": false, "connect_timeout": 120, "timeout": 30}, "db_pool_max_overflow": 100}
[MainThread] [anchore_manager.cli.utils/connect_database()] [INFO] DB connection configured: True
[MainThread] [anchore_manager.cli.utils/connect_database()] [INFO] DB attempting to connect...
[MainThread] [anchore_manager.cli.utils/connect_database()] [INFO] DB connected: True
[MainThread] [anchore_manager.cli.objectstorage/migrate()] [INFO] Loading configs
[MainThread] [anchore_manager.cli.objectstorage/migrate()] [INFO] Migration from config: {
  "storage_driver": {
    "config": {},
    "name": "db"
  },
  "compression": {
    "enabled": false,
    "min_size_kbytes": 100
  }
}
[MainThread] [anchore_manager.cli.objectstorage/migrate()] [INFO] Migration to config: {
  "storage_driver": {
    "config": {
      "access_key": "9EB92C7W61YPFQ6QLDOU",
      "create_bucket": true,
      "url": "http://minio-ephemeral-test:9000/",
      "region": false,
      "bucket": "anchore-engine-testing",
      "prefix": "internaltest",
      "secret_key": "TuHo2UbBx+amD3YiCeidy+R3q82MPTPiyd+dlW+s"
    },
    "name": "s3"
  },
  "compression": {
    "enabled": true,
    "min_size_kbytes": 100
  }
}
Performing this operation requires *all* anchore-engine services to be stopped - proceed? (y/N)y
[MainThread] [anchore_engine.subsys.object_store.migration/initiate_migration()] [INFO] Initializing migration from {'storage_driver': {'config': {}, 'name': 'db'}, 'compression': {'enabled': False, 'min_size_kbytes': 100}} to {'storage_driver': {'config': {'access_key': '9EB92C7W61YPFQ6QLDOU', 'create_bucket': True, 'url': 'http://minio-ephemeral-test:9000/', 'region': False, 'bucket': 'anchore-engine-testing', 'prefix': 'internaltest', 'secret_key': 'TuHo2UbBx+amD3YiCeidy+R3q82MPTPiyd+dlW+s'}, 'name': 's3'}, 'compression': {'enabled': True, 'min_size_kbytes': 100}}
[MainThread] [anchore_engine.subsys.object_store.migration/migration_context()] [INFO] Initializing source object_store: {'storage_driver': {'config': {}, 'name': 'db'}, 'compression': {'enabled': False, 'min_size_kbytes': 100}}
[MainThread] [anchore_engine.subsys.object_store.migration/migration_context()] [INFO] Initializing dest object_store: {'storage_driver': {'config': {'access_key': '9EB92C7W61YPFQ6QLDOU', 'create_bucket': True, 'url': 'http://minio-ephemeral-test:9000/', 'region': False, 'bucket': 'anchore-engine-testing', 'prefix': 'internaltest', 'secret_key': 'TuHo2UbBx+amD3YiCeidy+R3q82MPTPiyd+dlW+s'}, 'name': 's3'}, 'compression': {'enabled': True, 'min_size_kbytes': 100}}
[MainThread] [anchore_engine.subsys.object_store.migration/initiate_migration()] [INFO] Migration Task Id: 1
[MainThread] [anchore_engine.subsys.object_store.migration/initiate_migration()] [INFO] Entering main migration loop
[MainThread] [anchore_engine.subsys.object_store.migration/initiate_migration()] [INFO] Migrating 7 documents
[MainThread] [anchore_engine.subsys.object_store.migration/initiate_migration()] [INFO] Deleting document on source after successful migration to destination. Src = db://admin/policy_bundles/2c53a13c-1765-11e8-82ef-23527761d060
[MainThread] [anchore_engine.subsys.object_store.migration/initiate_migration()] [INFO] Deleting document on source after successful migration to destination. Src = db://admin/manifest_data/sha256:0873c923e00e0fd2ba78041bfb64a105e1ecb7678916d1f7776311e45bf5634b
[MainThread] [anchore_engine.subsys.object_store.migration/initiate_migration()] [INFO] Deleting document on source after successful migration to destination. Src = db://admin/analysis_data/sha256:0873c923e00e0fd2ba78041bfb64a105e1ecb7678916d1f7776311e45bf5634b
[MainThread] [anchore_engine.subsys.object_store.migration/initiate_migration()] [INFO] Deleting document on source after successful migration to destination. Src = db://admin/image_content_data/sha256:0873c923e00e0fd2ba78041bfb64a105e1ecb7678916d1f7776311e45bf5634b
[MainThread] [anchore_engine.subsys.object_store.migration/initiate_migration()] [INFO] Deleting document on source after successful migration to destination. Src = db://admin/manifest_data/sha256:a0cd2c88c5cc65499e959ac33c8ebab45f24e6348b48d8c34fd2308fcb0cc138
[MainThread] [anchore_engine.subsys.object_store.migration/initiate_migration()] [INFO] Deleting document on source after successful migration to destination. Src = db://admin/analysis_data/sha256:a0cd2c88c5cc65499e959ac33c8ebab45f24e6348b48d8c34fd2308fcb0cc138
[MainThread] [anchore_engine.subsys.object_store.migration/initiate_migration()] [INFO] Deleting document on source after successful migration to destination. Src = db://admin/image_content_data/sha256:a0cd2c88c5cc65499e959ac33c8ebab45f24e6348b48d8c34fd2308fcb0cc138
[MainThread] [anchore_engine.subsys.object_store.migration/initiate_migration()] [INFO] Migration result summary: {"last_state": "running", "executor_id": "3209ad44d7bb:37:139731996518208:", "archive_documents_migrated": 7, "last_updated": "2018-08-15T18:03:52.951364", "online_migration": null, "created_at": "2018-08-15T18:03:52.951354", "migrate_from_driver": "db", "archive_documents_to_migrate": 7, "state": "complete", "migrate_to_driver": "s3", "ended_at": "2018-08-15T18:03:53.720554", "started_at": "2018-08-15T18:03:52.949956", "type": "archivemigrationtask", "id": 1}
[MainThread] [anchore_manager.cli.objectstorage/migrate()] [INFO] After this migration, your anchore-engine config.yaml MUST have the following configuration options added before starting up again:
compression:
  enabled: true
  min_size_kbytes: 100
storage_driver:
  config:
    access_key: 9EB92C7W61YPFQ6QLDOU
    bucket: anchore-engine-testing
    create_bucket: true
    prefix: internaltest
    region: false
    secret_key: TuHo2UbBx+amD3YiCeidy+R3q82MPTPiyd+dlW+s
    url: http://minio-ephemeral-test:9000/
  name: s3
Note: If something goes wrong you can reverse the parameters of the migrate command to migrate back to the original configuration (e.g. … migrate /config/dest-config.yaml /config/config.yaml)
Step 5: Get coffee!
The migration time will depend on the amount of data and the source and destination systems performance.
Step 6: View results summary
[root@3209ad44d7bb ~]# anchore-manager objectstorage --db-connect ${db} list-migrations
[MainThread] [anchore_manager.cli.utils/connect_database()] [INFO] DB params: {"db_pool_size": 30, "db_connect": "postgresql+pg8000://postgres:postgres.dev@postgres-dev:5432/postgres", "db_connect_args": {"ssl": false, "connect_timeout": 120, "timeout": 30}, "db_pool_max_overflow": 100}
[MainThread] [anchore_manager.cli.utils/connect_database()] [INFO] DB connection configured: True
[MainThread] [anchore_manager.cli.utils/connect_database()] [INFO] DB attempting to connect...
[MainThread] [anchore_manager.cli.utils/connect_database()] [INFO] DB connected: True
id         state                  start time                         end time                 from        to        migrated count        total to migrate               last updated
1         complete        2018-08-15T18:03:52.949956        2018-08-15T18:03:53.720554         db         s3              7                      7                2018-08-15T18:03:53.724628
This lists all migrations for the service and the number of objects migrated. If you’ve run multiple migrations you’ll see multiple rows in this response.
Step 7: Replace old config.yaml with updated dest-config.yaml
[root@3209ad44d7bb ~]# cp /config/config.yaml /config/config.old.yaml
[root@3209ad44d7bb ~]# cp /config/dest-config.yaml /config/config.yaml
Step 8: Restart anchore-engine services
[user@host aevolume]$ docker compose start anchore-engine
The system should now be up and running using the new configuration! You can verify with the anchorectl command by fetching a policy, which will have been migrated:
[root@d8d3f49d9328 /]# anchorectl policy list
 ✔ Fetched policies
┌─────────────────────────┬──────────────────────────────────────┬────────┬──────────────────────┐
│ NAME                    │ POLICY ID                            │ ACTIVE │ UPDATED              │
├─────────────────────────┼──────────────────────────────────────┼────────┼──────────────────────┤
│ Default bundle          │ 2c53a13c-1765-11e8-82ef-23527761d060 │ true   │ 2022-07-14T22:52:27Z │
│ anchore_security_only   │ anchore_security_only                │ false  │ 2022-07-14T22:52:27Z │
│ anchore_cis_1.13.0_base │ anchore_cis_1.13.0_base              │ false  │ 2022-07-14T22:52:27Z │
└─────────────────────────┴──────────────────────────────────────┴────────┴──────────────────────┘

[root@d8d3f49d9328 /]# anchorectl -o json-raw policy get 2c53a13c-1765-11e8-82ef-23527761d060
[
  {
    "blacklisted_images": [],
    "comment": "Default bundle",
    "id": "2c53a13c-1765-11e8-82ef-23527761d060",
... <lots of json>
If that returns the content properly, then you’re all done!
Things to Watch for in a Multi-Node Anchore Engine Installation
- Before migration:
Ensure all services are down before starting migration
- At migration:
Ensure the place you’re running the migration from has the same db access and network access to the archive locations
- After migration:
Ensure that all components get the update config.yaml. Strictly speaking, only containers that run the catalog service need the update configuration, but its best to ensure that any config.yaml in the system which has a services.catalog definition also has the proper and up-to-date configuration to avoid confusion or accidental reverting of the config.
Example Process with docker compose
# ls docker-compose.yaml
docker-compose.yaml

# docker compose ps
              Name                            Command               State                       Ports
--------------------------------------------------------------------------------------------------------------------------
aevolumepy3_anchore-db_1           docker-entrypoint.sh postgres    Up      5432/tcp
aevolumepy3_anchore-engine_1       /bin/sh -c anchore-engine        Up      0.0.0.0:8228->8228/tcp, 0.0.0.0:8338->8338/tcp
aevolumepy3_anchore-minio_1        /usr/bin/docker-entrypoint ...   Up      0.0.0.0:9000->9000/tcp
aevolumepy3_anchore-prometheus_1   /bin/prometheus --config.f ...   Up      0.0.0.0:9090->9090/tcp
aevolumepy3_anchore-redis_1        docker-entrypoint.sh redis ...   Up      6379/tcp
aevolumepy3_anchore-ui_1           /bin/sh -c node /home/node ...   Up      0.0.0.0:3000->3000/tcp

# docker compose stop anchore-engine
Stopping aevolume_anchore-engine_1 ... done

# docker compose run anchore-engine anchore-manager objectstorage --db-connect postgresql+pg8000://postgres:mysecretpassword@anchore-db:5432/postgres check /config/config.yaml.new
[MainThread] [anchore_manager.cli.utils/connect_database()] [INFO] DB params: {"db_connect": "postgresql+pg8000://postgres:mysecretpassword@anchore-db:5432/postgres", "db_connect_args": {"timeout": 30, "ssl": false}, "db_pool_size": 30, "db_pool_max_overflow": 100}
[MainThread] [anchore_manager.cli.utils/connect_database()] [INFO] DB connection configured: True
[MainThread] [anchore_manager.cli.utils/connect_database()] [INFO] DB attempting to connect...
[MainThread] [anchore_manager.cli.utils/connect_database()] [INFO] DB connected: True
[MainThread] [anchore_manager.cli.objectstorage/check()] [INFO] Using config file /config/config.yaml.new
...
...

# docker compose run anchore-engine anchore-manager objectstorage --db-connect postgresql+pg8000://postgres:mysecretpassword@anchore-db:5432/postgres migrate /config/config.yaml /config/config.yaml.new
[MainThread] [anchore_manager.cli.utils/connect_database()] [INFO] DB params: {"db_connect": "postgresql+pg8000://postgres:mysecretpassword@anchore-db:5432/postgres", "db_connect_args": {"timeout": 30, "ssl": false}, "db_pool_size": 30, "db_pool_max_overflow": 100}
[MainThread] [anchore_manager.cli.utils/connect_database()] [INFO] DB connection configured: True
[MainThread] [anchore_manager.cli.utils/connect_database()] [INFO] DB attempting to connect...
[MainThread] [anchore_manager.cli.utils/connect_database()] [INFO] DB connected: True
[MainThread] [anchore_manager.cli.objectstorage/migrate()] [INFO] Loading configs
[MainThread] [anchore_engine.configuration.localconfig/validate_config()] [WARN] no webhooks defined in configuration file - notifications will be disabled
[MainThread] [anchore_engine.configuration.localconfig/validate_config()] [WARN] no webhooks defined in configuration file - notifications will be disabled
[MainThread] [anchore_manager.cli.objectstorage/migrate()] [INFO] Migration from config: {
  "compression": {
    "enabled": false,
    "min_size_kbytes": 100
  },
  "storage_driver": {
    "name": "db",
    "config": {}
  }
}
[MainThread] [anchore_manager.cli.objectstorage/migrate()] [INFO] Migration to config: {
  "compression": {
    "enabled": true,
    "min_size_kbytes": 100
  },
  "storage_driver": {
    "name": "s3",
    "config": {
      "access_key": "Z54LPSMFKXSP2E2L4TGX",
      "secret_key": "EMaLAWLVhUmV/f6hnEqjJo5+/WeZ7ukyHaBKlscB",
      "url": "http://anchore-minio:9000",
      "region": false,
      "bucket": "anchorearchive",
      "create_bucket": true
    }
  }
}
Performing this operation requires *all* anchore-engine services to be stopped - proceed? (y/N) y
...
...
...
[MainThread] [anchore_engine.subsys.object_store.migration/initiate_migration()] [INFO] Migration result summary: {"last_updated": "2018-08-14T22:19:39.985250", "started_at": "2018-08-14T22:19:39.984603", "last_state": "running", "online_migration": null, "archive_documents_migrated": 500, "migrate_to_driver": "s3", "id": 9, "executor_id": "e9fc8f77714d:1:140375539468096:", "ended_at": "2018-08-14T22:20:03.957291", "created_at": "2018-08-14T22:19:39.985246", "state": "complete", "archive_documents_to_migrate": 500, "migrate_from_driver": "db", "type": "archivemigrationtask"}
[MainThread] [anchore_manager.cli.objectstorage/migrate()] [INFO] After this migration, your anchore-engine config.yaml MUST have the following configuration options added before starting up again:
...
...

# cp config/config.yaml config/config.yaml.original

# cp config/config.yaml.new config/config.yaml

# docker compose start anchore-engine
Starting anchore-engine ... done
Migrating Analysis Archive Data
The object storage migration process migrates any data stored in the source config to the destination configuration, if
the analysis archive is configured to use the same storage backend as the primary object store then that data is migrated
along with all other data, but if the source or destination configurations define different storage backends for the
analysis archive than that which is used by the primary object store, then additional paramters are necesary in the
migration commands to indicate which configurations to migrate to/from.
The most common migration patterns are:
Migrate from a single backend configuration to a split configuration to move analysis archive data to an external system (db -> db + s3)
Migrate from a dual-backend configuration to a single-backend configuration with a different config (e.g. db + s3 -> s3)
Migrating a single backend to split backend
For example, moving from unified db backend (default config) to a db + s3 configuration with s3 for the analysis archive .
source-config.yaml snippet:
...
services:
...
  catalog:
    ...
    object_store:
      compression:
        enabled: false
        min_size_kbytes: 100
      storage_driver:
        name: db
        config: {}
...
dest-config.yaml snippet:
...
services:
...
  catalog:
    ...
    object_store:
      compression:
        enabled: false
        min_size_kbytes: 100
      storage_driver:
        name: db
        config: {}
    analysis_archive:
      enabled: true
      compression:
        enabled: false
        min_size_kbytes: 100
      storage_driver:
        name: s3
        config:
          access_key: 9EB92C7W61YPFQ6QLDOU
          secret_key: TuHo2UbBx+amD3YiCeidy+R3q82MPTPiyd+dlW+s
          url: 'http://minio-ephemeral-test:9000'
          region: null
          bucket: analysisarchive
      ...
Anchore stores its internal data in logical ‘buckets’ that are overlayed onto the storage backed in a driver-specific
way, so to migrate specific internal buckets (effectively these are classes of data), use the –bucket option in the
manager cli. This should generally not be necessary, but for specific kinds of migrations it may be needed.
The following command will execute the migration. Note that the –bucket option is for an internal Anchore logical-bucket, not
and actual bucket in S3:
anchore-manager objectstorage --db-connect migrate --to-analysis-archive --bucket analysis_archive source-config.yaml dest-config.yaml
Migrating from dual object storage backends to a single backend
For example, migrating from a db + s3 backend to a single s3 backend in a different bucket:
Example source-config.yaml snippet:
...
services:
...
  catalog:
    ...
    object_store:
      compression:
        enabled: false
        min_size_kbytes: 100
      storage_driver:
        name: db
        config: {}
    analysis_archive:
      enabled: true
      compression:
        enabled: false
        min_size_kbytes: 100
      storage_driver:
        name: s3
        config:
          access_key: 9EB92C7W61YPFQ6QLDOU
          secret_key: TuHo2UbBx+amD3YiCeidy+R3q82MPTPiyd+dlW+s
          url: 'http://minio-ephemeral-test:9000'
          region: null
          bucket: analysisarchive
...
The dest config is a single backend. In this case, note the S3 bucket has changed so all data must be migrated.
Example dest-config.yaml snippet:
...
services:
...
  catalog:
    ...
    object_store:
      enabled: true
      compression:
        enabled: false
        min_size_kbytes: 100
      storage_driver:
        name: s3
        config:
          access_key: 9EB92C7W61YPFQ6QLDOU
          secret_key: TuHo2UbBx+amD3YiCeidy+R3q82MPTPiyd+dlW+s
          url: 'http://minio-ephemeral-test:9000'
          region: null
          bucket: newanchorebucket
      ...
First, migrate the object data in the db on the source:
anchore-manager objectstorage --db-connect migrate source-config.yaml dest-config.yaml
Next, migrate the object data in the analysis archive from the old config (s3 bucket ‘analysisarchive’ to the new config
(s3 bucket ’newanchorebucket’):
anchore-manager objectstorage --db-connect migrate --from-analysis-archive source-config.yaml dest-config.yaml
4.22.4.2 - Database Driver
The default object store driver is the PostgreSQL database driver which stores all object store documents within the PostgreSQL database.
A component of the object store driver is the archive_document. When the default object store driver is used, as opposed to a user configuring a S3 bucket, this is the location where image SBOMs, vulnerability scans, policy evaluations, and reports are stored.
Compression is not supported for this driver since the underlying database will handle compression.
There are no configuration options required for the Database driver.
The embedded configuration for anchore enterprise includes the default configuration for the db driver.
object_store:
  compression:
    enabled: False
    min_size_kbytes: 100
  storage_driver:
    name: db
    config: {}
4.22.4.3 - S3 Object Store Driver
Using the S3 driver, data can be stored using Amazon’s S3 storage or any Amazon S3 API compatible system.
object_store:
  compression:
    enabled: False
    min_size_kbytes: 100
  storage_driver:
    name: 's3'
    config:
      access_key: 'MY_ACCESS_KEY'
      secret_key: 'MY_SECRET_KEY'
      #iamauto: True
      url: 'https://S3-end-point.example.com'
      region: False
      bucket: 'anchorearchive'
      create_bucket: True
Example for AWS S3 in us-west-2:
object_store:
  compression:
    enabled: True
    min_size_kbytes: 100
  storage_driver:
    name: 's3'
    config:
#      access_key: 'MY_ACCESS_KEY'
#      secret_key: 'MY_SECRET_KEY'
      iamauto: True
      #url: 'https://S3-end-point.example.com'
      region: us-west-2
      bucket: anchoredata
      create_bucket: False
Example for Minio running in a Docker Compose setup on the same host network as Anchore (container named ‘minio’):
object_store:
  compression:
    enabled: True
    min_size_kbytes: 100
  storage_driver:
    name: 's3'
    config:
      access_key: 'MY_ACCESS_KEY_FOR_MINIO'
      secret_key: 'MY_SECRET_KEY_FOR_MINIO'
      #iamauto: True
      url: 'https://minio:5000'
      #region: us-west-2
      bucket: anchoredata
      create_bucket: False
Compression
The S3 driver supports compression of documents. The documents are JSON formatted and will see significant reduction in
size through compression there is an overhead incurred by running compression and decompression on every access of these
documents. Anchore Enterprise can be configured to only compress documents above a certain size to reduce unnecessary
overhead. In the example below any document over 100kb in size will be compressed.
Authentication
Anchore Enterprise can authenticate against the S3 service using one of two methods:
Amazon Access Keys
Using this method an Access Key and Secret Access key that have access to read and write to the bucket. Parameters:
access_key and secret_key
Inherit IAM Role
Anchore Enterprise can be configured to inherit the IAM role from the EC2 or ECS instance that Anchore
Enterprise is running on or is provided via Kubernetes service account. When launching the EC2 instance that will run
Anchore Enterprise you need to specify a role that includes the
ability to read and write from the archive bucket. To use IAM roles to authenticate the access_key and secret_access
configurations should be replaced by iamauto: True
Parameters: iamauto
S3 Endpoint and Bucket
url: (required if region not set) A URL to set to reach an S3-API compatible service if you are not using actual Amazon S3. If the URL is configured, the region config value is ignored.region: (required if URL not set) The AWS region that is the primary bucket host (). If you are not using actual S3, this is probably not necessary unless your S3-compatible service requires it. If the ‘URL’ configured, this field is ignored.bucket: (required) The name of the S3 bucket that Anchore will use for storing data.create_bucket: (default: false) Try to create the bucket if it doesn’t already exist. This should be used very sparingly. For most cases, you should pre-create the bucket so that it has the permissions you desire, then set this to false.
4.23 - Working with Subscriptions
Introduction
Anchore Enterprise supports 7 types of subscriptions:
- Tag Update
- Policy Update
- Vulnerability Update
- Analysis Update
- Alerts
- Repository Update
- Runtime Inventory
Enabling some of these will generate a notification when the event is triggered while others may have a more significant impact on the system.
Note
Please read carefully what each subscription watches/manages and what effect enabling them may have on the overall deployment.Tag Update
| |
|---|
| Granularity | Per Image Tag |
| Notification Generated | Yes |
| Background Process | Yes |
| Default Timer Frequency | every 60 min |
| Default State | Disabled (Unless the Tag is added by AnchoreCTL) |
| Other Considerations | Adds new tag/digest pairs to the system |
When the tag_update subscription is enabled, a background process, called a “watcher”, will periodically query the repository for any new image digests with the same tag.
For each new image digest found:
- it will be pulled into the catalog and analyzed
- a Tag Update Notification will be triggered.
Policy Updates
| |
|---|
| Granularity | Per Image Tag |
| Notification Generated | Yes |
| Background Process | Yes |
| Default Timer Frequency | every 60 min |
| Default State | Disabled |
| Other Considerations | None |
This class of notification is triggered if a Tag to which a user has subscribed has a change in its policy evaluation status. The policy evaluation status of an image can be one of two states: Pass or Fail. If an image that was previously marked as Pass changes status to Fail or vice-versa then the policy update notification will be triggered.
The policy status of a Tag may be changed by a number of methods.
- Change to policy
- If an policy was changed, for example adding, editing or removing a policy check, then the policy status of an image may be effected. For example adding policy rule that denylists a specific package that is present in a given Tag may cause the Tag’s policy status to move to Fail.
- Changes to Allowlist
- If a allowlist is changed to add or remove a CVE then this may cause a policy status change. For example if an image contains a package that is vulnerable to Crticial Severity CVE-2017-9999 then this image may fail in it’s policy evaluation. If CVE-2017-9999 is added to a CVE Allowlist that is mapped to the subscribed Tag then the policy status may change from Fail to Pass.
- Change in Policy / Allowlist Mapping
- If the policy mapping is changed then a new policy or allowlist may be applied to an image which may change the status of the image. For example changing the mapping to add a more restrictive policy may change an Tag’s status from Pass to Fail.
- Change in Package or Vulnerability Data
- Some policy checks make use of data from external feeds. For example vulnerability checks use CVE data feeds. Changes in data within these feed may change the policy status, such as adding a new CVE vulnerability.
Vulnerability / CVE Update
| |
|---|
| Granularity | Per Image Tag |
| Notification Generated | Yes |
| Background Process | Yes |
| Default Timer Frequency | every 4 hours |
| Default State | Disabled |
| Other Considerations | None |
This class of notification is triggered if the list of CVEs or other security vulnerabilities in the image changes.
For example, a user was subscribed to the library/nginx:latest tag. On the 12th of September 2017 a new vulnerability was added to the Debian 9 vulnerability feed which matched a package in the library/nginx:latest image, triggering a notification.
Based on the changes made by the upstream providers of CVE data (operating system vendors and NIST) CVEs may be added, removed or modified – for example a CVE initially marked as severity level Unknown may be upgraded to a higher severity level.
Note: A change to the CVE list in a Tag may not trigger a policy status change based on the policy rules configured for an image. In the example above the CVE had an unknown severity level which may not be tested by the policy mapped to this image.
Analysis Update
| |
|---|
| Granularity | Per Image Tag |
| Notification Generated | Yes |
| Background Process | No |
| Default Timer Frequency | n/a |
| Default State | Enabled |
| Other Considerations | None |
This class of notification is triggered when an image has been analyzed. Typically, this is triggered when a new Tag has been added to the catalog.
A common use case for this trigger is to alert an external system that a new Tag was added and has been successfully analyzed.
Forcing a re-analysis on an existing image will also cause this notification to be generated.
Alerts
| |
|---|
| Granularity | Per Image Tag |
| Notification Generated | No |
| Background Process | Yes |
| Default Timer Frequency | 10 minutes |
| Default State | Disabled |
| Other Considerations | Enabling this Subscription may be resource intensive as frequent policy evaluations will occur |
The UI and API use stateful alerts that will be raised for policy violations on tags to which you are subscribed for alerts.
This raises a clear notification in the UI to help initiate the remediation workflow and address the violations via the remediation feature.
Once all findings are addressed the alert is closed, allowing an efficient workflow for users to bring their image’s into compliance with their policy.
Repository Update
| |
|---|
| Granularity | Per Repository |
| Notification Generated | No |
| Background Process | Yes |
| Default Timer Frequency | 60 seconds |
| Default State | Disabled |
| Other Considerations | Adds all the tags found in a repository to the system |
This subscription, when enabled, will query the provided repository for any new tags. Any tag not already managed with in Anchore, will be added.
This subscription also provides the ability to determine if the tag_update subscription should be enabled for any new tag added to Anchore.
Please Note: Enabling this subscription may add a large number of tags to the system.
Runtime Inventory
| |
|---|
| Granularity | Per Runtime Inventory Context (Cluster/Namespace) |
| Notification Generated | No |
| Background Process | Yes |
| Default Timer Frequency | 2.5 minutes |
| Default State | Disabled |
| Other Considerations | Adds all the images found in the Context to the system |
This subscription, when enabled, will find any newly reported images from the runtime inventory and add them to Anchore to be analyzed.
Please Note: Enabling this subscription may add a large number of tags to the system.
4.24 - TLS / SSL
Communication with the Anchore Enterprise and between Anchore Enterprise services can be secured with TLS/SSL. This can be performed in two ways
- Externally through a load balancing, ingress controller or reverse proxy such as NGINX
- Natively within the Anchore Enterprise
For most use cases an external service such as a proxy or load balancer will provide the simplest approach, especially when keys need to be rotated, new instances added, etc.
The Anchore Enterprise is comprised of 6 services, typically only the external API service (apiext) and Kubernetes webhook service are published externally, all other services are used for internal communication.
Transport Level Security (TLS/SSL) is enabled on a per-service basis. In the sample configuration the SSL/TLS configuration options are commented out.
In the following example the external API service is configured to listen on port 443 and is configured with a certificate for its external hostname anchore.example.com
Each service published in the Anchore Enterprise configuration (apiext, catalog, simplequeue, analyzer, policy_engine and kubernetes_webhook) can be configured to use transport level security.
services:
  apiext:
    enabled: True
    endpoint_hostname: 'anchore.example.com'
    listen: '0.0.0.0'
    port: 443
    ssl_enable: True
    ssl_cert: '/config/anchore-ex.crt'
    ssl_key: '/config/anchore-ex.key'
    ssl_chain: '/config/anchore-ex.crt'
| Setting | Notes |
|---|
| enabled | If the service is enabled |
| endpoint_hostname | DNS name of service |
| listen | IP address of interface on which the service should listen (use ‘0.0.0.0’ for all - default) |
| port | Port on which service should listen. |
| ssl_enable | Enable transport level security |
| ssl_cert | name, including full path of private key file. |
| ssl_chain | [optional] name, including full path of certificate chain |
The certificate files should be placed on a path accessible to the Anchore Enterprise service, for example in the /config directory which is typically mapped as a volume into the container. Note that the location outside the container will depend on your configuration - for example if you are volume mounting ‘/path/to/aevolume/config/’ on the docker host to ‘/config’ within the container, you’ll need to place the ssl files in ‘/path/to/aevolume/config/’ on the docker host, so that they are accessible in ‘/config/’ inside the container, before starting the service.
The ssl_chain file is optional and may be required by some certificate authorities. If your certificate authority provides a chain certificate then include it within the configuration.
Note: While a certificate may be purchased from a well-known and trusted certificate authority in some cases the certificate is signed by an intermediate certificate which is not included within a TLS/SSL clients trust stores. In these cases the intermediate certificate is signed by the certificate authority however without the full ‘chain’ showing the provenance and integrity of the certificate the TLS/SSL client may not trust the certificate.
Any certificates used by the Anchore Enterprise services need to be trusted by all other Anchore Enterprise services.
If an internal certificate authority is used the root certificate for the internal CA can be added to the Anchore Enterprise using the following procedure or SSL verification can be disabled by setting the following parameter:
internal_ssl_verify: True
4.25 - Enterprise UI Configuration
The Enterprise UI service has some static configuration options that are read
from /config/config-ui.yaml inside the UI container image when the system
starts up.
The configuration is designed to not require any modification when using the
quickstart (docker compose) or production (Helm) methods of deploying Anchore
Enterprise. If modifications are desired, the options, their meanings, and
environment overrides are listed below for reference:
The (required) license_path key specifies the location of the local system
folder containing the license.yaml license file required by the Anchore
Enterprise UI web service for product activation. This value can be overridden
by using the ANCHORE_LICENSE_PATH environment variable.
license_path: '/'
The (required) enterprise_uri key specifies the address of the Anchore
Enterprise service. The value must be a string containing a properly-formed
‘http’ or ‘https’ URI. This value can be overridden by using the
ANCHORE_ENTERPRISE_URI environment variable.
enterprise_uri: 'http://api:8228/v2'
The (required) redis_uri key specifies the address of the Redis service. The
value must be a string containing a properly-formed ‘http’, ‘https’, or
redis URI. Note that the default configuration uses the REdis Serialization
Protocol (RESP). This value can be overridden by using the ANCHORE_REDIS_URI
environment variable.
redis_uri: 'redis://ui-redis:6379'
The (required) appdb_uri key specifies the location and credentials for the
postgres DB endpoint used by the UI. The value must contain the host, port, DB
user, DB password, and DB name. This value can be overridden by using the
ANCHORE_APPDB_URI environment variable.
appdb_uri: 'postgres://<db-user>:<db-pass>@<db-host>:<db-port>/<db-name>'
The (required) reports_uri key specifies the address of the Reports service.
The value must be a string containing a properly-formed ‘http’ or ‘https’ URI
and can be overridden by using the ANCHORE_REPORTS_URI environment variable.
Note that the presence of an uncommented reports_uri key in this file (even
if unset, or set with an invalid value) instructs the Anchore Enterprise UI
web service that the Reports feature must be enabled.
reports_uri: 'http://reports:8228/v2'
The (optional) enable_ssl key specifies if SSL operations should be enabled
within in the web app runtime. When this value is set to True, secure
cookies will be used with a SameSite value of None. The value must be a
Boolean, and defaults to False if unset.
Note: Only enable this property if your UI deployment configured to run
within an SSL-enabled environment (for example, behind a reverse proxy, in the
presence of signed certs etc.)
This value can be overridden by using the ANCHORE_ENABLE_SSL environment
variable.
enable_ssl: False
The (optional) enable_proxy key specifies whether to trust a reverse proxy
when setting secure cookies (via the X-Forwarded-Proto header). The value
must be a Boolean, and defaults to False if unset. In addition, SSL must be
enabled for this to work. This value can be overridden by using the
ANCHORE_ENABLE_PROXY environment variable.
enable_proxy: False
The (optional) allow_shared_login key specifies if a single set of user
credentials can be used to start multiple Anchore Enterprise UI sessions; for
example, by multiple users across different systems, or by a single user on a
single system across multiple browsers.
When set to False, only one session per credential is permitted at a time,
and logging in will invalidate any other sessions that are using the same set
of credentials. If this property is unset, or is set to anything other than a
Boolean, the web service will default to True.
Note that setting this property to False does not prevent a single session
from being viewed within multiple tabs inside the same browser. This value
can be overridden by using the ANCHORE_ALLOW_SHARED_LOGIN environment
variable.
allow_shared_login: True
The (optional) redis_flushdb key specifies if the Redis datastore containing
user session keys and data is emptied on application startup. If the datastore
is flushed, any users with active sessions will be required to
re-authenticate.
If this property is unset, or is set to anything other than a Boolean, the web
service will default to True. This value can be overridden by using the
ANCHORE_REDIS_FLUSHDB environment variable.
redis_flushdb: True
The (optional) custom_links key allows a list of up to 10 external links to
be provided (additional items will be excluded). The top-level title key
provided the label for the menu (if present, otherwise the string “Custom
External Links” will be used instead).
Each link entry must have a title of greater than 0-length and a valid URI. If
either item is invalid, the entry will be excluded.
custom_links:
  title: Custom External Links
  links:
  - title: Example Link 1
    uri: https://example.com
  - title: Example Link 2
    uri: https://example.com
  - title: Example Link 3
    uri: https://example.com
  - title: Example Link 4
    uri: https://example.com
  - title: Example Link 5
    uri: https://example.com
  - title: Example Link 6
    uri: https://example.com
  - title: Example Link 7
    uri: https://example.com
  - title: Example Link 8
    uri: https://example.com
  - title: Example Link 9
    uri: https://example.com
  - title: Example Link 10
    uri: https://example.com
The (optional) force_websocket key specifies if the WebSocket protocol must
be used for socket message communications. By default, long-polling is
initially used to establish the handshake between client and web service,
followed by a switch to WS if the WebSocket protocol is supported.
If this value is unset, or is set to anything other than a Boolean, the web
service will default to False.
This value can be overridden by using the ANCHORE_FORCE_WEBSOCKET
environment variable.
force_websocket: False
The (optional) authentication_lock keys specify if a user should be
temporarily prevented from logging in to an account after one or more failed
authentication attempts. For this feature to be enabled, both values must be
whole numbers greater than 0. They can be overridden by using the
ANCHORE_AUTHENTICATION_LOCK_COUNT and ANCHORE_AUTHENTICATION_LOCK_EXPIRES
environment variables.
The count value represents the number of failed authentication attempts
allowed to take place before a temporary lock is applied to the username. The
expires value represents, in seconds, how long the lock will be applied for.
Note that, for security reasons, when this feature is enabled it will be
applied to any submitted username, regardless of whether the user exists.
authentication_lock:
  count: 5
    expires: 300
The (optional) enable_add_repositories key specifies if repositories can be
added via the application interface by either administrative users or standard
users. In the absence of this key, the default is True. When enabled, this
property also suppresses the availability of the Watch Repository toggle
associated with any repository entries displayed in the Artifact Analysis
view.
Note that in the absence of one or all of the properties, the default is also
True. Thus, this key, and a child key corresponding to an account type (that
is itself explicitly set to False) must be set for the feature to be
disabled for that account.
enable_add_repositories:
  admin: True
  standard: True
The (optional) ldap_timeout and ldap_connect_timeout keys respectively
specify the time (in milliseconds) the LDAP client should let operations stay
alive before timing out, and the time (in milliseconds) the LDAP client should
wait before timing out on TCP connections. Each value must be a whole number
greater than 0.
When these values are unset (or set incorrectly) the app will fall back to
using a default value of 6000 milliseconds. The same default is used when
the keys are not enabled.
These value can be overridden by using the ANCHORE_LDAP_AUTH_TIMEOUT and
ANCHORE_LDAP_AUTH_CONNECT_TIMEOUT environment variables.
ldap_timeout: 6000
ldap_connect_timeout: 6000
The (optional) custom_message key allows you to provide a message that will
be displayed on the application login page below the Username and
Password fields. The key value must be an object that contains:
- A
title key, whose string value provides a title for the message—which can
be up to 100 characters - A
message key, whose string value is the message itself—which can be up to
500 characters
custom_message:
  title:
    "Title goes here..."
  message:
    "Message goes here..."
Note: Both title and message values must be present and contain at
least 1 character for the message box to be displayed. If either value
exceeds the character limit, the string will be truncated with an ellipsis.
The (optional) log_level key allows you to set the descriptive detail of the
application log output. The key value must be a string selected from the
following priority-ordered list:
Once set, each level will automatically include the output for any levels
above it—for example, info will include the log output for details at the
warn and error details, whereas error will only show error output.
This value can be overridden by using the ANCHORE_LOG_LEVEL environment
variable. When no level is set, either within this configuration file or by
the environment variable, a default level of http is used.
log_level: 'http'
The (optional) enrich_inventory_view key allows you to set whether the
Kubernetes feature should aggregate and include compliance and
vulnerability data from the reports service. Setting this key to be False
can increase performance on high-volume systems.
This value can be overridden by using the ANCHORE_ENRICH_INVENTORY_VIEW
environment variable. When no flag is set, either within this configuration
file or by the environment variable, a default setting of True is used.
enrich_inventory_view: True
The (optional) enable_prometheus_metrics key enables exporting monitoring
metrics to Prometheus. The metrics are made available on the /metrics
endpoint.
This value can be overridden by using the ANCHORE_ENABLE_METRICS environment
variable. When no flag is set, either within this configuration file or by the
environment variable, a default setting of False is used.
enable_prometheus_metrics: False
NOTE: The latest default UI configuration file can always be extracted from
the Enterprise UI container to review the latest options, environment overrides
and descriptions of each option using the following process:
# docker login
# docker pull docker.io/anchore/enterprise-ui:latest
# docker create --name aui docker.io/anchore/enterprise-ui:latest
# docker cp aui:/config/config-ui.yaml /tmp/my-config-ui.yaml
# docker rm aui
# cat /tmp/my-config-ui.yaml
...
...
4.26 - User Authentication
Overview
Anchore Enterprise offers Authentication via HTTP basic auth, SAML/SSO, LDAP and API Keys.
For more information about specific types of Anchore authentication, see the following topics:
4.26.1 - API Keys
Overview
API keys, or Application Programming Interface keys, are alphanumeric codes used to authenticate and control access to web-based services or APIs (Application Programming Interfaces). These keys serve as unique identifiers for developers or applications seeking permission to interact with Anchore Enterprise. API keys are commonly employed in software development to manage and secure the flow of data between different applications, allowing authorized access while preventing unauthorized usage. They play a crucial role in ensuring the integrity, security, and controlled usage of APIs, acting as a form of digital credentials for developers to connect their applications to external services.
Generating API Keys
A system user can generate an API key for self use. Some users have specific RBAC roles (ie account-user-admin) that allow management of API keys for other system users.
For more details on generating and managing API keys, please refer to this section: Generating API keys
Generating API keys as an SAML (SSO) user
API keys for SAML (SSO) users are disabled by default.
To enable API keys for SAML users, please update your helm chart values file with the following:
    user_authentication:
        allow_api_keys_for_saml_users: true
API keys are an additional authentication mechanism for SAML (SSO) users that bypasses the authentication control of the IDP.
When access has been revoked at the IDP, it does not automatically disable the user or revoke all API keys for the user.
Note
API keys are an additional authentication mechanism for SAML (SSO) users that bypasses the authentication control of the IDP. When access has been revoked at the IDP, it does not automatically disable the user or revoke all API keys for the user. Therefore, when access has been revoked for a user, the system administrator is responsible to manually delete the Anchore User or revoke any API key which was created for the user.Using API Keys
API keys are authenticated using basic auth. In order to use API keys you need to use a special username _api_key and the password is the value that was output when you created the API key.
e.g.
curl -u '_api_key:<API key value>' http://localhost:8228/v2/images
Caveats for API keys
API Keys generally inherit the permissions and roles of the user they were generated for, but there are certain operations you cannot perform using API keys regardless of which user they were generated for:
- You cannot Add/Edit/Remove Users and Credentials.
- You cannot Add/Edit/Revoke API Keys.
4.26.2 - User Credential Storage
Overview
All user information is stored in the Anchore DB. The credentials can be stored as plaintext or in a hashed form using the Argon2 hashing algorithm.
Hashed passwords are much more secure, but can be more computationally expensive to compare. Hashed passwords cannot be used for internal service communication since they cannot be reversed. Anchore
provides a token based authentication mechanism as well (a simplified Password-Grant flow of Oauth2) to mitigate the performance issue, but it requires that
all Anchore services be deployed with a shared secret in the configuration or a public/private keypair common to all services.
Passwords
The configuration of how passwords are stored is set in the user_authentication section of the config.yaml file
and must be consistent across all components of an Anchore Enterprise deployment. Mismatch
in this configuration between components of the system will result in the system not being able to communicate internally.
user_authentication:
  hashed_passwords: true|false
For all new deployments using the Enterprise Helm chart, hashed_passwords is defaulted to true.
All helm upgrades will carry forward the previous hashed_passwords setting.
NOTE: When the configuration is set to enable hashed_passwords, it must also be configured to use OAuth. When OAuth is not configured in the system, Anchore must be able to use HTTP Basic authentication between internal services and thus requires credentials that can be read.
Bearer Tokens/OAuth2
If Anchore is configured to support bearer tokens, the tokens are generated and returned to the user but never persisted in the database.
Users must still have password credentials, however. Password persistence and protection configuration still applies as in the Password section above.
Configuring Hashed Passwords and OAuth
NOTE: Password storage configuration must be done at the time of deployment, it cannot be modified at runtime or after installation with an existing DB since
it will invalidate all existing credentials, including internal system credentials and the system will not be functional. You must choose the mechanism
at system deployment time.
Set in config.yaml for all components of the deployment:
Option 1: Use a shared secret for signing/verifying oauth tokens
user_authentication:
  oauth:
    enabled: true
  hashed_passwords: true
keys:
  secret: mysecretvalue
Option 2: Use a public/private key pair, delivered as pem files on the filesystem of the containers anchore runs in:
user_authentication:
  oauth:
    enabled: true
  hashed_passwords: true
keys:
  private_key_path: <path to private key pem file>
  public_key_path: <path to public key pem file>
Using environment variables with the config.yaml bundled into the Anchore provided anchore/enterprise image is also an option.
NOTE: These are only valid when using the config.yaml provided in the image due to that file referencing them explicitly as replacement values.
ANCHORE_AUTH_SECRET = the string to use as a secret
ANCHORE_AUTH_PUBKEY = path to public key file
ANCHORE_AUTH_PRIVKEY = path to the private key file
ANCHORE_OAUTH_ENABLED = boolean to enable/disable oauth support
ANCHORE_OAUTH_TOKEN_EXPIRATION = the number of seconds a token should be valid (default is 3600 seconds)
ANCHORE_OAUTH_REFRESH_TOKEN_EXPIRATION = the number of second a refresh token is valid (default is 86400 seconds)
ANCHORE_AUTH_ENABLE_HASHED_PASSWORDS = boolean to enable/disable hashed password storage in the anchore db instead of clear text
4.27 - Accounts and Users
4.27.1 - User Management
Introduction
In this section you will learn how to create accounts, users, and role assignment with the Anchore Enterprise UI.
Assumptions
- You have a running instance of Anchore Enterprise and access to the UI.
- You have the appropriate permissions to create accounts, users, and roles. This means you are either a user in the admin account, or a user that already is a member of the account-users-admin role for your account.
For more information on accounts, users, roles, and permissions see: Role Based Access Control
Navigation
- After a successful login, navigate to the configuration tab on the main menu.
Creating Accounts
In order to create accounts, navigate to the accounts tab from inside the configuration view and select “Create New Account”.
Upon selection, a popup window will display asking for two items:
- Account Name (required)
- Email
In the following example I’ve created a ‘security’ account:

Now that a group has been created, I can begin to add users to it.
Viewing Role Permissions
To view the permissions associated with a specific role using the UI, select an account, and navigate to the roles tab:

To view the members in the account assigned to a specific role, select the ‘View’ button on the right-hand side.
Creating Users and assigning Roles
Upon immediate creation of an account, there will, by default be zero users. To add users, select the edit button corresponding the account you would like to add users to. This will bring you to the account page, where you can add your first user by selecting the “Let’s add one!” button.
Upon selection, a popup window will display asking for three items:
- Username (required)
- Password (required)
- Assign Role(s)
- Note that you can assign more than one role to a user. For a normal user with full access to add, update, and evaluate images, we recommend assigning the read-write role. The other roles are for specific use-cases such as CI/CD automation, and read-only access for reporting. See: Role Based Access Control from more details on the roles and their capabilities.
In this case I’ve assigned three roles to the user:

Once ‘OK’ is selected, the user will be created and you will be able to edit or remove the user as needed.
Deleting and Disabling Accounts
In order to delete an account, disable the account by sliding the button under the ‘Active’ column for the corresponding account, then select the ‘Remove’ button on the right-hand side.
A few notes to keep in mind when deleting accounts:
- The ‘admin’ account is locked and cannot be deleted.
- Once deletion is in progress, all resources (users, images, automated tasks, etc) will start a garbage collection process and won’t be viewable. Although it will still be present in the list to prevent admins from adding an account with the same name.
- Once deleted, an account and their associated resources can’t be recovered.
A couple notes on disabling accounts:
- Disabling accounts is a way for administrators to freeze an account while still keeping any associated analysis info intact.
- Any automated tasks associated with the disabled account will be frozen.
Switching Account Data Context
System administrator users are able to view another account’s data context using the dropdown located at the top-right:

Generating API Keys
Enterprise release 5.1 adds support for API keys for various operations. This is to facilitate use-cases where the user does not want to expose their main credentials e.g. integrations can switch to using API keys instead of username/password credentials.
In order to generate an API key, navigate to the Enterprise UI and click on the top right button and select ‘API Keys’:

Clicking ‘API Keys’ will present a dialog that lists your active, expired and revoked keys:

To create a new API key, click on the ‘Create New API Key’ and this will open another dialog where it asks you for relevant details for the API key:

You can specify the following fields:
- Name: The name of your API key. It is mandatory and unique i.e. you cannot have two API keys with the same name.
- Description: An optional text descriptor for your API key.
- Expiry Date: An expiry date for your API key, you cannot specify a date in the past and it cannot exceed 365 days by default.
Click save to save your API key, the UI will display the output of the operation:

NOTE!: Make sure you copy the value that’s output, there is no way to get this key value back.
Revoking API keys
If there is a situation where you feel your API key has been compromised, you can revoke an active key. This prevents the key from being used for authentication.
To revoke a key, click on the ‘Revoke’ button next to a key:

NOTE: Be careful revoking a key, this is an irreversible operation i.e. you cannot mark it active later.
The UI by default only displays active API keys, if you want to see your revoked and expired keys, check the toggle to ‘Show only active API keys’:

Managing API Keys as an Admin
As an account admin you can manage API keys for all users in the account you are admin in.
A global admin can manage API keys across all accounts and all users.
To access the API keys as an admin, click on the ‘System’ icon and navigate to ‘Accounts’:

Click ‘Edit’ for the account you want to manage keys for and click on the ‘Tools’ button against the user you wish to manage keys for:

4.27.2 - Accounts and Users
System Initialization
When the system first initializes it creates a system service account (invisible to users) and a administrator account (admin) with a single administrator user (admin). The password for this user is set at bootstrap using a default value or an override available in the config.yaml on the catalog service (which is what initializes the db). There are two top-level keys in the config.yaml that control this bootstrap:
default_admin_password - To set the initial password (can be updated by using the API once the system is bootstrapped). Defaults to foobar if omitted or unset.
default_admin_email - To set the initial admin account email on bootstrap. Defaults to admin@myanchore if unset
Managing Accounts Using AnchoreCTL
These operations must be executed by a user in the admin account. These examples are executed from within the enterprise-api container if using the quickstart guide:
First, exec into the enterprise-api container, if using the quickstart docker compose. For other deployment types (eg. helm chart into kubernetes), execute these commands anywhere you have AnchoreCTL installed that can reach the external API endpoint for you deployment.
docker compose exec enterprise-api /bin/bash
To list all the currently present accounts in the system, perform the following command:
# anchorectl account list
 ✔ Fetched accounts
┌──────────┬────────────────────┬──────────┐
│ NAME     │ EMAIL              │ STATE    │
├──────────┼────────────────────┼──────────┤
│ admin    │ admin@myanchore    │ enabled  │
│ devteam1 │ [email protected] │ enabled  │
│ devteam2 │ [email protected] │ enabled  │
└──────────┴────────────────────┴──────────┘
To review the list of users for a specific account, issue the following:
# anchorectl user list --account devteam1
 ✔ Fetched users
┌───────────────┬──────────────────────┬──────────────────────┬────────┬────────┐
│ USERNAME      │ CREATED AT           │ LAST UPDATED         │ SOURCE │ TYPE   │
├───────────────┼──────────────────────┼──────────────────────┼────────┼────────┤
│ devteam1admin │ 2022-08-25T17:43:43Z │ 2022-08-25T17:43:43Z │        │ native │
└───────────────┴──────────────────────┴──────────────────────┴────────┴────────┘
Adding a New Account
To add a new account which, by default, will have no active credentials, issue the following command:
# anchorectl account add devteam1 --email [email protected]
 ✔ Added account
Name: devteam1
Email: [email protected]
State: enabled#
Note that the email address is optional and can be omitted.
At this point the account exists but contains no users. To create a user with a password, see below in the Managing Users section.
Disabling Account
Disabling an account prevents any of that account’s users from being able to perform any actions in the system. It also disabled all asynchronous updates on resources in that account, effectively freezing the state of the account and all of its resources. Disabling an account is idempotent, if it is already disabled the operation has no effect. Accounts may be re-enabled after being disabled.
Note
# anchorectl account disable devteam1
 ✔ Disabled account
State: disabled
Enabling an Account
To restore a disabled account to allow user operations and resource updates, simply enable it. This is idempotent, enabling an already enabled account has no effect.
# anchorectl account enable devteam1
 ✔ Enabled account
State: enabled
Deleting an Account
Note: Deleting an account is irreversible and will delete all of its resources (images, policies, evaluations, etc).
Deleting an account will synchronously delete all users and credentials for the account and transition the account to the deleting state. At this point the system will begin reaping all resources for the account. Once that reaping process is complete, the account record itself is deleted. An account must be in a disabled state prior to deletion. Failure to be in this state results in an error:
# anchorectl account delete devteam1
error: 1 error occurred:
	* unable to delete account:
{
  "detail": {
    "error_codes": []
  },
  "httpcode": 400,
  "message": "Invalid account state change requested. Cannot go from state enabled to state deleting"
}
So, first you must disable the account, as shown above. Once disabled:
# anchorectl account disable devteam1
✔ Disabled account
State: disabled
# anchorectl account delete devteam1
✔ Deleted account
No results
# anchorectl account get devteam1
✔ Fetched account
Name: devteam1
Email: [email protected]
State: deleting
Managing Users Using AnchoreCTL
Users exist within accounts, but usernames themselves are globally unique since they are used for authenticating api requests. User management can be performed by any user in the admin account in the default Anchore Enterprise configuration using the native authorizer. For more information on configuring other authorization plugins see: Authorization Plugins and Configuration.
Create User in a User-Type Account
To create a new user credential within a specified account, you can issue the following command. Note that the ‘role’ assigned will dictate the API/operation level permissions granted to this new user. See help output for a list of available roles, or for more information you can review roles and associated permissions via the Anchore Enterprise UI. In the following example, we’re granting the new user the ‘full-control’ role, which gives the credential full access to operations within the ‘devteam1’ account namespace.
# ANCHORECTL_USER_PASSWORD=devteam1adminp4ssw0rd anchorectl user add --account devteam1 devteam1admin --role full-control
✔ Added user devteam1admin
Username: devteam1admin
Created At: 2022-08-25T17:50:18Z
Last Updated: 2022-08-25T17:50:18Z
Source:
Type: native
# anchorectl user list --account devteam1
✔ Fetched users
┌───────────────┬──────────────────────┬──────────────────────┬────────┬────────┐
│ USERNAME │ CREATED AT │ LAST UPDATED │ SOURCE │ TYPE │
├───────────────┼──────────────────────┼──────────────────────┼────────┼────────┤
│ devteam1admin │ 2022-08-25T17:50:18Z │ 2022-08-25T17:50:18Z │ │ native │
└───────────────┴──────────────────────┴──────────────────────┴────────┴────────┘
That user may now use the API:
# ANCHORECTL_USERNAME=devteam1admin ANCHORECTL_PASSWORD=devteam1adminp4ssw0rd ANCHORECTL_ACCOUNT=devteam1 anchorectl user list
✔ Fetched users
┌───────────────┬──────────────────────┬──────────────────────┬────────┬────────┐
│ USERNAME │ CREATED AT │ LAST UPDATED │ SOURCE │ TYPE │
├───────────────┼──────────────────────┼──────────────────────┼────────┼────────┤
│ devteam1admin │ 2022-08-25T17:50:18Z │ 2022-08-25T17:50:18Z │ │ native │
└───────────────┴──────────────────────┴──────────────────────┴────────┴────────┘
Deleting a User
Using the admin credential, or a credential that has a user management role assigned for an account, you can delete a user with the following command. In this example, we’re using the admin credential to delete a user in the ‘devteam1’ account:
ANCHORECTL_USERNAME=admin ANCHORECTL_ACCOUNT=admin ANCHORECTL_PASSWORD=foobar anchorectl user delete devteam1admin --account devteam1
✔ Deleted user
No results
Updating a User Password
Note that only system admins can execute this for a different user/account.
As an admin, to reset another users credentials:
# ANCHORECTL_USER_PASSWORD=n3wp4ssw0rd anchorectl user set-password devteam1admin --account devteam1
✔ User password set
Type: password
Value: ***********
Created At: 2022-08-25T17:58:32Z
To update your own password:
# ANCHORECTL_USERNAME=devteam1admin ANCHORECTL_PASSWORD=existingp4ssw0rd ANCHORECTL_ACCOUNT=devteam1 anchorectl user set-password devteam1admin
❖ Enter new user password : ●●●●●●●●●●●
❖ Retype new user password : ●●●●●●●●●●●
✔ User password set
Type: password
Value: ***********
Created At: 2022-08-25T18:00:35Z
Or, to perform the operation fully-scripted, you can set the new password as an environment variable:
ANCHORECTL_USERNAME=devteam1admin ANCHORECTL_PASSWORD=existingp4ssw0rd ANCHORECTL_ACCOUNT=devteam1 ANCHORECTL_USER_PASSWORD=n3wp4ssw0rd anchorectl user set-password devteam1admin
✔ User password set
Type: password
Value: ***********
Created At: 2022-08-25T18:01:19Z
5 - Monitoring
After you have installed Anchore Enterprise, there are various ways to monitor its operations:
5.1 - System Health
Overview
Added in Anchore Enterprise 2.2, the Health section within the System tab is an administrator’s new display for investigating the operational status of their system’s various services and feeds. Leverage this view to understand when your system is ready or if it requires intervention.
The following sections in this document describe how to determine system readiness, the state of your services, and the progression of your feed sync.
For more information on the overall architecture of a full Anchore Enterprise deployment, please refer to the Architecture documentation. Or refer to the Feeds Overview if you’re interested in the feeds-side of things.
System Readiness
Ready
(Tentatively) Ready
Not Ready
The indicator for system readiness can be seen from any screen by viewing the System tab header:
The system readiness status relies on the service and feed data which are routinely updated every 5 minutes. Using the example indicator provided above, once all the feed groups are successfully synced, the status icon will turn green.
For up-to-date information outside of the normal update cycle, navigate to the Health section within the System tab and click on Refresh Service Health, Refresh Feed Data, or manually refresh the page.
Services
As shown above and as of 2.2, there are five services required by the system to function (API, Catalog, Policy Engine, SimpleQueue, and Analyzer).
For every service, the Base URL, Host ID, and Version is displayed. As long as one instance of each service is up and available, the main system is regarded as ready. In the example image provided above, we see that we have multiple instances of the Policy Engine and Analyzer services.
For the full, filterable list of instances for that service, click on the numbers provided. In the case of the Policy Engine, that would be the 1/2 Available.
Note that orphaned services are filtered out by default in this view (with a toggle to include it again) but will still impact the availability count on the main page.
In the case of service errors, they are logged within the Events & Notifications tab so we recommend following up there for more information or browse our Troubleshooting documentation for remediation guidance.
Feeds Sync
Listed in this section are the various feed groups your system relies on for vulnerability and package data. This data comes from a variety of upstream sources which is vital for policy engine operations such as evaluating policies or listing vulnerabilities.
As shown, you can keep track of your sync progression using the Last Sync column. To manually update the feed data displayed outside of its normal 5-minute cycle, click the Refresh Feed Data button or refresh the page.
If you’d rather have them grouped by feed rather than listed out individually, you can toggle the layout from list to cards using the buttons in the top-right corner above the table:
Similar to the service cards, if you decide to have them grouped as we show below using the layout buttons, you can click on the number of groups synced to view the full, filterable list within.
When viewing a list of feed groups - whether through the default list or through a specific feed card - you can filter for a specific value using the input provided or click on the button attached to filter by category. In this case, groups can be filtered by whether they are synced or unsynced.
In the case of feed sync errors, they are logged within the Events & Notifications tab so we recommend following up there for more information or browse our Troubleshooting documentation for remediation guidance.
Or if you’re interested in an overview of the various drivers Enterprise Feeds uses, check out our Feeds Overview.
5.2 - Prometheus
Anchore Enterprise exposes prometheus metrics in the API of each service if the
config.yaml that is used by that service has the metrics.enabled key set to
true.
Each service exports its own metrics and is typically scraped by a Prometheus
installation to gather the metrics. Anchore does not aggregate or distribute
metrics between services. You should configure your Prometheus deployment or
integration to check each Anchore service’s API using the same port it exports
for the /metrics route.
Monitoring in Kubernetes and/or Helm Chart
Prometheus is very commonly used for monitoring Kubernetes clusters. Prometheus
is supported by core Kubernetes services. There are many guides on using
Prometheus to monitor a cluster and services deployed within, and also many
other monitoring systems can consume Prometheus metrics.
The Anchore Helm Chart includes a quick way to enable the Prometheus metrics on
each service container:
Set:
helm install --name myanchore anchore/anchore-engine --set anchoreGlobal.enableMetrics=true
Or, set it directly in your customized values.yaml
The specific strategy for monitoring services with prometheus is outside the
scope of this document. But, because Anchore exposes metrics on the /metrics
route of all service ports, it should be compatible with most monitoring
approaches (daemon sets, side-cars, etc).
Metrics of Note
Anchore services export a range of metrics. The following list shows some
Anchore services that can help you determine the health and load of an Anchore
deployment.
- anchore_queue_length, specifically for queuename: “images_to_analyze”
- This is the number of images pending analysis, in the not_analyzed state.
- As this number grows you can expect longer analysis times.
- Adding more analyzers to a system can help drain the queue faster and keep
wait times to a minimum.
- Example:
anchore_queue_length{instance=“engine-simpleq:8228”,job=“anchore-simplequeue”,queuename=“images_to_analyze”}.
- This metric is exported from all simplequeue service instances, but is based
on the database state, so they should all present a consistent view of the
length of the queue.
- anchore_monitor_runtime_seconds_count
- These metrics, one for each monitor, record the duration of the async
processes as they execute on a duty cycle.
- As the system grows, these will become longer to account for more tags to
check for updates, repos to scan for new tags, and user notifications to
process.
- anchore_tmpspace_available_bytes
- This metric tracks the available space in the “tmp_dir” location for each
container. This is most important for the instances that are analyzers where
this can indicate how much disk is being used for analysis and how much
overhead there is for analyzing large images.
- This is expected to be consumed in cycles, with usage growing during
analysis and then flushing upon completion. A consistent growth pattern here
may indicate left over artifacts from analysis failures or a large
layer_cache setting that is not yet full. The layer cache (see Layer
Caching) is located in this space and thus will affect the metric.
- process_resident_memory_bytes
- This is the memory actually consumed by the instance, where each instance is
a service process of Anchore. Anchore is fairly memory intensive for large
images and in deployments with lots of analyzed images due to lots of json
parsing and marshalling, so monitoring this metric will help inform capacity
requirements for different components based on your specific workloads. Lots
of variables affect memory usage, so while we give recommendations in the
Capacity Planning document, there is no substitute for profiling and
monitoring your usage carefully.
5.3 - Event Log
Introduction
The event log subsystem provides the users with a mechanism to inspect asynchronous events occurring across various Anchore Enterprise services. Anchore events include periodically triggered activities such as vulnerability data feed syncs in the policy-engine service, image analysis failures originating from the analyzer service, and other informational or system fault events. The catalog service may also generate events for any repositories or image tags that are being watched, when the engine encounters connectivity, authentication, authorization or other errors in the process of checking for updates. The event log is aimed at troubleshooting most common failure scenarios (especially those that happen during asynchronous engine operations) and to pinpoint the reasons for failures, that can be used subsequently to help with corrective actions. Events can be cleared from anchore-engine in bulk or individually.
The Anchore events (drawn from the event log) can be accessed through the Anchore Enterprise API and AnchoreCTL, or can be emitted as webhooks if your Anchore Enterprise is configured to send webhook notifications. For API usage refer to the document on using the Anchore Enterprise API.
Accessing Events
The anchorectl command can be used to list events and filter through the results, get the details for a specific event and delete events matching certain criteria.
# anchorectl event --help
Event related operations
Usage:
event [command]
Available Commands:
delete Delete an event by its ID or set of filters
get Lookup an event by its event ID
list Returns a paginated list of events in the descending order of their occurrence
Flags:
-h, --help help for event
Use " event [command] --help" for more information about a command.
For help regarding global flags, run --help on the root command
For a list of the most recent events:
anchorectl event list
✔ List events
┌──────────────────────────────────┬──────────────────────────────────────────────┬───────┬─────────────────────────────────────────────────────────────────────────┬─────────────────┬────────────────┬────────────────────┬─────────────────────────────┐
│ UUID │ EVENT TYPE │ LEVEL │ RESOURCE ID │ RESOURCE TYPE │ SOURCE SERVICE │ SOURCE HOST │ TIMESTAMP │
├──────────────────────────────────┼──────────────────────────────────────────────┼───────┼─────────────────────────────────────────────────────────────────────────┼─────────────────┼────────────────┼────────────────────┼─────────────────────────────┤
│ 8c179a3b27a543fe9285cf4feb65561d │ system.image_analysis.registry_lookup_failed │ error │ docker.io/alpine:3.4 │ image_reference │ catalog │ anchore-quickstart │ 2022-08-24T23:08:30.54001Z │
│ 48c18a84575d45efbf5b41e0f3a87177 │ system.image_analysis.registry_lookup_failed │ error │ docker.io/alpine:latest │ image_reference │ catalog │ anchore-quickstart │ 2022-08-24T23:08:30.510193Z │
│ f6084efd159c43a1a0518b6df5e58505 │ system.image_analysis.registry_lookup_failed │ error │ docker.io/alpine:3.12 │ image_reference │ catalog │ anchore-quickstart │ 2022-08-24T23:08:30.480625Z │
│ 4464b8f83df046388152067122c03610 │ system.image_analysis.registry_lookup_failed │ error │ docker.io/alpine:3.8 │ image_reference │ catalog │ anchore-quickstart │ 2022-08-24T23:08:30.450983Z │
...
│ 60f14821ff1d407199bc0bde62f537df │ system.image_analysis.restored_from_archive │ info │ sha256:89020cd33be2767f3f894484b8dd77bc2e5a1ccc864350b92c53262213257dfc │ image_digest │ catalog │ anchore-quickstart │ 2022-08-24T22:53:12.662535Z │
│ cd749a99dca8493889391ae549d1bbc7 │ system.analysis_archive.image_archived │ info │ sha256:89020cd33be2767f3f894484b8dd77bc2e5a1ccc864350b92c53262213257dfc │ image_digest │ catalog │ anchore-quickstart │ 2022-08-24T22:48:45.719941Z │
...
└──────────────────────────────────┴──────────────────────────────────────────────┴───────┴─────────────────────────────────────────────────────────────────────────┴─────────────────┴────────────────┴────────────────────┴─────────────────────────────┘
Note: Events are ordered by the timestamp of their occurrence, the most recent events are at the top of the list and the least recent events at the bottom.
There are a number of ways to filter the event list output (see anchorectl event list --help for filter options):
For troubleshooting events related to a specific event type:
# anchorectl event list --event-type system.analysis_archive.image_archive_failed
✔ List events
┌──────────────────────────────────┬──────────────────────────────────────────────┬───────┬──────────────┬───────────────┬────────────────┬────────────────────┬────────────────────────────┐
│ UUID │ EVENT TYPE │ LEVEL │ RESOURCE ID │ RESOURCE TYPE │ SOURCE SERVICE │ SOURCE HOST │ TIMESTAMP │
├──────────────────────────────────┼──────────────────────────────────────────────┼───────┼──────────────┼───────────────┼────────────────┼────────────────────┼────────────────────────────┤
│ 35114639be6c43a6b79d1e0fef71338a │ system.analysis_archive.image_archive_failed │ error │ nginx:latest │ image_digest │ catalog │ anchore-quickstart │ 2022-08-24T22:48:23.18113Z │
└──────────────────────────────────┴──────────────────────────────────────────────┴───────┴──────────────┴───────────────┴────────────────┴────────────────────┴────────────────────────────┘
To filter events by level such as ERROR or INFO:
anchorectl event list --level info
✔ List events
┌──────────────────────────────────┬─────────────────────────────────────────────┬───────┬─────────────────────────────────────────────────────────────────────────┬───────────────┬────────────────┬────────────────────┬─────────────────────────────┐
│ UUID │ EVENT TYPE │ LEVEL │ RESOURCE ID │ RESOURCE TYPE │ SOURCE SERVICE │ SOURCE HOST │ TIMESTAMP │
├──────────────────────────────────┼─────────────────────────────────────────────┼───────┼─────────────────────────────────────────────────────────────────────────┼───────────────┼────────────────┼────────────────────┼─────────────────────────────┤
│ 60f14821ff1d407199bc0bde62f537df │ system.image_analysis.restored_from_archive │ info │ sha256:89020cd33be2767f3f894484b8dd77bc2e5a1ccc864350b92c53262213257dfc │ image_digest │ catalog │ anchore-quickstart │ 2022-08-24T22:53:12.662535Z │
│ cd749a99dca8493889391ae549d1bbc7 │ system.analysis_archive.image_archived │ info │ sha256:89020cd33be2767f3f894484b8dd77bc2e5a1ccc864350b92c53262213257dfc │ image_digest │ catalog │ anchore-quickstart │ 2022-08-24T22:48:45.719941Z │
...
Note: Event listing response is paginated, anchorectl displays the first 100 events matching the filters. For all the results use the –all flag.
All available options for listing events:
# anchorectl event list --help
Returns a paginated list of events in the descending order of their occurrence. Optional query parameters may be used for filtering results
Usage:
event list [flags]
Flags:
--all return all events (env: ANCHORECTL_EVENT_ALL)
--before string return events that occurred before the ISO8601 formatted UTC timestamp
(env: ANCHORECTL_EVENT_BEFORE)
--event-type string filter events by a prefix match on the event type (e.g. "user.image.")
(env: ANCHORECTL_EVENT_TYPE)
-h, --help help for list
--host string filter events by the originating host ID (env: ANCHORECTL_EVENT_SOURCE_HOST_ID)
--level string filter events by the level - INFO or ERROR (env: ANCHORECTL_EVENT_LEVEL)
-o, --output string the format to show the results (allowable: [text json json-raw id]; env: ANCHORECTL_FORMAT) (default "text")
--page int32 return the nth page of results starting from 1. Defaults to first page if left empty
(env: ANCHORECTL_PAGE)
--resource-type string filter events by the type of resource - tag, imageDigest, repository etc
(env: ANCHORECTL_EVENT_RESOURCE_TYPE)
--service string filter events by the originating service (env: ANCHORECTL_EVENT_SOURCE_SERVICE_NAME)
--since string return events that occurred after the ISO8601 formatted UTC timestamp
(env: ANCHORECTL_EVENT_SINCE)
For help regarding global flags, run --help on the root command
Event listing displays a brief summary of the event, to get more detailed information about the event such as the host where the event has occurred or the underlying the error:
# anchorectl event get c31eb023c67a4c9e95278473a026970c
✔ Fetched event
UUID: c31eb023c67a4c9e95278473a026970c
Event:
Event Type: system.image_analysis.registry_lookup_failed
Level: error
Message: Referenced image not found in registry
Resource:
Resource ID: docker.io/aerospike:latest
Resource Type: image_reference
User Id: admin
Source:
Source Service: catalog
Base Url: http://catalog:8228
Source Host: anchore-quickstart
Request Id:
Timestamp: 2022-08-24T22:08:28.811441Z
Category:
Details: cannot fetch image digest/manifest from registry
Created At: 2022-08-24T22:08:28.812749Z
Clearing Events
Events can be cleared/deleted from the system in bulk or individually. Bulk deletion allows for specifying filters to clear the events within a certain time window. To delete all events from the system:
# anchorectl event delete --all
Use the arrow keys to navigate: ↓ ↑ → ←
? Are you sure you want to delete all events:
▸ Yes
No
⠙ Deleting event
c31eb023c67a4c9e95278473a026970c
329ff24aa77549458e2656f1a6f4c98f
649ba60033284b87b6e3e7ab8de51e48
4010f105cf264be6839c7e8ca1a0c46e
...
Delete events before a specified timestamp (can also use --since instead of --before to delete events that were generated after a specified timestamp):
# anchorectl event delete --before 2022-08-24T22:08:28.629543Z
✔ Deleted event
ce26f1fa1baf4adf803d35c86d7040b7
081394b6e62f4708a10e521a960c54d7
d21b587dea5844cc9c330ba2b3d02d2e
7784457e6bf84427a175658f134f3d6a
...
Delete a specific event:
# anchorectl event delete fa110d517d2e43faa8d8e2dfbb0596af
✔ Deleted event
fa110d517d2e43faa8d8e2dfbb0596af
Sending Events as Webhook Notifications
In addition to access via API and AnchoreCTL, the Anchore Enterprise may be configured to send notifications for events as they are generated in the system via its webhook subsystem. Webhook notifications for event log records is turned off by default. To turn enable the ’event_update’ webhook, uncomment the ’event_log’ section under ‘services->catalog’ in config.yaml, as in the following example:
services:
...
catalog:
...
event_log:
notification:
enabled: True
# (optional) notify events that match these levels. If this section is commented, notifications for all events are sent
level:
- error
Note: In order for events to be sent via webhook notifications, you’ll need to ensure that the webhook subsystem is configured in config.yaml (if it isn’t already) - refer to the document on subscriptions and notifications for information on how to enable webhooks in Anchore Enterprise. Event notifications will be sent to ’event_update’ webhook endpoint if it is defined, and the ‘general’ webhook endpoint otherwise.
Events via the UI
The Events tab is your gateway to current and historical activity happening in your system. View various events such as policy evaluation and vulnerability updates, system errors, feed syncs, and more.
The following sections in this document describe how to view event details, how to filter for specific events you’re interested in, and how to manage events with bulk deletion.

Viewing Events
In order to view events, navigate to the Events & Notifications > View Events tab. By default, the most recent activity (up to 1000 events) is shown and is automatically updated for you every 5 minutes. Note that if you have applied any filters through the search bar, your results will need to be refreshed manually.
Top-level details such as the event’s level (whether it’s an INFO or ERROR event), type, message, and affected resource is shown. Dig in to a specific event by clicking View Details under its Actions column to expand the row.

Additional information such as the origininating service and host ID are available in the expanded row. Any details given by the service are also provided in JSON format to view or copy to clipboard.
Filtering Events

Often, you might want to search for a specific event type or events that happened after a certain time. In this case, use the Search Events bar near the top of the page to select a filter to search on. These include:
- Level
- Filter events by level - INFO or ERROR
- Event Type
- Filter events by a match on the event type (e.g. “user.image.*”)
- Since
- Return events that occurred after the timestamp
- Before
- Return events that occurred before the timestamp
- Source Servicename
- Filter events by the originating service
- Source Host ID
- Filter events by the originating host ID
- Resource Type
- Filter events by the type of resource - tag, imageDigest, repository, etc.
- Resource ID
- Filter events by the id of the resource
Once you have selected and populated the filter fields you’re interested in, click Apply Filters to search and show those filtered results.
An alternative way to filter your results is through the in-table filter input. Note that this only applies against any data already fetched. To increase what you’re filtering on, click Fetch More near the top-right of the table for up to an additional 1000 items.
To remove any filters and reset to the default view, click Clear Filters.
Deleting Events
To assist with event management, event deletion has been added in the Enterprise 2.3 release.
Deleting individual events can be done simply through clicking Delete under the Actions column and selecting Yes to confirm. Note that after deletion, events are not recoverable.
Multi-select is available for deleting multiple events at a time. Upon selecting an event using the checkbox in the far-left column, a toolbar-like component will slide in at the bottom of the table. The number of events selected is shown along with the selection type, Clear Selection, and Delete Events options.
Checking the box in the header will select all events within that page.

By default, it is viewed as a Custom selection. Choosing to select All Retrieved events auto-selects everything already fetched and present in the table (i.e. if a filter is applied, events not matching the filter are not selected but will be upon removal of the filter). In this state, deselecting an item will trigger a custom selection again.
Selecting All events will again auto-select all events already fetched and present in the table but while applying a filter may modify what’s viewable, this option is solely for clearing the entire backlog of events - including those not shown. In this state, deselecting an item will also trigger a custom selection.
Once you have selected the events you wish to remove, click Delete Events to open a modal and review up to 50 items. Any events you don’t wish to delete anymore can be deselected as well. To continue with removal, click Yes to confirm and start the process.
Note that events are account-wide and that any events removed will be mirrored across all users in the account.
6 - Upgrading Anchore Enterprise
Upgrading from one version of Anchore Enterprise to another is normally handled seamlessly by the Helm chart or the docker compose configuration files that are provided along with each release. Those follow the general methods from this guide. See Specific Instructions section for special instructions related to specific versions.
Upgrade scenarios
Anchore Enterprise is distributed as a docker image, which is composed of smaller micro-services that can be deployed in a single container or scaled out to handle load.
To retrieve the version of a running instance of Anchore, the anchorectl system status command can be run. The last column titled “CODE VERSION”, will display the running version of each service.
anchorectl system status
✔ Status system
┌─────────────────┬────────────────────┬─────────────────────────────┬──────┬────────────────┬────────────┬──────────────┐
│ SERVICE │ HOST ID │ URL │ UP │ STATUS MESSAGE │ DB VERSION │ CODE VERSION │
├─────────────────┼────────────────────┼─────────────────────────────┼──────┼────────────────┼────────────┼──────────────┤
│ analyzer │ anchore-quickstart │ http://analyzer:8228 │ true │ available │ 25 │ 4.9.5 │
│ apiext │ anchore-quickstart │ http://api:8228 │ true │ available │ 25 │ 4.9.5 │
│ rbac_manager │ anchore-quickstart │ http://rbac-manager:8228 │ true │ available │ 25 │ 4.9.5 │
│ notifications │ anchore-quickstart │ http://notifications:8228 │ true │ available │ 25 │ 4.9.5 │
│ catalog │ anchore-quickstart │ http://catalog:8228 │ true │ available │ 25 │ 4.9.5 │
│ rbac_authorizer │ anchore-quickstart │ http://rbac-authorizer:8228 │ true │ available │ 25 │ 4.9.5 │
│ reports_worker │ anchore-quickstart │ http://reports-worker:8228 │ true │ available │ 25 │ 4.9.5 │
│ reports │ anchore-quickstart │ http://reports:8228 │ true │ available │ 25 │ 4.9.5 │
│ simplequeue │ anchore-quickstart │ http://queue:8228 │ true │ available │ 25 │ 4.9.5 │
│ policy_engine │ anchore-quickstart │ http://policy-engine:8228 │ true │ available │ 25 │ 4.9.5 │
└─────────────────┴────────────────────┴─────────────────────────────┴──────┴────────────────┴────────────┴──────────────┘
In this example the Anchore version is 4.9.5 and the database schema is version 25. In cases where the database schema is changed between releases, Anchore will upgrade the database schema at launch.
Pre-upgrade Procedure
Prior to upgrading Anchore, it is highly recommended to perform a database backup/snapshot by stopping your Anchore installation, and backup the database in its entirety. There is no automatic downgrade capability, thus the only way to downgrade after an upgrade (whether it succeeds or fails) is to restore your database contents to a state from a prior version of Anchore, and explicitly run the compatible version of Anchore against the corresponding database contents.
Whether you wish to have the ability to downgrade or not, we recommend backing up your Anchore database prior to upgrading the software as a best practice.
Upgrade Procedure (for deployments using Helm)
A Helm pre-upgrade hook initiates a Kubernetes job that scales down all active Anchore Enterprise pods and handles the Anchore database upgrade.
The Helm upgrade is marked as successful only upon the job’s completion. This process causes the Helm client to pause until the job finishes and new Anchore Enterprise pods are initiated. To monitor the upgrade, follow the logs of the upgrade jobs. These jobs are automatically removed after a subsequent successful Helm upgrade.
An optional post-upgrade hook is available to perform Anchore Enterprise upgrades without forcing all pods to terminate prior to running the upgrade. This is the same upgrade behavior that was enabled by default in the legacy anchore-engine chart. To enable the post-upgrade hook, set upgradeJob.usePostUpgradeHook=true in your values file.
For the latest upgrade instructions using the Helm chart, please refer to the official Anchore Helm Chart documentation
View the release notes for the latest Anchore Enterprise chart version and perform any necessary steps prior to upgrading.
Update the Helm repository to get the latest chart version.
Upgrade Anchore Enterprise using the Helm chart.
export NAMESPACE=anchore
export RELEASE=my-release
helm upgrade ${RELEASE} -n ${NAMESPACE} anchore/enterprise -f anchore_values.yaml
Upgrade Procedure (example with docker compose)
Stop all running instances of Anchore
Make a copy of your original docker-compose.yaml file as backup
cp docker-compose.yaml docker.compose.yaml.backup
Download the latest docker-compose.yaml
curl https://docs.anchore.com/current/docs/deployment/docker_compose/docker-compose.yaml > docker-compose.yaml
Review the latest docker-compose.yaml and merge any edits/changes from your original docker-compose.yaml.backup to the latest docker-compose.yaml
Restart the Anchore containers
To monitor the progress of your upgrade, you can watch the docker logs from your catalog container, where you should see some initial output indicating whether or not an upgrade is needed or being performed, followed by the regular Anchore log output.
docker compose logs -f catalog
Once completed, you can review the new state of your Anchore install to verify the new version is running using the regular system status command.
Advanced / Manual Upgrade Procedure
If for any reason the automated upgrade fails, or you would like to perform the upgrade of the anchore database manually, you can use the following (general) procedure. This should only be done by advanced operators after backing up the anchore database, ensuring that the anchore database is up and running, and that all running anchore components are stopped.
- Install the desired Anchore container manually.
- Run the Anchore container but override the entrypoint to run an interactive shell instead of the default ‘anchore-manager service start’ entrypoint command.
- Manually execute the database upgrade command, using the appropriate db_connect string. For example, if using Postgres, the db_connect string will look like
postgresql://$ANCHORE_DB_HOST/$ANCHORE_DB_NAME?user=$ANCHORE_DB_USER&password=$ANCHORE_DB_PASSWORD
$ anchore-manager db --db-connect "postgresql://$ANCHORE_DB_HOST/$ANCHORE_DB_NAME?user=$ANCHORE_DB_USER&password=$ANCHORE_DB_PASSWORD" upgrade
[MainThread] [anchore_manager.cli.utils/connect_database()] [INFO] DB params: {"db_connect_args": {"timeout": 86400, "ssl": false}, "db_pool_size": 30, "db_pool_max_overflow": 100}
[MainThread] [anchore_manager.cli.utils/connect_database()] [INFO] DB connection configured: True
[MainThread] [anchore_manager.cli.utils/connect_database()] [INFO] DB attempting to connect...
[MainThread] [anchore_manager.cli.utils/connect_database()] [INFO] DB connected: True
...
...
- The output will indicate whether or not a database upgrade is needed. It will then prompt for confirmation if it is, and will display upgrade progress output before completing.
Specific Version Upgrades
This section is intended as a guide for any special instructions and information related to upgrading to specific versions of Enterprise.
Upgrading Enterprise v4.x to Enterprise v5.7.0
5.X Migration Guide
Upgrading Enterprise to 4.4.1
If you are upgrading from an Anchore Enterprise version prior to 4.2.0, there is a known issue that will require you to upgrade to 4.2.0 or 4.3.0 first. Once completed, you will have no issues upgrading to 4.4.1. Please contact Anchore Support if you need further assistance.
Please Note: This issue was addressed in 4.5.0. Upgrading from a version prior to 4.2.0 will succeed in 4.5.0 and newer releases.
6.1 - v4.x --> v5.x Migration Guide
This guide will help you understand, plan, and execute the migration of your Anchore deployment from
Enterprise v4.x --> Enterprise v5.7.0
The Enterprise v5.x Major Release involved several breaking changes. The migration to a v5.x release can be more complex than the regular Anchore feature release upgrade.
There are four significant component changes required to migrate to Enterprise v5.7.0 that each have their own migration paths. This document will help you migrate all components in a safe and downtime-minimizing way.
The components are:
- Anchore Enterprise: provides a new V2 API.
- v5.7.0 only supports the new V2 API
- v4.9.x supports both V1 and V2 APIs
- PostgreSQL Database: required version 13+ for Enterprise v5.7.0
- Enterprise Helm Chart:
- v5.7.0 can be deployed only with the new enterprise Helm chart.
- The older anchore-engine chart will be at end-of-life with the 4.x series.
- Integrations & Clients: all Anchore-provided integrations have new released versions that are compatible with v5.7.0 and support the new V2 API.
This guide will walk you through the process to go from this starting state.
Pre Migration: <= v4.8 with V1 API Only
graph
anchore("Enterprise <= v4.8 w/V1 API")
db[("PostgreSQL 9.6")]
chart["anchore-engine chart"]
ctl["anchorectl v1.x"]
anchore --uses--> db
chart --deploys--> anchore
ctl --v1 api calls-->anchoreTo this ending state where you are in production running Enterprise v5.7.0.
Post Migration: Full v5.7.0 with V2 API Only
graph
anchore("Enterprise v5.7.0 w/V2 API")
db[("PostgreSQL 13+")]
chart["enterprise chart"]
ctl["anchorectl v5.7.0"]
anchore --uses--> db;
chart --deploys--> anchore
ctl --v2 api calls-->anchoreNote: The upgrade to v4.9.x is very strongly recommended for all deployments as a key part of the migration process to v5.7.0. If you use ANY integrations or API calls you should use v4.9.x and its dual-API support as the version of Anchore to run while you migrate all you integrations to use the V2 API.
Planning Your Migration
Timing: Each phase has different duration expectations, and below we’ll review the expectations and process for each phase of the migration. You should expect and plan for downtime for each phase except the client API migrations, which are done while the system is running.
The migration may be a multi-day process since it involves things like client migrations that may take days or weeks depending on your org and how many other systems are integrated with your Anchore deployment.
Combining Phases: Phases can be combined if you wish to use a smaller number of larger maintenance windows. Since
combining phases increases the complexity of each phase and associated risk of misconfigurations or errors, the combination should be carefully considered for your specific needs and risk tolerance.
Migration Path 1: Chart-Managed Database
If you have PostgreSQL deployed in Kubernetes using the Anchore-Engine Helm Chart, then this is the migration path for you.
graph
subgraph Start
%% Start at v4.8.x or earlier, using postgres 9.6 and the anchore-engine helm chart
anchore4("Enterprise <= v4.8.x")
pg9[("PostgreSQL 9.6")]
engineChart["anchore-engine chart"]
anchorectl("anchorectl v1.7.x") --V1 api calls--> anchore4
anchore4 --uses--> pg9
engineChart --deploys--> anchore4
end
subgraph step1[Latest Enterprise v4.9.x]
%% Upgrade to v4.9.x for V2 API
anchore49_1("Enterprise v4.9.x")
pg9_2[("PostgreSQL 9.6")]
engineChart1["anchore-engine chart"]
anchore49_1 --uses--> pg9_2
anchorectl3("anchorectl v1.8.x") --V1 api calls--> anchore49_1
engineChart1 --deploys--> anchore49_1
end
subgraph step2[Chart and DB Migrated]
%% Migrate to new Chart & DB Migration to PG13, no Anchore version change
anchore49("Enterprise = v4.9.x")
pg13[("PostgreSQL 13+")]
pg96[("PostgreSQL 9.6")]
engineChart2["anchore-engine chart"]
enterpriseChart["enterprise chart"]
engineChart2 --uses--> pg96
pg96 --migrates to--> pg13
anchore49 --uses--> pg13
anchorectl2("anchorectl v1.8.x") --V1 api calls--> anchore49
enterpriseChart --deploys--> anchore49
end
subgraph step3[Integrations Migrated]
%% Upgrade integrations/AnchoreCTL
anchoreInter3("Enterprise v4.9.x")
engineChart3["anchore-engine chart"]
enterpriseChart2["enterprise chart"]
pg13_4[("PostgreSQL 13+")]
pg96_2[("PostgreSQL 9.6")]
engineChart3 --> pg96_2
anchoreInter3 --> pg13_4
anchorectl5("anchorectl v4.9.x") --V2 api calls--> anchoreInter3
enterpriseChart2 --deploys--> anchoreInter3
end
subgraph finish["Enterprise v5.7.0"]
%% Upgrade to v5.7.0
anchore5("Enterprise v5.7.0")
enterpriseChart3["enterprise chart"]
pg13_5[("PostgreSQL 13+")]
anchore5 --> pg13_5
anchorectl6("anchorectl v5.7.0") --V2 api calls--> anchore5
enterpriseChart3 --deploys--> anchore5
end
Start --Upgrade Anchore Enterprise to latest v4.9.x release--> step1;
step1 --Migrate to Enterprise Chart and PG13+ DB--> step2;
step2 --Migrate integrations & anchorectl to use V2 API--> step3;
step3 --Upgrade Anchore Enterprise to v5.7.0 & delete 4.0.x deployment--> finish;Step 1: Upgrade Anchore Enterprise to latest v4.9.x Release
Downtime: Required
Upgrade your Anchore deployment to v4.9.x. This is an important step for several reasons:
- It is supported by both the legacy
anchore-engine helm chart and the new enterprise helm chart - It supports PostgreSQL 9.6+ and newer (13+), so it provides a stable base to execute the other upgrade steps
- It supports both the V1 and V2 APIs, so you can have a stable Anchore version for updating all your integrations
Upgrade mechanism: normal Anchore Enterprise upgrade process
Step 2: Migrate to Enterprise Chart and PostgreSQL 13
Downtime: Required
Helm Migration Guide
Step 3: Migrate all integrations and clients to V2 API compatible versions
Downtime: None for Anchore itself, but individual integrations may vary
Once your deployment is running v4.9.x you have a stable platform to migrate integrations and clients to using the V2 API of Enterprise. You should perform the upgrades/migrations for the new V2 API in this phase. This phase may last for a while and does not end until all your API calls are using the V2 endpoint instead of V1.
| Integration | Recommended V2 API Compatible Version |
|---|
| AnchoreCTL | v4.9.0 |
| anchore-k8s-inventory | v1.1.1 |
| anchore-ecs-inventory | v1.2.0 |
| Kubernetes Admission Controller | v0.5.0 |
| Jenkins Plugin | v1.1.0 |
| Harbor Scanner Adapter | v1.2.0 |
| enterprise-gitlab-scan | v4.0.0 |
Upgrading AnchoreCTL Usage in CI
The installation script provided via Deploying AnchoreCTL will only automatically deploy new releases that are V1 API compatible, so you need to update use of that script to include specific versions.
For example, use:
curl -sSfL https://anchorectl-releases.anchore.io/anchorectl/install.sh | sh -s -- -b <DESTINATION_DIR> v4.9.0
Confirming V1 API is no longer in use
To verify that all clients have been updated, you can review the logs from the API containers in your v4.9.x deployment. We recommend that you monitor for multiple days to verify there are no periodic processes that still use the old endpoint.
Step 4: Upgrade to Enterprise v5.7.0
Downtime: required
Helm Upgrade Guide
Upgrading AnchoreCTL
You will want to install the compatible version of AnchoreCTL (v5.7.0) at this time as well.
curl -sSfL https://anchorectl-releases.anchore.io/anchorectl/install.sh | sh -s -- -b <DESTINATION_DIR> v5.7.0
Migration Path 2: External DB
If you deploy PostgreSQL using any mechanism other than the Anchore-provided chart (e.g. AWS RDS, your own DB chart,
Google CloudSQL, etc.), then this is the migration plan for you.
graph
subgraph Start[Enterprise v4.x]
anchoreStart("Enterprise <= v4.8.X")
pg9[("PostgreSQL 9.6")]
engineChart["anchore-engine chart"]
anchorectl("anchorectl v1.7.x") --V1 api calls--> anchoreStart
anchoreStart --uses--> pg9
engineChart --deploys--> anchoreStart
end
subgraph step1[Latest Enterprise v4.9.x]
%% Upgrade to v4.9.x for V2
anchoreInter1("Enterprise v4.9.x")
pg9_2[("PostgreSQL 9.6")]
engineChart2["anchore-engine chart"]
anchoreInter1 --uses--> pg9_2
anchorectl3("anchorectl v1.8.x") --V1 api calls--> anchoreInter1
engineChart2 --deploys--> anchoreInter1
end
subgraph step2[Enterprise Helm Chart]
%% Use new chart
anchoreInter2("Enterprise v4.9.x")
enterpriseChart["enterprise chart"]
pg9_3[("PostgreSQL 9.6")]
anchoreInter2 --> pg9_3
anchorectl4("anchorectl v1.8.x") --V1 api calls--> anchoreInter2
enterpriseChart --deploys--> anchoreInter2
end
subgraph step3[PostgreSQL 13+]
%% Migrate to PG13+ , no Anchore version change
anchoreInter3("Enterprise = v4.9.x")
pg13[("PostgreSQL 13+")]
enterpriseChart2["enterprise chart"]
anchoreInter3 --uses--> pg13
anchorectl2("anchorectl v1.8.x") --V1 api calls--> anchoreInter3
enterpriseChart2 --deploys--> anchoreInter3
end
subgraph step4[Integrations using V2 API]
%% Upgrade integrations/AnchoreCTL
anchoreInter4("Enterprise v4.9.x")
enterpriseChart3["enterprise chart"]
pg13_4[("PostgreSQL 13+")]
anchoreInter4 --> pg13_4
anchorectl5("anchorectl v4.9.x") --V2 api calls--> anchoreInter4
enterpriseChart3 --deploys--> anchoreInter4
end
subgraph finish[Enterprise v5.7.0]
%% Upgrade to v5.7.0
anchore5("Enterprise v5.7.0")
enterpriseChart4["enterprise chart"]
pg13_5[("PostgreSQL 13+")]
anchore5 --> pg13_5
anchorectl6("anchorectl v5.7.0") --V2 api calls--> anchore5
enterpriseChart4 --deploys--> anchore5
end
Start --Upgrade to latest v4.9.x Enterprise--> step1;
step1 --Migrate to Enterprise Helm Chart--> step2;
step2 --Upgrade External DB to PostgreSQL 13+--> step3;
step3 --Migrate Integrations and AnchoreCTL to use V2 API--> step4;
step4 --Upgrade Anchore to v5.7.0 --> finish;Step 1: Upgrade to latest Anchore Enterprise v4.9.x
Downtime: Required
Upgrade your Anchore deployment to v4.9.x. This is an important step for several reasons:
- It is supported by both the legacy
anchore-engine helm chart and the new enterprise helm chart - It supports PostgreSQL 9.6+ and newer (13+), so it provides a stable base to execute the other upgrade steps
- It supports both the V1 and V2 APIs, so you can have a stable Anchore version for updating all your integrations
Step 2: Upgrade PostgreSQL from 9.6.x to 13+
Downtime: Required
Enterprise v5.7.0 requires PostgreSQL 13 or later to run. The DB upgrade process will be specific to your deployment mechanisms and way of running Postgres. Depending on what version of PostgreSQL you are running when you start, there may be multiple DB upgrade operations necessary in PostgreSQL to get to 13+.
However, this upgrade can be done with any Anchore version. All 4.x versions of Anchore already support PostgreSQL 13+, so the DB upgrade can be executed outside any changes to the Anchore deployment itself.
If you are using AWS RDS or another cloud platform for hosting your PostgreSQL database, please refer to their upgrade
documentation for the best practices to upgrade your instance(s) to version 13 or higher.
Step 3: Migrate to Enterprise Helm Chart
Downtime: Required
Helm Migration Guide
Step 4: Upgrade all your integrations/clients to use the V2 API
Downtime: None for Anchore itself, but individual integrations may vary
Once your deployment is running v4.9.x you have a stable platform to migrate integrations and clients to using the V2 API of Enterprise. You should perform the upgrades/migrations for the new V2 API in this phase. This phase may last for a while and does not end until all your API calls are using the V2 endpoint instead of V1.
| Integration | Recommended V2 API Compatible Version |
|---|
| AnchoreCTL | v4.9.0 |
| anchore-k8s-inventory | v1.1.1 |
| anchore-ecs-inventory | v1.2.0 |
| Kubernetes Admission Controller | v0.5.0 |
| Jenkins Plugin | v1.1.0 |
| Harbor Scanner Adapter | v1.2.0 |
| enterprise-gitlab-scan | v4.0.0 |
Upgrading AnchoreCTL Usage in CI
The installation script provided via Deploying AnchoreCTL will only automatically deploy new releases that are V1 API compatible, so you need to update use of that script to include specific versions.
For example, use:
curl -sSfL https://anchorectl-releases.anchore.io/anchorectl/install.sh | sh -s -- -b <DESTINATION_DIR> v4.9.0
Confirming V1 API is no longer in use
To verify that all clients have been updated, you can review the logs from the API containers in your v4.9.x deployment. We recommend that you monitor for multiple days to verify there are no periodic processes that still use the old endpoint.
Step 5: Upgrade to Enterprise v5.7.0
Downtime: required
Helm Upgrade Guide
Upgrading AnchoreCTL
You will want to install the compatible version of AnchoreCTL (v5.7.0) at this time as well.
curl -sSfL https://anchorectl-releases.anchore.io/anchorectl/install.sh | sh -s -- -b <DESTINATION_DIR> v5.7.0
Verifying the Upgrade
Verify the version you’re using of AnchoreCTL
anchorectl version – All users should see v5.7.0 for the AnchoreCTL version
anchorectl system status – The system should return v5.7.0
7 - Troubleshooting
This section contains some general troubleshooting for your Anchore Enterprise instance. When troubleshooting Anchore Enterprise, the recommended approach is to first verify all Anchore services are up, use the event subsystem to narrow down particular issues, and then navigate to the logs for specific services to find out more information.
Throughout this section, AnchoreCTL commands will be executed to assist with troubleshooting. For more information AnchoreCTL, please reference the AnchoreCTL section.
7.1 - Smoke Testing
This term typically refers to a testing methodology which validates critical or crucial functionality of software. Versions of AnchoreCTL post-5.6.0 include a smoke-tests option, which can be used to validate general functionality of your Anchore Enterprise.
We recommend using this mechanism to validate functionality after upgrades.
Tip: the test check-admin-credentials will look for an admin user in the admin account context as defined in your anchorectl.yaml
./anchorectl system smoke-tests run
⠇ Running smoke tests
...
✔ Ran smoke tests
┌───────────────────────────────────────┬─────────────────────────────────────────────────┬────────┬────────┐
│ NAME │ DESCRIPTION │ RESULT │ STDERR │
├───────────────────────────────────────┼─────────────────────────────────────────────────┼────────┼────────┤
│ wait-for-system │ Wait for the system to be ready │ pass │ │
│ check-admin-credentials │ Check anchorectl credentials to run smoke tests │ pass │ │
│ create-test-account │ Create a test account │ pass │ │
│ list-test-policies │ List the test policies │ pass │ │
│ get-test-policy │ Get the test policy │ pass │ │
│ activate-test-default-policy │ Activate the test default policy │ pass │ │
│ create-test-image │ Create a test image and wait for analysis │ pass │ │
│ get-test-image │ Get the test image │ pass │ │
│ activate-test-subscription │ Activate a test subscription │ pass │ │
│ get-test-subscription │ Get the test subscription │ pass │ │
│ deactivate-test-vuln-subscription │ Deactivate the vuln subscription │ pass │ │
│ deactivate-test-policy-subscription │ Deactivate the policy subscription │ pass │ │
│ deactivate-test-tag-subscription │ Deactivate the tag subscription │ pass │ │
│ deactivate-test-analysis-subscription │ Deactivate the analysis subscription │ pass │ │
│ check-test-image │ Check the test image │ pass │ │
│ get-test-image-vulnerabilities │ Get the test image vulnerabilities │ pass │ │
│ delete-test-image │ Delete the test image │ pass │ │
│ disable-test-account │ Disable the test account │ pass │ │
│ delete-test-account │ Delete the test account │ pass │ │
└───────────────────────────────────────┴─────────────────────────────────────────────────┴────────┴────────┘
7.2 - Viewing Logs
Anchore services produce detailed logs that contain information about user interactions, internal processes, warnings and errors. The verbosity of the logs is controlled using the log_level setting in config.yaml (for manual installations) or the corresponding ANCHORE_LOG_LEVEL environment variable (for docker compose or Helm installations) for each service.
The log levels are DEBUG, INFO, WARN, ERROR, and FATAL, where the default is INFO. Most of the time, the default level is sufficient as the logs will container WARN, ERROR and FATAL messages as well. But for deep troubleshooting, it is always recommended to increase the log level to DEBUG in order to ensure the availability of the maximum amount of information.
Anchore logs can be accessed by inspecting the docker logs for any anchore service container using the regular docker logging mechanisms, which typically default to displaying to the stdout/stderr of the containers themselves - for example:
# docker ps
...
33c809f1803a anchore/anchore-engine:latest "/docker-entrypoint.…" 22 hours ago Up 22 hours (healthy) 8228/tcp aevolume_engine-catalog_1
...
# docker logs aevolume_engine-analyzer_1
[service:worker] 2019-12-06 00:54:20+0000 [-] [MainThread] [anchore_engine.twisted/makeService()] [INFO] Initializing configuration
[service:worker] 2019-12-06 00:54:20+0000 [-] [MainThread] [anchore_engine.twisted/makeService()] [INFO] Initializing logging
[service:worker] 2019-12-06 00:54:20+0000 [-] [MainThread] [anchore_engine.service/initialize()] [DEBUG] Invoking instance-specific handler registration
[service:worker] 2019-12-06 00:54:20+0000 [-] [MainThread] [anchore_engine.service/_register_instance_handlers()] [INFO] Registering api handlers
[service:worker] 2019-12-06 00:54:20+0000 [-] [MainThread] [anchore_engine.service/_process_stage_handlers()] [INFO] Processing init handlers for bootsrap stage: pre_config
[service:worker] 2019-12-06 00:54:20+0000 [-] [MainThread] [anchore_engine.service/_process_stage_handlers()] [DEBUG] Executing 0 stage pre_config handlers
[service:worker] 2019-12-06 00:54:20+0000 [-] [MainThread] [anchore_engine.service/_configure()] [INFO] Loading and initializing global configuration
[service:worker] 2019-12-06 00:54:20+0000 [-] [MainThread] [anchore_engine.service/_configure()] [INFO] Configuration complete
...
...
The logs themselves are also persisted as logfiles inside the Anchore service containers. Executing a shell into any Anchore service container and navigating to /var/log/anchore, you will find the service log files. For example, using the same analyzer container service as described previously.
# docker exec -t -i aevolume_engine-analyzer_1 /bin/bash
[anchore@687818c10b93 anchore-engine]$ cat /var/log/anchore/anchore-worker.log
2019-12-06 00:54:20+0000 [-] [MainThread] [anchore_engine.twisted/makeService()] [INFO] Initializing configuration
2019-12-06 00:54:20+0000 [-] [MainThread] [anchore_engine.twisted/makeService()] [INFO] Initializing logging
2019-12-06 00:54:20+0000 [-] [MainThread] [anchore_engine.service/initialize()] [DEBUG] Invoking instance-specific handler registration
2019-12-06 00:54:20+0000 [-] [MainThread] [anchore_engine.service/_register_instance_handlers()] [INFO] Registering api handlers
2019-12-06 00:54:20+0000 [-] [MainThread] [anchore_engine.service/_process_stage_handlers()] [INFO] Processing init handlers for bootsrap stage: pre_config
2019-12-06 00:54:20+0000 [-] [MainThread] [anchore_engine.service/_process_stage_handlers()] [DEBUG] Executing 0 stage pre_config handlers
2019-12-06 00:54:20+0000 [-] [MainThread] [anchore_engine.service/_configure()] [INFO] Loading and initializing global configuration
2019-12-06 00:54:20+0000 [-] [MainThread] [anchore_engine.service/_configure()] [INFO] Configuration complete
...
...
If you are using Kubernetes to run Anchore Enterprise, you can retrieve the logs from the service pods directly using kubectl commands:
Tip: You can find the desired pod name with kubectl get pods
# k8s-inventory kubectl logs -n <your-namespace> <your-anchore-pod-name>
[uvicorn:anchore-enterprise-apiext] [2024-06-05T19:26:51.508107+00:00] [MainProcess] [MainThread] [INFO] [asyncio.runners/run():190] | 10.244.1.1:55706 - "GET /health HTTP/1.1" 200
[uvicorn:anchore-enterprise-apiext] [2024-06-05T19:26:54.080546+00:00] [MainProcess] [MainThread] [INFO] [asyncio.runners/run():190] | 10.244.1.2:56838 - "GET /health HTTP/1.1" 200
[uvicorn:anchore-enterprise-apiext] [2024-06-05T19:26:54.085999+00:00] [MainProcess] [MainThread] [INFO] [asyncio.runners/run():190] | 10.244.1.2:56854 - "GET /health HTTP/1.1" 200
[uvicorn:anchore-enterprise-apiext] [2024-06-05T19:26:54.089404+00:00] [MainProcess] [MainThread] [INFO] [asyncio.runners/run():190] | 10.244.1.2:56860 - "GET /version HTTP/1.1" 200
[uvicorn:anchore-enterprise-apiext] [2024-06-05T19:26:56.773285+00:00] [MainProcess] [MainThread] [INFO] [asyncio.runners/run():190] | 10.244.1.1:46424 - "GET /health HTTP/1.1" 200
[uvicorn:anchore-enterprise-apiext] [2024-06-05T19:27:00.508614+00:00] [MainProcess] [MainThread] [INFO] [asyncio.runners/run():190] | 10.244.1.5:59244 - "POST /v2/kubernetes-inventory HTTP/1.1" 201
7.3 - Verifying Anchore Enterprise System Events
If you’ve successfully verified that all Anchore Enterprise services are up, but are still running into issues operating Anchore, a good place check is the event log.
The event log subsystem provides users with a mechanism to inspect asynchronous events occurring across various Anchore Enterprise services. Anchore events include periodically-triggered activities such as vulnerability data feed sync in the policy_engine service, image analysis failures originating from the analyzer service, and other informational or system fault events. The catalog service may also generate events for any repositories or image tags that are being watched when Anchore Enterprise encounters connectivity, authentication, authorization, or other errors in the process of checking for updates.
The event log is aimed at troubleshooting most common failure scenarios, especially those that happen during asynchronous operations, and to pinpoint the reasons for failures that can be used subsequently to help with corrective actions. Events can be cleared from Anchore Enterprise in bulk or individually.
Viewing Events
Running the following command will give a list of recent Anchore events: anchorectl event list
# Viewing list of recent Anchore events
# anchorectl event list
✔ List events
┌──────────────────────────────────┬──────────────────────────────────────────────┬───────┬───────────────────────────────────────────────────────┬─────────────────┬────────────────┬────────────────────┬─────────────────────────────┐
│ UUID │ EVENT TYPE │ LEVEL │ RESOURCE ID │ RESOURCE TYPE │ SOURCE SERVICE │ SOURCE HOST │ TIMESTAMP │
├──────────────────────────────────┼──────────────────────────────────────────────┼───────┼───────────────────────────────────────────────────────┼─────────────────┼────────────────┼────────────────────┼─────────────────────────────┤
│ 329ff24aa77549458e2656f1a6f4c98f │ system.image_analysis.registry_lookup_failed │ error │ dockerr.io/alpine:3.4 │ image_reference │ catalog │ anchore-quickstart │ 2022-08-24T22:08:29.026352Z │
│ 4010f105cf264be6839c7e8ca1a0c46e │ system.image_analysis.registry_lookup_failed │ error │ dockerr.io/alpine:latest │ image_reference │ catalog │ anchore-quickstart │ 2022-08-24T22:08:28.991101Z │
│ 6924eb83313746ff8b842a88654e3ac1 │ system.image_analysis.registry_lookup_failed │ error │ dockerr.io/alpine:3.12 │ image_reference │ catalog │ anchore-quickstart │ 2022-08-24T22:08:28.956321Z │
│ efdcf727647c458f85cb6464926e474d │ system.image_analysis.registry_lookup_failed │ error │ dockerr.io/nginx:latest │ image_reference │ catalog │ anchore-quickstart │ 2022-08-24T22:08:28.920222Z │
...
│ 1eb04509b2bc44208cdc7678eaf76fef │ user.image.analysis.completed │ info │ docker.io/ubuntu:latest │ image_tag │ analyzer │ anchore-quickstart │ 2022-08-24T22:06:13.736004Z │
│ 6f735f8db7e84ce19b221d3b024318af │ user.image.analysis.processing │ info │ docker.io/ubuntu:latest │ image_tag │ analyzer │ anchore-quickstart │ 2022-08-24T22:06:13.128912Z │
│ 480eb191f87440b48c9f8cfa6529badf │ user.image_tag.added │ info │ docker.io/ubuntu:latest │ image_tag │ catalog │ anchore-quickstart │ 2022-08-24T22:06:08.307039Z │
...
└──────────────────────────────────┴──────────────────────────────────────────────┴───────┴───────────────────────────────────────────────────────┴─────────────────┴────────────────┴────────────────────┴─────────────────────────────┘
Details about a specific event
If you would like more information about a specific event, you can run the following command: anchorectl event get <event-id>
# Details about a specific Anchore event
# anchorectl event get 1eb04509b2bc44208cdc7678eaf76fef
✔ Fetched event
UUID: 1eb04509b2bc44208cdc7678eaf76fef
Event:
Event Type: user.image.analysis.completed
Level: info
Message: Image analysis available
Resource:
Resource ID: docker.io/ubuntu:latest
Resource Type: image_tag
User Id: admin
Source:
Source Service: analyzer
Base Url: http://analyzer:8228
Source Host: anchore-quickstart
Request Id:
Timestamp: 2022-08-24T22:06:13.736004Z
Category:
Details:
Created At: 2022-08-24T22:06:13.832881Z
Note: Depending on the output from the detailed events, looking into the logs for a particular servicename (example: policy_engine) is the next troubleshooting step.
7.4 - Verifying Feeds
Anchore Enterprise runs a feed service which downloads vulnerability data from a number of configurable sources.
This data is stored on disk and is processed into a holistic vulnerability dataset. Once built and compiled, the dataset is stored in a postgres database and served to other Anchore Enterprise application services via an API endpoint.
The API endpoint is periodically queried by the policy service to fetch the latest dataset.
If a newer vulnerability dataset is available, the policy service will download and propagate the new dataset across all instances/pods. This updated data is used to generate vulnerability analysis results.
The accuracy of vulnerability analysis is determined by the ability for your Anchore Enterprise deployment to download, store and distribute this feed data. Ensuring the health of this process is critical to the operation of the platform.
Run $ anchorectl feed list as admin and ensure that:
- The last sync date shown is recent and that the feed has enabled set to true.
- Review the feed list to see if you have the required feed sources enabled.
- Missing an expected source? Review the configuration and operational sections on this page
Run $ anchorectl feed sync as admin which will:
- Queue an update to fetch and propagate feed data across internal services.
- Otherwise, this runs on a regular schedule.
- Note: It can take several hours to download, build and distribute the dataset.
You can also visually check the health in the ‘System’ section of the UI when logged in as admin.
Recommended best practices
Anchore Enterprise relies on multiple sources in order to build a high resolution picture of vulnerability data.
It is generally recommended that all vendor sources are enabled.
We highly recommend that you enable the GitHub GHSA feed for high quality vulnerability data
- This can often be misconfigured due to the nature of the nested feeds property in helm values file, due to the feeds service being a dependancy and independent chart.
- You must also ensure you set a valid GitHub Token, see below for a complete Helm values example.
feeds:
anchoreConfig:
feeds:
drivers:
github:
enabled: true
# The GitHub feeds driver requires a GitHub developer personal access token with no permission scopes selected.
# See https://docs.github.com/en/github/authenticating-to-github/keeping-your-account-and-data-secure/creating-a-personal-access-token
token: your-github-token
Enable the applicable feeds within Anchore e.g. if you use Ubuntu base images, enable the vendor specific feed in this case: Ubuntu. See Helm values example below
feeds:
anchoreConfig:
feeds:
drivers:
PROVIDER: true
For an air-gapped environment your high side feed service should be configured with api_only = true. This will ensure the feed service will only serve built databases stored locally.
Finally, operate your feeds database on a separate server to the anchore server. This ensures separation of concerns, ease of backup and less performance impacts. Where possible use a managed postgres service like RDS.
Operational & Configuration checks
Check that the feed pod/container has enough disk space:
- Ensure free disk space is (>10gb). The /workspace directory is where feed data is stored. By running:
$ df -h
Check that the feed pod/container and the feeds database has enough compute, memory and disk resources as covered in requirements
Check that your feed service has network connectivity to feed sources:
- Ensure the feed pod / container has network connectivity to feed sources.
- You can verify this by running a curl check - example:
$ curl -v https://secdb.alpinelinux.org - For other feed sources, you can find the domains listed here.
- If you have a network proxy deployed, you might need to configure the feed service to use it:
- Depending on proxy, you might also require embedding your proxy cert into the Anchore Enterprise image as per instructions here.
- You can test this by running
$ curl -v https://secdb.alpinelinux.org and verifying the output returns “SSL certificate verify ok.”
Check that the policy service has been configured to use your local feed service:
- Check your policy pod / container configuration by reviewing
- Run
$ cat '/config/config.yaml' and check policy_engine.vulnerabilities.sync.data.grypedb.url is set. - Ensure the set value or set ENV
$ echo $ANCHORE_GRYPE_DB_URL points to your local feed service.
- Ensure your policy pod / container has network connectivity to your local feed pod / container
- Run
$ curl -v ${ANCHORE_GRYPE_DB_URL} returns a response to confirm connectivity.
Check that your desired configuration has been correctly applied for both the feeds and policy services:
- On the feeds or policy pod / container run
$ cat '/config/config.yaml'- Review the configuration displayed matches your desired configuration.
- Any issues review your deployment process e.g. helm values
Finally, it should be noted, the feed service can take several hours to download, build and distribute an updated vulnerability dataset:
To check the status of a feeds sync you can:
- Review the feed logs, and even enable DEBUG for increased verbosity.
- Use the tasks api to return a tasks summary
$ curl ${ANCHORE_ENTERPRISE_FEEDS_EXTERNAL_URL}/tasks and for localising results use specific $ curl ${ANCHORE_ENTERPRISE_FEEDS_EXTERNAL_URL}/tasks/<parent-id-or-task-id>. - Use the feeds databases/grypedb endpont and review results
$ curl -v ${ANCHORE_GRYPE_DB_URL};
NOTE: On occasion a feed source might be experiencing downtime or a maintenance window. In this scenario, the feeds service will continue to operate for the remaining providers and will retry on the next run.
7.5 - Verifying Service Health
You can verify which services have registered themselves successfully, along with their status, by running: anchorectl system status
# anchorectl system status
✔ Status system
┌─────────────────┬────────────────────┬─────────────────────────────┬──────┬────────────────┬────────────┬──────────────┐
│ SERVICE │ HOST ID │ URL │ UP │ STATUS MESSAGE │ DB VERSION │ CODE VERSION │
├─────────────────┼────────────────────┼─────────────────────────────┼──────┼────────────────┼────────────┼──────────────┤
│ reports │ anchore-quickstart │ http://reports:8228 │ true │ available │ 570 │ 5.7.0 │
│ analyzer │ anchore-quickstart │ http://analyzer:8228 │ true │ available │ 570 │ 5.7.0 │
│ notifications │ anchore-quickstart │ http://notifications:8228 │ true │ available │ 570 │ 5.7.0 │
│ apiext │ anchore-quickstart │ http://api:8228 │ true │ available │ 570 │ 5.7.0 │
│ policy_engine │ anchore-quickstart │ http://policy-engine:8228 │ true │ available │ 570 │ 5.7.0 │
│ reports_worker │ anchore-quickstart │ http://reports-worker:8228 │ true │ available │ 570 │ 5.7.0 │
│ simplequeue │ anchore-quickstart │ http://queue:8228 │ true │ available │ 570 │ 5.7.0 │
│ catalog │ anchore-quickstart │ http://catalog:8228 │ true │ available │ 570 │ 5.7.0 │
└─────────────────┴────────────────────┴─────────────────────────────┴──────┴────────────────┴────────────┴──────────────┘
Note: If specific services are down, you can investigate the logs for the services. For more information, see Viewing Logs.
The -vvv and –json options
Passing the -vvv option to AnchoreCTL can often help narrow down particular issues by displaying the client configuration and client functions as they are running:
# Example system status with -vvv
# anchorectl -vvv system status
[0000] INFO anchorectl version: 5.7.0
[0000] DEBUG application config:
url: http://localhost:8228
username: admin
password: '******'
...
[0000] DEBUG command config:
format: text
[0000] DEBUG checking if new version of anchorectl is available
[0000] TRACE worker stopped component=eventloop
[0000] TRACE bus stopped component=eventloop
┌─────────────────┬────────────────────┬─────────────────────────────┬──────┬────────────────┬────────────┬──────────────┐
│ SERVICE │ HOST ID │ URL │ UP │ STATUS MESSAGE │ DB VERSION │ CODE VERSION │
├─────────────────┼────────────────────┼─────────────────────────────┼──────┼────────────────┼────────────┼──────────────┤
│ reports │ anchore-quickstart │ http://reports:8228 │ true │ available │ 570 │ 5.7.0 │
│ analyzer │ anchore-quickstart │ http://analyzer:8228 │ true │ available │ 570 │ 5.7.0 │
│ notifications │ anchore-quickstart │ http://notifications:8228 │ true │ available │ 570 │ 5.7.0 │
│ apiext │ anchore-quickstart │ http://api:8228 │ true │ available │ 570 │ 5.7.0 │
│ policy_engine │ anchore-quickstart │ http://policy-engine:8228 │ true │ available │ 570 │ 5.7.0 │
│ reports_worker │ anchore-quickstart │ http://reports-worker:8228 │ true │ available │ 570 │ 5.7.0 │
│ simplequeue │ anchore-quickstart │ http://queue:8228 │ true │ available │ 570 │ 5.7.0 │
│ catalog │ anchore-quickstart │ http://catalog:8228 │ true │ available │ 570 │ 5.7.0 │
└─────────────────┴────────────────────┴─────────────────────────────┴──────┴────────────────┴────────────┴──────────────┘
Passing the --json option to AnchoreCTL commands will output the API response data in JSON, which often contains much more information than what the CLI outputs by default for both regular successful operations, and for operations that are resulting in an error:
# anchorectl -o json system status
✔ Status system
{
"serviceStates": [
{
"baseUrl": "http://reports_worker:8228",
"hostid": "anchore-quickstart",
"serviceDetail": {
...
...
8 - Vulnerability Management
8.1.1 - Analyzing Images via CTL
Introduction
In this section you will learn how to analyze images with Anchore Enterprise using AnchoreCTL in two different ways:
- Distributed Analysis: Content analysis by AnchoreCTL where it is run and importing the analysis to your Anchore deployment
- Centralized Analysis: The Anchore deployment downloads and analyzes the image content directly
Using AnchoreCTL for Centralized Analysis
Overview
This method of image analysis uses the Enterprise deployment itself to download and analyze the image content. You’ll use AnchoreCTL to make API requests to Anchore to tell it which image to analyze but the Enterprise deployment does the work.
You can refer to the Image Analysis Process document in the concepts section to better understand how centralized analysis works in Anchore.
sequenceDiagram
participant A as AnchoreCTL
participant R as Registry
participant E as Anchore Deployment
A->>E: Request Image Analysis
E->>R: Get Image content
R-->>E: Image Content
E->>E: Analyze Image Content (Generate SBOM and secret scans etc) and store results
E->>E: Scan sbom for vulns and evaluate complianceUsage
The anchorectl image add command instructs the Anchore Enterprise deployment to pull (download) and analyze an image from a registry. Anchore Enterprise will attempt to retrieve metadata about the image from the Docker registry and if successful will initiate a pull of the image and queue the image for analysis. The command will output details about the image including the image digest, image ID, and full name of the image.
# anchorectl image add docker.io/library/nginx:latest
anchorectl image add docker.io/library/nginx:latest
✔ Added Image
Image:
status: not-analyzed (active)
tag: docker.io/library/nginx:latest
digest: sha256:89020cd33be2767f3f894484b8dd77bc2e5a1ccc864350b92c53262213257dfc
id: 2b7d6430f78d432f89109b29d88d4c36c868cdbf15dc31d2132ceaa02b993763
For an image that has not yet been analyzed, the status will appear as not_analyzed. Once the image has been downloaded it will be queued for analysis. When the analysis begins the status will be updated to analyzing, after which te status will update to analyzed.
Anchore Enterprise can be configured to have a size limit for images being added for analysis. Attempting to add an image that exceeds the configured size will fail, return a 400 API error, and log an error message in the catalog service detailing the failure. This feature is disabled by default so see documentation for additional details on the functionality of this feature and instructions on how to configure the limit.
Using AnchoreCTL for Distributed Analysis
Overview
This way of adding images uses anchorectl to performs analysis of an image outside the Enterprise deployment, so the Enterprise deployment never
downloads or touches the image content directly. The generation of the SBOM, secret searches, filesystem metadata, and content searches are all
performed by AnchoreCTL on the host where it is run (CI, laptop, runtime node, etc) and the results are imported to the Enterprise deployment where it can be scanned for vulnerabilities and evaluated against policy.
sequenceDiagram
participant A as AnchoreCTL
participant R as Registry/Docker Daemon
participant E as Anchore Deployment
A->>R: Get Image content
R-->>A: Image Content
A->>A: Analyze Image Content (Generate SBOM and secret scans etc)
A->>E: Import SBOM, secret search, fs metadata
E->>E: Scan sbom for vulns and evaluate complianceConfiguration
Enabling the full set of analyzers, “catalogers” in AnchoreCTL terms, requires updates to the config file used by AnchoreCTL. See Configuring AnchoreCTL for more information on the format and options.
Usage
Note
To locally analyze an image that has been pushed to a registry, it is strongly recommended to use the ‘–from registry’ rather than ‘–from docker’.
This removes the need to have docker installed and also results in a consistent image digest for later use. The registry option gives anchorectl access
to data that the docker source does not due to limitations with the Docker Daemon itself and how it handles manifests and image digests.
The anchorectl image add --from [registry|docker] command will run a local SBOM-generation and analysis (secret scans, filesystem metadata, and content searches) and upload the result to Anchore Enterprise without ever having that image touched or loaded by your Enterprise deployment.
# anchorectl image add docker.io/library/nginx:latest --from registry
anchorectl image add docker.io/library/nginx:latest --from registry -n
✔ Added Image
Image:
status: not-analyzed (active)
tag: docker.io/library/nginx:latest
digest: sha256:89020cd33be2767f3f894484b8dd77bc2e5a1ccc864350b92c53262213257dfc
id: 2b7d6430f78d432f89109b29d88d4c36c868cdbf15dc31d2132ceaa02b993763
For an image that has not yet been analyzed, the status will appear as not_analyzed. Once the image has been downloaded it will be queued for analysis. When the analysis begins the status will be updated to analyzing, after which te status will update to analyzed.
The ‘–platform’ option in distributed analysis specifies a different platform than the local hosts’ to use when retrieving the image from the registry for analysis by AnchoreCTL.
# anchorectl image add alpine:latest --from registry --platform linux/arm64
Adding images that you own
For images that you are building yourself, the Dockerfile used to build the image should always be passed to Anchore Enterprise at the time of image addition. This is achieved by adding the image as above, but with the additional option to pass the Dockerfile contents to be stored with the system alongside the image analysis data.
This can be achieved in both analysis modes.
For centralized analysis:
# anchorectl image add myrepo.example.com:5000/app/webapp:latest --dockerfile /path/to/Dockerfile
For distributed analysis:
# anchorectl image add myrepo.example.com:5000/app/webapp:latest --from registry --dockerfile /path/to/Dockerfile
To update an image’s Dockerfile, simply run the same command again with the path to the updated Dockerfile along with ‘–force’ to re-analyze the image with the updated Dockerfile. Note that running add without --force (see below) will not re-add an image if it already exists.
Providing Dockerfile content is supported in both push and pull modes for adding images.
Additional Options
When adding an image, there are some additional (optional) parameters that can be used. We show some examples below and all apply to both distributed and centralize analysis workflows.
# anchorectl image add docker.io/library/alpine:latest --force
✔ Added Image docker.io/library/alpine:latest
Image:
status: not-analyzed (active)
tags: docker.io/alpine:3
docker.io/alpine:latest
docker.io/dnurmi/testrepo:test0
docker.io/library/alpine:latest
digest: sha256:1304f174557314a7ed9eddb4eab12fed12cb0cd9809e4c28f29af86979a3c870
id: 9c6f0724472873bb50a2ae67a9e7adcb57673a183cea8b06eb778dca859181b5
distro: [email protected] (amd64)
layers: 1
the --force option can be used to reset the image analysis status of any image to not_analyzed, which is the base analysis state for an image. This option shouldn’t be necessary to use in normal circumstances, but can be useful if image re-analysis is needed for any reason desired.
# anchorectl image add myrepo.example.com:5000/app/webapp:latest --dockerfile /path/to/dockerfile --annotation owner=someperson --annotation [email protected]
the --annotation parameter can be used to specify ‘key=value’ pairs to associate with the image at the time of image addition. These annotations will then be carried along with the tag, and will appear in image records when fetched, and in webhook notification payloads that contain image information when they are sent from the system. To change an annotation, simply run the add command again with the updated annotation and the old annotation will be overriden.
# anchorectl image add alpine:latest --no-auto-subscribe
the ‘–no-auto-subscribe’ flag can be used if you do not wish for the system to automatically subscribe the input tag to the ’tag_update’ subscription, which controls whether or not the system will automatically watch the added tag for image content updates and pull in the latest content for centralized analysis. See Subscriptions for more information about using subscriptions and notifications in Anchore.
These options are supported in both distributed and centralized analysis.
In this example, we’re adding docker.io/mysql:latest, if we attempt to add a tag that mapped to the same image, for example docker.io/mysql:8 Anchore Enterprise will detect the duplicate image identifiers and return a detail of all tags matching that image.
Image:
status: analyzed (active)
tags: docker.io/mysql:8
docker.io/mysql:latest
digest: sha256:8191525e9110aa32b436a1ec772b76b9934c1618330cdb566ca9c4b2f01b8e18
id: 4390e645317399cc7bcb50a5deca932a77a509d1854ac194d80ed5182a6b5096
distro: [email protected] (amd64)
layers: 11
Deleting An Image
The following command instructs Anchore Enterprise to delete the image analysis from the working set using a tag. The --force option must be used if there is only one digest associated with the provided tag, or any active subscriptions are enabled against the referenced tag.
# anchorectl image delete mysql:latest --force
┌─────────────────────────────────────────────────────────────────────────┬──────────┐
│ DIGEST │ STATUS │
├─────────────────────────────────────────────────────────────────────────┼──────────┤
│ sha256:8191525e9110aa32b436a1ec772b76b9934c1618330cdb566ca9c4b2f01b8e18 │ deleting │
└─────────────────────────────────────────────────────────────────────────┴──────────┘
To delete a specific image record, the digest can be supplied instead to ensure it is the exact image record you want:
# anchorectl image delete sha256:899a03e9816e5283edba63d71ea528cd83576b28a7586cf617ce78af5526f209
┌─────────────────────────────────────────────────────────────────────────┬──────────┐
│ DIGEST │ STATUS │
├─────────────────────────────────────────────────────────────────────────┼──────────┤
│ sha256:899a03e9816e5283edba63d71ea528cd83576b28a7586cf617ce78af5526f209 │ deleting │
└─────────────────────────────────────────────────────────────────────────┴──────────┘
Deactivate Tag Subscriptions
Check if the tag has any active subscriptions.
# anchorectl subscription list
anchorectl subscription list
✔ Fetched subscriptions
┌──────────────────────────────────────────────────────────────────────┬─────────────────┬────────┐
│ KEY │ TYPE │ ACTIVE │
├──────────────────────────────────────────────────────────────────────┼─────────────────┼────────┤
│ docker.io/alpine:latest │ policy_eval │ false │
│ docker.io/alpine:3.12.4 │ policy_eval │ false │
│ docker.io/alpine:latest │ vuln_update │ false │
│ docker.io/redis:latest │ policy_eval │ false │
│ docker.io/centos:8 │ policy_eval │ false │
...
...
If the tag has an active subscription(s), then can disabled (deactivated) in order to permit deletion:
# anchorectl subscription deactivate docker.io/alpine:3.12.6 tag_update
✔ Deactivate subscription
Key: docker.io/alpine:3.12.6
Type: tag_update
Id: a6c7559deb7d5e20621d4a36010c11b0
Active: false
Advanced
Anchore Enterprise also allows adding images directly by digest / tag / timestamp tuple, which can be useful to add images that are still available in a registry but not associated with a current tag any longer.
To add a specific image by digest with the tag it should be associated with:
anchorectl image add docker.io/nginx:stable@sha256:f586d972a825ad6777a26af5dd7fc4f753c9c9f4962599e6c65c1230a09513a8
Note: this will submit the specific image by digest with the associated tag, but Anchore will treat that digest as the most recent digest for the tag, so if the image registry actually has a different history (e.g. a newer image has been pushed to that tag), then the tag history in Anchore may not accurately reflect the history in the registry.
Next Steps
Next, let’s find out how to Inspect Image Content
8.1.1.1 - Inspecting Image Content
Introduction
During the analysis of container images, Anchore Enterprise performs deep inspection, collecting data on all artifacts in the image including files, operating system packages and software artifacts such as Ruby GEMs and Node.JS NPM modules.
Inspecting images
The image content command can be used to return detailed information about the content of the container image.
# anchorectl image content INPUT_IMAGE -t CONTENT_TYPE
The INPUT_IMAGE can be specified in one of the following formats:
- Image Digest
- Image ID
- registry/repo:tag
the CONTENT_TYPE can be one of the following types:
- os: Operating System Packages
- files: All files in the image
- go: GoLang modules
- npm: Node.JS NPM Modules
- gem: Ruby GEMs
- java: Java Archives
- python: Python Artifacts
- nuget: .NET NuGet Packages
- binary: Language runtime locations and version (e.g. openjdk, python, node)
- malware: ClamAV mailware scan results, if enabled
You can always get the latest available content types using the ‘-a’ flag:
# anchorectl image content library/nginx:latest -a
✔ Fetched content [fetching available types] library/nginx:latest
binary
files
gem
go
java
malware
npm
nuget
os
python
For example:
# anchorectl image content library/nginx:latest -t files
✔ Fetched content [0 packages] [6099 files] library/nginx:latest
Files:
┌────────────────────────────────────────────────────────────────────────────────────────────────────┬────────────────────────────────────────────────────────────────────────────────────────────────────┬───────┬─────┬─────┬───────┬───────────────┬──────────────────────────────────────────────────────────────────┐
│ FILE │ LINK │ MODE │ UID │ GID │ TYPE │ SIZE │ SHA256 DIGEST │
├────────────────────────────────────────────────────────────────────────────────────────────────────┼────────────────────────────────────────────────────────────────────────────────────────────────────┼───────┼─────┼─────┼───────┼───────────────┼──────────────────────────────────────────────────────────────────┤
│ /bin │ │ 00755 │ 0 │ 0 │ dir │ 0 │ │
│ /bin/bash │ │ 00755 │ 0 │ 0 │ file │ 1.234376e+06 │ d86b21405852d8642ca41afae9dcf0f532e2d67973b0648b0af7c26933f1becb │
│ /bin/cat │ │ 00755 │ 0 │ 0 │ file │ 43936 │ e9165e34728e37ee65bf80a2f64cd922adeba2c9f5bef88132e1fc3fd891712b │
│ /bin/chgrp │ │ 00755 │ 0 │ 0 │ file │ 72672 │ f47bc94792c95ce7a4d95dcb8d8111d74ad3c6fc95417fae605552e8cf38772c │
│ /bin/chmod │ │ 00755 │ 0 │ 0 │ file │ 64448 │ b6365e442b815fc60e2bc63681121c45341a7ca0f540840193ddabaefef290df │
│ /bin/chown │ │ 00755 │ 0 │ 0 │ file │ 72672 │ 4c1443e2a61a953804a462801021e8b8c6314138371963e2959209dda486c46e │
...
AnchoreCTL will output a subset of fields from the content view, for example for files on the file name and size are displayed. To retrieve the full output the --json parameter should be passed.
For example:
# anchorectl -o json image content library/nginx:latest -t files
✔ Fetched content [0 packages] [6099 files] library/nginx:latest
{
"files": [
{
"filename": "/bin",
"gid": 0,
"linkdest": null,
"mode": "00755",
"sha256": null,
"size": 0,
"type": "dir",
"uid": 0
},
...
Next Steps
8.1.1.2 - Viewing Security Vulnerabilities
Introduction
The image vulnerabilities command can be used to return a list of vulnerabilities found in the container image.
# anchorectl image vulnerabilities INPUT_IMAGE -t VULN_TYPE
The INPUT_IMAGE can be specified in one of the following formats:
- Image Digest
- Image ID
- registry/repo:tag
The VULN_TYPE currently supports:
- os: Vulnerabilities against operating system packages (RPM, DPKG, APK, etc.)
- non-os: Vulnerabilities against language packages (NPM, GEM, Java Archive (jar, war, ear), Python PIP, .NET NuGet, etc.)
- all: Combination report containing both ‘os’ and ’non-os’ vulnerability records.
The system has been designed to incorporate 3rd party feeds for other vulnerabilites.
Examples
To generate a report of OS package (RPM/DEB/APK) vulnerabilities found in the image including CVE identifier, Vulnerable Package, Severity Level, Vulnerability details and version of fixed package (if available).
# anchorectl image vulnerabilities debian:latest -t os
Currently the following the system draws vulnerability data specifically matched to the following OS distros:
- Alpine
- CentOS
- Debian
- Oracle Linux
- Red Hat Enterprise Linux
- Red Hat Universal Base Image (UBI)
- Ubuntu
- Suse Linux
- Amazon Linux 2
- Google Distroless
To generate a report of language package (NPM/GEM/Java/Python) vulnerabilities, the system draws vulnerability data from the NVD data feed, and vulnerability reports can be viewed using the ’non-os’ vulnerability type:
# anchorectl image vulnerabilities node:latest -t non-os
To generate a list of all vulnerabilities that can be found, regardless of whether they are against an OS or non-OS package type, the ‘all’ vulnerability type can be used:
# anchorectl image vulnerabilities node:latest -t all
Finally, for any of the above queries, these commands (and other anchorectl commands) can be passed the -o json flag to output the data in JSON format:
# anchorectl -o json image vulnerabilities node:latest -t all
Other options can be reviewed by issuing anchorectl image vulnerabilities --help at any time.
Next Steps
- Subscribe to receive notifications when the image is updated, when the policy status changes or when new vulnerabilities are detected.
8.1.2 - Image Analysis via UI
Overview
In this section you will learn how to submit images for analysis using the user
interface, and how to execute a bulk removal of pending items or
previously-analyzed items from within a repository group.
Note: Only administrators and standard users with the requisite role-based
access control permissions are allowed to submit items for analysis, or remove
previously analyzed assets.
Getting Started
From within an authenticated session, click the Image Analysis button on the
navigation bar:

You will be presented with the Image Analysis view. On the right-hand side
of this view you will see the Analyze Repository and Analyze Tag buttons:

These controls allow you to add entire repositories or individual items to
the Anchore analysis queue, and to also provide details about how you would like
the analysis of these submissions to be handled on an ongoing basis. Both
options are described below in the following sections.
Analyze a Repository
After clicking the Analyze Repository button, you are presented with the
following dialog:

The following fields are required:
- Registry—for example:
docker.io - Repository—for example:
library/centos
Provided below these fields is the Watch Tags in Repository configuration
toggle. By default, when One-Time Tag Analysis is selected all tags
currently present in the repository will be analyzed; once initial analysis is
complete the repository will not be watched for future additions.
Setting the toggle to Automatically Check for Updates to Tags specifies that
the repository will be monitored for any new tag additions that take place
after the initial analysis is complete. Note that you are also able to set
this option for any submitted repository from within the Image Analysis
view.
Once you have populated the required fields and click OK, you will be
notified of the overhead of submitting this repository by way of a count that
shows the maximum number of tags detected within that repository that will be
analyzed:

You can either click Cancel to abandon the repository analysis request at
this point, or click OK to proceed, whereupon the specified repository will
be flagged for analysis.
Max image size configuration applies to repositories added via UI. See max image size
Analyze a Tag
After clicking the Analyze Tag button, you are presented with the
following dialog:

The following fields are required:
- Registry—for example,
docker.io - Repository—for example,
library/centos - Tag—for example,
latest
Note: Depending upon where the dialog was invoked, the above fields may be
pre-populated. For example, if you clicked the Analyze Tag button while
looking at a view under Image Analysis that describes a previously-analyzed
repository, the name of that repository and its associated registry will be
displayed in those fields.
Some additional options are provided on the right-hand side of the dialog:
Watch Tag—enabling this toggle specifies that the tag should be
monitored for image updates on an ongoing basis after the initial analysis
Force Reanalysis—if the specified tag has already been analyzed, you can
force re-analysis by enabling this option. You may want to force re-analysis if
you decide to add annotations (see below) after the initial analysis. This
option is ignored if the tag has not yet been analyzed.
Add Annotation—annotations are optional key-pair values that can be
added to the image metadata. They are visible within the Overview tab of
the Image Analysis view once the image has been analyzed, as well as from
within the payload of any webhook notification from Anchore that contains image
information.
Once you have populated the required fields and click OK, the specified tag
will be scheduled for analysis.
Max image size configuration applies to images added via UI. See max image size
Note: Anchore will attempt to download images from any registry without
requiring further configuration. However, if your registry needs authentication
then the corresponding credentials will need to be defined. See Configuring
Registries for more information.
Repository Deletion
Shown below is an example of a repository view under Image Analysis:

From a repository view you can carry out actions relating to the bulk removal of
items in that repository. The Analysis Cancellation / Repository Removal
control is provided in this view, adjacent to the analysis controls:

After clicking this button you are presented with the following options:
Cancel Images Currently Pending Analysis—this option is only enabled if
you have one or more tags in the repository view that are currently scheduled
for analysis. When invoked, all pending items will be removed from the queue.
This option is particularly useful if you have selected a repository for
analysis that contains many tags, and the overall analysis operation is
taking longer than initially expected.
Note: If there is at least one item present in the repository that is
not pending analysis, you will be offered the opportunity to decide if you
want the repository to be watched after this operation is complete.
Remove Repository and Analyzed Items—In order to remove a repository from
the repository view in its entirety, all items currently present within the
repository must first be removed from Anchore. When invoked, all items (in any
state of analysis) will be removed. If the repository is being watched, this
subscription is also removed.
8.2 - Scanning Repositories
Introduction
Individual images can be added to Anchore Enterprise using the image add command. This may be performed by a CI/CD plugin such as Jenkins or manually by a user with AnchoreCTL or API.
Anchore Enterprise can also be configured to scan repositories and automatically add any tags found in the repository. Once added, Anchore Enterprise will poll the registry to look for changes at a user configurable interval.
This interval is specified in the Anchore Enterprise configuration file: config.yaml within the services -> Catalog configuration stanza.
Note When you add a registry to Anchore, no images are pulled automatically. This is to prevent your Anchore deployment from being overwhelmed by a very large number of images.
Therefore. you should think of adding a registry as a preparatory step that allows you to then add specific repositories or tags without having to provide the access credentials for each.
Because a repository typically includes a manageable number of images, when you add a repository to Anchore images for all tags in that repository are automatically pulled and processed by Anchore.
Example Configuration
cycle_timers:
image_watcher: 3600
repo_watcher: 60
In this example the repo is polled for updates every minute (60 seconds).
For more details on the Repository Subscription, please see Subscriptions
Adding Repositories
The repo add command instructs Anchore Enterprise to add the specified repository watch list.
# anchorectl repo add docker.io/alpine
✔ Added repo
┌──────────────────┬─────────────┬────────┐
│ KEY │ TYPE │ ACTIVE │
├──────────────────┼─────────────┼────────┤
│ docker.io/alpine │ repo_update │ true │
└──────────────────┴─────────────┴────────┘
By default Anchore Enterprise will automatically add the discovered tags to the list of subscribed tags (see Working with Subscriptions this behavior can be overridden by passing the --auto-subscribe=<true|false> option.
Listing Repositories
The repo list command will show the repositories monitored by Anchore Enterprise.
# anchorectl repo list
✔ Fetched repos
┌─────────────────────────┬─────────────┬────────┐
│ KEY │ TYPE │ ACTIVE │
├─────────────────────────┼─────────────┼────────┤
│ docker.io/alpine │ repo_update │ true │
│ docker.io/elasticsearch │ repo_update │ true │
└─────────────────────────┴─────────────┴────────┘
Deleting Repositories
The del option can be used to instruct Anchore Enterprise to remove the repository from the watch list. Once the repository record has been deleted no further changes to the repository will be detected by Anchore Enterprise.
Note: No existing image data will be removed from Anchore Enterprise.
# anchorectl repo del docker.io/alpine
✔ Deleted repo
No results
Unwatching Repositories
When a repository is added, Anchore Enterprise will monitor the repository for new and updated tags. This behavior can be disabled preventing Anchore Enterprise from monitoring the repository for changes.
In this case the repo list command will show false in the Watched column for this registry.
# anchorectl repo unwatch docker.io/alpine
✔ Unwatch repo
┌──────────────────┬─────────────┬────────┐
│ KEY │ TYPE │ ACTIVE │
├──────────────────┼─────────────┼────────┤
│ docker.io/alpine │ repo_update │ false │
└──────────────────┴─────────────┴────────┘
Watching Repositories
The repo watch command instructs Anchore Enterprise to monitor a repository for new and updated tags. By default repositories added to Anchore Enterprise are automatically watched. This option is only required if a repository has been manually unwatched.
# anchorectl repo watch docker.io/alpine
✔ Watch repo
┌──────────────────┬─────────────┬────────┐
│ KEY │ TYPE │ ACTIVE │
├──────────────────┼─────────────┼────────┤
│ docker.io/alpine │ repo_update │ true │
└──────────────────┴─────────────┴────────┘
As of v3.0, Anchore Enterprise can be configured to have a size limit for images being added for analysis. This feature applies to the repo watcher. Images that exceed the max configured size in the repo being watched will not be added and a message will be logged in the catalog service. This feature is disabled by default so see documentation for additional details on the functionality of this feature and instructions on how to configure the limit
Removing a Repository and All Images
There may be a time when you wish to stop a repository analysis when the analysis is running (e.g., accidentally watching an image with a large number of tags). There are several steps in the process which are outlined below. We will use docker.io/library/alpine as an example.
Note: Be careful when deleting images. In this flow, Anchore deletes the image, not just the repository/tag combo. Because of this, deletes may impact more than the expected repository since an image may have tags in multiple repositories or even registries.
Check the State
Take a look at the repository list.
anchorectl repo list
✔ Fetched repos
┌──────────────────┬─────────────┬────────┐
│ KEY │ TYPE │ ACTIVE │
├──────────────────┼─────────────┼────────┤
│ docker.io/alpine │ repo_update │ true │
└──────────────────┴─────────────┴────────┘
Also look at the image list.
anchorectl image list | grep docker.io/alpine
✔ Fetched images
│ docker.io/alpine:20220328 │ sha256:c11c38f8002da63722adb5111241f5e3c2bfe4e54c0e8f0fb7b5be15c2ddca5f │ not_analyzed │ active │
│ docker.io/alpine:3.16.0 │ sha256:4ff3ca91275773af45cb4b0834e12b7eb47d1c18f770a0b151381cd227f4c253 │ not_analyzed │ active │
│ docker.io/alpine:20220316 │ sha256:57031e1a3b381fba5a09d5c338f7dbeeed2260ad5100c66b2192ab521ae27fc1 │ not_analyzed │ active │
│ docker.io/alpine:3.14.5 │ sha256:aee6c86e12b609732a30526ddfa8194e4a54dc5514c463e4c2e41f5a89a0b67a │ not_analyzed │ active │
│ docker.io/alpine:3.15.5 │ sha256:26284c09912acfc5497b462c5da8a2cd14e01b4f3ffa876596f5289dd8eab7f2 │ not_analyzed │ active │
...
...
Removing the Repository from the Watched List
Unwatch docker.io/library/alpine to prevent future automatic updates.
# anchorectl repo unwatch docker.io/alpine
✔ Unwatch repo
┌──────────────────┬─────────────┬────────┐
│ KEY │ TYPE │ ACTIVE │
├──────────────────┼─────────────┼────────┤
│ docker.io/alpine │ repo_update │ false │
└──────────────────┴─────────────┴────────┘
Delete the Repository
Delete the repository. This may need to be done a couple times if the repository still shows in the repository list.
# anchorectl repo delete docker.io/alpine
✔ Deleted repo
No results
Forcefully Delete the Images
Delete the analysis/images. This may need to be done several times to remove all images depending on how many there are.
# for i in `anchorectl -q image list | grep docker.io/alpine | awk '{print $2}'`
> do
> anchorectl image delete ${i} --force
> done
┌─────────────────────────────────────────────────────────────────────────┬──────────┐
│ DIGEST │ STATUS │
├─────────────────────────────────────────────────────────────────────────┼──────────┤
│ sha256:c11c38f8002da63722adb5111241f5e3c2bfe4e54c0e8f0fb7b5be15c2ddca5f │ deleting │
└─────────────────────────────────────────────────────────────────────────┴──────────┘
┌─────────────────────────────────────────────────────────────────────────┬──────────┐
│ DIGEST │ STATUS │
├─────────────────────────────────────────────────────────────────────────┼──────────┤
│ sha256:4ff3ca91275773af45cb4b0834e12b7eb47d1c18f770a0b151381cd227f4c253 │ deleting │
└─────────────────────────────────────────────────────────────────────────┴──────────┘
...
...
...
Verify the Repository and All Images are Deleted
Check the repository list.
# anchorectl repo list
✔ Fetched repos
┌─────┬──────┬────────┐
│ KEY │ TYPE │ ACTIVE │
├─────┼──────┼────────┤
└─────┴──────┴────────┘
Check the image list.
# anchorectl image list | grep docker.io/alpine
✔ Fetched images
<no output>
Next Steps
8.3 - Kubernetes Inventory
Anchore Enterprise allows you to navigate through your Kubernetes clusters to quickly and easy asses your vulnerabilities, apply policies, and take action on them. You’ll need to configure your clusters for collection before being able to take advantage of these features. See our installation instructions to get setup.
Watching Clusters and Namespaces
Users can opt to automatically scan all the images that are deployed to a specific cluster or namespace. This is helpful to monitor
your overall security posture in your runtime and enforce policies. Before opting to subscribe to a new cluster, it’s important to ensure you have proper credentials saved in Anchore to pull the images from the registry. Also watching a new cluster can create a considerable queue of images to work through and impact other users of your Anchore Enterprise deployment.
Using Charts Filters
The charts at the top of the UI provide key contextual information about your runtime. Upon landing on the page you’ll see a summary of your policy evaluations and vulnerabilities for all your clusters. Drilling down into a cluster or namespace will update these charts to represent the data for the selected cluster and/or namespace. Additionally, users can select to only view clusters or namespaces with the selected filters. For example selecting only high and critical vulnerabilities will only show the clusters and/or namespaces that have those vulnerabilities.
Using Views
In addition to navigating your runtime inventory by clusters and namespaces, users can opt to view the images or vulnerabilities across. This is a great way to identify vulnerabilities across your runtime and asses their impact.
Assessing impact
Another important aspect of the Kubernetes Inventory UI is the ability to assess how a vulnerability in a container images impacts your environment. For every container when you see a note about it usage being seen in particular cluster and X more… you will be able to mouse over the link for a detailed list of where else that container image is being used. This is fast way to determine the “blast-radius” of a vulnerability.
Data Delays
Due to the processing required to generate the data used by the Kubernetes Inventory UI, the results displayed may not be fully up to date. The overall delay depends on the configuration of how often inventory data is collected, and how frequently your reporting data is refreshed. This is similar to delays present on the dashboard.
Policy and Account Considerations
The Kubernetes Inventory is only available for an account’s default policy. You may want to consider setting up an account specifically for tracking your Kubernetes Inventory and enforcing a policy.
8.4 - Results
On occasion, you may see a vulnerability identified by GHSA (GitHub Security Advisory) instead of CVE (Common Vulnerability Enumeration). The reason for this is that Anchore uses an order of precedence to match vulnerabilities from feeds. Anchore gives precedence to OS and third-party package feeds which often contain more up-to-date information and provide more accurate matches with image content. However, these feeds may provide GHSA vulnerability IDs instead of CVEs as provided by NVD (National Vulnerability Database) feeds.
The vulnerability ID Anchore reports depends on how the vulnerability is matched. The order of precedence is packages installed by OS package managers, then third-party packages (java, python, node), and then NVD. The GHSA feeds tend to be ahead of the NVD feeds, so there may be some vulnerabilities that match a GHSA before they match a CVE from NVD.
We are working to unify the presentation of vulnerability IDs to keep things more consistent. Currently our default is to report the CVE unless the GHSA provides a more accurate match.
8.5 - Working with Subscriptions
Introduction
Anchore Enterprise supports 7 types of subscriptions.
- Tag Update
- Policy Update
- Vulnerability Update
- Analysis Update
- Alerts
- Repository Update
- Runtime Inventory
For detail information about Subscriptions please see Subscriptions
Managing Subscriptions
Subscriptions can be managed using AnchoreCTL.
Listing Subscriptions
Running the subscription list command will output a table showing the type and status of each subscription.
# anchorectl subscription list | more
✔ Fetched subscriptions
┌──────────────────────────────────────────────────────────────────────┬─────────────────┬────────┐
│ KEY │ TYPE │ ACTIVE │
├──────────────────────────────────────────────────────────────────────┼─────────────────┼────────┤
│ docker.io/alpine:latest │ policy_eval │ false │
│ docker.io/alpine:3.12.4 │ policy_eval │ false │
│ docker.io/alpine:latest │ vuln_update │ false │
│ docker.io/redis:latest │ policy_eval │ false │
│ docker.io/centos:8 │ policy_eval │ false │
│ docker.io/alpine:3.8.4 │ policy_eval │ false │
│ docker.io/centos:8 │ vuln_update │ false │
...
└──────────────────────────────────────────────────────────────────────┴─────────────────┴────────┘
Note: Tag Subscriptions are tied to registry/repo:tag and not to image IDs.
Activating Subscriptions
The subscription activate command is used to enable a subscription type for a given image. The command takes the following form:
anchorectl subscription activate SUBSCRIPTION_KEY SUBSCRIPTION_TYPE
SUBSCRIPTION_TYPE should be either:
- tag_update
- vuln_update
- policy_eval
- analysis_update
SUBSCRIPTION_KEY should be the name of the subscribed tag. eg. docker.io/ubuntu:latest
For example:
# anchorectl subscription activate docker.io/ubuntu:latest tag_update
✔ Activate subscription
Key: docker.io/ubuntu:latest
Type: tag_update
Id: 04f0e6d230d3e297acdc91ed9944278d
Active: true
and to de-activate:
# anchorectl subscription deactivate docker.io/ubuntu:latest tag_update
✔ Deactivate subscription
Key: docker.io/ubuntu:latest
Type: tag_update
Id: 04f0e6d230d3e297acdc91ed9944278d
Active: false
Tag Update Subscription
Any new tag added to Anchore Enterprise by AnchoreCTL will, by default, enable the Tag Update Subscription.
If you do to need this functionality, you can use the flag --no-auto-subscribe or set the environment variable ANCHORECTL_IMAGE_NO_AUTO_SUBSCRIBE when adding new tags.
# ./anchorectl image add docker.io/ubuntu:latest --no-auto-subscribe
Runtime Inventory Subscription
AnchoreCTL provides commands to help navigate the runtime_inventory Subscription. The subscription will monitor a specify runtime inventory context and add its images to the system for analysis.
Listing Inventory Watchers
# ./anchorectl inventory watch list
✔ Fetched watches
┌──────────────────────────┬───────────────────┬────────┐
│ KEY │ TYPE │ ACTIVE │
├──────────────────────────┼───────────────────┼────────┤
│ cluster-one/my-namespace │ runtime_inventory │ false │
└──────────────────────────┴───────────────────┴────────┘
Activating an Inventory Watcher
Note: This command will create the subscription is one does not already exist.
# ./anchorectl inventory watch activate cluster-one/my-namespace
✔ Activate watch
┌──────────────────────────┬───────────────────┬────────┐
│ KEY │ TYPE │ ACTIVE │
├──────────────────────────┼───────────────────┼────────┤
│ cluster-one/my-namespace │ runtime_inventory │ true │
└──────────────────────────┴───────────────────┴────────┘
Deactivating an Inventory Watcher
# ./anchorectl inventory watch deactivate cluster-one/my-namespace
✔ Deactivate watch
┌──────────────────────────┬───────────────────┬────────┐
│ KEY │ TYPE │ ACTIVE │
├──────────────────────────┼───────────────────┼────────┤
│ cluster-one/my-namespace │ runtime_inventory │ false │
└──────────────────────────┴───────────────────┴────────┘
Webhook Configuration
Webhooks are configured in the Anchore Enterprise configuration file config.yaml In the sample configuration file webhooks are disabled (commented) out.
webhooks:
webhook_user: 'user'
webhook_pass: 'pass'
ssl_verify: False
The webhooks can, optionally, pass basic credentials to the webhook endpoint, if these are not required the the webhook_user and webhool_pass entries can be commented out. By default TLS/SSL connections will validate the certificate provided. This can be suppressed by uncommenting the ssl_verify option.
url: 'http://localhost:9090/general/<notification_type>/<userId>'
If configured, the general webook will receive all notifications (policy_eval, tag_update, vuln_update) for each user.In this case <notification_type> will be replaced by the appropriate type. will be replaced by the configured user which is, by default, admin. eg. http://localhost:9090/general/vuln_update/admin'
policy_eval:
url: 'http://localhost:9090/somepath/<userId>'
webhook_user: 'mehuser'
webhook_pass: 'mehpass'
Specific endpoints for each event type can be configured, for example an endpoint for policy_eval notifications. In these cases the url, username, password and SSL/TLS verification can be specified.
error_event:
url: 'http://localhost:9090/error_event/'
This webook, if configured, will send a webhook if any FATAL system events are logged.
8.6 - Reports
Overview
The Reports tab is your gateway to producing insights into the collective status of your container image environment based on the back-end Enterprise Reporting Service.
Note: Because the reporting data cycle is configurable, the results shown in this view may not precisely reflect actual analysis output at any given time.
For more information on how to modify this cycle or the Reporting Service in general, please refer to the Reporting Service documentation.
Report View
The Report feature provides the tools to create custom reports, set a report to run on a schedule (or store the report for future use), and get notified when they’re executed in order to receive the insights you’re interested in for account-wide artifacts.
In addition, you can create user templates (also known as custom templates) that use any of the preconfigured system templates offered with the application as their basis, or create your own templates from scratch. Templates provide the structure and filter definitions the application uses in order to generate reports.
To jump to a particular guide, select from the following below:
8.6.1 - New Reports
Overview
The New Reports tab in the Reports view is where you can create a new report, either on
an ad-hoc basis for immediate download, or for it to be saved for future use. Saved
reports can be executed immediately, scheduled, or both.
Note: The New Reports tab will be the default tab selected in the Reports view when you don’t yet have any saved reports.
Reports created in this view are based on templates. Templates provide the output structure and filter definitions the user can configure in order for the application to generate the shape of the report. Anchore Enterprise client provides immediate access to a number of preconfigured system templates that can be used as the basis for user templates. For more information on how to create and manage templates, please refer to the Templates documentation.
Creating a Report
The initial view of the New Reports tab is shown below:

In the above view you can see that the application is inviting you to select a template
from the dropdown menu. You can either select an item from this dropdown or click in the field itself and enter text in order to filter the list.
Once a template is selected, the view will change to show the available filters for the selected template. The following screenshot shows the view after selecting the Artifacts by Vulnerability template:

At this point you can click Preview Report to see the summary output and download the information, or you can refine the report by adding filters from the associated dropdown. As with the template selection, you can either select an item from the dropdown or click in the field itself and enter text in order to filter the list.

After you click the Preview Report button, you are presented with the summary output and the ability to download the report in a variety of formats:

At this point you can click any of the filters you applied in order to adjust them (or remove them entirely). The results will update automatically. If you want to add more filters you can click the [ Edit ] button and select more items from the available options and then click Preview Report again to see the updated results.
You can now optionally configure the output information by clicking the [ Configure Columns ] button. The resulting popup allows you to reorder and rename the columns, as well as remove columns you don’t want to see in the output or add columns that are not present by default:

Once you’re satisfied with the output, click Download Full Report to download the report in the selected format. The formats provided are:
- CSV - comma-separated values, with all nested objects flattened into a linear list of items
- Flat JSON - JavaScript object notation, with all nested objects flattened into a linear list of items
- Raw JSON - JavaScript object notation, with all nested objects preserved
Saving a Report
The above describes the generation of an ad-hoc report for download, which may
be all you need. However, you can also save the report for future use. To do so, click the Save Report button. The following popup will appear:

Provide a name and optional description for the report, and then select
whether you want to save the report and store results immediately, set it to run on a schedule, or both. If you select the Generate Report option, you can then select the frequency of the report generation. Once you’re satisfied with the configuration, click Save.
The saved report will be stored under Saved Reports and you will immediately be transitioned to this view on success. The features within this
view are described in the Saved Reports section.
8.6.2 - Quick Report
Overview
Generate a report utilizing the back-end Enterprise Reporting Service through a variety of formats - table, JSON, and CSV. If you’re interested in refining your results, we recommend using the plethora of optional filters provided.
Note: Because the reporting data cycle is configurable, the results shown in this view may not precisely reflect actual analysis output at any given time.
For more information on how to modify this cycle or the Reporting Service in general, please refer to the Reporting Service documentation.
The following sections in this document describe how to select a query, add optional filters, and generate a report.
Reports
Selecting a Query
To select a query, click the available dropdown present in the view and select the type of report you’re interested in generating.
Images Affected by Vulnerability
View a list of images and their various artifacts that are affected by a vulnerability. By default, a couple optional filters are provided:
| Filter | Description |
|---|
| Vulnerability Id | Vulnerability ID |
| Tag Current Only | If set to true, current tag mappings are evaluated. Otherwise, all historic tag mappings are evaluated |
Policy Compliance History by Tag
Query your policy evaluation data using this report type. By default, this report was crafted with compliance history in mind. Quite a few optional filters are provided to include historic tag mappings and historic policy evaluations from any policy that is or was set to active. More info below:
| Filter | Description |
|---|
| Registry Name | Name of the registry |
| Repository Name | Name of the repository |
| Tag Name | Name of the tag |
| Tag Current Only | If set to true, current tag mappings are evaluated. Otherwise, all historic tag mappings are evaluated |
| Policy Evaluation Latest Only | If set to true, only the most recent policy evaluation is processed. Otherwise, all historic policy evaluations are evaluated |
| Policy Active | If set to true, only the active policy at the time of this query is used. Otherwise, all historically active policies are also included. This attribute is ignored if a policy ID or digest is specified in the filter |
Note that the default filters provided are optional.
Adding Optional Filters
Once a report type has been selected, an Optional Filters dropdown becomes available with items specific to that Query. Such as those listed above, any filters considered default to that report type are also shown.
You can remove any filters you don’t need by pressing the in their top right corner but as long as they’re empty/unset, they will be ignored at the time of report generation.
Generating a Report
After a report type has been selected, you immediately can Generate Report by clicking the button shown in the bottom left of the view.
By default, the Table format is selected but you can click the dropdown and modify the format for your report by selecting either JSON or CSV.
Table
A fast and easy way to browse your data, the table report retrieves paginated results and provides optional sorting by clicking on any column header. Each column is also resizable for your convenience. You can choose to fetch more or fetch all items although please note that depending on the size of your data, fetching all items may take a while.
Download Options
Download your report in JSON or CSV format. Various metadata such as the report type, any filters used when querying, and the timestamp of the report are included with your results. Please note that depending on the size of your data, the download may take a while.
8.6.3 - Report Manager
Overview
Use the Report Manager view to create custom queries, set a report to run on a schedule (or store the configuration for future use), and get notified when they’re executed in order to receive the insights you’re interested in for account-wide artifacts. The results are provided through a variety of formats - tabular, JSON, or CSV - and rely on data retrieved from the back-end Enterprise Reporting Service.
Note: Because the reporting data cycle is configurable, the results shown in this view may not precisely reflect actual analysis output at any given time.
For more information on how to modify this cycle or the Reporting Service in general, please refer to the Reporting Service documentation.
The following sections in this document describe templates, queries, scheduling reports, and viewing your results.
Report Manager

Templates
Templates define the filters and table field columns used by queries to generate report output. The templates provided by the sytem or stored by other users in your account can be used directly to create a new query or as the basis for crafting new templates.
System Templates
By default, the UI provides a set of system templates:
- Images Failing Policy Evaluation
- This template contains a customized set of filters and fields, and is based on “Policy Compliance History by Tag”.
- Images With Critical Vulnerabilities
- This template contains a customized set of filters and fields, and is based on “Images Affected by Vulnerability”.
- Artifacts by Vulnerability
- This templates contains all filters and fields by default.
- Tags by Vulnerability
- This templates contains all filters and fields by default.
- Images Affected by Vulnerability
- This templates contains all filters and fields by default.
- Policy Compliance History by Tag
- This templates contains all filters and fields by default.
- Vulnerabilities by Kubernetes Namespace
- This templates contains all filters and fields by default.
- Vulnerabilities by Kubernetes Container
- This templates contains all filters and fields by default.
- Vulnerabilities by ECS Container
- This templates contains all filters and fields by default.
Creating a Template
In order to define a template’s list of fields and filters, navigate to the Create a New Template section of the page, select a base configuration provided by the various System Templates listed above, and click Next to open a modal.

Provide a name for your new template, add an optional description, and modify any fields or filters to your liking.
The fields you choose control what data is shown in your results and are displayed from left to right within a report table. To optionally refine the result set returned, you can add or remove filter options, set a default value for each entry and specify if the filter is optional or required.
Note that templates must contain at least one field and one filter.
Once the template is configured to your satisfaction, click OK to save it as a Stored Template. Your new template is now available to hydrate a query or as a basis for future templates.
Editing a Template
To view or edit a template that has been stored previously, click its name under Stored Report Items on the right of the page. As with the creation of a template, the list of fields and filters can be customized to your preference.
When you’re done, click OK to save any new changes or Cancel to discard them.
Deleting a Template
To delete a template that you have configured previously, click the red “x” to the left of its name under Stored Report Items and click Yes to remove it. Note that once the template has been removed, you won’t be able to recover it.
Queries
Queries are based on a template’s configuration and can then be submitted to the back-end Enterprise Reporting Service on a reoccurring schedule to generate reports. These results can then be previewed in tabular form and downloaded in JSON or CSV format.
Creating a Query
To create a query, navigate to the Create a New Query section of the page, select a template configuration, and click Next to open a modal.

After you provide a unique name for the query and an optional description, click OK to save your new query. You will be automatically navigated to view it.
Editing a Query
To view or edit a query, click its name under Stored Report Items on the right of the page to be navigated to the Query View.

Within this view, you can edit its name and description, set a schedule to act as the base configuration for Scheduled Items, and view the various filters set by the template this query was based on.
To save any changes to the query, click Save Query or Save Query and Schedule Report.
Setting a Schedule
In order to set or modify a query’s schedule, click Add/Change Schedule to open a modal.

Reports can be generated daily, weekly, or monthly at a time of your choosing. This can be set according to your timezone or UTC. By default, the schedule is set for weekly on Mondays at 12PM your time.
When scheduling reports to be generated monthly, note that multiple days of the month can be selected and that certain days (the 31st, for example) may not trigger every month.
In the top-right corner of the modal, you can toggle the enabled state of the schedule which determines whether reports will be executed continuously on the timed interval you saved. Note that pressing OK modifies the schedule but does not save it to the query. Please click the Save Query or Save Query and Schedule Report to do so.
Deleting a Query
To delete a query, click the red “x” to the left of its name under Stored Report Items and click Yes to remove it. Note that every scheduled report associated with that query will also be removed and not be recoverable.
Scheduled Reports
Adding a Scheduled Item
Once you’ve crafted a query based on a system or custom template, supplied any filters to refine the results, and previewed the report generated to ensure it is to your satisfaction, you can add it to be scheduled by clicking Save Query and Schedule Report.
Any schedules created from this view will be listed at the bottom.
Editing a Scheduled Item
To edit a scheduled item, click on Tools within that entry’s Actions column and select Edit Scheduled Item to open a modal.
Here, you can modify the name, description, and schedule for that item. Click Yes to save any new changes or Cancel to discard them.
Deleting a Scheduled Item
To delete a scheduled item, click on Tools within that entry’s Actions column and select Delete Scheduled Item. Note that every report generated from that schedule will also be removed upon clicking Yes and will not be recoverable.
Viewing Results
Click View under a scheduled item’s Actions column to expand the row and view its list of associated reports sorted by most recent. Click View or Tools > View Results to navigate to that report’s results.

If you configured notifications to be sent when a report has been executed, you can navigate to the report’s results by clicking the link provided in its notification.
Downloading results
A preview of up to 1000 result items are shown in tabular form which provides optional sorting by clicking on any column header. If a report contains more than 1000 results, please download the data to view the full report. To do so, click Download to JSON or Download to CSV based on your preferred format.
Various metadata such as the report type, any filters used when querying, and the timestamp of the report are included with your results. Please note that depending on the size of your data, the download may take a while.
To be notified whenever a report has been generated, navigate to Events & Notifications > Manage Notifications. Once any previous notification configurations have loaded, add a new one from your preferred endpoint (Email, Slack, etc), and select the predefined event selector option for Scheduled Reports.

This includes the availability of a new result or any report execution failures.
Once you receive a notification, click on the link provided to automatically navigate to the UI to view the results for that report.
8.6.4 - Saved Reports
Overview
The Saved Reports tab in the Reports view is where you can view,
configure, download, or delete reports that have been saved for future use. Each report
entry may contain zero or more results, depending on whether the report has
been run or not.
Note: The Saved Reports tab will be the default tab selected in the
Reports view when you have one or more saved reports.
Viewing a Report
An example of the Saved Reports tab is shown below:
Clicking anywhere within the row other than on an active report title or on the
Actions button will expand it, displaying the executions for that report if
any are available. Clicking an active report title will take you to a view
displaying the latest execution for that report. An inactive report title
indicates that no results are yet available.
If a report has been scheduled but has no executions, the expanded row will look
like the following example:

Reports with one or more executions will look like the following example:

In the above example you can see a list of previously executed reports. Their
completion status is indicated by the green check mark. Reports that are still
in progress are indicated by a spinning icon. Reports that are queued for
execution are indicated by an hourglass icon. The reports shown here are all
complete, so they can be downloaded by clicking the Download Full Report button.
Incomplete, queued, or failed reports cannot be downloaded.
The initial view shows up to four reports, with any older items being viewable
by clicking the View More button. The View More button will disappear
when there are no more reports to show. In addition:
Clicking the Refresh List button will refresh the list of reports, including any executions that may have completed since the last time the list was refreshed. Clicking the Generate Now button will generate a new execution of the report.
Individual report items can be deleted by clicking the Delete button. If the
topmost report item is deleted, the link in the table row will correspond to the
next report item in the list (if any are available).
Note: Deleting all the execution entries for a report will not delete the
report itself. The report will still be available for future executions.
Each report row has a Tools control that allows you to perform the following
actions:
- Configure: Opens the report configuration popup, allowing you to change
the report name, description, and schedule
- Generate Now: Generates a new execution of the report
- Save as Template: Saves the report as a user template, allowing you to use
it as the basis for future reports
- Delete: Removes the report and any associated executions. If all reports
are deleted, the page will transition to the New Reports tab and the Saved
Reports tab will be disabled.
8.6.5 - Templates
Overview
The Templates tab in the Reports view is where you can view and manage
report templates. Templates provide the basis for creating the reports executed
by the system and specify which filters are applied to the retrieved dataset and
how the returned data is shaped.
A number of system templates are provided with the application and all of these
and can be used as-is, or as a starting point for creating your own user templates.
Viewing Templates
An example of the System Templates view in the Templates tab is shown
below:

In this view you can see all the system templates provided by default, and their
associated descriptions. System templates cannot be deleted, but can be copied
and modified to create your own user templates.
An alternate way of creating a new user template is by clicking the Create New
Template button. You will be presented with a dialog that allows you to
select an existing system template as your starting point, or base your
composition on any of the custom templates created by you or other users:

Selecting a template from the provided dropdown will open the Create a New
Template dialog:

Within this dialog you can provide a unique name and optional description for
the new template. In addition, you can modify the filters available when composing
reports based on this template, and the columns that will be displayed in the
resulting report:
Filters: You can add or remove filters, set
default values, and specify if the filter is optional or required. Filters are
displayed from left to right when composing a report—you can change the display
order by clicking on a row hotspot and dragging the row item up or down
the list.
Columns: You can add or remove columns, change their display
order, or provide custom column names to be used when the data is presented in
the tabular form offered by comma-separated variable (CSV) file downloads.
Columns are displayed from left to right within a report table—you can change
the display order by clicking on a row hotspot and dragging the row item up or
down the list. Note that templates must contain at least one column.
Once you have configured the filters and columns, you can specify if the report
will be scoped to return results against the analysis data in either the current selected
account or from all accounts, and click OK. The new template will be added
to the list of available user templates.
Custom Templates
The custom templates view shows all user-defined templates present in
the current selected account. An example of the Custom Templates view is shown below:
Unlike system templates, custom templates can be edited or deleted in addition
to being copied. Clicking the Tools button for a custom template will
display the following options:

Note that any changes you make to templates in this view, or any new entries you
create, will be available to all users in the current selected account.
8.7.1 - Hints
8.7.2 - Corrections
When Anchore analyzes an image, it reports a Software Bill of Materials (SBOM) to be stored and later scanned in order to match package metadata against known vulnerabilities.
One aspect of the SBOM is a best effort guess of the CPE (Common Platform Enumeration) for a given package. The Anchore analyzer builds a list of CPEs for each package
based on the metadata that is available (ex. for Java packages, the manifest, which contains multiple different version specifications among other metadata), but sometimes gets this wrong.
For example, Java Spring packages are generally reported as follows:
- Spring Core, version 5.1.4
cpe:2.3:a:*:spring-core:5.1.4:*:*:*:*:*:*:*
However, since Spring is a framework built by Pivotal Software, the CPE referenced in the NVD database looks more like:
cpe:2.3:a:pivotal_software:spring_security:5.1.4:*:*:*:*:*:*:*
To facilitate this correction, Anchore provides the Correction feature. Now, a user can provide a correction that will
update a given package’s metadata so that attributes (including CPEs) can be corrected when Anchore does a vulnerability scan
Using the above example, a user can add a correction as using anchorectl or via HTTP POST to the /corrections endpoint:
{
"description": "Update Spring Core CPE",
"match": {
"type": "java",
"field_matches": [
{
"field_name": "package",
"field_value": "spring-core"
},
{
"field_name": "implementation-version",
"field_value": "5.1.4.RELEASE"
}
]
},
"replace": [
{
"field_name": "cpes",
"field_value": "cpe:2.3:a:pivotal_software:spring_security:5.1.4:*:*:*:*:*:*:*"
}
],
"type": "package"
}
JSON Reference:
- description: A description of the correction being added (for note taking purposes)
- replace: a list of field name/value pairs to replace.
- type: The type of correction being added. Currently only “package” is supported
- match:
- type: The type of package to match upon. Supported values are based on the type of content available to images being analyzed (ex. java, gem, python, npm, os, go, nuget)
- field_matches: A list of name/value pairs based on which package metadata fields to match this correction upon
- The schema of the fields to match can be found by outputting the direct JSON content for the given content type:
- Ex. Java Package Metadata JSON:
{
"cpes": [
"cpe:2.3:a:*:spring-core:5.1.4.RELEASE:*:*:*:*:*:*:*",
"cpe:2.3:a:*:spring-core:5.1.4.RELEASE:*:*:*:*:java:*:*",
"cpe:2.3:a:*:spring-core:5.1.4.RELEASE:*:*:*:*:maven:*:*",
"cpe:2.3:a:spring-core:spring-core:5.1.4.RELEASE:*:*:*:*:*:*:*",
"cpe:2.3:a:spring-core:spring-core:5.1.4.RELEASE:*:*:*:*:java:*:*",
"cpe:2.3:a:spring-core:spring-core:5.1.4.RELEASE:*:*:*:*:maven:*:*"
],
"implementation-version": "5.1.4.RELEASE",
"location": "/app.jar:BOOT-INF/lib/spring-core-5.1.4.RELEASE.jar",
"maven-version": "N/A",
"origin": "N/A",
"package": "spring-core",
"specification-version": "N/A",
"type": "JAVA-JAR"
}
Note: if a new field is specified here, it will be added to the content output when the correction is matched. See below for additional functionality around CPEs.
To add the above JSON using anchorectl the following command can be used
anchorectl correction add -i path-to-file.json
You could also achieve something similar using
anchorectl correction add \
--match package=spring-core \
--match implementation-version="5.1.4.RELEASE" \
--type java \
--replace cpes="cpe:2.3:pivotal_software:spring_security:5.1.4:*:*:*:*:*:*:*" \
--replace description="Update Spring Core CPE"
Don’t forget you can list, delete and get a correction with the anchorectl
The command to retrieve a list of existing corrections is:
anchorectl correction list
The command to delete a corrections is:
anchorectl correction delete {correction_id}
# {correction_id} is the UUID of the correction you wish to delete
The command to get a correction is:
anchorectl correction get {correction_id}
# {correction_id} is the UUID of the correction you wish to get
The result of the correction can be checked using the image content command of anchorectl. For example to see our above java correction we would run
anchorectl image content -t java Image_sha256_ID -o json
We would see the spring-core package returned as having the CPE cpe:2.3:a:pivotal_software:spring_security:5.1.4:*:*:*:*:*:*:*
Note: Don’t forget to replace the Image_sha256_ID with the image ID you’re trying to test.
Corrections may be updated and deleted via the API as well. Creation of a Correction generates a UUID that may be used to reference that Correction later.
Refer to the Enterprise Swagger spec for more details.
CPE Templating
CPE replacement can be templated based on the other fields of the package as well. In the above example, a replacement could have been provided as follows:
{
"field_name": "cpes",
"field_value": "cpe:2.3:a:pivotal_software:spring_security:{implementationVersion}:*:*:*:*:*:*:*"
}
For the “cpes” field only, Anchore Enterprise can recognize a templated field via curly braces “{}”. Package JSON keys contained here will be replaced with their corresponding value.
Vulnerability Matching Configuration
Search by CPE can be globally configured per supported ecosystem via the anchore enterprise policy engine config. The default enables search by cpe for all ecosystems except for javascript (since NPM package vulnerability reports are exhaustively covered by the GitHub Security Advisory Database).
A fully-specified default config is as below:
policy_engine:
vulnerabilities:
matching:
default:
search:
by_cpe:
enabled: true
ecosystem_specific:
dotnet:
search:
by_cpe:
enabled: true
golang:
search:
by_cpe:
enabled: true
java:
search:
by_cpe:
enabled: true
javascript:
search:
by_cpe:
enabled: false
python:
search:
by_cpe:
enabled: true
ruby:
search:
by_cpe:
enabled: true
stock:
search:
by_cpe:
# Disabling search by CPE for the stock matcher will entirely disable binary-only matches
# and is *NOT ADVISED*
enabled: true
A shorter form of the default config is:
policy_engine:
vulnerabilities:
matching:
default:
search:
by_cpe:
enabled: true
ecosystem_specific:
javascript:
search:
by_cpe:
enabled: false
If disabling search by CPE for all GitHub covered ecosystems is desired, the config would look like:
policy_engine:
vulnerabilities:
matching:
default:
search:
by_cpe:
enabled: false
ecosystem_specific:
stock:
search:
by_cpe:
enabled: true
It is important to note that the GitHub Provider must be enabled in the feed service when disabling search by CPE or else there will be no vulnerability reporting for those ecosystems.
9 - Compliance Management
9.1 - Policy Overview
What is a policy?
A policy is composed of a set of rules that are used to perform an evaluation
on a source repository or container image. These rules include—but are not
limited to—checks on security, known vulnerabilities, configuration file
contents, the presence of credentials, manifest changes, exposed ports, or any
user defined checks.
Policies can be deployed site wide, or customized to run against specific
sources, container images, or categories of application. For additional
information, refer to the Policy
concepts section.
Once a policy has been applied to a source repository or image container, it can
return one of two results:
A policy includes the following elements:
Rule Sets
A policy is made up from a set of rules that are used to perform an evaluation on a source repository or container image. These policies can be deployed site wide or customized for specific source repositories, container images, or categories of applications. A policy may contain one or more named rule sets.
Policy rule checks are made up of gates and triggers. A gate is a set of policy checks against broad categories like vulnerabilities, secret scans, licenses, and so forth. It will include one or more triggers, which are checks specific to the gate category. For additional information, refer to the Policy Rules concepts section.
The policy additionally specifies the following action results:
- STOP: Critical error that should stop the deployment by failing the policy evaluation.
- WARN: Issue a warning.
- GO: Okay to proceed.
The result of an evaluation will be based on the actions configured in your rule set.
If you are creating a policy rule for a source repository, only vulnerabilities checks are available.
Allowlists
An allowlist contains one or more exceptions that can be used during policy
evaluations, such as allowing a CVE to be excluded. A policy may contain multiple allowlists.
Mappings
A policy mapping defines which policies and allowlists should be used to
perform the policy evaluation of a given source repository or container image.
A policy may contain multiple mappings including wildcard mappings that
apply to multiple elements.
Allowed Images
An allowed images list defines one or more images that will always pass policy
evaluation regardless of any policy violations. Allowed images can be
specified by name, image ID, or image digest. A policy contains a
single list of allowed images.
Denied Images
A denied images list defines one or more images that will always fail policy
evaluation. Denied images can be specified by name, image ID, or image digest.
A policy contains a single list of denied images.
Listing Policies
The Policies tab contains a table
that lists the policies defined within an account.

Note: A lock icon next to the policy name indicates that the policy cannot
be deleted. Policy rules that are used by policy mappings in the policy (which
will be listed under the Mappings column entry within the Edit option) cannot be deleted
until they are removed from every associated mapping.
Policies can also be managed directly using the REST API or the anchorectl policy command. It is recommended that any policy configuration be handled via UI and not AnchoreCTL
# anchorectl policy list
✔ Fetched policies
┌────────────────┬──────────────────────────────────────┬────────┬──────────────────────┐
│ NAME │ POLICY ID │ ACTIVE │ UPDATED │
├────────────────┼──────────────────────────────────────┼────────┼──────────────────────┤
│ Default policy │ 2c53a13c-1765-11e8-82ef-23527761d060 │ true │ 2023-10-25T20:39:28Z │
│ devteam1policy │ da8208a2-c8ae-4cf2-a25b-a52b0cdcd789 │ false │ 2023-10-25T20:47:16Z │
└────────────────┴──────────────────────────────────────┴────────┴──────────────────────┘
** times are reported in UTC
Using the policy get command, summary or detailed information about a policy can be retrieved. The policy is referenced using its unique POLICY ID.
# anchorectl policy get 2c53a13c-1765-11e8-82ef-23527761d060
✔ Fetched policy
Name: Default policy
ID: 2c53a13c-1765-11e8-82ef-23527761d060
Comment: Default policy
Policies:
- artifactType: image
comment: System default policy
id: 48e6f7d6-1765-11e8-b5f9-8b6f228548b6
name: DefaultPolicy
rules:
- action: STOP
gate: dockerfile
id: ce7b8000-829b-4c27-8122-69cd59018400
params:
- name: ports
value: "22"
- name: type
value: denylist
trigger: exposed_ports
...
...
The policy can be downloaded in JSON format by passing the --detail parameter.
# anchorectl policy get 2c53a13c-1765-11e8-82ef-23527761d060 --detail -o json-raw > policy.json
✔ Fetched policy
The Tools dropdown menu in the Actions column provides options to:
- Edit the policy
- Copy the policy
- Download the policy as a JSON document
- Delete the policy (if it is not being used by any policy mapping)

The Edit button provides options to view and edit:
- Rule Sets
- Allowlists
- Mappings
- Allowed/Denied Images
9.1.1 - Managing Policies
Policies
The Policy tab displays a list of policies that are loaded in the
system. Each policy has a unique name, unique ID (UUID), and an optional
description.

Anchore Enterprise supports multiple policies. AnchoreCTL, API, and CI/CD
plugins support specifying a policy when requesting an source repository or
container image evaluation. For example, the development team may use a
different set of policy checks than the operations team. In this case, the
development team would specify their policy ID as part of their policy
evaluation request.
If no policy ID is specified, then Anchore Enterprise will use the active policy
which can be considered as the default policy. Only one policy can be set as
default/active at any time. This policy will be highlighted with a green ribbon.
Note: Policies which are not marked as Active can still be explicitly
requested as part of a policy evaluation.
If multiple users are accessing Policies, or if policies are
being added or removed through the API or AnchoreCTL, then you may update the list of policies by clicking on the Refresh the Policy List button.

The following command can be run to list policies using AnchoreCTL:
# anchorectl policy list
Adding and Editing Policies
You can add a new policy with custom rule rests within the Policies tab.
Click Create New Policy and provide a name and description.
Click Add New Rule Set and select Source Repository if you want the new policy to apply to a source, or select Container Image to have the policy apply to an image.
You can configure each rule set under the Edit option. Start by selecting an item from the Gate dropdown list, where each item represents a category of policy checks.
Note: If you are creating a policy rule for a source repository, only
vulnerabilities are available.
After selecting a gate item, hover over the (i) indicator next to
Gate to see additional descriptive details about the gate you have
selected.
Click the Triggers drop down and select a specific check that you want
associated with this item, such as package, vulnerability data unavailable,
and so on. Triggers may have parameters, some of which may be optional.
If any optional parameters are associated with the trigger you select, these
will also be displayed in an additional field where they can be added or
removed. Optional parameters are described in more detail in the next
section.
Select an action to apply to the policy rule. Choose STOP, WARN, or
GO. The action options are only displayed once all required parameters
have been provided, or if no mandatory parameters are required. Once an
action has been selected, the rule is added to the main list of rules
contained in the policy.
Click Save and Close.
# anchorectl policy add --input /path/to/policy/policy.json
Note: Adding a policy will not automatically make it active. You will need to activate the policy using the activate command.
The policy activate command can be used to activate a policy. The policy is referenced using its unique POLICY ID which can be retrieved using the policy list command.
# anchorectl policy activate 2c53a13c-1765-11e8-82ef-23527761d061
✔ Activate policy
┌─────────────────┬──────────────────────────────────────┬────────┬──────────────────────┐
│ NAME │ POLICY ID │ ACTIVE │ UPDATED │
├─────────────────┼──────────────────────────────────────┼────────┼──────────────────────┤
│ Default policy │ 2c53a13c-1765-11e8-82ef-23527761d061 │ true │ 2023-10-25T20:50:17Z │
└─────────────────┴──────────────────────────────────────┴────────┴──────────────────────┘
Upload a Policy
If you have a JSON document containing an existing policy, then you can
upload it into Anchore Enterprise.
Click Add a Local File to upload or paste a valid policy JSON.
You can drag a policy file into the dropzone. Or, you can click
the “Add a Local File” button to add from the local file system.
Click OK to perform a validation on a policy. Only validated policies may
be stored by Anchore Enterprise.
Note: The following command can be run to add policies using AnchoreCTL
# anchorectl policy add --input /path/to/my/policy/bundle.json
Copy an Existing Policy
If you already have a policy that you would like to use as a base for
another policy, you can make a copy of it, give it a new name, and then work
with the policies, mappings, allowlists, and allowed or denied images.
From the Tools list, select Copy Policy.
Enter a unique name for the copy of the policy.
Optional: You can add a description to explain the new policy. This is
recommended.
Click OK to copy the policy.
Download a Policy
From the Tools menu, select Download to JSON.
The JSON file is downloaded just like any other downloaded file to your
computer. Save the downloaded JSON file to your location of choice.
Note: Use the following command to download a policy using AnchoreCTL.
The policy must be referenced by its UUID. For example:
# anchorectl policy get 4c1627b0-3cd7-4d0f-97da-00be5aa835f4 --detail > policy.json
Delete a Policy
If you no longer use a policy, you can delete it. An active (default)
policy cannot be deleted. To delete the active policy first you must mark
another policy as active.
From the Tools menu, select Delete Policy.
Click Yes to confirm that you want to delete the policy.
*Warning: Once the policy is deleted, you cannot recover it.
Note: Use the following command to delete a policy using AnchoreCTL.
The policy must be referenced by its UUID. For example:
# anchorectl policy delete 4c1627b0-3cd7-4d0f-97da-00be5aa835f4
Example Gate Configuration
The following example shows a sophisticated policy check. The metadata gate has
a single trigger that allows checks to be performed against various attributes
of an image, including image size, architecture, and operating system
distribution:

The Attribute parameter drop-down includes a number of attributes taken from
image metadata, including the operating system distribution, number of layers,
and architecture of the image (AMD64, ARM, and so forth).
Once an attribute has been selected, the Check dropdown is used to create a
comparison expression.
The type of comparison varies based on the attribute. For example the numeric
comparison operators such as >, <, >= would be relevant for numeric field
such as size, while other operators such as not in may be useful for querying
data field such as distro.
In this example, by entering rhel centos oracle in the Value field, our
rule will check that the distro (that is, the operating system) under analysis
is not RHEL, Centos, or Oracle.

Optional Parameters
If a trigger has optional parameters, they will be automatically displayed in
the policy editor, and an editable field next to the Triggers drop-down will
show all the current selections.
You can remove unneeded optional parameters by clicking the X button
associated with each entry in the Optional Parameters list, or by clicking
the X button within each associated parameter block.
If an optional parameter is removed, it can be reapplied to the rule by clicking
the Optional Parameters field and selecting it from the resulting dropdown
list.
9.1.2 - Anchore Policy Checks
Introduction
In this document, we describe the current gates (and related triggers and parameters) that are supported within Anchore policy.
Gate: dockerfile
Checks against the content of a dockerfile if provided, or a guessed dockerfile based on docker layer history if the dockerfile is not provided.
Note For further information on usage see Policy Gate: Dockerfile
| Trigger Name | Description | Parameter | Description | Example |
|---|
| instruction | Triggers if any directives in the list are found to match the described condition in the dockerfile. | instruction | The Dockerfile instruction to check. | from |
| instruction | Triggers if any directives in the list are found to match the described condition in the dockerfile. | check | The type of check to perform. | = |
| instruction | Triggers if any directives in the list are found to match the described condition in the dockerfile. | value | The value to check the dockerfile instruction against. | scratch |
| instruction | Triggers if any directives in the list are found to match the described condition in the dockerfile. | actual_dockerfile_only | Only evaluate against a user-provided dockerfile, skip evaluation on inferred/guessed dockerfiles. Default is False. | true |
| effective_user | Checks if the effective user matches the provided user names, either as a allowlist or blocklist depending on the type parameter setting. | users | User names to check against as the effective user (last user entry) in the images history. | root,docker |
| effective_user | Checks if the effective user matches the provided user names, either as a allowlist or blocklist depending on the type parameter setting. | type | How to treat the provided user names. | denylist |
| exposed_ports | Evaluates the set of ports exposed. Allows configuring allowlist or blocklist behavior. If type=allowlist, then any ports found exposed that are not in the list will cause the trigger to fire. If type=denylist, then any ports exposed that are in the list will cause the trigger to fire. | ports | List of port numbers. | 80,8080,8088 |
| exposed_ports | Evaluates the set of ports exposed. Allows configuring allowlist or blocklist behavior. If type=allowlist, then any ports found exposed that are not in the list will cause the trigger to fire. If type=denylist, then any ports exposed that are in the list will cause the trigger to fire. | type | Whether to use port list as a allowlist or denylist. | denylist |
| exposed_ports | Evaluates the set of ports exposed. Allows configuring allowlist or blocklist behavior. If type=allowlist, then any ports found exposed that are not in the list will cause the trigger to fire. If type=denylist, then any ports exposed that are in the list will cause the trigger to fire. | actual_dockerfile_only | Only evaluate against a user-provided dockerfile, skip evaluation on inferred/guessed dockerfiles. Default is False. | true |
| no_dockerfile_provided | Triggers if anchore analysis was performed without supplying the actual image Dockerfile. | | | |
Gate: files
Checks against files in the analyzed image including file content, file names, and filesystem attributes.
| Trigger Name | Description | Parameter | Description | Example |
|---|
| content_regex_match | Triggers for each file where the content search analyzer has found a match using configured regexes in the analyzer_config.yaml “content_search” section. If the parameter is set, the trigger will only fire for files that matched the named regex. Refer to your analyzer_config.yaml for the regex values. | regex_name | Regex string that also appears in the FILECHECK_CONTENTMATCH analyzer parameter in analyzer configuration, to limit the check to. If set, will only fire trigger when the specific named regex was found in a file. | .password. |
| name_match | Triggers if a file exists in the container that has a filename that matches the provided regex. This does have a performance impact on policy evaluation. | regex | Regex to apply to file names for match. | .*.pem |
| attribute_match | Triggers if a filename exists in the container that has attributes that match those which are provided . This check has a performance impact on policy evaluation. | filename | Filename to check against provided checksum. | /etc/passwd |
| attribute_match | Triggers if a filename exists in the container that has attributes that match those which are provided . This check has a performance impact on policy evaluation. | checksum_algorithm | Checksum algorithm | sha256 |
| attribute_match | Triggers if a filename exists in the container that has attributes that match those which are provided . This check has a performance impact on policy evaluation. | checksum | Checksum of file. | 832cd0f75b227d13aac82b1f70b7f90191a4186c151f9db50851d209c45ede11 |
| attribute_match | Triggers if a filename exists in the container that has attributes that match those which are provided . This check has a performance impact on policy evaluation. | checksum_match | Checksum operation to perform. | equals |
| attribute_match | Triggers if a filename exists in the container that has attributes that match those which are provided . This check has a performance impact on policy evaluation. | mode | File mode of file. | 00644 |
| attribute_match | Triggers if a filename exists in the container that has attributes that match those which are provided . This check has a performance impact on policy evaluation. | mode_op | File mode operation to perform. | equals |
| attribute_match | Triggers if a filename exists in the container that has attributes that match those which are provided . This check has a performance impact on policy evaluation. | skip_missing | If set to true, do not fire this trigger if the file is not present. If set to false, fire this trigger ignoring the other parameter settings. | true |
| suid_or_guid_set | Fires for each file found to have suid or sgid bit set. | | | |
Gate: passwd_file
Content checks for /etc/passwd for things like usernames, group ids, shells, or full entries.
| Trigger Name | Description | Parameter | Description | Example |
|---|
| content_not_available | Triggers if the /etc/passwd file is not present/stored in the evaluated image. | | | |
| denylist_usernames | Triggers if specified username is found in the /etc/passwd file | user_names | List of usernames that will cause the trigger to fire if found in /etc/passwd. | daemon,ftp |
| denylist_userids | Triggers if specified user id is found in the /etc/passwd file | user_ids | List of userids (numeric) that will cause the trigger to fire if found in /etc/passwd. | 0,1 |
| denylist_groupids | Triggers if specified group id is found in the /etc/passwd file | group_ids | List of groupids (numeric) that will cause the trigger ot fire if found in /etc/passwd. | 999,20 |
| denylist_shells | Triggers if specified login shell for any user is found in the /etc/passwd file | shells | List of shell commands to denylist. | /bin/bash,/bin/zsh |
| denylist_full_entry | Triggers if entire specified passwd entry is found in the /etc/passwd file. | entry | Full entry to match in /etc/passwd. | ftp:x:14:50:FTP User:/var/ftp:/sbin/nologin |
Gate: packages
Distro package checks.
| Trigger Name | Description | Parameter | Description | Example |
|---|
| required_package | Triggers if the specified package and optionally a specific version is not found in the image. | name | Name of package that must be found installed in image. | libssl |
| required_package | Triggers if the specified package and optionally a specific version is not found in the image. | version | Optional version of package for exact version match. | 1.10.3rc3 |
| required_package | Triggers if the specified package and optionally a specific version is not found in the image. | version_match_type | The type of comparison to use for version if a version is provided. | exact |
| verify | Check package integrity against package db in the image. Triggers for changes or removal or content in all or the selected “dirs” parameter if provided, and can filter type of check with the “check_only” parameter. | only_packages | List of package names to limit verification. | libssl,openssl |
| verify | Check package integrity against package db in the image. Triggers for changes or removal or content in all or the selected “dirs” parameter if provided, and can filter type of check with the “check_only” parameter. | only_directories | List of directories to limit checks so as to avoid checks on all dir. | /usr,/var/lib |
| verify | Check package integrity against package db in the image. Triggers for changes or removal or content in all or the selected “dirs” parameter if provided, and can filter type of check with the “check_only” parameter. | check | Check to perform instead of all. | changed |
| denylist | Triggers if the evaluated image has a package installed that matches the named package optionally with a specific version as well. | name | Package name to denylist. | openssh-server |
| denylist | Triggers if the evaluated image has a package installed that matches the named package optionally with a specific version as well. | version | Specific version of package to denylist. | 1.0.1 |
| metadata | Triggers on a package type comparison. | type | The type of package. | rpm |
| metadata | Triggers on a package name comparison. | name | The name of the package. Wildcards are supported. | *ssl |
| metadata | Triggers on a package version comparison. | version | The version of the package. Wildcards are supported. | *fips |
Gate: vulnerabilities
CVE/Vulnerability checks.
| Trigger Name | Description | Parameter | Description | Example |
|---|
| package | Triggers if a found vulnerability in an image meets the comparison criteria. | package_type | Only trigger for specific package type. | all |
| package | Triggers if a found vulnerability in an image meets the comparison criteria. | severity_comparison | The type of comparison to perform for severity evaluation. | > |
| package | Triggers if a found vulnerability in an image meets the comparison criteria. | severity | Severity to compare against. | high |
| package | Triggers if a found vulnerability in an image meets the comparison criteria. | cvss_v3_base_score_comparison | The type of comparison to perform for CVSS v3 base score evaluation. | > |
| package | Triggers if a found vulnerability in an image meets the comparison criteria. | cvss_v3_base_score | CVSS v3 base score to compare against. | None |
| package | Triggers if a found vulnerability in an image meets the comparison criteria. | cvss_v3_exploitability_score_comparison | The type of comparison to perform for CVSS v3 exploitability sub score evaluation. | > |
| package | Triggers if a found vulnerability in an image meets the comparison criteria. | cvss_v3_exploitability_score | CVSS v3 exploitability sub score to compare against. | None |
| package | Triggers if a found vulnerability in an image meets the comparison criteria. | cvss_v3_impact_score_comparison | The type of comparison to perform for CVSS v3 impact sub score evaluation. | > |
| package | Triggers if a found vulnerability in an image meets the comparison criteria. | cvss_v3_impact_score | CVSS v3 impact sub score to compare against. | None |
| package | Triggers if a found vulnerability in an image meets the comparison criteria. | fix_available | If present, the fix availability for the vulnerability record must match the value of this parameter. | true |
| package | Triggers if a found vulnerability in an image meets the comparison criteria. | vendor_only | If True, an available fix for this CVE must not be explicitly marked as wont be addressed by the vendor | true |
| package | Triggers if a found vulnerability in an image meets the comparison criteria. | max_days_since_creation | A grace period, in days, for a vulnerability match to be present after which the vulnerability is a policy violation. Uses the date the match was first found for the given image. | 7 |
| package | Triggers if a found vulnerability in an image meets the comparison criteria. | max_days_since_fix | If provided (only evaluated when fix_available option is also set to true), the fix first observed time must be older than the days provided, to trigger. | 30 |
| package | Triggers if a found vulnerability in an image meets the comparison criteria. | vendor_cvss_v3_base_score_comparison | The type of comparison to perform for vendor specified CVSS v3 base score evaluation. | > |
| package | Triggers if a found vulnerability in an image meets the comparison criteria. | vendor_cvss_v3_base_score | Vendor CVSS v3 base score to compare against. | None |
| package | Triggers if a found vulnerability in an image meets the comparison criteria. | vendor_cvss_v3_exploitability_score_comparison | The type of comparison to perform for vendor specified CVSS v3 exploitability sub score evaluation. | > |
| package | Triggers if a found vulnerability in an image meets the comparison criteria. | vendor_cvss_v3_exploitability_score | Vendor CVSS v3 exploitability sub score to compare against. | None |
| package | Triggers if a found vulnerability in an image meets the comparison criteria. | vendor_cvss_v3_impact_score_comparison | The type of comparison to perform for vendor specified CVSS v3 impact sub score evaluation. | > |
| package | Triggers if a found vulnerability in an image meets the comparison criteria. | vendor_cvss_v3_impact_score | Vendor CVSS v3 impact sub score to compare against. | None |
| package | Triggers if a found vulnerability in an image meets the comparison criteria. | package_path_exclude | The regex to evaluate against the package path to exclude vulnerabilities | .test.jar |
| package | Triggers if a found vulnerability in an image meets the comparison criteria. | inherited_from_base | If true, only show vulns inherited from the base, if false than only show vulns not inherited from the base. Don’t specify to include vulns from the base image and the current image. See Base Images for more details. | True |
| denylist | Triggers if any of a list of specified vulnerabilities has been detected in the image. | vulnerability_ids | List of vulnerability IDs, will cause the trigger to fire if any are detected. | CVE-2019-1234 |
| denylist | Triggers if any of a list of specified vulnerabilities has been detected in the image. | vendor_only | If set to True, discard matches against this vulnerability if vendor has marked as will not fix in the vulnerability record. | True |
| stale_feed_data | Triggers if the CVE data is older than the window specified by the parameter MAXAGE (unit is number of days). | max_days_since_sync | Fire the trigger if the last sync was more than this number of days ago. | 10 |
| vulnerability_data_unavailable | Triggers if vulnerability data is unavailable for the image’s distro packages such as rpms or dpkg. Non-OS packages like npms and java are not considered in this evaluation | | | |
Gate: licenses
License checks against found software licenses in the container image.
| Trigger Name | Description | Parameter | Description | Example |
|---|
| denylist_exact_match | Triggers if the evaluated image has a package installed with software distributed under the specified (exact match) license(s). | licenses | List of license names to denylist exactly. | GPLv2+,GPL-3+,BSD-2-clause |
| denylist_exact_match | Triggers if the evaluated image has a package installed with software distributed under the specified (exact match) license(s). | package_type | Only trigger for specific package type. | all |
| denylist_partial_match | triggers if the evaluated image has a package installed with software distributed under the specified (substring match) license(s) | licenses | List of strings to do substring match for denylist. | LGPL,BSD |
| denylist_partial_match | triggers if the evaluated image has a package installed with software distributed under the specified (substring match) license(s) | package_type | Only trigger for specific package type. | all |
Gate: secret_scans
Checks for secrets and content found in the image using configured regexes found in the “secret_search” section of analyzer_config.yaml.
| Trigger Name | Description | Parameter | Description | Example |
|---|
| content_regex_checks | Triggers if the secret content search analyzer has found any matches with the configured and named regexes. Checks can be configured to trigger if a match is found or is not found (selected using match_type parameter). Matches are filtered by the content_regex_name and filename_regex if they are set. The content_regex_name shoud be a value from the “secret_search” section of the analyzer_config.yaml. | content_regex_name | Name of content regexps configured in the analyzer that match if found in the image, instead of matching all. Names available by default are: [‘AWS_ACCESS_KEY’, ‘AWS_SECRET_KEY’, ‘PRIV_KEY’, ‘DOCKER_AUTH’, ‘API_KEY’]. | AWS_ACCESS_KEY |
| content_regex_checks | Triggers if the secret content search analyzer has found any matches with the configured and named regexes. Checks can be configured to trigger if a match is found or is not found (selected using match_type parameter). Matches are filtered by the content_regex_name and filename_regex if they are set. The content_regex_name shoud be a value from the “secret_search” section of the analyzer_config.yaml. | filename_regex | Regexp to filter the content matched files by. | /etc/.* |
| content_regex_checks | Triggers if the secret content search analyzer has found any matches with the configured and named regexes. Checks can be configured to trigger if a match is found or is not found (selected using match_type parameter). Matches are filtered by the content_regex_name and filename_regex if they are set. The content_regex_name shoud be a value from the “secret_search” section of the analyzer_config.yaml. | match_type | Set to define the type of match - trigger if match is found (default) or not found. | found |
Checks against image metadata (ie size, OS, distro, architecture, etc.).
| Trigger Name | Description | Parameter | Description | Example |
|---|
| attribute | Triggers if a named image metadata value matches the given condition. | attribute | Attribute name to be checked. | size |
| attribute | Triggers if a named image metadata value matches the given condition. | check | The operation to perform the evaluation. | > |
| attribute | Triggers if a named image metadata value matches the given condition. | value | Value used in comparison. | 1073741824 |
Gate: always
Triggers that fire unconditionally if present in policy, useful for things like testing and deny-listing.
| Trigger Name | Description | Parameter | Description | Example |
|---|
| always | Fires if present in a policy being evaluated. Useful for things like deny-listing images or testing mappings and allowlists by using this trigger in combination with policy mapping rules. | | | |
Gate: retrieved_files
Checks against content and/or presence of files retrieved at analysis time from an image.
| Trigger Name | Description | Parameter | Description | Example |
|---|
| content_not_available | Triggers if the specified file is not present/stored in the evaluated image. | path | The path of the file to verify has been retrieved during analysis | /etc/httpd.conf |
| content_regex | Evaluation of regex on retrieved file content | path | The path of the file to verify has been retrieved during analysis | /etc/httpd.conf |
| content_regex | Evaluation of regex on retrieved file content | check | The type of check to perform with the regex | match |
| content_regex | Evaluation of regex on retrieved file content | regex | The regex to evaluate against the content of the file | .SSlEnabled. |
Gate: Malware
Checks against malware presence.
| Trigger | Description | Parameters |
|---|
| scans | Triggers if any malware scanner has found any matches in the image. | |
| scan_not_run | Triggers if no scan was found for the image. | |
Gate: Tag Drift
Compares the SBOM from the evaluated image’s tag and the tag’s previous image, if found. Provides triggers to detect packages added, removed or modified.
| Trigger Name | Description | Parameter | Description | Example |
|---|
| packages_added | Checks to see if any packages have been added. | package_type | Package type to filter for only specific types. If ommitted, then all types are evaluated. | apk |
| packages_removed | Checks to see if any packages have been removed. | package_type | Package type to filter for only specific types. If ommitted, then all types are evaluated. | apk |
| packages_modified | Checks to see if any packages have been modified. | package_type | Package type to filter for only specific types. If ommitted, then all types are evaluated. | apk |
Gate: Image Source Drift
Triggers for evaluating diffs of an image’s source repo SBOM and the built image. Operates on the diffs defined by ‘contains’ relationships where the image is the ‘source’ and the source revisions that are the ’target’ for the relationship.
| Trigger Name | Description | Parameter | Description | Example |
|---|
| package_downgraded | Checks to see if any packages have a lower version in the built image than specified in the input source sboms | package_types | Types of package to filter by | java,npm |
| package_removed | Checks to see if any packages are not installed that were expected based on the image’s related input source sboms | package_types | Types of package to filter by | java,npm |
| no_related_sources | Checks to see if there are any source sboms related to the image. Findings indicate that the image does not have a source sbom to detect drift against | | | |
Gate: Ancestry
Checks the image ancestry against approved images. See Base Images for more information on how “Base Image” is calculated.
| Trigger Name | Description | Parameter | Description | Example |
|---|
| allowed_base_image_digest | Checks to see if base image is approved | base_digest | List of approved base image digests. | sha256:123abc |
| allowed_base_image_tag | Checks to see if base image is approved | base_tag | List of approved base image tags. | docker.io/debian:latest |
| no_ancestors_analyzed | Checks to see if the image has a known ancestor | | | |
Gate: Distro
Checks against the image distro metadata. This can be used to denylist versions of a distro, such as versions that are EOL.
| Trigger Name | Description | Parameter | Description | Example |
|---|
| deny | Triggers if the image distro and version match the criteria | distro | Name of the distribution to match | debian |
| deny | Triggers if the image distro and version match the criteria | version | Version of distribution to compare against | 9 |
| deny | Triggers if the image distro and version match the criteria | check | The comparison to use in the evaluation | < |
9.1.3 - Policy Mappings
Introduction
The Mapping feature of the Policy Editor creates rules that define which
policies and allowlists should be used to perform the policy evaluation of a
source repository or container image based on the registry, repository name,
and tag of the image.
The policy editor lets you set up different policies that will be used on
different images based on the use case. For example the policy applied to a
web-facing service may have different security and operational best
practices rules than a database backend service.
A mapping has:
- Registry - The registry url to match, including wildcards (e.g. ‘docker.io’, ‘quay.io’, ‘gcr.io’, ‘*’)
- Repository - The repository name to match, including wildcards (e.g. ’library/nginx’, ‘mydockerhubusername/myrepositoryname’, ’library/*’, ‘*’)
- Image - The way to select an image that matches the registry and repository filters
- type: how to reference the image and the expected format of the ‘value’ property
- “tag” - just the tag name itself (the part after the ‘:’ in a docker pull string: e.g. nginx:latest -> ’latest’ is the tag name)
- “id” - the image id
- “digest” - the image digest (e.g. sha256@abc123)
- value: the value to match against, including wildcards
For example:
| Field | Example | Description |
|---|
| Registry | registry.example.com | Apply mapping to the registry.example.com |
| Repository | anchore/web\* | Map any repository starting with web in the anchore namespace |
| Tag | * | Map any tag |
In this example,an image named registry.example.com/anchore/webapi:latest
would match this mapping, and so the policy and allowlist configured for this
mapping would be applied.
Unlike other parts of the policy, Mappings are evaluated in order and will halt on the first matching rule. This is important to understand when combined with wildcard matches since it enables sophisticated matching behavior.
Note: The trusted images and denylisted images lists take precedence over
the mapping. See Allowed / Denied Images for
details.
It is recommended that a final catch-all mapping is applied to ensure that all
images are mapped to a policy. This catch-all mapping should specify wildcards
in the registry, repository, and tag fields.
9.1.3.1 - Container Image Mapping
Introduction
The container image policy mapping editor creates rules that define which
policies and allowlists should be used to perform the policy evaluation of an
image based on the registry, repository name, and tag of the image.
Create a New Image Container Mapping
From the Policies screen, click Mappings.

Under Container Images, click on the “Let’s add one!” button.
From the Add New Container Image Mapping dialog, add a name for the mapping, the policy for which the mapping will apply (added automatically), a registry, a repository, and a tag. You can optionally add an allowlist for the mapping.
Note Once you have created your first mapping, any mapping that is created afterwards will contain an additional optional field called Position. Image evaluation is performed sequentially from top to bottom. The system will stop at the first match, so the order or position of the mapping is important.

| Field | Description |
|---|
| Name | A unique name to describe the mapping. For example: “Mapping for webapps”. |
| Position | Set the order for the new mapping. |
| Rule Sets | Rule Sets in the policy to be used for evaluation. A drop down will be displayed allowing selection of a single policy. |
| Allowlist(s) | Optional: The allowlist(s) to be applied to the image evaluation. Multiple allowlists may be applied to the same image. |
| Registry | The name of the registry to match. Note the name should exactly match the name used to submit the image or repo for analysis. For example: foo.example.com:5000 is different to foo.example.com. Wildcards are supported. A single * would specify any registry. |
| Repository | The name of the repository, optionally including namespace. For example: webapp/foo. Wildcards are supported. A single * would specify any repository. Partial names with wildcards are supported. For example: web*/*. |
| Tag | Tags mapped by this rule. For example: latest. Wildcard are supported. A single * would match any tag. Partial names with wildcards are supported. For example: 2018*. |
Click OK to create the new mapping.
It is recommended that a final catch-all mapping is applied to ensure that all container images are mapped to a policy. This catch-all mapping should specify wildcards in the registry, repository, and tag fields.
Using the policy editor, you can set up different policies that will be used on different images based on use case. For example the policy applied to a web facing service may have different security and operational best practices rules than a database backend service.
Mappings are set up based on the registry, repository, and tag of an image. Each field supports wildcards. For example:
| Field | Example | Description |
|---|
| Registry | registry.example.com | Apply mapping to the registry.example.com |
| Repository | anchore/web\* | Map any repository starting with web in the anchore namespace |
| Tag | * | Map any tag |
In this example, an imaged named registry.example.com/anchore/webapi:latest would match this mapping, so the policy and allowlist configured for this mapping would be applied.
The mappings are applied in order, from top to bottom and the system will stop at the first match.
Note: The allowed images and denied images lists take precedence over the mapping. See Allowed / Denied Images for details.
9.1.3.2 - Source Repository Mapping
The source repository policy mapping editor creates rules that define which policies and allowlists should be used to perform the policy evaluation of a source repository based on the host, and repository name.
Organizations can set up multiple policies that will be used on different source repositories based on use case. For example the policy applied to a web facing service may have different security and operational best practices rules than a database backend service.
Mappings are set up based on the Host and Repository of a source repository. Each field supports wildcards.
Create a Source Repository Mapping
From the Policies screen, click Mappings.

Under Source Repositories, click on the “Let’s add one!” button.
From the Add New Source Repository Mapping dialog, add a name for the
mapping, choose the policy for which the mapping will apply, a host (such as github.com), and a repository. You can optionally add an allowlist for the mapping.
Note Once you have created your first mapping, any mapping that is created afterwards will contain an additional optional field called Position. Image evaluation is performed sequentially from top to bottom. The system will stop at the first match, so the order or position of the mapping is important.

| Field | Description |
|---|
| Name | A unique name to describe the mapping. |
| Position | Optional: Set the order for the new mapping. |
| Policies | Name of policy to use for evaluation. A drop down will be displayed allowing selection of a single policy. |
| Allowlist(s) | Optional: The allowlist(s) to be applied to the source repository evaluation. Multiple allowlists may be applied to the same source |
| Host | The name of the source host to match. For example: github.com. |
| Repository | The name of the source repository, optionally including namespace. For example: webapp/foo. Wildcards are supported. A single * would specify any repository. Partial names with wildcards are supported. For example: web*/*. |
- Click OK to create the new mapping.
9.1.3.3 - Policy Mappings Example
Mappings in the policy are a set of rules, evaluated in order, that describe matches on an image, id, digest, or tag and the corresponding sets of policies and allowlists to apply to any image that matches the rule’s criteria.
Policies can contain one or more mapping rules that are used to determine which rule_sets and allowlists apply to a given image. They match images on the registry and repository, and finally be one of id, digest, or tag.
Examples
Example 1, all images match a single catch-all rule:
[
{
"registry": "*",
"repository": "*",
"image": { "type": "tag", "value": "*"},
"rule_set_ids": ["defaultpolicy"],
"allowlist_ids": ["defaultallowlist"]
}
]
Example 2, all “official” images from DockerHub are evaluated against officialspolicy and officialsallowlist (made up names for this example), while all others from DockerHub will be evaluated against defaultpolicy and defaultallowlist , and private GCR images will be evaluated against gcrpolicy and gcrallowlist:
[
{
"registry": "docker.io",
"repository": "library/*",
"image": { "type": "tag", "value": "*"},
"rule_set_ids": [ "officialspolicy"],
"allowlist_ids": [ "officialsallowlist"]
},
{
"registry": "gcr.io",
"repository": "*",
"image": { "type": "tag", "value": "*"},
"rule_set_ids": [ "gcrpolicy"],
"allowlist_ids": [ "gcrallowlist"]
},
{
"registry": "*",
"repository": "*",
"image": { "type": "tag", "value": "*"},
"rule_set_ids": [ "defaultpolicy"],
"allowlist_ids": [ "defaultallowlist"]
}
]
Example 3, all images from a unknown registry will be evaluated against defaultpolicy and defaultallowlist, and an internal registry’s images will be evaluated against a different set (internalpolicy and internalallowlist):
[
{
"registry": "myregistry.mydomain.com:5000",
"repository": "*",
"image": { "type": "tag", "value": "*"},
"policy_ids": [ "internalpolicy"],
"allowlist_ids": [ "internalallowlist"]
},
{
"registry": "*",
"repository": "*",
"image": { "type": "tag", "value": "*"},
"policy_ids": [ "defaultpolicy"],
"allowlist_ids": [ "defaultallowlist"]
}
]
Using Multiple Policies and Allowlists
The result of the evaluation of the mapping section of a policy is the list of rule sets and allowlists that will be used for actually evaluating the image. Because multiple rule sets and allowlists can be specified in each mapping rule, you can use granular rule sets and allowlists and then combine them in the mapping rules.
Examples of schemes to use for how to split-up policies include:
- Different policies for different types of checks such that each policy only uses one or two gates (e.g. vulnerabilities, packages, dockerfile)
- Different policies for web servers, another for database servers, another for logging infrastructure, etc.
- Different policies for different parts of the stack: os-packages vs. application package
9.1.4 - Allowlists
Introduction
An allowlist contains one or more exceptions that can be used during policy
evaluation. For example allowing a CVE to be excluded from policy evaluation.
The Allowlist tab shows a list of allowlists present in the policy.
Allowlists are an optional element of the policy, and a policy may
contain multiple instances.

Add a New Allowlist
Click Add New Allowlist to create a new, empty allowlist.
Add a name for the allowlist. A name is required and should be unique.
Optional: Add a description. A description is recommended. Often the
description is updated as new entries are added to the allowlist to explain
any background. For example “Updated to account for false positive in glibc
library”.

Upload or Paste an Allowlist
If you have a JSON document containing an existing allowlist, then you can
upload it into Anchore Enterprise.
Click Import Allowlist to upload an allowlist. You can also
manually edit the allowlist in the native JSON format.

Drag an allowlist file into the dropzone. Or, you can click the “Add a
Local File” button and load it from a local filesystem.
Click OK to upload the allowlist. The system will perform a validation
for the allowlist. Only validated allowlists may be stored by Anchore
Enterprise.
Example allowlist:
{
"id": "allowlist1",
"name": "My First Allowlist",
"comment": "A allowlist for my first try",
"version": "2",
"items": [
{
"gate": "vulnerabilities",
"trigger_id": "CVE-2018-0737+*",
"id": "rule1",
"expires_on": "2019-12-30T12:00:00Z"
}
]
}
Copying a Allowlists
You can copy an existing allowlist, give it a new name, and use it for a policy
evaluation.
From the Tools drop down, select Copy Allowlist.

Enter a unique name for the allowlist.
Optional: Add a description. This is recommended. Often the description is
updated as new entries are added to the allowlist to explain any background.

Downloading Allowlists
You can download an existing allowlists as a JSON file. From the Tools drop
down, click Download to JSON.

Editing Allowlists
The Allowlists editor allows new allowlist entries to be created, and existing
entries to be edited or removed.
The components:
- Gate: The gate the allowlist matches from (ensures trigger_ids are not matched in the wrong context).
- Trigger Id: The specific trigger result to match and allowlist. This id is gate/trigger specific as each trigger may have its own trigger_id format. We’ll use the most common for this example: the CVE trigger ids produced by the vulnerability->package gate-trigger. The trigger_id specified may include wildcards for partial matches.
- id: an identifier for the rule, must only be unique within the allowlist object itself.
- Expires On: (optional) specifies when a particular allowlist item expires. This is an RFC3339 date-time string. If the rule matches, but is expired, the policy engine will NOT allowlist according to that match.
The allowlist is processed if it is specified in the mapping rule that was matched during policy evaluation and is applied to the results of the policy evaluation defined in that same mapping rule. If a allowlist item matches a specific policy trigger output, then the action for that output is set to go and the policy evaluation result notes that the trigger output was matched for a allowlist item by associating it with the allowlist id and item id of the match.

Choose an allowlist to edit, then click Edit.

Anchore Enterprise supports allowlisting any policy trigger, however the Allowlists editor currently supports only adding Anchore Security checks, allowing vulnerabilities to be allowlisted.
Choose a gate for the allowlist, for example, vulnerabilities.

A vulnerabilities allowlists entry includes two elements: A CVE / Vulnerability Identifier and a Package.
Enter a CVE / Vulnerability Identifier. The CVE/Vulnerability Identifier
field contains the vulnerability that should be matched by the allowlists.
This can include wildcards.

For example: CVE-2017-7246. This format should match the format of the CVEs
shown in the image vulnerabilities report. Wildcards are supported, however,
care should be taken with using wildcards to prevent allowlisting too many
vulnerabilities.
Enter a package. The package name field contains the package that should be
matched with a vulnerability. For example libc-bin.

Wildcards are also supported within the Package name field.
An allowlists entry may include entries for both the CVE and Package field
to specify an exact match, for example: Vulnerability: CVE-2005-2541
Package: tar.
In other cases, wildcards may be used where a multiple packages may match a
vulnerability. For example, where multiple packages are built from the same
source. Vulnerability: CVE-2017-9000 Package: bind-*
In this example the packages bind-utils, bind-libs and bind-license will all
be allowlisted for CVE-2017-9000.
Special care should be taken with wildcards in the CVE / Vulnerability
Identifier field. In most cases a specific vulnerability identifier will be
entered. In some exceptional cases a wild card in this field may be
appropriate.
A good example of a valid use case for a wildcard in the CVE / Vulnerability
Identifier field is the bind-license package. This package include a single
copyright text file and is included by default in all CentOS:7 images.
CVEs that are reported against the Bind project are typically applied to all
packages built from the Bind source package. So when a CVE is found in Bind
it is common to see a CVE reported against the bind-license package. To
address this use case it is useful to add an allowlists entry for any
vulnerability (*) to the bind-license package.

Optional: Click  to edit an allowlist.
Optional: Click Remove to delete an allowlist.
Ensure that all changes are saved before exiting out of the Edit Allowlists
Items Page. At that point the edits will be sent to Anchore Enterprise.
9.1.5 - Allowed / Denied Images
Introduction
You can add or edit allowed or denied images for your policy rules.
The Allowed / Denied Images tab is split into the following two sub tabs:
Allowed Images: A list of images which will always pass policy evaluation irrespective of any policies that are mapped to them.
Denied Images: A list if images which will always fail policy evaluation irrespective of any policies that are mapped to them.

Add an Allowed or Denied Image to a Policy
If you do not have any allowed or denied images in your policy, click Let’s add one! to add them.


The workflow for adding Allowed or Denied Images is identical.
Images can be referenced in one of the following ways:
By Name: including the registry, repository and tag. For example: docker.io/library/centos:latest
The name does not have to be unique but it is recommended that the identifier is descriptive.

By Image ID: including the full image ID. For example: e934aafc22064b7322c0250f1e32e5ce93b2d19b356f4537f5864bd102e8531f

The full Image ID should be entered. This will be a 64 hex characters. There are a variety of ways to retrieve the ID of an image including using the AnchoreCTL, Anchore UI, and Docker command.
By Image Digest: including the registry, repository and image digest of the image. For example: docker.io/library/centos@sha256:989b936d56b1ace20ddf855a301741e52abca38286382cba7f44443210e96d16

Click OK to add the Allowed or Denied Image item to your policy.
See the following sections for more details about the Name, Image ID, and Image Digest.
For most use cases, it is recommended that the image digest is used to reference the image since an image name is ambiguous. Over time different images may be tagged with the same name.
If an image appears on both the Allowed Images and Denied Images lists, then the Denied Image takes precedence and the image will be failed.
The Allowed Images list will show a list of any allowed images defined by the system includes the following fields:
Allowlist Name
A user friendly name to identify the image(s).
Type
Describes how the image has been specified. By Name, ID, or Digest.
Image
The specification used to define the image.
Actions
The actions you can set for the allowed image.
The  button can be used to copy the image specification into the clipboard.
An existing image may be deleted using the  or edited by pressed the
  button.
Adding an Image by Image ID
The full Image ID should be entered. This will be a 64 hex characters. There are a variety of ways to retrieve the ID of an image including using the AnchoreCTL, Anchore UI and Docker command.
Using AnchoreCTL
$ anchorectl image get library/debian:latest | grep ID
ID: 8626492fecd368469e92258dfcafe055f636cb9cbc321a5865a98a0a6c99b8dd
Using Docker CLI
$ docker images --no-trunc debian:latest
REPOSITORY TAG IMAGE ID CREATED SIZE
docker.io/debian latest sha256:8626492fecd368469e92258dfcafe055f636cb9cbc321a5865a98a0a6c99b8dd 3 days ago 101 MB
By default the docker CLI displays a short ID, the long ID is required and it can be displayed by using the –no-trunc parameter.
Note: The algorithm (sha256:) should not be entered into the Image ID field.
Adding an Image by Digest
When adding an image by Digest the following fields are required:
Registry. For example: docker.io
Repository. For example: library/debian
Digest. For example: sha256:de3eac83cd481c04c5d6c7344cd7327625a1d8b2540e82a8231b5675cef0ae5f
The full identifier for this image is: docker.io/library/debian@sha256:de3eac83cd481c04c5d6c7344cd7327625a1d8b2540e82a8231b5675cef0ae5f
Note: The tag is not used when referencing an image by digest.
There are a variety of ways to retrieve the digest of an image including using the AnchoreCTL, Anchore UI, and Docker command.
Using AnchoreCTL
$ anchorectl image get library/debian:latest | grep Digest
Digest: sha256:7df746b3af67bbe182a8082a230dbe1483ea1e005c24c19471a6c42a4af6fa82
Using Docker CLI
$ docker images --digests debian
REPOSITORY TAG DIGEST IMAGE ID CREATED SIZE
docker.io/debian latest sha256:de3eac83cd481c04c5d6c7344cd7327625a1d8b2540e82a8231b5675cef0ae5f 8626492fecd3 1 days ago 101 MB
Note: Unlike the Image ID entry, the algorithm (sha256:) is required.
Adding an Image by Name
When adding an image by Name, the following fields are required:
Note: Wild cards are supported, so to trust all images from docker.io you would enter docker.io in the Registry field, and add a * in the Repository and Tag fields.
9.1.6 - Testing Policies
Introduction
The Evaluation Preview feature allows you to perform a test evaluation on an image to verify the mapping, policies and allowlists used to evaluate an image.

To test an image you should enter the name of the image, optionally including the registry if the image is not stored on docker.io In the example below an evaluate was requested for library/debian:latest because no registry was specified the default, docker.io registry was used.

Here we can see that the image was evaluated against the policy named “anchore_security_only” and failed, resulting in a STOP action.
Clicking the “View Policy Test Details” will show a more detailed report.

The image was evaluated using the mapping named  and the evaluation failed as the image was found in a denylist.
The next line explains that the image had been denylisted by the Deny CentOS denylist rule, however if the image was not denylisted, it would only have produced a WARN instead of a failure.

The subsequent table lists the policy checks that resulted in any Warn or Stop (failure) checks.
The policy checks are performed on images already analyzed and recorded in Anchore Enterprise. If an image has been added to the system but has not yet completed analysis, then the system will display the following error:

If the evaluation test is re-run after a few minutes, the image will likely have completed analysis and a policy evaluation result will be returned.
If the image specified has not been analyzed by the system and has not been submitted for analysis, then the following error message will be displayed.

9.1.6.1 - Policy Gate: dockerfile
Introduction
This article reviews the “dockerfile” gate and its triggers. The dockerfile gate allows users to perform checks on the content of the dockerfile or docker history for an image and make policy actions based on the construction of an image, not just its content. This is particularly useful for enforcing best practices or metadata inclusion (e.g. labels) on images.
Anchore is either given a dockerfile or infers one from the docker image layer history. There are implications to what data is available and what it means depending on these differing sources, so first, we’ll cover the input data for the gate and how it impacts the triggers and parameters used.
The “dockerfile”
The data that this gate operates on can come from two different sources:
- The actual dockerfile used to build an image, as provided by the user at the time of running
anchorectl image add <img ref> --dockerfile <filename> or the corresponding API call to: POST /images?dockerfile= - The history from layers as encoded in the image itself (see
docker history <img> for this output)
All images have data from history available, but data from the actual dockerfile is only available when a user provides it. This also means that any images analyzed by the tag watcher functionality will not have an actual dockerfile.
The FROM line
In the actual dockerfile, the FROM instruction is preserved and available as used to build the image, however in the history data, the FROM line will always be the very first FROM instruction used to build the image and all of its dependent based image. Thus, for most images, the value in the history will be omitted and Anchore will automatically infer a FROM scratch line, which is logically inserted for this gate if the dockerfile/history does not contain an explicit FROM entry.
For example, using the docker.io/jenkins/jenkins image:
IMAGE CREATED CREATED BY SIZE COMMENT
sha256:3b9c9666a66e53473c05a3c69eb2cb888a8268f76935eecc7530653cddc28981 11 hours ago /bin/sh -c #(nop) COPY file:3a15c25533fd87983edc33758f62af7b543ccc3ce9dd570e473eb0702f5f298e in /usr/local/bin/install-plugins.sh 8.79kB
<missing> 11 hours ago /bin/sh -c #(nop) COPY file:f97999fac8a63cf8b635a54ea84a2bc95ae3da4d81ab55267c92b28b502d8812 in /usr/local/bin/plugins.sh 3.96kB
<missing> 11 hours ago /bin/sh -c #(nop) ENTRYPOINT ["/sbin/tini" "--" "/usr/local/bin/jenkins.sh"] 0B
<missing> 11 hours ago /bin/sh -c #(nop) COPY file:dc942ca949bb159f81bbc954773b3491e433d2d3e3ef90bac80ecf48a313c9c9 in /bin/tini 529B
<missing> 11 hours ago /bin/sh -c #(nop) COPY file:a8f986413b77bf4d88562b9d3a0dce98ab6e75403192aa4d4153fb41f450843d in /usr/local/bin/jenkins.sh 1.45kB
<missing> 11 hours ago /bin/sh -c #(nop) COPY file:55594d9d2aed007553a6743a43039b1a48b30527f8fb991ad93e1fd5b1298f60 in /usr/local/bin/jenkins-support 6.12kB
<missing> 11 hours ago /bin/sh -c #(nop) USER jenkins 0B
<missing> 11 hours ago /bin/sh -c #(nop) ENV COPY_REFERENCE_FILE_LOG=/var/jenkins_home/copy_reference_file.log 0B
<missing> 11 hours ago /bin/sh -c #(nop) EXPOSE 50000 0B
<missing> 11 hours ago /bin/sh -c #(nop) EXPOSE 8080 0B
<missing> 11 hours ago |9 JENKINS_SHA=e026221efcec9528498019b6c1581cca70fe9c3f6b10303777d85c6699bca0e4 JENKINS_URL=https://repo.jenkins-ci.org/public/org/jenkins-ci/main/jenkins-war/2.161/jenkins-war-2.161.war TINI_VERSION=v0.16.1 agent_port=50000 gid=1000 group=jenkins http_port=8080 uid=1000 user=jenkins /bin/sh -c chown -R ${user} "$JENKINS_HOME" /usr/share/jenkins/ref 328B
<missing> 11 hours ago /bin/sh -c #(nop) ENV JENKINS_INCREMENTALS_REPO_MIRROR=https://repo.jenkins-ci.org/incrementals 0B
<missing> 11 hours ago /bin/sh -c #(nop) ENV JENKINS_UC_EXPERIMENTAL=https://updates.jenkins.io/experimental 0B
<missing> 11 hours ago /bin/sh -c #(nop) ENV JENKINS_UC=https://updates.jenkins.io 0B
<missing> 11 hours ago |9 JENKINS_SHA=e026221efcec9528498019b6c1581cca70fe9c3f6b10303777d85c6699bca0e4 JENKINS_URL=https://repo.jenkins-ci.org/public/org/jenkins-ci/main/jenkins-war/2.161/jenkins-war-2.161.war TINI_VERSION=v0.16.1 agent_port=50000 gid=1000 group=jenkins http_port=8080 uid=1000 user=jenkins /bin/sh -c curl -fsSL ${JENKINS_URL} -o /usr/share/jenkins/jenkins.war && echo "${JENKINS_SHA} /usr/share/jenkins/jenkins.war" | sha256sum -c - 76MB
<missing> 11 hours ago /bin/sh -c #(nop) ARG JENKINS_URL=https://repo.jenkins-ci.org/public/org/jenkins-ci/main/jenkins-war/2.161/jenkins-war-2.161.war 0B
<missing> 11 hours ago /bin/sh -c #(nop) ARG JENKINS_SHA=5bb075b81a3929ceada4e960049e37df5f15a1e3cfc9dc24d749858e70b48919 0B
<missing> 11 hours ago /bin/sh -c #(nop) ENV JENKINS_VERSION=2.161 0B
<missing> 11 hours ago /bin/sh -c #(nop) ARG JENKINS_VERSION 0B
<missing> 11 hours ago /bin/sh -c #(nop) COPY file:c84b91c835048a52bb864c1f4662607c56befe3c4b1520b0ea94633103a4554f in /usr/share/jenkins/ref/init.groovy.d/tcp-slave-agent-port.groovy 328B
<missing> 11 hours ago |7 TINI_VERSION=v0.16.1 agent_port=50000 gid=1000 group=jenkins http_port=8080 uid=1000 user=jenkins /bin/sh -c curl -fsSL https://github.com/krallin/tini/releases/download/${TINI_VERSION}/tini-static-$(dpkg --print-architecture) -o /sbin/tini && curl -fsSL https://github.com/krallin/tini/releases/download/${TINI_VERSION}/tini-static-$(dpkg --print-architecture).asc -o /sbin/tini.asc && gpg --no-tty --import ${JENKINS_HOME}/tini_pub.gpg && gpg --verify /sbin/tini.asc && rm -rf /sbin/tini.asc /root/.gnupg && chmod +x /sbin/tini 866kB
<missing> 11 hours ago /bin/sh -c #(nop) COPY file:653491cb486e752a4c2b4b407a46ec75646a54eabb597634b25c7c2b82a31424 in /var/jenkins_home/tini_pub.gpg 7.15kB
<missing> 11 hours ago /bin/sh -c #(nop) ARG TINI_VERSION=v0.16.1 0B
<missing> 11 hours ago |6 agent_port=50000 gid=1000 group=jenkins http_port=8080 uid=1000 user=jenkins /bin/sh -c mkdir -p /usr/share/jenkins/ref/init.groovy.d 0B
<missing> 11 hours ago /bin/sh -c #(nop) VOLUME [/var/jenkins_home] 0B
<missing> 11 hours ago |6 agent_port=50000 gid=1000 group=jenkins http_port=8080 uid=1000 user=jenkins /bin/sh -c mkdir -p $JENKINS_HOME && chown ${uid}:${gid} $JENKINS_HOME && groupadd -g ${gid} ${group} && useradd -d "$JENKINS_HOME" -u ${uid} -g ${gid} -m -s /bin/bash ${user} 328kB
<missing> 11 hours ago /bin/sh -c #(nop) ENV JENKINS_SLAVE_AGENT_PORT=50000 0B
<missing> 11 hours ago /bin/sh -c #(nop) ENV JENKINS_HOME=/var/jenkins_home 0B
<missing> 11 hours ago /bin/sh -c #(nop) ARG JENKINS_HOME=/var/jenkins_home 0B
<missing> 11 hours ago /bin/sh -c #(nop) ARG agent_port=50000 0B
<missing> 11 hours ago /bin/sh -c #(nop) ARG http_port=8080 0B
<missing> 11 hours ago /bin/sh -c #(nop) ARG gid=1000 0B
<missing> 11 hours ago /bin/sh -c #(nop) ARG uid=1000 0B
<missing> 11 hours ago /bin/sh -c #(nop) ARG group=jenkins 0B
<missing> 11 hours ago /bin/sh -c #(nop) ARG user=jenkins 0B
<missing> 11 hours ago /bin/sh -c apt-get update && apt-get install -y git curl && rm -rf /var/lib/apt/lists/* 0B
<missing> 3 weeks ago /bin/sh -c set -ex; if [ ! -d /usr/share/man/man1 ]; then mkdir -p /usr/share/man/man1; fi; apt-get update; apt-get install -y --no-install-recommends openjdk-8-jdk="$JAVA_DEBIAN_VERSION" ; rm -rf /var/lib/apt/lists/*; [ "$(readlink -f "$JAVA_HOME")" = "$(docker-java-home)" ]; update-alternatives --get-selections | awk -v home="$(readlink -f "$JAVA_HOME")" 'index($3, home) == 1 { $2 = "manual"; print | "update-alternatives --set-selections" }'; update-alternatives --query java | grep -q 'Status: manual' 348MB
<missing> 3 weeks ago /bin/sh -c #(nop) ENV JAVA_DEBIAN_VERSION=8u181-b13-2~deb9u1 0B
<missing> 3 weeks ago /bin/sh -c #(nop) ENV JAVA_VERSION=8u181 0B
<missing> 3 weeks ago /bin/sh -c #(nop) ENV JAVA_HOME=/docker-java-home 0B
<missing> 3 weeks ago /bin/sh -c ln -svT "/usr/lib/jvm/java-8-openjdk-$(dpkg --print-architecture)" /docker-java-home 33B
<missing> 3 weeks ago /bin/sh -c { echo '#!/bin/sh'; echo 'set -e'; echo; echo 'dirname "$(dirname "$(readlink -f "$(which javac || which java)")")"'; } > /usr/local/bin/docker-java-home && chmod +x /usr/local/bin/docker-java-home 87B
<missing> 3 weeks ago /bin/sh -c #(nop) ENV LANG=C.UTF-8 0B
<missing> 3 weeks ago /bin/sh -c apt-get update && apt-get install -y --no-install-recommends bzip2 unzip xz-utils && rm -rf /var/lib/apt/lists/* 2.21MB
<missing> 3 weeks ago /bin/sh -c apt-get update && apt-get install -y --no-install-recommends bzr git mercurial openssh-client subversion procps && rm -rf /var/lib/apt/lists/* 142MB
<missing> 3 weeks ago /bin/sh -c set -ex; if ! command -v gpg > /dev/null; then apt-get update; apt-get install -y --no-install-recommends gnupg dirmngr ; rm -rf /var/lib/apt/lists/*; fi 7.81MB
<missing> 3 weeks ago /bin/sh -c apt-get update && apt-get install -y --no-install-recommends ca-certificates curl netbase wget && rm -rf /var/lib/apt/lists/* 23.2MB
<missing> 3 weeks ago /bin/sh -c #(nop) CMD ["bash"] 0B
<missing> 3 weeks ago /bin/sh -c #(nop) ADD file:da71baf0d22cb2ede91c5e3ff959607e47459a9d7bda220a62a3da362b0e59ea in / 101MB
Where the actual dockerfile for that image is:
FROM openjdk:8-jdk-stretch
RUN apt-get update && apt-get install -y git curl && rm -rf /var/lib/apt/lists/*
ARG user=jenkins
ARG group=jenkins
ARG uid=1000
ARG gid=1000
ARG http_port=8080
ARG agent_port=50000
ARG JENKINS_HOME=/var/jenkins_home
ENV JENKINS_HOME $JENKINS_HOME
ENV JENKINS_SLAVE_AGENT_PORT ${agent_port}
# Jenkins is run with user `jenkins`, uid = 1000
# If you bind mount a volume from the host or a data container,
# ensure you use the same uid
RUN mkdir -p $JENKINS_HOME \
&& chown ${uid}:${gid} $JENKINS_HOME \
&& groupadd -g ${gid} ${group} \
&& useradd -d "$JENKINS_HOME" -u ${uid} -g ${gid} -m -s /bin/bash ${user}
# Jenkins home directory is a volume, so configuration and build history
# can be persisted and survive image upgrades
VOLUME $JENKINS_HOME
# `/usr/share/jenkins/ref/` contains all reference configuration we want
# to set on a fresh new installation. Use it to bundle additional plugins
# or config file with your custom jenkins Docker image.
RUN mkdir -p /usr/share/jenkins/ref/init.groovy.d
# Use tini as subreaper in Docker container to adopt zombie processes
ARG TINI_VERSION=v0.16.1
COPY tini_pub.gpg ${JENKINS_HOME}/tini_pub.gpg
RUN curl -fsSL https://github.com/krallin/tini/releases/download/${TINI_VERSION}/tini-static-$(dpkg --print-architecture) -o /sbin/tini \
&& curl -fsSL https://github.com/krallin/tini/releases/download/${TINI_VERSION}/tini-static-$(dpkg --print-architecture).asc -o /sbin/tini.asc \
&& gpg --no-tty --import ${JENKINS_HOME}/tini_pub.gpg \
&& gpg --verify /sbin/tini.asc \
&& rm -rf /sbin/tini.asc /root/.gnupg \
&& chmod +x /sbin/tini
COPY init.groovy /usr/share/jenkins/ref/init.groovy.d/tcp-slave-agent-port.groovy
# jenkins version being bundled in this docker image
ARG JENKINS_VERSION
ENV JENKINS_VERSION ${JENKINS_VERSION:-2.121.1}
# jenkins.war checksum, download will be validated using it
ARG JENKINS_SHA=5bb075b81a3929ceada4e960049e37df5f15a1e3cfc9dc24d749858e70b48919
# Can be used to customize where jenkins.war get downloaded from
ARG JENKINS_URL=https://repo.jenkins-ci.org/public/org/jenkins-ci/main/jenkins-war/${JENKINS_VERSION}/jenkins-war-${JENKINS_VERSION}.war
# could use ADD but this one does not check Last-Modified header neither does it allow to control checksum
# see https://github.com/docker/docker/issues/8331
RUN curl -fsSL ${JENKINS_URL} -o /usr/share/jenkins/jenkins.war \
&& echo "${JENKINS_SHA} /usr/share/jenkins/jenkins.war" | sha256sum -c -
ENV JENKINS_UC https://updates.jenkins.io
ENV JENKINS_UC_EXPERIMENTAL=https://updates.jenkins.io/experimental
ENV JENKINS_INCREMENTALS_REPO_MIRROR=https://repo.jenkins-ci.org/incrementals
RUN chown -R ${user} "$JENKINS_HOME" /usr/share/jenkins/ref
# for main web interface:
EXPOSE ${http_port}
# will be used by attached slave agents:
EXPOSE ${agent_port}
ENV COPY_REFERENCE_FILE_LOG $JENKINS_HOME/copy_reference_file.log
USER ${user}
COPY jenkins-support /usr/local/bin/jenkins-support
COPY jenkins.sh /usr/local/bin/jenkins.sh
COPY tini-shim.sh /bin/tini
ENTRYPOINT ["/sbin/tini", "--", "/usr/local/bin/jenkins.sh"]
# from a derived Dockerfile, can use `RUN plugins.sh active.txt` to setup /usr/share/jenkins/ref/plugins from a support bundle
COPY plugins.sh /usr/local/bin/plugins.sh
COPY install-plugins.sh /usr/local/bin/install-plugins.sh
Anchore will detect the history/dockerfile as this, if not explicitly provided (note order is reversed from docker history output, so it reads in same order as actual dockerfile):
[
{
"Size" : 45323792,
"Tags" : [],
"Comment" : "",
"Id" : "sha256:cd8eada9c7bb496eb685fc6d2198c33db7cb05daf0fde42e4cf5bf0127cbdf38",
"Created" : "2018-12-28T23:29:37.981962131Z",
"CreatedBy" : "/bin/sh -c #(nop) ADD file:da71baf0d22cb2ede91c5e3ff959607e47459a9d7bda220a62a3da362b0e59ea in / "
},
{
"Size" : 0,
"Tags" : [],
"Comment" : "",
"Id" : "<missing>",
"Created" : "2018-12-28T23:29:38.226681736Z",
"CreatedBy" : "/bin/sh -c #(nop) CMD [\"bash\"]"
},
{
"Size" : 10780911,
"Comment" : "",
"Tags" : [],
"CreatedBy" : "/bin/sh -c apt-get update && apt-get install -y --no-install-recommends \t\tca-certificates \t\tcurl \t\tnetbase \t\twget \t&& rm -rf /var/lib/apt/lists/*",
"Created" : "2018-12-29T00:04:28.920875483Z",
"Id" : "sha256:c2677faec825930a8844845f55454ee0495ceb5bea9fc904d5b3125de863dc1d"
},
{
"Comment" : "",
"Tags" : [],
"Size" : 4340024,
"CreatedBy" : "/bin/sh -c set -ex; \tif ! command -v gpg > /dev/null; then \t\tapt-get update; \t\tapt-get install -y --no-install-recommends \t\t\tgnupg \t\t\tdirmngr \t\t; \t\trm -rf /var/lib/apt/lists/*; \tfi",
"Created" : "2018-12-29T00:04:34.642152001Z",
"Id" : "sha256:fcce419a96b1219a265bf7a933d66b585a6f8d73448533f3833c73ad49fb5e88"
},
{
"Size" : 50062697,
"Tags" : [],
"Comment" : "",
"Id" : "sha256:045b51e26e750443c84216071a1367a7aae0b76245800629dc04934628b4b1ea",
"CreatedBy" : "/bin/sh -c apt-get update && apt-get install -y --no-install-recommends \t\tbzr \t\tgit \t\tmercurial \t\topenssh-client \t\tsubversion \t\t\t\tprocps \t&& rm -rf /var/lib/apt/lists/*",
"Created" : "2018-12-29T00:04:59.676112605Z"
},
... <truncated for brevity> ...
{
"Tags" : [],
"Comment" : "",
"Size" : 0,
"Id" : "<missing>",
"CreatedBy" : "/bin/sh -c #(nop) ENTRYPOINT [\"/sbin/tini\" \"--\" \"/usr/local/bin/jenkins.sh\"]",
"Created" : "2019-01-21T08:56:30.737221895Z"
},
{
"Size" : 1549,
"Tags" : [],
"Comment" : "",
"Id" : "sha256:283cd3aba8691a3b9d22d923de66243b105758e74de7d9469fe55a6a58aeee30",
"Created" : "2019-01-21T08:56:32.015667468Z",
"CreatedBy" : "/bin/sh -c #(nop) COPY file:f97999fac8a63cf8b635a54ea84a2bc95ae3da4d81ab55267c92b28b502d8812 in /usr/local/bin/plugins.sh "
},
{
"Comment" : "",
"Tags" : [],
"Size" : 3079,
"Created" : "2019-01-21T08:56:33.158854485Z",
"CreatedBy" : "/bin/sh -c #(nop) COPY file:3a15c25533fd87983edc33758f62af7b543ccc3ce9dd570e473eb0702f5f298e in /usr/local/bin/install-plugins.sh ",
"Id" : "sha256:b0ce8ab5a5a7da5d762f25af970f4423b98437a8318cb9852c3f21354cbf914f"
}
]
NOTE: Anchore processes the leading /bin/sh commands, so you do not have to include those in any trigger param config if using the docker history output.
The actual_dockerfile_only Parameter
The actual vs history impacts the semantics of the dockerfile gate’s triggers. To allow explicit control of the differences, most triggers in this gate includes a parameter: actual_dockerfile_only that if set to true or false will ensure the trigger check is only done on the source of data specified. If actual_dockerfile_only = true, then the trigger will evaluate only if an actual dockerfile is available for the image and will skip evaluation if not. If actual_dockerfile_only is false or omitted, then the trigger will run on the actual dockerfile if available, or the history data if the dockerfile was not provided.
Differences in data between Docker History and actual Dockerfile
With Actual Dockerfile:
- FROM line is preserved, so the parent tag of the image is easily available
- Instruction checks are all against instructions created during the build for that exact image, not any parent images
- When the actual_dockerfile_only parameter is set to true, all instructions from the parent image are ignored in policy processing. This may have some unexpected consequences depending on how your images are structured and layered (e.g. golden base images that establish common patterns of volumes, labels, healthchecks)
- COPY/ADD instructions will maintain the actual values used
- Multistage-builds in that specific dockerfile will be visible with multiple FROM lines in the output
With Docker History data, when no dockerfile is provided:
- FROM line is not accurate, and will nearly always default to ‘FROM scratch’
- Instructions are processed from all layers in the image
- COPY and ADD instructions are transformed into SHAs rather than the actual file path/name used at build-time
- Multi-stage builds are not tracked with multiple FROM lines, only the copy operations between the phases
Trigger: instruction
This trigger evaluates instructions found in the “dockerfile”.
Parameters
actual_dockerfile_only (optional): See above
instruction: The dockerfile instruction to check against. One of:
- ADD
- ARG
- COPY
- CMD
- ENTRYPOINT
- ENV
- EXPOSE
- FROM
- HEALTHCHECK
- LABEL
- MAINTAINER
- ONBUILD
- USER
- RUN
- SHELL
- STOPSIGNAL
- VOLUME
- WORKDIR
check: The comparison/evaluation to perform. One of: =, != , exists, not_exists, like, not_like, in, not_in.
value (optional): A string value to compare against, if applicable.
Examples
- Ensure an image has a HEALTHCHECK defined in the image (warn if not found).
{
"gate": "dockerfile",
"trigger": "instruction",
"action": "warn",
"parameters": [
{
"name": "instruction",
"value": "HEALTHCHECK"
},
{
"name": "check",
"value": "not_exists"
}
]
}
- Check for AWS environment variables set.
{
"gate": "dockerfile",
"trigger": "instruction",
"action": "stop",
"parameters": [
{
"name": "instruction",
"value": "ENV"
},
{
"name": "check",
"value": "like"
},
{
"name": "value",
"value": "AWS_.*KEY"
}
]
}
Trigger: packages_added
This trigger warns if a package was added to the SBOM.
Parameters
package_type (optional)
Example
Raise a warning if packages were added.
{
"action": "WARN",
"gate": "tag_drift",
"trigger": "packages_added",
"params": [],
"id": "1ba3461f-b9db-4a6c-ac88-329d38e08df5"
}
Trigger: packages_removed
This trigger warns if a package was deleted from the SBOM.
Parameters
package_type (optional)
Example
Raise a warning if packages were deleted.
{
"action": "WARN",
"gate": "tag_drift",
"trigger": "packages_removed",
"params": [],
"id": "de05d77b-1f93-4df4-a65d-57d9042b1f3a"
}
Trigger: packages_modified
This trigger warns if a package was changed in the SBOM.
Parameters
package_type (optional)
Example
Raise a warning if packages were changed.
{
"action": "WARN",
"gate": "tag_drift",
"trigger": "packages_modified",
"params": [],
"id": "1168b0ac-df6c-4715-8077-2cb3e016cf63"
}
Trigger: effective_user
This trigger processes all USER directives in the dockerfile or history to determine which user will be used to run the container by default (assuming no user is set explicitly at runtime). The detected value is then subject to a allowlist or denylist filter depending on the configured parameters. Typically, this is used for denylisting the root user.
Parameters
actual_dockerfile_only (optional): See above
users: A string with a comma delimited list of username to check for.
type: The type of check to perform. One of: ‘denylist’ or ‘allowlist’. This determines how the value of the ‘users’ parameter is interpreted.
Examples
- Denylist root user.
{
"gate": "dockerfile",
"trigger": "effective_user",
"action": "stop",
"parameters": [
{
"name": "users",
"value": "root"
},
{
"name": "type",
"value": "denylist"
}
]
}
- Denylist root user but only if set in actual dockerfile, not inherited from parent image.
{
"gate": "dockerfile",
"trigger": "effective_user",
"action": "stop",
"parameters": [
{
"name": "users",
"value": "root"
},
{
"name": "type",
"value": "denylist"
},
{
"name": "actual_dockerfile_only",
"value": "true"
}
]
}
- Warn if the user is not either “nginx” or “jenkins”.
{
"gate": "dockerfile",
"trigger": "effective_user",
"action": "warn",
"parameters": [
{
"name": "users",
"value": "nginx,jenkins"
},
{
"name": "type",
"value": "allowlist"
}
]
}
Trigger: exposed_ports
This trigger processes the set of EXPOSE directives in the dockerfile/history to determine the set of ports that are defined to be exposed (since it can span multiple directives). It performs checks on that set to denylist/allowlist them based on parameter settings.
Parameters
actual_dockerfile_only (optional): See above
ports: String of comma delimited port numbers to be checked.
type: The type of check to perform. One of: ‘denylist’ or ‘allowlist’. This determines how the value of the ‘users’ parameter is interpreted.
Examples
- Allow only ports 80 and 443. Trigger will fire on any port defined to be exposed that is not 80 or 443.
{
"gate": "dockerfile",
"trigger": "exposed_ports",
"action": "warn",
"parameters": [
{
"name": "ports",
"value": "80,443"
},
{
"name": "type",
"value": "allowlist"
}
]
}
- Denylist ports 21 (ftp), 22 (ssh), and 53 (dns) . Trigger will fire a match on ports 21, 22, 53 if found in EXPOSE directives.
{
"gate": "dockerfile",
"trigger": "exposed_ports",
"action": "warn",
"parameters": [
{
"name": "ports",
"value": "21,22,53"
},
{
"name": "type",
"value": "denylist"
}
]
}
Trigger: no_dockerfile_provided
This trigger allows checks on the way the image was added, firing if the dockerfile was not explicitly provided at analysis time. This is useful in identifying and qualifying other trigger matches.
Parameters
None
Examples
- Raise a warning if no dockerfile was provided at analysis time .
{
"gate": "dockerfile",
"trigger": "no_dockerfile_provided",
"action": "warn",
"parameters": []
}
9.1.6.2 - Evaluating Images Against Policies
Introduction
The evaluate command can be used to evaluate a given image for policy compliance.
The image to be evaluated can be in the following format:
- Image Digest
- Image ID
- registry/repo:tag
Using the Evaluate command
# anchorectl image check docker.io/debian:latest
✔ Evaluated against policy [failed] docker.io/debian:latest
Tag: docker.io/debian:latest
Digest: sha256:0fcb5a38077422c4e70c5c43be21831193ff4559d143e27d8d5721e7a814bdcc
Policy ID: 2c53a13c-1765-11e8-82ef-23527761d060
Last Evaluation: 2023-10-25T20:34:43Z
Evaluation: fail
By default, only the summary of the evaluation is shown. Passing the --detail parameter will show the policy checks that raised warnings or errors.
# anchorectl image check docker.io/debian:latest --detail
✔ Evaluated against policy [failed] docker.io/debian:latest
Tag: docker.io/debian:latest
Digest: sha256:0fcb5a38077422c4e70c5c43be21831193ff4559d143e27d8d5721e7a814bdcc
Policy ID: 2c53a13c-1765-11e8-82ef-23527761d060
Last Evaluation: 2023-10-25T20:35:05Z
Evaluation: fail
Final Action: stop
Reason: policy_evaluation
Policy Evaluation Details:
┌─────────────────┬─────────────┬────────────────────────────────────────────────────────────────────────────────────────────────────────────────────────────────────────────────┬────────┐
│ GATE │ TRIGGER │ DESCRIPTION │ STATUS │
├─────────────────┼─────────────┼────────────────────────────────────────────────────────────────────────────────────────────────────────────────────────────────────────────────┼────────┤
│ dockerfile │ instruction │ Dockerfile directive 'HEALTHCHECK' not found, matching condition 'not_exists' check │ warn │
│ vulnerabilities │ package │ MEDIUM Vulnerability found in os package type (dpkg) - libgnutls30 (CVE-2011-3389 - https://security-tracker.debian.org/tracker/CVE-2011-3389) │ warn │
│ vulnerabilities │ package │ CRITICAL Vulnerability found in os package type (dpkg) - zlib1g (CVE-2022-37434 - https://security-tracker.debian.org/tracker/CVE-2022-37434) │ stop │
└─────────────────┴─────────────┴────────────────────────────────────────────────────────────────────────────────────────────────────────────────────────────────────────────────┴────────┘
In this example we specified library/repo:tag which could be ambiguous. At the time of writing the image Digest for library/debian:latest was sha256:0fc..... however previously different images may have been tagged as library/debian:latest. The --history parameter can be passed to show historic evaluations based on previous images or previous policies.
Anchore supports allowlisting and denylisting images by their name, ID or digest. A denylist or allowlist takes precedence over any policy checks. For example if an image is explicitly listed as denylisted then even if all the individual policy checks pass the image will still fail evaluation.
# anchorectl image check docker.io/debian:latest --detail
✔ Evaluated against policy [failed] docker.io/debian:latest
Tag: docker.io/debian:latest
Digest: sha256:0fcb5a38077422c4e70c5c43be21831193ff4559d143e27d8d5721e7a814bdcc
Policy ID: 2c53a13c-1765-11e8-82ef-23527761d060
Last Evaluation: 2023-10-25T20:39:36Z
Evaluation: fail
Final Action: stop
Reason: denylisted
Policy Evaluation Details:
┌─────────────────┬─────────────┬────────────────────────────────────────────────────────────────────────────────────────────────────────────────────────────────────────────────┬────────┐
│ GATE │ TRIGGER │ DESCRIPTION │ STATUS │
├─────────────────┼─────────────┼────────────────────────────────────────────────────────────────────────────────────────────────────────────────────────────────────────────────┼────────┤
│ dockerfile │ instruction │ Dockerfile directive 'HEALTHCHECK' not found, matching condition 'not_exists' check │ warn │
│ vulnerabilities │ package │ MEDIUM Vulnerability found in os package type (dpkg) - libgnutls30 (CVE-2011-3389 - https://security-tracker.debian.org/tracker/CVE-2011-3389) │ warn │
└─────────────────┴─────────────┴────────────────────────────────────────────────────────────────────────────────────────────────────────────────────────────────────────────────┴────────┘
In this example even though the image only had one policy check that raised a warning the image fails policy evaluation since it is present on a denylist.
Evaluating status based on Digest or ID
Performing an evaluation on an image specified by name is not recommended since an image name is ambiguous. For example the tag docker.io/library/centos:latest refers to whatever image has the tag library/centos:latest at the time of evaluation. At any point in time another image may be tagged as library/centos:latest.
It is recommended that images are referenced by their Digest. For example at the time of writing the digest of the ‘current’ library/centos:latest image is sha256:191c883e479a7da2362b2d54c0840b2e8981e5ab62e11ab925abf8808d3d5d44
If the image to be evaluated is specified by Image ID or Image Digest then the --tag parameter must be added. Policies are mapped to images based on registry/repo:tag so since an Image ID may may to multiple different names we must specify the name user in the evaluation.
For example - referencing by Image Digest:
# anchorectl image check docker.io/debian@sha256:0fcb5a38077422c4e70c5c43be21831193ff4559d143e27d8d5721e7a814bdcc --detail --tag docker.io/debian:latest
✔ Evaluated against policy [failed] docker.io/debian@sha256:0fcb5a38077422c4e70c5c43be21831193ff4559d143e27d8d5721e7a814bdcc
Tag: docker.io/debian:latest
Digest: sha256:0fcb5a38077422c4e70c5c43be21831193ff4559d143e27d8d5721e7a814bdcc
Policy ID: 2c53a13c-1765-11e8-82ef-23527761d060
Last Evaluation: 2023-10-25T20:44:24Z
Evaluation: fail
Final Action: stop
Reason: denylisted
Policy Evaluation Details:
┌─────────────────┬─────────────┬────────────────────────────────────────────────────────────────────────────────────────────────────────────────────────────────────────────────┬────────┐
│ GATE │ TRIGGER │ DESCRIPTION │ STATUS │
├─────────────────┼─────────────┼────────────────────────────────────────────────────────────────────────────────────────────────────────────────────────────────────────────────┼────────┤
│ dockerfile │ instruction │ Dockerfile directive 'HEALTHCHECK' not found, matching condition 'not_exists' check │ warn │
│ vulnerabilities │ package │ MEDIUM Vulnerability found in os package type (dpkg) - libgnutls30 (CVE-2011-3389 - https://security-tracker.debian.org/tracker/CVE-2011-3389) │ warn │
│ vulnerabilities │ package │ CRITICAL Vulnerability found in os package type (dpkg) - zlib1g (CVE-2022-37434 - https://security-tracker.debian.org/tracker/CVE-2022-37434) │ stop │
└─────────────────┴─────────────┴────────────────────────────────────────────────────────────────────────────────────────────────────────────────────────────────────────────────┴────────┘
For example - referencing by image ID:
# anchorectl image check dd8bae8d259fed93eb54b3bca0adeb647fc07f6ef16745c8ed4144ada4d51a95 --detail --tag docker.io/debian:latest
✔ Evaluated against policy [failed] dd8bae8d259fed93eb54b3bca0adeb647fc07f6ef16745c8ed4144ada4d51a95
Tag: docker.io/debian:latest
Digest: sha256:0fcb5a38077422c4e70c5c43be21831193ff4559d143e27d8d5721e7a814bdcc
Policy ID: 2c53a13c-1765-11e8-82ef-23527761d060
Last Evaluation: 2023-10-25T20:45:20Z
Evaluation: fail
Final Action: stop
Reason: denylisted
Policy Evaluation Details:
┌─────────────────┬─────────────┬────────────────────────────────────────────────────────────────────────────────────────────────────────────────────────────────────────────────┬────────┐
│ GATE │ TRIGGER │ DESCRIPTION │ STATUS │
├─────────────────┼─────────────┼────────────────────────────────────────────────────────────────────────────────────────────────────────────────────────────────────────────────┼────────┤
│ dockerfile │ instruction │ Dockerfile directive 'HEALTHCHECK' not found, matching condition 'not_exists' check │ warn │
│ vulnerabilities │ package │ MEDIUM Vulnerability found in os package type (dpkg) - libgnutls30 (CVE-2011-3389 - https://security-tracker.debian.org/tracker/CVE-2011-3389) │ warn │
│ vulnerabilities │ package │ CRITICAL Vulnerability found in os package type (dpkg) - zlib1g (CVE-2022-37434 - https://security-tracker.debian.org/tracker/CVE-2022-37434) │ stop │
└─────────────────┴─────────────┴────────────────────────────────────────────────────────────────────────────────────────────────────────────────────────────────────────────────┴────────┘
9.1.6.3 - SBOM Drift
Software bill of materials (SBOM) drift is understanding how SBOMs change over time, and is a key part of managing your SBOMs. The nature of changes themselves may give early warning into unexpected behavior or intrusion into the build system that a review without context from previous builds would not easily be able to identify.
To do this, you set triggers for policy violations on changes in the SBOM between images with the same tag so that it can detect drift over time between builds of your images.
Gate: tag_drift
The triggers are:
- packages_added
- packages_removed
- packages_modified
The “tag_drift” gate compares the SBOMs from the image being evaluated as input, and the SBOM of the image that precedes the input image with the requested tag provided for policy evaluation. The triggers in this gate evaluate the result to determine if packages were added, removed, or modified.
Trigger: packages_added
This trigger warns if a package was added to the SBOM.
Parameters
Optional parameter: “package_type”
Example
Raise a warning if packages were added.
{
"action": "WARN",
"gate": "tag_drift",
"trigger": "packages_added",
"params": [],
"id": "1ba3461f-b9db-4a6c-ac88-329d38e08df5"
}
Trigger: packages_removed
This trigger warns if a package was deleted from the SBOM.
Parameters
Optional parameter: “package_type”
Example
Raise a warning if packages were deleted.
{
"action": "WARN",
"gate": "tag_drift",
"trigger": "packages_removed",
"params": [],
"id": "de05d77b-1f93-4df4-a65d-57d9042b1f3a"
}
Trigger: packages_modified
This trigger warns if a package was changed in the SBOM.
Parameters
Optional parameter: “package_type”
Example
Raise a warning if packages were changed.
{
"action": "WARN",
"gate": "tag_drift",
"trigger": "packages_modified",
"params": [],
"id": "1168b0ac-df6c-4715-8077-2cb3e016cf63"
}
9.2 - Policies
Introduction
Anchore Enterprise can currently scan for the following compliance frameworks:
9.2.1 - FedRAMP
Throughout this guide, we break down the deployment and configuration of the FedRAMP policy with the following sections:
Introduction
FedRAMP (Federal Risk and Authorization Management Program) is a standardized approach for assessing, authorizing, and monitoring cloud service providers (CSPs) that provide service to federal agencies. Through a rigorous and comprehensive process, FedRAMP ensures that CSPs meet security standards by providing a baseline set of security controls in order to enhance the overall security for federal information systems.
Anchore’s FedRAMP policy validates whether container images scanned by Anchore Enterprise are compliant with the FedRAMP Vulnerability Scanning Requirements and also validates them against FedRAMP controls specified in NIST 800-53 Rev 5 and NIST 800-190.
Anchore’s FedRAMP policy only checks for specification requirements relevant to software supply chain security.
Anchore’s FedRAMP policy checks for the following specifications:
- AC-6(10) ACCESS CONTROL: Prevent Non-Privileged Users from Executing Privileged Functions
- CM-2(2), CM-3(1), CM-6 CONFIGURATION MANAGEMENT: Baseline Configuration | Configure Systems and Components for High-risk Areas
- CM-10 CONFIGURATION MANAGEMENT: Software Usage Restrictions
- CM-5(5) CONFIGURATION MANAGEMENT: Access Restrictions for Change | Privilege Limitation for Production and Operation
- CM-7(1) CONFIGURATION MANAGEMENT: Least Functionality - Network Port Exposure Checks
- CM-7(5), CM-8(3) CONFIGURATION MANAGEMENT: Least Functionality - Container Image Build Content Checks
- IA-05(7) IDENTIFICATION AND AUTHENTICATION: Authenticator Management | No Embedded Unencrypted Static Authenticators
- RA-5, SI-02(2) RISK ASSESSMENT: Vulnerability Monitoring and Scanning
- SC-5 SYSTEM AND COMMUNICATIONS PROTECTION: Denial-of-Service Protection
Enabling the FedRAMP Policy
If you are an Anchore Enterprise customer, you will receive an email, which includes a json file for the specific FedRAMP policy that comes with your service.
Navigate to the Policies tab in Anchore Enterprise and click on the ‘Import Policy’.

Drag and drop, or paste the .json file to import the policy into Anchore Enterprise.

Or run the following command using AnchoreCTL
# anchorectl policy add --input FedRAMP_policy_pack_json_file
✔ Added policy
Name: Anchore FedRAMP v5 Checks
Policy Id: 1346c770-c49b-46be-b8f0-961ee40afbc3
Active: false
Updated: 2024-05-01T21:09:41Z
After a successful import, the FedRAMP policy will be available in the Policies tab.

Or run the following command using AnchoreCTL
# anchorectl policy list
✔ Fetched policies
┌───────────────────────────┬──────────────────────────────────────┬────────┬──────────────────────┐
│ NAME │ POLICY ID │ ACTIVE │ UPDATED │
├───────────────────────────┼──────────────────────────────────────┼────────┼──────────────────────┤
│ Default policy │ 2c53a13c-1765-11e8-82ef-23527761d060 │ true │ 2024-04-25T18:21:54Z │
│ Anchore FedRAMP v5 Checks │ 1346c770-c49b-46be-b8f0-961ee40afbc3 │ false │ 2024-04-25T18:23:10Z │
└───────────────────────────┴──────────────────────────────────────┴────────┴──────────────────────┘
In order to activate the FedRAMP policy, simply click on the circle under ‘Active’.

Once activated, you will see that the FedRAMP policy is highlighted in green.

Or run the following command using AnchoreCTL
# anchorectl policy activate 1346c770-c49b-46be-b8f0-961ee40afbc3
✔ Activate policy
Name: Anchore FedRAMP v5 Checks
Policy Id: 1346c770-c49b-46be-b8f0-961ee40afbc3
Active: true
Updated: 2024-04-25T18:30:24Z
Navigate to the Image tab in Anchore Enterprise and you will now be able to evaluate an image with the FedRAMP policy.

Or run the following command using AnchoreCTL
As an example, we will add a centos image and evaluate it using the FedRAMP policy. please give it some time for Anchore to analyze the image when added
# anchorectl image add docker.io/centos:latest --wait
✔ Added Image docker.io/centos:latest
✔ Analyzed Image docker.io/centos:latest
Image:
status: analyzed (active)
tag: docker.io/centos:latest
digest: sha256:a1801b843b1bfaf77c501e7a6d3f709401a1e0c83863037fa3aab063a7fdb9dc
id: 5d0da3dc976460b72c77d94c8a1ad043720b0416bfc16c52c45d4847e53fadb6
distro: centos@8 (amd64)
layers: 1
To apply the active FedRAMP policy and see all the details of violation:
#anchorectl image check docker.io/centos:latest --detail
To apply the active FedRAMP policy and get a simple pass/fail check:
#anchorectl image check -f docker.io/centos:latest
✔ Evaluated against policy [failed] docker.io/centos:latest
Tag: docker.io/centos:latest
Digest: sha256:a1801b843b1bfaf77c501e7a6d3f709401a1e0c83863037fa3aab063a7fdb9dc
Policy ID: 1346c770-c49b-46be-b8f0-961ee40afbc3
Last Evaluation: 2024-04-25T18:40:15Z
Evaluation: fail
Final Action: stop
Reason: policy_evaluation
error: 1 error occurred:
* failed policies:
Configuring Rule Sets for the FedRAMP Policy
Some of the control specifications need configuration based on the user’s environment. The control specifications are represented by ‘Rule Sets’ in Anchore Enterprise. Navigate to the Policies tab and click on the ‘Edit’ under ‘Actions’.
It is recommended all configuration changes to rule sets be done in the Anchore Enterprise UI.

You will be able to view all the FedRAMP specifications Anchore analyzes for. Under each Rule Set, please edit the ones that require configuration.
As an example, a user may need to change the port configuration for CM-7(1) CONFIGURATION MANAGEMENT, which checks for network port exposures.

Make sure to go through each of the Rule Sets to configure all applicable specifications. Save and close.
The following rule sets MUST be configured before using the FedRAMP policy:
- CM-2(2), CM-3(1), CM-6 CONFIGURATION MANAGEMENT: Baseline Configuration | Configure Systems and Components for High-risk Areas
- CM-10 CONFIGURATION MANAGEMENT: Software Usage Restrictions
- CM-5(5) CONFIGURATION MANAGEMENT: Access Restrictions for Change | Privilege Limitation for Production and Operation
- CM-7(1) CONFIGURATION MANAGEMENT: Least Functionality - Network Port Exposure Checks
- CM-7(5), CM-8(3) CONFIGURATION MANAGEMENT: Least Functionality - Container Image Build Content Checks
9.2.2 - NIST
Throughout this guide, we break down the deployment and configuration of the NIST policy with the following sections:
Introduction
The National Institute of Standards and Technology (NIST) is a non-regulatory agency of the U.S Commerce Department that provides industry standards and guidelines to help federal agencies meet requirements set by the Federal Information Security Management Act (FISMA).
Anchore Enterprise scans for the following NIST policies:
NIST 800-53 provides guidelines to ensure the security of information systems used within the federal government. In order to maintain the integrity, confidentiality and security of federal information systems, NIST 800-53 provides a catalogue of controls in order for federal agencies to meet industry standard and compliance.
Anchore checks for the following control specifications in the NIST 800-53 policy:
- AC-6(10) Container Image Must Have Permissions Removed from Executables that Allow a User to Execute Software at Higher Privileges
- CM-6(b) Confidential Data Checks
- CM-7(1b) Network Port Exposure Checks
- CM-7(a) Container Image Build Content Checks
- IA-5(2a) Base Image Checks
- IA-5(7) Embedded Credentials
- RA-5 Software Vulnerability Checks
- SC-5 Image Checks
- SC-8(2) Base Image Checks
- SI-2(6) Image Software Update/Layer Checks
NIST 800-190 provides guidelines to ensure the security of application containers used within the federal government. In order to maintain the integrity, confidentiality and security of federal application containers, NIST 800-190 provides a catalogue of controls in order for federal agencies to meet industry standard and compliance.
Anchore checks for the following control specifications in the NIST 800-190 policy:
- 3.1.1 Image Vulnerabilities
- 3.1.2 Image Configuration Defects
- 3.1.3 Embedded Malware
- 3.1.4 Embedded Clear Text Secrets
Enabling the NIST Policy
For this walkthrough, we will be using the NIST 800-53 policy for demonstration.
If you are an Anchore Enterprise customer, you will receive an email, which includes a json file for the NIST 800-53 policy that comes with your service.
Navigate to the Policies tab in Anchore Enterprise and click on the ‘Import Policy’.
Drag and drop, or paste the .json file to import the policy into Anchore Enterprise.

Or run the following command using AnchoreCTL
# anchorectl policy add --input NIST_800_53_policy_pack.json
✔ Added policy
Name: NIST 800-53
Policy Id: 5-NIST-800-53-policy
Active: false
Updated: 2024-05-01T21:05:36Z
After a successful import, the NIST 800-53 policy will be available in the Policies tab.

Or run the following command using AnchoreCTL
# anchorectl policy list
✔ Fetched policies
┌────────────────┬──────────────────────────────────────┬────────┬──────────────────────┐
│ NAME │ POLICY ID │ ACTIVE │ UPDATED │
├────────────────┼──────────────────────────────────────┼────────┼──────────────────────┤
│ Default policy │ 2c53a13c-1765-11e8-82ef-23527761d060 │ true │ 2024-05-01T21:03:55Z │
│ NIST 800-53 │ 5-NIST-800-53-policy │ false │ 2024-05-01T21:05:36Z │
└────────────────┴──────────────────────────────────────┴────────┴──────────────────────┘
In order to activate the NIST 800-53 policy, simply click on the circle under ‘Active’.
Once activated, you will see that the NIST 800-53 policy is highlighted in green.

Or run the following command using AnchoreCTL
# anchorectl policy activate 5-NIST-800-53-policy
✔ Activate policy
Name: NIST 800-53
Policy Id: 5-NIST-800-53-policy
Active: true
Updated: 2024-05-01T21:15:43Z
Navigate to the Image tab in Anchore Enterprise and you will now be able to evaluate an image with the NIST 800-53 policy.

Or run the following command using AnchoreCTL
As an example, we will add a centos image and evaluate it using the NIST 800-53 policy. please give it some time for Anchore to analyze the image when added
# anchorectl image add docker.io/centos:latest --wait
✔ Added Image docker.io/centos:latest
✔ Analyzed Image docker.io/centos:latest
Image:
status: analyzed (active)
tag: docker.io/centos:latest
digest: sha256:a1801b843b1bfaf77c501e7a6d3f709401a1e0c83863037fa3aab063a7fdb9dc
id: 5d0da3dc976460b72c77d94c8a1ad043720b0416bfc16c52c45d4847e53fadb6
distro: centos@8 (amd64)
layers: 1
To apply the active NIST 800-53 policy and see all the details of violation:
#anchorectl image check docker.io/centos:latest --detail
To apply the active NIST 800-53 policy and get a simple pass/fail check:
#anchorectl image check -f docker.io/centos:latest
✔ Evaluated against policy [failed] docker.io/centos:latest
Tag: docker.io/centos:latest
Digest: sha256:a1801b843b1bfaf77c501e7a6d3f709401a1e0c83863037fa3aab063a7fdb9dc
Policy ID: 5-NIST-800-53-policy
Last Evaluation: 2024-05-01T21:17:51Z
Evaluation: fail
Final Action: stop
Reason: denylisted
error: 1 error occurred:
* failed policies:
Configuring Rule Sets for the NIST 800-53 Policy
Some of the control specifications need configuration based on the user’s environment. The control specifications are represented by ‘Rule Sets’ in Anchore Enterprise. Navigate to the Policies tab and click on the ‘Edit’ under ‘Actions’.
It is recommended all configuration changes to rule sets be done in the Anchore Enterprise UI.

You will be able to view all the NIST 800-53 specifications Anchore analyzes for.
As an example, a user may need to change the port configuration for CM-7(1b): Network Port Exposure Checks, which checks for network port exposures.

Make sure to go through each of the Rule Sets to configure all applicable specifications. Save and close.
The following rule sets MUST be configured before using the NIST 800-53 policy:
- CM-6(b) Confidential Data Checks
- CM-7(1b) Network Port Exposure Checks
- CM-7(a) Container Image Build Content Checks
9.2.3 - DoD
Throughout this guide, we break down the deployment and configuration of the DoD policy with the following sections:
Introduction
Anchore Enterprise scans for the following DoD policies:
- DISA Image Creation and Deployment Guide
- IronBank
Being part of the Department of Defense (DoD), Defense Information Systems Administration (DISA) is the agency that provides IT and communications support to both the US government and federal organizations. The DISA Image Creation and Deployment Guide Policy provides security and compliance checks that align with specific NIST 800-53 and NIST 800-190 security controls and requirements as described in the DoD Container Image Creation and Deployment Guide.
Anchore checks for the following control specifications in the DISA policy:
- AC6(10) Container Image Must Have Permissions Removed from Executables that Allow a User to Execute Software at Higher Privileges
- CM-6(b) Confidential Data Checks
- CM-7(1b) Network Port Exposure Checks
- CM-7(a) Container Image Build Content Checks
- IA-5(2a) Base Image Checks
- IA-5(7) Embedded Credentials
- RA-5 Software Vulnerability Checks
- SC-5 Image Checks
- SC-8(2) Base Image Checks
- SI-2(6) Image Software Update/Layer Checks
The DoD IronBank policy validates images against DoD security and compliance requirements in alignment with U.S. Air Force security standards at Platform One and IronBank. The IronBank policy has been written in accordance to the following DoD documentation.
- Dockerfile Checks
- User Checks
- File Checks
- Istio Checks
- Software Checks
- Transfer Protocol Checks
- Node.js Checks
- Etcd Checks
- Snort Checks
- Jenkins Checks
- Grafana Checks
- UBI7 Checks
- Chef Checks
- Sonarqube Checks
- Prometheus Checks
- Postgres Checks
- Nginx Checks
- OpenJDK Checks
- Twistlock Checks
- Keycloak Checks
- Fluentd Checks
- Elasticsearch Checks
- Kibana Checks
- Redis Checks
- Apache HTTP Checks
- Apache Tomcat Checks
Enabling the DoD Policy
For this walkthrough, we will be using the IronBank policy for demonstration.
If you are an Anchore Enterprise customer, you will receive an email, which includes a json file for the IronBank policy that comes with your service.
Navigate to the Policies tab in Anchore Enterprise and click on the ‘Import Policy’.
Drag and drop, or paste the .json file to import the policy into Anchore Enterprise.

Or run the following command using AnchoreCTL
# anchorectl policy add --input anchore_dod_iron_bank_security_policies_09212022.json
✔ Added policy
Name: anchore_dod_iron_bank_security_policies_09212022
Policy Id: 5-DoD-Iron-Bank-Docker
Active: false
Updated: 2024-05-03T21:42:53Z
After a successful import, the IronBank policy will be available in the Policies tab.

Or run the following command using AnchoreCTL
# anchorectl policy list
✔ Fetched policies
┌──────────────────────────────────────────────────┬──────────────────────────────────────┬────────┬──────────────────────┐
│ NAME │ POLICY ID │ ACTIVE │ UPDATED │
├──────────────────────────────────────────────────┼──────────────────────────────────────┼────────┼──────────────────────┤
│ Default policy │ 2c53a13c-1765-11e8-82ef-23527761d060 │ true │ 2024-05-03T22:04:08Z │
│ anchore_dod_iron_bank_security_policies_09212022 │ 5-DoD-Iron-Bank-Docker │ false │ 2024-05-03T22:04:08Z │
└──────────────────────────────────────────────────┴──────────────────────────────────────┴────────┴──────────────────────┘
In order to activate the IronBank policy, simply click on the circle under ‘Active’.
Once activated, you will see that the IronBank policy is highlighted in green.

Or run the following command using AnchoreCTL
# anchorectl policy activate 5-DoD-Iron-Bank-Docker
✔ Activate policy
Name: anchore_dod_iron_bank_security_policies_09212022
Policy Id: 5-DoD-Iron-Bank-Docker
Active: true
Updated: 2024-05-03T22:07:54Z
Navigate to the Image tab in Anchore Enterprise and you will now be able to evaluate an image with the IronBank policy.

Or run the following command using AnchoreCTL
As an example, we will add a centos image and evaluate it using the IronBank policy. please give it some time for Anchore to analyze the image when added
# anchorectl image add docker.io/centos:latest --wait
✔ Added Image docker.io/centos:latest
✔ Analyzed Image docker.io/centos:latest
Image:
status: analyzed (active)
tag: docker.io/centos:latest
digest: sha256:a1801b843b1bfaf77c501e7a6d3f709401a1e0c83863037fa3aab063a7fdb9dc
id: 5d0da3dc976460b72c77d94c8a1ad043720b0416bfc16c52c45d4847e53fadb6
distro: centos@8 (amd64)
layers: 1
To apply the active IronBank policy and see all the details of violation:
#anchorectl image check docker.io/centos:latest --detail
To apply the active IronBank policy and get a simple pass/fail check:
#anchorectl image check -f docker.io/centos:latest
✔ Evaluated against policy [failed] docker.io/centos:latest
Tag: docker.io/centos:latest
Digest: sha256:a1801b843b1bfaf77c501e7a6d3f709401a1e0c83863037fa3aab063a7fdb9dc
Policy ID: 5-DoD-Iron-Bank-Docker
Last Evaluation: 2024-05-03T22:08:52Z
Evaluation: fail
Final Action: stop
Reason: policy_evaluation
Configuring Rule Sets for the DoD Policy
Some of the control specifications need configuration based on the user’s environment. The control specifications are represented by ‘Rule Sets’ in Anchore Enterprise. Navigate to the Policies tab and click on the ‘Edit’ under ‘Actions’.
It is recommended all configuration changes to rule sets be done in the Anchore Enterprise UI.
The IronBank policy does not need any configuration changes for the Rule Sets. However, the DISA policy will need configuration changes for certain specifications.
As an example, a user may need to change the port configuration for CM-7(1b): Network Port Exposure Checks, which checks for network port exposures.

Make sure to go through each of the Rule Sets to configure all applicable specifications. Save and close.
The following rule sets MUST be configured before using the DISA policy pack:
- CM-6(b) Confidential Data Checks
- CM-7(1b) Network Port Exposure Checks
- CM-7(a) Container Image Build Content Checks
10 - SBOM Management
A software bill of materials (SBOM) is a comprehensive inventory of the individual components from source repositories and container images. One or more SBOMs can be grouped together in higher-level applications to visualize related artifacts in applications by versions. Applications are the top-level building block in a hierarchical view, and can represent any project your teams deliver.
Security Engineers are often required to investigate security issues that stem from a source repository or from container images. The security team can use Anchore Enterprise to identify any open source security vulnerabilities or policy evaluation results which originate from a source code repository or image container. This helps them catch security issues earlier.
You can generate SBOMs using AnchoreCTL as part of a command line or CI/CD workflow, through pulling content from a registry, or by submitting an artifact to the Anchore API.
SBOMs can be managed using the command line, API or GUI, where contents can be grouped together, annotated, viewed or searched. Artifact metadata, vulnerability information, and policy evaluations can also be viewed and managed through the same interfaces.
All SBOMs can be downloaded into a variety of formats, either individually or collectively, to be sent to security teams, customers or end-users.
10.1 - Observe Applications in Enterprise
Observe Applications in Enterprise
You can use the Anchore Enterprise GUI to see a summary of the applications that have been collected into an application. From the application view, you can drill down into the source repositories or container images that make up the application, and browse their software bill of materials (SBOMs).
10.1.1 - View Applications from Image Containers
To work with image container data, you must first load the image container data into the Application view of Enterprise. Once your data is brought in, you can go to Applications to see the summary of the information. The information is categorized by applications, with sub-categories of application versions available from container images.
For information about analyzing images, see Image Analysis.
For information about adding Images, see Scanning Repositories.

When you select an application version, you will see a list of artifacts associated with that application version.

You can download a report for everything in the application or for an individual artifact. The application level download supports JSON format. Artifact level download supports JSON, SPDX, CycloneDX formats.

When you select an artifact link, you will see the analysis options for that artifact. You can then view information about the artifact, such as the policies set up, the vulnerabilities, software bill of materials (SBOM) contents, image metadata information, build summary, and action workbench.

If you want to set up policies, as well as mappings for an artifact, select *Policies to set them up there.
See Policies for more information.
See Policy Mappings for more information.

10.1.2 - View Applications from Source Repositories
To work with source repository data, you must first use AnchoreCTL or the Anchore API to load the source repository into the Applications view of Enterprise.
Once your data is brought in, you can go to the Applications tab to see the summary of the information. The information is categorized by applications, with sub-categories of application versions available from source repositories.

When you select an application version, you will see a list of artifacts associated with that application version.

You can download a report for everything in the application or for an individual artifact. The application level download supports JSON format. Artifact level download supports JSON, SPDX, CycloneDX formats.

When you select an artifact link, you will see the analysis options for that artifact. You can then view information about the artifact, such as the policies set up, the vulnerabilities, software bill of materials (SBOM) contents, and source metadata information.

If you want to set up policies, as well as mappings for an artifact, select the Policies tab and set them up there.
For information about policies, see Policies.
For information about adding policy mapping, see Policy Mappings.
10.1.3 - Work with Applications Generated from Image Containers
To work with image container data in Anchore Enterprise, you must first load the image container data into Enterprise. For more information, see Scanning Repositories.
Once the data is made available to Anchore Enterprise, you can then analyze it. An example workflow might be as follows.
Start Anchore Enterprise. You will default to the dashboard view. The Dashboard is your configurable landing page where insights into the collective status of your container image environment. The summary information is displayed through various widgets. Utilizing the Enterprise Reporting Service, the widgets are hydrated with metrics which are generated and updated on a cycle, the duration of which is determined by application configuration. See Dashboard for more information about what you can view.
Click Applications > Container Images to view a summary of the applications in your container images. The information is categorized by applications, with sub-categories of application versions available from image containers that you previously loaded. Notice the list of applications and application versions, as well as any artifacts in the applications.
Click SBOM Report Updated Application name to download a software bill of materials (SBOM) report in JSON format for everything in an application. Or, click SBOM Report to download a report for everything in an artifact.
Click an artifact link under Repository Name to view the detailed information for the artifact.
The Images analysis screen for an artifact shows you a summary of what is in that artifact.
- From the analysis screen, you can perform the following actions.
- Click Policy Compliance to view the policies set up for the artifact. You can see the policy rules that are set up as well.
- Click Vulnerabilities to view the vulnerabilities associated with the artifact.
- Click SBOM to view the contents of the SBOM(s) associated with the artifact.
- Click Image Metadata to view the metadata information for the artifact.
- Click Build Summary to see the Manifest, Dockerfile, and Docker History of your artifact.
- Click Action Workbench to see the action plans and history for an image artifact.
- You have the option to click SBOM Report to download a report for everything in the artifact.
- You also have the option to click Compliance Report to download a report that shows the compliance information in the artifact.
- Click Policies to set up the rules for the analyzed container image.
See Policies for more information.
See Policy Mappings for more information.
10.1.4 - Work with Applications Generated from Source Repositories
To work with source repository data in Anchore Enterprise, you must first use AnchoreCTL or the Anchore API to load the source repository into Enterprise.
Once the data is made available to Anchore Enterprise, you can then view and generate reports specific to an application version. An example workflow might be as follows.
Start Anchore Enterprise. You will default to the dashboard view. The Dashboard is your configurable landing page where insights into the collective status of your source repository. The summary information is displayed through various widgets. Utilizing the Enterprise Reporting Service, the widgets are hydrated with metrics which are generated and updated on a cycle, the duration of which is determined by application configuration. See Dashboard for more information about what you can view.
Click Applications > Source Repositories to view a summary of the applications in your source repository. The information is categorized by applications, with sub-categories of application versions available from source repositories that you previously loaded via AnchoreCTL or the Anchore API. Notice the list of applications and application versions, as well as any artifacts in the applications.

Click SBOM Report Updated Application name to download a software bill of materials (SBOM) report in JSON format for everything in an application. Or, click SBOM Report to download a report for everything in an artifact.
Click an artifact link for a soure repository under Repository Name to view the detailed information for the artifact.
The Sources analysis screen for an artifact shows you a summary of what is in that artifact.
- From the analysis screen, you can perform the following actions.
- Click Policy Compliance to view the policies set up for the artifact. You can see the policy rules that are set up as well.
- Click Vulnerabilities to view the vulnerabilities associated with the artifact.
- Click SBOM to view the contents of the SBOM(s) associated with the artifact.
- Click Source Metadata to view the metadata information for the artifact.
- You have the option to click SBOM Report to download a report for everything in the artifact.
- You also have the option to click Compliance Report to download a report that shows the compliance information in the artifact.
- Click Policies to set up the rules for the analyzed source repository. The rules set up for an artifact source repository are different from what you apply to a container image.
See Policies for more information.
See Policy Mappings for more information.
10.2 - Anchore Enterprise Application Groups
Anchore Enterprise lets you model your versioned applications to create a comprehensive view of the vulnerability and security health of the projects your teams are building across the breadth of your Software Delivery Lifecycle.
By grouping related components into applications, and updating those components across application versions as projects grow and change, you can get a holistic view of the current and historic security health of the applications from development through built image artifacts.
The typical flow is:
- An application will be created for each project that you want to track.
- Versions will be created both for the current in-development version and for previous versions.
- Artifacts will be grouped together under those application versions.
Applications, application versions, and artifact associations can be managed via either the applications API or AnchoreCTL.
10.2.1 - Application Components
Applications
Applications are the top-level building block in this hierarchical view, containing artifacts like packages or image artifacts. Applications can represent any project your teams deliver. Applications have user-specified name and description fields to describe them. Applications are expected to be long-lived constructs, typically with multiple versions added over time.
Application Versions
Each application is associated with one or more application versions. Application versions track the specific grouping of artifacts that comprise a product version. They have one directly user-editable field called version_name which reflects the name of the product’s application version. This field has no special constraints on it, so you can use it to reflect the versioning scheme or schemes for your projects.
Each application, on creation, automatically has one application version created for it, named “HEAD”. “HEAD” is a special version meant to track the in-development version of your product through its release. A typical flow is that, as your CI jobs build new versions of your software, they will add new versions of your source and image artifacts to Anchore Enterprise and associate them with your HEAD application version. On release, you update your “HEAD” version to reflect the actual name of your release (for example, “v1.0.0”), and then create a new “HEAD” version to track development on the next version of your project. Any application version, including the “HEAD” version, can be deleted if needed.
Application versions, rather than applications, are directly associated with artifacts from sources and images. As your project grows and evolves, the packages and package versions associated with it will naturally change and advance over time. Associating them with application versions (rather than directly with applications) allows older application versions to maintain their associations with the older packages that compose them. This allows for historical review auditing and comparison across versions.
Associating Artifacts with Application Versions
An artifact is a generic term that encompasses any SDLC artifact that can be associated with an application version. Currently, that includes sources and images. The application API has endpoints (and AnchoreCTL has subcommands) to manage the associations between application versions and artifacts.
One important distinction is that these endpoints and commands are operating on the association between artifacts and application versions, not on the artifacts themselves. A source or image must already be added to Anchore Enterprise before it can be associated with an application. Similarly, removing the association with an application version does not remove the artifact from Anchore Enterprise. It can later be re-associated with the application version, or another application version.
Application Version software bill of materials (SBOM)
Once an application version has artifacts associated with it, users can generate an application version SBOM, which aggregates the SBOMs for all of the artifacts associated with the application version.
Application Version Vulnerabilities
Users can generate a list of vulnerabilities within an application version. This will be an aggregate of all
vulnerabilities found within the artifacts associated with the specific application version.
10.2.2 - Application Features with the Anchore Enterprise GUI
Anchore Enterprise lets you use the UI to see a summary of the applications available from source repositories. You can perform an analysis of the application and artifact data.
Additionally, you can set your policies and mappings for a source repository, similar to how you set them up for images.
10.2.3 - Application Management - Anchore API
Use the Anchore API to manage your applications. For more information about using Anchore APIs via Swagger, see: Using the Anchore API.
The API application workflow would be like the following.
Create an Application
Create an application by POSTing the JSON in the block below to http://<host:port>/v2/applications/.
{
"name": "Application name",
"description": "Application description"
}
Note: Creating an application will also create an application version named HEAD, used to track the in-development version.
GET the List of All Applications
GET the list of all applications from http://<host:port>/v2/applications/.
Add the include_versions=true flag to include all application versions under each application in the API response.
GET a Single Application
GET a single application by adding the application_id to the GET command. For example: http://<host:port>/v2/applications/<application_id>/.
Add the include_versions=true flag to include all application versions under each application in the API response.
Update an Existing Application
PUT the following to http://<host:port>/v2/applications/<application_id>/ to update an existing application, such as changing the name and description.
{
"name": "Updated application name",
"description": "Updated application description"
}
Remove a Specified Application
Send a DELETE to http://<host:port>/v2/applications/<application_id>/ to remove the specified application.
10.2.3.1 - Application Version Management - Anchore API
Use the Anchore API to manage your application versions. For more information about using Anchore APIs via Swagger, see: Using the Anchore API.
The API application workflow would be like the following.
Create an Application Version
To use the Anchore API to create an application version that is associated with an already-existing application, POST the JSON in the block below to http://<host:port>/v2/applications/<application_id>/versions/.
{
"version_name": "v1.0.0"
}
GET the List of All Application Versions
GET the list of all application versions for the application from http://<host:port>/v2/applications/<application_id>/ versions.
GET a Single Application Version
GET a specific application version from http://<host:port>/v2/applications/<application_id>/versions/<application_version_id>.
Update an Existing Application
To update the name of an existing application version, PUT the following to http://<host:port>/v2/applications/<application_id>/versions/<application_version_id>
{
"version_name": "v1.0.1"
}
Remove a Specified Application Version
To delete an application version, Send a DELETE to http://<host:port>/v2/applications/<application_id>/versions/<application_version_id>.
10.2.3.2 - Associate Artifacts with Application Versions - Anchore API
Add an Artifact Association
The following commands require source or image artifacts to already be added to the Anchore Enterprise instance before they can be associated with the application version.
Note: Keep track of the uuid of the sources, and the digest of the images that you will add to the application version. These are the values used to associate each artifact with the application version.
The response body for each artifact association request will contain an artifact_association_metadata block with an association_id field in it. This field uniquely identifies the association between the artifact and the application version, and is used in requests to remove the association.
Associate a Source Artifact
To associate a source artifact, POST the following body to http://<host:port>/v2/applications/<application_id>/versions/<application_version_id>/artifacts.
Note the fields specific to source artifacts in contrast to the image artifact in the next example.
{
"artifact_type": "source",
"artifact_keys": {
"uuid": "<source uuid>"
}
}
Associate an Image Artifact
To associate an image artifact, POST the following body to http://<host:port>/v2/applications/<application_id>/versions/<application_version_id>/artifacts.
Note the fields specific to image artifacts in contrast to the source artifact in the previous example.
{
"artifact_type": "image",
"artifact_keys": {
"image_digest": "<image_digest>"
}
}
List All Associated Artifacts
Each artifact in the response body will contain an artifact_association_metadata block with an association_id field in it. This field uniquely identifies the association between the artifact and the application version, and is used in requests to remove the association.
List All Artifacts Associated with an Application Version
To list all artifacts associated with an application version, GET http://<host:port>/v2/applications/<application_id>/versions/<application_version_id>/artifacts.
Filter the Results by Artifact Type
To filter the results by artifact type, add the artifact_types=<source,image> query parameter.
Remove an Artifact Association
Send a DELETE request to http://<host:port>/v2/applications/<application_id>/versions/<application_version_id>/artifacts/<association_id>.
10.2.3.3 - Application Version Operations - Anchore API
Users can perform queries against specific versions of an application.
SBOM for a specific Application Version
Using the application API to generate a combined software bill of materials (SBOM) for all artifacts within an
application version. This lets you easily archive the components, or provide them to others for verification
process compliance requirements. The data structure metadata for the application and application version,
along with the SBOMs for each artifact associated with the application version.
Download a Combined SBOM
To download a combined SBOM, GET the application version SBOM from http://<host:port>/v2/applications/<application_id>/versions/<application_version_id>/sboms/native-json.
To filter the results by artifact type, add the artifact_types=<source,image> query parameter.
Vulnerabilities for a specific Application Version
Using the application API, a user can generate a combined list of vulnerabilities found among all artifacts within an
application version. This allows easier vulnerability management for any Application Version.
Get a Combined Vulnerabilities List
http://<host:port>/v2/applications/<application_id>/versions/<application_version_id>/vulnerabilities.
Optional query parameter of will_not_fix=<true | false> is provided. When true, the results will include any vulnerabilities
that the vendor of an image distribution either disagrees with or does not intend to prioritize for remediation
10.2.4 - Application Management - AnchoreCTL
Use AnchoreCTL to manage your applications. The AnchoreCTL application workflow would be like the following.
Create a Named Application
Use AnchoreCTL to create a named application. For example: anchorectl application add <name> --description <description>
Note: Creating an application will also create an application version named HEAD, used to track the in-development version.
List All Applications
Use the AnchoreCTL to list all applications. For example: anchorectl application list.
Request an Individual Application
Request an individual application from Anchore via AnchoreCTL to view details about it. For example:
anchorectl application get <application_name>.
Update and Change Properties of an Existing Application
Update and change the properties of an existing application via AnchoreCTL.
For example, change the application name and description as follows: anchorectl application update <application_name> --name <new_name> --description <new_description>.
Remove an Application
Use AnchoreCTL to delete applications. This lets you remove applications that are no longer useful or important to you. For example:
anchorectl application delete <application_name>
10.2.4.1 - Application Version management - AnchoreCTL
Use AnchoreCTL to manage your application versions.
The AnchoreCTL application workflow would be like the following.
Create and Store Versions of your Application
Use AnchoreCTL to create and store versions of your applications. Versioning is useful for audit compliance and reporting. Use the following AnchoreCTL command to create a version:
anchorectl application version add <application-name>@<version-name>
List All Application Versions
Use AnchoreCTL to list all application versions that are associated with an application.
anchorectl application version list <application_name>
Update Application Version Properties
Use AnchoreCTL to update application version properties for an existing application in Anchore.
anchorectl application version update <application-name>@<version-name> --name <new_version_name>
Request a Specific Application Version
Use AnchoreCTL to request a specific version of an application to view its details. The following example shows the AnchoreCTL command to request a version:
anchorectl application version get <application-name>@<version-name>
Remove Application Version
Use AnchoreCTL to delete application versions. This lets you remove application versions that are no longer useful or important to you.
anchorectl application version delete <application-name>@<version-name>
10.2.4.2 - Get an Application Version SBOM - AnchoreCTL
Run the anchorectl application version sbom <application_id> <application_version_id> -o json command to download a combined software bill of materials (SBOM) for all components and supply-chain elements of an application. This lets you easily archive the components, or provide them to others for verification process compliance requirements. The data structure includes the version and version metadata for the application version, along with the SBOMs for each associated artifact.
To filter the results by artifact type, add the argument –-type <source,image> to the end of the command.
10.2.4.3 - Associate Artifacts with Application Versions - AnchoreCTL
Add an Artifact Association
The following commands require source or image artifacts to already be added to the Anchore Enterprise instance before they can be associated with the application version.
Note: Keep track of the uuid of the sources, and the digest of the images that you will add to the application version. These are the values used to associate each artifact with the application version.
The response body for each artifact association request will contain an artifact_association_metadata block with an association_id field in it. This field uniquely identifies the association between the artifact and the application version.
Associate a Source Artifact
To associate a source artifact:
anchorectl application artifact add <application-name>@<version-name> source <source_uuid>
Associate an Image Artifact
To associate an image artifact:
anchorectl application artifact add <application-name>@<version-name> image <image_digest>
List All Associated Artifacts
To list all artifacts associated with an application version:
anchorectl application artifact list <application-name>@<version-name>
To filter the results by artifact type, add the argument --type <source,image> to the end of the command.
Remove an Artifact Association
Get the association_id of one of the associated artifacts and run the following command:
anchorectl application artifact remove <application-name>@<version-name> <artifact_id>
10.3 - Generating SBOMs for a Source Repository using the API
Use the Anchore API to import a source repository artifact from a software bill of materials (SBOM) file on disk. You can also get information about the source repository, investigate vulnerability packages by requesting vulnerabilities for a single analyzed source repository, or get any policy evaluations.
For more information about using Anchore APIs via Swagger, see: Using the Anchore API.
The SBOM management API workflow would generally be as follows.
Note: Reference the API endpoints in Swagger for the latest information.
- Once you have generated a SBOM using anchorectl, you can use the API to import that SBOM as a source artifact. For example, to create the import “operation” (job) for importing a source.
curl -u admin:foobar -X 'POST' 'http://localhost:8228/v2/imports/sources'
{
"created_at": "2023-10-27T16:26:33Z",
"expires_at": "2023-10-28T16:26:33Z",
"last_updated": "2023-10-27T16:26:33Z",
"status": "pending",
"uuid": "b78cda3b-eff7-4e2e-a1ed-e3f8433435cf"
}
- Add the SBOM to the import operation. For example:
curl -u admin:foobar -X POST http://localhost:8228/v2/imports/sources/767c77fe-8f93-4e7e-a9ff-f0f39e2a80ba/sbom -d @/absolute/path/to/your/sbom.json -H "Content-Type: application/json"
{
"created_at": "2022-02-28T20:36:32Z",
"digest": "6778145cdda7a3443abc9650683c6d5bf8a87e3e6b4b3c8868224e7755680446"
}
- Finalize the import. For example:
curl -X 'POST' 'http://localhost:8228/v2/imports/sources/767c77fe-8f93-4e7e-a9ff-f0f39e2a80ba/finalize'
-H 'accept: application/json'
-H 'Content-Type: application/json’
-d '{
"branch_name": "main",
"change_author": "[email protected]",
"ci_workflow_execution_time": "2022-02-28T20:38:13.117Z",
"ci_workflow_name": "default",
"contents": {
"sbom": "6778145cdda7a3443abc9650683c6d5bf8a87e3e6b4b3c8868224e7755680446"
},
"host": "http://github.com",
"repository_name": "anchore-engine",
"revision": "8f7e4afb9bc9a284e24b69e529863a0b99373bf7"
}'
{
"account_name": "admin",
"analysis_status": "not_analyzed",
"created_at": "2022-02-28T20:43:58Z",
"host": "http://github.com",
"last_updated": "2022-02-28T20:43:58Z",
"metadata_records": [
{
"branch_name": "main",
"change_author": "[email protected]",
"ci_workflow_execution_time": "2022-02-28T20:38:13Z",
"ci_workflow_name": "default",
"uuid": "8b97a668-2044-4f24-a5af-6010e7957ac3"
}
],
"repository_name": "anchore-engine",
"revision": "8f7e4afb9bc9a284e24b69e529863a0b99373bf7",
"source_status": "active",
"uuid": "a0eb87e2-61ef-4721-bb16-9682ad528bbe",
"vcs_type": "git"
}
- List all sources that you’ve imported. For example:
curl -u admin:foobar -X 'GET' 'http://localhost:8228/v2/sources'
{
"items" : [
{
"account_name": "admin",
"analysis_status": "analyzed",
"created_at": "2022-02-28T20:43:58Z",
"host": "http://github.com",
"last_updated": "2022-02-28T20:43:58Z",
"repository_name": "anchore-engine",
"revision": "8f7e4afb9bc9a284e24b69e529863a0b99373bf7",
"source_status": "active",
"uuid": "a0eb87e2-61ef-4721-bb16-9682ad528bbe"
},
…
]
}
- Get information about a single source that you’ve imported. For example:
curl -u admin:foobar -X 'GET' 'http://localhost:8228/v2/sources/a0eb87e2-61ef-4721-bb16-9682ad528bbe'
{
"account_name": "admin",
"analysis_status": "analyzed",
"created_at": "2022-02-28T20:43:58Z",
"host": "http://github.com",
"last_updated": "2022-02-28T20:43:58Z",
"metadata_records": [
{
"branch_name": "main",
"change_author": "[email protected]",
"ci_workflow_execution_time": "2022-02-28T20:38:13Z",
"ci_workflow_name": "default",
"uuid": "8b97a668-2044-4f24-a5af-6010e7957ac3"
}
],
"repository_name": "anchore-engine",
"revision": "8f7e4afb9bc9a284e24b69e529863a0b99373bf7",
"source_status": "active",
"uuid": "a0eb87e2-61ef-4721-bb16-9682ad528bbe",
"vcs_type": "git"
}
- Fetch a gzip compressed copy of the sbom for a specific type. For example:
curl -X 'GET' -u admin:foobar 'http://localhost:8228/v2/sources/a0eb87e2-61ef-4721-bb16-9682ad528bbe/sbom/native-json'
curl -X 'GET' -u admin:foobar 'http://localhost:8228/v2/sources/a0eb87e2-61ef-4721-bb16-9682ad528bbe/sbom/cyclonedx-json'
curl -X 'GET' -u admin:foobar 'http://localhost:8228/v2/sources/a0eb87e2-61ef-4721-bb16-9682ad528bbe/sbom/spdx-json'
- Get the types of vulnerabilities that you may fetch with respect to a source. For example:
curl -X 'GET' -u admin:foobar 'http://localhost:8228/v2/sources/a0eb87e2-61ef-4721-bb16-9682ad528bbe/vuln'
[
"os",
"non-os",
"all"
]
- Get the vulnerabilities for a source. For example:
curl -X 'GET' -u admin:foobar 'http://localhost:8228/v2/sources/a0eb87e2-61ef-4721-bb16-9682ad528bbe/vuln/all'
{
"source_id": "a0eb87e2-61ef-4721-bb16-9682ad528bbe",
"vulnerabilities": [
{
"feed": "vulnerabilities",
"feed_group": "nvd",
"fix": "None",
"nvd_data": [
{
"cvss_v2": {
"base_score": 5,
"exploitability_score": 10,
"impact_score": 2.9
},
"cvss_v3": {
"base_score": 7.5,
"exploitability_score": 3.9,
"impact_score": 3.6
},
"id": "CVE-2019-13509"
}
],
"package": "docker-4.3.1",
"package_cpe": "None",
"package_cpe23": "cpe:2.3:a:docker:docker:4.3.1:*:*:*:*:*:*:*",
"package_name": "docker",
"package_path": "/Users/vijay/Documents/enterprise/requirements-test.txt",
"package_type": "python",
"package_version": "4.3.1",
"severity": "High",
"url": "https://nvd.nist.gov/vuln/detail/CVE-2019-13509",
"vendor_data": [],
"vuln": "CVE-2019-13509",
"will_not_fix": false
},
…
],
"vulnerability_type": "all"
}
- Get the policy evaluation for a source. For example:
curl -X 'GET' -u admin:foobar 'http://localhost:8228/v2/sources/a0eb87e2-61ef-4721-bb16-9682ad528bbe/check'
[
{
"account_name": "admin",
"created_at": "2022-02-28T21:11:37Z",
"evaluation_id": "7a4611f2fa26d80bd680782eb379081f",
"evaluation_url": "policy_evaluations/7a4611f2fa26d80bd680782eb379081f",
"final_action": "fail",
"final_action_reason": "policy_evaluation",
"findings": [
{
"action": "warn",
"allowlist_match": null,
"allowlisted": false,
"gate": "vulnerabilities",
"message": "MEDIUM Vulnerability found in non-os package type (gem) - /syft/pkg/cataloger/ruby/test-fixtures/Gemfile.lock (fixed in: 4.1.11)(GHSA-vxvp-4xwc-jpp6 - https://github.com/advisories/GHSA-vxvp-4xwc-jpp6)",
"policy_id": "f2dbc082-7d10-432a-9f62-02ea8f1e5dbf",
"recommendation": "",
"rule_id": "24c7ec4f-d795-4ee3-93e7-4d603560ddb3",
"trigger": "package",
"trigger_id": "GHSA-vxvp-4xwc-jpp6+Gemfile.lock"
},
...
]
"host": "http://github.com",
"matched_mapping_rule": {
"host": "*",
"id": "9a899100-6e4c-4038-93ba-12f6d8ab97b3",
"name": "default-source-mapping",
"policy_id": "f2dbc082-7d10-432a-9f62-02ea8f1e5dbf",
"repository": "*",
"allowlist_ids": [
"37fd763e-1765-11e8-add4-3b16c029ac5c"
]
},
"number_of_findings": 149,
"last_updated": "2022-02-28T21:11:37Z",
"policy_id": "2c53a13c-1765-11e8-82ef-23527761d060",
"policy": {
"allowlisted_images": [],
"allowlists": [
{
"description": "Default global allowlist",
"id": "37fd763e-1765-11e8-add4-3b16c029ac5c",
"items": [],
"name": "Global Allowlist",
"version": "2"
}
],
"denylisted_images": [],
"description": "Default bundle",
"id": "2c53a13c-1765-11e8-82ef-23527761d060",
...
},
"repository_name": "anchore-engine",
"revision": "8f7e4afb9bc9a284e24b69e529863a0b99373bf7",
"source_id": "a0eb87e2-61ef-4721-bb16-9682ad528bbe",
"source_mapped_to_rule": true,
"status": "fail"
}
]
- Delete any individual source repository SBOM artifact from Anchore Enterprise. For example:
curl -X 'DELETE' -u admin:foobar 'http://localhost:8228/v2/sources/a0eb87e2-61ef-4721-bb16-9682ad528bbe'
11 - API
Anchore Enterprise is an API-first system. All functions available in the UI and AnchoreCTL are constructed from the same
APIs directly available to users. The complete API is a combination of OpenAPI-specified REST-like APIs and a reporting-specific
GraphQL API.
For a more detailed information regarding access and authentication, see V2 API
Access to the API Specification itself is available in the following ways:
- Documentation API Browser
- Enterprise API
- Enterprise UI
11.1 - Anchore V2 API
V2 API Overview
Anchore Enterprise is an API-first system. All functions available in the UI and AnchoreCTL are constructed from the same
APIs directly available to users. THe APIs are a combination of a OpenAPI-specified REST-like API and a reporting-specific GraphQL API.
The REST API is the primary API for interacting with Anchore and has the most functionality. The GraphQL API is for querying
aggregated information within an account and does not provide the same functionality as the REST API.
The API specifications for this release of Anchore Enterprise are available here in the documentation. The specifications
are also available directly from your Enterprise deployment at GET /v2/openapi.json
REST API Version 2
The Anchore V2 API is now available with the Enterprise v4.9.0 release. V2 will be the only supported API beginning
in the future Enterprise v5.0.0 release.
GraphQL API
The GraphQL API is intended for reporting functions and aggregating data from all resources in an Anchore account. The data
that the GraphQL API operates on is updated differently than the data in the REST API and thus may have an update lag between
when changes are visible via the REST API and when that data flows into functionality covered by the GraphQL API.
Authentication
Any API exposed on a network should be protected at the channels level using TLS. Regardless of the authentication scheme,
transport security ensure resistance to replay attacks and other forms of request and credential abuse and should always be used.
See Configuring TLS for setting up TLS in Anchore service directly, or use TLS
termination via load balancers or service meshes such as Istio and LinkerD. The
right choice for your deployment will depend on your specific environment and requirements.
The API supports two authentication methods:
- HTTP Basic
- Use HTTP ‘Authorization’ header:
Authorization: Basic <base64_encode(<username> + ':' + <password>)>- curl example:
curl -u <username>:<password> http://localhost:8228/v2/images
- OAuth2 Bearer Tokens
- SAML Bearer Flow
- PasswordGrant flow
- API Keys
- Generate API keys following this guide
- Use HTTP Basic Authorization with a special username
_api_key and use the API key value generated as the password- curl example:
curl -u "_api_key:<api_key_value>" http://localhost:8228/v2/images
Authorization
Anchore implements authorization with Role-Based Access Control (RBAC)
Enterprise Service V2 API Specifications
Browse Online
The V2 API is available to browse hosted in this site: V2 API browser
Downloadable YAML Documents
Anchore API Swagger Specification YAML
Feed Service API Swagger Specfication YAML
Retrieving the Swagger JSON from your Anchore Deployment Directly
The APIs provide their own specifications available from the deployment itself using: GET /v2/openapi.json.
This provides a useful mechanism for integrations and other automation tasks to retrieve the specification for the correct
Anchore version since it is provided by the deployment itself.
11.1.1 - Anchore API V2 Reference
Reference for the Anchore API V2
11.1.2 - Anchore Enterprise Reports API Access
Anchore Enterprise Reports provides a GraphQL API for direct interaction with the service.
GraphQL is a query language for APIs and a runtime for fulfilling those queries.
The main Anchore REST API includes operations for retrieving scheduled report results as static sets to make retrieval
of saved results simpler. It is available in V2 API.
Get started
There are different ways of interacting with the Anchore Enterprise Reports GraphQL API. The following sections highlight
two different options for exploring the Anchore Enterprise Reports GraphQL schema with a few examples.
THe endpoint you use for interacting with the GraphQL API is the same host and port as the main V2 API. The path is:
/v2/reports/.
Interactive GUI
One of the ways of exploring and testing a GraphQL schema is by using GraphiQL.
Anchore Enterprise Reports Service has GraphiQL built-in to the service and enabled by default.
To access it in a running Anchore Enterprise deployment, open one of the following urls in a browser:
- http://<main_api_servername:port>/v2/reports/graphql
- http://<main_api_servername:port>/v2/reports/global/graphql (Administrator Access Only)
You will be prompted to enter your Anchore Enterprise credentials.
Click the Docs tab to view the self-describing schema

In addition to being able to see the API docs, GraphiQL is handy for exploring and constructing queries supported by
the backing API. Here is an example of a query for available metrics in the system. Happy querying!

Command line using curl
You can also use curl to send HTTP requests to Anchore Enterprise Reports API. To view the schema
$ curl -u <username:password> -X POST "http://<servername:port>/v2/reports/graphql?query=%7B__schema%7BqueryType%7Bname%20description%20fields%7Bname%20description%20args%7Bname%20description%20type%7Bname%20kind%7D%7D%7D%7D%7D%7D%0A"
Generating an API key
If you are interacting directly with the API, either via a command line tool, third party integration or custom scripts/programs;
you can generate API keys to avoid exposing your private credentials. See Generating API keys for details on generating API keys.
Using an API key
You can use API keys in the same way as your regular credentials. The username for API keys is static as _api_key and the password is the value of the key itself.
$ curl -u <_api_key:<generated key value> -XGET "http://<servername:port>/v2/images
Depending on the size of data set (i.e. number of tags, images etc in the system) results of a query could be very
large. Reports service implements pagination for all queries to better handle the volume of the results and respond to
the clients within a reasonable amount of time.
Structure of the query contains a metadata object called pageInfo. It is optional, recommended to add to all
queries:
{
imagesByVulnerability {
pageInfo {
nextToken
count
}
results {
...
}
}
}
The response may return an opaque token or a null value for nextToken:
{
"data": {
"imagesByVulnerability": {
"pageInfo": {
"nextToken": "Q1ZFLTIwMTYtMTAyNjY=",
"count": 1000
},
"results": [
...
]
}
}
}
A non-null nextToken indicates that results are paginated. To get the next page of results, fire the same query along
with the nextToken from the last response as a query parameter:
{
imagesByVulnerability(nextToken: "Q1ZFLTIwMTYtMTAyNjY=") {
pageInfo {
nextToken
count
}
results {
...
}
}
}
Some useful queries
Vulnerability centric queries
List vulnerabilities of a specific severity. And include all the images, currently or historically mapped to a tag,
affected by each vulnerability
Use the query’s filter argument for specifying the conditionality. Reports service defaults to the “current”
image-tag mapping for computing results. To compute results across all image-tag mappings - current and historic,
set the tag filter’s currentOnly attribute to false. Query for vulnerabilities of Critical severity:
{ imagesByVulnerability(filter: {vulnerability: {severity: Critical}, tag: {currentOnly: false}}) { pageInfo { nextToken } results { vulnerabilityId links imagesCount images { digest } } } }
To get more details such as tag mappings for the image, add the relevant attributes from the schema to the body of the query.
List vulnerabilities detected in the last x hours. And include all the images, currently or historically mapped to a tag, affected by each vulnerability
Use vulnerability filter’s after and before attributes for specifying a time window using UTC timestamps. Query for vulnerabilities detected after/since August 1st 2019:
{
imagesByVulnerability(filter: {vulnerability: {after: "2019-08-01T00:00:00"}, tag: {currentOnly: false}}) {
pageInfo {
nextToken
}
results {
vulnerabilityId
images {
digest
}
}
}
}
Given a vulnerability ID, list all the artifacts affected by that vulnerability. And include all the images, currently or historically mapped to a tag, containing the said artifact
Use vulnerability filter’s id attribute for specifying a vulnerability identifier. Query for vulnerability ID CVE-2019-15213:
{
artifactsByVulnerability(filter: {vulnerability: {id: "CVE-2019-15213"}, tag: {currentOnly: false}}) {
pageInfo {
nextToken
}
results {
vulnerabilityId
links
artifactsCount
artifacts {
artifactName
artifactVersion
artifactType
severity
images {
digest
}
}
}
}
}
Policy evaluation centric queries
Given a repository, get the policy evaluation results for all the tags currently mapped to an image using the active policy
Use registry and repository filters for narrowing the results down. Query for docker.io registry and library/node repository:
{
policyEvaluationsByTag(filter: {registry: {name: "docker.io"}, repository: {name: "library/node"}}) {
pageInfo {
nextToken
}
results {
repositories {
tagsCount
tags {
tagName
imageDigest
evaluations {
result
reason
}
}
}
}
}
}
Given a tag, get the policy evaluation history. Include policy evaluations encompassing updates to the tag and the active policy
Reports service defaults to the “current” state for computing results. To compute results across historic state, a few filter knobs have to be turned
tag -> currentOnly set to false instructs the service to include all, current and historic, image tag mappingspolicyEvaluation -> latestOnly set to false instructs the service to include all, current and historic, policy evaluationspolicyBundle -> active set to false instructs service to include all, current and historic, active policies
{
policyEvaluationsByTag(filter: {registry: {name: "docker.io"}, repository: {name: "library/node"}, tag: {name: "latest", currentOnly: false}, policyEvaluation: {latestOnly: false}, policyBundle: {active: false}}) {
pageInfo {
nextToken
}
results {
repositories {
tags {
imageDigest
detectedAt
current
evaluations {
result
reason
lastEvaluatedAt
policyBundle {
bundleId
bundleDigest
}
latest
}
}
}
}
}
}
Metric centric queries
List all the available metrics
{
metrics {
pageInfo {
nextToken
}
results {
id
name
description
metricType
}
}
}
Given a metric ID, list values for that metric within a period of time. Useful for plotting changes over a timescale
Query for vulnerabilities.tags.all.critical metric between 1st August and 1st September 2019:
{
metricData(filter: {metricId: "vulnerabilities.tags.all.critical", start: "2019-08-01T00:00:00", end: "2019-09-01T00:00:00"}) {
pageInfo {
nextToken
}
results {
collectedAt
value
}
}
}
11.1.3 - Migrating from API V1 to V2
Overview
The changes from V1 to V2, while breaking, primarily resolve inconsistencies and confusion in the V1 API rather than
establishing any new API patterns or interaction styles. Clients using the V1 API should be able to migrate to V2 without
changing their workflows at all.
API Consolidation
Endpoint Consolidation
In the V2 API, all REST-like APIs are available from the main API service in the deployment. This means simpler integrations,
ingress setups, and client configurations. Specifically, the RBAC Manager API, Notifications API, and Reports API are now served
through the same endpoint. Those services will become internal-only services for processing requests in the 5.0 release.
A single swagger/openapi specification now covers all Anchore APIs except the GraphQL API.
Enterprise & Non-Enterprise Route Consolidation
There are no longer any enterprise prefixed routes, and all routes that had a version with and without the enterprise
prefix are now consolidated with no prefix but implement the full enterprise functionality.
Authentication
There are no changes to authentication mechanisms.
HTTP Basic and Oauth2 Tokens using JWT continue to be the authentication mechanisms for
using the API. See Authentication
Authorization
There are no changes to the RBAC authorization scheme, actions, and management workflows.
All roles, accounts, and role memberships directly transfer to V2, subject to some
field and URL path element renaming for consistency as indicated in the table below.
All the RBAC-related APIs are now served from the main API endpoint per the consolidation section above. There is no
longer a need to expose a public port from the RBAC Manager Service (NOTE: The RBAC Manger Service has been removed altogether in the v5.4.0 release).
Specification
The V2 API is specified using OpenAPI v2/Swagger v2. We anticipate a future migration to specifying the API using
OpenAPI v3 to support more modern client generation tooling. However, in the 4.9 release of the V2 API the specification
continues to be in Swagger V2.
Required Version in Path
In the V1 API, Anchore services would automatically re-write a version-less request path to use a “v1” prefix. This behavior will
no longer be present in the V2 API and in the 5.0 release all clients must specify the requested API version in the path explicitly.
For example, in V1:
GET /images –> routed internally to –> GET /v1/images
In V2:
GET /images –> HTTP 404. Must use GET /v2/images explicitly.
This is being strictly enforced to allow better future migration between APIs and consistent request handling for clients as
the APIs evolve.
Field Renames and Consolidations Overview
This covers the most impactful and significant updates, but is not exhaustive.
Account Name
The “userId” field was a legacy element of a very old version of Anchore. It is now removed and replaced with account_name
in the operations where the return is in fact the account name rather than the ID of the specific user. Since resources
in Anchore are owned by accounts, which may contain multiple users, this is the correct and clear field.
Example: userId ==> account_name
Snake Casing
There is no longer a mix between Camel Casing and Snake Casing for fields in the API. All fields are snake-case for consistency.
Example: imageDigest is now image_digest
Arrays Removed Where Not Appropriate
All APIs that returned an array where the actual response was always a single element have been re-typed to return objects.
Example:
POST /v2/images, returns a single object instead of an array.
APIs that may return large arrays have been wrapped in an object and the array set to the “items” property of the object.
This change will allow better non-breaking evolution of the API in the future.
Detailed Changes from V1 to V2
API Comparison
12 - Anchore Enterprise Release Notes
See the release notes for all Anchore Enterprise releases.
12.1 - Anchore Enterprise Release Notes - Version 5.7.0
Anchore Enterprise v5.7.0
Anchore Enterprise release v5.7.0 contains targeted fixes and improvements.
Attention
The v5.5.0 release changed the defaults for the feed provider’s configuration. The new defaults will import results published by Anchore every six (6) hours. This will reduce configuration to multiple sources, provide the NVD with Anchore Enriched data, as well as make GitHub Security Advisories available to customers that have firewall constraints. Please ensure that you have access to
https://enterprise.vunnel.feed.anchore.io for uninterrupted feeds service.
Enterprise Service Updates
Requirements
- If upgrading from a v4.x release, please refer to the v4.x –> v5.x Migration Guide.
- If upgrading from a release in the range of v5.0.0 - v5.3.0
- The upgrade will result in an automatic schema change that will require database downtime. We are anticipating that this schema change may take more than an hour to complete depending on the amount of data in your reporting system.
- If your Anchore Enterprise deployment is on FIPS enabled hosts and your database is being hosted on Amazon RDS, an upgrade to Postgres 16 or greater is required. For more information please see the FIPS section in Requirements.
- If upgrading from a release in the range of v5.4.x - v5.6.x
- The upgrade will result in an automatic schema change that will require database downtime. We expect that this could take up to 2 hours depending on the amount of data in your system.
Improvements
- Adds the ability for users to override the base image used throughout the system. This is accomplished by adding an image annotation to the image
anchore.user/marked_base_image.- API endpoints
/v2/images/{image_digest}/check and /v2/images/{image_digest}/vuln/{vuln_type} now take auto as a value for base_digest parameter. This will allow the system to determine which ancestor will be used as the Base Image. - This feature is enabled by default in v5.7.0. To disable this feature, set
services.policy_engine.enable_user_base_image to false in the values.yaml file.
- API access for users configured for
native access can now be disabled by setting anchoreConfig.user_authentication.disallow_native_users to true in the values.yaml file. - Adds info level log messages to runtime inventory post handlers.
- Improves report Vuln ID Filter description to include CVEs.
- Removes the
image_cpes database table that is no longer used and can consume a large amount of database space. - Improve validation of object_store and analysis_archive settings during startup.
- Response object GET
/v2/rbac-manager/my-roles now includes more detail about the account for each role. - Admin users can now create an API Key that can be used to manage Accounts, User Groups and RBAC Roles.
- Reduced the size of the Enterprise Image.
Fixes
- The
Fix Observed At value on vulnerabilities from all ecosystems now display correctly. - Deployments using
db as their object store driver will now be able to store large objects over 1GB in size. This means very large SBOMs will now successfully store. - Addresses an issue where account deletion didn’t fully clean up db artifacts stored for the account. Example is some reporting data.
- The CycloneDX SBOM now contains the
bom-ref field as part of the output. - Allow users with
read-only or read-write RBAC Authorization to have the following permissions:getECSContainersgetECSServicesgetECSTasksgetKubernetesClustersgetKubernetesVulnerabilitieslistRuntimeInventoriesgetKubernetesNamespacesgetKubernetesContainersgetKubernetesNodesgetKubernetesPods
- Fixes an issue in the
policy_creation counter found in the GET /v2/system/statistics endpoint. - Explicit SAML Users are now allowed to use the
: character in usernames. - Account names are now prevented from being created with the
# character.
Deprecations
- Support for OpenStack Swift, which is an open-source object storage system, has been deprecated. Please see Object Storage for a list of supported Object Stores.
- Package Feeds and Policy Gates for
Ruby Gems and NPMs, are now deprecated. Please contact Anchore Support for more information.
UI Updates
Improvements
The login page has been updated with a new design that uses tabs
to switch between configured authentication methods. When multiple
authentication methods are available, tabs are shown for each available
method. The user’s last-selected method is remembered and shown as the
default tab on subsequent visits.
Anchore Enterprise now supports a Single Sign-On (SSO) only mode.
This mode allows administrators to disable the local authentication
mechanism, which removes the default login form. This is an opt-in
feature enabled by setting the sso_auth_only configuration option
to True.
The Analyze a Tag control has been updated to allow users to
provide a SHA256 digest for the image they wish to analyze. This
feature is useful when you only want to analyze a specific image.
In addition, you can now populate the Registry, Repository,
and Tag fields by pasting a pull string (e.g.,
docker pull docker.io/library/alpine:latest) in the inline control
provided.
The reported base image in the Artifact Analysis view now
reflects changes made within our platform services, whereby the
system can either make the determination automatically or have the
base image specified by an anchore.user/marked_base_image
annotation associated with an image in the ancestry.
Fixes
Previously, the selected default entry in the table page size
dropdown was not being set correctly when opened, and was defaulting to
the first entry. This has now been addressed.
Our application security policies have been updated to prevent
client-side caching, the execution of arbitrary code within our
dependent packages using eval(), and the HTTP Strict Transport
Security (HSTS) header has been added to enforce the use of HTTPS
connections and to remove the ability for users to click through
warnings about invalid certificates.
Within Artifact Analysis, when the route for this view (and the associated
compliance data request) contained the fat manifest digest, the image_digest
returned would still be the platform-specific digest. This caused an
equality check with the route to fail. This has now been fixed.
The Vulnerability ID filter description has been updated to
clarify that it filters the Vulnerability and CVE fields.
The Delete Events modal within the Events tab was successfully
deleting events in batches, but the progress bar was not visually
updating to indicate this. This has now been fixed.
The calculation in the Dashboard view that describes how many
vulnerabilities were affecting how many repositories was inaccurate because the
summarization included duplicate entries. This was a consequence of
different vulnerabilities against the same repository advancing the
repository count. This has now been corrected.
An issue with the policy allowlist data payload was preventing
updates (such as removals) from taking place against allowlists displayed by the
associated dialog in the Artifact Analysis view. Now fixed.
The donut chart displayed in the printable version of the Policy
Compliance tab in the Artifact Analysis view was not positioned correctly.
This has now been fixed.
Boolean values for annotations are now displayed correctly.
The Twitter social media logo has been updated to 𝕏 to reflect the change in
brand and name.
Various supporting libraries have been updated in order to improve
security, performance, and also to remove deprecation warnings from
browser and server output logs. Redundant libraries have been
removed to reduce the app startup time and overall size.
Recommended Component Versions
Anchore Helm Chart can be found at https://github.com/anchore/anchore-charts
12.2 - Anchore Enterprise Release Notes - Version 5.6.0
Anchore Enterprise v5.6.0
Anchore Enterprise release v5.6.0 contains targeted fixes and improvements.
Attention
The v5.5.0 release changed the defaults for the feed provider’s configuration. The new defaults will import results published by Anchore every six (6) hours. This will reduce configuration to multiple sources, provide the NVD with Anchore Enriched data, as well as make GitHub Security Advisories available to customers that have firewall constraints. Please ensure that you have access to
https://enterprise.vunnel.feed.anchore.io for uninterrupted feeds service.
Enterprise Service Updates
Requirements
- If upgrading from a v4.x release, please refer to the v4.x –> v5.x Migration Guide.
- If upgrading from a release in the range of v5.0.0 - v5.3.0
- The upgrade will result in an automatic schema change that will require database downtime. We are anticipating that this schema change may take more than an hour to complete depending on the amount of data in your reporting system.
- If your Anchore Enterprise deployment is on FIPS enabled hosts and your database is being hosted on Amazon RDS, an upgrade to Postgres 16 or greater is required. For more information please see the FIPS section in Requirements.
- If upgrading from a release in the range of v5.4.x - v5.5.x
- The upgrade will result in an automatic schema change that will require database downtime. We expect that this will take between 2 and 15 minutes depending on the amount of data in your system.
Improvements
/v2/system/statistics API endpoint now includes creation and current counts of runtime inventory and associated metadata./v2/system/feeds and /v2/system/feeds/{feed} API endpoints now include the last updated time for the feed groups.- Artifact Lifecycle Policies now include a new policy condition to preserve base images.
- Deployment history now includes the initial deployment information.
/v2/images and /v2/summaries/image-tags API endpoints now include an optional flag analyzed_since to help reduce the amount of data returned.
Fixes
- Ensures that the layer cache is cleared periodically.
- Ensures image imports are not removed until they have been completely processed.
- Fixes inconsistent return values when specifying registry data to the POST
/v2/registries and /v2/registries/{registry_name} endpoints. - Improves the validation of data posted to the
/v2/ecs-inventory endpoint. - Improves the validation around the object store compression setting. Appropriate error messages are now available in the log during startup.
- Resolves an issue with Policy evaluation and in Reports where inherited_from_base information for vulnerabilities was calculated against the image with the fewest layers in common instead of the most.
- Fixes an issue caused by expired image imports that resulted in logs being flooded with validation errors.
- Promptly load new tags and policy evaluations for existing images into the reporting system.
- Fixes the Ubuntu 24.04 mapping within Enterprise to be noble based on the security announcement. It was previous mapped to numbat incorrectly.
- The
Stale Feed Policy Gate trigger now uses the last updated time per feed group. - Fixes a deadlock seen by the report-worker service while updating the runtime inventory data in the reporting system.
Deprecations
- Support for OpenStack Swift, which is an open-source object storage system, has been deprecated. Please see Object Storage for a list of supported Object Stores.
- In the upcoming v5.7.0 release, the support for package feeds, Ruby Gem and NPM will be deprecated. Please contact Anchore Support for more information.
UI Updates
Improvements
- By default, the account context is now included within the URL when
navigating throughout the application. This change allows users to
bookmark or share links that will open the application in the same
account context as the original link, as long as they have sufficient
permissions to access the resource.
- The Image Selection view has been further optimized to improve
performance when loading the different data tiers (registry,
repository, and tags) via server-side pagination, filtering, and
sorting. This optimization should reduce the time taken to present
the information in each of these tables.
- The Dashboard view has been optimized to improve the Time to
Interactive (TTI) on load. Calculation of Dashboard metrics can take
a significant amount of time, so we now allow the pending metrics
data to continue loading without blocking the UI. Since the Dashboard
view is typically the default on login, this change allows users to
navigate elsewhere if desired.
- When creating or editing an image retention policy within the Data
Management view, the option to exclude base images from removal
is now available.
- When creating a SAML Provider Configuration, the system role
account-viewer
is no longer available to be set as the default role.
Fixes
- The View Incomplete Analyses modal within the Images tab had the
ability to toggle between listing pending, analyzing, and failed
images across your account or for the registry, repository, or tag
you were viewing. This was removed in a previous release, but has now
been reinstated.
- When certain modals were open and a forced logout was triggered due
to a permission change or session expiration, the modal dimmer would
remain. This has now been fixed.
- When creating a SAML Provider Configuration, the system role
account-viewer is no longer available to be set as the default role. - Various supporting libraries have been updated in order to improve
security, performance, and also to remove deprecation warnings from
browser and server output logs. Redundant libraries have been
removed to reduce the app startup time and overall size.
Recommended Component Versions
Anchore Helm Chart can be found at https://github.com/anchore/anchore-charts
12.3 - Anchore Enterprise Release Notes - Version 5.5.1
Anchore Enterprise v5.5.1
Anchore Enterprise release v5.5.1 contains targeted improvements.
Attention
The v5.5.1 release has changed the defaults for the feed provider’s configuration. The new defaults will import results published by Anchore every six (6) hours. This will reduce configuration to multiple sources, provide the NVD with Anchore Enriched data, as well as make GitHub Security Advisories available to customers that have firewall constraints. Please ensure that you have access to
https://enterprise.vunnel.feed.anchore.io for uninterrupted feeds service.
Enterprise Service Updates
Requirements
- If upgrading from a v4.x release, please refer to the v4.x –> v5.x Migration Guide.
- If upgrading from a release in the range of v5.0.0 - v5.3.0
- The upgrade will result in an automatic schema change that will require database downtime. We are anticipating that this schema change may take more than an hour to complete depending on the amount of data in your reporting system.
- If your Anchore Enterprise deployment is on FIPS enabled hosts and your database is being hosted on Amazon RDS, an upgrade to Postgres 16 or greater is required. For more information please see the FIPS section in Requirements.
- If upgrading from the v5.4.x release, no additional action is needed.
Improvements
- A small change to improve the responsiveness of the Runtime Images by Vulnerability report. This change will reduce the time it takes to generate the report under certain conditions.
Deprecations
- Support for OpenStack Swift, which is an open-source object storage system, has been deprecated. Please see Object Storage for a list of supported Object Stores.
Recommended Component Versions
12.4 - Anchore Enterprise Release Notes - Version 5.5.0
Anchore Enterprise v5.5.0
Anchore Enterprise release v5.5.0 contains targeted fixes and improvements.
Attention
The v5.5.0 release has changed the defaults for the feed provider’s configuration. The new defaults will import results published by Anchore every six (6) hours. This will reduce configuration to multiple sources, provide the NVD with Anchore Enriched data, as well as make GitHub Security Advisories available to customers that have firewall constraints. Please ensure that you have access to
https://enterprise.vunnel.feed.anchore.io for uninterrupted feeds service.
Enterprise Service Updates
Requirements
- If upgrading from a v4.x release, please refer to the v4.x –> v5.x Migration Guide.
- If upgrading from a release in the range of v5.0.0 - v5.3.0
- The upgrade will result in an automatic schema change that will require database downtime. We are anticipating that this schema change may take more than an hour to complete depending on the amount of data in your reporting system.
- If your Anchore Enterprise deployment is on FIPS enabled hosts and your database is being hosted on Amazon RDS, an upgrade to Postgres 16 or greater is required. For more information please see the FIPS section in Requirements.
- If upgrading from the v5.4.x release, no additional action is needed.
Improvements
Feeds Service
- Defaults to using the anchore produced workspaces for each vulnerability feed provider. These workspaces are updated every six (6) hours. Please see Feeds for more detailed information.
- Ubuntu 24.04 Feed Provider is now supported.
Reports
- Reduced the number of links to upstream sources of vulnerabilities within the reports by adding a new field in the reports. This should be seamless to users of the UI reporting service.
Authentication
- Improved the error message returned when requesting an API Key expiry date exceeds the configured setting.
- Removes the restriction that prevents creation of SSO users explicitly in Anchore when
sso_require_existing_users is not set. SSO users may now be created manually and associated with an IDP by user admins regardless of the configuration of the IDP integration. This is only available directly via the API.
API
- Provides a new endpoint to download the compatible version of AnchoreCTL directly from the product.
GET /system/anchorectl - Provide new value of
stateless_sbom_analysis from GET /system/statistics
AUDIT Logs
- The helm chart now provides the ability to disable the AUDIT logging that was introduced in v5.4.0. The default is set to enable.
audit:
enabled: true
- Now includes the following endpoint
/v2/user/api-keys/v2/user/api-keys/{key_name}/v2/user/credentials/v2/accounts/{account_name}/users/{username}/credentials
Update the built-in CIS policy to the latest version (v1.6.0). The new policy will automatically be populated for newly created accounts.
Service Logging
- Improved logging output
- Ability to enable service log output as structured logs
- Ability to change service log size and rotation rules
- Helm chart has deprecated the previous log_level control
## NOTE: This is deprecated, use logging.log_level
anchoreConfig:
log_level: INFO
- New helm chart controls are
anchoreConfig:
logging:
file_rotation_rule: "10 MB"
file_retention_rule: 10
log_level: INFO
structured_logging: false
Fixes
- Removes false-positive vulnerability matches on the kernel headers packages for RHEL and Debian when the match is on the full kernel and the kernel is not present in the image.
- Better handle overlapping vulnerability scans for the same image.
- Better detection of vulnerabilities for Calico images.
- Improved error messages for misconfigured S3 buckets during service startup.
- Fixed the filter of
Vendor Only when used by the Vulnerabilities Policy Gate and Package Trigger. - Better handle Runtime Inventory that contains missing IDs.
- Reports, Vulnerabilities by ECS Container, Vulnerabilities by Kubernetes Container, and Vulnerabilities by Kubernetes Namespace, no longer produce results that are not part of the current inventory tracked by Catalog Service. This behavior is now the same as other provided reports.
Deprecations
- Support for OpenStack Swift, which is an open-source object storage system, has been deprecated. Please see Object Storage for a list of supported Object Stores.
UI Updates
Improvements
- The Image Selection view has been optimized to improve
performance when loading the different data tiers (registry,
repository, and tags). This optimization should reduce the time
taken to present the information in each of these tables.
- The report templates that contain links to external references
now use the
Image Link field by default, replacing the
(deprecated) Links field. This prevents duplication of results
where the only differences between row entries were the links
themselves.
Fixes
Operations against the services utilized by the Inventory view
are now correctly logged in the system logs.
Various supporting libraries have been updated in order to improve
security, performance, and also to remove deprecation warnings from
browser and server output logs. Redundant libraries have been
removed to reduce the app startup time and overall size.
Recommended Component Versions
12.5 - Anchore Enterprise Release Notes - Version 5.4.1
Anchore Enterprise v5.4.1
Anchore Enterprise release v5.4.1 contains a targeted fix and configuration options for feeds.
Enterprise Service Updates
Requirements
- If upgrading from a v4.x release, please refer to the v4.x –> v5.x Migration Guide.
- If upgrading from a release in the range of v5.0.0 - v5.3.0
- The upgrade will result in an automatic schema change that will require database downtime. We are anticipating that this schema change may take more than an hour to complete depending on the amount of data in your reporting system.
- If your Anchore Enterprise deployment is on FIPS enabled hosts and your database is being hosted on Amazon RDS, an upgrade to Postgres 16 or greater is required. For more information please see the FIPS section in Requirements.
- If upgrading from the v5.4.0 release, no additional action is needed.
Improvements
Enables delivery of Anchore augmentation to vulnerability records to enable a better vulnerability scanning experience. This enables Anchore to minimize customer impact from the current NVD analysis slowdown and ensure accurate scan results.
In order to provide the best experience, we have 3 configuration options available.
- NVD Direct Mode - No changes are needed. You will continue to receive the vulnerability data from NVD as you do today.
- NVD Direct Mode with Anchore Enrichment - Allowing Anchore to enrich NVD entries by adding CPE string(s) which allows Anchore Enterprise to correctly match on new vulnerabilities. Requires access to GitHub.
- NVD Proxy Mode with Anchore Enrichment - In this mode, Anchore produces the resulting workspace of the Anchore Enrichments and publishes it in https://enterprise.vunnel.feed.anchore.io. This allows users to consume the Anchore NVD Enriched data without needing access to GitHub.
For more configuration details please review NVD Provider.
NVD with Anchore Enriched data is not currently providing any severity information. By definition only NVD can supply NVD CVSS scores.
Note
The future v5.5.0 release will change the default for the feed provider’s configuration. The new default will import results published by Anchore every 6 hours. This will reduce configuration to multiple sources, provide the NVD with Anchore Enriched data, as well as make GitHub Security Advisories available to customers that have firewall constraints.
Fixes
- Resolves issue with uploading runtime inventory that contains unicode characters.
Deprecations
- Support for OpenStack Swift, which is an open-source object storage system, has been deprecated. Please see Object Storage for a list of supported Object Stores.
UI Updates
Fixes
- A fix has been applied to the image summary data processing operation
that calculates the artifact taxonomy for registries, repositories,
and tags. Ports are now correctly handled when included in the registry
value.
Recommended Component Versions
12.6 - Anchore Enterprise Release Notes - Version 5.4.0
Anchore Enterprise v5.4.0
Anchore Enterprise release v5.4.0 contains targeted fixes and improvements.
Note
We are anticipating that this upgrade may take more than an hour to complete depending on the amount of data in the reporting system.Enterprise Service Updates
Requirements
- If upgrading from a v5.x release, a database update is required.
- If upgrading from a v4.x release, please refer to the v4.x –> v5.x Migration Guide.
- If your Anchore Enterprise deployment is on FIPS enabled hosts and the database is being hosted on Amazon RDS, an upgrade to Postgres 16 or greater is required. For more information please see the FIPS section in Requirements.
Improvements
- AUDIT event logs have been added to the API Service for the following endpoints
/accounts/accounts/{account_name}/accounts/{account_name}/state/accounts/{account_name}/users/accounts/{account_name}/users/{username}/accounts/{account_name}/users/{username}/api-keys/accounts/{account_name}/users/{username}/api-keys/{key_name}/rbac-manager/roles/rbac-manager/roles/{role_name}/members/rbac-manager/saml/idps/rbac-manager/saml/idps/{name}/rbac-manager/saml/idps/{name}/user-group-mappings/system/user-groups/system/user-groups/{group_uuid}/system/user-groups/{group_uuid}/roles/system/user-groups/{group_uuid}/users
- Deployment
- We have simplified the Anchore Enterprise deployment by removing the need to create RBAC Authorizer Service and RBAC Manager Service. RBAC functionality within the product is unchanged.
- Reports
- Reports which contain vulnerability information have a new column for CVEs.
- The CVEs may be different from the Vulnerability ID which was used to match on if it was an Advisory ID.
- The CVEs column may contain
N/A if a CVE has not been published or detected for the Advisory’s ID yet. - Current saved reports remain unchanged. To see this new column, you will need to generate a new saved report.
- The Vulnerability ID Filter has been updated to work on both the Vulnerability ID and the CVEs.
- API
/system/deployment-history is a new endpoint that returns a history of your future upgrades./system/statistics endpoint now includes the number of total number of policy creations, the current number of policies in the deployment, and the total number of policy evaluations.
Fixes
- Policy delete now properly removes document store artifacts from this policy.
- Improves the account creation errors returned to the user when the failure is regarding policy creation.
- Deletion of an image will no longer cause other images to return 500 errors. This could occur when the two image shared the same image ID.
- Fixes the Policy Gate: Tag Drift Trigger failure that was seen when multiple versions of the tag existed and the comparison was against the newest one.
- Improves the archive rule deletion errors returned to the user when they did not have permissions for the operation.
- Return the image content even when the parent digest is being used for the request. This was seen in a error in
anchorectl image content. - Improves errors from
POST /rbac-manager/roles/{role_name}/members- when the user is an
admin user - when the username is not valid or is a reserved system name
- Improves errors from
POST /system/user-groups/{group_uuid}/users- when the user is an
admin user - when the username is not valid or is a reserved system name
- Improves errors from
POST /system/user-groups- when the user group name is a reserved system name
- when the user group name overlaps with a username
- Fixes the response of
PATCH /system/user-groups/{group_uuid} to return the entire user group value. - Fixes a 500 error in the Action Workbench when selecting a notification endpoint.
Deprecations
- Support for OpenStack Swift, which is an open-source object storage system, has been deprecated. Please see Object Storage for a list of supported Object Stores.
UI Updates
Improvements
The User Groups view provides a summary of all user groups and
the accounts associated with each group. From this view,
administrators can create, edit, and delete user groups, and define the accounts and associated permissions accessible to
users within each group. Native users, LDAP users, and SSO users can
all be assigned to user groups from their respective Add or
Edit dialogs.
A performance improvement has been applied to the image summary data
processing operation that calculates the artifact taxonomy for
registries, repositories, and tags. This improvement should reduce
the time taken to present the Image selection view.
Fixes
A default of N/A has now been provided for empty entries in the
CVEs column of the Vulnerabilities tab. This change ensures
that the CVEs column is always populated with data, even if the
vulnerability has no associated CVEs.
During template creation, we identified an issue where the state of
unchanged boolean filters marked as False was incorrectly
recorded as null after being saved. This error caused the filter
to be omitted from any report queries generated from that template.
While the issue was resolved in the 5.3.2 release for new
templates, pre-existing templates remained unchanged. An AppDB
migration has been added to automatically correct this issue for
existing templates.
The Last Seen popup contained broken links to the Inventory
page for ECS containers. Images of this type are not currently
supported in the Inventory view, and the links have now been
removed.
Reports downloaded from the Reports view that contained multiple
CVE entries would not display correctly in the CSV format on account
of the data itself being comma-separated. This issue has now been
addressed.
Various supporting libraries have been updated in order to improve
security, performance, and also to remove deprecation warnings from
browser and server output logs. Redundant libraries have been
removed to reduce the app startup time and overall size.
Recommended Component Versions
12.7 - Anchore Enterprise Release Notes - Version 5.3.0
Anchore Enterprise v5.3.0
Anchore Enterprise release v5.3.0 contains targeted fixes and improvements.
Enterprise Service Updates
Announcements
Note
In the future v5.4.0 release, any Anchore Enterprise that is deployed on FIPS enabled hosts with its database being hosted on Amazon RDS, will be required to be running with a Postgres Version of 16 or greater. For more information please contact Customer Support.Requirements
- If upgrading from a v5.x release, a database update is required.
- If upgrading from a v4.x release, please refer to the v4.x –> v5.x Migration Guide.
Improvements
- User Groups API Support (v5.3.0 Preview)
- Providing the ability for an administrator to define one or more
RBAC Roles for one or more accounts within an User Group. The administrator has the ability to add and remove users from the User Groups. These users will automatically have the privileges as defined by the User Group in addition to any explicitly assigned RBAC Roles.
- Policy
- Policy
packages gate has a new metadata trigger and provides the following parameter values:- Package type to exact match against
- Package name to match against (supports wildcards)
- Package version to match against (supports wildcards)
- Allowlists can contain either CVEs or corresponding Advisory IDs and work the same regardless of which was used to match the Trigger ID.
- Reports
- Report executions that fail to complete after 3 attempts will be cancelled. The report will continue to be executed on any defined schedule.
- Improved the description of the
Current Only filter in reports that contain tag information.
- The
/system/statistics endpoint now includes the number of successful policy evaluations and the number of reports generated. - Improved the performance of the background task that deletes older runtime inventory based on the configuration value
inventory_ttl_days. - Improved the performance of Policy Evaluations.
- Improved the behavior of the GitHub Vulnerability Provider when a token is not provided. The system will automatically disable this provider and log a warning message to alert the user.
Fixes
- Addressed an issue where the policy’s
dockerfile gate with effective_user trigger could not determine the effective user. - Enterprise provides better handling of NuGet packages.
- Syft v0.105.0 improved its ability to search common patterns within a go binary. This should resolve an issue determining the version where the main module is
(devel). - Addressed a failure seen by all the feed providers when the GitHub Token was set to NULL instead of an empty string.
- Fixed the Policy
distro gate when the version field was a non-numeric value (ie latest). - Policy Engine has improved its validation of the
grype-db during startup. - JAR filenames, which had an underscore in their names, are now parsed correct in SBOMs.
Deprecations
- Support for OpenStack Swift, which is an open-source object storage system, has been deprecated. Please see Object Storage for a list of supported Object Stores.
UI Updates
Improvements
The results table within the Vulnerabilities tab now contains a
CVEs column that lists all CVEs associated with each
vulnerability.
NVD CVSS Base Score is now included in the CSV and JSON reports that
are generated from the Vulnerabilities tab in the Artifact
Analysis view. In addition, a CVEs column has also been added in
order to fully represent every CVE associated with each
The results view for a report now contains the following additional
details:
Results generation started atResults generation completed at'
Fixes (v5.3.1)
- Due to a regression accidentally introduced in version 5.2.0, the migration of reports predating 5.0.0 would fail upon upgrading to 5.2.0. This failure resulted in a service error when attempting to view the report from the Saved Reports view. This issue has now been resolved.
- In rare cases, the Accounts view would return a 404 if it tried to fetch users from an account that had been deleted by another admin. This issue has now been addressed.
- Due to a regression in 5.3.0, the calendar widget available in Events and Policies was not centered correctly. This issue has now been resolved.
Fixes (v5.3.0)
A fix has been provided for an issue where reports that have no
results either serve corrupted (JSON) or empty (CSV) files on
download. This issue has now been addressed.
In previous releases, the timestamps displayed in the Report
Results view were not correctly calculated if the page was
visited directly via URL, or if the page was refreshed. Now fixed.
Deleted image retention policies are no longer displayed in the
System > Data Management view (admin only).
Various supporting libraries have been updated in order to improve
security, performance, and also to remove deprecation warnings from
browser and server output logs. Redundant libraries have been
removed to reduce the app startup time and overall size.
Recommended Component Versions
12.8 - Anchore Enterprise Release Notes - Version 5.2.0
Anchore Enterprise v5.2.0
Anchore Enterprise release v5.2.0 contains targeted fixes and improvements.
Enterprise Service Updates
Requirements
If upgrading from a v5.x release, a database update is required.
If upgrading from a v4.x release, please refer to the v4.x –> v5.x Migration Guide.
Enterprise v5.2.0 requires Postgres 13 or greater.Enterprise v5.2.0 requires that the previous version was Enterprise v4.0.0 or greater. Strongly recommend that you upgrade to Enterprise v4.9.5 prior to attempting this upgrade.Enterprise v5.2.0 requires the use of the Enterprise Helm Chart. Please see below the table containing compatible version.Enterprise v5.2.0 requires that you upgrade your integrations and client. Please see below the table containing compatible versions.
Improvements
- RBAC Roles
- Adds new system role called
account-viewer. This role allows the user to list all the accounts within Anchore Enterprise. Authorization to bestow this role is restricted to system administrators.
- Reports
- Provides a configuration variable,
services.reports.use_volume, which directs the Report Service to use disk space instead of memory while generating reports. - The “Inherited From Base” field is now available the vulnerability-related reports including:
Artifacts by VulnerabilityImages Affected by VulnerabilityRuntime Inventory Images by VulnerabilityTags by VulnerabilityVulnerabilities by ECS ContainerVulnerabilities by Kubernetes ContainerVulnerabilities by Kubernetes Namespace
- Improves the performance of the Kubernetes Namespace Vulnerability Loader within the Report Worker Service.
- API
- Adds a
/system/statistics endpoint to return various system statistics and counters over time. - The
/images/{image_digest}/vuln/{vuln_type} endpoint provides a query flag, include_vuln_description, that indicates when to include the vulnerability description field in the response. - Provides a new field, password_last_updated, in the response of
/accounts/{account_name}/users.
- API Keys
- Provides a configuration variable,
user_authentication.remove_deleted_user_api_keys_older_than_days, which determines the number of days API Keys will remain in the database.
Fixes
- Corrects the time that a Scheduled Query started to be generated in the unlikely occurrence that system restarted the report.
- Addresses an issue with the RedHat vulnerability data provider not automatically updating OVAL files which prevents getting accurate fix version information for appstream packages in RHEL 9.
- Addresses an issue with grype-db matching logic for RHEL 9, where they are no longer reporting a modularity, resulting in false positives. Specifically, RHEL 9’s default stream no longer reports a modularity.
- API endpoint
/images/{image_digest}/content/java returns a version format consistent with the output from AnchoreCTL. - Fixes an issue where the
services.reports_worker.data_egress_window was not working correctly for the runtime reports. - Fixes a failure in the Source SBOM import that refer to poetry.lock or python requirements files.
- An interrupted report generation will correctly error out correctly instead of trying to persist a partially generated report.
- Fixes an issue where CVE-2023-44487 would show the incorrect severity.
Licenses for all package content types are now returned when available.Cpes property returns a list of strings or an empty list for all package content types.- Reintroduced the Policy Evaluation Cache which aids in better evaluation performance.
- Logging
- Reduces the number of log warning messages for orphaning services.
- Suppress an SQLite exception that was not impacting the system.
- Removes an incorrect error message in the Reports Service that looked like the following “Could not trigger reports_image_refresh after multiple retries. Will retry on next cycle”.
Deprecations
- Support for OpenStack Swift, which is an open-source object storage system, has been deprecated. Please see Object Storage for a list of supported Object Stores.
UI Updates
Improvements
Administrators can now assign the system-wide account-viewer role
to users. This role allows users to list all accounts in the system
and is intended for programmatic access to the Anchore API.
Administrators can now view the last time a user password was
changed from the summary table in the Accounts view.
The error indicator for a failed report has been updated to provide
more information about the failure.
From within the new Data Management view, administrators can
now set policies to determine the removal schedule for images
in the system across all accounts. The policies allow you to
specify the number of days to retain images, based on either
presence in the runtime inventory or their presence globally.
Logs are now written to a file (by default in the
/var/log/anchore directory) in addition to the console. The
logs are rolled once a maximum capacity of 10Mb is reached, and
the last 10 log files are retained. In addition, outbound
requests made by the application to our Anchore Enterprise API now
display the request identifier used within our services, which can
be used to correlate the UI request with the platform service
logs.
A Licenses column has been added to the Java sub-tab.
The "Inherited From Base" field has been added as a default to a variety
of vulnerability-related reports including:
Artifacts by VulnerabilityImages Affected by VulnerabilityRuntime Inventory Images by VulnerabilityTags by VulnerabilityVulnerabilities by ECS ContainerVulnerabilities by Kubernetes ContainerVulnerabilities by Kubernetes Namespace
Fixes
Administrators who switch into a different (non-administrative)
account context are no longer able to create global reports in
that account.
Previously, when a saved report was reconfigured (for example, by
changing the name or description), the filter details would be
dropped from the AppDB record, preventing the report from being
viewed (although it would still be available for download). This
issue has now been fixed.
Administrators who are authenticated via LDAP are now able to
create and manage API keys for non-LDAP administrative and standard
users (although not for themselves, because we currently don’t
support API Key self-service for LDAP authenticated users).
Various supporting libraries have been updated in order to improve
security, performance, and also to remove deprecation warnings from
browser and server output logs. Redundant libraries have been
removed to reduce the app startup time and overall size.
Recommended Component Versions
12.9 - Anchore Enterprise Release Notes - Version 5.1.1
Anchore Enterprise v5.1.1
Anchore Enterprise release v5.1.1 contains targeted fixes and improvements.
Enterprise Service Updates
Requirements
If upgrading from a previous v5.1.0 release, a database update is not required.
If upgrading from a previous v5.0.x release, a database update is required.
If upgrading from a v4.x release, please refer to the v4.x –> v5.x Migration Guide.
Enterprise v5.1.1 requires Postgres 13 or greater.Enterprise v5.1.1 requires that the previous version was Enterprise v4.0.0 or greater. Strongly recommend that you upgrade to Enterprise v4.9.3 prior to attempting this upgrade.Enterprise v5.1.1 requires the use of the Enterprise Helm Chart. Please see below the table containing compatible version.Enterprise v5.1.1 requires that you upgrade your integrations and client. Please see below the table containing compatible versions.
Improvements
- Reports
- Performance improvement in report generation.
- Reduction of database swap space needed during report loading.
Recommended Component Versions
12.10 - Anchore Enterprise Release Notes - Version 5.1.0
Anchore Enterprise v5.1.0
Anchore Enterprise release v5.1.0 contains targeted fixes and improvements.
Enterprise Service Updates
Requirements
If upgrading from a previous v5.x release, a database update is required.
If upgrading from a v4.x release, please refer to the v4.x –> v5.x Migration Guide.
Enterprise v5.1.0 requires Postgres 13 or greater.Enterprise v5.1.0 requires that the previous version was Enterprise v4.0.0 or greater. Strongly recommend that you upgrade to Enterprise v4.9.3 prior to attempting this upgrade.Enterprise v5.1.0 requires the use of the Enterprise Helm Chart. Please see below the table containing compatible version.Enterprise v5.1.0 requires that you upgrade your integrations and client. Please see below the table containing compatible versions.
Improvements
- Global Artifact Lifecycle Policy
- API Keys
Support for API Keys. API Keys are manually generated credentials used during authenticate with Anchore Enterprise. For more information, please see API Keys
Note: This feature is not currently available for users who have authenticated using LDAP
- Vulnerabilities
- Provide additional vulnerability matching for
goCompiledVersion. - Provide vulnerability matching for pre-released versions of Debian.
- Support capture of vulnerability data for Ubuntu 23.04 (Lunar Lobster) and Ubuntu 23.10 (Mantic Minotaur) once publishing commences from Canonical.
- Analysis
- All namespaced python packages are persisted during analysis which improves displaying the installed location for python packages.
- Reports
- Report generation can be scaled out to multiple report pods.
- Runtime reports now work with the
enable_data_egress and data_egress_window configuration options. Please review Reports for more information. - Improved report service logging to provide better error messages.
- Runtime report filters for Labels now supports multiple labels.
- RBAC Roles
- image-lifecycle - permissions around management of archival rules.
- registry-editor - permissions to manage private registry credentials.
- General System Improvements
- Improve memory profile and behavior in the API service.
- Improve logging within the feed service.
- Provide clear logging of the service version and db schema during startup.
Fixes
- Better error handling for policies that are missing data from the document store.
- Ability to execute a software downgrade from a patch release to a release within the Major.Minor version numbers.
- Prevent a deadlock when two agents are reporting inventory from the same Cluster/Namespace.
- If report generation exceeds the configured timeout execution record will be marked as
timed out and processing will be halted to allow other scheduled reports to start. - Vulnerability matching now properly accounts for maven versions according to the maven spec rather than the plain semver spec.
- Fixed an issue that prevented new Windows OS containers from being analyzed properly.
- Image digests will now match when an image is analyzed within Enterprise (centralised analysis) and the image SBOM is imported via AnchoreCTL (distributed analysis).
- If an error occurs during database upgrade, the error will be elevated to the pod to prevent it from starting.
- Image import that contains a secret or content search results, will now have the correct line number and name translations.
- Fix a
grypedb digest mismatch that can occur when Policy Engine syncs with the Feed Service.
UI Updates
Improvements
- API Token Support
Users can now create and manage API keys for use with the Anchore API. Administrators can control the keys for all users from the System > Accounts view, and all users can create or revoke their own keys from the dropdown menu in the top navigation bar.
Note: This feature is not currently available for users who have authenticated using LDAP
- Application Vulnerabilities
- Vulnerabilities data for an application group can now be downloaded in JSON format from the Applications view
- The Artifact Analysis view now indicates, if available, the fat manifest ID associated with the currently selected artifact in the breadcrumb trail
- The Artifact Analysis > SBOM view now includes a Version column to the Java sub-tab
- Reports
- The
Vulnerabilities by ECS Container report now provides the Will Not Fix and Last Seen fields - The
Vulnerabilities by Kubernetes Container report now provides the Last Seen field - The
Fix Observed At field has been added as a default to a variety of vulnerability-related reports - Help text improvements have been made to the filters associated with runtime-related reports
- Accounts
- The email address associated with an account can now be updated by an administrator
- The roles provided in the user-creation dialog within an account are now alphabetically sorted
- UI Theme
- A dark theme has been added to the application. This can be enabled by clicking the Dark Mode toggle in the top right of the UI. By default, the theme will follow the system theme, but it can be overridden by the user.
Fixes
- Reports
- Any previous errors are now cleared when the configuration dialog is opened. In addition, the title of the dialog no longer changes as a new name is entered.
- The Report Results page displayed the execution schedule as UTC, which was inconsistent with the information shown in the Saved Reports view, where it is converted to the local timezone. Now fixed.
- Licenses are now displayed correctly in the Artifact Analysis > SBOM view; previously they would be displayed as
Unknown - Image Selection
- A significant performance improvement has been applied to the repository summary operation that presents the interstitial dialog when adding a repository
- Clicking an enabled alert subscription toggle for tags that inherit their subscription state from their parent repository would not disable the subscription for the tag; instead, a new subscription would be added for that specific tag, with another tag required to actively disable the entry. This has now been fixed
- Various supporting libraries have been updated to improve security and performance, and to remove deprecation warnings from both browser and server output logs. Redundant libraries have been removed to reduce the application’s startup time and overall size.
Recommended Component Versions
12.11 - Anchore Enterprise Release Notes - Version 5.0.0
Anchore Enterprise v5.0.0
Note
Please review Migration Details for the Enterprise v5.0.0 Release. Important requirements must be met before upgrade. See link below.Enterprise Service Updates
5.0 Migration Guide
Requirements
Enterprise v5.0.0 requires Postgres 13 or greater.Enterprise v5.0.0 requires that the previous version was Enterprise v4.0.0 or greater. Strongly recommend that you upgrade to Enterprise v4.9.0 prior to attempting this upgrade.Enterprise v5.0.0 requires the use of the Enterprise Helm Chart v2.0.0.Enterprise v5.0.0 requires that you upgrade your integration and client. Please see below the table containing compatible versions.
Improvements
- V2 API
- The Anchore Enterprise API has been updated. For complete details, please review Migrating from API V1 to V2.
- The Anchore Enterprise API is found in the API Service. The RBAC Manager API, Notifications API, and Reports API are now served through that same endpoint. Those services are now internal-only services for processing requests in the 5.0 release.
fix_observed_at is now returned as part of the GET /v2/images/{image_digest}/vuln/{vuln_type} endpoint response where a fix is available.
- Reports
- Scheduled Query Executions now contain a status field. Values include:
pending, error, running, and complete. - The pagination of the
scheduledQueries query has been improved. An additional query scheduledQueryExecutions has been added to allow pagination of the executions of a specific scheduled query. - Provided a
Fix Observed Date for all report queries that contain vulnerabilities information. This Fix Observed Date is the date which Anchore observed that a fix was available. - Improved the Filter Descriptions within the runtime reports.
- False Positive Reduction
- Provide configuration settings so users can select which package types use CPE-base matching against NVD. For additional details, please review False Positive Management
- Policy
- Improvements in presentation and validation during policy editing have been made. Please see Policy for an overview on using policies.
- New
distro policy gate has been added with a deny trigger. Required parameters include the Name of the Distribution, Version of Distribution, and the Operation to perform the evaluation (ie. <, >, !=).
- RBAC Roles
- Provided a new user role called
image-developer. Used alone, the role limits the user to viewing images, vulnerabilities, polices and policy evaluations.
- Events
- The ANCHORE_EVENT_RETENTION_AGE_DAYS has now been set to 180 days by default.
- Runtime Inventory
- Now supports a new configuration option
inventory_ingest_overwrite which, when set to true, stores only the most recent
inventory per cluster/namespace. Note: the inventory_ttl_days continues to be available for use.
Fixes
- Image Dockerfile Status now reports correctly even after a force re-analysis.
- Images analyzed from runtime inventory now have the correct Dockerfile Status reported.
- Policy
- Improved Policy validation; The policy editor no longer allows saving policies with unknown elements.
- Policy Name is now a required field during the creating of new policies.
- Tag Drift Gate no longer fails with images analyzed with 4.9.x.
- The
createScheduledQuery mutation now returns correct returns the createdAt, updatedAt, and account fields. - A verbose warning log message in the Policy Engine Service, regarding sqlalchemy, has been attended to.
- Addressed an exception in the Report Service when loading an image with an empty
dockerfile_mode. - The report
vulnerabilitiesByKubernetesContainer executes correctly even when node information is not present. - The V2 API now specifies the
version field in the ContentJAVAPackageResponse. This is the response for GET v2/images/{image_digest}/content/java. - Fixed a scale issue where an image, which has been queued for analysis, can be garbage collected prior to being processed.
Deprecations
- The
anchore-cli has been deprecated and removed from the docker.io/anchore/enterprise imageAnchoreCTL is available within docker.io/anchore/enterprise image todayAnchoreCTL is the only supported command line tool for interacting with Anchore Enterprise.- For more details, please see AnchoreCTL
KAI (Kubernetes Automated Inventory) no longer be compatible with Enterprise v5.0.0. A new version of this
agent, called anchore-k8s-inventory, is available now and compatible with Enterprise v4.7.0. You may start to migrate to this new agent today.- Support for
REM (Remote Execution Manager) has been deprecated. It is no longer be supported in Enterprise v5.0.0. - Analyzer Service no longer supports multiple analysis threads. The
concurrentTasksPerWorker value is no longer valid within the Enterprise Helm Chart. Analysis throughput should be increased by adding more analyzer pods instead.
UI Updates
Improvements
The Anchore Enterprise Client now uses the Anchore Enterprise V2 API. This transition should be transparent to users. However, if you encounter any issues, please contact support.
The Reports feature has been rebuilt to provide a more intuitive and streamlined experience for creating, scheduling, and managing reports. The new report manager is now the default view when you click the Reports icon in the main navigation bar. If any reports are already present, the Saved Reports tab will be displayed. If no reports are yet available, you will initially see the New Report tab. Once you have created at least one report, the Saved Reports tab will become available as the default.
This component offers the following enhancements:
- Report composition is simplified, combining the capabilities of the previous Quick Reports and Report Manager features.
- Scheduling has also been simplified. Reports can either be generated on demand or scheduled to run at a specific time.
- Templates can now be created at any time, either from an ad-hoc report or from a scheduled report, and are stored in their own dedicated tab. Custom (user) templates and system templates are separated into their own views.
- Report data, whether scheduled or ad-hoc, can be downloaded in CSV or JSON format at any time.
- Report schedules can be easily reconfigured or removed after their creation.
- Individual report items can be removed.
In addition to the above, performance improvements have been made to the report generation process.
Note: In previous versions of the UI, users could create reports using entities known as queries, which were stored filter sets. These sets could be associated with one or more schedules, each containing multiple result items. In the new reports UI, the concept of queries within the Reports Manager has been replaced by storing individual reports under Saved Reports. Therefore, migrating to version 5.0.0 will have the following effects:
- Queries that contain schedules will be converted into multiple reports—one for each schedule—with their associated result entries displayed when the report item is expanded.
- Queries that do not contain schedules will be turned into custom templates.
The Fix Observed Date is now displayed within the Vulnerabilities tab of the Images view. This date, which is the date Anchore observed a fix being available for a given vulnerability, is also included in the reports where applicable.
Clicking the View Reports button in either the Images or Vulnerabilities views will take you directly to the Saved Reports tab in the Reports view. Here, you can view all reports containing data for the selected image or vulnerability.
Minor improvements have been made to the display of summary data in the rule composition dialog of the Policy Editor.
Service logging has been enhanced to provide information about connections made from the web service to the Anchore Enterprise API services. This information is displayed at the DEBUG level.
There’s a more comprehensive presentation of error details when errors are logged and displayed in the UI.
A new image-developer RBAC role has been added, which is applied to the rule-sets for the UI features. This role is intended for users who need to view images, vulnerabilities, policies, and policy evaluations, but do not need to create or edit them.
Fixes
AppDB database migrations will not execute unless the app is connected to a running instance of Anchore Enterprise services.
The application tour dialog no longer redirects users to the Dashboard view when displayed.
Logging in will now present the user with a landing page appropriate for their RBAC role.
Textual references to Anchore Engine have been replaced with Anchore Enterprise.
An error will now be displayed if a user attempts to submit a repository that has already been analyzed.
The issue where the UI sometimes did not update to reflect a logout event (even though the event was executed on the server) has been addressed.
Notification endpoints that have been disabled by an administrator can no longer be selected in the Action Workbench feature of the Artifact Analysis view.
Security enhancements have been made to the test connection operation within the Notifications view.
Package size is now accurately displayed in the Package Detail popup within the Vulnerabilities view of Artifact Analysis.
Multi-select and clear-all operations now function correctly in both the Events view and the Images view of Artifact Analysis when viewing repositories.
Dashboard metrics now use inclusive terminology.
Broken links to documentation in the Malware subtab of the Content view of Artifact Analysis have been addressed.
Various supporting libraries have been updated to improve security and performance, and to remove deprecation warnings from both browser and server output logs. Redundant libraries have been removed to reduce the application’s startup time and overall size.
Recommended Component Versions
12.12 - Anchore Enterprise Release Notes - Version 4.9.5
Anchore Enterprise v4.9.5
Anchore Enterprise release v4.9.5 contains targeted fixes.
No database upgrade is needed.
Note
Please view the details around the upcoming Enterprise v5.0.0 release. Important requirements must be met before upgrade. See link below.Enterprise v5.0.0 Release NotesEnterprise Service Updates
Fixes
- Fixes an issue with the V1 Schema that prevented a JIRA Notification Endpoint from being configured via the UI.
- Addresses an issue with the RedHat vulnerability data provider not automatically updating OVAL files which prevents getting accurate fix version information for appstream packages in RHEL 9.
- Addresses an issue with grype-db matching logic for RHEL 9, where they are no longer reporting a modularity, resulting in false positives. Specifically, RHEL 9’s default stream no longer reports a modularity.
UI Updates
Fixes
- The control used to test notifications in the Notifications view would
return a
400 error when used. Now fixed. - In previous versions, the Report Manager would not display report output
on account of an internal page-redirection condition that was an artifact of
pre-release
5.0 testing. This issue has now been addressed. - Previously, the form that allowed you to edit a JIRA notification was not
displaying the required fields. This issue has now been addressed (as
described by the fix in the Enterprise Service Updates section above).
Recommended Component Versions
| Component | Recommended Version |
|---|
| Enterprise | v4.9.5 |
| Enterprise UI | v4.9.1 |
| Enterprise Helm Chart | v1.0.4 |
| Engine Helm Chart (Deprecated) | v1.28.7 |
| AnchoreCTL (V1 API Compatible) | v1.8.0 |
| AnchoreCTL (V2 API Compatible) | v4.9.0 |
| anchore-k8s-inventory | v1.1.1 |
| anchore-ecs-inventory | v1.2.0 |
| KAI (Deprecated) | v0.5.0 |
| Kubernetes Admission Controller | v0.4.0 |
| REM - Remote Execution Manager (Deprecated) | v0.1.10 |
| Harbor Scanner Adapter | v1.1.0 |
| Jenkins Plugin | v1.1.0 |
12.13 - Anchore Enterprise Release Notes - Version 4.9.4
Anchore Enterprise v4.9.4
Anchore Enterprise release v4.9.4 contains targeted fixes.
No database upgrade is needed.
Note
Please view the details around the upcoming Enterprise v5.0.0 release. Important requirements must be met before upgrade. See link below.Enterprise v5.0.0 Release NotesEnterprise Service Updates
Fixes
- Fix an issue that prevented new Windows OS containers from being analyzed properly.
- The report vulnerabilitiesByKubernetesContainer executes correctly even when node information is not present.
- Prevent a deadlock when two agents are reporting inventory from the same Cluster/Namespace.
- Fix a grypedb digest mismatch that can occur when Policy Engine syncs with the Feed Service. The issue is seen as a
ChecksumMismatchError in the policy-engine’s logs and results in a failure to sync the feeds. - Fix an exception in the Report Service when loading an image with an empty dockerfile_mode.
- Ability to execute a software downgrade from a patch release to a release within the same Major.Minor version numbers. Also provides better log messages during upgrade.
- Image digests will now match when an image is analyzed within Enterprise (centralised analysis) and the image SBOM is imported via AnchoreCTL (distributed analysis).
Recommended Component Versions
| Component | Recommended Version |
|---|
| Enterprise | v4.9.4 |
| Enterprise UI | v4.9.0 |
| Enterprise Helm Chart | v1.0.2 |
| Engine Helm Chart (Deprecated) | v1.28.4 |
| AnchoreCTL (V1 API Compatible) | v1.8.0 |
| AnchoreCTL (V2 API Compatible) | v4.9.0 |
| anchore-k8s-inventory | v1.1.1 |
| anchore-ecs-inventory | v1.2.0 |
| KAI (Deprecated) | v0.5.0 |
| Kubernetes Admission Controller | v0.4.0 |
| REM - Remote Execution Manager (Deprecated) | v0.1.10 |
| Harbor Scanner Adapter | v1.1.0 |
| Jenkins Plugin | v1.1.0 |
12.14 - Anchore Enterprise Release Notes - Version 4.9.3
Anchore Enterprise v4.9.3
Anchore Enterprise release v4.9.3 contains targeted fixes.
No database upgrade is needed.
Note
Please view the details around the upcoming Enterprise v5.0.0 release. Important requirements must be met before upgrade. See link below.Enterprise v5.0.0 Release NotesEnterprise Service Updates
Fixes
- Resolved a memory consumption issue in the Policy Engine Service that could occur when handling images with multiple vulnerabilities without fixes. This fix addresses the issue identified during vulnerability scanning, ensuring more efficient resource usage.
Recommended Component Versions
| Component | Recommended Version |
|---|
| Enterprise | v4.9.3 |
| Enterprise UI | v4.9.0 |
| Engine Helm Chart | v1.28.3 |
| AnchoreCTL (V1 API Compatible) | v1.8.0 |
| AnchoreCTL (V2 API Compatible) | v4.9.0 |
| anchore-k8s-inventory | v1.1.1 |
| anchore-ecs-inventory | v1.2.0 |
| KAI (Deprecated) | v0.5.0 |
| Kubernetes Admission Controller | v0.4.0 |
| REM - Remote Execution Manager (Deprecated) | v0.1.10 |
| Harbor Scanner Adapter | v1.2.0 |
| Jenkins Plugin | v1.1.0 |
12.15 - Anchore Enterprise Release Notes - Version 4.9.2
Anchore Enterprise v4.9.2
Anchore Enterprise release v4.9.2 contains targeted fixes.
No database upgrade is needed.
Note
Please view the details around the upcoming Enterprise v5.0.0 release. Important requirements must be met before upgrade. See link below.Enterprise v5.0.0 Release NotesEnterprise Service Updates
Fixes
- Improved the efficiency of
Vulnerability Scans. Slower scan time has been linked to the policy-engine service hitting Out of Memory conditions under increased load. - Fixed the
Tag Drift Policy Gate which was failing on images analyzed by Enterprise v4.9.0 or later. - Restored the Runtime Inventory Image TTL setting which keeps only the most recent set of inventory per namespace.
- Improved the memory profile and reduced memory usage for all the services of Anchore Enterprise.
- V2 API Fixes
POST /v2/images - prevent deprecated fields from being accepted in the V2 APIGET /v2/images/{image_digest}/check - returns both the overall final_action, which includes the result of the allow/deny lists, as well as the policy_action of the policy rule evaluation.GET /v2/subscriptions - when the subscription_type is repo_update, now returns the subscription_value data in the V2 API format.POST /v2/subscriptions - when the subscription_type is repo_update, prevents non-valid json to be added via the subscription_value data.GET /v2/subscriptions/{subscription_id} - when the subscription_type is repo_update, now returns the subscription_value data in the V2 API format.PUT /v2/subscriptions/{subscription_id} - when the subscription_type is repo_update, prevents non-valid json to be added via the subscription_value data.- Evaluation Details field of Policy Evaluations will contain a
policy_action field. This field represents the policy result before applying image allow/deny lists
Recommended Component Versions
| Component | Recommended Version |
|---|
| Enterprise | v4.9.2 |
| Enterprise UI | v4.9.0 |
| Engine Helm Chart | v1.28.1 |
| AnchoreCTL (V1 API Compatible) | v1.8.0 |
| AnchoreCTL (V2 API Compatible) | v4.9.0 |
| anchore-k8s-inventory | v1.1.1 |
| anchore-ecs-inventory | v1.2.0 |
| KAI (Deprecated) | v0.5.0 |
| Kubernetes Admission Controller | v0.4.0 |
| REM - Remote Execution Manager (Deprecated) | v0.1.10 |
| Harbor Scanner Adapter | v1.2.0 |
| Jenkins Plugin | v1.1.0 |
12.16 - Anchore Enterprise Release Notes - Version 4.9.1
Anchore Enterprise v4.9.1
Anchore Enterprise release v4.9.1 contains targeted fixes.
No database upgrade is needed.
Note
Please view the details around the upcoming Enterprise v5.0.0 release. Important requirements must be met before upgrade. See link below.Enterprise v5.0.0 Release NotesEnterprise Service Updates
Fixes
- Fixes loading all bundles in the
<service_dir>/bundles directory of the API service when new accounts are created`. - Vulnerability records will be created for out-of-support entries from the RHEL Provider when none of the in-support versions are affected.
- Addressed a failure with
grypedb syncing with Policy Engine.- Enterprise now properly handles the error case where a vulnerability provider fails to run. An example of a provider failing to run - GitHub Provider will fail if the Github API Key was not properly provided in the config.
Recommended Component Versions
| Component | Recommended Version |
|---|
| Enterprise | v4.9.1 |
| Enterprise UI | v4.9.0 |
| Engine Helm Chart | v1.27.2 |
| AnchoreCTL (V1 API Compatible) | v1.8.0 |
| AnchoreCTL (V2 API Compatible) | v4.9.0 |
| anchore-k8s-inventory | v1.1.1 |
| anchore-ecs-inventory | v1.1.0 |
| KAI (Deprecated) | v0.5.0 |
| Kubernetes Admission Controller | v0.4.0 |
| REM - Remote Execution Manager (Deprecated) | v0.1.10 |
| Harbor Scanner Adapter | v1.2.0 |
| Jenkins Plugin | v1.0.25 |
12.17 - Anchore Enterprise Release Notes - Version 4.9.0
Anchore Enterprise v4.9.0
Anchore Enterprise release v4.9.0 contains targeted fixes and improvements.
A Database update is needed.
Note
Please view the details around the upcoming Enterprise v5.0.0 release. Important requirements must be met before upgrade. See link below.Enterprise v5.0.0 Release NotesEnterprise Service Updates
Improvements
- Anchore Enterprise V2 API is now available for use.
- The V2 API has been provided for early adoption for any customer who has custom integrations or scripts that may directly access the V1 API. This will provide extra time to migrate to the new V2 API endpoints prior to the official Enterprise v5.0.0 release.
- The V1 APIs were distributed across several files and have now been consolidated into the single V2 API.
- The following V1 APIs have been deprecated:
- Enterprise API Swagger
- Engine API Swagger
- Notifications Swagger
- RBAC Manager Swagger
- Reports Swagger
- For more details about the Anchore Enterprise V2 API, and to view the V2 swagger, please visit API Usage
- Kubernetes and ECS Runtime Inventory ingest path received performance enhancements.
- Reports
- Scheduled Queries now provide a
executionsLimit filter - Improvement in both performance and memory consumption were completed on the following reports:
Vulnerabilities by Kubernetes NamespacesVulnerabilities by Kubernetes ContainersVulnerabilities by ECS Containers
- Added several new Metrics within the report service. These are now available via Prometheus.
- Configuration
- Image import maximum size is now configurable. Current default size is 100 MB.
- Docker Compose users can set the environment variable
ANCHORE_MAX_IMPORT_CONTENT_SIZE_MB - Helm users can modify
max_import_content_size_mb
- Source repository import maximum size is now configurable. Current default size is 100 MB.
- Docker Compose users can set the environment variable
ANCHORE_MAX_IMPORT_SOURCE_SIZE_MB - Helm users can modify
max_source_import_size_mb
- Provided a configuration option to bypass object store content checks. This was provided to aid our customer support team during specific triage. Please contact customer support for additional information.
- Policy Engine can now capture and persist additional metadata for vulnerabilities reported by the vulnerability provider sync. The following observed dates are persisted:
- The date on which a vulnerability within a provider namespace is first observed by Enterprise via the vulnerability provider sync.
- The date on which a specific package fix is first observed by Enterprise via the vulnerability provider sync. This “fix observed date” will be used during policy eval of
max days since fix to give a more consistent evaluation result across all newly analyzed image and source SBOMs.
- Support capture of vulnerability data for Ubuntu 23.04 (Lunar Lobster) and Ubuntu 23.10 (Mantic Minotaur) once publishing commences from Canonical.
- Provide support for vulnerability data for Mariner.
- If a Vunnel Provider fails, the system will provide a new sync using the previous data for the failing provider and the new data from the other providers. This change also provides improved messaging around failing providers.
- Improved Java matches for Source SBOMS by capturing more metadata during SBOM imports.
Fixes
- Reports
- Handle an error when the service is loading data for
ECS Container Report Table and Kubernetes Container Report Table in cases where a container stops being reported long enough for it to be removed from the Catalog, and is then reported again. - The report service no longer triggers an out of memory error when running larger runtime workloads.
- The Archive Image Delete
force flag options now works even when the image is in the archiving state. - ECS Inventory which contains both tasks as part of a service and tasks that are run standalone will be properly accepted.
- Fixed an issue seen with the Ubuntu provider failing to sync when the git repo has untracked files present.
- Addressed an issue where distroless images reported incorrect findings from other catalogers.
- Correctly handled the Ubuntu CVE Tracker change for labeling which indicated end of life. This could lead to unfixed CVEs to be missing from the data.
- Modifying the value of the Catalog’s
resource_metrics cycle timer is now honored. - API call
POST /v1/enterprise/stateless/sbom/vuln/{vtype} now works as expected. - Proper handling for vulnerability transitions from
affected to not-affected within the RHEL provider.
UI Updates
Fixes
- Various supporting libraries have been updated in order to improve security, performance, and also to remove deprecation warnings from browser and server output logs. Redundant libraries have been removed to reduce the app startup time and overall size.
Recommended Component Versions
| Component | Recommended Version |
|---|
| Enterprise | v4.9.0 |
| Enterprise UI | v4.9.0 |
| Engine Helm Chart | v1.27.0 |
| AnchoreCTL (V1 API Compatible) | v1.8.0 |
| AnchoreCTL (V2 API Compatible) | v4.9.0 |
| anchore-k8s-inventory | v1.1.1 |
| anchore-ecs-inventory | v1.1.0 |
| KAI (Deprecated) | v0.5.0 |
| Kubernetes Admission Controller | v0.4.0 |
| REM - Remote Execution Manager (Deprecated) | v0.1.10 |
| Harbor Scanner Adapter | v1.2.0 |
| Jenkins Plugin | v1.0.25 |
12.18 - Anchore Enterprise Release Notes - Version 4.8.1
Anchore Enterprise v4.8.1
Anchore Enterprise release v4.8.1 contains a new configuration option.
No database upgrade is needed.
Note
Please view the details around the upcoming Enterprise v5.0.0 release. Important requirements must be met before upgrade. See link below.Enterprise v5.0.0 Release NotesEnterprise Service Updates
Improvements
- Configuration
New configuration options are available for customers who do not wish to generate the report data need to support the following reports:
Vulnerabilities by Kubernetes NamespaceVulnerabilities by Kubernetes ContainersVulnerabilities by ECS Containers
Docker Compose users can set one or more of the environment variables in the reports_worker to false:
ANCHORE_ENTERPRISE_REPORTS_GENERATE_VULN_K8S_NAMESPACEANCHORE_ENTERPRISE_REPORTS_GENERATE_VULN_K8S_CONTAINERANCHORE_ENTERPRISE_REPORTS_GENERATE_VULN_ECS_CONTAINER
Helm users can set one or more of the following in values.yaml to false:
anchoreEnterpriseReports.vulnerabilitiesByK8sNamespaceanchoreEnterpriseReports.vulnerabilitiesByK8sContaineranchoreEnterpriseReports.vulnerabilitiesByEcsContainer
Recommended Component Versions
| Component | Recommended Version |
|---|
| Enterprise | v4.8.1 |
| Enterprise UI | v4.8.0 |
| Helm Chart | v1.26.4 |
| AnchoreCTL | v1.7.0 |
| anchore-k8s-inventory | v1.0.0 |
| anchore-ecs-inventory | v1.0.0 |
| KAI (Deprecated) | v0.5.0 |
| Kubernetes Admission Controller | v0.4.0 |
| REM (Remote Execution Manager) | v0.1.10 |
| Harbor Scanner Adapter | v1.0.1 |
| Jenkins Plugin | v1.0.25 |
12.19 - Anchore Enterprise Release Notes - Version 4.8.0
Anchore Enterprise v4.8.0
Anchore Enterprise release v4.8.0 contains targeted fixes and improvements.
A Database update is needed.
Note
Please view the details around the upcoming Enterprise v5.0.0 release. Important requirements must be met before upgrade. See link below.Enterprise v5.0.0 Release NotesEnterprise Service Updates
Improvements
Reporting
Vulnerabilities by Kubernetes Containers is a new report template which will allow you to view and filter on
vulnerabilities found within a Kubernetes Container. The report will populate only if you have deployed the new anchore-k8s-inventory.Vulnerabilities by ECS Containers is a new report template which will allow you to view and filter on
vulnerabilities found within an ECS Container. The report will populate only if you have deployed the new anchore-ecs-inventory.Vulnerabilities by Kubernetes Namespace report now displays the Anchore Account Name.
Configuration
- A new configuration option is available that can show a significant reduction in resource usage. It is available for
customers that do not use the
/v1/query/images/by_vulnerability API.- Setting this configuration option to
false will:- Disable the
/v1/query/images/by_vulnerability API and return a 501 code if called. - Disable the SBOM vulnerability rescans which occur after each feed sync. It is these rescans that populate the data returned by the API.
- Customers who are using
/v1/query/images/by_vulnerability API, are encouraged to switch to calling the
ImagesByVulnerability query in the GraphQL API. This query provides equivalent functionality and will allow you to
benefit from this new configuration option. - Docker Compose users can set environment variable,
ANCHORE_POLICY_ENGINE_ENABLE_IMAGES_BY_VULN_QUERY, in the policy engine to false. - Helm users can set
services.policy_engine.enable_images_by_vulnerability_api key in config.yaml
Fixes
- Improved operating system matching prior to determining if a CVE should be reported against an image.
- CVSS Scores from NVD are now preferred over other source. This provides a more consistent end user experience.
- Addressed a failure to properly generate the
Policy Compliance by Runtime Inventory report while using the new anchore-k8s-inventory agent.
A symptom was that the Compliance and Vulnerabiliy Count fields within the Kubernetes tab remained in Pending state. - Switch archive delimiter in malware scan output from ‘!’ to ‘:’ to ensure shell copy-paste ease of use.
- Improved a few misleading internal service log messages.
- Fixed an issue that resulted in a scheduled query, with a qualifying filter, failing to execute. Examples of filters which will result in this failure:
| Query Name | Filter Name |
|---|
| Tags by Vulnerability | Vulnerability LastTag Detected In Last |
| Images Affected By Vulnerability | Vulnerability LastTag Detected In LastImage Analyzed In Last |
| Artifacts By Vulnerability | Vulnerability LastTag Detected In Last |
| Policy Compliance History by Tag | Tag Detected In LastPolicy Evaluation Latest Evaluated In Last |
| Policy Compliance by Runtime Inventory Image | Policy Evaluation Latest Evaluated In Last |
| Runtime Inventory Images by Vulnerability | Vulnerability LastImage Last Seen In |
| Unscanned Runtime Inventory Images | Last Seen In |
| |
UI Updates
- The Watch Repository toggles displayed in the registry and repository view tables under Images can now be suppressed when the
enable_add_repositories property in config-ui.yaml is set to False for admin or standard accounts. This and other parameters contained in the UI configuration file are described
here. - The
Vulnerabilities by ECS Container report template has been added that allows you to search for a specific vulnerability across ECS containers in order to view a list of clusters services, tasks and containers that are impacted by the vulnerability. - The
Vulnerabilities by Kubernetes Container report template has been added that allows you to search for a specific vulnerability across Kubernetes containers in order to view a list of clusters services, tasks and containers that are impacted by the vulnerability.
Fixes
- References to Anchore Engine have been removed and replaced
app-wide with Anchore Enterprise Services
- A fix has applied for an issue where a
read-only user was not able to manage registry credentials in another context even when they had a full-control role associated with that account - An
Account Name filter has been added to the Kubernetes Runtime Vulnerabilities by Namespace report template, and improved descriptions have been provided for the Label and Annotations filters - Various supporting libraries have been updated in order to improve security, performance, and also to remove deprecation warnings from browser and server output logs. Redundant libraries have been removed to reduce the app startup time and overall size.
Recommended Component Versions
| Component | Recommended Version |
|---|
| Enterprise | v4.8.0 |
| Enterprise UI | v4.8.0 |
| Helm Chart | v1.26.0 |
| AnchoreCTL | v1.7.0 |
| anchore-k8s-inventory | v1.0.0 |
| anchore-ecs-inventory | v1.0.0 |
| KAI (Deprecated) | v0.5.0 |
| Kubernetes Admission Controller | v0.4.0 |
| REM (Remote Execution Manager) | v0.1.10 |
| Harbor Scanner Adapter | v1.0.1 |
| Jenkins Plugin | v1.0.25 |
12.20 - Anchore Enterprise Release Notes - Version 4.7.1
Anchore Enterprise v4.7.1
Note
Please view the details around the upcoming Enterprise v5.0.0 release. Important requirements must be met before upgrade. See link below.Enterprise v5.0.0 Release NotesAnchore Enterprise release v4.7.1 is a patch release that provides two targeted fixes.
Enterprise Service Fixes
- Updated to latest ClamAV LTS version, resolving FIPS enabled host incompatibilities.
- Database upgrades now succeed from Anchore Enterprise Releases older than v4.2.0.
Recommended Component Versions
| Component | Recommended Version |
|---|
| Enterprise | v4.7.1 |
| Enterprise UI | v4.7.0 |
| Helm Chart | v1.25.0 |
| AnchoreCTL | v1.6.0 |
| anchore-k8s-inventory | v1.0.0 |
| anchore-ecs-inventory | v1.0.0 |
| KAI (Deprecated) | v0.5.0 |
| Kubernetes Admission Controller | v0.4.0 |
| REM (Remote Execution Manager) | v0.1.10 |
| Harbor Scanner Adapter | v1.0.1 |
| Jenkins Plugin | v1.0.25 |
12.21 - Anchore Enterprise Release Notes - Version 4.7.0
Anchore Enterprise v4.7.0
Anchore Enterprise release v4.7.0 contains targeted fixes and improvements.
A Database update is needed.
Note
Please view the details around the upcoming Enterprise v5.0.0 release. Important requirements must be met before upgrade. See link below.Enterprise v5.0.0 Release NotesPlease Note: If you are upgrading from an Anchore Enterprise version prior to v4.2.0, there is a known issue that will require you to upgrade to v4.2.0 or v4.3.0 first. Once completed, you will have no issues upgrading to v4.7.0. Please contact Anchore Support if you need further assistance.
Enterprise Service Updates
Improvements
- Runtime Inventory
- Anchore has introduced two new Runtime Inventory Agents for use with the v4.7.0 release of Anchore Enterprise.
anchore-k8s-inventory and anchore-ecs-inventory will provide better access to your runtime environments.
See Kubernetes Runtime Inventory and ECS Runtime Inventory for more details. - Runtime Inventory TTL was also improved to be more effective in helping you to manage expired inventory items.
- Reporting
Vulnerabilities by Kubernetes Namespace is a new template which will allow you to view and filter on
vulnerabilities found within a Kubernetes Namespace. The report will populate only if you have deployed the new anchore-k8s-inventory.
- Feeds
- Anchore Enterprise is now fully integrated with our Open Source applications of
anchore/vunnel and anchore/grype-db. - Chainguard Linux Vulnerability Provider has been added to the list of feeds.
- Support for the OVAL v2 RHEL Security Endpoint.
- Account email field is now editable via API.
- Vulnerability Package trigger, adds a new parameter that controls the behavior of vulnerabilities found in the base image. The new parameter can be set to trigger on vulnerabilities in the base image, trigger on vulnerabilities that are not in the base image, or to trigger only on vulnerabilities present in the base image.
- Container Image SBOM generation and import from AnchoreCTL without the need for Syft
- Combined with AnchoreCTL 1.6.0, you can now analyze images fully using AnchoreCTL and import the results to Enterprise, including secret scans, filesystem metadata analysis, content searches and file retrieval with equivalent functionality to what Enterprise-backend analysis scans produce. The only exception is that malware scanning is not supported by AnchoreCTL-based analysis.
Fixes
- Enabling the
Repo Watcher when there is already an image from the repo with an active subscription, no longer returns an error. - Adding a source sbom which does has java packages without a metadata virtual path is handled correctly.
- Addressed an issue where Anchore Enterprise displayed multiple Binary Package Locations.
- Correctly handle an import of an image sbom which contains packages with no metadata.
- Improved handling of the Microsoft Windows product id during analysis of Windows containers.
UI Updates
Fixes
- Various supporting libraries have been updated in order to improve security, performance, and also to remove deprecation warnings from browser and server output logs. Redundant libraries have been removed to reduce the app startup time and overall size.
Recommended Component Versions
| Component | Recommended Version |
|---|
| Enterprise | v4.7.0 |
| Enterprise UI | v4.7.0 |
| Helm Chart | v1.25.0 |
| AnchoreCTL | v1.6.0 |
| anchore-k8s-inventory | v1.0.0 |
| anchore-ecs-inventory | v1.0.0 |
| KAI (Deprecated) | v0.5.0 |
| Kubernetes Admission Controller | v0.4.0 |
| REM (Remote Execution Manager) | v0.1.10 |
| Harbor Scanner Adapter | v1.0.1 |
| Jenkins Plugin | v1.0.25 |
12.22 - Anchore Enterprise Release Notes - Version 4.6.0
Anchore Enterprise 4.6.0
Anchore Enterprise release v4.6.0 contains targeted fixes and improvements.
A Database update is needed.
Note
Please view the details around the upcoming Enterprise v5.0.0 release. Important requirements must be met before upgrade. See link below.Enterprise v5.0.0 Release NotesPlease Note: If you are upgrading from an Anchore Enterprise version prior to v4.2.0, there is a known issue that will require you to upgrade to v4.2.0 or v4.3.0 first. Once completed, you will have no issues upgrading to v4.6.0. Please contact Anchore Support if you need further assistance.
Enterprise Service Updates
Improvements
- Runtime Inventory
- New API Delete functionality for any runtime inventory context that is no longer being reported on by KAI.
/enterprise/inventories DELETE
- The Inventory Watcher improved logging output at info level so that it is more concise.
- The Inventory Watcher now contains additional global metrics
anchore_monitor_inventory_contexts_monitored_total - Total number of contexts monitored via subscriptionsanchore_monitor_inventory_images_total ( found ) - Total number of images from runtime inventory that are being watchedanchore_monitor_inventory_images_total ( success ) - Total number of images successfully added to the cataloganchore_monitor_inventory_images_total ( fail ) - Total number of images that failed to be added to the catalog
- Policy Triggers
- Vulnerability Package Trigger has a new parameter
inherited from base. It provides more control on which vulnerabilities will be considered by the policy.true shows vulnerabilities only inherited from the base imagefalse hides vulnerabilities inherited from the base image
- We have deprecated various triggers using
blacklist and whitelist terminology in favor of denylist and allowlist.
The deprecated triggers will continue to work until they are removed in Enterprise v5.0.0. Note that existing allowlist
entries for the deprecated triggers will continue to work until the policy is updated to use the new triggers at
which time the trigger IDs will no longer match.
- Analysis Jobs
- Improves the ability of the system to re-queue image analysis and image import jobs from shut-down analyzers to minimize the impact of
scale-down operations on the set of analyzers. In addition to the existing
analyzing state timeout behavior, the system can
now detect an image was analyzed by a now-down analyzer as soon as the analyzer is reported as down, making the re-queue time
a matter of minutes instead of hours. - Additional metrics were also added to help give more visibility into analysis
anchore_analyzer_status ( waiting ) - Analyzer is idle and is waiting to receive work from the queueanchore_analyzer_status ( error ) - Analyzer is not able to process workanchore_analyzer_status ( processing ) - Analyzer is currently processing workanchore_analyzer_dequeue_latency - Indicator of the responsiveness of the queue service for this analyzer
Fixes
- Fixed an SSL Error for customers who are using custom certificates.
- Resolved problems in the Inventory Watcher when processing large inventories.
- Policy validation has been improved during initial creation of the policy bundle. This will provide a better feedback mechanism so that invalid policies can be fixed earlier.
- Addressed an issue where the python binary cataloger incorrectly returned multiple instances of a python package.
UI Updates
Fixes
- Deprecated policy triggers
- A new warning indicator has been added to the policy rule list to flag triggers that are invalid or that have been deprecated. If you edit a policy rule containing a deprecated trigger, we also indicate that the currently selected trigger has been deprecated and replaced by another trigger, so that it is easy to know how to fix policies containing such triggers.
- Policy editor tables
- We have upgraded the table widgets within the policy editor to make the columns resizable.
- Miscellaneous
- Various supporting libraries have been updated in order to improve security, performance, and also to remove deprecation warnings from browser and server output logs. Redundant libraries have been removed to reduce the app startup time and overall size.
12.23 - Anchore Enterprise Release Notes - Version 4.5.0
Anchore Enterprise 4.5.0
Anchore Enterprise release v4.5.0 contains targeted fixes and improvements.
There is no Database update needed.
Enterprise Service Updates
Improvements
- Introducing a new RBAC Role called
report-admin. This is meant to be a companion role for users that need to work with scheduled queries but do not have other write permissions. - Anchore Enterprise is now using Red Hat Universal Base Image 9 Minimal as its base image.
This significantly reduces the number of packages provided
by the operating system, thus reducing the vulnerability surface overall.
Fixes
- Fixed an issue that prevented image metadata from being correctly displayed for images with unsupported packaging systems (Arch Linux, etc).
- Properly identifies
alpine:edge when evaluating the vulnerabilities.vulnerability_data_unavailable trigger. - Fixed an issue that allowed
admin users to perform some operations against non-existent accounts. - Database upgrades now succeed from Anchore Enterprise Releases older than v4.2.0.
- Users who only have
read-only permissions are correctly prevented from creating, updating and deleting scheduled report queries.
Deprecation Reminders
- The
anchore-cli has been deprecated and will be removed from the docker.io/anchore/enterprise image during the v5.0.0 Release.
AnchoreCTL is the only supported command line tool for interacting with Anchore Enterprise.
UI Updates
Improvements
- Artifact Analysis
- In addition to our native JSON format, the Artifact Analysis
view now allows Software Bill of Material (SBOM) data to be
downloaded in both the Software Package Data Exchange (SPDX) format
and the OWASP CycloneDX format.
- The table in the Vulnerabilities tab now contains a Detected At
column that indicates the analysis discovery time of the
vulnerability. This data is now also present in the downloadable
report data for this view.
- Policy Editor
- The Policy Editor dialog now displays any rules that contain
invalid or obsolete triggers in its summary table. These rules are
similarly highlighted when the rule is edited for easy removal.
- Reports
From within the administrative account, both the Quick Reports
and Report Manager controls now allow you to preview and
retrieve report data from either the local account or from all
accounts system-wide.
A new template has been added to our current set of system templates
that surfaces policy compliance data against runtime inventory
artifacts.
Additional fields have been added to our existing system templates:
Vulnerability-related templates now include a links field
Runtime-related templates now include an account field
All templates now include an inventory_type field
Note: In order to surface these fields, new queries must be
created using these updated system templates as their basis—they
will not be present in any existing stored queries.'
Fixes
- System: User Management
- Prior to this fix, updates to the user list would be inaccurate
if a user was created by another user with
full-control privileges
from a switched account context. Now addressed.
- Logging
- A minor issue has been addressed whereby active users that had their
accounts deleted, or resided within an account that was disabled,
would not be correctly logged after this event.
- Policy Manager: Rules
- Gate rules created for Source artifacts will now only display the
triggers associated with that artifact type. Prior to this fix, the
entire set of triggers (for both Source and Image types) were
shown in the dropdown.
- Report Manager: RBAC
- Access control restrictions for report management operations have
now been applied throughout this feature. The creation, management,
and deletion of report schedules and their associated items are now
gated by the RBAC roles associated with the reports service.
- Application Architecture
- The Anchore Enterprise UI is now provisioned using Red Hat Universal Base Image 9 Minimal.
This image significantly reduces the number of packages provided
by the operating system, thus reducing the vulnerability surface
overall.
- System: Login
- Addressed an issue whereby logging in via an external IDP, as
opposed to the SSO link on the Enterprise UI login page, would fail
under certain circumstances.
- Miscellaneous
- Various supporting libraries have been updated in order to improve
security, performance, and also to remove deprecation warnings from
browser and server output logs. Redundant libraries have been
removed to reduce the app startup time and overall size.
12.24 - Anchore Enterprise Release Notes - Version 4.4.1
Anchore Enterprise 4.4.1
Anchore Enterprise release v4.4.1 is a patch release which solely addresses a critical vulnerability in the ClamAV malware scanner (CVE-2023-20032).
The malware scanner is not enabled by default within Anchore Enterprise. If you have not enabled the malware scanner you are not exposed to this vulnerability.
Please Note: If you are upgrading from an Anchore Enterprise version prior to v4.2.0, there is a known issue that will require you to upgrade to v4.2.0 or v4.3.0 first. Once completed, you will have no issues upgrading to v4.4.1. Please contact Anchore Support if you need further assistance.
12.25 - Anchore Enterprise Release Notes - Version 4.4.0
Anchore Enterprise 4.4.0
Anchore Enterprise release v4.4.0 contains targeted fixes and improvements.
A Database update will be required.
Please Note: If you are upgrading from an Anchore Enterprise version prior to v4.2.0, there is a known issue that will require you to upgrade to v4.2.0 or v4.3.0 first. Once completed, you will have no issues upgrading to v4.4.0. Please contact Anchore Support if you need further assistance.
Enterprise Service Updates
Improvements
The AnchoreCTL binary for linux x86 is now packaged into the docker.io/anchore/enterprise image for use via direct
’exec’ invocation or to copy from the image into your environment without having to access external networks. The
packaged binary will be the current release of AnchoreCTL at the time of release of Enterprise.
Configuration Options
enable_package_db_load is a new configuration option that will allow users to disable the use of the
package.verify policy trigger. Disabling this trigger, will prevent further additions in the image_package_db_entries
table, which will reduce load on the database. In addition, users may now safely delete the existing entries in the
table and reclaim database capacity usage. See Database for more details.- A new option for users to specify the endpoint used for the Ubuntu Feed Driver. See
Feeds for more information.
Enterprise API now supports the ability to download SBOMs in SPDX Format and CycloneDX Format.
/images/{imageDigest}/sboms/spdx-json/images/{imageDigest}/sboms/cyclonedx-json/sources/{source_id}/sbom/spdx-json/sources/{source_id}/sbom/cyclonedx-json
A new Image Ancestry Policy Gate has been added. Allows the user to verify that a specified image contains an
approved base image. See Policy Checks
for complete details.
Binary detection is now consistent between uploaded SBOMs generated by AnchoreCTL and SBOMs generated by the
backend Enterprise Service.
Tech Preview: Enterprise Reporting provides a global endpoint which will allow administrators to generate queries that
will include data from all accounts. See Reports from more details.
Vulnerability data is now available from Feed Group - Ubuntu 22.10 (Kinetic Kudu).
Fixes
- Vulnerability feed group information is now populated at time of switch-over. This should address issues with
displaying the vulnerability group record counts in systems with a large number of active images.
- Addressed an error path exception in the Application Version Vulnerability API.
- Addressed a parsing issue within the execution of Policy Gate
retrieved files with Trigger content regex. - Schedule Report generation will gracefully handle an error found in a report and continue with the generation of other reports.
- Properly account for rolling distros (currently Wolfi) when evaluating the
vulnerabilities.vulnerability_data_unavailable trigger. - Addressed an analysis failure during SBOM generation for certain images with cycles of soft links.
Deprecation Reminders
- The
anchore-cli python client has been deprecated as of Enterprise Release
v4.2.0. It will be removed from the docker.io/anchore/enterprise image during the v4.5.0 Release.
AnchoreCTL is the only supported command line tool for interacting with Anchore Enterprise.
UI Updates
Improvements
- Reporting
- Prometheus logging has now been added to the application with the
following data now being captured and reported:
- General node process metrics
- Number of active sessions
- Count of HTTP requests, split by endpoint and status code
- HTTP request duration
- Latency of each service, calculated during every health check cycle
- Configuration
- Sessions will now preferentially use OAuth tokens to provide and maintain
ongoing authentication state
- In the event that the token dispensation is not possible when the user
logs in, the system will fall back to using basic authentication
- Added confirmation toast on dashboard widget creation
- Updated various supporting libraries to improve security and performance
- Redundant libraries have been removed to reduce the app startup time and
overall size
Fixes
- Reporting
- Schedules that contain queries with data enumerations can now be saved
properly
- Configuration
- Increased the opacity on both the filter input and the sort dropdown when
either are in a disabled state-that is, when no application data exists
- This ensures the text is legible while still clearly indicating the
inactive state
- Policy Editor Evaluation correctly updates after changes are applied
- RBAC rules are now correctly applied to the radio button used to change
the active bundle
- Copy bundle modal would now allow all key events
- Service errors and access control errors are now properly articulated
12.26 - Anchore Enterprise Release Notes - Version 4.3.0
Anchore Enterprise 4.3.0
Anchore Enterprise release v4.3.0 contains targeted fixes and improvements.
A Database update will be required.
Enterprise Service Updates
Improvements
- Reporting Improvements
- The
runtimeInventoryImagesByVulnerability report query now supports
various vulnerability filters such as Vulnerability Id. - Various vulnerability-related report queries, such as
artifactsByVulnerability,
tagsByVulnerability, now support filtering by one or more severities
via the Severities option. - A new report query called
runtimeInventoryUnscannedImages is now available. It provides the list of images
in the runtime inventory that have not been analyzed. - See https://docs.anchore.com/current/docs/using/api_usage/reports/ for an overview of how to access reports via the API.
- API now supports the ability to query a list of vulnerabilities found for a specific Application Version. See https://docs.anchore.com/current/docs/sbom_management/application_groups/application_management_anchore_api for additional information about Applications.
- Introducing a new RBAC Role called
repo-analyzer. It is meant to be a companion to the image-analyzer role and
specifically provides the ability to create a repository subscription. - Now importing the Wolfi Security Feed. Used in vulnerability matching for Wolfi OS Packages.
Fixes
- Fixed a failure during the cleanup of old versions of GrypeDB. This was seen to cause an issue during feed sync.
- When deploying with multiple instances of policy-engine, there will only be a maximum of two GrypeDB instances.
- Addressed an issue which prevented a scheduled query of a Runtime Inventory Images By Vulnerability from running.
- Fixed the unlikely condition where a deleted image is added back into the system, due to a subscription processing error.
- Image analysis properly displays all found versions of the same OS package.
- Increased accuracy of vulnerability matches on Debian source packages when the source package version differs
from the binary package version. Requires re-analysis in order to populate necessary metadata for existing scans.
- Identifies improper SSO IDP Configuration during creation or modification of an existing configuration.
Deprecation Reminders
- The
anchore-cli python client has been deprecated as of Enterprise Release
v4.2.0. It will be removed from the Enterprise image during the v4.4.0 Release.
AnchoreCTL is the only supported command line tool for interacting with Anchore Enterprise. It will be included in the Enterprise image during the v4.4.0 Release.
UI Updates
Improvements
- A new Quick Report for
Unscanned Runtime Inventory Images is now available.
It shows which images running in Kubernetes clusters have not yet been
analyzed by Anchore so that users can verify all images are scanned in CI/CD. - The
Runtime Inventory Images by Vulnerability report type now supports
various vulnerability filters such as Vulnerability Id. This makes it
easier to focus efforts on zero-days (or other critical and well-known
vulnerabilities) and find exactly which runtime contexts (and the images
within) are impacted by a specific vulnerability. - Various vulnerability-related reports (
Artifacts by Vulnerability,
Tags by Vulnerability, etc.) now support filtering by one or more severities
via the Vulnerability Severities option. - An improvement has been made to our cookie management for higher entropy via
an autogenerated encryption key unique to each deployment and to allow
administrators to change it if they wish.
Fixes
- Fixed a bug causing logins made directly via an IDP, as opposed to the SSO
link on the Anchore login page, to fail with a 404 error.
- Improved fault-tolerance in the event of an invalid or malicious websocket
request: using a scanner such as Nessus could under certain conditions lead to
an application crash.
- Fixed a routing issue causing requests to /artifacts/image/ with a trailing
slash to lead to a 404 page not found error.
- Various supporting libraries have been updated in order to improve security,
performance, and also to remove deprecation warnings from browser and server
output logs. Redundant libraries have been removed to reduce the app startup
time and overall size.
12.27 - Anchore Enterprise Release Notes - Version 4.2.0
Anchore Enterprise 4.2.0
Anchore Enterprise release v4.2.0 contains targeted fixes and improvements. A Database update will be required.
Enterprise Service Updates
Improvements
- SSO feature enhancements includes
- The ability for an Anchore administrator to create another user in the admin account who will authenticate using SSO/SAML enabling use of 2FA and other SSO security mechanisms.
- A strict mode which will require SAML users to be configured in Anchore Enterprise prior to user login as an alternative to the existing behavior that creates Anchore users at login time only. This allows administrators to restrict login access for SSO users to only those users specifically allocated by the Anchore admin.
- See [Configuring SSO](https://docs.anchore.com/current/docs/configuration/sso/ for additional information about SSO.
- Adds detection of non-packaged node.js binaries during image analysis to support sbom and vulnerability scanning.
- The Reporting Service now offers the ability to show and filter on vulnerabilities that the vendor of an image distribution either disagrees with or has decided not to fix. This matches the ‘vendor_only’ filtering behavior of the vulnerability APIs and AnchoreCTL.
Fixes
- Fixed an issue where the analysis queue processing stops. This was seen in environments with multiple Catalog, Policy Engine, and Analyzer Containers running.
- Populates fix information per module for rpm-based feeds such as oracle, rhel, and centos. The rpm modularity is now taken into account when matching rpm packages to vulnerabilities.
- Make RedHat/CentOS AppStream modules fully supported for vulnerability matching with reduced false positives and more accurate fix versions.
- Improved error handling during SSO IDP Configuration changes.
- During the creation of an SSO default account, the default policy bundles are correctly populated.
- Improved error handling in the MSRC feed driver so that invalid records are skipped and processing will continue for other records.
Feature Removal
- Removed the Kubernetes Runtime Inventory Embedded mode, and associated cluster configuration APIs. This feature saw limited usage and the same goal can be accomplished by deploying KAI into the cluster directly in inventory mode. See https://docs.anchore.com/current/docs/configuration/runtime_inventory/ for more information about configuring KAI in agent mode.
Deprecation Reminders
- The
anchore-cli python client will be deprecated as of Enterprise Release v4.2.0. AnchoreCTL will be the only supported command line tool for interacting with Anchore Enterprise.
UI Updates
Improvements
- The UI now supports the creation and configuration of administrators who
can authenticate directly using Single Sign-On (SSO). In addition,
administrators in deployments that have been configured to use
exclusionary account assignment by disabling “Just-in-Time” account
provisioning for SSO can now associate specific standard users with an
individual IDP.
- For environments where analytical volume is extremely high, the
Kubernetes page now provides an optimized presentational view that
excludes information from the reporting services. This version of the view
can be enabled via the file- or environment-based Enterprise Client
application configuration
parameters.
- The Vulnerabilities tab now provides a client-side filter for
Vendor Only CVEs that is enabled by default. When disabled, the
full vulnerability dataset is now displayed. Upon disabling the
filter, a new Will Not Fix column is will be displayed within
the results table.
- A
Vulnerability Will Not Fix filter has been added to the following base templates in the Scheduled Reports view:Images With Critical VulnerabilitiesArtifacts by VulnerabilityTags by VulnerabilityImages Affected by Vulnerability
Fixes
- In previous versions, setting a boolean filter to
true in
Quick Reports would not get correctly passed to the web service. This
is now fixed. - Users with the
policy-editor role should not have access to the
Artifact Analysis view. Although the associated navbar icon was
correctly disabled, users could still access the page (albeit in
read-only mode) directly via the URL. This behavior has now been
addressed. - The Only Show toggles in the Vulnerabilities tab of the Artifact
Analysis view provide a number of filters that can reduce the number of
items displayed. When applied, the table updates accordingly—however,
prior to this fix the graph and vulnerability severity summary counts did
not. This issue has now been addressed.
- Prior to this fix, if a user encountered an error when saving a policy,
there was no way for them to fix the error and save the policy again
because the Save button remained disabled. Users can now attend to the
error and save the policy.
- Various supporting libraries have been updated in order to improve
security, performance, and also to remove deprecation warnings from
browser and server output logs. Redundant libraries have been removed to
reduce the app startup time and overall size.
12.28 - Anchore Enterprise Release Notes - Version 4.1.1
Anchore Enterprise 4.1.1
Anchore Enterprise release v4.1.1 contains targeted fixes and improvements.
Enterprise Service Updates
Improvements
- Introduced a
Recommendation field that is available in the Policy Rule. This field will be visible in the image policy check results. It will allow the Policy Rule creator to provide a generic hint on how to fix policy findings. - Improved the description of the “max days since creation” parameter within the vulnerability->package rule. It now states, “A grace period, in days, for a vulnerability match to be present after which the vulnerability is a policy violation”.
Fixes
- Fixed enterprise database schema upgrade process from 4.0.x to 4.1.0 schema when run on a fips-enabled host.
- Improved error message when providing invalid tag to the External API Inventory calls.
- Improved error messages around registry access failures.
- Improved detection and error handling of an image that contains an empty or unknown distro.
- Image analysis will succeed when the image contains an uncompressed layer.
- Image analysis will succeed when the image contains un-parsable rpmdb file entries.
- On a restart or a manual resync of the feed service, the system will maintain no more than 2 versions of the grype database records.
- Tag status is updated immediately in reporting data. Previously, the tag status updates maybe have been delayed.
Deprecation Reminders
- The Embedded Inventory Mode Feature, has been deprecated. During the future Enterprise Release v4.2.0, it will be removed.
- The
anchore-cli python client will be deprecated as of the future Enterprise Release v4.2.0. AnchoreCTL will be the only supported command line tool for interacting with Anchore Enterprise.
UI Updates
Improvements
- A Recommendation field has been added to the policy rule editor to allow
policy creators to provide bespoke remediation guidance. This information
will be surfaced within the output for any matched rule within the
Policy Compliance results table in the Artifact Analysis view.
- The service log output for the application has been overhauled.
Administrators with access to the running app instance are now able to
view detailed timestamped information—categorized by level—that describes
the routes being accessed, connection and configuration details, and
information about the major operations taking place within the runtime.
Additional logging data will be added in subsequent releases.
Fixes
- The management of database connectivity details from the app has been updated to handle special characters in configuration strings.
- A
Forbidden error is displayed when a non-administrative user tries to
directly access the /system/notifications tab via URL. It also blocks a
fetch for the LDAP configuration details for non-admins. - Various supporting libraries have been updated in order to improve
security and performance, and also to remove deprecation warnings from
browser and server output logs. Redundant libraries have been removed to
reduce the app startup time and overall size.
12.29 - Anchore Enterprise Release Notes - Version 4.1.0
Anchore Enterprise 4.1.0
Anchore Enterprise release v4.1.0 contains targeted fixes and improvements.
A Database update will be required.
4.1.0 Upgrade Notes
The 4.1 upgrade requires a new vulnerability database to be built by the feed service using a new schema. In the time between the new deployment startup and the completion
of the first post-upgrade feed service data sync, the policy engine API will return errors for vulnerability scans. Once it receives the newly built vulnerability database
from the upgraded feed service it will resume normal operation. Depending on the deployment, the data update and new db build may take several hours.
The system will resolve this condition on its own but your maintenance window should take this into account.
Notes for new deployments
Due to improved error handling in the vulnerability scanner (see details below) new deployments will not provide vulnerability reports via the API until the first full vulnerability
sync has occurred but images may be analyzed during this time. Once the first sync is completed (you can see using anchorectl feed list), the vulnerability scans will return successfully.
Enterprise Service Updates
Improvements
- Source to Image SBOM Drift
- Introduces a new artifact relationship API which provides the ability to indicate that a container image was built from one or more specific source repository revisions. Allowing Anchore to show when the source repository’s SBOM packages are correctly found in the image SBOM.
- Introduces a new policy gate and trigger which will raise drift findings in the policy compliance evaluations.
- Vulnerability False Positives Reduction
- Introduces an Anchore vulnerability feed shown as ‘anchore:exclusions’. This is a curated feed of vulnerability matches which will be automatically excluded from results in order to reduce false positives.
- The feed utilizes Version 4 of the Grype database schema which provides support for vulnerability match exclusion data.
- Application Name and Version Name improvements
- Added uniqueness and non nullable constraints to the following fields:
- Application.name must be unique per account
- ApplicationVersion.version_name must be unique per application
- Attempting to create or update these fields to a non-unique value will result in a 409 error.
- During upgrade, if existing records are found to have the same value, they will be automatically renamed by appending ‘_N’ where ‘N’ is incremented for each conflict. For example, if there are two applications named “test” within an account, one will be renamed “test_1”.
- Accounts may now be created with a name that contains an underscore (_) as the last character.
- Tag subscriptions will now be removed when the last image for a tag is deleted from the system.
- Adds last_seen_in_days field to the archival rule exclusion block that allows images to be excluded from archive if there is a corresponding runtime inventory image where last_seen is within the specified number of days
- Image Vulnerabilities now provides the timestamp when each vulnerability was detected on the image. This is now available in the API and is indicated with the “detected_at” field.
- Reduced the number of Error Events generated when there is an issue accessing the registry. You will now only see on event generated per registry/repo. Previously there would be an event for each image.
- In order to reduce vulnerability false positives, it is recommended that users do not attempt vulnerability matches on go main modules with pseudo-version v0.0.0- or (devel) unless the true version has been specified via correction.
Fixes
- Subscriptions are now being properly cleaned up when images are deleted or archived.
- The API will return a proper error message if the caller attempts to delete an image, using the image ID, that is the latest of its tags and still has an active subscription.
- Providing an unsupported vulnerability type for API sources/{source_id}/vuln will result in a proper error message.
- Addressed an incorrect error events regarding Image Registry Lookups. This event was generated in error even when registry credentials were valid and the lookup succeeded.
- Errors that are detected during a vulnerability scan are now properly reflected in the API. Previously, it was possible that the scan would fail, but it would appear that the image had no vulnerabilities.
- Importing an image SBOM where the distro version is NULL or None, will now succeed.
- A max-images-per-account Archive Rule will correctly handle an image that has more than one tag associated with it.
Deprecations
- The Embedded Inventory Mode Feature has been deprecated as of this release. It will be removed from the Enterprise product during the future release of v4.2.0.
- Configuration Variable ‘ANCHORE_VULNERABILITIES_PROVIDER’ is no longer supported by Enterprise.
- Configuration Variable ‘ANCHORE_ENTERPRISE_FEEDS_THIRD_PARTY_DRIVERS_ENABLED’ is no longer supported by Enterprise.
Future Deprecations
- The anchore-cli Python client will be deprecated as of version 4.2 of Anchore Enterprise. AnchoreCTL contains all of the functionality of anchore-cli and is the default, supported tool for interacting with Anchore Enterprise as of 4.1.
UI Updates
Improvements
- In SSL-enabled environments, all requests made from client are automatically upgraded to use a secure connection.
- Account entries and user entries are now both permitted to contain spaces in their names. In addition, account names are now permitted to contain a trailing underscore (
_) character. - Various supporting libraries have been updated in order to improve
security, performance, and also to remove deprecation warnings from browser and server output logs. Redundant libraries have been removed to reduce the app startup time and overall size.
Fixes
- Single sign-on (SSO) authentication now preserves the page URL. Prior to this update, the user would always be sent to the Dashboard view, but now the original location is used after the SSO authorization round-trip is complete.
- Due to a cookie misconfiguration, completion of the SSO round-trip would
not always place the user inside an authenticated view, requiring a page refresh—this issue has now been addressed.
- The Whats's New tour dialog will now be displayed for new SSO users /
SSO users logging in after a version update.
- When changing the displayed item range for any table within the Kubernetes view, under certain circumstances the app would
whitescreen—this issue has now been fixed. In addition, the summary total of items shown for each table is now displayed correctly.
- The documentation link provided in the Add Cluster popup in the
Kubernetes view is now correct.
12.30 - Anchore Enterprise Release Notes - Version 4.0.3
Anchore Enterprise 4.0.3
Anchore Enterprise v4.0.3 is a patch release containing targeted fixes and improvements. No database upgrade is necessary.
Enterprise Service Changes
Improvements
- Expanded capability for users with an
image-analyzer role. The role now has the ability to create subscriptions. - Added Amazon Linux 2022 vulnerability feed to the amazon driver. This will populate the
amzn:2022 namespace. - Support added for cataloging RPM databases with NDB and sqlite formats.
- Improved handling of manifest lists where the mediaType is missing.
- Details of Event Notifications have been improved for the following events:
user.image.analysis.pendinguser.image.analysis.processinguser.image.analysis.completeuser.image_tag.added
Fixes
- The global archive rule for max number of images per account, will only consider images that have been analyzed and are in the active state.
- In some configurations, the global archive delete rule failed to run do to an error in the order of the rule processing. This issue has been corrected.
UI Updates
Improvements
- The Applications button in the navbar will remain highlighted
when presented with the Artifact Analysis view for a source
item, as sources are considered part of the navigation path for
applications. In addition, this button will also now indicate the
last application and version viewed (if applicable) in a popup on hover.
- Grab targets for Dashboard items widget have been increased inside for
easier focus and manipulation.
- The legends associated with charts in the app have been removed
in all instances where the meaning of the data is otherwise
indicated.
- The
createSubscription permission is now a requisite to use
components that create subscriptions—this permission has also been
added to roles where it was missing yet required in the context of
the general purpose of that role (for example, image-analyzer). - Non-alphanumeric characters are now permitted in the password used
to authenticate against the AppDB service.
Fixes
- The Copy Allowlist modal within the Tools dropdown for items
displayed within the Alowlists tab of the Policy Editor had
an issue whereby focus would be drawn away from the Name input
field, preventing the submission of a valid form. This behavior is
now fixed.
- Due to a regression in our date component, removing a timestamp
from the Edit Allowlist Items dialog in the Policy Editor or
from the Add / Remove Allowlist Item dialog associated with
compliance results in the Artifact Analysis view would result in
an error on save. This has been fixed.
- The Copy Policy modal within the Tools dropdown for items
displayed within the Policies tab of the Policy Editor
would successfully copy a policy, but would fail to close after the
operation concluded. This behavior is now fixed.
- The summary count of event items in the Events view now
correlates to the number displayed after a severity filter
(
WARN / INFO) has been applied. Prior to this fix, the count
would remain the same. - Removing all filter boxes displayed within the Events view would
also remove the Clear Filters button, preventing any filters
previously applied from the boxes from also being removed. This
behavior has now been fixed.
- An error in our payload validation system caused the notifications
component to fail to update upon editing an entry. This issue has
now been resolved.
- The RBAC permissions associated with
policy-editor role are now
correctly asserted when trying to navigate to Images or
Applications using the main navigation bar (or when using the
minimized icons in the topnav that appear when the main bar is out
of view). - Various supporting libraries have been updated in order to improve
security, performance, and also to remove deprecation warnings from
browser and server output logs. Redundant libraries have been
removed to reduce the app startup time and overall size.
12.31 - Anchore Enterprise Release Notes - Version 4.0.2
Anchore Enterprise 4.0.2
Anchore Enterprise v4.0.2 is a patch release containing targeted fixes and improvements. No database upgrade is necessary.
Enterprise Service Changes
Improvements
- Expanded capability for users with an
image-analyzer role. The role now has the ability to modify image subscriptions. - Added support of space characters in usernames.
- It is now possible to create an account name that contains a forward slash character.
- Added support for policy bundle license gate triggers to differentiate between os and non os components during package license checks.
- Tech Preview: Added the ability to run a stateless vulnerability scan of a sbom via a new API call.
- Added new event types which improve visibility during the image analysis workflow.
user.image.analysis.pendinguser.image.analysis.processinguser.image.analysis.completeuser.image_tag.added
Fixes
- Fixed the growth of log files beyond 10MB and collection of log files when reaching the maximum count of 10 files.
- Fixed the detection of vendored golang modules in built binaries.
- Fixed the analysis of images with binaries built by golang 1.18 to correctly identify the go modules used.
- Improved grypedb to exclude matching entries that have been withdrawn from GitHub Security Advisories.
- Improved grypedb to handle entries without primary vulnerability identifier which may be received from vulnerability feed services.
- Fix ability to update existing ECR registry credentials, no longer reports an 406 error.
UI Updates
Improvements
- The content types within the SBOM tab under Artifact Analysis in the UI are now presented vertically to prevent them being truncated at narrower screen widths.
- It is now possible to create an account name that contains a forward slash character
- In order to improve the filtering and sorting operations within the
Mappings tab of the Policy Editor in the UI, source and image mappings are now stored within their own dedicated subtabs.
- Various supporting UI libraries have been updated in order to improve
security, performance, and also to remove deprecation warnings from browser and server output logs. Redundant libraries have been removed to reduce the app startup time and overall size.
Fixes
- When resizing the table columns in the UI Applications view, the action
controls could be made to overflow the bounds of their cell—this is now fixed.
- Items added via
anchorectl would occasionally cause an app exception when
viewed from within the Applications view in the UI. This issue has now been addressed. - The
JSON entry in the SBOM Report download menu in the UI within the
Artifact Analysis view had an extraneous tail pointer, which has now been removed. - The button to download a report from the Vulnerabilities tab in the
Artifacts view in the UI now correctly reads
Vulnerability Report instead of Compliance Report. - The no-results condition in the content view for Malware under the SBOM tab
of the Artifact Analysis view in the UI did not disambiguate between no results being found vs. malware scanning not being enabled. If malware scanning is not enabled, the message now indicates this and provides a link to the documentation for this feature.
- As of release
4.0.0, the default behavior when creating a new policy bundle
was to add a default source rule and mapping, however this interfered with the upgrade path for users who wanted to upload a pre 4.0.0 bundle to the system. These default entries are no longer added. - The information and recent creation indicator labels within the Stored
Report Items component of the advanced Reports view in the UI are now
correctly aligned.
- Switching account context within the UI and then attempting to download a
report would result in a fatal app error due to missing privileges on the call that fetches the data. This issue has now been addressed.
- A slight error in the alignment of the header within the UI date picker
component has been addressed.
12.32 - Anchore Enterprise Release Notes - Version 4.0.1
Anchore Enterprise 4.0.1
Anchore Enterprise v4.0.1 is a patch release containing targeted fixes and improvements. No database upgrade is necessary.
Fixes
- Fixes issues with vulnerability data matching for a small set of distros including Ubuntu, Oracle Linux, and Amazon Linux. All customers are recommended to upgrade to include this patch.
AnchoreCTL
The latest version of AnchoreCTL is 0.2.0.
AnchoreCTL is dependent on Syft v0.39.3 as a library.
AnchoreCTL v0.1.4 is vulnerable to CVE-2022-1766, which was fixed in v0.1.5+. We strongly encourage users to upgrade to the latest version.
The current features that are supported are as follows:
- Ability to add sboms via anchorectl using stdin to provide an existing SBOM without re-creating it.
- Source Repository Management: Generate an SBOM and store the SBOM in Anchore’s database. Get information about the source repository, investigate vulnerability packages by requesting vulnerabilities for a single analyzed source repository, or get any policy evaluations.
- Download full image SBOMs for images analyzed with Enterprise 4.0.0.
- Compliance Reports: View and operate on runtime compliance reports, such as STIGs, created by the
rem tool. - Corrections Management: View and modify corrections information to help reduce false positives in your vulnerability results.
- Image Management: View, list, import local analysis, and request image analysis by the system.
- Runtime Inventory Management: Add, update, and view cluster configurations for Anchore to scan, as well as for the inventory reports themselves.
- System Operations: View and manage system information for your Enterprise deployment.
12.33 - Anchore Enterprise Release Notes - Version 4.0.0
Anchore Enterprise 4.0.0
The Anchore Enterprise 4.0.0 release offers significant new supply chain security features expanding the Anchore Enterprise SBOM management platform beyond container scanning. Users can now generate and continuously monitor SBOMs for their source code repositories to identify vulnerability and security risks. Policy rules that are specific to managing source code are now available in the Policy Engine. Multiple source code and container image SBOMs can also now be grouped together as an Application that can be managed as a single set enabling generation of SBOMs representing a total application or service.
Additional new SBOM capabilities enable users to observe and limit SBOM drift between container image builds. Users can use policy rules to enforce immutable container best practices or help detect potentially malicious activity.
AnchoreCTL, the integration tool for use in CI/CD pipelines, has also been updated to include Source Repository Management.
A number of performance improvements have also been made to improve the response of the GUI, reporting service, as well as the efficiency of the queue processing processes.
Version 4.0.0 also includes other improvements and fixes.
New Features
The following new features are included in Enterprise 4.0.
SBOM Management
You can now generate SBOMs using AnchoreCTL as part of a command line or CI/CD workflow, through pulling content from a registry, or by submitting an artifact to the Anchore API.
SBOMs can be managed using the command line, API or GUI, where contents can be grouped together, annotated, viewed, or searched. Artifact metadata, vulnerability information, and policy evaluations can also be viewed and managed through the same interfaces.
All SBOMs can be downloaded into a variety of formats, either individually or collectively, to be sent to security teams, customers or end-users.
Applications
You can now build applications in Anchore Enterprise. Applications are the top-level building block in a hierarchical view, containing artifacts like packages or image artifacts. Applications can represent any project your teams deliver. Each application is associated with one or more application versions which track the specific grouping of artifacts that comprise a product version.
Anchore Enterprise lets you model your versioned applications to create a comprehensive view of the vulnerability and security health of the projects your teams are building across the breadth of your Software Delivery Lifecycle.
By grouping related components into applications, and updating those components across application versions as projects grow and change, you can get a holistic view of the current and historic security health of the applications from development through built image artifacts.
SBOM Drift
You can now set triggers for policy violations on changes in the SBOM between images, with the same tag, so that it can detect drift over time between builds of your images.
There is a new gate called:
tag_drift
The triggers are:
- packages_added
- packages_removed
- packages_modified
Legacy Vulnerability Scanner No Longer Supported
The legacy vulnerability scanner is no longer included as an option when installing or upgrading Anchore Enterprise.
If you currently have Enterprise configured to use the legacy vulnerability scanner, you will not be able to successfully upgrade and start the system without explicitly configuring the default vulnerability scanner.
You can remove that configuration variable so the system can default to the current vulnerability scanner.
If you choose not to upgrade, instead performing a new installation of Enterprise, the vulnerability scanner will be configured by default.
Improvements
- Analyzers no longer wait 5 seconds between analysis tasks if the last queue check had work available.
- Adds global image count metrics to the set of available prometheus metrics.
- Adds new internal reports_worker service that processes async tasks for reporting data.
- Adds reporting task (data load, refresh, etc) to the set of available prometheus metrics.
- System can be configured to automatically delete events older than a specified age to help manage data growth.
- Go modules detected and reported from within binaries.
- Removes old and unsupported PG8000 DB driver from container image. Database connection strings starting with “pg8000:” will no longer work.
- Default PostgreSQL version used in the Quickstart docker-compose.yaml is updated from 9.6 to 12. Anchore’s Postgres requirements are unchanged.
- Reporting service can be configured to remove reporting data for images deleted or archived.
- Reporting service data update performance improvements and scalability improvements.
Fixes
- Resolved data leaks from the grypedb feeds driver that could occur when process terminated by OS.
- Resolved reporting service refresh issue.
- Reporting service no longer looks at or attempts to refesh deleted image data. Reporting procedures now operate on data sets where the analysis state is analyzed and image state is active.
- There was an issue with the Debian driver providing empty content. The grype-db-builder now builds all Debian data in the feeds service.
- The NVD CVSS scores known issue from the 3.3.0 release has been fixed. NVD CVSS scores are now present in the API responses for the request to get a detailed information query about a vulnerability feed record.
- Stale feeds policy trigger issue fixed.
- Report worker tag refresh issue fixed.
- Fixes vulnerability scanning failures for container images with no known distro.
Known Issues
The vulnerability scanner needs to be explicitly configured for Grype. If it is configured for v1 (legacy) vulnerability scanner, you will get an error during upgrade.
Image drift only supports comparison of images analyzed by 4.0.0. Images analyzed prior to upgrade do not support drift computation and will result in a policy evaluation warning message.
Image SBOM downloads do not include content hints entries or detected binaries (python, go) that are not installed via a package manager.
Enterprise UI Changes
- New Applications tab. Observe applications in Enterprise and see a summary of the artifacts that have been collected into an application. From the application view, you can drill down into the source repositories or container images that make up the application, and browse their SBOMS.
- View applications and application versions from source repositories and image containers. The information is categorized by applications, with sub-categories of application versions available.
- You can download an SBOM report in JSON format for everything in an application.
- View information about an artifact, such as the policies set up, the vulnerabilities, SBOM contents,and metadata information.
- From the Policies tab, set up policies and policy bundles for source repositories.
Fixes
- Fixed inventory view performance issues with large data sets.
- Report manager now returns preview results.
- The inventory service error now returns the appropriate 500 error message.
- Fixed how the ordering of policy bundle mappings are displayed within a table.
- Increased the LDAP filter character limit.
- Package names within the Vulnerability tab are now sorted alphanumerically.
Upgrading
Upgrading to Anchore Enterprise 4.0.0 involves a database upgrade that the system will handle itself. It may cause the upgrade to take several minutes.
If you currently have Enterprise configured to use the legacy vulnerability scanner, you will not be able to successfully upgrade and start the system without explicitly configuring the default vulnerability scanner.
You can remove that configuration variable so the system can default to the current vulnerability scanner.
If you choose not to upgrade, instead performing a new installation of Enterprise, the vulnerability scanner will be configured by default.
AnchoreCTL
The latest version of AnchoreCTL is 0.1.4.
AnchoreCTL is dependent on Syft v0.39.3 as a library.
The current features that are supported are as follows:
- NEW! Source Repository Management: Generate an SBOM and store the SBOM in Anchore’s database. Get information about the source repository, investigate vulnerability packages by requesting vulnerabilities for a single analyzed source repository, or get any policy evaluations.
- NEW! Download full image SBOMs for images analyzed with Enterprise 4.0.0.
- Compliance Reports: View and operate on runtime compliance reports, such as STIGs, created by the
rem tool. - Corrections Management: View and modify corrections information to help reduce false positives in your vulnerability results.
- Image Management: View, list, import local analysis, and request image analysis by the system.
- Runtime Inventory Management: Add, update, and view cluster configurations for Anchore to scan, as well as for the inventory reports themselves.
- System Operations: View and manage system information for your Enterprise deployment.
12.34 - End-of-Life Releases
12.34.1 - Anchore Enterprise Release Notes - Version 3.3.0
Anchore Enterprise 3.3.0
This release offers Rocky Linux support and various UI updates.
Version 3.3.0 also includes other improvements and fixes.
Rocky Linux support
Anchore Enterprise can now scan Rocky Linux images for vulnerabilities.
Asynchronous parts of the image deletion workflow in the backend can now be parallelized. You may now configure the maximum number of parallel workers in the catalog configuration.
Fixes
- Images that had Go content and hints enabled were failing analysis. This has been fixed.
- Images reported via runtime inventory that also had port numbers in the registry host URL were failing to parse properly, which caused scan failures. This issue has been fixed.
- NuGet packages were not matched to vulnerabilities correctly. This is now fixed.
- With the Grype provider, NVD and vendor CVSS scores were missing for records in non-NVD namespaces. This is now fixed.
- Migration code was added to clean-up the unused feed records, and fixed artifacts and vulnerabilities records for the github:os group.
Known Issue
NVD CVSS scores may not be present in the API responses for the request to get a detailed information query about a vulnerability feed record.
- There is a workaround to get this information. See the Workaround section below for more details on the workaround.
- This is only present for a subset of records NVD records.
- It does not impact the vulnerability reports or findings for images. It only impacts the next-gen vulnerability scanner, so users still on the legacy scanner are not impacted.
Details
The /query/vulnerabilities API response contains an nvd_data attribute for each vulnerability in the result. The value of the attribute represents the NVD assigned CVSS scores. This field is not correctly populating for a small subset of vulnerabilities in the system. Instead of a list of results, the value is a null reference as shown below.
Note: This known issue only affects vulnerabilities that exclusively belong in the nvd namespace with Grype as the vulnerabilities provider (next-gen v2 scanner). It does not affect the legacy vulnerability provider.
% curl -u user:password "http://localhost:8228/v1/query/vulnerabilities?id=CVE-2019-15780"
{
"page": "1",
"returned_count": 1,
"total_count": 1,
"vulnerabilities": [
{
"affected_packages": [
{
"name": "formidable_form_builder",
"type": "unknown",
"version": "< 4.02.01",
"will_not_fix": false
}
],
"description": "The formidable plugin before 4.02.01 for WordPress has unsafe deserialization.",
"id": "CVE-2019-15780",
"link": "https://nvd.nist.gov/vuln/detail/CVE-2019-15780",
"namespace": "nvd",
"nvd_data": null,
"references": [
{
"source": "N/A",
"url": "https://wordpress.org/plugins/formidable/#developers"
},
{
"source": "N/A",
"url": "https://raw.githubusercontent.com/Strategy11/formidable-forms/master/changelog.txt"
},
{
"source": "N/A",
"url": "https://pentest.co.uk/labs/advisory/cve-2019-15780/"
},
{
"source": "N/A",
"url": "https://wpvulndb.com/vulnerabilities/9935"
}
],
"severity": "Critical",
"vendor_data": []
}
]
}
Workaround
The API supports a namespace query parameter to filter results based on the namespace. Supply the namespace with an nvd value to view the NVD CVSS scores, as shown in the following example.
% curl -u user:password "http://localhost:8228/v1/query/vulnerabilities?id=CVE-2019-15780&namespace=nvd"
{
"page": "1",
"returned_count": 1,
"total_count": 1,
"vulnerabilities": [
{
"affected_packages": [
{
"name": "formidable_form_builder",
"type": "unknown",
"version": "< 4.02.01",
"will_not_fix": false
}
],
"description": "The formidable plugin before 4.02.01 for WordPress has unsafe deserialization.",
"id": "CVE-2019-15780",
"link": "https://nvd.nist.gov/vuln/detail/CVE-2019-15780",
"namespace": "nvd",
"nvd_data": [
{
"cvss_v2": {
"base_metrics": {
"base_score": 7.5,
"expolitability_score": 10,
"impact_score": 6.4
},
"severity": "High",
"vector_string": "AV:N/AC:L/Au:N/C:P/I:P/A:P",
"version": "2.0"
},
"cvss_v3": null,
"id": "CVE-2019-15780"
},
{
"cvss_v2": null,
"cvss_v3": {
"base_metrics": {
"base_score": 9.8,
"expolitability_score": 3.9,
"impact_score": 5.9
},
"severity": "Critical",
"vector_string": "CVSS:3.0/AV:N/AC:L/PR:N/UI:N/S:U/C:H/I:H/A:H",
"version": "3.0"
},
"id": "CVE-2019-15780"
}
],
"references": [
{
"source": "N/A",
"url": "https://wordpress.org/plugins/formidable/#developers"
},
{
"source": "N/A",
"url": "https://raw.githubusercontent.com/Strategy11/formidable-forms/master/changelog.txt"
},
{
"source": "N/A",
"url": "https://pentest.co.uk/labs/advisory/cve-2019-15780/"
},
{
"source": "N/A",
"url": "https://wpvulndb.com/vulnerabilities/9935"
}
],
"severity": "Critical",
"vendor_data": []
}
]
}
Enterprise UI Changes
- Multi-image selection and deletion now possible for RepositoryView.
- The login page banner can now be edited. You can now edit the banner on the login page to provide customized information, such as how to log in, whether to use SSO or email addresses, and support contact information.
- Failed images can now be removed from a repository.
- The context of the policy bundle test results view is now preserved as a user changes to different tabs.
Fixes
- JSON and CSV downloads from the Policy Compliance tab now include the policy bundle name and data.
- Compliance tables now correctly filter based on column data.
Upgrading
Upgrading to Anchore Enterprise 3.3.0 involves a database upgrade that the system will handle itself. It may cause the upgrade to take several minutes.
AnchoreCTL
The latest version of AnchoreCTL is 0.1.3.
AnchoreCTL is dependent on Syft v0.20.0 as a library.
The current features that are supported are as follows:
- Compliance Reports: View and operate on runtime compliance reports, such as STIGs, created by the
rem tool. - Corrections Management: View and modify corrections information to help reduce false positives in your vulnerability results.
- Image Management: View, list, import local analysis, and request image analysis by the system.
- Runtime Inventory Management: Add, update, and view cluster configurations for Anchore to scan, as well as for the inventory reports themselves.
- System Operations: View and manage system information for your Enterprise deployment.
12.34.2 - Anchore Enterprise Release Notes - Version 3.2.1
Anchore Enterprise 3.2.1
v3.2.1 is a patch release of Anchore Enterprise containing targeted fixes and improvements. No database upgrade is necessary.
Enterprise Service Changes
Fixes
- Feed syncs no longer fail for GitHub groups.
- Images failing analysis due to specific unexpected python package format issue fixed in Syft to ensure analysis can complete.
- Content hints now correctly scan non-OS packages for vulnerabilities.
- The Syft invocation during image analysis now uses the analyzer unpack directory consistent with other analysis data IO instead of the OS default temp directory.
Enterprise UI Changes
Fixes
- Image Analysis: Vulnerabilities. RPM packages were displayed as RedHat packages in the Vulnerabilities tab, and they used the RedHat icon for SuSE images. The RPM icon is now used, and the package type is now simply described as RPM.
- Image Analysis: Ancestry. Image ancestry fetch errors are now gracefully handled inline and do not block image analysis calls if they occur.
- Image Selection: Add Image/Add Repository. Opening the Add Registry dialog from the Add Image or Add Repository dialogs would cause the tooltips on the initial dialogs to flicker if you attempted to view them after dismissing the Add Registry dialog. This is now fixed.
- Kubernetes Inventory: Analyze Image. On initial presentation of the list of any images detected within a namespace, the buttons that allowed you to analyze new images would be disabled. This was due to an RBAC permission error. This issue is now fixed.
- LDAP: Connectivity. LDAP authentication connection timeouts have now been externalized in order to allow customers to directly configure these thresholds, if necessary. These values can be set via the file- or environment-based Enterprise Client application configuration parameters.
- Miscellaneous. Various supporting libraries have been updated to improve security, performance, and also to remove deprecation warnings from browser and server output logs. Redundant libraries have also been removed to reduce the app startup time and overall size.
Upgrading
No database upgrades are required for this update.
12.34.3 - Anchore Enterprise Release Notes - Version 3.2.0
Anchore Enterprise 3.2.0
This release brings the Next-Gen (v2) vulnerability scanner, based on Grype, from Tech Preview into full support and makes it the default for new Anchore Enterprise deployments.
Version 3.2.0 also includes other improvements and fixes.
New Features
Next-Gen scanner is now the default vulnerability scanner
Anchore Enterprise now uses the Next-Gen scanner, based on Grype, for vulnerability scanning. The new scanner replaces the legacy vulnerability scanner, but legacy remains available.
Only new installations will default to the new scanner. Upgrades for existing deployments will use the same scanner as the pre-upgrade deployment unless specifically configured to change.
SUSE Linux Enterprise Server (SLES) support
Anchore Enterprise can now scan SLES and OpenSUSE images for vulnerabilities.
Allow trigger IDs to be added to allow lists
To allow list a package and version rule, a mechanism to allow list items other than vulnerabilities has been added to the app.
Fixes
Dependency updates to resolve vulnerability findings.
Enterprise UI Changes
Added
- New Secret Search content tab. Secret Search results are now available within the Image Analysis → Contents page. These artifacts are already calculated during analysis, but were not previously visible in the UI.
- New Content Search content tab. Content Search results are now available within the Image Analysis → Contents page. These artifacts are already calculated during analysis, but were not previously visible in the UI.
- New Retrieved Files content tab. Retrieved Files results are now available within the Image Analysis → Contents page. These artifacts are already calculated during analysis, but were not previously visible in the UI.
- Add / Edit Registry Credentials feature now is accessible from the Account menu. Since the Registry Credentials are at the account level, they were moved from the System view to the top-right Account menu. It is also accessible from within the Analyze Repository / Tag modals.
- View package metadata from the Vulnerabilities tab main table. As a SecOps user, you can now see more information about a package listed with a vulnerability in the Vulnerabilities tab main table. You can click the Package column entry to assess the impact, and determine if the vulnerability match may be a false positive.
- Analyzing images can now be removed in bulk via the Analysis Cancellation / Repository Removal dropdown.
- Content tab data is now cached. Content type tabs within the Image Analysis → Contents page are now lightly cached for performance.
- Permit gates other than vulnerabilities to be added to an allowlist. This includes package version triggers, and more.
- Descriptions can be added upon allowlisting a trigger from within the Image Analysis → Policy Compliance tab.
Fixes
- View Reports tab now available for any user with listImages permissions.
- Severities filter is now properly handled for scheduled Runtime Inventory Images by Vulnerability queries.
- Table columns are automatically resized. When table column widths are greater than the total width of its container, they automatically resize to avoid overlap of text.
- LDAP user mappings are now removed upon account deletion.
- Miscellaneous: Various supporting libraries have been updated in order to improve security, performance, and also to remove deprecation warnings from browser and server output logs. Redundant libraries have been removed to reduce the app startup time and overall size.
Upgrading
With the new scanning engine there may be slightly different vulnerability results due to improved accuracy. It is highly
recommended for you to reach out and partner with Anchore Support for planning and managing the upgrade to ensure minimal
disruption for your workflows and workloads.
Upgrading to Anchore Enterprise 3.2.0 involves a database upgrade that the system will handle itself. It may cause the upgrade to take several minutes.
12.34.4 - Anchore Enterprise Release Notes - Version 3.1.2
Anchore Enterprise 3.1.2
v3.1.2 is a patch release of Anchore Enterprise containing targeted fixes and improvements. No database upgrade is necessary.
Enterprise Service Changes
Fixes
- The Syft /tmp directory clean-up error is now fixed.
- Anchore Enterprise now runs on FIPS-enabled hosts.
Enterprise UI Changes
Fixes
No changes to the Anchore UI from 3.1.1.
Upgrading
No database upgrades are required for this update.
12.34.5 - Anchore Enterprise Release Notes - Version 3.1.1
Anchore Enterprise 3.1.1
v3.1.1 is a patch release of Anchore Enterprise containing targeted fixes and improvements. No database upgrade is necessary.
Enterprise Service Changes
Note: the Content Hints feature now only supports adding new packages to the analysis report and can no longer modify or update package records found
by the package analyzers. This is to ensure unintended conflicts do not occur.
Fixes
- Some RPMs content in hints file causes analysis to fail
- Feeds service driver for MSRC safely handles unexpected data from upstream
- Feed service MSRC driver should not require a Microsoft API key
- Ubuntu feed service driver git repo sync error
- Github feed service driver incorrectly categorizes some data
- Sometimes get error when trying to analyze image due to finding unsupported package types
- Remove unused nvd scores from normalized vulnerability records
- Alpine feeds driver to use CVSS v3 for severity scoring instead of CVSS v2
- Events not generated correctly if an image digest has multiple tags
- Ensure content hints do not conflict with findings from analyzers and only add entries and cannot modify existing analysis finings
- SSL Error handling in swift objectstorage driver
- Syft/Stereoscope cache in /tmp not cleaned up after image analysis
- Adds
will_not_fix field to vulnerability report API response - Adds
will_not_fix field to /query/vulnerabilities response - Wrong tag may be used for image download during analysis if the digest is mapped to multiple tags
- Dependency updates to resolve non-impacting vulnerability findings
- Additional minor bug fixes and enhancements
Enterprise UI Changes
Fixes
- Socket protocol now enforceable via configuration to avoid false positives with application scanners
- Allow expiration of allowlist item to be set via Vulnerabilities table view in Image Analysis
- Security vulnerability in package WS addressed
- Add/Edit User & Add/Edit LDAP User Mapping modal content overflows issue fixed
- Enable System button for users with correct requisite permissions
- Users without correct permissions can no longer directly access app routes via URL
- Default allowlist expiration now set to 30 days
- Items with vulnerabilities inherited from base image can now be excluded by filter in Vulnerabilities view in Image Analysis
- Users can now be prevented from accessing the app for a configurable amount of time after a configurable number of invalid login attempts
- Improved internal field validation to prevent unexpected input in AppDB report routes
- Additional minor bug fixes and enhancements
Upgrading
No database upgrades are required for this update.
AnchoreCTL
- Updates vendor_only option to default to true for consistent experience with users coming from anchore-cli
12.34.6 - Anchore Enterprise Release Notes - Version 3.1.0
Anchore Enterprise 3.1.0
This release adds new capabilities for automated runtime inventory scanning, runtime container compliance checks, a new
vulnerability scanner option in tech preview, a new enterprise CLI, as well as other improvements and fixes.
New Features
Runtime Kubernetes Inventory Scanning with UI Support
Building on the runtime inventory features in the 3.0 release, Anchore can now automatically analyze images reported as in
use in kubernetes clusters so that you can easily assess the security risks not only of image in your CI pipelines, but also
in production in your clusters. Additionally, the UI now supports visualizations of kubernetes inventories and the vulnerability
and policy compliance status of the inventory by namespace or cluster.
See Runtime Kubernetes Inventory for more information.
Runtime Compliance Checks for Containers
Anchore now includes the ability to execute and collect runtime compliance checks using industry standard tooling such as OpenSCAP to provide evaluation of running
containers’ STIG compliance or any other compliance specification that can be described and checked using XCCDF profiles.
See Compliance Checks for more information on this feature.
New CLI with Integrated Pipeline Scanning Support
The new anchorectl tool provides a new Enterprise-focused CLI experience with support for local analysis of images to import
into your deployment. Using the new tool you can also perform other Enterprise operations such as interacting with new compliance reports
and viewing or configuring inventory scanning.
Tech Preview Features
A new vulnerability scanner based on Grype is now available in tech preview. See Vulnerability Scanner V2 for more information.
This update is not configured by default and must be set by opt-in using a configuration value.
Enterprise Service Changes
This release contains a database schema update to version 0.0.8 for the enterprise schema and 0.0.15 for the engine schema.
The upgrade process will modify the db schema and update some tables in the reporting service for any existing runtime
inventory records. Unless you have a very large number of inventory records, the upgrade should complete in seconds to minutes depending
on your database size.
Owned Package Filtering Control
A new configuration option: services.analyzer.enable_owned_package_filtering: is now available in the analyzer service configuration.
By default, the analyzer will filter packages that are determined at analysis time to be “owned” by a parent package when that package
installs all the files of the child package. That behavior can be disabled by setting this configuration value to “false”.
The default filtering removes false positives associated with packages installed by distro packages that install language
packages like python, npms, or gems and have backports applied by the distro maintainer with no corresponding
language package version change. However, if you package your own applications as rpms, debs, or similar and need to
ensure all included packages are scanned directly against NVD sources, then you can disable this behavior.
Added
- New tech-preview vulnerability scanner
- Improved alpine vulnerability scanning by using NVD matches for OS packages for CVEs that are not yet present in Alpine SecDB
- Analyzer service configuration option to control package-ownership filtering. Allows exposing all packages regardless of ownership relationship
Fixed
- Adds missing fields and fixes errors in the swagger spec for the API
- Restores file package verification data ingress during image load to fix a regression
- Malware policy gate can fail causing policy eval error when malware not enabled and other rules precede malware rule in a policy
- JSON serialization error in internal policy engine user image listing API
- “package_cpe23” field missing in vulnerabilities
- Ensure python38 used in the Dockerfile build, and set tox tests to only run py38
- User to not be able to delete some notification configurations when they should be able based on RBAC role
Improved
- Performance of GET operations between services improved by better streaming memory management for large payload transfers
- Use UBI 8.4 as base image in Docker build
- Updates skopeo version used to 1.2.1, allowing removal of the ’lookuptag’ field in the POST /repositories call for
watching repositories that do not have a ’latest’ tag
- RedHat packages for an Out-of-Support distro release version now indicated as being vulnerable if a newer distro release version is supported and indicated as affected for the package.
Additional minor bug fixes and enhancements
Known Issues/Errata
Note: the policy engine feed sync configuration is now in the policy engine service configuration as part of the provider
configuration. The provided helm charts, docker-compose.yaml and default configurations handle this change automatically.
Deprecations
The affected_package_version query parameter in GET /query/vulnerabilities is not supported in the V2 scanner (aka Grype mode)
and has known correctness issues in the legacy mode. It is deprecated and will be removed in a future release.
Enterprise UI Changes
Added
- From the new Kubernetes Runtime Inventory view you can now inspect
the spread of compliance and vulnerability information reported by
the KAI agent across all detected
Kubernetes clusters and namespaces in your deployment topology
- Information relating to any items detected by the runtime agent is
now surfaced in the repository- and tag-level views within the Image
Selection hierarchy
Improved
- If the reporting service fails, feature components that require this
service as a dependency will be disabled in the navigation bar until
service recovery
- Pie-chart components have been restructured to present selected
information inclusively when segments are clicked—other segments
are now disabled
Fixes
- Printable view assembly issues addressed in Image Analysis Vulnerability
and Compliance views—charts now render correctly in portrait mode
- The alerts banner is now subject to RBAC and will not appear if the
fetch alert permission is not detected
- Clipping issues resolved in the creation date popup in the Policy Bundle view
- Supporting libraries have been updated in order to improve security,
performance, and also to remove deprecation warnings from browser
and server output logs
Additional minor bug fixes and enhancements
Upgrading
12.34.6.1 - STIG
Overview
You can use the Anchore runtime compliance API to gain insight into the security compliance of runtime environments. Tools responsible for executing compliance checks on a running environment are the intended consumers of this general-purpose API, such as the Security Technical Implementation Guides (STIGs) that users can run on a Kubernetes cluster using Anchore’s Remote Execution Manager (REM). These tools can upload the results of an execution to Anchore through this new compliance API, which allows users to leverage additional Anchore functionality like reporting and correlating the runtime environment to images analyzed by Anchore. This enables deeper understanding and insight into an image’s lifecycle and the ongoing security of the runtime environments deploying them.
Usage
The Compliance API can be found in the Enterprise API swagger specification. This API allows for the creation and retrieval of runtime compliance checks and any document reports provided in the creation calls.
The following is an example of the body of an API call to create a runtime compliance check using the Compliance API to be submitted as a multipart form to support file upload:
{
"check_type": "oscap", // type of compliance check to report
"result": "pass", // overall result of compliance check
"pod": "postgres-9.6", // k8s or kubernetes pod the compliance check was run against
"namespace": "dev", // the namespace of the pod
"image_tag": "9.6", // tag of the image that the pod is running
"image_digest": "sha256:a435b8edc3bdb4d766818dc6ce22ca3a5e6a922d19ca7001afd1359d060500eb", // the digest of the running image
"start_time": "2021-03-22T15:12:24.580054", // start time of the compliance run
"end_time": "2021-03-22T16:02:24.580054" // end time of the compliance run
"result_file": "path_to_file",
"report_file": "path_to_file
}
Two fields are required for the creation of runtime compliance checks. The type field references the type of scan that generates the report. The only supported option is oscap, which stands for OpenSCAP. The other required field is image_digest, which represents the image used by the container that the runtime compliance check was run against.
While not required, the status attribute is used to designate whether the given compliance check has passed or failed. There are several additional metadata fields provided to further contextualize the runtime check, such as the pod and namespace that the check was run against.
One of the other key functionalities of this API is the ability to attach a report_file and a result_file to the created runtime compliance checks. This can be the direct output generated by the runtime tool itself, such as an OpenSCAP XML document. This allows for entire reports to be stored within Anchore using the object storage, which allows for a number of options for how and where this data will be preserved.
Once created, runtime compliance checks can be retrieved using the GET endpoint specified in the Swagger spec. The corresponding result and report files can be retrieved by pulling the file_ids from a runtime compliance check and querying the endpoint for runtime compliance results using the specified result_id.
12.34.6.1.1 - REM
Remote Compliance Check
Anchore Enterprise Remote Execution Manager (REM) enables an operator to run a STIG compliance check for a defined container
within a Kubernetes Cluster. REM contains functionality to perform package management such as installation and removal
of OpenSCAP, retrieval of generated results files, and upload capabilities to the compliance API. There is also a provided
local data-store if upload functionality is disabled or unavailable.
Installation
REM releases are uploaded to a public AWS S3 bucket.
To install REM, you can use either the AWS CLI or cURL to retrieve both the binary and the default configuration for REM.
Retrieving the default configuration file is the same regardless of which operating system you’re using:
curl -o rem.yaml https://anchore-rem-releases.s3-us-west-2.amazonaws.com/v0.1.9/rem.yaml
macOS dmg
curl -o rem.dmg https://anchore-rem-releases.s3-us-west-2.amazonaws.com/v0.1.9/rem_0.1.9_darwin_amd64.dmg
macOS Tar
curl -o rem.tar.gz https://anchore-rem-releases.s3-us-west-2.amazonaws.com/v0.1.9/rem_0.1.9_darwin_amd64.tar.gz
Debian
curl -o rem.deb https://anchore-rem-releases.s3-us-west-2.amazonaws.com/v0.1.9/rem_0.1.9_linux_amd64.deb
RPM
curl -o rem.rpm https://anchore-rem-releases.s3-us-west-2.amazonaws.com/v0.1.9/rem_0.1.9_linux_amd64.rpm
Linux Tar
curl -o rem.tar.gz https://anchore-rem-releases.s3-us-west-2.amazonaws.com/v0.1.9/rem_0.1.9_linux_amd64.tar.gz
Windows
curl -o rem.zip https://anchore-rem-releases.s3-us-west-2.amazonaws.com/v0.1.9/rem_0.1.9_windows_amd64.zip
Usage:
REM can work well out-of-the-box with minimal required configurations.
At the very least, REM needs to be able to authenticate with the Kubernetes API, know which command to run, and know which
pod and container to connect to. If you have a Kube Config at ~/.kube/config, REM will use that by default.
To see how to configure REM with these minimal details, see the Pod Configuration section
Shell Completion
REM supports completion for BASH, Zsh, and Fish shells. Run rem completion -h for more information.
Configuration
REM will search for the configuration file in a few locations:
The following examples are listed in the order of precedence.
From the CLI you can pass a -f or --config flag with the path to the configuration file.
> rem -f /tmp/anchore/config.yaml
Setting an Environment variable:
> export REM_CONFIGPATH="/tmp/anchore/config.yaml"
Current directory of execution:
./rem.yaml
.rem/config.yaml
User home directory path:
XDG configured directory path:
It is always recommended to use the configuration file that is attached to each release as an artifact.
The example configuration file in the repository is a good reference for explaining which configuration key does what.
Pod configuration
This section will describe the minimum required configuration required for REM to work.
In the file, you can specify kubernetes pod information in the following section:
# This section tells REM the execution details for the STIG check report:
# Pod Name, Namespace, and Container Name are required so that REM knows where to exec the stig check
report:
podName: "centos"
nameSpace: "default"
containerName: "centos"
# These must be set via the file, and correspond to the command being executed in the container
# For example, if your compliance check command looks like this:
# oscap xccdf eval --profile <profile> --results /tmp/anchore/result.xml --report /tmp/anchore/report.html target.xml
# The values should for --results and --report should match the values of these configurations.
# The file paths defined here are also where REM downloads the files from the container. You can think of it like this:
# docker cp container:/tmp/anchore/report.html /tmp/anhore/report.html
reportFile: "/tmp/anchore/report.html"
resultFile: "/tmp/anchore/result.xml"
# REM supports Kubernetes Configuration in the following manner:
# 1. If you have a Kubeconfig at ~/.kube/config, you don't need to set any of these fields below, REM will just use that
# 2. If you want to explicitly specify kubernetes configuration details, you can do so in each field below (ignore path)
# 3. If you are running REM within Kubernetes, set path to "use-in-cluster" and set cluster to the cluster name and you don't need to set any of the other fields
kubeconfig:
path: "" # set to "use-in-cluster" if running REM within a kubernetes container
cluster: ""
clusterCert: # base64 encoded cluster cert
server: # ex. https://kubernetes.docker.internal:6443
user:
type: # valid: [private_key, token]
clientCert: # if type==private_key, base64 encoded client cert
privateKey: # if type==private_key, base64 encoded private key
token: # plaintext service account token
As an alternative, or a way to override the setting in the configuration file on the command line, you can pass a few flags to set new values.
Here, <cmd> is the full oscap command to execute within the container, and the args before the double hyphen '--' are telling REM where to run the command
$ rem kexec -n <namespace> -p <pod> -c <container> -k <kubeconfig-path-override> -- <cmd>
Example (this will use kubeconfig at ~/.kube/config)
$ rem kexec -n default -p anchore-pod -c anchore-container -- oscap xccdf eval --profile standard --result /tmp/result.xml --report /tmp/report.html target.xml
Note: The double hyphen -- is important because it tells REM that all subsequent flags should be passed to the container command
A full list of the options supported by the rem kexec command can be found by running the command with the -h or --help option
i.e.
rem kexec --help
Enable the following section in the configuration file.
command:
.
..
oscap:
# This boolean flag tells REM whether or not to try to install OpenSCAP into the container (if the command is oscap)
installEnabled: true
# This boolean flag tells REM whether or not to try to uninstall OpenSCAP from the container
# (after the oscap command runs and the result/report files get downloaded)
uninstallEnabled: true
After the installation option has been enabled this will allow the operator to manually install the compliance tool
or allow REM to automatically install the missing tool needed to run the compliance check.
note: uninstallEnabled can be set to false if you intend on leaving the tool available.
Running the following will install OpenSCAP but this is not mandatory.
> rem kexec install oscap
Run a compliance check
There are two options on how to run the check. The first is from the command line. The second method
is to have REM read it from the configuration file.
From the command line
> rem kexec oscap -- xccdf eval --profile xccdf_org.ssgproject.content_profile_stig --fetch-remote-resources --results /tmp/anchore/result.xml --report /tmp/anchore/report.html /usr/share/xml/scap/ssg/content/ssg-rhel8-ds.xml
From configuration file
command:
# If no command is specified through arguments passed to the application on the command line, this command will be used
# Each element of the list is interpreted as part of the command
# I.E. echo 'hello-world' > /tmp/test.txt would look like:
# cmd:
# - echo
# - 'hello-world' > /tmp/tst.txt
cmd: oscap xccdf eval --profile xccdf_org.ssgproject.content_profile_stig --fetch-remote-resources --results /tmp/anchore/result.xml --report /tmp/anchore/report.html /usr/share/xml/scap/ssg/content/ssg-rhel8-ds.xml
Once the check has completed the report and results file should be located in the set path passed into openSCAP.
Custom STIG targets
REM has the option to allow the operator to specify a custom target by setting a path under customTargetPath.
# If a custom OSCAP profile is desired, specify it's path here
# Note: this will be placed into a /tmp/anchore/ directory in the container at runtime, so the command being executed
customTargetPath: <local path to target>/custom.xml
Audit uploads
REM has an audit database which is used to track which compliance checks have been successfully run, this also
serves as a method to ensure fault tolerance in the case where reports have not been uploaded do to unavailable
service connections to Enterprise. REM will mark those uploads as incomplete allowing the operator to issue a flush
command and push the remainders to Enterprise.
Database subcommand
To list the current state for all past transactions issue the following command:
In order to retreive detailed information about a transaction use the db get command with the id:
To push all results which have been marked as not uploaded, issue the follow command:
note: the –dryrun flag will show you the records which will be processed
12.34.6.2 - Tech Preview - V2 Vulnerability Scanner
Tech Preview: V2 Vulnerability Scanner
A new vulnerability scanning engine, based on Grype improves performance, reduces
database load, and provides better vulnerability matching results. It includes a new vulnerability feed sync process
integrated into the enterprise feed service that also provides faster feed syncs from the feed service to the policy engine.
Tech Preview Status
Note: The v2 scanner is intended for use in sandbox or staging environments in the current release. It is not possible to
run both vulnerability scanners at the same time. This configuration is picked up at bootstrap, and cannot be changed
on a running system.
- The new mode must be set at deployment time, the scanner is configured at service startup.
- Switching modes in a deployment is not supported.
- Downgrading from the v2 scanner back to the legacy scanner is not supported.
- Some features of the policy system are not yet supported in this mode:
vulnerability gate triggers not supported for the new scanner. They will return incorrect results when used.vulnerability_data_unavailablestale_feed_data policy
- Windows container scanning is not yet supported. Support will be added in the next feature release.
- Proprietary vulnerability feeds are not yet supported in this scanner. Support will be added in the next feature release.
Running with docker compose
- Install or update to Anchore Enterprise 3.1.0
- Add the following environment variable to the policy engine container section of the docker compose file:
policy-engine:
...
environment:
...
- ANCHORE_VULNERABILITIES_PROVIDER=grype
- Redeploy the services.
Running with helm
- Install or update to Anchore Engine 0.10.0.
- Update the following value in your
values.yaml configuration file. See
the chart README
for more details on configuring this file:
anchorePolicyEngine
...
vulnerabilityProvider: grype
- Redeploy the services
helm upgrade
After making the relevant change above and redeploying, the system will start up with the v2 vulnerability scanner enabled and will
sync the latest version of grype db as built by your local feed service. Note that legacy feeds will no longer be synced while the v2 scanner is configured. All vulnerability data
and scanning will now come from the ‘grypedb’ feed.
Vulnerability Feed Data and Syncs
The v2 scanner has its own feed sync mechanism that generates a Grype vulnerability DB from your locally installed feed
service instead of https://ancho.re as used by Grype itself. This results in a much faster sync process since the DB is
packaged as a single database file. It also reduces load on the Engine DB since the scanner matching and syncs do not
require large amounts of writes into the Engine DB. The Grype vulnerability DB is built from the same sources as the
legacy service, so there is no reduction in scan coverage or vulnerabilities sources supported.
The feed synced by the Grype provider is identified as feed name ‘grypedb’ when using the feed listing API or anchore-cli system feeds list CLI command.
12.34.7 - Anchore Enterprise Release Notes - Version 3.0.3
Anchore Enterprise 3.0.3
v3.0.3 is a patch release of Anchore Enterprise containing targeted fixes and improvements. No database upgrade is necessary.
Enterprise Service Changes
Fixes
- Better vulnerability listing API call performance
- Fixes regression in 3.0.0+ that made “hints” feature cause analysis errors of images for some package types
- Large image analysis load failures from catalog to policy engine due to connection timeout. Makes timeout configurable.
- Updates internal Syft to 0.15.1 to reduce java package CVE false positives and include CPE permutations that replace hyphens with underscores for better matching
- Adds missing recent ubuntu release vulnerability feeds (20.10, 21.04)
- Fixes Ubuntu feed mappings from name to version via configuration
- Adds new debian releases for vulnerability feeds and makes new ones configurable without software upgrades
Enterprise UI Changes
Fixes
- Adds package path to vulnerability listing table to differentiate findings packages in multiple locations
- Report manager timezone string conversion error
- The CSV report data for an image that is a descendant of a base image would not show the Inherited From Base column header in the output if the dataset contained items that were false
- In the Print Report view for Vulnerabilities in Image Analysis, the appearance of the View Report button was obscuring the values held in the Vulnerability ID column
- The Anchore Service Version (previously, Anchore Engine Version) in the About Anchore Enterprise Client modal will now update dynamically if the services are upgraded in the background
Additional minor bug fixes and enhancements
Upgrading
12.34.8 - Anchore Enterprise Release Notes - Version 3.0.2
Anchore Enterprise 3.0.2
v3.0.2 is a patch release of Anchore Enterprise containing targeted fixes and improvements. No database upgrade is necessary.
A flaw has been discovered in Anchore Enterprise versions 3.0.0 and 3.0.1 that partially effects java software detection and GHSA vulnerability matching. If a container image has java artifacts that are embedded within java artifacts (i.e. jars in jars), AND certain embedded java artifacts have certain forms of malformed metadata, Anchore analysis can fail to report on the top level java artifact and all artifacts embedded within. The fingerprint of this issue is apprent as the SBOM (content) reports from Anchore would show incomplete or missing java packages when compared to the same reports generated from Anchore Enterprise versions prior to 3.0.0. In addition, while Anchore Enterprise uses several vulnerability data feeds when performing matches against java artifacts, another flaw was discovered that prevented Anchore Enterprise from matching java artifacts with records from the GHSA data feed (other feeds, including NVD, Third-party, and OS feeds were still being consulted). The fingerprint for this issue would manifest as missing GHSA matches when compared to results from versions of Anchore Enterprise prior to 3.0.0. Both flaws have been addressed in Anchore Enterprise version 3.0.2.
Enterprise Service Changes
Fixes
- Fixes issue where java artifacts are not being matched against records from GHSA feed - synthesize pom properties contents in syft mapper. See https://github.com/anchore/anchore-engine Issue #950
- Updates syft to 0.14.0 to fix missing java elements from image SBOM, for embedded java artifacts combined with malformed pom.properties metadata. See https://github.com/anchore/syft Issue #349
Enterprise UI Changes
Fixes
- Updates to the security model surrounding the stored data presented in the LDAP mapping management view.
- Within System > Accounts, Role dropdowns are no longer truncated by the boundary of the user management dialog and will now display all entries without needing to scroll the list.
- Various supporting libraries have been updated in order to improve security, performance, and also to remove deprecation warnings from browser and server output logs. Redundant libraries have been removed to reduce the app startup time and overall size.
Upgrading
12.34.9 - Anchore Enterprise Release Notes - Version 3.0.1
Anchore Enterprise 3.0.1
v3.0.1 is a patch release of Anchore Enterprise containing targeted fixes and improvements. No database upgrade is necessary.
Enterprise Service Changes
Adds
- Adds new “inventory-agent” RBAC role with minimal permissions for use with KAI agents deployed in kubernetes clusters
- Adds wildcard support for GraphQL query filters in reporting service
Fixes
- Increases the TTL for kubernetes runtime inventory items to 120 days from 1 day after last being seen
- Fixes RHEL/UBI images imported to engine using syft have different distro name that skips OS vuln checks by mapping them to the proper “rhel” namespace and adding support for “redhat” namespaces.
- Fixes false positive vulnerabilities due to application packages (npm, python, etc) being installed via rpms, debs, or other distro packages. Filters those “owned” packages from analysis leaving the parent rpm/deb/apk for vulnerability matching.
- Fixes SSO login not working after upgrade from 2.4.x to 3.0.0 with “invalid_client” error
- Fixes analysis failures due to python package manifest format issues causing Syft errors
- Fixes image ancestor lookup failures due to ancestor being deleted or not found
- Fixes ubuntu feed driver failures during data fetch processing
Enterprise UI Changes
Fixes
- Fixes bulk delete image count limitations during repo cleanup
- Fixes potential SSO issues due to Redis connection errors
- Fixes potential LDAP connection update failures
Additional minor bug fixes and enhancements
Upgrading
12.34.10 - Anchore Enterprise Release Notes - Version 3.0.0
Anchore Enterprise 3.0
This represents a significant update in Enterprise, requiring database upgrades and adds new components to the system including an optional deployable agent for gathering
runtime image inventory from Kubernetes clusters.
New Features
Runtime Kubernetes Inventory
Anchore now can receive inventory reports from a new agent that runs in the kubernetes cluster and reports which images are used in which namespaces. The new agent is KAI, and
it can run within your Anchore deployment or in another kubernetes cluster to return which images are in-use over time. This allows Anchore to show which
images are in use and facilitates focused triage and attention on in-use images to ensure you are addressing security findings in this most critical images first.
See Runtime Kubernetes Inventory for more information.
Anchore now provides fix suggestions for policy violations and a notification delivery mechanism so you can quickly and conveniently send notifications (email, Slack, MS Teams, Github, Jira, etc) to the image maintainer
so they can take corrective action for policy findings such as updating packages, modifying the Dockerfile, or rebuilding on a new base image.
See Remediation recommendations for more information.
Policy Violation Alerts
The UI and API now present stateful alerts that will be raised for policy violations on tags to which you are subscribed for alerts. This raises a clear notification in the UI to help initiate the remediation
workflow and address the violations via the remediation feature. Once all findings are addressed the alert is closed, allowing an efficient workflow for users to bring their image’s into compliance with
their policy.
Improved Pipeline Scanning Integration
Anchore now has the ability to accept SBoM and image metadata from analysis run inside your CI/CD pipelines or local to developer machines and load it into the system for processing without requiring
images to be pushed to an image registry. This enables more efficient scanning inside the pipelines and less data transfer to decrease the overall time to result. Analysis results are provided by Syft which
is integrated into Anchore itself for SBoM generation of packages as well.
See Pipeline and Local Analysis for more information.
Feature Enhancements and Improvements
Configurable Image Maximum Allowed Size Limit
A new configurable maximum image size has been added to the system to enable administrators to ensure that very large images are not admitted into Anchore causing potential QoS or resource usage issues.
See Configuring Maximum Allowed Image Size
Enhanced Analysis Archive Rule Flexibility
New capabilities in the analysis archive rules allow more efficient description of what to archive and what to exclude as well as the ability to set rules to limit the number of images in each account to help with capacity management.
These new capabilities include new selectors for exclusions to rules so that broader rules can be use to select candidates for archival and just exclusions set for specific images, tags, or repos.
See [Analysis Archive Rules]
Enterprise Service Changes
In Enterprise 3.0, the system now requires the deployment configuration to explicitly set a default admin password and will fail system initialization if one is not found in the configuration. This is automatically
configured for users of the helm chart and our Quickstart docker-compose.yaml, but if you have a custom deployment template and create a new deployment of Anchore, you must ensure that the default_admin_password field
is set in the config.yaml used by the catalog component.
Added
- Adds ability to block large images based on configurable max size
- Adds configurable image max size value to optionally limit size of images analyzed by system
- Adds corrections API to support artifact metadata corrections for false positive management
- Adds kubernetes inventory ingress API and agent to run in kubernetes clusters to track image inventory
- Adds additional archive analysis rule exclusions to allow rules to be broader but have specific exclusions so that fewer rules can be used
- Adds API to upload analysis SBoM generated by Syft and imported as image for remote analysis without Anchore retrieving the image content directly
- Adds CPEs used for vulnerability matching against NVD and VulnDB data to the image content output itself for greater transparency in matching
- Use Python 3.8 instead of Python 3.6
- Update base image for containers to UBI 8.3 from UBI 8.2
Improved
- Improved - Updated output messages and description for vulnerability_data_unavailable trigger and stale_feeds_data trigger to clarify only OS packages impacted.
- Improved - Do not allow selectors to be empty unless using max_images_per_account_rule.
- Improved - Updates Syft to version 0.12.4 to fix several issues in image analysis including empty package names/versions in invalid package.json files and java jar parent references being Nil.
- Improved - Require user to set explicit default admin password at bootstrap instead of defaulting to a value if none found.
- Improved - Update Authlib to 0.15.2 from 0.12.1
- Improved - Update PyYAML to 5.4.1
- Improved - Update Passlib to 1.7.4
- Improved - Update to use Python 3.8
- Improved - Update base image to UBI 8.3.
Fixes
- Fixed - Failed analysis due to incorrect manifest mime types due to bug in buildah that caused incorrect content type to be in the manifest at build time.
- Fixed - External API service swagger spec for GetRegistry response is inconsistent with actual returned JSON.
- Fixed - Fixed analysis archive rules that did not fire if delete transition rule present.
- Fixed - Force re-analysis of tag and digest rejected if create_at_override timestamp not provided.
Additional minor bug fixes and enhancements
Known Issues/Errata
False Positive Management feature incompatible with legacy Engine report/query routes
Using the GET /query/images_by_vulnerability endpoint for querying all images with a specific vulnerability using the legacy Engine API does not support the new False Positives management feature.
It is recommended to use the Enterprise Reporting Service GraphQL API to get the same information that does support the corrections.
Change to now require an explicitly set default admin password at system bootstrap may cause issues with some deployment templates
If your deployment template (chart, docker compose, etc) does not ensure that the config.yaml for services includes default_admin_password explicitly set to a value, the system will no longer
bootstrap with a built-in default. This does not affect our updated helm chart or quickstart docker-compose.yaml files, those have been updated appropriately.
Enterprise UI Changes
Added
- New compliance landing page
- Alerts view in dashboard
- Alerts selection for repositories and tags
- Remedation workflow and Actions Workbench
- Kubernetes runtime inventory reports
- “Last Seen” timestamp in image analysis to overlay runtime inventory in analysis view
Improved
Fixes
Additional minor bug fixes and enhancements
Upgrading
12.34.11 - Anchore Enterprise Release Notes - Version 2.4.1
Anchore Enterprise 2.4.1
v2.4.1 is a patch release of Anchore Enterprise containing targeted fixes and improvements. No database upgrade is necessary.
Enterprise Service Changes
Added
- Ability to set pool_recycle and other SQLAlchemy engine parameters via config in db_engine_args section of config.yaml
- Updates image build to support dynamic UID mapping in OpenShift
Fixes
- RedHat CVE normalization in feed service did not ensure only one fix record per vulnerability in all cases
- Orphaned feed service driver tasks left in ‘running’ when the system shuts down are now cleaned up on restart and marked as failed
- Fixes small size limit of data scanned by ClamAV, adds default 4GB max size and configuration options to make it smaller. Errors if image is larger than that (ClamAV does no support larger sizes)
- Report ClamAV malware findings that do not include a file path as ‘unknown’ rather than skipping
- Policy engine should return HTTP 400 with instructive message on invalid bundle upload instead of HTTP 500
- Vulnerability fix version not correct for vulnerabilities with multiple fixes
- NPM and Gem packages not matching GHSA sources properly
- Update urllib3 to 1.25.9 to address CVE-2020-26137 even though Anchore not affected by that issue
- Deactivating or deleting repo subscription does not halt in-progress repository scans and can result in analysis being added after the subscription is removed
Additional minor bug fixes and enhancements
Enterprise UI Changes
Improved
- Only show enabled feeds and groups via system health
- Updates image build to support dynamic UID mapping in OpenShift
Fixes
- Repositories with no watch subscription can cause UI errors during deletion
- Lack of error message in case of creating/updating password with value that is too short to pass validation
- Switching account contexts breaks scheduled query recomposition flow
Additional minor bug fixes and enhancements
Upgrading
Built on Anchore Engine v0.8.2: Anchore Enterprise is built on top of the open-source Anchore Engine, which has received new features and updates as well See Anchore Engine Release Notes for information on new features, bug fixes, and improvements in Anchore Engine.
12.34.12 - Anchore Enterprise Release Notes - Version 2.4.0
Anchore Enterprise 2.4.0
Features & changes of note:
- Malware scanning capabilities
- Image ancestry and comparison of an image’s policy and vulnerability findings with a base image
- New analyzers for binaries not delivered in packages,
- A “content hints” capability in the analyzers so developers or image builders can pass metadata to augmentation analysis results
- UI improvements for scanning and deleting repositories with warnings for very large repositories
- Asynchronous deletion of images
- A new enterprise extension to the external API, available with base route: /v1/enterprise/
Malware Scanning
Anchore Enterprise now integrates ClamAV for optional (disabled by default) malware scanning of image content during the analysis phase and with policy rules to trigger on findings. This is particularly useful for using Engine to validate
external images in an image catalog or “golden repo” where you must guard against both vulnerable and malicious code from external sources.
For more information see: Malware Scanning
Image Ancestry and Base Image Comparisons for Vulnerabilities and Policy Findings
Anchore now provides an API and UI enhancements to show an image’s base image as well as any images in its ancestry. Using this information, Anchore can now also show which
vulnerabilities and policy findings are inherited from an image’s base. This allows quicker triage, analysis, and remediation of image findings. See Base Images.
New Binary Content Type
A new binary analyzer will check for and inspect binaries that are often installed outside of package managers. This supports a common use-case of language or runtime-specific base images
such as Python and Go images where the runtime is installed via an archive and thus no package db entry exists. The analyzer supports specific binaries that it searches and can get metadata for: Go, Python, and BusyBox.
Once detected, these are checked for vulnerabilities, just like regular packages using the NVD and other non-OS vulnerability sources.
Content Hints
A new “hints” feature allows users to pass specific metadata into the analyzers to help identify and augment content that existing analyzers would not have been discovered. This feature is useful
if you have libraries statically compiled into another binary or installed outside of a package manager that you want to tell Anchore about so you can get vulnerability matches for and include them in the
image’s content manifests. This is accomplished with a specific JSON file present in the image: /anchore_hints.JSON. The entries are merged into the analyzer results to augment their findings for
different content types.
For more information, see: Content Hints
Changed Image Deletion Behavior
Image deletion is now an asynchronous operation and the image_status property in the image record now has possible states ‘active’ and ‘deleting’. Deletion of an image by API call will
transition the image record to a deleting status as indicated by the image_status property. Images in that state will be deleted by an asynchronous process on a duty cycle. This approach helps manage database
load under a high volume of delete operations and also makes the client-perceived response time much lower.
NOTE: Responses for GET /images and GET /summaries/imagetags do not include images in the deleting state by default, though new query parameters
allow those images to be returned in those calls if desired (image_status=deleting or image_status=all)
New API Extension for Enterprise
The engine API is updated to version 0.1.15
There is also a new enterprise extension to the API, available at /v1/enterprise/ that has its own version (0.1.0) and has calls specific to the Enterprise edition. These calls include
the new base-image comparison and ancestry API calls.
The swagger spec for this is available from the service using the route: /v1/enterprise/swagger.json
Enterprise Service Changes
Added
- Changed image deletion to asynchronous behavior to make API more responsive and throttle db load during image deletes.
- New dry-run mode for repository scan request to return list of tags that would be scanned without scanning or persisting the record.
- Support for a “hints” JSON file in the image. JSON file to pass additional metadata to augment analyzer findings.
- Adds API support for deleting multiple images in a single call.
- Support for malware scanning using ClamAV and new ‘malware’ content type in API and policy gate to trigger on findings as well as scan not run. Disabled by default.
- Support for content type ‘binary’ with analyzers to detect specific binaries: Python, Golang, Busybox not installed by package manager.
- Query parameter filters for GET /images calls to filter by image_status and analysis_status.
- Ability to indicate which vulnerability findings are inherited from the base image.
- Ability to indicate which policy findings are inherited from the base image.
- API call to return the ancestor images (parent and base images) for an image.
Improved
- Change image analysis queue processing behavior to fair share across accounts.
- Removes image_to_get property in GET body of /images route, since body in GET operations is not standard behavior.
Fixes
- Handle scratch images correctly in files gate behavior.
- Add missing fields in swagger JSON spec for GET /query/vulnerabilities.
- Better handling of java packages missing certain metadata in MANIFEST.MF files.
Additional minor bug fixes and enhancements
Enterprise UI Changes
Added
- New image count summaries to Image Analysis pages
- Warning during “Analyze Repo” workflow if repo to be added has a lot of images, allowing users to cancel operation before the analysis is requested to avoid unintentional workload.
- “Whats New” message on initial login and available in the “About Enterprise Client” selection from Account dropdown in top right of screen.
- “Binary” content type in Image Contents tab
- “Golang” content type in Image Contents tab
- “Malware” content type in Image Contents tab
- Ability to cancel all pending analyses from a single repository
- Download for report preview data as JSON and CSV
- Show image’s base image in Image Overview page
- Shows which vulnerabilities are inherited from the base image in the Vulnerabilities view
- Shows which policy findings are inherited from the base image in the Compliance view
- Images can be deleted via the UI
- Repository deletion (deletes all image analyses for that repository)
Improved
- Order accounts by name in Associate Accounts pop-up
- Analysis status is its own column to allow sorting by analysis status in repository view of tags
- Adds total image counts to repository view, main page, and tag listing
- Improved error handling in GraphQL responses for Reports
- Custom control for relative time filters in reporting
Fixes
- Some table cell truncations for image digests and other fields in the Image Analysis tab
- Changelog showing entries when no change is apparent
- Re-analysis of images that failed analysis
- Version mismatch after container restart
- Results shown after whitelisting an item with an inactive bundle
Additional minor bug fixes and enhancements
Upgrading
Built on Anchore Engine v0.8.1: Anchore Enterprise is built on top of the open-source Anchore Engine, which has received new features and updates as well See Anchore Engine Release Notes for information on new features, bug fixes, and improvements in Anchore Engine.
12.34.13 - Anchore Enterprise Release Notes - Version 2.3.2
Anchore Enterprise 2.3.2
Adds features as well as bug fixes and improvements. Highlighted features are: new parameters in the Reporting service’s GraphQL API for specifying time ranges using a relative window (e.g last 30 days), and a new CVE blacklisting rule in the policy language to trigger if specific CVEs are found.
Improved
- Improved - Adds retry wrapper on image download operations on analyzer. Implements #483
- Improved - Updates serialize-javascript dependency to 4.0.0 to bring in fix for CVE-2020-7660 (Anchore unaffected)
- Improved - Adds HEALTHCHECK to UI image
- Improved - Removes npm installation from UI image to remove all the unused artifacts it brings in
Bug Fixes
- Fix - Adds release to version string for all os package types if one is present. Fixes #504
- Fix - Fixes global analysis archive rule application for non-admin accounts. Fixes #503
- Fix - Fixes LDAP service tab fails if account mappings cannot be retrieved from service API
- Fix - Fixes multiple vulnerability fix records from RHEL driver by collapsing to a single fix for correct semantics
- Fix - Updates Alpine SecDB driver to use new source (https://secdb.alpinelinux.org) for data and new download process. Adds Alpine 3.12 support
- Fix - Some db tables not created correctly for certain upgrade paths
Additional minor bug fixes and enhancements
- Built on Anchore Engine v0.7.3: Anchore Enterprise is built on top of the OSS Anchore Engine, which has received new features and updates as well See Anchore Engine Release Notes for information on new features, bug fixes, and improvements in Anchore Engine
Upgrading from Anchore Enterprise 2.3.1
12.34.14 - Anchore Enterprise Release Notes - Version 2.3.1
Anchore Enterprise 2.3.1
Adds features as well as bug fixes and improvements. Highlighted features are: new parameters in the Reporting service’s GraphQL API for specifying time ranges using a relative window (e.g last 30 days), and a new CVE blacklisting rule in the policy language to trigger if specific CVEs are found.
Added
- Added - New reporting GraphQL parameters for relative time-windows on reports (e.g. last 30 days) as alternative to absolute date ranges for all queries with start/end parameters.
- Added - CVE Blacklisting via new policy rule.
- Added - New “licenses” field in API response for content (pkgs etc) that is an array type for easier parsing. Supplements existing “license” field that is a comma-delimited list in a single string.
- Added - Configuration option to disable Repository Add feature in UI
- Added - Support for custom links/content on UI login page
Improved
- Improved - Update base docker image to UBI 8.2 from 8.1.
- Improved - Faster rhel feed driver execution via parallelized data download
- Improved - Renamed “Registries” to “Registry Credentials” for more clarity in UI
- Improved - Ask user if they are sure they want to add a full repository of tags in UI to prevent accidental add of large numbers of tags in UI
- Improved - Alphabetical ordering of account data in context list in UI
- Improved - Ability to copy and paste full tag string in image analysis page in UI
- Improved - Enable vulnerabilities tab even if image has no vulnerabilities in UI
Bug Fixes
- Fix - Ability to whitelist VulnDB IDs in policy editor in UI
- Fix - PDF generation from vulnerabilities fix to not be truncated in UI
- Fix - Protect against LDAP service tab whitescreen based on service response in UI
- Fix - Fixes previewing saved query with invalid filter value shows nothing in UI
- Fix - Fix formatting error on compliance report in UI
- Fix - Filter entry persists between tabs in UI
- Fix - Fixes error viewing vulnerabilities for .NET Core images
- Fix - Fixes payload handling for MS Teams integration for notifications.
- Fix - Fixes rhel feeds driver to handle updates in upstream data properly
- Fix - package_type parameter now handles GHSA matches correctly as non-os types.
- Fix - Correctly finds java content in cases where file permissions prevent a read.
- Fix - Updates pyyaml dependency to 5.3.1.
- Fix - Updates several npm dependencies of the UI.
- Fix - Fixes API documentation in swagger spec for registry digest-style POST /image call.
- Fix - Fixes db upgrade failure during upgrades of deployments that still have the ’nvd’ data from the deprecated driver.
- Additional minor bug fixes and enhancements
- Built on Anchore Engine v0.7.2: Anchore Enterprise is built on top of the OSS Anchore Engine, which has received new features and updates as well See Anchore Engine Release Notes for information on new features, bug fixes, and improvements in Anchore Engine
Upgrading from Anchore Enterprise 2.3.0
12.34.15 - Anchore Enterprise Release Notes - Version 2.3.0
This release focuses on enabling the Microsoft ecosystem within Anchore to allow the same analysis flow and pipelines that you use for linux images to be applied to Windows images
as well for a consistent approach across ecosystems. It also includes several enhancements to the reporting and event management features of the UI.
New Features
Windows Container Image Support
- Analyze and get vulnerabilities for Windows OS-based containers. Anchore ingresses Microsoft vulnerability data via the MSRC
- No requirement to run Anchore itself on windows or other changes to the infrastructure needed to deliver this feature
NuGet/.NET Package Support (Tech Preview)
- Detection and inclusion in analysis output as well as vulnerability scans
GitHub Advisories vulnerability data
- See Configuring GitHub advisories for information on configuring the new feed including creating a GitHub token the driver can use for API calls to GitHub.
Scheduled Reports
- Create report templates for easy re-use of your most frequently used reports
- Schedule reports for generation and get notifications when they are ready, delivered via Slack, email, webhooks, and the other supported notification integrations Enterprise provides.
Event Management in the UI
- Improved sorting, filtering, and deletion of events in the UI directly
Improved RHEL/CentOS vulnerability matching using CVE-based feeds instead of RHSA-based data
- To help provide early detection of vulnerabilities before a fix is available or for issues where a fix is not issued, Anchore now uses RedHat’s CVE information instead of RHSA information
- This also provides improved whitelist consistency between RHEL/Centos and images based on other distros since CVEs are consistent
- For more details see RHSA-to-CVE Feed Change
Improved feed data and configuration management via APIs and CLI
- New APIs and CLI commands allow dynamic configuration of which feeds to sync and the ability to enable/disable and delete feed data without updating configuration files or restarting containers.
- See CLI Feeds configuration
Built on Anchore Engine v0.7.1: Anchore Enterprise is built on top of the OSS Anchore Engine, which has received new features and updates in the 0.7 series. See Anchore Engine Release Notes for information on new features, bug fixes, and improvements in Anchore Engine for versions v0.7.0 and v0.7.1.
Changes
Starting in 2.3.0 all services except the UI in an Enterprise deployment must:
Have the license.yaml available in /license.yaml inside the image. This is currently how the Notifiations, Reports, and RBAC services are run, and is now extended to all services.
Be started with the anchore-enterprise-manager command instead of anchore-manager. This ensures that enterprise extensions and functionality is properly loaded and available.
The docker-compose.yaml is no longer built into the image, but is available in the Docker Compose guide via a link to download. The image versions will be set to the release version matching the documentation version.
These changes are all configured by default in the new Docker Compose guide and are also enabled in the updated Helm chart for this release.
As with previous releases, we recommend upgrading with the newest deployment templates rather than just changing the image references in existing templates.
Bug Fixes and Enhancements
- Fixed user deletion and role removal failures
- Uses NVD severity for Debian vulnerabilties when ‘urgency’ field not set in the upstream data
- Updates alpine feed driver to ensure severies are set using newer nvd2 driver data instead of older nvd driver that may have had stale data due to old NVD XML feed
- Adds new ‘–no-auto-upgrade’ option to anchore-enterprise-manager to start services that will not upgrade the db automatically, enabling more control over the upgrade process
- Fixed Report CSV/JSON download missing records in UI
- Fixed scrollbar functionality issue in Policy Bundle editor in UI
- Fixed missing scrollbar for context switching in UI
- Fixed problem with sorting vulnerability columns in UI causing hangs and missing links
- Updates to dependencies
- Fixes in the Anchore Engine v0.7.0 release notes and v0.7.1 release notes
Upgrading from Anchore Enterprise 2.2 to 2.3.0
This is a significant upgrade. Backups should be taken, and downtime expected to complete the process.
NOTE The upgrade from 2.2.x to 2.3.0 will take several minutes at least for the database schema upgrade and involves a data migration can take longer to fully transition the RHSA data to CVE data. Part of this process is done during
the database upgrade, but part of the process can only complete after the upgraded feed service is able to run and sync the new RedHat CVE data. Because of this, there will be an interval where RHEL-based images
will have no vulnerabilities listed. That will automatically resolve itself once the feed syncs, and all affected images will have CVE-based vulnerability matches as expected, but depending on deployment environment and number
of images in the database, this may take a long time (hours potentially).
See RHSA-to-CVE Feed Change for more information on the change and upgrade implications.
To upgrade, use the new version of the Helm chart or docker compose provided with this release. The new chart and compose files contain all needed configuration changes. See Enterprise Upgrade to 2.3.0 for details on this specific upgrade process and how to update your own deployment templates if you are not using the official Helm chart.
12.34.15.1 - RHSA to CVE Feed Changes for RHEL-Based Images
Starting in Enterprise 2.3.0, Anchore Enterprise uses the RedHat Security API for CVEs for vulnerability matches for RHEL, CentOS, and UBI images. This
is a change from previous releases that utilized the API for Advisories (RHSAs) instead.
What Changed
In short, rhel:* replaces centos:* in the vulnerability feed for matches against RHEL-based distros such as CentOS and UBI.
Specifically, in Enterprise 2.2.x, all RHEL-based images (CentOS, RHEL, UBI) used data from the RedHat Security Advisories API. This data populated
the centos:* groups of the vulnerabilities feed, as seen when you run anchore-cli system feeds list or via the UI’s system page showing feed syncs.
Changed for Enterprise 2.3.0, RHEL-based images will match against a new feed source by default: data from the RedHat CVE API .
This new source populates the rhel:* groups of the vulnerabilities feed. The centos:* groups are no longer used for matches by default.
Reason for Change
The CVE source provides the ability to match vulnerabilities that have not yet been fixed upstream or via backports by Redhat as well as information on
vulnerabilities that will not be fixed. Both of these classes of vulnerability are not covered in the RHSA data because that data is generated by fix
releases. Overall, the change gives better matches earlier in the vulnerability triage and fix process so you can make better decisions about issues
that affect your images.
Upgrade
During upgrade Anchore will change the matching logic to transition images to use the new feed groups. This update involves:
Completed Automatically During DB Upgrade:
- Updating db schema to support new enable/disable flags for feeds and groups.
- Disabling the existing
centos:* feed groups from future syncs by setting the groups to disabled status. - Updating the internal mappings for distros to use the new groups.
When the system starts, all RHEL/CentOS/UBI images will still have RHSA matches, but the centos:* groups will be disabled so no new updates arrive for those groups.
After upgrade, when the system is running the new version:
- Feed service will sync the new data from the source
- Policy engine syncs from feed service to get new data
- Once the
rhel:* groups sync in the policy engine, all RHEL/CentOS/UBI pre-upgrade analyzed images will now show both CVE and RHSA matches. - Images analyzed after the upgrade will only match CVEs.
The output from a CLI feed listing should look roughly like (note the disabled centos groups and synced rhel groups:
anchore@c4799ee0b36e enterprise]$ anchore-cli system feeds list
Feed Group LastSync RecordCount
...
vulnerabilities centos:5(disabled) 2020-05-15T16:33:53.165136 1171
vulnerabilities centos:6(disabled) 2020-05-15T16:33:47.819467 1219
vulnerabilities centos:7(disabled) 2020-05-15T16:33:48.007930 1044
vulnerabilities centos:8(disabled) 2020-05-15T16:33:51.662811 255
...
vulnerabilities rhel:5 2020-05-15T22:23:56.300077 7237
vulnerabilities rhel:6 2020-05-15T22:23:55.343614 6833
vulnerabilities rhel:7 2020-05-15T22:23:56.040785 5893
vulnerabilities rhel:8 2020-05-15T22:23:56.561123 1472
...
You can optionally flush the old RHSA matches by using the anchore-cli to delete the centos group data, which will remove the both the feed data and vulnerability matches for the RHSAs, leaving only the CVE matches.
To accomplish this, via the cli run:
[anchore@c4799ee0b36e enterprise]$ anchore-cli system feeds delete vulnerabilities --group centos:5
Group LastSync RecordCount
centos:5(disabled) pending 0
[anchore@c4799ee0b36e enterprise]$ anchore-cli system feeds delete vulnerabilities --group centos:6
Group LastSync RecordCount
centos:6(disabled) pending 0
[anchore@c4799ee0b36e enterprise]$ anchore-cli system feeds delete vulnerabilities --group centos:7
Group LastSync RecordCount
centos:7(disabled) pending 0
[anchore@c4799ee0b36e enterprise]$ anchore-cli system feeds delete vulnerabilities --group centos:8
Group LastSync RecordCount
centos:8(disabled) pending 0
Listing will now show:
anchore@c4799ee0b36e enterprise]$ anchore-cli system feeds list
Feed Group LastSync RecordCount
...
vulnerabilities centos:5(disabled) - 0
vulnerabilities centos:6(disabled) - 0
vulnerabilities centos:7(disabled) - 0
vulnerabilities centos:8(disabled) - 0
...
vulnerabilities rhel:5 2020-05-15T23:45:04.969330 7237
vulnerabilities rhel:6 2020-05-15T23:45:03.552281 6833
vulnerabilities rhel:7 2020-05-15T23:45:04.678325 5894
vulnerabilities rhel:8 2020-05-15T23:45:05.232375 1473
...
At this point all RHSA matches for all images in the DB have also been removed, leaving only the CVE matches from the new RedHat CVE source.
Feed Service Driver Configuration
The new RHEL CVE feed is enabled in the feed service by default. No changes to configuration are necessary to enable it.
Policy Engine Configuration
No changes to the policy engine configuration are needed to enable the new data because it is delivered as new groups in the existing vulnerabilities feed,
which syncs all groups automatically.
Rolling Back
If you need to restore the old behavior see the rollback guide
12.34.15.2 - Reverting Back to use RHSA Data
NOTE: This section is only for very specific situations where you absolutely must revert the matching system to use the RHSA data. This should not be done lightly. The newer CVE-based data is more accurate, specific, and provides a more consistent experience with other distros.
If your processing of anchore output relies on RHSA keys as vulnerability matches, or you have large RHSA-based whitelists that cannot be converted to CVE-based,
then it is possible, though not recommended, to migrate your system back to using the RHSA-based feeds (centos:* groups).
Here is the process. It requires the Anchore CLI with access to the API as well as direct access to the internal policy engine API endpoint. That may require a docker exec or kubectl exec call
to achieve and will be deployment/environment specific.
Revert the distro mapping records that map centos, fedora, and rhel to use the RHEL vuln data.
- With API access to the policy engine directly (output omitted for brevity), remove the existing distro mappings to RHEL data. These are the used by Anchore:
curl -X DELETE -u admin:foobar http://localhost:8087/v1/distro_mappings?from_distro=centos
curl -X DELETE -u admin:foobar http://localhost:8087/v1/distro_mappings?from_distro=rhel
curl -X DELETE -u admin:foobar http://localhost:8087/v1/distro_mappings?from_distro=fedora
- Continuing with API access to the policy engine directly, replace the removed mappings with new mappings to the centos feeds:
curl -H "Content-Type: application/json" -X POST -u admin:foobar -d'{"from_distro":"centos", "to_distro":"centos", "flavor":"RHEL"}' http://localhost:8087/v1/distro_mappings
curl -H "Content-Type: application/json" -X POST -u admin:foobar -d'{"from_distro":"fedora", "to_distro":"centos", "flavor":"RHEL"}' http://localhost:8087/v1/distro_mappings
curl -H "Content-Type: application/json" -X POST -u admin:foobar -d'{"from_distro":"rhel", "to_distro":"centos", "flavor":"RHEL"}' http://localhost:8087/v1/distro_mappings
Note: if something went wrong and you want to undo the progress you’ve made, just make the same set of calls as the last two steps in the same order but with the to_distro values set to ‘rhel’.
- Now, ensure you are back where you have access to the main Anchore API and the Anchore CLI installed. Disable the existing rhel feed groups
anchore-cli system feeds config vulnerabilities --disable --group rhel:5
anchore-cli system feeds config vulnerabilities --disable --group rhel:6
anchore-cli system feeds config vulnerabilities --disable --group rhel:7
anchore-cli system feeds config vulnerabilities --disable --group rhel:8
anchore-cli system feeds delete vulnerabilities --group rhel:8
anchore-cli system feeds delete vulnerabilities --group rhel:7
anchore-cli system feeds delete vulnerabilities --group rhel:6
anchore-cli system feeds delete vulnerabilities --group rhel:5
- Enable the centos feed groups that have the RHSA vulnerability data
anchore-cli system feeds config vulnerabilities --enable --group centos:8
anchore-cli system feeds config vulnerabilities --enable --group centos:7
anchore-cli system feeds config vulnerabilities --enable --group centos:6
anchore-cli system feeds config vulnerabilities --enable --group centos:5
NOTE: if you already have centos data in your feeds (verify with anchore-cli system feeds list) then you’ll need to delete the centos data groups as well
to ensure a clean re-syncin the next steps. This is accomplished with:
anchore-cli system feeds delete vulnerabilities --group centos:5
anchore-cli system feeds delete vulnerabilities --group centos:6
anchore-cli system feeds delete vulnerabilities --group centos:7
anchore-cli system feeds delete vulnerabilities --group centos:8
- Now do a sync to re-match any images using rhel/centos to the RHSA data
[root@d64b49fe951c ~]# anchore-cli system feeds sync
WARNING: This operation should not normally need to be performed except when the anchore-engine operator is certain that it is required - the operation will take a long time (hours) to complete, and there may be an impact on anchore-engine performance during the re-sync/flush.
Really perform a manual feed data sync/flush? (y/N)y
Feed Group Status Records Updated Sync Duration
github github:composer success 0 0.28s
github github:gem success 0 0.34s
github github:java success 0 0.33s
github github:npm success 0 0.23s
github github:nuget success 0 0.23s
github github:python success 0 0.29s
nvdv2 nvdv2:cves success 0 60.59s
vulnerabilities alpine:3.10 success 0 0.27s
vulnerabilities alpine:3.11 success 0 0.31s
vulnerabilities alpine:3.3 success 0 0.31s
vulnerabilities alpine:3.4 success 0 0.25s
vulnerabilities alpine:3.5 success 0 0.26s
vulnerabilities alpine:3.6 success 0 0.25s
vulnerabilities alpine:3.7 success 0 0.26s
vulnerabilities alpine:3.8 success 0 0.35s
vulnerabilities alpine:3.9 success 0 0.28s
vulnerabilities amzn:2 success 0 0.26s
vulnerabilities centos:7 success 1003 34.91s
vulnerabilities centos:8 success 199 9.15s
vulnerabilities debian:10 success 2 0.50s
vulnerabilities debian:11 success 4 60.53s
vulnerabilities debian:7 success 0 0.30s
vulnerabilities debian:8 success 3 0.34s
vulnerabilities debian:9 success 2 0.38s
vulnerabilities debian:unstable success 4 0.39s
vulnerabilities ol:5 success 0 0.31s
vulnerabilities ol:6 success 0 0.29s
vulnerabilities ol:7 success 0 0.41s
vulnerabilities ol:8 success 0 0.28s
vulnerabilities rhel:5 success 0 0.28s
vulnerabilities rhel:6 success 0 0.43s
vulnerabilities ubuntu:12.04 success 0 0.45s
vulnerabilities ubuntu:12.10 success 0 0.25s
vulnerabilities ubuntu:13.04 success 0 0.24s
vulnerabilities ubuntu:14.04 success 0 0.37s
vulnerabilities ubuntu:14.10 success 0 0.25s
vulnerabilities ubuntu:15.04 success 0 0.42s
vulnerabilities ubuntu:15.10 success 0 0.23s
vulnerabilities ubuntu:16.04 success 0 0.35s
vulnerabilities ubuntu:16.10 success 0 0.33s
vulnerabilities ubuntu:17.04 success 0 0.33s
vulnerabilities ubuntu:17.10 success 0 0.31s
vulnerabilities ubuntu:18.04 success 0 0.42s
vulnerabilities ubuntu:18.10 success 0 0.37s
vulnerabilities ubuntu:19.04 success 0 0.45s
vulnerabilities ubuntu:19.10 success 0 0.32s
[root@d64b49fe951c ~]# anchore-cli image vuln centos os
Vulnerability ID Package Severity Fix CVE Refs Vulnerability URL Type Feed Group Package Path
RHSA-2020:0271 libarchive-3.3.2-7.el8 High 0:3.3.2-8.el8_1 CVE-2019-18408 https://access.redhat.com/errata/RHSA-2020:0271 rpm centos:8 pkgdb
RHSA-2020:0273 sqlite-libs-3.26.0-3.el8 High 0:3.26.0-4.el8_1 CVE-2019-13734 https://access.redhat.com/errata/RHSA-2020:0273 rpm centos:8 pkgdb
RHSA-2020:0575 systemd-239-18.el8_1.1 High 0:239-18.el8_1.4 https://access.redhat.com/errata/RHSA-2020:0575 rpm centos:8 pkgdb
RHSA-2020:0575 systemd-libs-239-18.el8_1.1 High 0:239-18.el8_1.4 https://access.redhat.com/errata/RHSA-2020:0575 rpm centos:8 pkgdb
RHSA-2020:0575 systemd-pam-239-18.el8_1.1 High 0:239-18.el8_1.4 https://access.redhat.com/errata/RHSA-2020:0575 rpm centos:8 pkgdb
RHSA-2020:0575 systemd-udev-239-18.el8_1.1 High 0:239-18.el8_1.4 https://access.redhat.com/errata/RHSA-2020:0575 rpm centos:8 pkgdb
Note in the last command output that the OS vulnerabilities are again showing ‘RHSA’ matches. The restoration to RHSA-based vuln data is complete.
12.34.16 - Anchore Enterprise Release Notes - Version 2.2.0
Anchore Enterprise 2.2.0
Building upon the Anchore Enterprise 2.0 release, Anchore Enterprise 2.2 adds major new features and architectural updates that extend integration / deployment options, security insights, and the evaluation power available to all users.
New Features
Integration with Github, Jira, Slack and Microsoft Teams: Anchore Enterprise Notifications is a new capability offered in version 2.2, bringing the ability to flexibly configure your Enterprise deployment to send proactive system, user, and workload level notification events to a variety of third party systems.
System Dashboard and Feed Sync Status: New system dashboard in the Enterprise GUI which makes it easier to review the status of your Anchore Enterprise deployment, troubleshoot issues and understand the roles of the various services.
Harbor Support: Anchore Enterprise 2.2 is fully supported by the latest release of the CNCF’s Harbor project (v1.10++) – an open source container and artifact registry.
Built on Anchore Engine v0.6: Anchore Enterprise is built on top of the OSS Anchore Engine, which has received new features and updates as well See Anchore Engine Release Notes for information on new features, bug fixes, and improvements in Anchore Engine
Upgrading from Anchore Enterprise 2.1
12.34.17 - Anchore Enterprise Release Notes - Version 2.1.0
Anchore Enterprise 2.1.0
Building upon the Anchore Enterprise 2.0 release, Anchore Enterprise 2.1 adds major new features and architectural updates that extend integration / deployment options, security insights, and the evaluation power available to all users.
New Features
GUI report enhancements: Leveraging Anchore Enterprise’s reporting service, there is a new set of configurable queries available within the Enterprise GUI Reports control. Users can now generate filtered reports (tabular HTML, JSON, or CSV) that contain image, security, and policy evaluation status for collections of images.
Single-Sign-On (SSO): Integration support for common SSO providers such as Okta, Keycloak, and other Enterprise IDP systems, in order to simplify, secure, and better control aspects of user management within Anchore Enterprise
Enhanced authentication methods: SAML / token-based authentication for API and other client integrations
Enhanced vulnerability data: Inclusion of third party vulnerability data feeds from Risk Based Security (VulnDB) for increased fidelity, accuracy, and live-ness of image vulnerability scanning results, available for all existing and new images analyzed by Anchore Enterprise
Policy Hub GUI: View, list and import pre-made security, compliance and best-practices policies hosted on the open and publicly available Anchore Policy Hub
Built on Anchore Engine v0.5: Anchore Enterprise is built on top of the OSS Anchore Engine, which has received new features and updates as well See Anchore Engine Release Notes for information on new features, bug fixes, and improvements in Anchore Engine
Upgrading from Anchore Enterprise 2.0
12.34.18 - Anchore Enterprise Release Notes - Version 2.0.0
Anchore Enterprise 2.0.0
Building on top of the existing Anchore Enterprise 1,2 release, Anchore Enterprise version 2.0 adds major new features and architectural updates. The overarching purpose of the new features and design of the 2.0 version of Anchore Enterprise is to directly address the challenges of continued growth and scale by extending the enterprise integration capabilities of Anchore, establishing an architecture that grows alongside our users’ demanding throughput and scale requirements, and offering even more insight into users’ container image environments through rich new APIs and reporting capabilities, all in addition to the rich set of enforcement capabilities included with Anchore Enterprise’s flexible policy engine.
New Features
GUI Dashboard: new configurable landing page for users of the Enterprise UI, presenting complex information summaries and metrics time series for deep insight into the collective status of your container image environment.
Enterprise Reporting Service: entirely new service that runs alongside existing Anchore Enterprise services that exposes the full corpus of container image information available to Anchore Engine via a flexible GraphQL interface
LDAP Integration: Anchore Enterprise can now be configured to integrate with your organization’s LDAP/AD identity management system, with flexible mappings of LDAP information to Anchore Enterprise’s RBAC account and user subsystem.
Red Hat Universal Base Image: all Anchore Enterprise container images have been re-platformed atop the recently announced Red Hat Universal Base Image, bringing more enterprise-grade software and support options to users deploying Anchore Enterprise in Red Hat environments.
Anchore Engine v0.4: Anchore Enterprise is built on top of the OSS Anchore Engine, which has received many new features and updates as well. See Anchore Engine Release Notes for information on new features, bug fixes, and improvements in Anchore Engine
Upgrading from Anchore Enterprise 1.2
If using the trial docker compose method, or the production Helm chart method of deploying Anchore Enterprise, upgrading from 1.2 to 2.0 follows the normal upgrade procedure for Anchore Enterprise. However, if you are deploying Anchore Enterprise manually or using another orchestration environment, there are new dependencies and considerations to take into account for deploying Enterprise 2.0. Please visit the upgrade section for more information.
13 - AnchoreCTL Release Notes
Version Compatibility
The version scheme for AnchoreCTL changed as part of the Enterprise 5.0 release. AnchoreCTL is now version
aligned with Enterprise.
Note For Enterprise 4.9.0 and beyond: the major and minor versions should be the same, but the patch versions may differ. For example, Enterprise X.Y.* is compatible with AnchoreCTL X.Y.*
Note For Enterprise versions earlier than 4.9.0: see the Enterprise version release notes for the version you have deployed
Release Notes
13.1 - AnchoreCTL Release Notes - Version 5.7.0
Note: AnchoreCTL v5.7.x versions are compatible with Enterprise v5.7.x deployments.
AnchoreCTL v5.7.0
A feature and bug fix release which includes:
- Cataloger scope specified from the configuration file is now respected during the image content command.
- Improvements to golang release version extraction from go binary ldflags.
- Various supporting libraries have been updated in order to improve security.
13.2 - AnchoreCTL Release Notes - Version 5.6.0
Note: AnchoreCTL v5.6.x versions are compatible with Enterprise v5.6.x deployments.
AnchoreCTL v5.6.2
A maintenance release which includes:
- Updates to the
Syft version of v1.5.0
AnchoreCTL v5.6.1
A bug fix release which includes:
- Fails the creation of a user within the
admin account when an RBAC Role is specified. If the user is not being created in the admin account, the default RBAC Role is read-write unless otherwise specified.
AnchoreCTL v5.6.0
A feature and bug fix release which includes:
- The addition of a
system smoke-tests run command. This can be used as a tool to aid the assessment of the health of your Anchore
Enterprise deployment by executing a few basic operations.- The command requires the caller to have
admin credentials. - The command does not have the ability to assess the health of the feed service, the report service, or the notification service.
- The command
feed list now includes the Last Updated column which is the last successful update time of the specific feed groups. - Updates the
system artifact-lifecycle-policy commands to expose a new policy condition which allows for the preservation of base images. - Improved an error message during creation of a user within the
admin account when an RBAC Role is specified. - Various supporting libraries have been updated in order to improve security.
13.3 - AnchoreCTL Release Notes - Version 5.5.0
The latest version of AnchoreCTL is 5.5.0.
Note: AnchoreCTL v5.5.x versions are compatible with Anchore Enterprise v5.5.x deployments.
AnchoreCTL v5.5.0 is a maintenance release
- Various supporting libraries have been updated in order to improve security
13.4 - AnchoreCTL Release Notes - Version 5.4.0
The latest version of AnchoreCTL is 5.4.0.
Note: AnchoreCTL v5.4.x versions are compatible with Anchore Enterprise v5.4.x deployments.
AnchoreCTL v5.4.0 is a feature and bug fix release which includes:
RBAC Role Support
- Addition of the following commands that are accessible by users with admin, account-user-admin, or full-control.
anchorectl system role list - returns the list of supported RBAC Roles.anchorectl system role get <rbac role name> - returns description and list of permissions of the specified role.
User Group Support
- Commands for the management of User Groups
anchorectl usergroup add <usergroup name or uuid> [--description <string>]anchorectl usergroup delete <usergroup name or uuid>anchorectl usergroup get <usergroup name or uuid>anchorectl usergroup list [--contains-user <username>] [--contains-account <account name>] [--user-group-name <usergroup name>]anchorectl usergroup update <usergroup name> --description <string>anchorectl usergroup role add <usergroup name> <account name> --role <rbac role name>anchorectl usergroup role delete <usergroup name> <account name> --role <rbac role name>anchorectl usergroup role list <usergroup name>anchorectl usergroup user add <usergroup name> --user <username>anchorectl usergroup user delete <usergroup name> --user <username>anchorectl usergroup user list <usergroup name>
anchorectl system wait command now defaults to waiting only on the Enterprise API Service. The –services flag can be used to specify other services that should be waited on as well.
Return the image content even when the parent digest is being used for the request. This was seen in a error in anchorectl image content.
Various supporting libraries have been updated in order to improve security
13.5 - AnchoreCTL Release Notes - Version 5.3.0
The latest version of AnchoreCTL is 5.3.0.
Note: AnchoreCTL v5.3.x versions are compatible with Anchore Enterprise v5.3.x deployments.
AnchoreCTL v5.3.0 is a feature and bug fix release which includes:
- Enable the dotnet-deps-cataloger for image analysis
- Various supporting libraries have been updated in order to improve security
13.6 - AnchoreCTL Release Notes - Version 5.2.0
The latest version of AnchoreCTL is 5.2.0.
Note: AnchoreCTL v5.2.x versions are compatible with Anchore Enterprise v5.2.x deployments.
AnchoreCTL v5.2.0 is a feature and bug fix release which includes:
- Adds the ability to delete runtime inventory with
inventory delete. - Adds the ability for admins to edit the email field of accounts with
account update. - Addresses an exception in the
system artifact-lifecycle-policy update command when the policy uuid was not provided. - Adds a new field,
password_last_updated, to the response of user list and user get commands. image content command correctly displays the licenses property in the response.image vuln command provides an optional flag, --include-description, that is available with the json output format. Using this flag will include the description for each vulnerability listed.
13.7 - AnchoreCTL Release Notes - Version 5.1.0
The latest version of AnchoreCTL is 5.1.0.
AnchoreCTL 5.1.0 is a feature and bug fix release which includes:
- Commands to manage artifact lifecycle policies
- Removes errant ‘status’ string at beginning of
anchorectl image check <img> --detail output which caused invalid json. - Updates Syft version to v0.97.1 aligned with Enterprise 5.1.0
AnchoreCTL 5.1.x versions are compatible with Anchore Enterprise 5.1.X deployments.
13.8 - AnchoreCTL Release Notes - Version 5.0.1
The latest version of AnchoreCTL is 5.0.1.
AnchoreCTL 5.0.1 is a bug fix release which includes:
- A fix for a stack overflow that can be seen when executing the command
anchorectl image check <image> --detail. This can occur when the image has an allowlisted policy finding.
AnchoreCTL 5.0.x versions are compatible with Anchore Enterprise 5.0.X deployments.
13.9 - AnchoreCTL Release Notes - Version 5.0.0
The latest version of AnchoreCTL is 5.0.0.
NOTE: This version of AnchoreCTL only supports Anchore Enterprise 5.0.x
AnchoreCTL 5.0.0 is a feature and bug fix release which includes:
- Dependency updates, and general client updates to support Anchore Enterprise v5.0.0
- Change to version scheme, switching to keep version of AnchoreCTL inline with the version of Anchore Enterprise that the client supports (by semver compatibility)
- Add sub-command for policy update
- Add single java version column to the table output for java content
- Remove rbac-url requirement from configuration in support of Anchore Enterprise v5.0.0’s single API feature
- Remove the fix_observed_at date from table output for image vulnerability operation
- Update the inventory watch commands
- Update source policy check output to be more inline with image policy check output
- Fix to some cases where the command could hang or terminal could get scrambled
Update to Syft 0.90.0, inline with the version of Syft used in Anchore Enterprise 5.0.0
AnchoreCTL 5.0.x versions are compatible with Anchore Enterprise 5.0.X deployments.
13.10 - AnchoreCTL Release Notes - Version 4.9.0
AnchoreCTL 4.9.0 is a V2 API-compatibility release that is otherwise identical to 1.8.0.
Warning
AnchoreCTL 4.9.0 is compatible Enterprise 4.9.x ONLY and requires the V2 API.To minimize impact to automated installations, the V2 API compatible AnchoreCTL will not be automatically upgraded using
the install script. See Installation for more information.
AnchoreCTL v4.9.0 uses Syft 0.84.1, the same as AnchoreCTL v1.8.0
AnchoreCTL 4.9.x versions are compatible with Anchore Enterprise 4.9.X deployments.
13.11 - AnchoreCTL Release Notes - Version 1.8.0
The latest version of AnchoreCTL is 1.8.0.
AnchoreCTL 1.8.0 is a feature and bug fix release which includes:
- Adds the ability to create explicit SAML users with
user add --idp_name - Adds the ability to list, activate and deactivate runtime inventory watchers with
inventory watch - Extends
image content command to support the type content_search - Extends
image content command to support the type retrieved_files - Extends
image content command to support the type secret_search - Adds the ability to specify the image platform to retrieve and analyze when using the
--from registry source in the image add command so that local analysis can be done on images of a different architecture than the local host where the analysis occurs. - Add an API version check to prevent accidental use of 1.8.0 against an Anchore V2 API endpoint. See Configuration for more information.
Update to using Syft 0.84.1
13.12 - AnchoreCTL Release Notes - Version 1.7.0
The latest version of AnchoreCTL is 1.7.0.
AnchoreCTL 1.7.0 is a feature and bug fix release which includes:
- Adds more detail from the Anchore Enterprise service for error responses, exposing the server side error detail to the user
- Adds new formats (spdx, cycloneDX) to the SBOM output options when using the content get options during
image add operations - Add support for new
ancestor list command - Add new
recommendation field to policy evaluation table output for the image check operation - Changed the policy evaluation level of detail from basic to full detail when fetching policy evaluation during
image add operation - Fixed issue where the
sbom content was not being fetched when the all type was given to the get option, in the image add operation
Update to using Syft 0.80.0
13.13 - AnchoreCTL Release Notes - Version 1.6.0
The latest version of AnchoreCTL is 1.6.0.
AnchoreCTL 1.6.0 is a feature and bug fix release which includes:
- Adds ability to generate container image SBOMs using a new ‘–from’ option to
anchorectl image add. This removes the need to use Syft with anchorectl. AnchoreCTL can now perform all the analysis itself and upload it to your Enterprise deployment. See Using CLI for Images for mor information. - Adds extra analysis locally in addition to the SBOM generation. Filesystem metadata, secret scans, content scans, and file retrieval are now supported as they are when doing analysis of an image inside and Anchore Enterprise deployment
- The additional analysis features of secret scans, filesystem metdata, and content searches are only compatible with Anchore Enterprise 4.7+
- Fixes the –help output for the ‘completion’ commands to provide correct autocompletion setup guidance
- Fixes duplication of vulns shown when no type is specified in
anchorectl image vuln <digest> usage
Update to using Syft 0.79.0
13.14 - AnchoreCTL Release Notes - Version 1.5.0
The latest version of AnchoreCTL is 1.5.0.
AnchoreCTL 1.5.0 is a bug fix release which includes:
- Updates a help string for subscription update command to include the runtime_inventory subscription type
- Fixes
image add <tag> --wait failure with image not found if the same tag is added with another image digest by another client while waiting for the original image to analyze
Update to using Syft 0.75.0
13.15 - AnchoreCTL Release Notes - Version 1.4.0
The latest version of AnchoreCTL is 1.4.0.
AnchoreCTL 1.4.0 is a feature release which includes:
- Adds full output format option support to ‘source sbom’ command similar to ‘image sbom’ operation, including spdx and cyclonedx formats
- Adds new command to get a list of vulnerabilities in a specific application version across all artifacts (images and sources)
- Adds csv output format for source-repo vulnerability and policy evaluation commands
- Fixes adding of incorrect image to application version when using a tag reference in cases where more than one image with that tag is present in the system
Update to using Syft 0.72.1
13.16 - AnchoreCTL Release Notes - Version 1.3.0
The latest version of AnchoreCTL is 1.3.0.
AnchoreCTL 1.3.0 is a maintenance release which includes:
- Added SPDX, CycloneDX and other format options alongside the default JSON format, to the ‘image sbom’ fetch operation
- Added CSV format option to ‘image vulnerabilities’ and ‘image check’ operations
- Enable ability add container images to Anchore Enterprise by image digest
- Add a new ‘CVEs’ column to default table output for ‘image vulnerabilities’ operation for non-CVE findings that refer to one or more CVEs
- Update ‘image add’ from SBOM to respect the –no-auto-subscribe flag
- Fixes segfault when adding application association to an image that is in analyzing state
Update to using Syft 0.62.3
13.17 - AnchoreCTL Release Notes - Version 1.2.0
The latest version of AnchoreCTL is 1.2.0.
AnchoreCTL 1.2.0 is a maintenance release which includes:
- Support for ‘recommendation’ fields from policy evaluations when used with Enterprise 4.1.1
- Fixed to only show a vulnerability once in
anchorectl image vuln when not using the -t/--type option - Help and command typo fixes
Updated to using Syft v0.58.0
13.18 - AnchoreCTL Release Notes - Version 1.1.0
The latest version of AnchoreCTL is 1.1.0.
AnchoreCTL 1.1.0 is a maintenance release which includes:
inventory list command to show all images in the inventory- compatability with Syft v0.56.0
Updated to using Syft v0.56.0
13.19 - AnchoreCTL Release Notes - Version 1.0.0
The latest version of AnchoreCTL is 1.0.0.
AnchoreCTL 1.0.0 represents the first stable release of the tool as the primary CLI for Anchore Enterprise users. Configuration, command structure and capabilities have all been renovated to support the usage of the client by administrators, users, and within scripting environments for automated integration
Added new administrative command groupings:
- Account commands (add, get, list, delete, enable, disable)
- User commands (add, get, list, delete, set-password)
- Analysis archive rule commands (add, get, list, delete)
- Analysis archive image commands (add, get list, delete, restore)
- Event commands (get, list, delete)
- Feed commands (list, sync)
- Policy commands (add, get, list, delete, activate)
- Registry commands (add, get list, delete, update)
- Repo commands (add, get, list, delete, watch, unwatch)
- Subscription commands (get, list, delete, activate, deactivate)
- System commands (status, wait, delete)
The image add and source add commands have been revisited to additionally provide a simple way to extract common data from Anchore Enterprise:
anchorectl image add <my-image> --get vulnerabilities,content : get a summary of content and vulnerabilities to stdoutanchorectl image add <my-image> --get all=/path/to/store/results: get policy evaluation, vuln, and content results, and store all raw JSON files to /path/to/store/resultsanchorectl image add <my-image> --get policy-evaluation: will get the policy evaluation results and set the return code to 1 if the policy evaluation is not passing (allowing use as a quality gate)
Added the ability to associate images and sources with an application name and version when adding into the system (e.g. anchorectl image add <my image> --application <name>@<version>).
The UI for all commands has been enhanced to convey intermediate progress and be transparent about actions taken to any result. For instance, using ANCHORECTL_DEBUG_API=true and increasing log levels to “debug” or “trace” (-vv or -vvv) will show individual API events and responses
The anchorectl.yaml application configuration has changed, use anchorectl --help to see the latest configuration schema
Added flag to switch output format for most commands to one of text, json, json-raw, or ID
Updated to using syft v0.52.0
13.20 - AnchoreCTL Release Notes - Version 0.2.0
The latest version of AnchoreCTL is 0.2.0.
AnchoreCTL is dependent on Syft v0.39.3 as a library.
The current features that are supported are as follows:
- Ability to add sboms via anchorectl using stdin to provide an existing SBOM without re-creating it.
13.21 - AnchoreCTL Release Notes - Version 0.1.4
The latest version of AnchoreCTL is 0.1.4.
AnchoreCTL is dependent on Syft v0.39.3 as a library.
The current features that are supported are as follows:
- Source Repository Management: Generate an SBOM and store the SBOM in Anchore’s database. Get information about the source repository, investigate vulnerability packages by requesting vulnerabilities for a single analyzed source repository, or get any policy evaluations.
- Download full image SBOMs for images analyzed with Enterprise 4.0.0.
- Compliance Reports: View and operate on runtime compliance reports, such as STIGs, created by the
rem tool. - Corrections Management: View and modify corrections information to help reduce false positives in your vulnerability results.
- Image Management: View, list, import local analysis, and request image analysis by the system.
- Runtime Inventory Management: Add, update, and view cluster configurations for Anchore to scan, as well as for the inventory reports themselves.
- System Operations: View and manage system information for your Enterprise deployment.
14 - Data Privacy
Anchore takes data privacy seriously.
Anchore Enterprise is designed to run locally. It does not share data with Anchore Inc., or any third parties.
Anchore Enterprise can be configured to download vulnerability and other feed / package data from one of two places based on your policy engine configuration. These two places are:
- Publicly accessible URL and vulnerability dataset maintained by Grype https://toolbox-data.anchore.io/grype/databases/listing.json.
- Third party vulnerability sources, documented here: Anchore Feeds Overview with each source being configurable.
No data from your deployment is uploaded to Anchore or third party.