1 - Container Registries via the API
Using the API or CLI, Anchore Enterprise can be instructed to download an image from a public or private container registry.
Anchore Enterprise will attempt to download images from any registry without requiring further configuration. However if your registry requires authentication then the registry and corresponding credentials will need to be defined. Anchore Enterprise can analyze images from any Docker V2 compatible registry.

Jump to the registry configuring guide for your registry:
1.1 - Amazon Elastic Container Registry
Amazon AWS typically uses keys instead of traditional usernames & passwords. These keys consist of an access key ID and a secret access key. While it is possible to use the aws ecr get-login command to create an access token, this will expire after 12 hours so it is not appropriate for use with Anchore Enterprise, otherwise a user would need to update their registry credentials regularly. So when adding an Amazon ECR registry to Anchore Enterprise you should pass the aws_access_key_id and aws_secret_access_key.
# ANCHORECTL_REGISTRY_PASSWORD=<MY_AWS_SECRET_ACCESS_KEY> anchorectl registry add 1234567890.dkr.ecr.us-east-1.amazonaws.com --username <MY_AWS_ACCESS_KEY_ID> --type awsecr
The registry-type parameter instructs Anchore Enterprise to handle these credentials as AWS credentials rather than traditional usernames and passwords. Currently Anchore Enterprise supports two types of registry authentication standard username and password for most Docker V2 registries and Amazon ECR. In this example we specified the registry type on the command line however if this parameter is omitted then AnchoreCTL will attempt to guess the registry type from the URL which uses a standard format.
Anchore Enterprise will use the AWS access key and secret access keys to generate authentication tokens to access the Amazon ECR registry, Anchore Enterprise will manage regeneration of these tokens which typically expire after 12 hours.
In addition to supporting AWS access key credentials Anchore also supports the use of IAM roles for authenticating with Amazon ECR if Anchore Enterprise is run on an EC2 instance.
In this case you can configure Anchore Enterprise to inherit the IAM role from the EC2 instance hosting the system.
When launching the EC2 instance that will run Anchore Enterprise you need to specify a role that includes the AmazonEC2ContainerRegistryReadOnly policy.
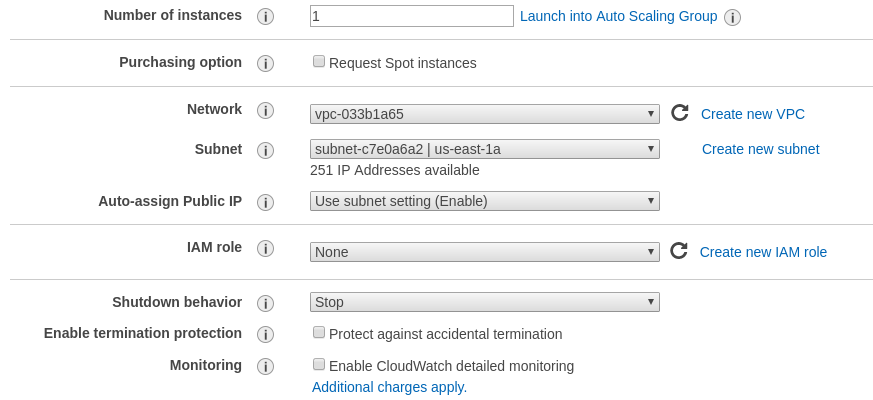
While this is best performed using a CloudFormation template, you can manually configure from the launch instance wizard.
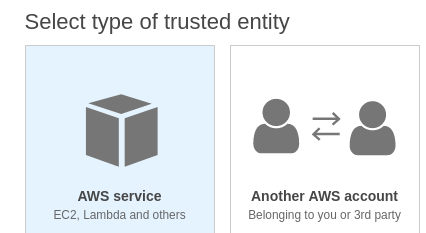
Step 1: Select Create new IAM role.
Step 2: Under type of trusted entity select EC2.
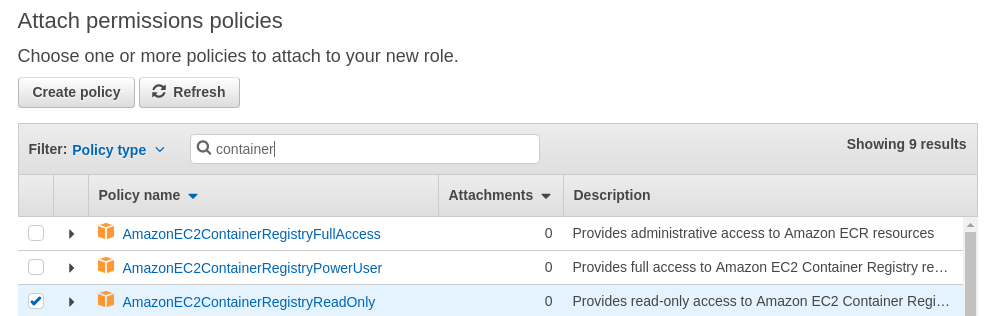
Ensure that the AmazonEC2ContainerRegistryReadOnly policy is selected.
Step 3: Attach Permissions to the Role.
Step 4: Name the role.
Give a name to the role and add this role to the Instance you are launching.
On the running EC2 instance you can manually verify that the instance has inherited the correct role by running the following command:
# curl http://169.254.169.254/latest/meta-data/iam/info
{
 "Code" : "Success",
 "LastUpdated" : "2018-01-1218:45:12Z",
 "InstanceProfileArn" : "arn:aws:iam::123456789012:instance-profile/ECR-ReadOnly",
 "InstanceProfileId" : "ABCDEFGHIJKLMNOP”
}
Step 5: Enable IAM Authentication in Anchore Enterprise.
By default the support for inheriting the IAM role is disabled.
To enable IAM based authentication add the following entry to the top of Anchore Enterprise config.yaml file:
allow_awsecr_iam_auto: True
Step 6: Add the Registry using the AWSAUTO user.
When IAM support is enabled instead of passing the access key and secret access key use “awsauto” for both username and password. This will instruct Anchore Enterprise to inherit the role from the underlying EC2 instance.
# ANCHORECTL_REGISTRY_PASSWORD=awsauto anchorectl registry add 1234567890.dkr.ecr.us-east-1.amazonaws.com --username awsauto --type awsecr
1.2 - Azure Container Registry
To use an Azure Registry, you can configure Anchore to use either the admin credential(s) or a service principal. Refer to Azure documentation for differences and how to setup each. When you’ve chosen a credential type, use the following to determine which registry command options correspond to each value for your credential type
Admin Account
- Registry: The login server (Ex. myregistry1.azurecr.io)
- Username: The username in the ‘az acr credential show –name ’ output
- Password: The password or password2 value from the ‘az acr credential show’ command result
Service Principal
- Registry: The login server (Ex. myregistry1.azurecr.io)
- Username: The service principal app id
- Password: The service principal password
Note: You can follow Microsoft Documentation for creating a Service Principal.
To add an azure registry credential, invoke anchorectl as follows:
ANCHORECTL_REGISTRY_PASSWORD=<password> anchorectl registry add <registry> --username <username> <Password>
Once a registry has been added, any image that is added (e.g. anchorectl image add <Registry>/some/repo:sometag) will use the provided credential to download/inspect and analyze the image.
1.3 - Google Container Registry
When working with Google Container Registry it is recommended that you use JSON keys rather than the short lived access tokens.
JSON key files are long-lived and are tightly scoped to individual projects and resources. You can read more about JSON credentials in Google’s documentation at the following URL: Google Container Registry advanced authentication
Once a JSON key file has been created with permissions to read from the container registry then the registry should be added with the username _json_key and the password should be the contents of the key file.
In the following example a file named key.json in the current directory contains the JSON key with readonly access to the my-repo repository within the my-project Google Cloud project.
# ANCHORECTL_REGISTRY_PASSWORD="$(cat key.json)" anchorectl registry add us.gcr.io --username _json_key
1.4 - Harbor Container Registry
1.5 - Managing Registries
Anchore Enterprise will attempt to download images from any registry without requiring further configuration. However if your registry requires authentication then the registry and corresponding credentials will need to be defined.
Listing Registries
Running the following command lists the defined registries.
# anchorectl registry list
 ✔ Fetched registries
┌───────────────────┬───────────────┬───────────────┬─────────────────┬──────────────────────┬─────────────┬───────────────────┐
│ REGISTRY NAME     │ REGISTRY TYPE │ REGISTRY USER │ REGISTRY VERIFY │ CREATED AT           │ LAST UPATED │ REGISTRY          │
├───────────────────┼───────────────┼───────────────┼─────────────────┼──────────────────────┼─────────────┼───────────────────┤
│ docker.io         │ docker_v2     │ anchore       │ true            │ 2022-08-24T21:37:08Z │             │ docker.io         │
│ quay.io           │ docker_v2     │ anchore       │ true            │ 2022-08-25T20:55:33Z │             │ quay.io           │
│ 192.168.1.89:5000 │ docker_v2     │ johndoe       │ true            │ 2022-08-25T20:56:01Z │             │ 192.168.1.89:5000 │
└───────────────────┴───────────────┴───────────────┴─────────────────┴──────────────────────┴─────────────┴───────────────────┘
Here we can see that 3 registries have been defined. If no registry was defined Anchore Enterprise would attempt to pull images without authentication but a registry is defined then all pulls for images from that registry will use the specified username and password.
Adding a Registry
Registries can be added using the following syntax.
# ANCHORECTL_REGISTRY_PASSWORD=<password> anchorectl registry add <registry> --username <username>
The REGISTRY parameter should include the fully qualified hostname and port number of the registry. For example: registry.anchore.com:5000
Anchore Enterprise will only pull images from a TLS/SSL enabled registry. If the registry is protected with a self signed certificate or a certificated
signed by an unknown certificate authority then the --secure-conection=<true|false> parameter can be passed which instructs Anchore Enterprise not to validate the certificate.
Most Docker V2 compatible registries require username and password for authentication. Amazon ECR, Google GCR and Microsoft Azure include support for their own native credentialing. See Working with AWS ECR Registry Credentials, Working with Google GCR Registry Credentials and Working with Azure Registry Credentials for more details.
Getting Registry Details
The registry get command allows the user to retrieve details about a specific registry.
For example:
# anchorectl registry get registry.example.com
 ✔ Fetched registry
┌──────────────────────┬───────────────┬───────────────┬─────────────────┬──────────────────────┬─────────────┬──────────────────────┐
│ REGISTRY NAME        │ REGISTRY TYPE │ REGISTRY USER │ REGISTRY VERIFY │ CREATED AT           │ LAST UPATED │ REGISTRY             │
├──────────────────────┼───────────────┼───────────────┼─────────────────┼──────────────────────┼─────────────┼──────────────────────┤
│ registry.example.com │ docker_v2     │ johndoe       │ false           │ 2022-08-25T20:58:33Z │             │ registry.example.com │
└──────────────────────┴───────────────┴───────────────┴─────────────────┴──────────────────────┴─────────────┴──────────────────────┘
In this example we can see that the registry.example.com registry was added to Anchore Enterprise on the 25th August at 20:58 UTC. The password for the registry cannot be retrieved through the API or AnchoreCTL.
Updating Registry Details
Once a registry had been defined the parameters can be updated using the update command. This allows a registry’s username, password and secure-connection (validate TLS) parameters to be updated using the same syntax as is used in the ‘add’ operation.
# ANCHORECTL_REGISTRY_PASSWORD=<newpassword> anchorectl registry update registry.example.com --username <newusername> --validate=<true|false> --secure-connection=<true|false>
Deleting Registries
A Registry can be deleted from Anchore’s configuration using the del command.
For example to delete the configuration for registry.example.com the following command should be issued:
# anchorectl registry delete registry.example.com
 ✔ Deleted registry
No results
Note: Deleting a registry record does not delete the records of images/tags associated with that registry.
Advanced
Anchore Enterprise attempts to perform a credential validation upon registry addition, but there are cases where a credential can be valid but the validation routine can fail (in particular, credential
validation methods are changing for public registries over time). If you are unable to add a registry but believe that the credential you are providing is valid, or you wish to add a
credential to anchore before it is in place in the registry, you can bypass the registry credential validation process using the --validate=false option to the registry add or registry update command.
2 - Configuring Registries via the GUI
Introduction
In this section you will learn how to configure access to registries within the Anchore Enterprise UI.
Assumptions
- You have a running instance of Anchore Enterprise and access to the UI.
- You have the appropriate permissions to list and create registries. This means you are either a user in the admin account, or a user that is already a member of the read-write role for your account.
The UI will attempt to download images from any registry without requiring further configuration. However, if your registry requires authentication then the registry and corresponding credentials will need to be defined.
First off, after a successful login, navigate to the Configuration tab in the main menu.

Add a New Registry
In order to define a registry and its credentials, navigate to the Registries tab within Configuration. If you have not yet defined any registries, select the Let’s add one! button. Otherwise, select the Add New Registry button on the right-hand side.
Upon selection, a modal will appear:

A few items will be required:
- Registry
- Type (e.g. docker_v2 or awsecr)
- Username
- Password
As the required field values may vary depending on the type of registry and credential options, they will be covered in more depth below. A couple additional options are also provided:
Allow Self Signed By default, the UI will only pull images from a TLS/SSL enabled registry. If the registry is protected with a self signed certificate or a certificate signed by an unknown certificate authority, you can enable this option by sliding the toggle to the right to instruct the UI not to validate the certificate.
Validate on Add Credential validation is attempted by default upon registry addition although there may be cases where a credential can be valid but the validation routine can fail (in particular, credential validation methods are changing for public registries over time). Disabling this option by sliding the toggle to the left will instruct the UI to bypass the validation process.
Once a registry has been successfully configured, its credentials as well as the options mentioned above can be updated by clicking Edit under the Actions column. For more information on analyzing images with your newly defined registry, refer to: UI - Analyzing Images.

The instructions provided below for setting up the various registry types can also be seen inline by clicking ‘Need some help setting up your registry?’ near the bottom of the modal.
Docker V2 Registry
Regular docker v2 registries include dockerhub, quay.io, artifactory, docker registry v2 container, redhat public container registry, and many others. Generally, if you can execute a ‘docker login’ with a pair of credentials, Anchore can use those.
Registry Hostname or IP of your registry endpoint, with an optional port Ex: docker.io, mydocker.com:5000, 192.168.1.20:5000
Type Set this to docker_v2
Username Username that has access to the registry
Password Password for the specified user
Amazon Web Services Registry (AWS ECR)
Registry The ECR endpoint hostname Ex: 123456789012.dkr.ecr.us-east-1.amazonaws.com
Type Set this to awsecr
For Username and Password, there are three different modes that require different settings when adding an ECR registry, depending on where your Anchore Enterprise is running and how your AWS IAM settings are configured to allow access to a given ECR registry.
API Keys Provide access/secret keys from an account or IAM user. We highly recommend using a dedicated IAM user with specific access restrictions for this mode.
Username AWS access key
Password AWS secret key
Local Credentials Uses the AWS credentials found in the local execution environment for Anchore Enterprise (Ex. env vars, ~/.aws/credentials, or instance profile).
Username Set this to awsauto
Password Set this to awsauto
ECR Assume Role To have Anchore Enterprise assume a specific role different from the role it currently runs within, specify a different role ARN. Anchore Enterprise will use the execution role (as in iamauto mode from the instance/task profile) to assume a different role. The execution role must have permissions to assume the role requested.
Username Set this to _iam_role
Password The desired role’s ARN
For more information, see: Working with Amazon ECR Registry Credentials
Google Container Registry (GCR)
When working with Google Container Registry, it is recommended that you use service account JSON keys rather than the short lived access tokens. Learn more about how to generate a JSON key here.
Registry GCR registry hostname endpoint Ex: gcr.io, us.gcr.io, eu.gcr.io, asia.gcr.io
Type Set this to docker_v2
Username Set this to _json_key
Password Full JSON string of your JSOn key (the content of the key.json file you got from GCR)
For more information, see: Working with Google Container Registry (GCR) Credentials
Microsoft Azure Registry
To use an Azure Registry, you can configure Anchore to use either the admin credential(s) or a service principal. Refer to Azure documentation for differences and how to setup each.
Registry The login server Ex. myregistry1.azurecr.io
Type Set this to docker_v2
Admin Account Username The username in the ‘az acr credentials show –name ’ output
Password The password or password2 value from the ‘az acr credentials show’ command result
Service Principal Username The service principal app id
Password The service principal password
For more information, see: Working with Azure Registry Credentials
3 - CI / CD Integration
Anchore Enterprise can be integrated into CI/CD systems such as Jenkins, GitHub, or GitLab to secure pipelines by adding automatic scanning.
If an artifact does not pass the policy checks then users can configure either a gating workflow which fails the build or allow the pipeline to continue with a warning to the build job owner. Notifications can be handled via the CI/CD system itself or using Anchore’s native notification system and can provide information about the CVEs discovered and the complete policy analysis. Images that pass the policy check can be promoted to the production registry.
There are two ways to use CI/CD with Anchore: distributed mode or centralized mode. Both modes work with any CI/CD system as long as the AnchoreCTL binary can be installed and run, or you can access the Enterprise APIs directly.
Distributed mode
The build job invokes a tool called AnchoreCTL locally on the CI/CD runner to generate both data and metadata about the artifact being scanned, such as source code or a container image, in the form of a software bill of materials (SBOM). The SBOM is then passed to Anchore Enterprise for analysis. The policy analysis can look for known CVEs, exposed secrets, incorrect configurations, licenses, and more.
Centralized mode
The build job will upload the container image to a repo and then request Anchore Enterprise pulls it down, generate the SBOM on the backend, and return the policy analysis result.
Requirements
Anchore Enterprise is deployed in your environment with the API accessible from your pipeline runner. Centralized Mode: Credentials for your container registry are added to Anchore Enterprise, under the Anchore account that you intend to use with this pipeline. See Registries. For information on what registry/credentials must be added to allow Anchore Enterprise to access your container registry, refer to your container registry’s documentation.
Further Reading
To learn more about distributed and centralized modes, please review the Analyzing Images via CTL documentation.
3.1 - GitLab
Requirements
- Anchore Enterprise is deployed in your environment, with the API accessible from your GitLab CI environment.
- Credentials for your GitLab Container Registry are added to Anchore Enterprise, under the Anchore account that you intend to use with GitLab CI. See Registries. For information on what registry/credentials must be added to allow Anchore Enterprise to access your GitLab Container Registry, see https://docs.gitlab.com/ee/user/packages/container_registry/.
1. Configure Variables
Ensure that the following variables are set in your GitLab repository (settings -> CI/CD -> Variables -> Expand -> Add variable):
ANCHORECTL_USERNAME  (protected)
ANCHORECTL_PASSWORD (protected and masked)
ANCHORECTL_URL (protected)
Note Gitlab has a minimum length of 8 for variables. Please ensure both your username and password meet this requirement.

2. Create config file
Create a new file in your repository. Name the file .gitlab-ci.yml.

3. Configure scanning mode
a) Distributed Mode
This is the most easily scalable method for scanning images. Distributed scanning uses the anchorectl utility to build the SBOM directly on the build runner and then pushes the SBOM to Anchore Enterprise through the API. To use this scanning method, paste the following workflow script into your new .gitlab-ci.yml file. After building the image from your Dockerfile and scanning it with anchorectl, this workflow will display vulnerabilities and policy results in the build log. After pasting, click “Commit changes” to save the new file.
### Anchore Distributed Scan
  # you will need three variables defined:
  # ANCHORECTL_USERNAME
  # ANCHORECTL_PASSWORD
  # ANCHORECTL_URL

image: docker:latest
services:
- docker:dind
stages:
- build
- anchore
variables:
  ANCHORECTL_FAIL_BASED_ON_RESULTS: "false"
  ANCHORE_IMAGE: ${CI_REGISTRY_IMAGE}:${CI_COMMIT_REF_SLUG}

Build:
  stage: build
  script:
    ### build and push docker image
    - docker login -u gitlab-ci-token -p $CI_JOB_TOKEN registry.gitlab.com
    - docker build -t ${ANCHORE_IMAGE} .
    - docker push ${ANCHORE_IMAGE}

Anchore:
  stage: anchore
  script:
    ### install anchorectl binary
    - apk add --no-cache curl
    - curl -sSfL https://anchorectl-releases.anchore.io/anchorectl/install.sh | sh -s -- -b ${HOME}/.local/bin
    - export PATH="${HOME}/.local/bin/:${PATH}"
    ### scan image and push to anchore enterprise
    - anchorectl image add --no-auto-subscribe --wait --dockerfile ./Dockerfile --from registry ${ANCHORE_IMAGE}
    ### then get the results:
    - anchorectl image vulnerabilities ${ANCHORE_IMAGE}
    - anchorectl image check --detail ${ANCHORE_IMAGE}
b) Centralized Mode
This method uses the “analyzer” pods in the Anchore Enterprise deployment to build the SBOM. This can create queuing if there are not enough analyzer processes, and this method may require the operator to provide registry credentials in the Enterprise backend (if the images to be scanned are in private registries). This method may be preferred in cases where the Anchore Enterprise operator does not control the image build process (the analyzers can simply poll registries to look for new image builds as they are pushed), and this method also allows the operator to simply queue up the image for asynchronous scanning later if vulnerability and policy results are not required immediately. If the user wants malware scanning results from Anchore Enterprise’s clamav integration, the Centralized Scanning method is required. To use this scanning method, paste the following workflow script into your new .gitlab-ci.yml file. After building the image from your Dockerfile,, this workflow will tell Anchore Enterprise to scan the image, then it will display the vulnerability and policy results in the build log. After pasting, click “Commit changes” to save the new file.
### Anchore Centralized Scan
  # you will need three variables defined:
  # ANCHORECTL_USERNAME
  # ANCHORECTL_PASSWORD
  # ANCHORECTL_URL

image: docker:latest
services:
- docker:dind
stages:
- build
- anchore
variables:
  ANCHORECTL_FAIL_BASED_ON_RESULTS: "false"
  ANCHORE_IMAGE: ${CI_REGISTRY_IMAGE}:${CI_COMMIT_REF_SLUG}

Build:
  stage: build
  script:
    ### build and push docker image
    - docker login -u gitlab-ci-token -p $CI_JOB_TOKEN registry.gitlab.com
    - docker build -t ${ANCHORE_IMAGE} .
    - docker push ${ANCHORE_IMAGE}

Anchore:
  stage: anchore
  script:
    ### install anchorectl binary
    - apk add --no-cache curl
    - curl -sSfL https://anchorectl-releases.anchore.io/anchorectl/install.sh | sh -s -- -b ${HOME}/.local/bin
    - export PATH="${HOME}/.local/bin/:${PATH}"
    ### queue image for scanning
    - anchorectl image add --no-auto-subscribe --wait --dockerfile ./Dockerfile ${ANCHORE_IMAGE}
    ### then get the results:
    - anchorectl image vulnerabilities ${ANCHORE_IMAGE}
    - anchorectl image check --detail ${ANCHORE_IMAGE}
4. View pipeline
Gitlab will automatically start a pipeline. Navigate to “Build” -> “Pipelines” and then on your running pipeline.

5. View output
Once the build is complete, click on the “anchore” stage and view the output of the job. You will see the results of the vulnerability match and policy evaluation in the output.
3.2 - GitHub
Image Scanning can be easily integrated into your GitHub Actions pipeline using anchorectl.
1. Configure Variables
Ensure that the following variables/secrets are set in in your GitHub repository (repository settings -> secrets and variables -> actions):
- Variable ANCHORECTL_URL
- Variable ANCHORECTL_USERNAME
- Secret ANCHORECTL_PASSWORD
These are necessary for the integration to access your Anchore Enterprise deployment. The ANCHORECTL_PASSWORD value should be created as a repository secret to prevent exposure of the value in job logs, while ANCHORECTL_URL and ANCHORECTL_USERNAME can be created as repository variables.

2. Configure Permissions
(“Settings” -> “Actions” -> “General” -> “Workflow permissions”) select “Read and write permissions” and click “Save”.

3. Create config file
In your repository, create a new file ( “Add file” -> “Create new file”) and name it .github/workflows/anchorectl.yaml.

4. Set scanning mode
a) Distributed Mode
This is the most easily scalable method for scanning images. Distributed scanning uses the anchorectl utility to build the SBOM directly on the build runner and then pushes the SBOM to Anchore Enterprise through the API. To use this scanning method, paste the following workflow script into your new anchorectl.yaml file. After building the image from your Dockerfile and scanning it with anchorectl, this workflow will display vulnerabilities and policy results in the build log.
name: Anchore Enterprise Distributed Scan

on:
  workflow_dispatch:
    inputs:
      mode:
        description: 'On-Demand Build'

env:
  ANCHORECTL_URL: ${{ vars.ANCHORECTL_URL }}
  ANCHORECTL_USERNAME: ${{ vars.ANCHORECTL_USERNAME }}
  ANCHORECTL_PASSWORD: ${{ secrets.ANCHORECTL_PASSWORD }}
  ## set ANCHORECTL_FAIL_BASED_ON_RESULTS to true if you want to break the pipeline based on the evaluation
  ANCHORECTL_FAIL_BASED_ON_RESULTS: false
  REGISTRY: ghcr.io

jobs:
  Build:
    runs-on: ubuntu-latest
    steps:

    - name: "Set IMAGE environmental variables"
      run: |
        echo "IMAGE=${REGISTRY}/${GITHUB_REPOSITORY}:${GITHUB_REF_NAME}" >> $GITHUB_ENV

    - name: Checkout Code
      uses: actions/checkout@v3

    - name: Log in to the Container registry
      uses: docker/login-action@v2
      with:
        registry: ${{ env.REGISTRY }}
        username: ${{ github.actor }}
        password: ${{ secrets.GITHUB_TOKEN }}

    - name: Set up Docker Buildx
      uses: docker/setup-buildx-action@v2


    - name: build local container
      uses: docker/build-push-action@v3
      with:
        tags: ${{ env.IMAGE }}
        push: true
        load: false


  Anchore:
    runs-on: ubuntu-latest
    needs: Build
    steps:

    - name: "Set IMAGE environmental variables"
      run: |
        echo "IMAGE=${REGISTRY}/${GITHUB_REPOSITORY}:${GITHUB_REF_NAME}" >> $GITHUB_ENV

    - name: Checkout Code
      ### only need to do this if you want to pass the dockerfile to Anchore during scanning
      uses: actions/checkout@v3

    - name: Install Latest anchorectl Binary
      run: |
        curl -sSfL https://anchorectl-releases.anchore.io/anchorectl/install.sh | sh -s -- -b ${HOME}/.local/bin v1.6.0
        export PATH="${HOME}/.local/bin/:${PATH}"

    - name: Generate SBOM and Push to Anchore
      run: |
        anchorectl image add --no-auto-subscribe --wait --from registry --dockerfile Dockerfile ${IMAGE}

    - name: Pull Vulnerability List
      run: |
        anchorectl image vulnerabilities ${IMAGE}

    - name: Pull Policy Evaluation
      run: |
        # set "ANCHORECTL_FAIL_BASED_ON_RESULTS=true" (see above in the "env:" section) to break the pipeline here if the
        # policy evaluation returns FAIL or add -f, --fail-based-on-results to this command for the same result
        #
        anchorectl image check --detail ${IMAGE}
b) Centralized Mode
This method uses the “analyzer” pods in the Anchore Enterprise deployment to build the SBOM. This can create queuing if there are not enough analyzer processes, and this method may require the operator to provide registry credentials in the Enterprise backend (if the images to be scanned are in private registries). This method may be preferred in cases where the Anchore Enterprise operator does not control the image build process (the analyzers can simply poll registries to look for new image builds as they are pushed), and this method also allows the operator to simply queue up the image for asynchronous scanning later if vulnerability and policy results are not required immediately. If the user wants malware scanning results from Anchore Enterprise’s clamav integration, the Centralized Scanning method is required. To use this scanning method, paste the following workflow script into your new anchorectl.yaml file. After building the image from your Dockerfile,, this workflow will tell Anchore Enterprise to scan the image, then it will display the vulnerability and policy results in the build log.
name: Anchore Enterprise Centralized Scan

on:
  workflow_dispatch:
    inputs:
      mode:
        description: 'On-Demand Build'

env:
  ANCHORECTL_URL: ${{ vars.ANCHORECTL_URL }}
  ANCHORECTL_USERNAME: ${{ vars.ANCHORECTL_USERNAME }}
  ANCHORECTL_PASSWORD: ${{ secrets.ANCHORECTL_PASSWORD }}
  ## set ANCHORECTL_FAIL_BASED_ON_RESULTS to true if you want to break the pipeline based on the evaluation
  ANCHORECTL_FAIL_BASED_ON_RESULTS: false
  REGISTRY: ghcr.io

jobs:

  Build:
    runs-on: ubuntu-latest
    steps:

    - name: "Set IMAGE environmental variables"
      run: |
        echo "IMAGE=${REGISTRY}/${GITHUB_REPOSITORY}:${GITHUB_REF_NAME}" >> $GITHUB_ENV

    - name: Checkout Code
      uses: actions/checkout@v3

    - name: Log in to the Container registry
      uses: docker/login-action@v2
      with:
        registry: ${{ env.REGISTRY }}
        username: ${{ github.actor }}
        password: ${{ secrets.GITHUB_TOKEN }}

    - name: Set up Docker Buildx
      uses: docker/setup-buildx-action@v2


    - name: build local container
      uses: docker/build-push-action@v3
      with:
        tags: ${{ env.IMAGE }}
        push: true
        load: false

  Anchore:
    runs-on: ubuntu-latest
    needs: Build

    steps:

    - name: "Set IMAGE environmental variables"
      run: |
        echo "IMAGE=${REGISTRY}/${GITHUB_REPOSITORY}:${GITHUB_REF_NAME}" >> $GITHUB_ENV

    - name: Checkout Code
      uses: actions/checkout@v3

    - name: Install Latest anchorectl Binary
      run: |
        curl -sSfL https://anchorectl-releases.anchore.io/anchorectl/install.sh | sh -s -- -b ${HOME}/.local/bin
        export PATH="${HOME}/.local/bin/:${PATH}"

    - name: Queue Image for Scanning by Anchore Enterprise
      run: |
       anchorectl image add --no-auto-subscribe --wait --dockerfile ./Dockerfile ${IMAGE}

    - name: Pull Vulnerability List
      run: |
        anchorectl image vulnerabilities ${IMAGE}

    - name: Pull Policy Evaluation
      run: |
        # set "ANCHORECTL_FAIL_BASED_ON_RESULTS=true" (see above in the "env:" section) to break the pipeline here if the
        # policy evaluation returns FAIL or add -f, --fail-based-on-results to this command for the same result
        #
        anchorectl image check --detail ${IMAGE}
5. Run Workflow
Go to “Actions” -> “Anchore Enterprise with anchorectl” and hit “Run workflow”.

6. View Results
When the workflow completes, view the results by clicking on the workflow name (“Anchore Enterprise with anchorectl”), then on the job (“Anchore”), then expand the “Pull Vulnerability List” and/or “Pull Policy Evaluation” steps to see the details.

7. Notifications
You can also integrate your Anchore deployment into GitHub API whereby Anchore notifications can sent over to GitHub Notifications to GitHub in the form of new issues in a repository.
To configure and enable this please review the GitHub Notifications documentation.
3.3 - Jenkins
1. Configure variables
Ensure that the following credentials are set in in your Jenkins instance (Dashboard -> Manage Jenkins -> Credentials) as credential type “secret text”:
ANCHORECTL_USERNAME
ANCHORECTL_PASSWORD
ANCHORECTL_URL
These are necessary for the integration to access your Anchore Enterprise deployment. The ANCHORECTL_PASSWORD value should be created as a repository secret to prevent exposure of the value in job logs, while ANCHORECTL_URL and ANCHORECTL_USERNAME can be created as repository variables.
2. Configure scanning mode
a) Distributed
This is the most easily scalable method for scanning images. Distributed scanning uses the anchorectl utility to build the SBOM directly on the build runner and then pushes the SBOM to Anchore Enterprise through the API. To use this scanning method, paste the following stage anywhere after your target container image has been built:
stage('Analyze Image w/ anchorectl') {
      environment {
        ANCHORECTL_URL = credentials("Anchorectl_Url")
        ANCHORECTL_USERNAME = credentials("Anchorectl_Username")
        ANCHORECTL_PASSWORD = credentials("Anchorectl_Password")
        // change ANCHORECTL_FAIL_BASED_ON_RESULTS to "true" if you want to break on policy violations
        ANCHORECTL_FAIL_BASED_ON_RESULTS = "false"
      }
      steps {
        script {
          sh """
            ### install latest anchorectl
            curl -sSfL  https://anchorectl-releases.anchore.io/anchorectl/install.sh  | sh -s -- -b $HOME/.local/bin
            export PATH="$HOME/.local/bin/:$PATH"
            #
            ### actually add the image to the queue to be scanned
            #
            ### --wait tells anchorectl to block until the scan
            ### is complete (this isn't always necessary but if
            ### you want to pull the vulnerability list and/or
            ### policy report, you need to wait
            #
            anchorectl image add --wait --from registry  ${REGISTRY}/${REPOSITORY}:${TAG}
            #
            ### pull vulnerability list (optional)
            anchorectl image vulnerabilities ${REGISTRY}/${REPOSITORY}:${TAG}
            ###
            ### check policy evaluation (omit –detail if you just
            ### want a pass/fail determination)
            anchorectl image check --detail ${REGISTRY}/${REPOSITORY}:${TAG}
            ###
            ### if you want to break the pipeline on a policy violation, add "--fail-based-on-results"
            ### or change the ANCHORECTL_FAIL_BASE_ON_RESULTS variable above to "true"
          """
        } // end script
      } // end steps
    } // end stage "analyze with anchorectl"
b ) Centralized
Centralized Scanning: this method uses the “analyzer” pods in the Anchore Enterprise deployment to build the SBOM. This can create queuing if there are not enough analyzer processes, and this method may require the operator to provide registry credentials in the Enterprise backend (if the images to be scanned are in private registries). This method may be preferred in cases where the Anchore Enterprise operator does not control the image build process (the analyzers can simply poll registries to look for new image builds as they are pushed), and this method also allows the operator to simply queue up the image for asynchronous scanning later if vulnerability and policy results are not required immediately. If the user wants malware scanning results from Anchore Enterprise’s clamav integration, the Centralized Scanning method is required. To use this scanning method, paste the following stage anywhere after your target container image has been built. After building the image from your Dockerfile, this stage will tell Anchore Enterprise to scan the image, then it will display the vulnerability and policy results in the build log.
stage('Analyze Image w/ anchorectl') {
      environment {
        ANCHORECTL_URL = credentials("Anchorectl_Url")
        ANCHORECTL_USERNAME = credentials("Anchorectl_Username")
        ANCHORECTL_PASSWORD = credentials("Anchorectl_Password")
        // change ANCHORECTL_FAIL_BASED_ON_RESULTS to "true" if you want to break on policy violations
        ANCHORECTL_FAIL_BASED_ON_RESULTS = "false"
      }
      steps {
        script {
          sh """
            ### install latest anchorectl
            curl -sSfL  https://anchorectl-releases.anchore.io/anchorectl/install.sh  | sh -s -- -b $HOME/.local/bin
            export PATH="$HOME/.local/bin/:$PATH"
            #
            ### actually add the image to the queue to be scanned
            #
            ### --wait tells anchorectl to block until the scan
            ### is complete (this isn't always necessary but if
            ### you want to pull the vulnerability list and/or
            ### policy report, you need to wait
            #
            anchorectl image add --wait ${REGISTRY}/${REPOSITORY}:${TAG}
            #
            ### pull vulnerability list (optional)
            anchorectl image vulnerabilities ${REGISTRY}/${REPOSITORY}:${TAG}
            ###
            ### check policy evaluation (omit –detail if you just
            ### want a pass/fail determination)
            anchorectl image check --detail ${REGISTRY}/${REPOSITORY}:${TAG}
            ###
            ### if you want to break the pipeline on a policy violation, add "--fail-based-on-results"
            ### or change the ANCHORECTL_FAIL_BASE_ON_RESULTS variable above to "true"
          """
        } // end script
      } // end steps
    } // end stage "analyze with anchorectl"
4 - Kubernetes
4.1 - Kubernetes Admission Controller
For installation see - Kubernetes Installation
Anchore Enterprise can be integrated with Kubernetes to ensure that only certified images are started within a Kubernetes POD.
Kubernetes can be configured to use an Admission Controller to validate that the container image is compliant with the user’s policy.
The admission controller can be configured to make a webhook call into Anchore Enterprise. Anchore Enterprise exports a Kubernetes-specific API endpoint and will return the pass of fail response in the form of an ImageReview response.

This approach allows the Kubernetes system to make the final decision on running an container image and does not require installation of any per-node plugins into Kubernetes.
Using native Kubernetes features allows this approach to be used in both on-prem and cloud hosted Kubernetes environments.
4.2 - Kubernetes Runtime Inventory
Overview
Anchore uses a go binary called anchore-k8s-inventory that leverages the Kubernetes Go SDK to reach out and list containers in a configurable set of namespaces to determine which images are running.
anchore-k8s-inventory can be deployed via its helm chart, embedded within your Kubernetes cluster as an agent. It will require access to the Anchore API.
KAI (Kubernetes Automated Inventory) - Deprecated
Prior to the v1.0.0 release of anchore-k8s-inventory Kubernetes inventory was called kai. Anchore Enterprise 5.X+ no longer supports kai. For documentation related to the integration & configuration of kai
please refer to the Anchore Enterprise v4.6 documentation.
Deployment
The most common way to track inventory is to install anchore-k8s-inventory as an agent in your cluster. To do this you will need to configure credentials
and information about your deployment in the values file. It is recommended to first configure a specific robot user
for the account where you’ll want to track your Kubernetes inventory.
As an agent anchore-k8s-inventory is installed using helm and the helm chart is hosted as part of the https://charts.anchore.io repo. It is based on the anchore/k8s-inventory docker image.
To install the helm chart, follow these steps:
- Configure your username, password, Anchore URL and cluster name in the values file.
k8sInventory:
  # Path should not be changed, cluster value is used to tell Anchore which cluster this inventory is coming from
  kubeconfig:
    cluster: <unique-name-for-your-cluster>

  anchore:
    url: <URL for your>

    # Note: recommend using the inventory-agent role
    user: <user>
    password: <password>
- Run helm install in the cluster(s) you wish to track
$ helm repo add anchore https://charts.anchore.io
$ helm install <release> -f <values.yaml> anchore/k8s-inventory
anchore-k8s-inventory must be able to resolve the Anchore URL and requires API credentials. Review the anchore-k8s-inventory logs if you are not able to see the inventory results in the UI.
Note: the Anchore API Password can be provided via a Kubernetes secret, or injected into the environment of the anchore-k8s-inventory container
- For injecting the environment variable, see: injectSecretsViaEnv
- For providing your own secret for the Anchore API Password, see: useExistingSecret. K8s Inventory creates it’s own secret based on your values.yaml file for key
k8sInventory.anchore.password, but thek8sInventory.useExistingSecretkey allows you to create your own secret and provide it in the values file. See the K8s Inventory repo for more information about the K8s Inventory specific configuration
Usage
To verify that you are tracking Kubernetes Inventory you can access inventory results with the command anchorectl inventory list and look for results where the TYPE is kubernetes.
The UI also displays the Kubernetes Inventory and allows operators to visually navigate the images, vulnerability results, and see the results of the policy evaluation.
For more details about watching clusters, and reviewing policy results see the Using Kubernetes Inventory section.
General Runtime Management
See Data Management
5 - ECS
Overview
Anchore uses a go binary called anchore-ecs-inventory that leverages the AWS Go SDK to gather an inventory of containers and their images running on ECS and report back to Anchore.
Deployment
Via Helm Chart
You can install the chart via:
helm repo add anchore https://charts.anchore.io
helm install <release-name> -f <values.yaml> anchore/ecs-inventory
A basic values file can always be found here. The key configurations are in the ecsInventory section.
Anchore ECS Inventory creates it’s own secret based on your values.yaml file for the following keys that are required for successfully deploying and connecting the ecs-inventory service to the Anchore Platform and AWS ECS Service:
- ecsInventory.awsAccessKeyId
- ecsInventory.awsSecretAccessKey
Using your own secrets
The (ecsInventory.useExistingSecret and ecsInventory.existingSecretName) or ecsInventory.injectSecretsViaEnv keys allows you to create your own secret and provide it in the values file or place the required secret into the pod via different means such as injecting the secrets into the pod using hashicorp vault.
For example:
Create a secret in kubernetes:
apiVersion: v1
kind: Secret
metadata:
  name: ecs-inventory-secrets
type: Opaque
stringData:
  ANCHORE_ECS_INVENTORY_ANCHORE_PASSWORD: foobar
  AWS_ACCESS_KEY_ID: someKeyId
  AWS_SECRET_ACCESS_KEY: someSecretAccessKey
Provide it to the helm chart via the values file:
ecsInventory:
    useExistingSecret: true
    existingSecretName: "ecs-inventory-secrets"
The Anchore API Password and required AWS secret values can also be injected into the environment of the ecs-inventory container. For injecting the environment variable
# set
ecsInventory:
  injectSecretsViaEnv=true
See the ecs-inventory repo for more information about the ECS Inventory specific configuration
Via ECS
It is also possible to deploy the ecs-inventory container on ECS. Here is an sample task definition that could be used to deploy ecs-inventory with a default configuration:
{
    "family": "anchore-ecs-inventory-example-task-definition",
    "containerDefinitions": [
        {
            "name": "ecs-inventory",
            "image": "docker.io/anchore/ecs-inventory:latest",
            "cpu": 0,
            "essential": true,
            "environment": [
                {
                    "name": "ANCHORE_ECS_INVENTORY_ANCHORE_URL",
                    "value": "https://anchore.url"
                },
                {
                    "name": "ANCHORE_ECS_INVENTORY_ANCHORE_USER",
                    "value": "admin"
                },
                {
                    "name": "ANCHORE_ECS_INVENTORY_ANCHORE_ACCOUNT",
                    "value": "admin"
                },
                {
                    "name": "ANCHORE_ECS_INVENTORY_REGION",
                    "value": "us-east-2"
                }
            ],
            "secrets": [
                {
                    "name": "ANCHORE_ECS_INVENTORY_ANCHORE_PASSWORD",
                    "valueFrom": "arn:aws:ssm:${region}:${aws_account_id}:parameter/ANCHORE_ADMIN_PASS"
                },
                {
                    "name": "AWS_ACCESS_KEY_ID",
                    "valueFrom": "arn:aws:ssm:${region}:${aws_account_id}:parameter/ECS_INVENTORY_AWS_ACCESS_KEY_ID"
                },
                {
                    "name": "AWS_SECRET_ACCESS_KEY",
                    "valueFrom": "arn:aws:ssm:${region}:${aws_account_id}:parameter/ECS_INVENTORY_AWS_SECRET_ACCESS_KEY"
                }
            ],
            "logConfiguration": {
                "logDriver": "awslogs",
                "options": {
                    "awslogs-create-group": "true",
                    "awslogs-group": "/anchore/ecs-inventory",
                    "awslogs-region": "us-east-2",
                    "awslogs-stream-prefix": "ecs"
                }
            }
        }
    ],
    "executionRoleArn": "arn:aws:iam::${aws_account_id}:role/ecsTaskExecutionRole",
    "networkMode": "awsvpc",
    "requiresCompatibilities": [
        "FARGATE"
    ],
    "cpu": "512",
    "memory": "1024",
    "runtimePlatform": {
        "cpuArchitecture": "X86_64",
        "operatingSystemFamily": "LINUX"
    }
Usage
To verify that you are tracking ECS Inventory you can access inventory results with the command anchorectl inventory list and look for results where the TYPE is ecs.
Watching ECS Inventory to auto analyze
It is possible to create a subscription to watch for new ECS Inventory that is reported to Anchore and automatically schedule those images for analysis.
1. Create the subscription
A subscription can be created by sending a POST to /v1/subscriptions with the following payload:
{
  "subscription_key": "<SUBSCRIPTION_KEY>",
  "subscription_type": "runtime_inventory"
}
Curl example:
curl -X POST -u USERNAME:PASSWORD --url ANCHORE_URL/v1/subscriptions --header 'Content-Type: application/json' --data '{
  "subscription_key": "arn:aws:ecs:eu-west-2:123456789012:cluster/myclustername",
  "subscription_type": "runtime_inventory"
}'
The subscription_key can be set to any part of an ECS ClusterARN. For example setting the subscription_key to the:
- full ClusterARN
arn:aws:ecs:us-east-1:012345678910:cluster/telemetrywill create a subscription that only watches this cluster - partial ClusterARN
arn:aws:ecs:eu-west-2:988505687240will result in a subscription that watches every cluster within the account988505687240
2. Activate the subscription
After a subscription has been created it needs to be activated. This can be achieved with anchorectl.
anchorectl subscription activate <SUBSCRIPTION_KEY> runtime_inventory
General Runtime Management
See Data Management
6 - Git for Source Code
Use anchorectl to generate a software bill of materials (SBOM) and import a source repository artifact from a file location on disk. You can also get information about the source repository, investigate vulnerability packages by requesting vulnerabilities for a single analyzed source repository, or get any policy evaluations. The workflow would generally be as follows.
- Generate an SBOM. The format is similar to the following:
syft <path> -o json > <resulting filename>.jsonFor example:
$ syft dir:/path/to/your/source/code -o json > my_sbom.json
- Import the SBOM from a source with metadata. This would normally occur as part of a CI/CD pipeline, and the various metadata would be programmatically added via environment variables. The response from anchorectl includes the new ID of the Source in Anchore Enterprise. For example:
# anchorectl source add github.com/my-project@12345 --branch test --author [email protected] --workflow-name default --workflow-timestamp 2002-10-02T15:00:00Z --from ./my_sbom.json
 ✔ Added Source                                                                          github.com/my-project@12345
 ✔ Imported SBOM                                                                                         /tmp/s.json
Source:
  status:           not-analyzed (active)
  uuid:             fa416998-59fa-44f7-8672-dc267385e799
  source:           github.com/my-project@12345
  vcs:              git
  branch:           test
  workflow:         default
  author:           [email protected]
- List the source repositories that you have sent to Anchore Enterprise. This command will allow the operator to list all available source repositories within the system and their current status.
# anchorectl source list
 ✔ Fetched sources
┌──────────────────────────────────────┬────────────┬─────────────────────┬──────────────────────────────────────────┬─────────────────┬───────────────┐
│ UUID                                 │ HOST       │ REPOSITORY          │ REVISION                                 │ ANALYSIS STATUS │ SOURCE STATUS │
├──────────────────────────────────────┼────────────┼─────────────────────┼──────────────────────────────────────────┼─────────────────┼───────────────┤
│ fa416998-59fa-44f7-8672-dc267385e799 │ github.com │ my-project          │ 12345                                    │ analyzed        │ active        │
└──────────────────────────────────────┴────────────┴─────────────────────┴──────────────────────────────────────────┴─────────────────┴───────────────┘
- Fetch the uploaded SBOM for a source repository from Anchore Enterprise. The for this command is taken from the UUID(s) of the listed source repositories.
# anchorectl source sbom fa416998-59fa-44f7-8672-dc267385e799 -f /tmp/sbom.json
 ✔ Fetched SBOM
- Get detailed information about a source. For example:
# anchorectl source get fa416998-59fa-44f7-8672-dc267385e799
 ✔ Fetched source
Uuid: fa416998-59fa-44f7-8672-dc267385e799
Host: github.com
Repository: my-project
Revision: 12345
Vcs Type: git
Metadata Records:
  - branchName: test
    changeAuthor: [email protected]
    ciWorkflowExecutionTime: "2002-10-02T15:00:00Z"
    ciWorkflowName: default
    uuid: ae5f6617-5ad5-47dd-81ca-8fcb10391fed
Analysis Status: analyzed
Source Status: active
- Use anchorectl to investigate vulnerability packages by requesting vulnerabilities for a single analyzed source repository. You can choose os, non-os, or all. For example:
# anchorectl source vulnerabilities fa416998-59fa-44f7-8672-dc267385e799
 ✔ Fetched vulnerabilities                   [48 vulnerabilities]                                                                                                                                                             fa416998-59fa-44f7-8672-dc267385e799
┌─────────────────────┬──────────┬────────────┬─────────┬────────┬──────────────┬──────┬─────────────┬───────────────────────────────────────────────────┐
│ ID                  │ SEVERITY │ NAME       │ VERSION │ FIX    │ WILL NOT FIX │ TYPE │ FEED GROUP  │ URL                                               │
├─────────────────────┼──────────┼────────────┼─────────┼────────┼──────────────┼──────┼─────────────┼───────────────────────────────────────────────────┤
│ GHSA-p6xc-xr62-6r2g │ High     │ log4j-core │ 2.14.1  │ 2.17.0 │ false        │ java │ github:java │ https://github.com/advisories/GHSA-p6xc-xr62-6r2g │
│ GHSA-7rjr-3q55-vv33 │ Critical │ log4j-core │ 2.14.1  │ 2.16.0 │ false        │ java │ github:java │ https://github.com/advisories/GHSA-7rjr-3q55-vv33 │
│ GHSA-8489-44mv-ggj8 │ Medium   │ log4j-core │ 2.14.1  │ 2.17.1 │ false        │ java │ github:java │ https://github.com/advisories/GHSA-8489-44mv-ggj8 │
│ CVE-2021-45105      │ Medium   │ log4j-api  │ 2.14.1  │ None   │ false        │ java │ nvd         │ https://nvd.nist.gov/vuln/detail/CVE-2021-45105   │
...
- Use anchorectl to compute a policy evaluation for a source. For example:
# anchorectl source check fa416998-59fa-44f7-8672-dc267385e799
 ✔ Evaluated against policy                  [failed]                                                                                                                                                                         fa416998-59fa-44f7-8672-dc267385e799
Evaluation ID: 3e490750b404eb1b09baf019a4df3942
Source ID: fa416998-59fa-44f7-8672-dc267385e799
Host: github.com
Repository: my-project
Policy ID: 2c53a13c-1765-11e8-82ef-23527761d060
Updated: 2022-08-30T15:58:24Z
Evaluation: fail
(Use -o json option to get more detailed output)
- Use anchorectl to delete any individual source repository artifacts from Anchore Enterprise. For example:
# anchorectl source delete fa416998-59fa-44f7-8672-dc267385e799
 ✔ Deleted source
Uuid: fa416998-59fa-44f7-8672-dc267385e799
Host: github.com
Repository: my-project
Revision: 12345
Vcs Type: git
Metadata Records:
  - branchName: test
    changeAuthor: [email protected]
    ciWorkflowExecutionTime: "2002-10-02T15:00:00Z"
    ciWorkflowName: default
    uuid: ae5f6617-5ad5-47dd-81ca-8fcb10391fed
Analysis Status: analyzed
Source Status: deleting